Can you paint tile floors? Yes! I’m sharing how to paint a tile floor so it looks good and lasts! We painted the ceramic tile floors in our bathroom and this simple, inexpensive DIY transformed our space!
Have you ever had a project that ended up being so much easier than you expected that you wished you hadn’t procrastinated so long to do it? Painting the ceramic tile floors in our first floor bathroom was one of those projects!
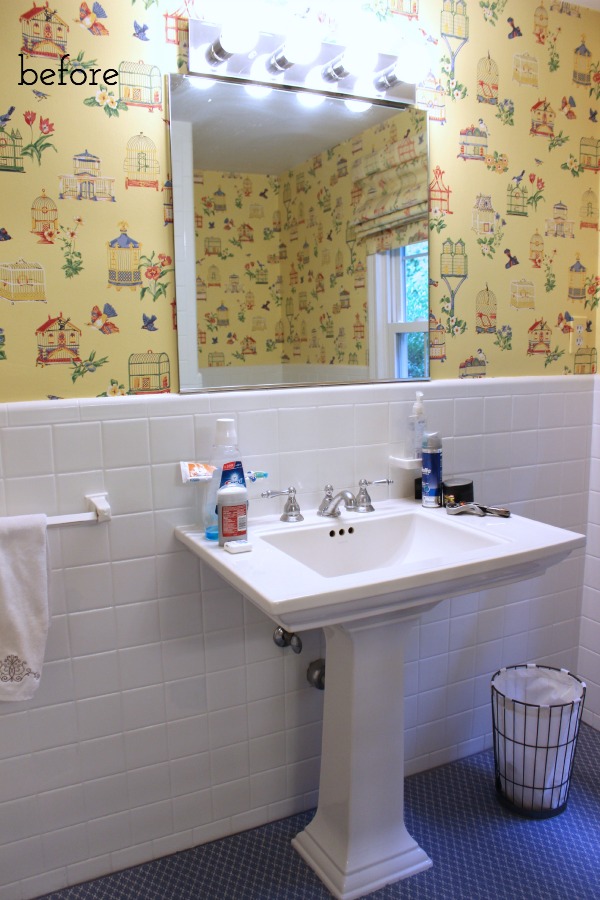
I decided I was going to figure out how to paint our tile floor way back in 2014 when I was making over my space for the One Room Challenge. But.. the stenciling of the bathroom walls took so long that I ran out of time to do it before my big reveal. Somehow THREE full years went by before I finally knocked this little DIY project. It ended up being so cheap and easy to do and I LOVE the result! Welcome to my its-five-hundred-times-better-than-those-ugly-reddish-floors-were bathroom!
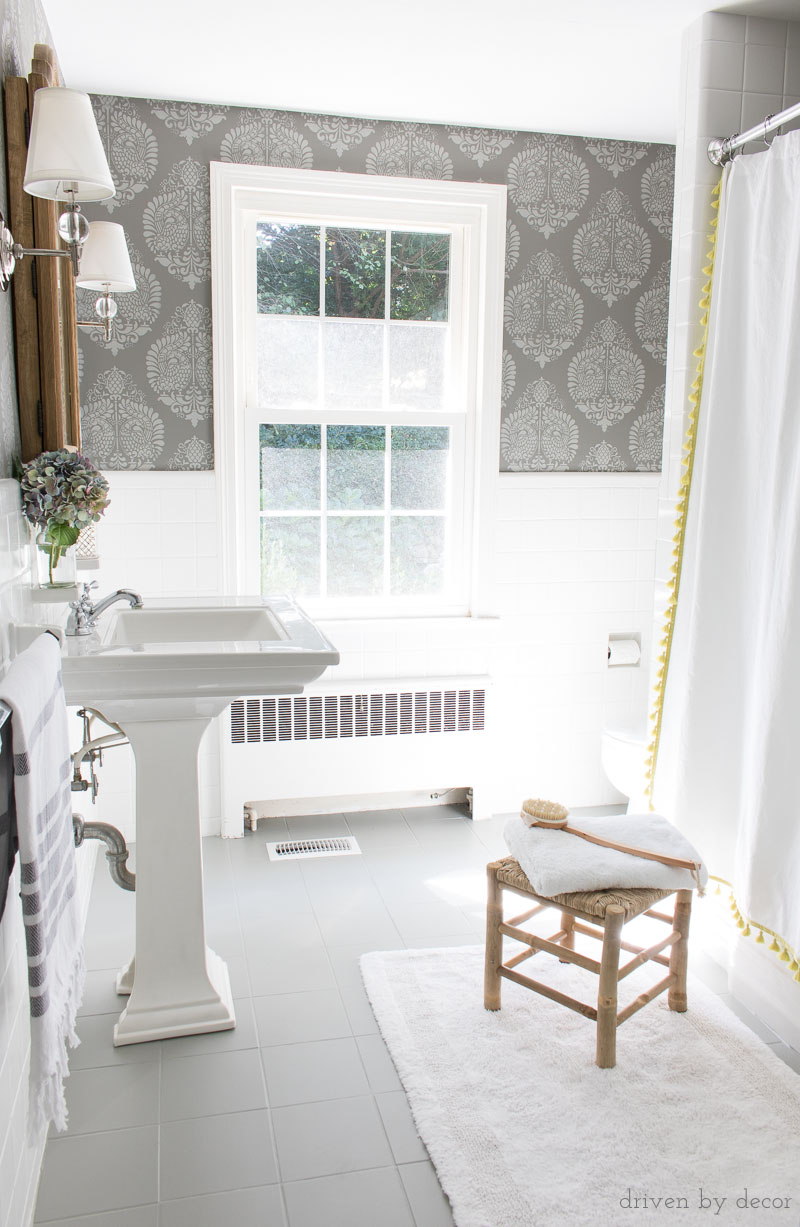
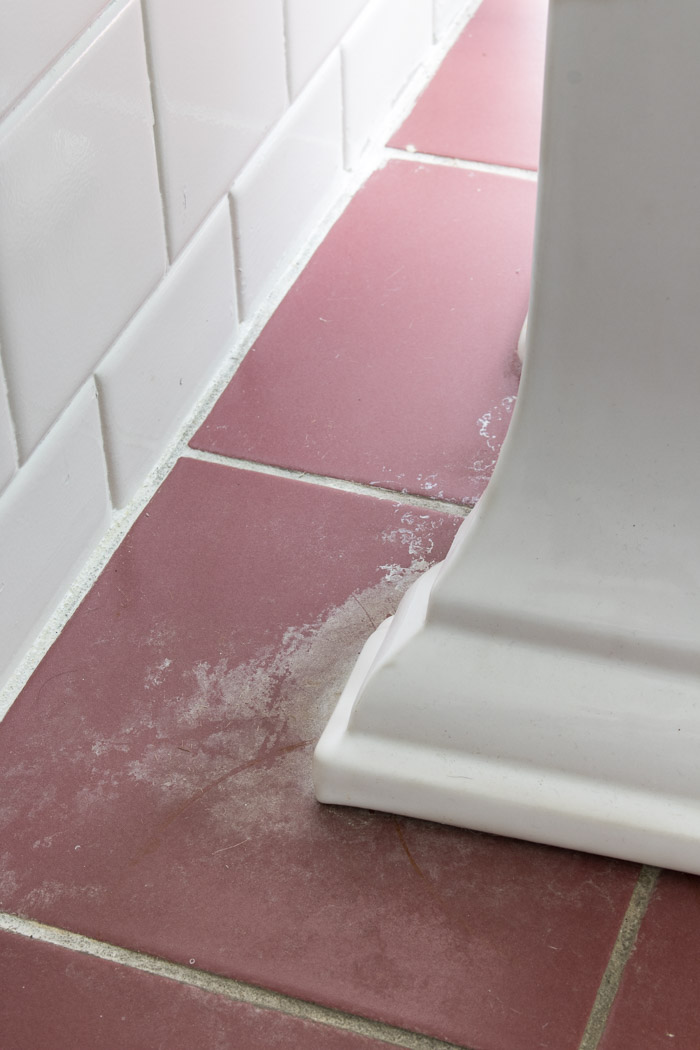
Such a HUGE improvement over the reddish tile we started with, right?!

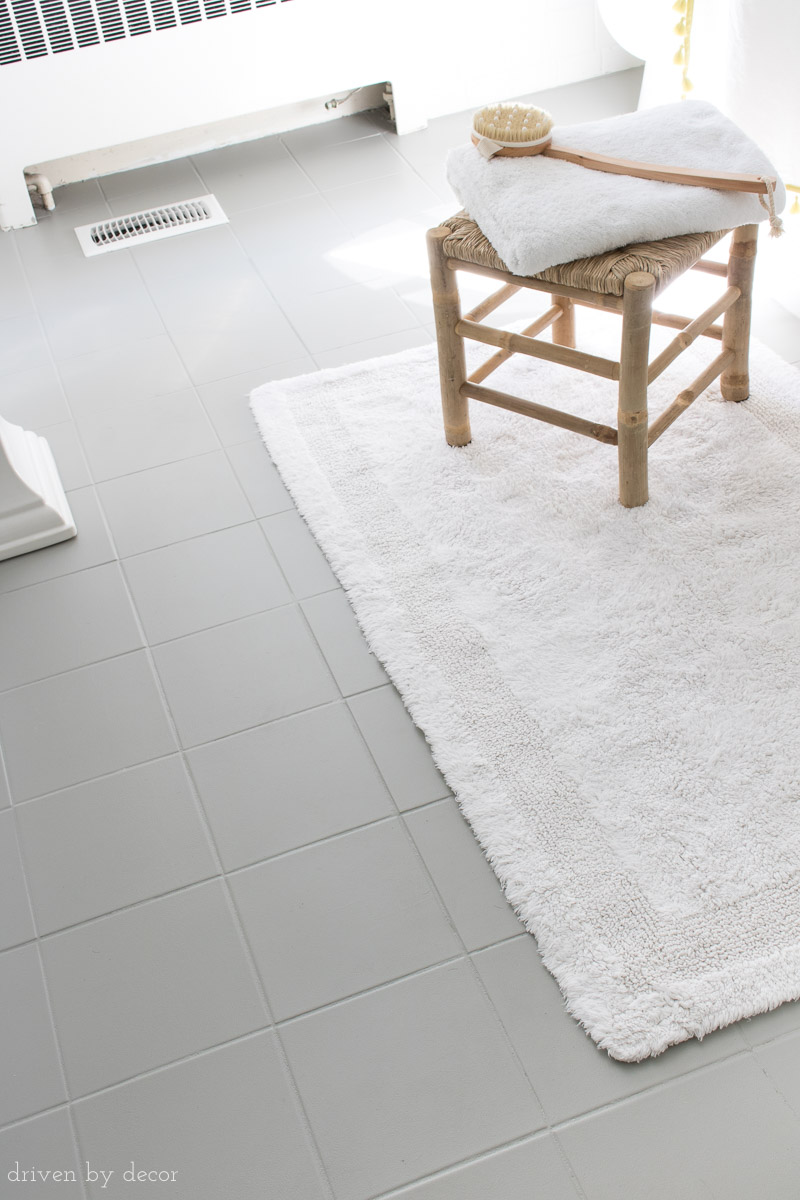
And believe it or not, the ugly color wasn’t even the worst thing about the old tile floors. Behind both the sink and the toilet, the tile had gross, ugly stains that I couldn’t get off no matter how hard I tried. It was completely gagworthy and something the previous owners hid under a custom cut rug they had in this bathroom when we bought the house:
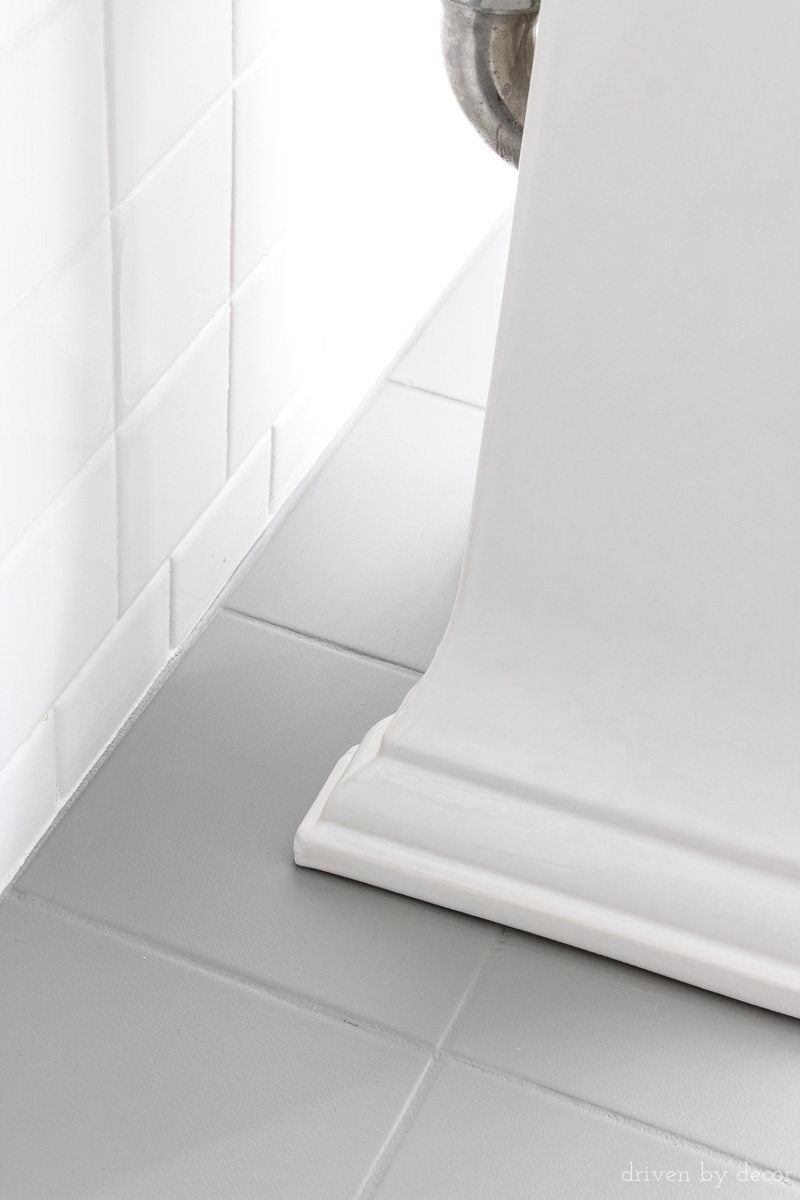
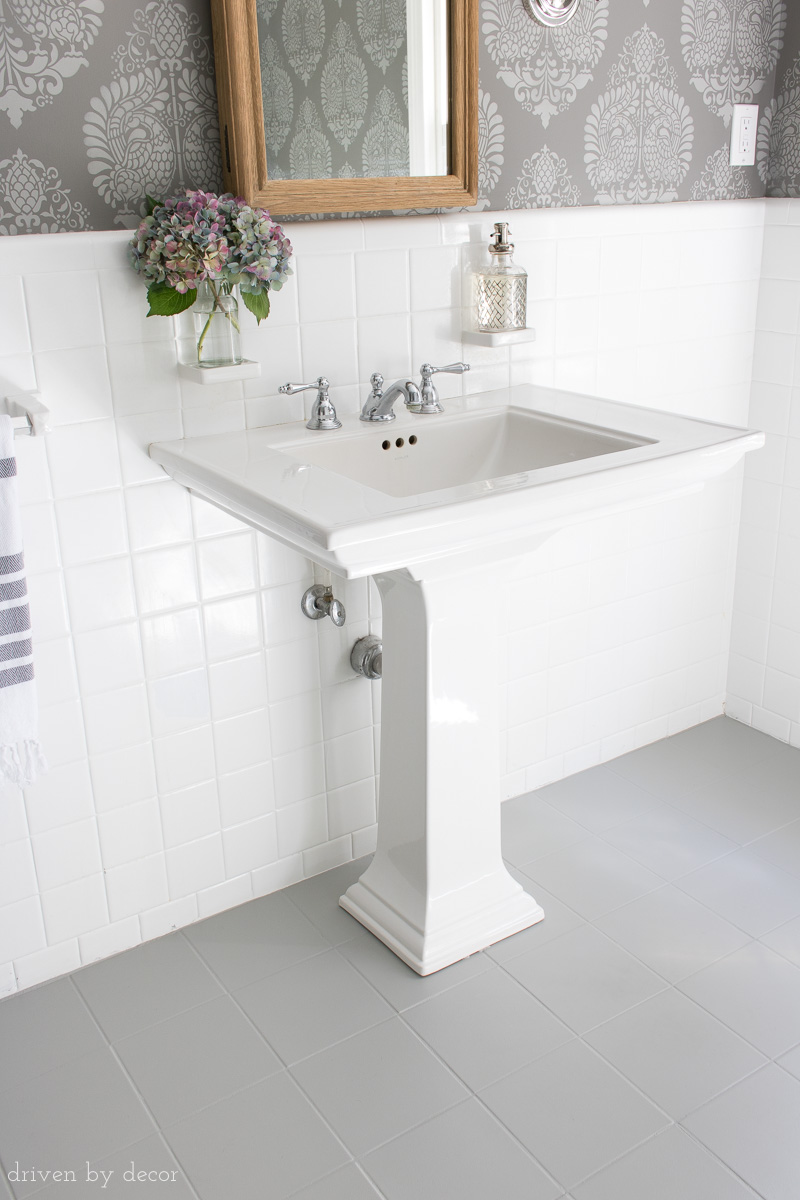
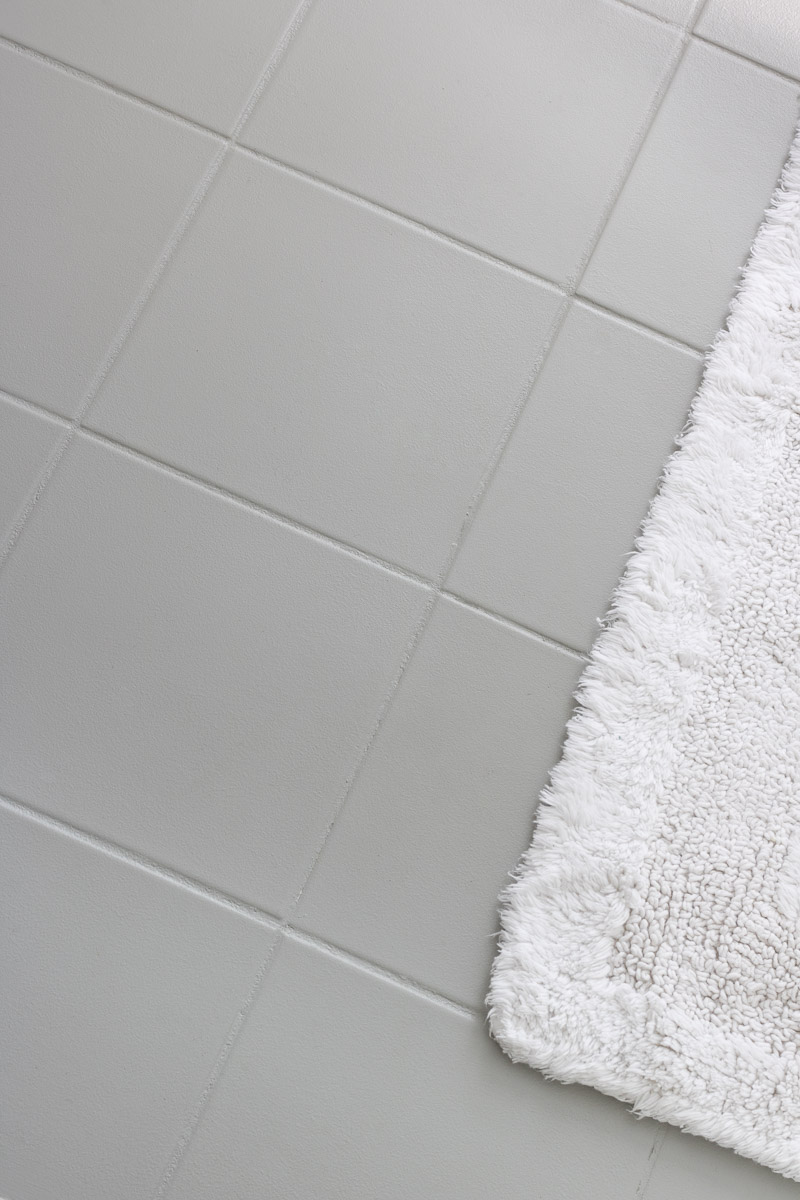
Now you’d never know that my poor tile had such an ugly past!
It’s been six years now since we painted our tile floors and I would do it all over again! Today, I’m sharing everything you need to know about how to paint a tile floor so it lasts! 🙌🏻 (post includes commissionable links; for more information, see my full disclosure statement {here})
Step 1: Gather Your Supplies
These are the supplies you’ll need to successfully knock this project out:
- Sandpaper (I used 80, 120, and 220 grit) and/or an electric sander (I used {this sander} and {this sandpaper} that fits it.
- Stripper and cleaner (I used {this one})
- Grout or caulk to repair cracked/missing grout (if needed)
- Bonding primer (I swear by {this STIX primer})
- 4″ mini rollers such as {these} that have ¼″ nap
- Mini roller frame
- Paint brush
- Benjamin Moore Floor & Patio Paint
- Polyurethane topcoat (optional)
Step 2: Sand Your Tile Floors
The first step is to lightly sand your tile floors. The purpose is not to remove the glaze on the tile, it’s just to scuff it up which helps the primer adhere. And it also removed the disgusting crap on the surface of my tile that I couldn’t get off no matter what I tried.
It’s important to note that ceramic tile can contain lead so consider testing for it or consulting with a professional if you’re unsure about your tile. Always use protective eyewear and an appropriate mask or respirator to prevent you from breathing in the sanding dust. And contain the dust so it doesn’t go into other areas of the house.
I used {this electric sander} which makes the job so much quicker and easier than doing it by hand. If you do a lot of projects around the house and don’t already have one of these electric sanders, I’d highly recommend it. It’s lightweight, fits in the palm of your hand, and has an angled head to get into corners easily:
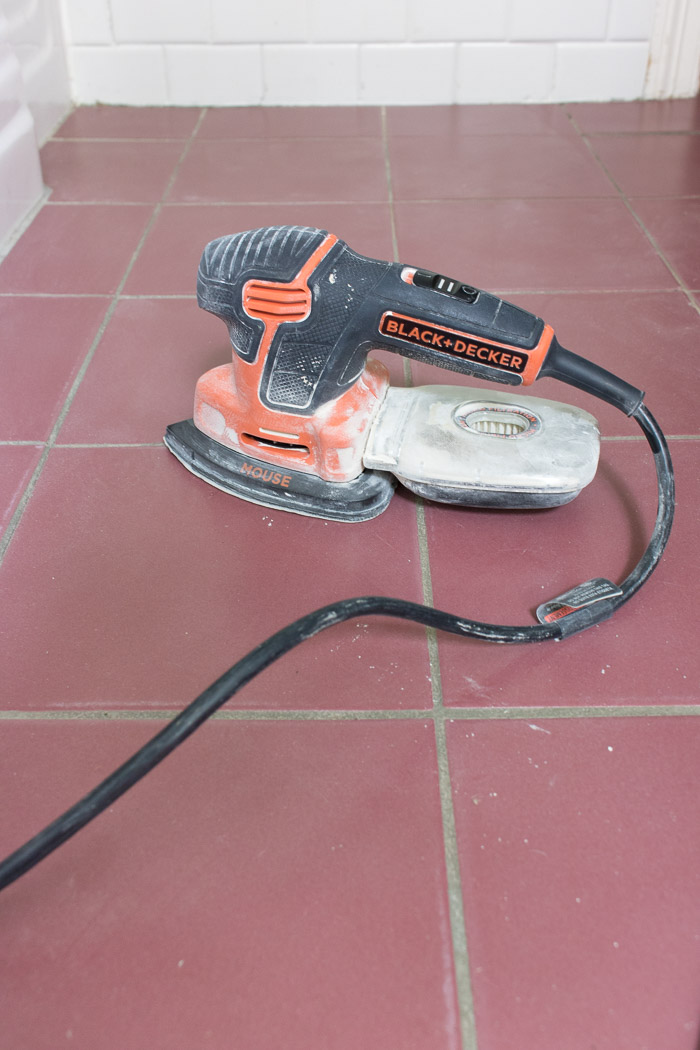
I sanded the tiles that had a build-up of crud on them with 80 grit sandpaper, did a light sanding of the whole floor with 120 grit, and then finished off with a quick once-over with a fine 220 grit sandpaper. A variety pack of sandpapers that fit the mouse sander such as {this one} is perfect.
Step 3: Clean Your Floors (Super Well!)
After finishing sanding, I vacuumed up all of the dust and debris and then went to town on cleaning my floors. Any heavy-duty stripper & cleaner should do the job – you can get the one that I used online {here}.
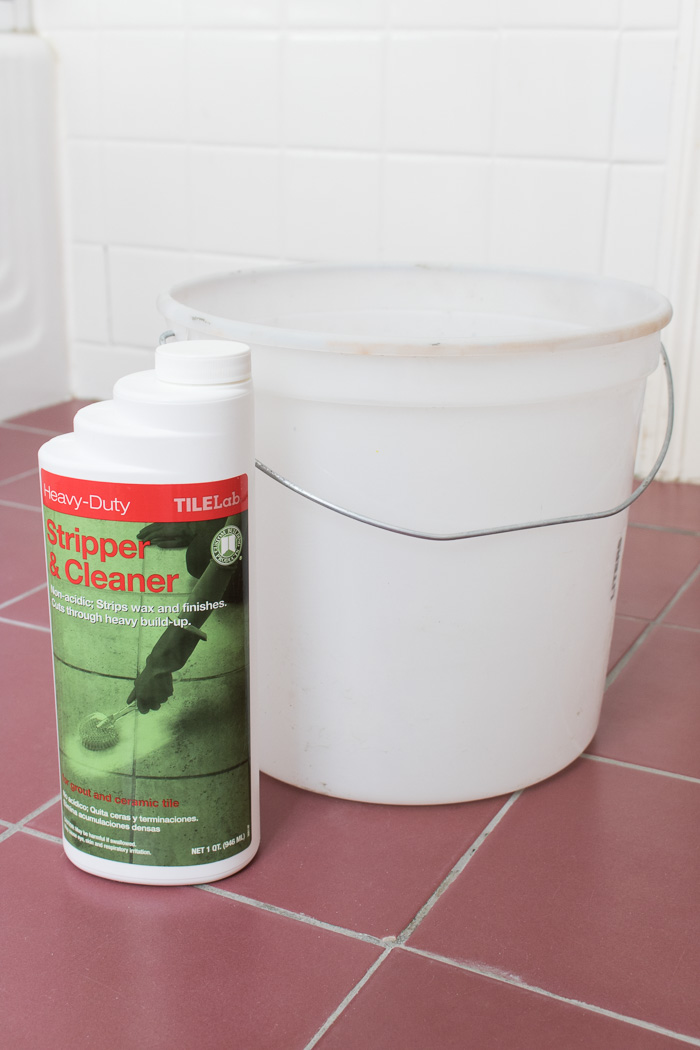
I mixed the cleaner with water (per the instructions), mopped it onto the floor, let it sit for about 15 minutes, and then scrubbed the entire floor with a nylon scrub brush. Then I cleaned it off with bucket of warm water and did it a second time. The cleaner the floor, the better your paint will adhere!
Step 4: Repair any Missing Grout or Cracked Tiles
The grout on our floor was a mess and there are several areas where chunks of it were missing. Regrouting is a pretty huge job since you need to spend a lot of time digging out the old grout first so I went the easy route and simply used paintable caulk to fill in and smooth over any bare spots in my grout. The caulk adhered well and now that it’s painted, you would never know that I had done it.
Now would be the time to replace or repair any cracked tiles too. I had one tile closer to our bathtub with a crack in it but knew it would be covered by our bathroom rug so I simply caulked the cracked portion and sanded down the rough edge a bit instead of replacing it.
Step 5: Apply a Good Primer
Using a really good primer is the key to success for painting ceramic tile! I used INSL-X STIX (available {here}) which is my go-to primer for painting surfaces that paint might normally have a hard time adhering too.
I used a paint brush and small roller simultaneously (I use a ¼ inch mini roller like {these}), painting the edges and grout lines with my brush and then rolling on the primer for the rest. Just make sure to start at the far end of the room and work towards the door so you don’t paint yourself into a corner. Once it was dry, I recoated using the same technique.
Step 6: Paint Your Tile!
I painted our floor tile in the same way as I primed it, using a paint brush on the edges and on the grout and rolling the rest as I went (as with the primer, I used a 4 inch mini roller like {this}):
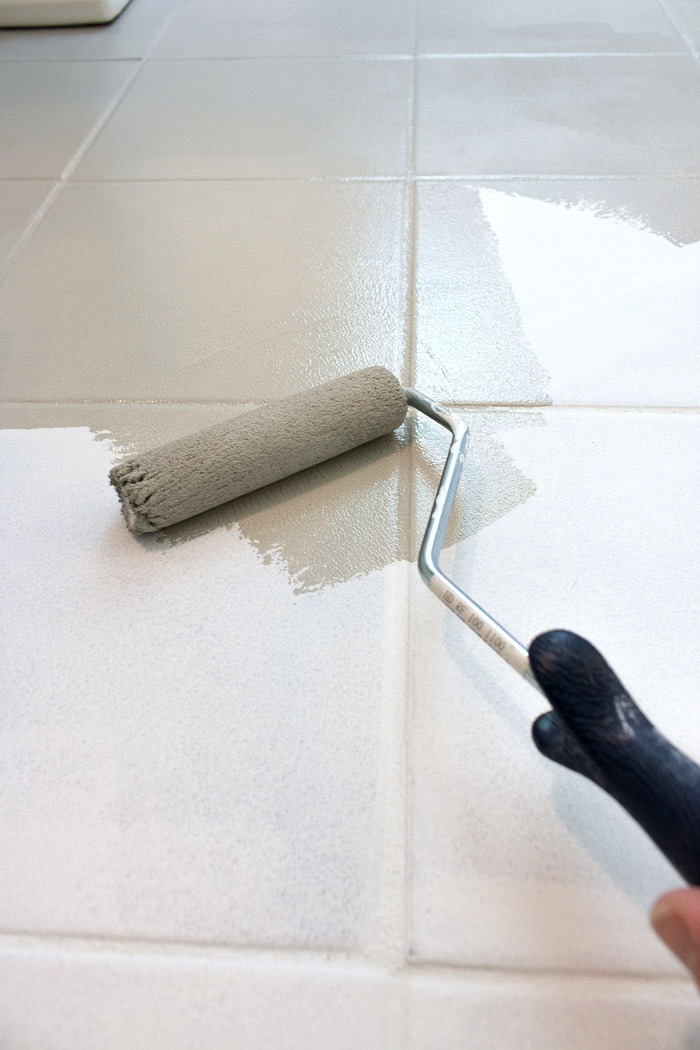
The type of paint that I used was Benjamin Moore’s Floor & Patio Paint since it’s meant to stand up to lots of use and abuse. It comes in High Sheen and Low Sheen options. I chose Low Sheen just for personal preference.
I applied three coats of paint, letting it dry according to the paint instructions in between coats. The color I chose is Benjamin Moore Platinum Gray, which is the same gray color as the lighter portions of my stenciled walls.
Step 7: Seal Your Tile?
The last step, if you choose to do it, is to seal your tile. I was definitely torn on whether or not to seal mine. With porch paint you technically don’t need to seal it since the paint is made to withstand a lot of wear. The pro of adding a polyurethane topcoat is that it will make your painted tile more durable. The negative is that with a polyurethane topcoat, if you get a gash in your floor that needs to be repaired, it’s a little trickier to fix in a way that it blends in perfectly if you’ve topcoated with polyurethane.
I decided NOT to use a polyurethane topcoat and years later I’m happy with that choice. At one point a deep scratch appeared on one of our tiles that I’m guessing was made by stone getting stuck in someone’s shoe tread while construction was being done on our house. I was able to sand and repaint just that one tile and it blended in perfectly.
I also recoated our painted tile floors a few years after they were first done to freshen them up, and since I had no polyurethane topcoat I didn’t have to do any prepwork to remove it before repainting.
Step 8: Let Your Floor Dry & Then Put It To Use!
After your last coat of paint or polyurethane, give your floor at least a couple of days to fully dry before walking on it. The more humid it is, the longer it will take. It’s best to be gentle with it (no heeled shoes, etc.) for the first week or two until everything is fully cured.
Overall, I’m incredibly happy with how our painted tile floor looks and how it’s worn! Especially for a project that cost me under $100!
It’s fun to look back and see how far this bathroom has come. This is what it looked like when we moved in and the tile was covered by carpet (which I promptly took out because I decided that even the ugliest tile is better than a rug that goes around the toilet – yuck!):
and here it is today:
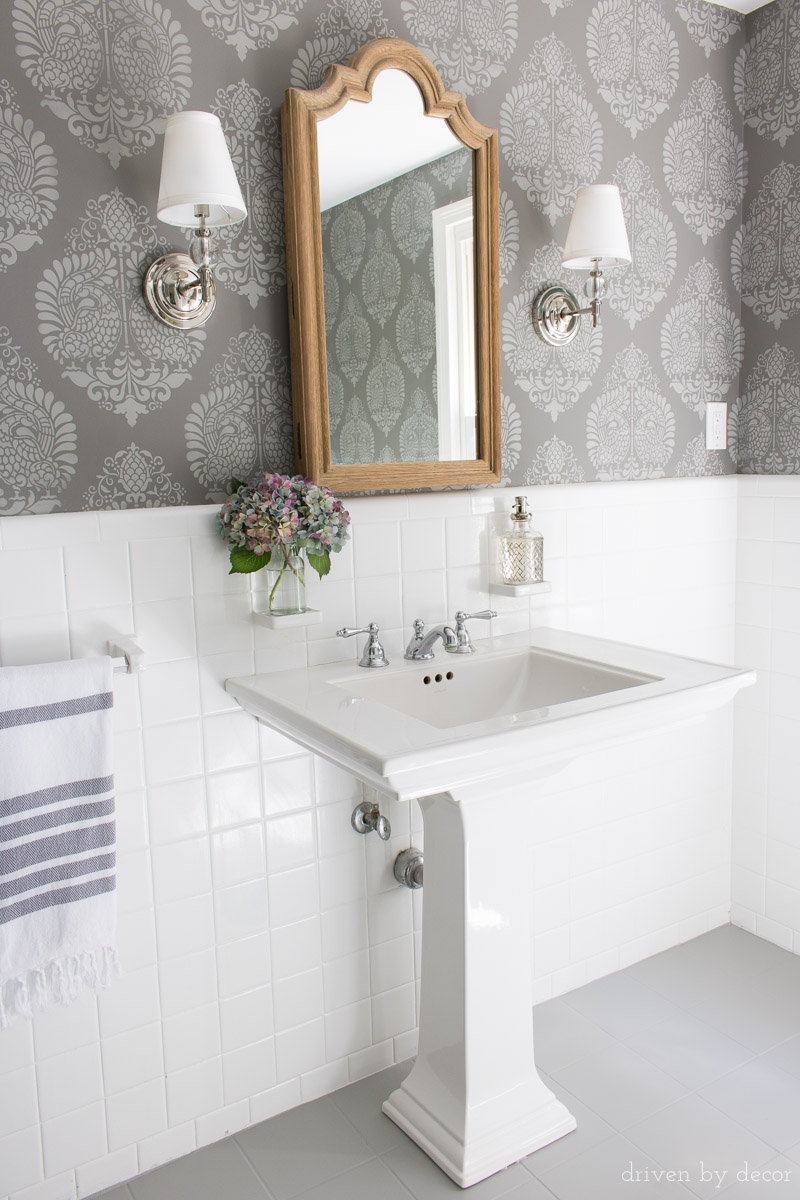
Powder Room Sources: Damask Wall Stencil (11.25″ x 15.5″) | Arched wood medicine cabinet mirror – no longer available | Pedestal Sink | Sconces (Polished Nickel) | Gray & white striped towel
The best part is that it’s a room we didn’t spend a ton of money on. Other than the money spent on the wood medicine cabinet and sconces, the rest of the changes were accomplished with inexpensive DIY projects. To learn more about our bathroom makeover check out my posts on:
Wall Stencils (yes, those walls are stenciled, not wallpapered!)
How to Replace a Towel Bar with Fixed Ceramic Ends
Also check out my post on our painted bathroom vanity which was another easy painting project that made a huge difference!
UPDATE!! If you’re wondering how our painted tile floors have held up, check out my post how how our painted tile lasted with an update of how they had done years later!
Thanks for stopping by!


Haneen says
Kris, this is amazing! So impressive!
Kris Jarrett says
Haneen, thank you – so sweet of you to stop by! XOXO
Dominique Stevens says
This is lovely. thanks for the article. It’s really inspiring!
Sandra Hattingh says
How does your painted tiles stand up to cleaning? I’m thinking your shower.
Looks lovely by the way!
Kris Jarrett says
So far it’s held up great! I’ve just used warm water with a splash of all-purpose cleaner in it. I didn’t paint any of the tile in the actual shower – I’d definitely be worried about that holding up!
Sarah says
Hi Kris,
Would this work if our tile is glazed? Yours looks more porous.
Bests, Sarah
Cassie says
Looks great!! Love that you took 3 years – makes me feel like it’s never too late : )
Kris Jarrett says
Thank you! I have way too many projects that I should have knocked out sooner than I did!
Gail Wozniak says
How long did you wait to apply the primer after stripping your floors. I got the one you used and the instructions indicate you need to wait 48 to 72 hours. I’m curious if you followed that. Thanks!
Kris Jarrett says
It’s been several years now since doing this so I can’t remember the exact amount of time I waited but I would follow the product instructions.
Carrie says
In my bathroom, I have dated Burgundy tiles spread out randomly with white tiles~ do you think it would be worth the effort to try and individually paint these gray (or greige) to be a complement to the white or should I try and paint all the tiles? The tiles go up and around a jetted tub too……
Thanks for the post!!
Your floors are spectacular and I LOVE the stenciling. 🙂
Kris Jarrett says
With your tile situation, that’s a tough call! It would definitely take a whole lot longer to do individual tiles than do all of the tiles plus the grout – I think it just depends on how much time you’re willing to put into it and which look you like better. I would be hesitant to do it around a tub if those tiles get a lot of water splashed on them but if they don’t, you should be good! And thanks for your sweet words about my post!
Megan Roberts says
Looks great! I’ve been thinking of painting one of our bathroom floors so your post has been really helpful. How do your floors stand up to cleaning?
Kris Jarrett says
So far so good! I can actually get them a lot cleaner than I could my old tile. I’ve just been using warm water with a touch of all-purpose cleaner in it.
Stacy Connolly says
Wow!!!!! Looks fantastic!
Kris Jarrett says
Thank you so much!
Kathy says
Wow, the floors look fabulous! I used your grout paint for a spot in mine and that
worked well too.
Kris Jarrett says
Thank you so much! And I’m glad the grout paint worked as well for you as it did for me!
Anonymous says
How are your tiles holding up today? I have been going back and forth trying to decide if painting my kitchen tiles or not. It gets high traffic so I’m hesitant.
Linda Grubbs says
Wow! Very nice Kris….amazing improvement!
And I love that it was so inexpensive. ????
Kris Jarrett says
Thank you so much! The price was definitely a plus!!
Sharon says
Kris, you are a wonder! I’m still in awe of your stenciling job (those corners!) and now your ‘new’ tile floor! Gorgeous. Thanks for sharing your sources, btw.
Kris Jarrett says
You are too sweet! Thank you Sharon and enjoy your weekend!
Pamela says
What I great idea. I never thought of painting tile floors. It looks amazing.
Kris Jarrett says
Thank you so much!!
Vanessa says
WOW!!! What a transformation from the original bathroom! The space is gorgeous!
I have a couple of accent tiles in the shower of the guest bathroom that I’ve been giving the stink eye to. They are travertine that has been sealed. Do you think this same method could work on those?
I purchased the grout paint, per one of your previous posts; and really need to get started on that project.
Thank you for sharing such a beautiful space and the sources.
Kris Jarrett says
Hi Vanessa,
I’m not sure about using it on tile in the shower itself – I would be worried that with so much exposure to water it might eventually peel!
Marty Oravetz says
Oh my word, this looks amazing. Great job.
Kris Jarrett says
Marty – thank you so much! Enjoy your weekend!!
Jenny says
Hi, when can you come and do mine. I live in England- is that a bit too far to travel?
I seriously love what you’ve done with your bathroom. I would never have used grey and white, thinking it’d be too cold looking. What you’ve done is amazing.
Kris Jarrett says
Jenny, if you send me a plane ticket and give me a place to stay, I’m there! Ha! Thanks so much for your sweet words and enjoy your weekend!
Monique Lawson says
Gorgeous! Thank you for the tips! I was thinking about sealing! Good job!
Kris Jarrett says
Thanks Monique! Enjoy your weekend!
Brenna@Domestic Charm says
Such a difference a little paint makes! It definitely needed the grey!
Kris Jarrett says
Thanks Brenna! The power of paint always amazes me! That ugly floor had nowhere to go but up!
Jill says
Looks fantastic! Thanks for being brave enough to give it a go & sharing your process.
Kris Jarrett says
Thank you so much Jill!
Karen B. says
What a great fix to an ugly floor. That’s really cool, it goes so well with your stenciled walls. I think you should write a book! A DIY to fixing up a home. 🙂
xo,
Karen
Kris Jarrett says
Ha! Thank you Karen! Maybe that will be a good project for me in a few years when I’m an empty nester 🙂
Lisa says
Amazing difference Kris!! And $50 is a heck of a lot cheaper than tearing out the tile and installing something new! What a difference the before and after!!
Kris Jarrett says
Thanks Lisa! I’m seriously kicking myself for waiting so long to do it. Enjoy your weekend sweet friend!
Sandi says
Amazing!! We just moved into a home that has gray tile with a red diamond in between every tile in the entry way. I was thinking of painting that diamond black to match the railings. Think it would work?? I adore what you did!!
Kris Jarrett says
Hi Sandi! I think that would probably work – you’d just need to paint it carefully so you don’t get paint on the grout. In this case, I would seal them after painting too!
Sherri Smith says
Wow what a difference that made to your bathroom! It looks gorgeous!! You did a fantastic job thanks for sharing with us!
Kris Jarrett says
Thanks Sherri!
JENNIFER PROCK says
What an improvement!!! You are so talented my friend!
Kris Jarrett says
Thanks so much Jen! I had so much fun with you this week! We need to do it all over again sometime soon!
Monique Lawson says
Painting the tiles? Never thought at this DIY! Love the idea! Going to make some changes, you know it!
Kris Jarrett says
Thanks Monique – it definitely opens up lots of possibilities!!
Rosie mauk says
I love what you have done. I am goi g to paint my bathroom floor but planning to use a stencil for design. Your tips will really help. Anything you can add about using stencils please feel free
Kris Jarrett says
Thanks Rosie! I’ve never stenciled a floor but I did write a post with tips about stenciling walls that I think would be useful for floors too – you can find it here: https://www.drivenbydecor.com/stenciling-how-to-tips-tricks-pics/
Sharon C says
Wow, what a transformation, from an ugly duckling to classy and sophisticated bathroom. You have done an amazing job Kris. Who knew that painting a tile floor would be so relatively easy and super affordable.
Kris Jarrett says
Thank you so much Sharon – I’m so glad you like it! XOXO
Sherrin says
What an amazing job you’ve done!
Congratulations. I have so many ideas in my head for things about the house but lack the “know how”. Your articles are so helpful and I thank you.
Kris Jarrett says
Thank you so much for taking the time to comment – it’s so appreciated! Enjoy your weekend!
Bonnie says
Do you think this would work in a large, high traffic area kitchen? I’m dying to go gray. I painted my cabinets and the floor needs to be in harmony 🙂 Worried that it won’t hold up and I will wish I didn’t miss with the old tiles. Thanks!
Kris Jarrett says
Hi Bonnie – it’s hard to say if it would hold up well enough or not but I think I’d be a little hesitant about it in an area like the kitchen where occasionally things get dropped on the floor. If you did try it, I’d definitely top coat it with polyurethane. Wish I had more definite advice one way or another but I haven’t tried it myself so just don’t know for sure!
Katy Beacher says
You are not only extremely talented but you are so brave! What a lot of hard work that really paid off! I have no suggestions. I’m just swooning over the beautiful results.
Kris Jarrett says
What a super sweet comment Katy – thank you!!
Lori says
I had that same birdcage wallpaper in my master bath, I love what you have done! Thanks for sharing, I’m going to try this on a bathroom in our house that has green tile with pink grout, I’ve hated it since we moved in 18 years ago?
Kris Jarrett says
Lori that’s hysterical – I bet that wallpaper was the talk of the town back in the day! 🙂
Elisabeth says
I am so glad I found your blog. I’m in the process of updating the bathroom of our 1960 home. All original. So you can imagine the old gouted tiny patterned tiles of the floor. You did an outstanding job, hope my tiny tiles turns out as well as yours did. Our bathroom is the kind that has matching lavender color tub, toilet and sink. They certainly had wild style back then.
Kris Jarrett says
Ha! My whole bathroom (tub, tile, and all) used to be pink so I hear you! Good luck with whipping your bathroom into shape!
Terri Haynes says
Very pretty bathroom you have gave me excellent ideas for my bathroom.
Kris Jarrett says
Oh good! I’m glad you enjoyed the post Terri!
Pat Watson says
It all looks fabulous, especially the stencilling. I recently painted my bedroom grey which I loved at first but now thinking a little decoration would be goo. Thank you for sharing.
Kris Jarrett says
Thank you so much Pat! Happy holidays!
Adam says
Love love love it! How has it stood up to the test of time? My wife is so concerned that it won’t withstand our walking , her moving chairs to put on makeup etc.
Kris Jarrett says
Adam, it has held up even better than I expected! As I mentioned in the post, one tile got scratched early on by something sharp (I’m guessing a stone in someone’s shoe) but other than that it still looks perfect! We really don’t have any furniture we’re moving around on our floors though – If you have a chair, I’d definitely be sure to topcoat it with a polyurethane for some extra protection!
Wendy says
Your painted tile floors look fantastic! I’m inspired to start on my kitchen backsplash using your painting tips and techniques. I don’t know how well a painted tile backsplash will hold up long term, but a light color of paint will make a big impact in this dark kitchen. Thanks so much for sharing your home and talent!
Kris Jarrett says
Thanks Wendy! I actually have a friend whoo painted her backsplash and it turned out great! I’d just try to not go overboard with the amount of water it’s exposed to.
Marilyn says
Thank you for your detailed how to project. I have several tiles floors and thought to myself, “Could these be painted?” Until now, the experts I asked said no. You have given me inspiration to do it. The tile in my Nevada house has a shinier finish than your tile. Do you think that sanding will allow the paint to adhere?
Kris Jarrett says
Marilyn I’ve only done it in this one room so I can’t say for sure but I’m guessing that as long as you sand it well and use the primer I mentioned, you should be ok!
Mark Sawyer says
I have ceramic tile floors in my bathroom that I dislike because of the color. I would like to paint the tile floors but am wondering if it is possible because of the style of my tiles. Each tile has an uneven pattern so they are not smooth like your tiles. Do you think it might still be possible for me to paint these tiles? Your bathroom looks great by the way!
Kris Jarrett says
Mark I can’t say for sure because I’ve never tried it with uneven tile but I wouldn’t think it would be a problem!
Chris H says
Looks great. How does the painted tile feel on your feet? I am afraid painted floor tile will feel rough to the tough.
Kris Jarrett says
Honestly I don’t feel like it’s the least bit rough! Since I sanded the tile well before painting and used a roller that gives a really smooth finish it really feels no different on my feet than typical tile!
Diana Forbes says
Your bathroom looks great!! I am considering trying this in my kitchen but I have 2 dogs. Do you think it would hold up?
Kris Jarrett says
Thanks Diana! My only experience doing it is in our bathroom and it’s held up great but our dog really doesn’t go in that room so I can’t say for sure. I would definitely put some type of polyurethane or other protective coating on it though. Good luck!
Kathleen says
WOW! Wonderful transformation. I revamped our bathroom with subway tile etc. Even though the floor is in fine condition it no longer looks right with the new black, white and gray color scheme. You have definitely inspired me to paint floor tiles. I have been wanting to do it for a while now but until I read your post I was fearful. Not anymore….thank you.
I do wonder though, if painting them will hurt the resale value of the house any though. Thanks again.
Kris Jarrett says
So glad that you found it helpful Kathleen!
Ivory says
I got to do this to my son bathroom. Outstandingly gorgeous
Kris Jarrett says
Thank you so much!
Melody Mitchell says
Thank you! Your floor looks beautiful. I have a basement floor I’ve been giving the stink eye. As soon as I etch out some time I’m going to tackle it.
Kris Jarrett says
Thank you! Good luck getting it done!
Jody Merrill says
I guess you can paint wall tile using the same method? I wonder how the paint would hold up in a shower area?
Kris Jarrett says
Jody I’m assuming it would work on wall tile too but haven’t tried it. I’d be hesitant to do it in a shower though – being exposed to that much moisture I’m not sure it would hold up.
sandy says
The bathroom tile repaint is beautiful- I’m thinking about trying that in my bathroom. I have white tile and it looks dirty and stained in some places- I think you’re idea might work! Thanks for all the info too- really appreciate it!
Anonymous says
Did you remove the toilet and sink pedestals before painting, or did you just paint around them? I’ve been putting off replacing my floor tile because I really don’t want to have to remove and reinstall my toilet.
Tammy says
Hi Kris,
Your bathroom looks fabulous! Thank you for sharing!
What is your thought about doing this same painting process on a kitchen tile floor that gets higher traffic than a bathroom?
It seems hard to find a clear sealer that isn’t glossy…..even the polyurethanes that say matte finish dry with a shine. Any suggestions? Or recommendations on a product that is clear and seals with a matte finish? for tile?
Thanks!
Tammy
Kris Jarrett says
If you do a high traffic spot like that, I’d definitely use a top coat. I know that Minwax’s Polyacrylic in Matte is not shiny because I just used it on a refinished table but I don’t know if that’s an appropriate topcoat for flooring – definitely something to look into though!
Rain says
Hi, your project looks great! I came across your page when I was googling on re painting toilet. I am looking at painting a small patch of the tiles in the shower area. Do you think the paint which you recommend would stand up to daily dose of shower water or it’s better to go with epoxy paint? Thanks!
Kris Jarrett says
I think for daily water and moisture like in the shower I’d do an epoxy paint. With daily high humidity like that, this might not hold up.
Bri says
Love love LOVE!!!! Going to do this to my bathroom after reading this!
Dorothy says
Thanks so much for your inspiration. Does this paint have a bad odor like some of the other tile paint I have been reading about?
Kris Jarrett says
Dorothy it had an odor but nothing terrible – I’ve read that about certain tile paints and don’t think this is anywhere near as smelly as those.
Patricia J Leahy says
Painting the bathroom floor didn’t come out right. I had my handyman go to our local Rings End and bought the primer and paint that could be used on garage floors. I see exactly where we went wrong NOW. No sanding, no stripper & cleaner but I did vacuum and washed the floor with Clorox & water. Two coats primer and one coat top paint. It’s a miserable mess-the white primer is scratched and the one coat of Navy blue obviously did not stick. I think I will rent a palm sander and start over myself and follow your direction to the word. Thank You.
Kris Jarrett says
I’m glad that you found this post helpful! I would definitely scuff up your floors by sanding first and I would also tint your primer since you’re using a dark color over it. Finally, if it’s in a room that gets a lot of wear, I would finish it off with a top coat!
robin says
you showed the bath tile floor with red tile but the “before” picture had blue tile ? Is that the same bath?
Kris Jarrett says
Yes – the blue was a rug and the red tile was under it.
Mary B says
I came across your blog when I was desperately googling for a solution to my ugly bathroom tile that didn’t involve ripping it out and installing new flooring. Your bathroom is beautiful and I can’t wait to give it a try! Quick question: did you have to remove the toilet and sink before painting your floor? Or were you able to just sand/prime/paint around them? Thanks!
(And now off to browse the rest of your blog 🙂 )
Kris Jarrett says
Hi Mary – no I didn’t remove the toilet – I just painted around it including painting the paintable caulk that seals it to the ground!
Lee says
After reading this. I’m ready to paint my ugly floor tile. I like that you use bm patio paint. That’s a great idea.
Kris Jarrett says
Good luck with it!
Cathleen says
I have been searching for information on painting a ceramic tile floor and this fits the bill. The floor is one with a combination of different sized tiles laid in a pattern and a high gloss shine. Do you think this method would work?
Thanks, Cathy
Kris Jarrett says
Cathy I think if you did a good cleaning and sanding job on the tile first it would likely work but I can’t say for sure since I’ve never tried it on an extremely high gloss tile.
djaz says
This looks so great!
I;m going to try this in the kitchen, since, we’re empty nesters and I’m usually the only one in there. Leaving it unsealed and using the products you recommend seems to be the best way to go for easy repair if needed.
Thanks so much for your post. I’ve been agonizing over what to do with the floor for some time.
Kris Jarrett says
I hope it works well for you!
Pilly Sykowski says
Hello Kris, I really like how your tile turn out. I am going to try to do mine as well. But I have a questions. After painting the tile, what are you doing with the grout. Will the grout remain panted and will not show any grout?
Is this paint will not peel through the years. Your response will be greatly appreciated.
Kris Jarrett says
I painted both the tile and the grout so yes, the grout will stay painted. My floors have been in place for over six months now with no peeling. I can’t promise that for every single tile type there is no chance of it ever peeling, I can only tell you what my experience has been and it has not been an issue for me.
Kim says
Honestly, I prefer the “before” picture, with its bright, cheery colors.
Kris Jarrett says
It was DEFINITELY not my style but to each his/her own!
JENNIFER says
I’m going to do this to my pink 1960s tile. Can I use a ‘glossy’-oil (porch, floor & patio) paint or is a latex best?? I don’t know which to choose. I’d like a shiny look so I prefer glossy but it’s oil based. Will it hold up and what exactly did you use? Thank you for the great idea!! Also, will this same method work for my shower?
Kris Jarrett says
Hi Jennifer – I used Benjamin Moore Floor & Patio paint which is available in different sheens depending on the look that you like. I would not recommend painting tile that’s in the shower as I think you’d have peeling issues.
brett polsen says
what was the total cost?
Kris Jarrett says
It depends on which supplies you already have on hand but unless you need to buy a sander it should cost under $100 (not including any top coat you might add).
Antonia says
Beautiful! Does painting floor tile work if the floors are radiant heat?
Kris Jarrett says
Antonia I don’t know but I’d be hesitant to try it!
Vicky says
Beautiful! You did awesome job. I’m inspired to do the same.
patti says
just one comment about using polyurethane, ..if you are painting over white, best to use a water based poly because the oil based poly will eventually yellow the white color.
Sandra Montes says
Hi, it looks great and I am inspired. I have a question on painting the floor tilt with the product you used. How has it held up with time and foot traffic?
Kris Jarrett says
Yes, it’s held up remarkably well!
Lisa says
Wow! Thanks for the great information. I have been thinking about this project.
Ryan says
Hi Kris thank you for the story. I looked for specifics on the sanding and didn’t find them so I’ll ask. Did you use coarse or fine sanding paper? Was there a lot of dust with that sanding process?
Kris Jarrett says
I sanded the tiles I had with the crud on them with 80 grit, did the whole floor with 120 grit, and then finished off with a quick once-over with a fine 240 grit. The sander that I mention in the post has a dust collector so there wasn’t a lot of dust generated.
Janet says
I have brand new tile in my bathroom that is supposed to be grey. It is in a herringbone style, not all one color. It is on the brown and tan shades not grey. Any ideas?
Claire says
Love it! Great detailed instructions too. Can you tell me how long it took you to do your floors?
Kris Jarrett says
There were several hours of drying time between coats but the total amount of time that I was actually working on them was only about four hours.
jill says
Your bathroom floor looks great, so much better than that original red one. A very good fix for a low cost (though a lot of prep). Years ago we bought a house that had a small white octagon tile in the bath that was interspersed with flower shapes (more octagons) that were maroon and pink in the center. I painted over these using Testor’s PLA model paint in black on the outer “petals” and grey in the center. For a small job this worked well as it had a tough finish that matched the gloss on the rest of the floor tile. We lived in the house several years and it held up perfectly. I’ve also seen the professionally done epoxy used on weird old colors of wall tiles that was very effective (though it can be pricey, it is still cheaper than removing tile set in concrete and mesh that was built to stay there forever). You certainly came out with a great fix for an older floor with the painted finish to match the wall stencil color. The final result of your bath re-do is a lovely, stylish room to be proud of.
Kris Jarrett says
Thank you! And glad to hear you had success with a few other methods too!
Anonymous says
Thank you! – Great project -and does not cost too much! – I was looking at having my bathroom tiles reglazed … wonder how different the two processes are for upgrading the tiles.
Kris Jarrett says
Reglazing is likely going to be a bit more durable in the long-run but also a lot more expensive. It’s definitely a better option if you need to change the color of tile in an area exposed to water like your shower!
Michelle Anderson says
How has the paint held up on the tile?
Kris Jarrett says
It’s still in great shape!
Denise Brook says
This looks amazing, SO creative!
Kris Jarrett says
Thank you!!
Vickie says
Hi Kris,
I have same question as Ryan before me, what grit sandpaper did you use on the tile?
Your project looks great and can’t wait to start mine.
Kris Jarrett says
Thank you! I sanded the tiles I had with the crud on them with 80 grit, did the whole floor with 120 grit, and then finished off with a quick once-over with a fine 240 grit.
lauren l lauren alford design says
this is amazing, I never would have thought to paint tile. what a change!
Kris Jarrett says
Thanks Lauren!
Deb says
Hi Kris,
We bought a mid-century modern home 2 years ago when we moved back to St. Louis. It was built in the late 50’s (like me ) and has the sink as part of the master bedroom with the tub & toilet separated with a pocket door. The ceramic time floor was a hideous red. I saw your bathroom makeover and immediately started working. I’be done the first coat of paint – the color you used. It’s going to absolutely look great!
Thank you so much for your makeover step-by-step! So much cheaper than having the ceramic tile removed and redone!
You’re the best!
Kris Jarrett says
I’m so glad you found it helpful and hope you love your new floor!
Deb says
Hi Kris,
Our floor looks great, but after a week of drying and not using it, the floor is still a bit sticky. My husband has a handicap and uses a cane. He walked on it yesterday and his cane left a round mark and his slippers left an impression – like when you walk on a really dusty floor. I took a clean washcloth and wiped down the floor and the marks came out.
How long does the floor need to dry? I’m concerned about putting down rugs or using it right now. Any advise would be appreciated.
Kris Jarrett says
Glad it turned out well! I did our floor right before we left on vacation so it was about a week before we put it to use – it wasn’t at all sticky. Drying time is going to depend on whether you used a protective top coat or not and also the humidity – If you live somewhere really humid that will extend dry time.
Robin says
Hi Kris,
Great instructions and great results in your bathroom. I love your modern take on classic and your ideas definitely inspire me. Curious about on update on how the painted tile is holding up? We recently purchased (a way more in need of fixing up than we thought) beach condo and I’m stuck with 80’s tile and horrible grout in the bedrooms … considering the paint approach, wondering what you think? Planning on some rugs in the bedrooms in the traffic patterns so thought this might save some $ while giving a beach look. Thanks for any suggestions
Kris Jarrett says
It’s held up beautifully!
Stephanie Goldfarb says
Hey Kris! I’ve been researching painting the tile in our master. When I went to our benjamin moore showroom yesterday, he recommended that same bonder primer and the same brand “cabinet coat” or the benjamin moore advanced paint. He also said there was no need to poly over it for the same concerns you had.. if it got scratched, it would be hard to cover that. So I’m curious.. how is yours holding up with no poly?? I can’t WAIT to dive into this project!
Kris Jarrett says
It’s holding up really well! There’s just the beginning of a little sign of wear in the most trafficked area (it’s been over a year since we painted it) so I might clean it and roller a fresh coat. Even if I have to do that one hour touch up once a year, it’s well worth it for the money saved!
Kim Valadez says
Hi! Love this bathroom.
Did you paint the wall tile or replace it?
We could be purchasing a home with pink tile on the floor and walls. ?
All the help would be awesome!
Thank you!
Kris Jarrett says
The wall tile was originally pink but the previous owners had it professionally glazed along with the pink tub! Congrats on your new home!
Ellen says
SIGH OF RELIEF… that this exists. thank you so much. This is my first time visiting your blog, wow is all I can say. Thank you for the very descriptive breakdown of each step. What a wonderful makeover you accomplished 🙂
Kris Jarrett says
Thanks Ellen – I’m so glad you found it helpful!
Denise says
My tile is the orange sileto tile Spanish can I do the sanding and also paint this and the grout is cement will this work for me it’s a 1/2 bath and foyer ?
Kris Jarrett says
Denise I’m honestly not sure! I know that type of tile has lots of uneven surfaces and can sometimes flake so I’m not sure if it will work or not.
Rachel says
I’m currently flipping a house and have been cringing at the fact of pulling up ugly green tiles! Cannot wait to use your painting alternative, it looks amazing!
Kris Jarrett says
I’m so glad that you were inspired!!
Linda says
Love this and going to do this weekend. You did a beautiful job.
Kris Jarrett says
Thank you!!
Laurie says
This is amazing!!! How long did it take you I have three little ones so I can’t have the project take too long. Was it more than a day?
Kris Jarrett says
I can’t remember exact times but none of the steps are very time consuming and there is dry time between steps so it’s an easy project to do just an hour or so at a time!
shelly gilad says
THANKS! So helpful. I was so frustrated with our tiles.Thought there was no hope then found your post.
Kris Jarrett says
So glad you found it helpful!
Chris says
I love it!!
Kris Jarrett says
Thank you!
KristinaB says
How has your floors held up over time? Considering painting our bathroom floors!
Kris Jarrett says
It’s done really well! After a year there are starting to be just the slightest signs of wear so I might roll a quick recoat layer on to keep it looking good. Still super happy with it!
Billy says
I need help with large tile floor in my kitchen. I would like to paint it if I could. It is the old 1980s style. What would I need to do as in the easy steps that you have done in your bathroom and I am interested in doing the same with my kitchen. Please give me some comments .
Brenda says
This looks wonderful! What was the grit number of the sandpaper used?
Kris Jarrett says
Thank you! I sanded the tiles I had with the crud on them with 80 grit, did the whole floor with 120 grit, and then finished off with a quick once-over with a fine 240 grit.
Anonymous says
The before picture shows blue tile, smaller, than the red you painted???
Kris Jarrett says
That’s carpet that was over the red tile.
Anna says
I’d love to know also!
Kat says
Looks great! Do you think this would hold up in the wall tile (tub/shower) in a guest bathroom that rarely gets used? The tile is ugly plus the grout is badly stained, and I’ve tried everything under the sun to clean/bleach them.
Kris Jarrett says
I’ve never tried using it in an area with so much moisture – I’d be worried about how it would hold up long-term.
Danielle says
How did this hold up to water getting on it.. I used chalk paint and it looks great but if water gets on it it bubbles up instantly..
Kris Jarrett says
We never have standing water in there but it does get wet from people getting out of the shower and it hasn’t been a problem at all!
Marsha says
Looks amazing! What would you say about this process for bathroom walls?? My guy has picked a waterproof laminate wood look for the floor, but the walls need some change and we don’t want to rip and redo tile!
Kris Jarrett says
I think it would work fine for the walls too as long as they weren’t exposed to a lot of water like shower walls would be.
January Beeler says
Looks fantastic. I’m confused about the before pictures. At the beginning they were a reddish tile and at the end they were blue? What color tile did you paint? The red or blue? Wondering if coats would depend on starting colors because I’m painting over off white.
Kris Jarrett says
The blue is carpet that was over the red tile!
Laura says
This looks fantastic! Would you try this for the walls that were tiled to? How well do you think it would hold up in really wet situations like the shower?
How well has it held up? Has it scratched at all?
I love your bathroom!
Kris Jarrett says
I think walls would be fine except those that are exposed to a lot of water – I’m not sure it would hold up somewhere like a shower. There are some minor scratches on the floor around the tile so at some point I’ll give it a fresh top coat but overall it’s help up beautifully!
lee joshua horowitz says
Hi! I used the benjamin moree floor paint thank to your recommendation. I’m finding that the floor is sticky and tracks lots of dirt. Any recommendations for poly?
Kris Jarrett says
If it’s sticky and tracking dirt then it’s not completely dry and you need to give it more drying time. It can take a while to dry in hot weather, especially when it’s humid!
Patricia says
Hi Kris , I just happened upon your post about painting your bathroom floor from September 2017 as I am searching for a way to breathe new life into my ceramic tile floors and I have a question for you
How are your tiles holding up after a year and do you regularly use this bathroom ? It looks great and I’m wanting to try it but am concerned about the durability , my bathroom is used daily and of course about 5 feet of the tile is right along the bath tub/shower.
Kris Jarrett says
Hi Patricia, this is our hall bathroom so it does get regular use. A year in, 95% of our tile looks perfect while a few tiles in the most used areas have some signs of wear and scratches. I plan to fix those tiles and give the whole room a single recoat sometime this winter. If I had put a protective coating over the top, I have no doubt it would have worn even better but I’m overall really happy with how it’s held up!
Pat Johnson says
I want to say that your bathroom is just out of sight! I have read and reread all of this project. But my question is…if the ceramic tile on the floors can be painted this way, then can the ceramic tiles on the wall be done the same?? Thanks for answering and again I must say that room is gorgeous! Pat
Kris Jarrett says
Thank you Pat! I would think that you could paint wall tile the same way as floor tile but I wouldn’t do it for tile exposed to a lot of water like tile in your shower.
Kim Westwood says
Wow!! that looks great. I keep being told you can’t paint floor tiles as it wont last. Well perhaps I will give it a go. Thanks for sharing
Kris Jarrett says
I’m so glad that you found it helpful!
Sarah says
Thanks so much for this. We have some 1960s red pattern tiles in Austria that we are thinking of painting a pale grey over ( concrete colour) and wonder if we can keep the pattern from the tile with a light grey wash. Have you experienced this before?
Kris Jarrett says
Honestly I’m not sure Sarah – I haven’t tried that before!
Petro says
I never knew you can paint a caramic tile??
Brittany says
I’m so excited to do this in my kitchen in a couple of weeks!! I know you’ve done this in a bathroom. Is this ok to do in a bigger area and higher traffic area? Thank you for sharing this!!
Kris Jarrett says
I’ve only tried it in this one space! If you try it in a higher traffic area, I would definitely seal it after painting.
Johanna says
Hi. I painted my spare bathroom tiles with this technique, however, I didn’t use a sander. I hand sanded and probably didn’t do a thorough job. So far I’ve put 2 coats of BM Floor/Patio paint and the coverage is good. Not sure if I need a 3rd coat. Also, I noticed that the paint feels slightly tack-y. It is definitely dry but don’t have a smooth soft feeling. Is this normal? Thanks for your feedback and I just subscribed!
Thanks, Johanna
Kris Jarrett says
Sorry for the late reply! You’ve probably figured this out by now but I would give it more drying time if it’s still feeling tacky. It should be smooth and not at all sticky before it’s ready to be walked on.
Toni says
Wow. Loving everything I’ve quickly glanced at. I was more concerned with painting bathroom ceramic tile. I’m attempting this much thought about project very soon and your instructions are the BEST!!!
Kris Jarrett says
I hope it all goes well!
Jane Timmons says
Do I paint over the grout with the same paint ?
Kris Jarrett says
Yes, I used the same paint for over both the grout and tile.
Nancy says
I also love the long bathroom rugs but worry how to launder them. Do you send them out or machine launder at home? How large is the capacity if I may ask?
Kris Jarrett says
Mine easily fits in my home washing machine!
Lisa says
Kris-
Love the bathroom! I have this hideous, small rectangular tile with pink grout on my bathroom counters. I was thinking I could paint it like you did the floors. What do you think?
Kris Jarrett says
Hi Lisa! I’m honestly not sure how well it would stand up to pooling water – I’ve never tried it!
Tania says
This is amazing. Now I know what I want to do with my master bathroom.
Kris Jarrett says
Thanks Tania!
Janene says
Your bathroom looks amazing and I love seeing that. And knowing you transformed your entire bathroom and cost you practically nothing has got to be one of the best feeljngs this world!!!! I love doing DIY projects myself around the house! I’ve done a few that weren’t as big as yours redoing an entire room, but it’s amazing how even just recovering pillows or painting a lamp, can make all the difference in the world!! I try to recycle as much as I can, too!! I’m always looking for some new project to do and am very interested in receiving your posts !! Ty☺️
Kris Jarrett says
I’m so glad that you enjoyed the post! I find DIY projects to be super rewarding too!
Mj says
Did you just roll tile paint over the grout and then repaint the grout?
Kris Jarrett says
I just rolled over both the paint and tile. I didn’t repaint the grout – I left it the same color as the tile.
Meryl says
Superb result – hard work during all the preparation ….but my what a result for the money. Well done YOU . Don’t know you obviously but very proud of your tenacity to achieve such rewarding results.
Kris Jarrett says
That’s so sweet of you to say – thank you!!
Mary says
Wow! What a difference! You did a great job! I need to do the tiles in my kitchen and I’m so afraid cuz I sweep and mop regularly.
Kris Jarrett says
Thank you! I would definitely top your painted floors with a protective top coat for a heavily trafficked area!
Debra says
Hi…you’ve done a great job the rooms look beautiful,clean and updated. Thank you for your instructions,the only problem is that Benjamin Moore paints aren’t available here in Australia…any thoughts on what I could use instead…debz
Karen Hanzel says
You have given me the courage to do it!
Kris Jarrett says
Good luck with your project!
Paul Rothery says
I followed your instructions to the letter, using the same brand of paint. After 4 days the floors still feel slightly tacky when walked on. Do you have any suggestions? It feels quite dry to the hand but sounds worrisome when walked on. Please let me know if you experienced the same?
Kris Jarrett says
I would give it a few more days to fully dry because it shouldn’t feel tacky. If you are having a lot of rain or you live in a humid climate, it’s going to increase drying time.
Philippa says
Hey – I painted my floor tiles, but find it really picks up the dirt so easily and is hard to clean – have you found this at all?
Kris Jarrett says
Honestly, no I haven’t had an issue but our painted tile is in the bathroom and we don’t wear shoes in the house so there’s not a lot of dirt getting tracked in on it. If it ends up being an issue for you, I would put a protective top coat over the painted tiles.
Vuyiswa says
Impressive I also wanna give my kitchen and bathroom a make one …thank you
Lisa says
Can you do the same thing for wall tile? I see yours is white already. I’d like to make me cream wall tilewhite too.
Kris Jarrett says
I think it would likely work on wall tile too but I would hesitate to try it on tile exposed to water and a lot of moisture like wall tile in a shower.
Angela says
Painting the tile would be a cheap, quick fix for my fireplace surround. Do you think the paint you used would hold up to heat that is given off by a gas fireplace?
Your project looks great!
Kris Jarrett says
I honestly have no idea! I would ask someone at your local Benjamin Moore paint dealer!
Peggy says
How about just painting grout? I don’t want all the tile painted but the grout is too light and always looks dity. I know there are grout color enhancers but they are very expensive for a large area.
Thanks!
Kris Jarrett says
I honestly don’t think it would look very good to just paint the grout. This same product that I used to turn stained grout white is also available in different colors: https://www.drivenbydecor.com/how-clean-floor-tile-grout/
Ashley says
Our new apartment title floor in the restroom is kitchen red like at a fast food place :/ I already work at one I don’t wanna come home to the same floor. I am considering doing this! it’s already sanded down and everything though the landlord did all that I need to just re paint it asap
Kris Jarrett says
Sorry I’m so late in getting to your comment – I hope it all went well!
Yv9nne says
Thank you…the tiles look good but is there a particular paint..eg regular paint, chalk paint? Did you ever do that to get tiles more shinny? Also, what is the polyurathane product?
Kris Jarrett says
If you go back and read through the post, I talked about the specific type of paint I used! And I’ve only tried this on my own tile floors, not any that are more shiny. If you decide to top coat it, I would speak with someone at a local reputable paint store to determine the best type of product to use – I didn’t research it since I didn’t use polyurethane or another topcoat on mine.,
Anonymous says
Overall good directions, but you’re talking about getting a DIY project done quickly and on a budget:
Once you sand something and vacuum with a good shop-vac, you don’t need to clean with stripper. It’s clean!
Also, three coats of paint is definitely over-kill.
Kris Jarrett says
I disagree – the sanding creates dust and dirt that you can’t fully pick up with the vacuum. Cleaning with a stripper only takes a short amount of time so why cut corners and skip a step that could help the primer adhere a bit better. And three coats isn’t overkill because I used a roller that gives a very smooth finish but it’s also a thin finish. You can certainly cut corners if you wish but that’s not how I do things.
Susan says
Do you prime and paint right over the grout as well?
Kris Jarrett says
Yes I did!
Kelly Jo says
I love your bathroom and plan to paint our own bathroom tile this weekend. I was wondering how you clean painted tile. I normally use Pine-sol. Can I use this on the painted tile? Would I need a finish on top of the paint to clean?
Kris Jarrett says
I’m not sure about Pine-sol – I just use a bucket of warm water with a squirt of a mild soap!
Cathy says
I am so going to do that to the orange and black tiles in my old bathroom. Do you suppose you could do that to the tiles in the shower?
Kris Jarrett says
I’m not sure how well it would hold up in the shower – I would guess that after prolonged exposure to moisture it might start to peel so I’d be cautious about doing that.
Lindsey says
I am interested in doing this in my guest/future children’s bathroom. It’s small with very basic white tile from when our house was built in 2002. We though about just redoing the tile, but that’s a lot of time & effort we just don’t have right now with everything else going on.
What sandpaper do you recommend? If you were to seal the floor would you use a basic tile sealer or soemthing else?
We do use rugs & the space is only 8×5 so most of it wont be exposed, but we want to make sure it really holds up since it’s only other bath we have besides our master.
Kris Jarrett says
I think I used 220 grit sandpaper. As far as sealing it, I don’t have a specific product to recommend since I didn’t do this step myself. I would talk to someone in a reputable local paint store about a specific sealing recommendation.
Katie says
This looks so good!! Do you think it would work on the tile on the wall? I have tile similar to yours 40 in up the wall on the walls around the toilet in our bathroom and would love to paint it, but don’t want it Stark white like the tub and tile kits. Do you think this would work?
Kris Jarrett says
I think it would work on wall tile in the main area of the bathroom but I don’t know how well it would stand up to wall tile in a bath or shower area where it was exposed to a lot of moisture.
Shae Bordes says
Hi Kris! So glad I stumbled onto your website! Fantastic ideas and I adore your taste ! I will be tackling the tile in our kitchen with this fantastic idea… But how many days did the whole project take? I know I can order takeout or pizza for a day or two, or will this be a 5 day project?
Kris Jarrett says
It’s only a 2 day project to finish the floors (since you have to allow for drying time between coats) but I would recommend giving it several days after you’re done before subjecting it to everyday wear and tear and putting down rugs or mats – you’d be fine going in and out in socks though!
Karen says
All beautiful!! A couple of questions about the wall stencil, how did you do the corners to align the design, and how did you know what kind of paint to mix for the stencil??? It is gorgeous!!! All lovely, wonderful job!
Kris Jarrett says
You can find all of those details in this post: https://www.drivenbydecor.com/stenciling-how-to-tips-tricks-pics/
Laura says
Great article. I am definitely going to try this on my tile foyer. Do you have a specific type of polyurethane you recommend? All the ones I can find say they are meant for use on wood – will they still work over the painted tile?
Kris Jarrett says
I actually don’t have a specific recommendation only because I decided in my case that I didn’t need to use polyurethane. I would talk to someone at a reputable local paint store!
Pam says
How has it held up ? Contemplating big job. Ceramic tile.
Kris Jarrett says
Yes it has held up really well!
Dianna says
It’s absolutely beautiful!! You did a great job and my bathroom floor is exactly what I am fixing to start on but my thought is to make it a more rugged paint for more traction. I tend to slip alot. What are your thoughts on this?
Kris Jarrett says
I believe you can make paint non-slip by adding grit to it but I’ve never specifically tried it with a painted floor.
Kate says
Thank you so much for this tutorial! I’m going to do a checker pattern in my bathroom and I’m so excited! Your bathroom looks amazing! I love seeing DIY mini makeovers that just need some elbow grease. So inspiring!
Kris Jarrett says
Glad you found it helpful Kate! Hope your project goes well!
Tara Stoddard says
We’re the wall tiles already white, or did you paint them as well?
Kris Jarrett says
Our bathroom walls were originally pink tile and the owners before us had them professionally reglazed in white.
Melissa says
Looks great! I am not happy with my kitchen tile (texture traps dirt). I wonder if something like this would be an inexpensive solution. Thanks for sharing.
Kris Jarrett says
Thanks Melissa – glad you found the post to be helpful!
Michelle says
Hello… I’m so inspired! I have a 1950’s black chipped tiled floor, walls and shower/tub that I’m going to do this to. It will be an enormous job with all the surfaces, but holy moly…. cheap! I want white on white on white….. clean as I have looked at this stained dirty chipped black tile for too long. I can’t wait! I’ll take a before and after!
Cheers!
Michelle
Kris Jarrett says
Good luck! My only hesitation would be the tile in your shower and tub – I’m not sure painted tile will stand up to how wet and humid it is in the actual shower or not.
Becky says
She didn’t paint inside the tub or shower, did she? I thought just the floor?
Becky says
Whoops, ignore my comment! I misunderstood who I was responding to!
Debi Croy says
I’m guessing from the pictures & description that you did not remove the toilet and sink for the project. Did you caulk around them when done? Also, what matte roller did you use?
Thanks
Kris Jarrett says
Hi Debi – no I didn’t remove either of those. I didn’t caulk around them but in hindsight I probably should have recaulked my toilet before painting the floor. Might do that when I recoat! I used a 1/4″ nap small roller for a super smooth finish!
Jean says
It looks great! I’ve been thinking about having this done using Garage floor paint. Now I’m wondering if it would be a durable as the porch and floor paint us used? I loved the new wallpaper too! Great job.
Kris Jarrett says
I’m not sure – I’ve never used paint specifically for garage floors!
Tracy says
The whole room looks quite beautiful. I have been thinking of doing the same with my bathroom floor tiles. I shelled out to retile walls but doing the floor is just too much upheaval and cost. Everyone looks in horror and shakes their head when I talk of painting my floor tiles but I think if you really put the effort into the preparation then it’s got to be worth a try. I am keeping your article on hand to refer to.
And maybe you need to ban outside shoes in the house but that’s quite a common culture in my neck of the woods – three seasons – snow and slush, mud season, dry dust and grit season, back to snow.
Kris Jarrett says
Yes, prep is definitely key! And I would love to totally ban shoes in my house – I try as much as I can but my husband is proving to be difficult to train 🙂
Layah says
How is the paint holding up years later? You have done a great job the bathroom is beautiful.
Kris Jarrett says
It’s held up great – details are in this post: https://www.drivenbydecor.com/does-painted-tile-last/
Rebecca Shalmoni says
Any chance you can link the paint you used? I’m trying to find it online, but am having trouble finding the exact one!
It would be much appreciated 🙂
Kris Jarrett says
I don’t think it’s available for purchase online because it has to be tinted to the color you want but any local Benjamin Moore dealer should carry it!
Tamara Harrison says
Thank You! I really enjoyed how you wrote this. Honestly, I usually just browse over these type of articles. But I actually read yours and that means I will be using your guide for my entry tile, bathroom tile, and kitchen tile. The kitchen tile I may have to touch up more often. But… it will be easier than chipping and tearing up all that tile. Thank You Again.
Alice Pax says
I was looking for a post on how to paint a bathroom floor.
I just love your blog. Your bathroom is beautiful and the directions were so simple!
THANK YOU!!!
Susan Mohr says
I am having my tub and surround reglazed in a couple of weeks and have been contemplating replacing the bathroom tile, too, but having a hard time finding a contractor that isn’t booked up, plus cringe at the inconvenience of the mess of removing the old tile, and the toilet being out of commission for days! Ran across this blog and now I know how to make the old tile look like new! We do have radiant heat in the floor, but I actually think that will be a plus if I wait until Fall to paint the tile, as it should enhance drying time. Also thinking of doing a stencil design on these 8X8 tiles. I’m thinking a little pattern can hide any imperfections from wear and tear. My husband will be away in Sept for a 2 week hunting trip, the perfect time for this project. And, yes, the heat may be on by then, as we live in Wisconsin! : ) Thanks so much for a great “how-to” blog!!
Kris Jarrett says
So glad you found it helpful Susan! And I think a pattern would look beautiful!
Becky says
Absolutely stunning makeover. You have inspired me to paint my downstairs bathroom tile floor. I eventually want to put vinyl wood down over it– my whole first floor is tiled, like one big airport landing strip. BLECH. So if the painting doesn’t turn out as pretty as yours, I won’t freak out too much – knowing it will get covered next year anyway. Thank you for inspiring me!
Kris Jarrett says
That’s exactly what gave me the courage to do mine – I was planning on changing out my bathroom floor in a few years so knew if it was a fail, it wasn’t the end of the world. I’ve been so pleasantly surprised by how well it’s held up!
Debbie says
Looks amazing! I really want to paint the ugly beige tile in my only bathroom. Since I only have one bathroom, how long would I need to wait before showering? Is this even an option? Thanks for your help!
Kris Jarrett says
It really depends upon how humid it is when you paint and how much air circulation your room gets. I would give it a minimum of a few days even under ideal conditions.
Eliza says
Hi Kris,
Beautiful bathroom! Thank you very much for sharing all the necessary information to ‘Get it Done’. I’m so glad I found your post and look forward to receiving your posts, in the meantime….I’ll get on the tile floor, LOL.
Lisa Kraus says
Did you paint same color in grout spaces? It looks great! I want to do this to my kitchen floor. Thank you so much! Not sure if I need to do any to the grout
Kris Jarrett says
Yes, I painted the entire floor including the grout.
Barbara Wall says
cool…good job!
Tam says
Looks good!
Pat says
Was it as hard to paint the wall tile
Kris Jarrett says
I didn’t paint the wall tile – only the floors. I would imagine you could paint wall tile using the same steps I did on the floor but I haven’t tried it myself. I would also hesitate to paint tile in the shower – not sure how that would hold up.
Ivana says
Thank you for putting your experience into words and images. Very helpful! I would like this done to the tiles around our fireplace. I would like to remove the glossiness and apply a flat or matte paint in a dark brown or black to match the frame and the mantel. Also, I’d like if the grout between the tiles is in the same color as the tile if at all possible. Any advise you might have for me? I am a little worried about cleaning the tile after being sanded due to the hardwood floor around the tile.
Thank you again
Kris Jarrett says
If you’re painting tile around a fireplace, you’d want to specifically use a paint that can hold up to high temperatures such as Rustoleum High Heat.
Paulette says
Love it
Terri Galloway says
Hi! Thank you for this detailed, step-by-step blog of painting your bathroom ceramic tile floor. I am very interested in repainting ours, SOON!! LOL One question/concern please: Did the primer and/or paint have something in it to help prevent slipping when floor is wet?
Thank you again!
Terri
Sara says
Hi, I found your tutorial because we are going to paint the tile in our bathroom, but I’m wondering about your medicine cabinet/mirror. Do you replace the entire medicine cabinet, or just remove the mirror and put the new mirror on? We have an old medicine cabinet and we aren’t quite sure how to upgrade it when we do this face lift!
Elena Gonzalez says
Hi, I’m trying to find the Benjamin Moore floor paint you used but can’t find it online. Where/how did you purchase it? Thank you
Walt says
Do you find the floor to be slippery?
Liza Coyne says
Hi! I followed your post and my bathroom turned out amazingggg!!! One thing, I used the BM Patio paint you suggested and it still (1 month later) feels tacky when wet. Did you ever experience this? Do you think putting a polyurethane on top would solve this?
Thanks,
Liza
Karen says
I love what you did! It’s absolutely gorgeous! My only problem is I want to do my kitchen floor with alternating black and white squares and I couldn’t not walk on it for two days! ?
Tricia Wenborne says
I would love to do this to similar tiles in my kitchen which is quite large but worry about getting to the sink and cooker whilst it is hardening. I cant think of any way round this. Yours looks great.
Christine says
I love the bathroom floor you did!!
Great job!
Christy says
The tile in the “before” picture does not look the same as the red tile that was painted. Was the smaller tile in the “before” picture replaced with the red tile which was then painted?
Christy says
I think the tile in the “before” picture is actually the rug and the red tile that was painted is underneath the rug – correct? Thanks!
Heather says
I LOVE this idea! I would like to try this in my bathroom. The house was built in the mid 70’s & has NEVER been updated, its scary yellow, brown & green!!! The bathroom is a jack & jill style. I pulled up the nasty carpet, yes I said carpet, & found tile. The tiles are small with wide grout lines. It’s a mosaic of small tiles measuring from 1’x1′ to 3’x3′, with some square some rectangular. Would this technique work on a floor like that? Do you think it would look decent? I’m thinking anything would look better at this point.
Vikki says
I used this technique on all my ceramic floors in my Florida home…..
They turned out so good! I am so proud of myself and can’t wait for friends to see my efforts!
Pam says
Hi, this is fantastic! I want to do the same, however, the tiles in my bathroom are textured, sort of wavy and uneven. I’d like to stencil them can you advise on this?
Bill says
Question, what grit sand paper did you use? and if you want a high gloss paint, what paint do you buy?
Kris Jarrett says
I sanded the tiles I had with the crud on them with 80 grit, did the whole floor with 120 grit, and then finished off with a quick once-over with a fine 240 grit. And the same Floor & Patio paint that I used has a high gloss option!
Angela says
The new “look” on you bathroom is absolutely gorgeous! I need to do this in the second bathroom. Beige walls, beige tiles yuck ? looked ok in the beginning three yrs ago. But after seeing what you did, I need to do ours and sooner rather that later. Thanks for sharing ??
Angela N.
Stephanie Lynn McCain says
Now this makes more sense. Beautiful.
Carmel says
Be aware of a phenomenon that can happen with latex paint. I followed all of your directions, then put the first coat of Benjamin Moore Floor and Patio paint. After 5 days, the first coat is still tacky. This is called blocking. Just hoping it doesn’t take weeks or months to resolve. Still needs the second coat.
Ignacia says
I´ve done it three times and non of them have worked. Mabye is because my bathrooms are used to shower about 4 times every day and the paint is not exactrly for that? Any idea?
Kris Jarrett says
Did you paint the tile in the shower itself or the tile on the floor? I don’t know if painting tile that’s actually in the shower and being exposed to that much moisture and humidity would work.
Vessela says
Amazing! I am inspired to paint ours.
What kind of roller did you use to achieve smooth finish? Did you use new rollers between coats?
Did you use satin finish?
Thank you.
Kris Jarrett says
I used a 1/4″ nap small roller for a super smooth finish. I didn’t use a new roller between coats – just covered the roller with plastic and stored it in the refrigerator between coats. I used the Low Sheen version of the paint I mentioned.
Jessica says
Sorry if I read over this – did you remove your toilet and sink or just paint around?
Thanks!
Kris Jarrett says
No I just painted around them!
Hanna says
Beautiful. How long did it take to do / paint the bathroom floor? Planning to do mine.
Hanna says
Stunning. Love it.
KAREN says
Hi Kris,
I just “found” you and have already loved your posts/projects. I can really appreciate your knowledge (I’m an Interior Designer) it is so nice that you share it with us all. A big thank you to you!
Anonymous says
You did a fabulous job and it looks amazing. I was thinking of doing this to my bathroom floor, but after finding out about the dry time I dont think it would work for me since it’s the only bathroom. Unless there’s a way around it.
Marie says
That’s a fabulous job you did. I’m just concerned that it has actually lasted? Did it as I’m thinking of doing the same thing in our downstairs toilet…..
Alex says
I have the same question, how is it holding up?
Kris Jarrett says
This follow-up post has all the details! https://www.drivenbydecor.com/does-painted-tile-last/
Amy G says
Kris, so excited to try this — I think I am going to go the stencil route possibly. I initially planned to do vinyl peel and stick tiles, but they were really expensive. There had to be a better option for a basement bathroom — here it is!
Kemah says
Just simply beautiful! I googled painting ceramic tile floors and found your site. So glad that I did.
I’m contemplating doing my kitchen floors. We live on a ranch, sandy soil, dogs and a high traffic area. Eventually, we will replace the floors with hardwood, but until then, I just can’t stand these 12×12 brownish tiles. Ugh! Lol our entire house is a 1993 ranch house, great bones, but dated!
Looking forward to seeing more of your DIY projects. Thank you!
Keeli says
Is it still holding up after almost 3 years?
Carol says
You’ve definitely inspired me!!!!!
Wish me luck:)
Thank you.
Li says
Do you think the materials and methods you used for the floor work for bathroom wall tiles?
Kris Jarrett says
I think they would work for wall tiles that are on the walls in the bathroom itself but I’m not sure if it would hold up on tile on the wall in a shower or bathtub because of the extreme moisture.
Tiera says
Thank you for sharing! What brand of paintable caulk do you recommend?
Kris Jarrett says
I like ALEX PLUS caulk!
Tiera says
I greatly appreciate your suggestion. Fingers crossed my project results look as wonderful as yours. Again, thank you!
Cat says
Hi! I know this is an old post but I’m using your tutorial for the exact same project! Did you wait a certain amount of time between stripping the tile and priming, priming and painting, and between coats?
Thanks! I’m just hoping mine turns out half as good as yours!
Kris Jarrett says
After sanding and cleaning the tile, I just waited until it was thoroughly dry before priming. Then I just followed recoat instructions on the primer and paint I used to know how many hours to wait between coats.
Sam says
What’s wit the blue tile? Crazy! Where did that come into play!?
James says
I like it. And Yes seal the paint. It will last longer. Good prime, paint and seal. Thanks for sharing.
Linda says
We are about to change our floors throughout the living room and all the bedrooms,
and I didn’t want to have to change the kitchen floor too, even though I don’t love
the color of the tile in our kitchen. I’m now going to follow your instructions and do what you
did in your bathroom…. I LOVE the color you chose to replace the old color on
the floor and the entire bathroom makeover is perfect.
Rebecca Henry says
Beautiful! What was used to lift the flowers and soap dispenser up off of the pedestal sink? Thank you for sharing all of your amazing ideas and gorgeous designs!
Margi says
Have been getting my 106 year old home ready for sale. But every time I have looked at the floors in my downstairs bath are worn and dated. But the cost to remove and not disturb the wall tile was an insane amount. I’m lucky both baths used pale cream with a mint border. Not at all offensive but the floor – yuck. Once I realized I couldn’t really replace the floor I quit thinking about it and just used lot of bath rugs to cover. Someone mentioned about painting ceramic and the light bulb went off. Found your site, so inspired and it’s going to happen. Soon. Thanks for being so detailed in your descriptions.
Ross says
What a lovely DIY job you have done Kris!
How long it takes for premier and the paint to dry? I am thinking of painting my kitchen floor but we need to use it. Thanks Ross
Roshni says
This is amazing! I’m in the process of purchasing a home with tile throughout the entire downstairs, yikes! I was originally thinking about removing and replacing with hardwood but do you think painting the tiles would work for an entire place? Thanks!
Joan says
Thank you for both these bathroom makeovers…you did a fabulous job.
Anonymous says
love the ideas, I want tobtry this myself.
Tanya B says
Hi! Thank you so much for sharing this, make me think redoing my bathroom is actually doable! Quick question- my tiles aren’t completely flat, the style of tile in my bathroom is slightly indented and raised in area. Would this work for the tile, I’m assuming I would have have to paint sure paint doesn’t build up in the indented parts?
Catharine says
Can you paint kitchen tiles?
Angelos Kokkidis says
Simply impressive!
Caroline says
Well done on the tiles ime going to do my kitchen floor tiles shortly done the cabinets now for the floor so your tips are great and very helpfull thanks for sharing
Peter DIYPD says
Hi kris and thanks for sharing!
Great tips. It looks stunning. I’m thinking to paint my kitchen floor tiles I’m guessing is the same procedure. I would like to ask you. Once a year I will pull my washing machine to clean at the back. Do you know if will leave any marks or no .
Thank you!
Kris Jarrett says
I think pulling something as heavy as a washing machine out across painted tile floors would likely leave marks…
Peter DIYPD says
Thank you Kris!
karen says
Beautiful job. What so you clean the floor with? And would be a total nono to clean with.
Ashley A. says
I love it! I really need to do this in my sea foam green 1952 bathroom. 🙂 I appreciate your detailed step-by-step instructions!! One question: did you have to remove the toilet to sand and paint behind it? Thanks!
Peter says
I have recently just painted my bathroom tile floor and I was very skeptical about how easy it was gonna be and I was very surprised. Between the prep work (cleaning, deglazing tiles and tape), premier and two coats of final paint it probably took all about 5 hours total. Total investment was just over $70 and I couldn’t be happier. I would post pictures but not sure if I can on this blog. Honestly it turned out amazing and saved me a ton of money! I used INSLX STIX Premier (2 coasts) and for top coat used INSLX Tough Floor paint (2 coats) – got everything from Benjamin Moore
Palma says
You did a fantastic job! Your color choices are on point. Can you give me some advice? I am staring at my old bathroom floor tiles, 1/2 white and gray ceramic ones with black grout. They have specks of glue from the past owners floor tiles which were pulled up just before I moved in. I have tried everything to get the glue up but nothing works. I think I am pulling out some of the black grout too. Is it possible to fill the grout without pulling up the old grout? Now you have me thinking I should fill inthe grout and paint the floor! 🙂 So glad I found your page!
Joanne says
I’m inspired to try this in our small kid’s bathroom with white tile that is stained in places and seems to be a magnet for dust and hair. I had looked into ways to cover with thick vinyl laminate plank boards but it was an expensive and risky way to go. Thanks for sharing this incredible do-over and the specifics on how to accomplish!
Karen Jarosiewiczz says
Kris,
Thank you for posting. You have given me the courage to paint my tile!!!
Cheers,
Karen
Melissa Areias says
What was the overall cost for doing this?
Stephanie says
Wow. The floor looks great and everything looks so pretty. Great job!!!
Imtiaz Hasan says
Hi looks wonderful. We have bought a house which needs almost everything done to it other than underfloor heating. To save money on retiling we were hoping to paint the living room floor as per your suggestions. Do you think the underfloor heating will have an effect on the paint?
Hope to hear from you.
Thank you
Imtiaz
Sarah says
This looks really good! I’m thinking of doing the same for my kitchen. It goes through more wear and tear as I spend a lot of time there. Would you recommend this solution to give my floors new life?
Diana says
Hello
Just wondering the best way to test for lead in your tiles and if it does have lead, what are you supposed to do? Thank you!
Dee Loera says
I am considering painting over the tile color that I chose as it is too light. Any suggestions on how to do this? So I start from step 1, or go to painting step?
Kris Jarrett says
I would start from step 1!
Stacy says
I”ve searched your blog and IG account and can’t find the answer. What is the gray pain color you used on the tile floors? It’s gorgeous!
Kris Jarrett says
Hi Stacy – the paint color is under step #5 – it’s BM Platinum Gray. I’ve been really happy with it!
Deborah says
Love your post ! Hunting for something I think you wrote on choosing white paint colors
Kris Jarrett says
Hi Deborah – glad you enjoyed the post. I think this is the white paint color post you’re looking for: https://www.drivenbydecor.com/picking-white-paint-color-8-proven/
Maria says
Love your floor tiles I have the wall tiles and want to paint those would I sand them and do like you did the floor tiles
Thanks
Kris Jarrett says
Yes you should be able to do wall tiles the same way using the same steps as the floor!
Yolanda Muniz says
Please I need a list of products you use to paint your bathroom tile Thank you and iam going to use the same color gray that you used THANKS AGAIN🙏
Jared says
This looks great. Will this work on a ceramic tile that has a texture?
Kris Jarrett says
I haven’t tried it but I would think so – if it’s heavily textured you might have to use your paint brush a bit more than I did to get into all of the crevices and irregular surface areas.
BERYL F NEWELL says
What kind of polyurethane did you used? I painted my ceramic tile floor with Dura Max which is really great paint for tile flooring.
Kris Jarrett says
I didn’t add a polyurethane top coat to mine. The porch paint on its own has held up well.
Shannon says
Just WOW!
You did an Incredible Job!
And with your knowledge, someday soon I’ll brave it and recreate our bathroom ❤️
Thank You!
Geri Greco says
Hello.
I loved your info and painting tiles info.
I just finished my daughters small 2/2 bath last week. It looks amazing. I used Zins primer after I sanded, cleaned and used BM low luster porch paint . I left it dry between. Costs for a day. No one walked on the finished floor for 3 days.
It had thin coats. Sadly it feels tacky after a week.
If you have any ideas it would be greatly appreciated. I did not put a poly coat on.
Thank you.,
Kris Jarrett says
Really the only explanation for that is if there wasn’t enough dry time between coats – generally that’s only an issue if you either recoated too soon (which it sounds like you didn’t) or are in a high humidity environment where dry time takes much longer. It typically wouldn’t take this long to not be tacky but hopefully within the next few days it will fully cure.
Janice says
Great job.
Rosanne Newkirk says
Love your style and ideas
Virginia T Fippinger says
Great information. We are Expats now living in Mexicos Yucatan.
We recently purchased our city home in Merida. It has 3 era’s, 1700, 1920s and 1970s.
Tile in 4 bathrooms floor, walls to ceiling. Same with the kitchen.
You may have saved us thousands. Great site
Melissa Crawford says
The bathroom floor looks amazing.
Have you ever painted shower tile? Wondering about the process for that.
Toni says
Ugh, you killed this bathroom’s original charm and character. You took it from adorable to bland. Just AWFL. But thanks for the tile-painting tips!
Alex says
You should really consider not posting something unless it is helpful, interesting, or funny.
Anne says
Hi! I’m following your post and giving my bathroom a total makeover. Question: one or two coats of primer? It looks kinda like you’re saying two coats. Please let me know. Thanks!!!
Evie says
Hi! I am following this tutorial in my entry way. I have a question: I bought some black grout refresh to contrast with my painted tiles. Should I do the grout refresh first or paint first? Then, how long should I let the product cure before doing the next step? I’m not sure if you can help me with this but I thought I would ask. Thank you for your help 🙂
Kris Jarrett says
I’m not sure since I’ve never painted tile where I didn’t also paint the grout. My guess is that it would be best to paint first and then do the grout because trying to paint the tile without getting any on the grout would be pretty difficult!
Melinda says
Everything looks great!
Korilyn Martin says
Wow! You’re came out amazing! I just did mine and am blown away with how easy this process was! Great color choice by the way!!
Judy says
Can I ask you how well your painted floor have held up
Traci says
Hi I came across this post and I’m excited to paint my floor tiles by my front door and in a hallway. My only question/concern now is based on your advice to stay off of it for a few days, I’m wondering if that’s a definite must do? I don’t know if that’s possible due to the location of the tiled floor. Your bathroom looks amazing! I love DIY projects!!
Cat says
This is absolutely just what I was seeking help with for updating my bathroom tile which currently looks dirty even when clean!!! Super amazing results and thank you for all the help on recommending how to go about it! You did an excellent job!
Douglas says
Not sure how I came across this. We’ve needed a change and this is just the change we needed within our budget. Thank you so much for sharing! I wasn’t really aware you could paint tile, but it makes sense with an adhesion paint and patio paint. Will use as many links as I can were applicable. This is very beautiful. I love it.
Elle says
Thank you for sharing this excellent information. The stenciled walls are fabulous. You are so skilled … I thought it was wallpaper print! You’ve given me the confidence to fix my ugly tile floors in the upstairs bath. Thanks again 😉
Rita Clark says
Our bathroom floor is heated. Will it make any difference in the paint?
Kris Jarrett says
For a heated floor, it might be fine to use the same paint as you would otherwise, but I’d consider using a paint that’s rated for use on radiators such as Farrow & Ball paints.
Anonymous says
I love this! I just bought an older home with dated tile. I can’t wait to try this! Thanks for sharing.