Looking for details on how to refinish a table? I’ll walk you through the step by step of how I brought my beat up (but sentimental favorite) end table back to life!
A lot of us have furniture pieces that we can’t part with for sentimental reasons even if we don’t love how they look, right?! And while I’m all about painting wood furniture that you scored at a flea market or on Craigslist, I can’t bring myself to paint old stained wood furniture pieces that hold special meaning.
Case in point… this dark, round side table that’s been sitting in our living room doing nothing but blending into the dark corner since the day we moved in:
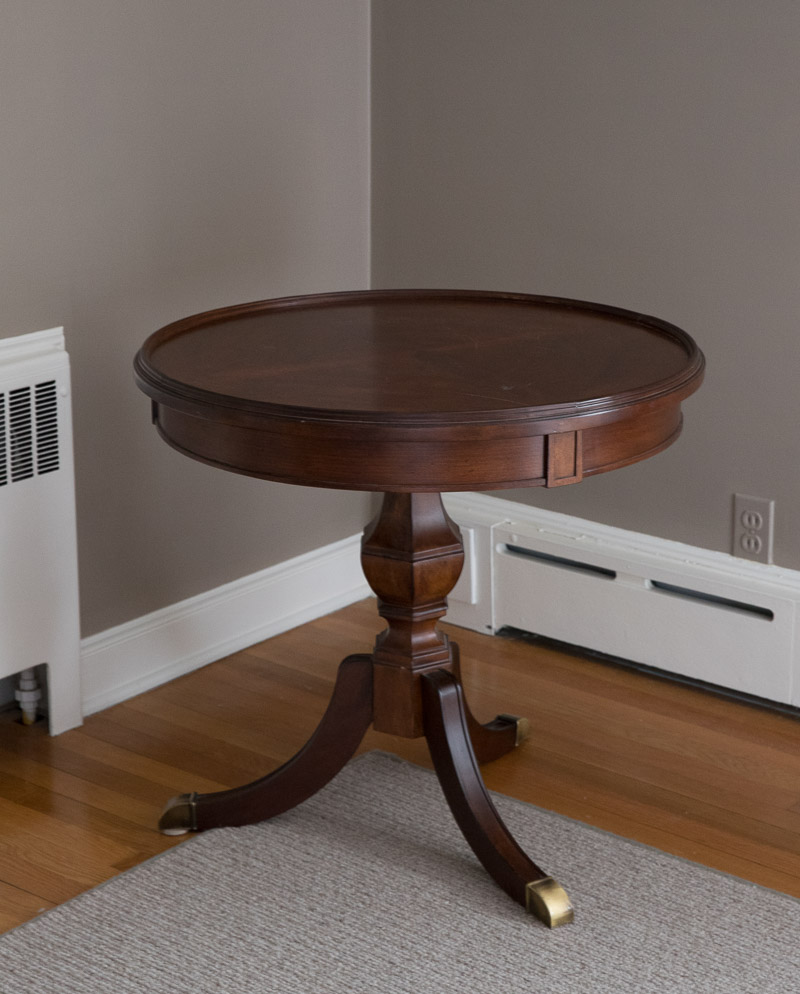
I bought this little lady during my “mahogany phase” about 20 years ago when I thought that dark, reddish mahogany colored wood was where it was at! Kinda funny considering that I steer 100% clear of it when looking at furniture pieces now. From a distance, it looks like she’s in pretty good shape but a closer look reveals lots and lots of scratches:
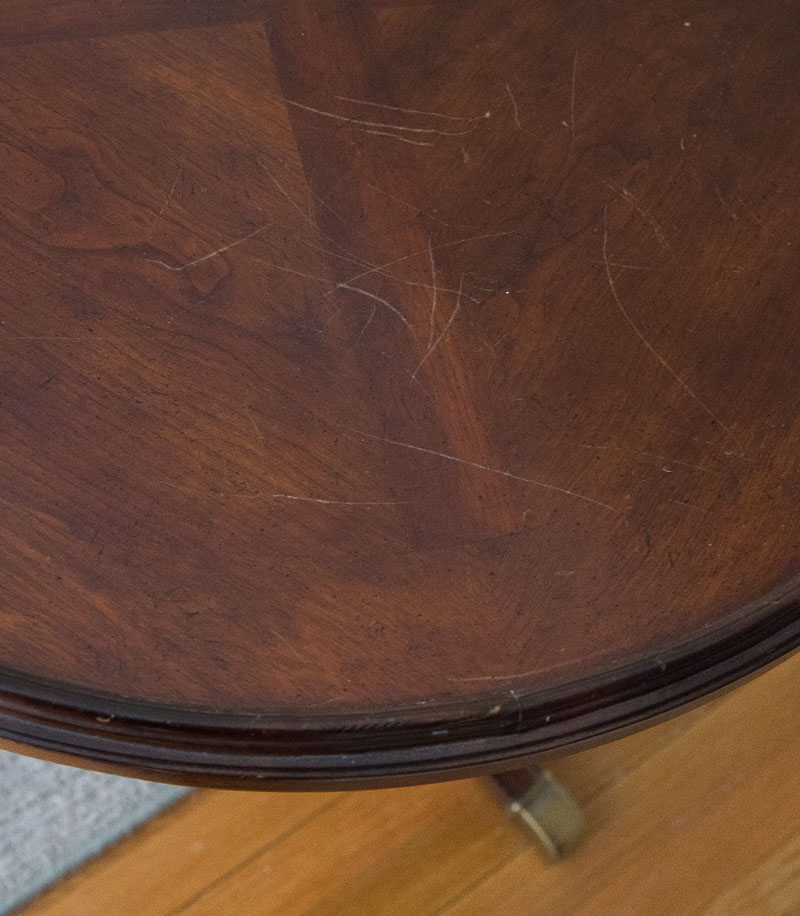
How did it get so scratched? One day when our family was out in our front yard, our previous dog was so upset that she wasn’t part of the action going on out the window that she hopped up on this table and scratched the heck out of it. I was so upset. It was the first nice piece of furniture my husband and I bought together and I vividly remember my excitement in finally buying something that didn’t come from IKEA or as part of a six-piece set from Value City. So needless to say, this piece holds a lot of sentimental value.
Fast forward about 10 years (yes, I’ve held on to this scratched up piece THAT long!!) and her time has come. Using my table I’m showing you step by step how to refinish a table, hopefully giving you the know-how and confidence to tackle a piece of your own.
No more sitting in a dark corner for this not-going-to-be-mahogany-much-longer lady! Here’s how my makeover went down… (Read the directions on the label of every product mentioned before use, including all precaution and disposal info; Post contains affiliate links – for more information, see my disclosure statement {here})
1. Clean the Surface of Your Table
The first step is to get your table free of dirt and grime, which will make it easier to strip. You can do this using a simple mixture of water with a small amount of mild dish. Saturate a sponge with the mixture, wring it out, and then gently scrub! Rinse with a sponge dipped in water and dry with a microfiber cloth.
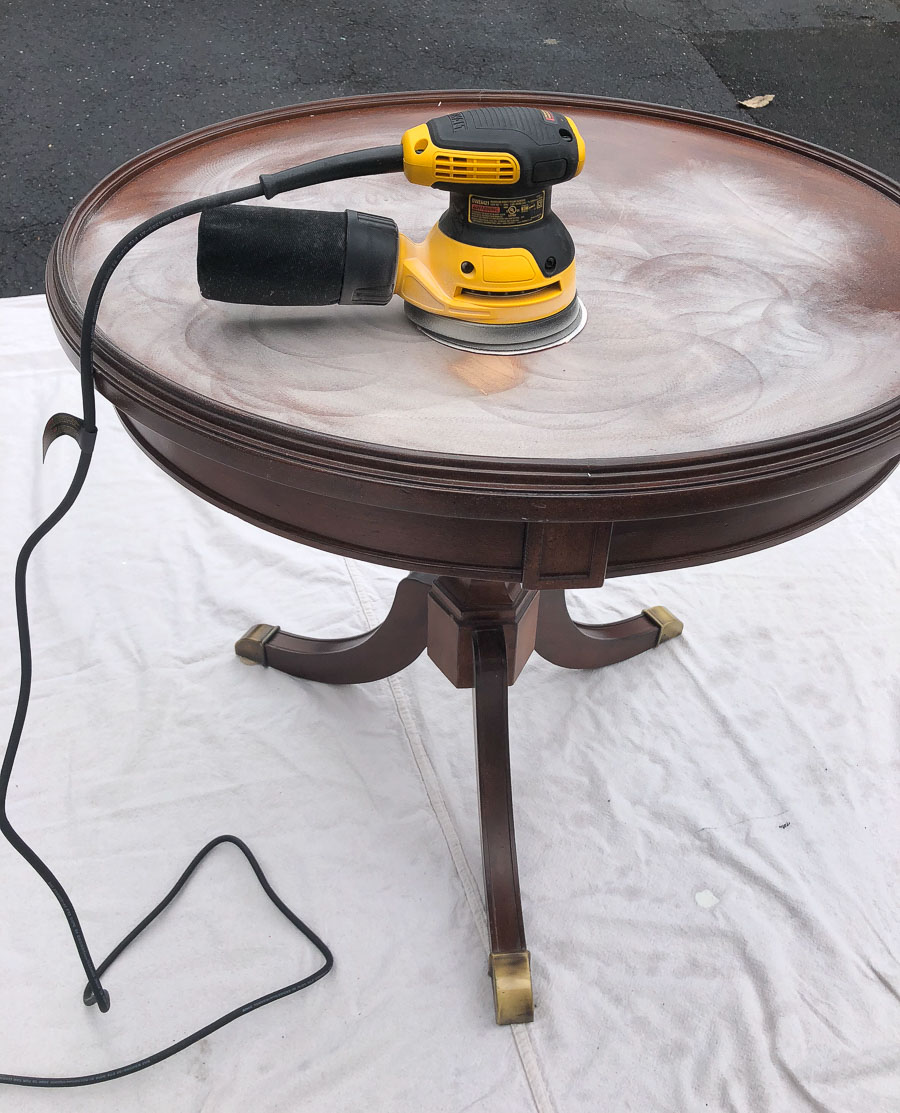
2. Sand Out the Scratches
If your piece has no scratches or marks in the wood that you want to get rid of, you can skip to step three. If you have scratches, let’s take care of those first! There are a few ways to do this – if the scratches are on a flat area of the table, the quickest way to get rid of them is to sand them out with a power sander.
I put my respirator and safety glasses on and used {this orbital sander} on my table. You do need to be careful that you don’t over-sand because for pieces like mine that are wood veneer (a thin top layer of wood on top) and not solid wood, you need to take care to sand evenly and not sand down too far or you may sand all the way through the veneer to the cheap particle board/MDF layer underneath it.
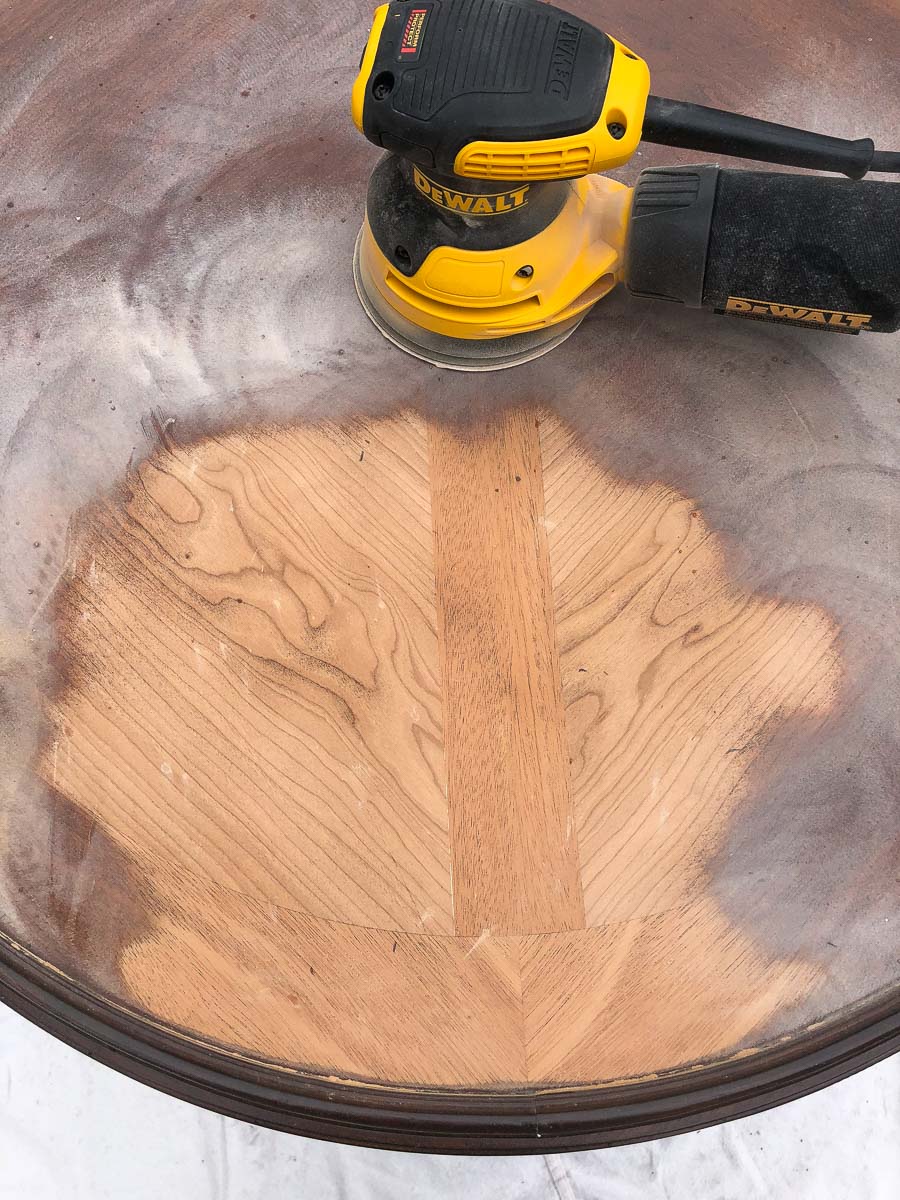
If you’re refinishing an antique or incredibly special piece or if it’s a painted piece that could be lead paint, using a wood stripper and then hand sanding (with appropriate precautions for lead paint) is the better route to go. With my sander, I started off with 150 grit sandpaper and then went down to 220 grit once I started seeing the wood layer underneath:
About half way through sanding the top I started seeing this – who knew such a gorgeous design was hiding underneath that dark stain!
3. Use a Wood Stripper On the Rest
Next it’s time to use a wood stripper on the rest of your table to remove the paint or varnish on its surface. I like using gel wood strippers (my favorite is {this one}) because they cling to all of the little nooks and crannies. Use all safety precautions specified on the wood stripper including using rubber gloves.
You simply apply the stripper, let it sit about 10-15 minutes (I find it works best if you don’t let the stripper start drying before removing) and then remove it. I first remove what I can with a putty knife following the grain of the wood as you remove the stripper and paint/varnish that came off with it. Then use paper towels or old rags to wipe the rest off. Sometimes it can take 2-3 rounds of using wood stripper to get it completely stripped down.

Once you’re done using the wood stripper, rub your table with a rag soaked in mineral spirits to remove any remaining residue. Then using fine sand paper (220-grit paper) or a very fine steel wool, sand any remaining spots that didn’t get completely stripped down to the bare finish. Sanding sponges like {these} work great for areas with lots of detailing like the top rim of my table.
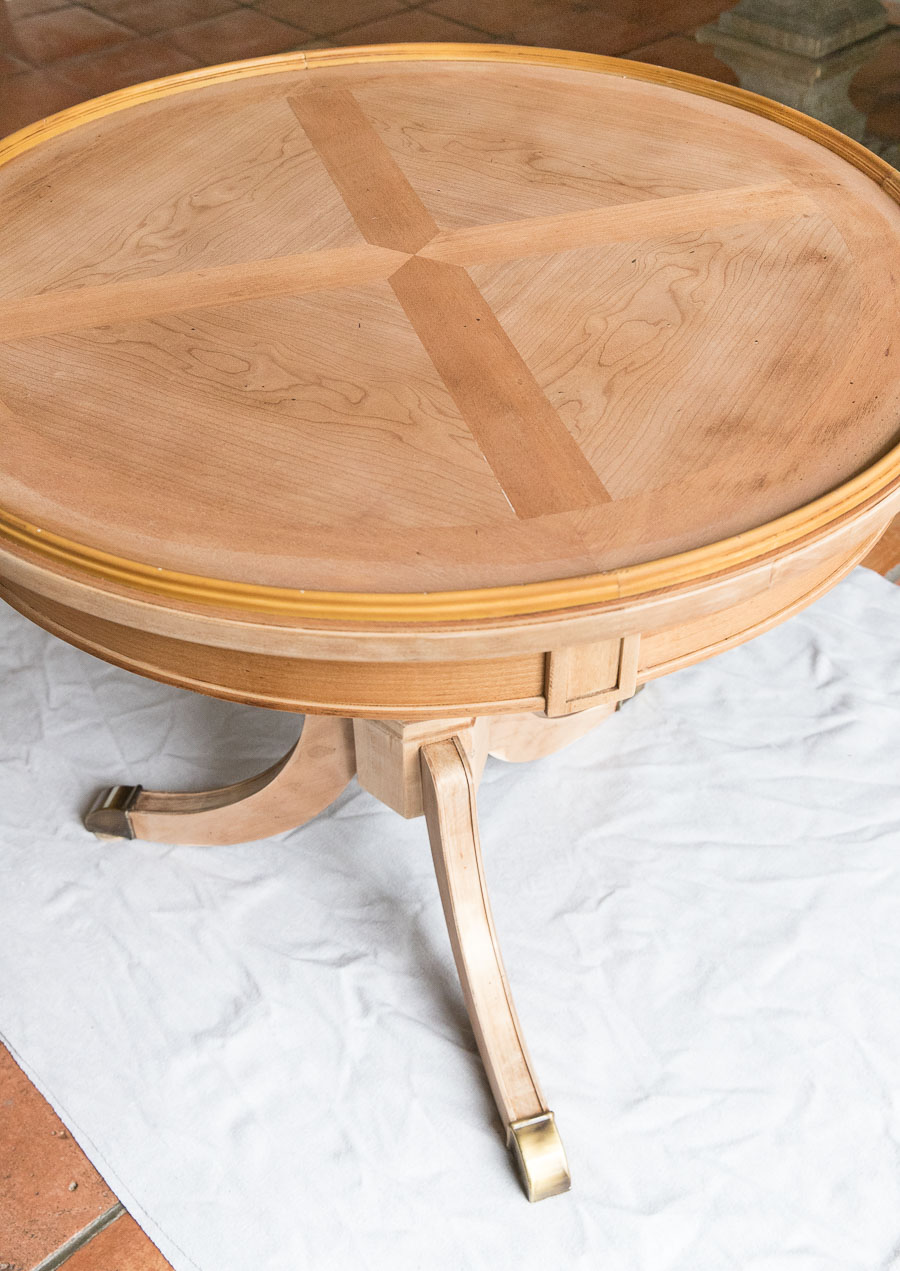
After all of the stripping and sanding, here she is, all bare and ready for stain! Having a blank slate to work with is my favorite thing about refinishing a table!
4. Apply a Pre-Stain Wood Conditioner
Before applying stain, a pre-stain wood conditioner is a must-do – it prevents streaking and blotching by evening out the absorption of the stain. After using a tack cloth to remove any residual dust, I used {this Minwax conditioner} that prepares wood for oil-based stains (if you’re using a water-based stain, you’d want to use {this Minwax conditioner}).
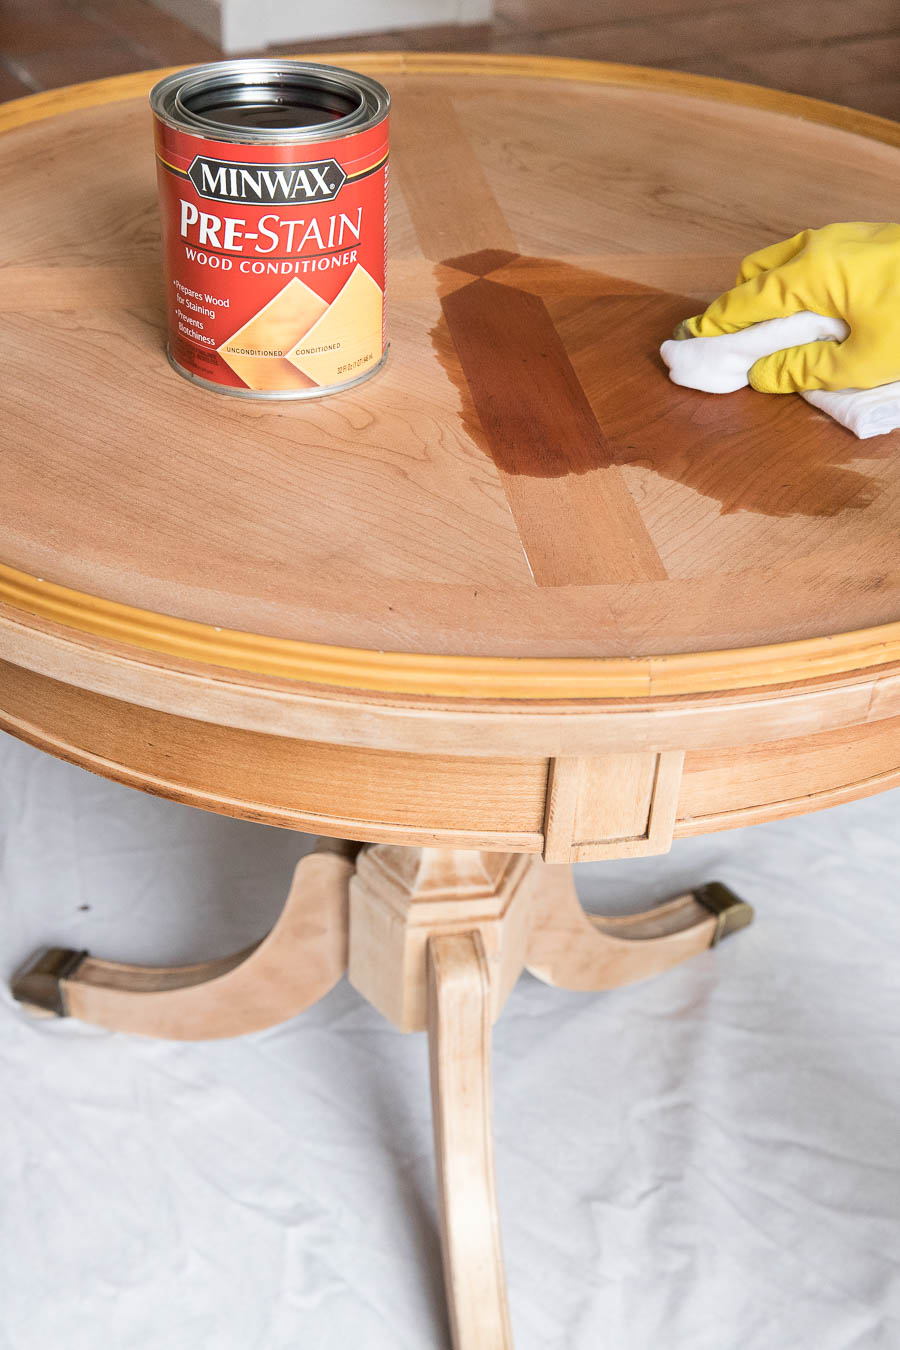
I applied it with a cloth (you can also use a brush) and then waited about ten minutes before going over it with a clean rag to remove any excess.
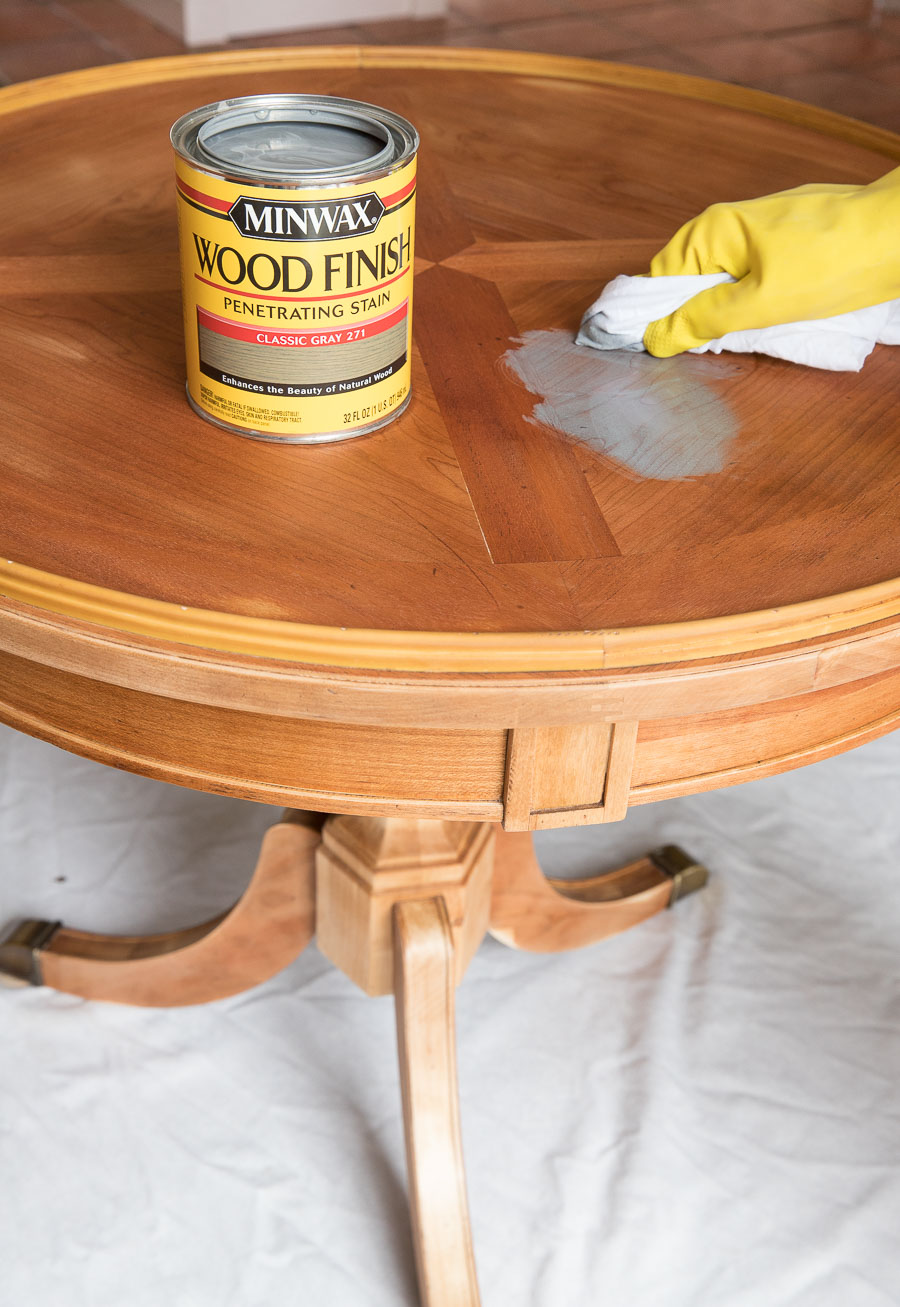
5. Choose & Apply the Stain
Here’s where the magic happens with refinishing a table – the stain! But before giving the how-to, let’s talk about choosing your stain. Stains are going to look different depending on (1) the type of wood you’re using it on, (2) how long you let the stain sit before wiping off the excess, and (3) how many coats of stain you apply. If you can, it’s always a good idea to test your stain out in a hidden spot before applying it to your whole piece.
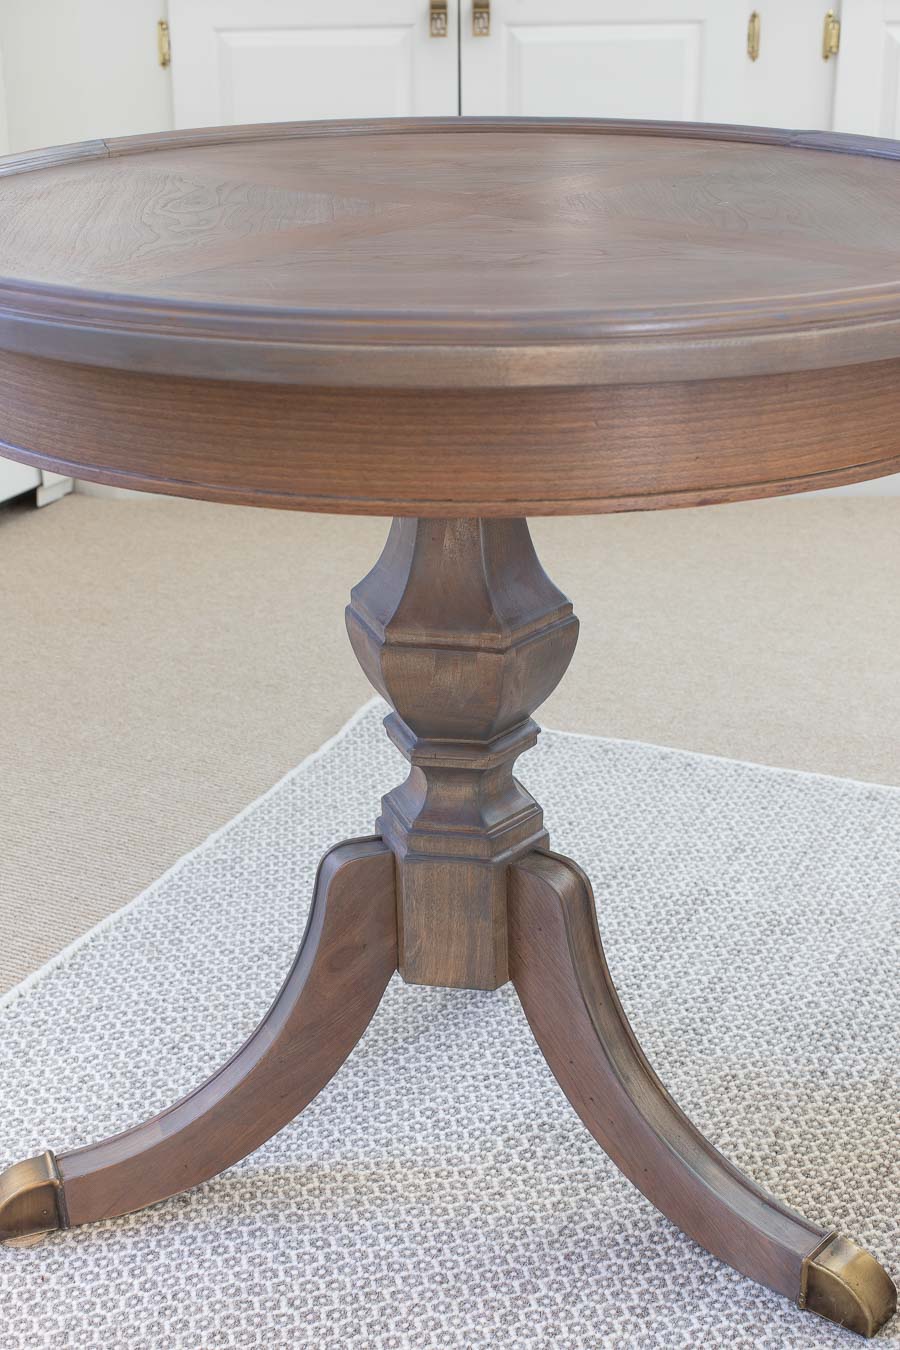
In my case, I tested it out on the underside of one of my table legs. I actually tested a few different stains and also a few mixes of stains (which you can totally do as long as you’re mixing oil-based stain with oil-based stain and water-based with water-based). I ended up liking Minwax’s Classic Gray Wood Finish the best – it’s beautiful!
I applied the stain about 15 minutes after applying the conditioner (you can apply it up to two hours after conditioning but I personally think it works best when done before the conditioner dries) using a clean cloth in the direction of the wood grain. I was going for a light gray whitewash look so only let the stain sit about five minutes before wiping off the excess with a clean cloth (you can let it penetrate up to 15 minutes if you want a darker color).
Since I was only letting my stain sit for a few minutes, I worked in sections. Here’s what the finish was looking like after staining the top of the table – I was pretty excited about it because it’s EXACTLY the type of finish I was looking for!
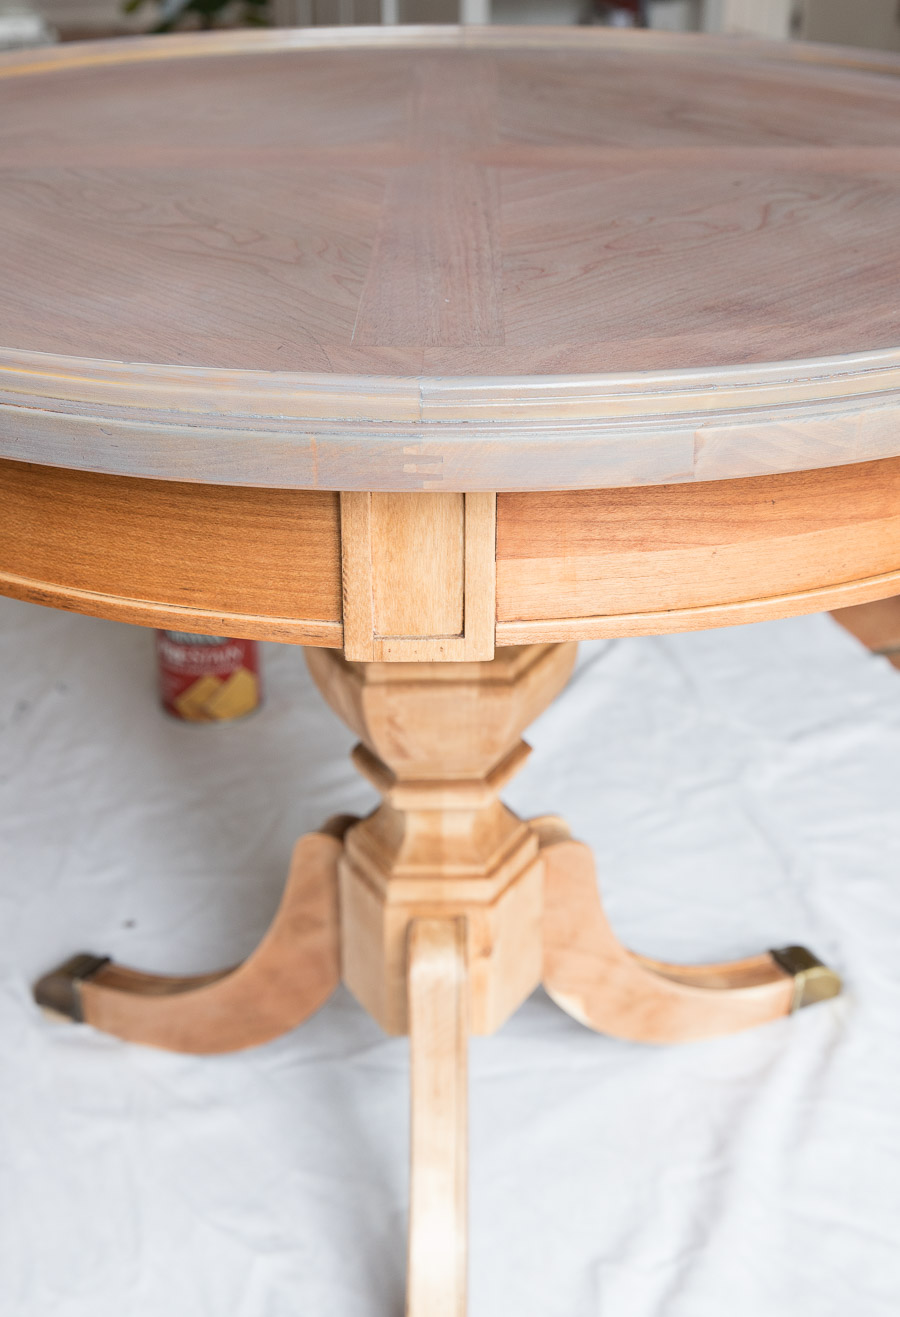
I kept going with my stain around the rest of the table and called it good with just that single coat since I liked the amount of color but you can apply a second coat of stain 4-6 hours later if you want it darker.
6. Apply a Protective Finish
Choosing the right top coat to finish off your project is key. I really love the raw, natural look of wood so was considering finishing mine with {this finishing wax} but I wanted to be able to place a vase on top of it without worrying about water issues so I went with Minwax’s Polycrylic Protective Finish. This is my favorite top coat, especially when covering a light colored stain because it doesn’t yellow like some polyurethane top coats can. And since it’s water-based, it dries fast.
I brushed on one coat with a nylon paint brush and after two hours of drying time, did a light sanding with very fine sand paper, used a tack cloth to remove the dust, and then applied a second coat.
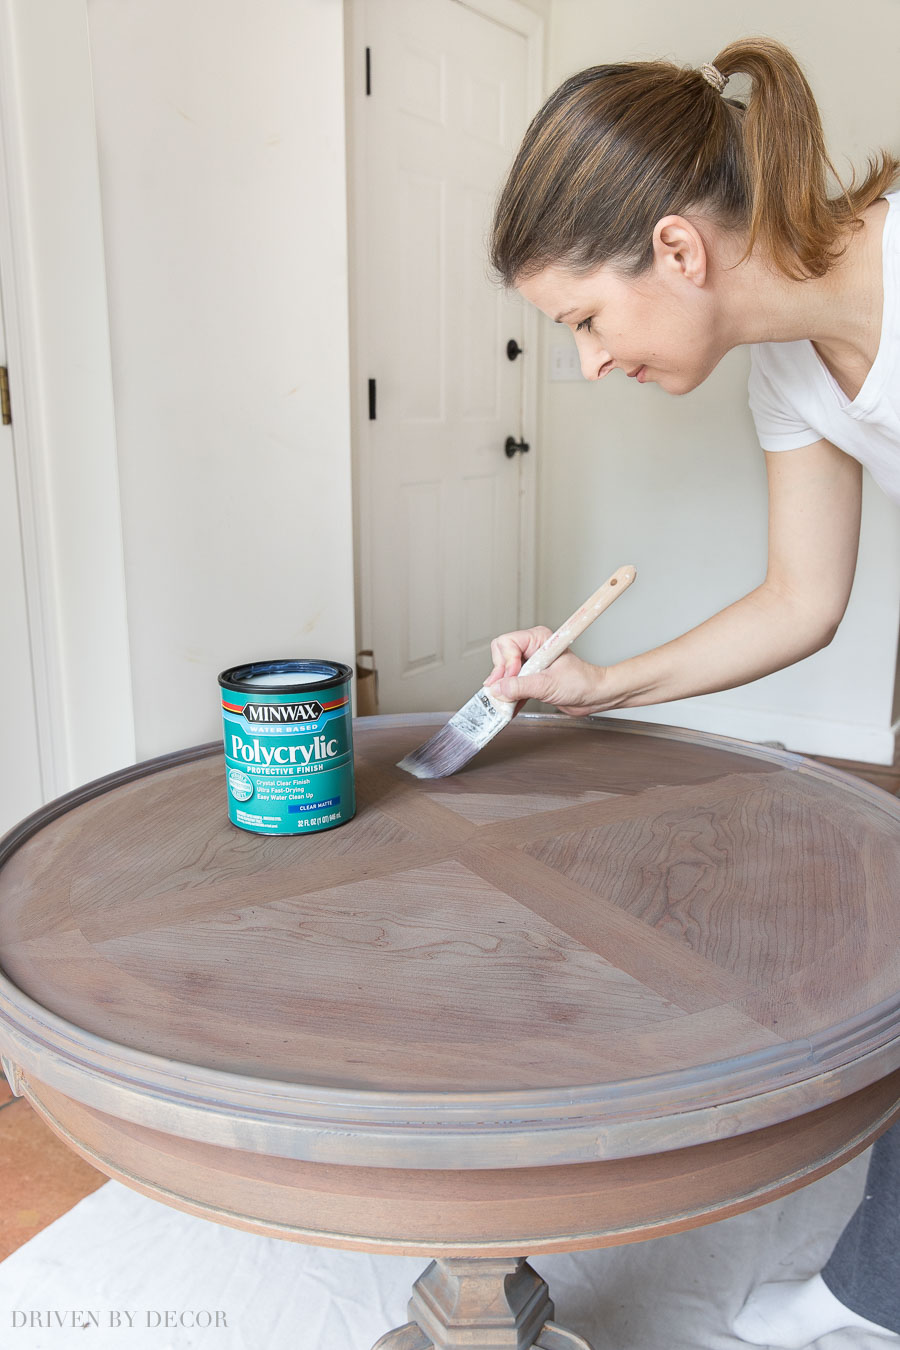
I went with the Matte finish which I had never tried before but it’s perfect! I’m not big on shine and once the Matte Polycrylic was dry, there was virtually no sheen or reflection. Ready to see my newly refinished beauty?? Love!!! It makes me so happy to see this old girl restored and looking gorgeous!
7. Put Your Beautiful Newly Refinished Piece to Use!
As I mentioned, my side table has been living in the corner of our living room and that’s probably where it will eventually end back up since it’s the perfect size and shape for that spot, but since I’m working on painting our living room (more on that later!), for now I’m giving it some time to shine in our family room. I’m so, so happy that this piece that means so much to me has been given a new lease on life!
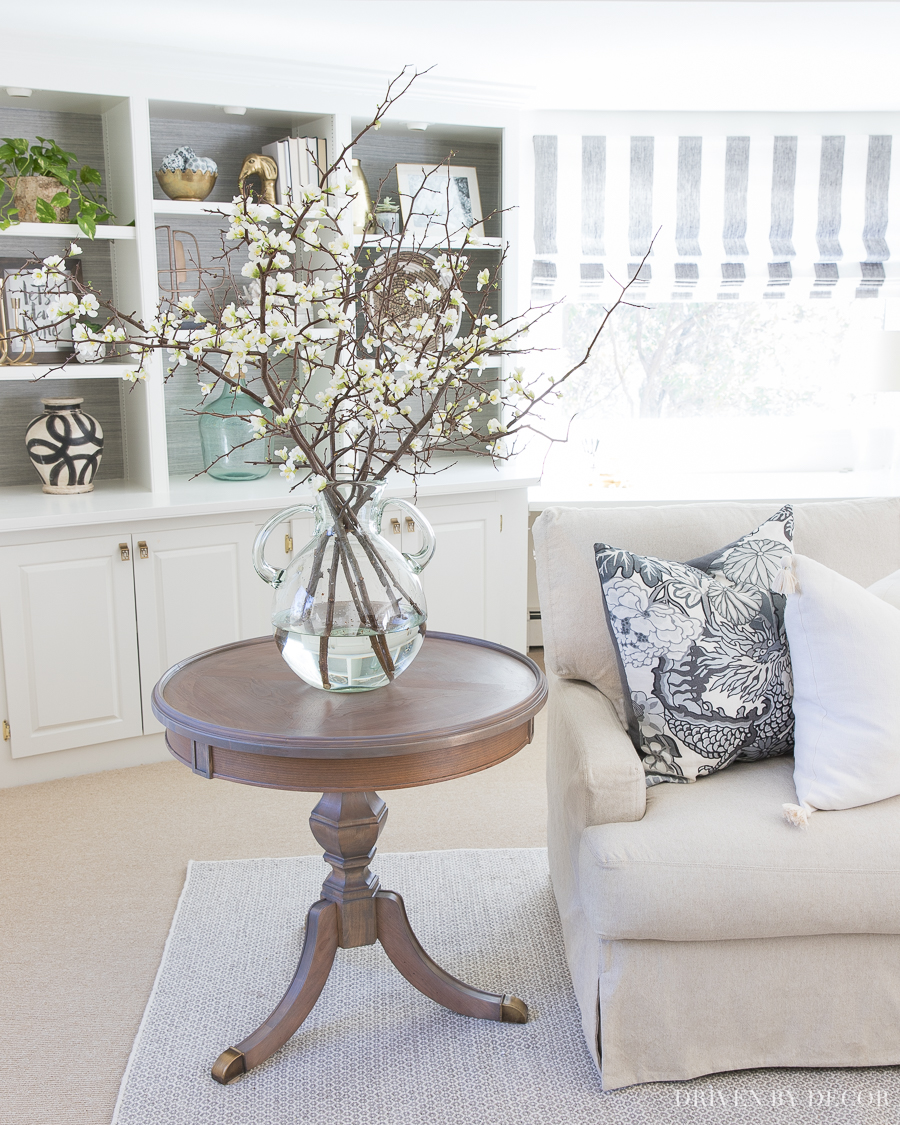

Room sources: Slipcovered sectional | Acrylic coffee table (similar) | Chandelier (satin bronze) | Honeycomb ivory/grey wool rug | Large glass jug vase – HomeGoods
Hopefully this post gave you the info and inspiration you may have needed to refinish a table of your own! Not sure you want to refinish your furniture piece but are instead thinking about painting it? Use the same steps as I did in my post on our painted bathroom vanity.
I’ll see you over on Instagram and Instagram Stories {here} and back on the blog soon!


Lisa says
That’s gorgeous! I love when one can repurpose something that you already have and really enjoy it! I looks beautiful in your lovely home!!
Sofie says
Wow! I even loved it at stage 5! The wood is stunning. Kris, what if your table has built of grime (no scratches). What would you recommend to give it a deep cleaning before moving on? What if there are scratches on the legs? Would you use a sander? And lastly, how long would you say it took start to finish (and how bad was the smell?)
Thanks!
Helen says
Very nice! I have good quality dark cherry kitchen cabinets with beautiful wood grain. Have considered doing something similar to them instead of just painting over which is so common, but it may be way too labor intensive. Has anyone ever done this?
Renae says
Your table is absolutely gorgeous! You did an amazing job.
Gale Weaver says
Are those faux dogwood stems. If so where did you find them?
Love your style!
Carly says
Was the stain water or oil based? The link goes to an oil based stain but I wanted to make sure since the conditioner and protective coat are both water-based.
Kris Jarrett says
Hi Carly – stain I used was oil based. The Minwax protective coat I used can be used over both oil- and water-based stains. And I actually did use an oil-based conditioner – in the post you’ll see a link to the one I used plus a link to the the water-based one too, noting that it was the one to use if you choose water-based instead. Hope that helps!
JL says
This is perfect. I have been using my grandparents sideboard in our living room underneath our tv on the wall for storage and to balance things out. Sadly, it’s gone from a light honey color to a downright orange patina. It’s awful. I fooled around with the idea of chalk paint and even took a class, but it just didn’t ever take off because I never felt like painting it was the right choice. THIS IS! Thanks so much. Now I have a New Year’s project.
Michel Lê says
What impresses me the most is your willingness to go for it, no matter the complexity, difficulty and the amount of elbow grease needed. Your results are always beautiful. What an inspiration. On the cheap note, you can find those sandpaper sponges at DollarTree!
Susan says
It’s a beautiful table even before refinishing!
Pam says
It’s pretty. But I still fail to see the ugly in the previous color. Some people, even designers, still like the darker cherry stains. Yes, clean it, sand it, and restore it. But stain color is a matter of preference. Actually, I liked it the natural color of the wood, as well.
matt says
I love to finish wood and furniture. This step by step is great! The piece which was used is difficult to sand and clean. The final stain however is not attractive. While the designer tried to match the living room, the stain is thin and the wood charactristics show through. This is not a good look in this white room. Hopefully, someone else will rescue the table and find a finish and a more appropriate setting for it.
Sue says
Absolutely gorgeous! Yummy! I recently got rid of a similar table because I didn’t want antiques or vintage furniture with my new sectional, but now I’m second guessing myself. Time to go to hunt for.my tables with a new eye. Thank you so much.
Anne Haubert says
Have you tried Heirloom Traditions Paint? You truly do not have to sand–it’s so easy and your furniture will turn out so beautiful.
Kris Jarrett says
I haven’t but I have used Annie Sloan paint which is another no-sand paint 🙂
Sue says
Wow, beautiful. Great job!!
JAMIE says
Would that Polycrylic work for a dining table (heavy use, multiple times a day)?
Kris Jarrett says
Yes you could use it as a final coat on a dining table too!