Ready to ditch your ugly bi-fold or sliding closet doors? I said goodbye to mine and hello to closet curtains & LOVE my closet’s new look! In this post I’m sharing our closet makeover how-to!
Hands down the most asked questions about our master bedroom have to do with our closet makeover. We replaced our bi-fold closet doors (which I had a mad hatred for!) with a simple rod and closet curtains. I was pretty leery about how this little project would turn out but having curtains instead of doors on our closet has been a game-changer.
It’s not only way better looking than before but also every inch of our closet is now easily accessible which is huge when you’re living in an older house that’s majorly lacking in storage space!

For those of you have been thinking about tackling this project in your own home, I’m sharing the how-to and all of my sources (includes some affiliate links – see my full disclosure statement {here})). Let’s get to it…
Why I Hated My Closet Doors
Wondering what’s so bad about closet doors? In most cases, nothing at all. But our closet doors were bifold doors and when you folded them back to open the closet, the doors took up about ¼ of the closet opening. That made it difficult to see and reach the clothes on those ends.
Also, it drove me nuts that we had to close to the door into our bedroom in order to open the bifold door on the left.
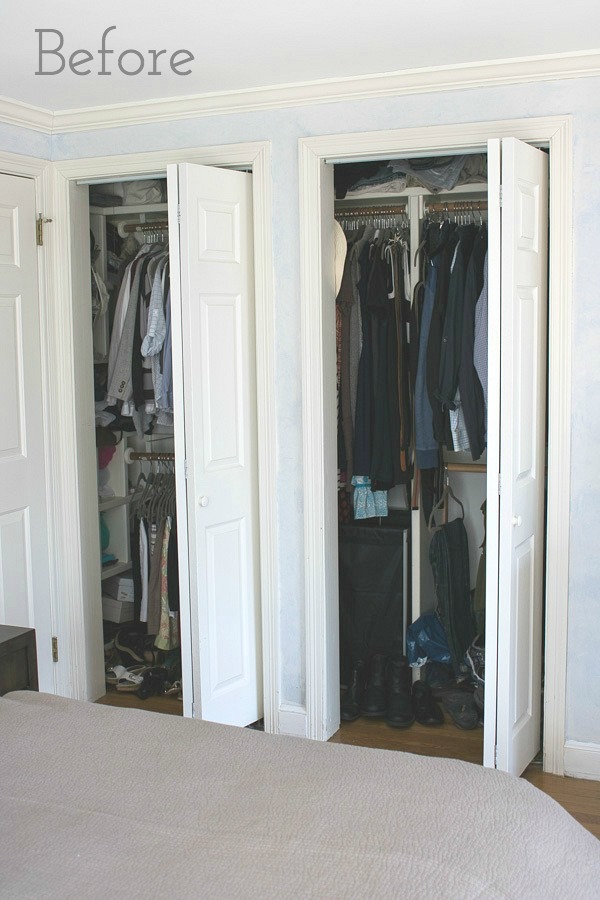
Replacing the bifold doors with full doors wouldn’t solve the issue with the closet doors interfering with our bedroom door. And swapping them out for sliding doors wasn’t the answer either. They’re also a pet peeve of mine since you can only see half of your closet at any one time.
Removing Our Closet Doors
Most closets with bi-fold doors simply have two doors that connect in the middle, in which case you can simply remove both doors and the track they attach to, do a little patch work with wood putty, and be done with it.
Our closet had a center support between the two closet doors that needed to be removed so I called in my contractor to tear that out (after making sure it wasn’t a structural support), add a new header, and patch the hardwood floors. I was already loving how you could access our whole closet!:
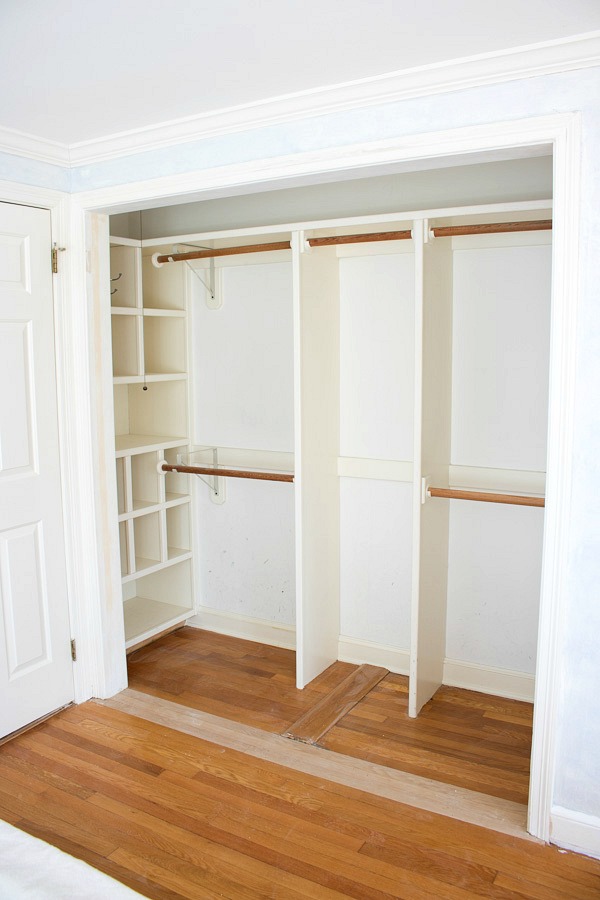
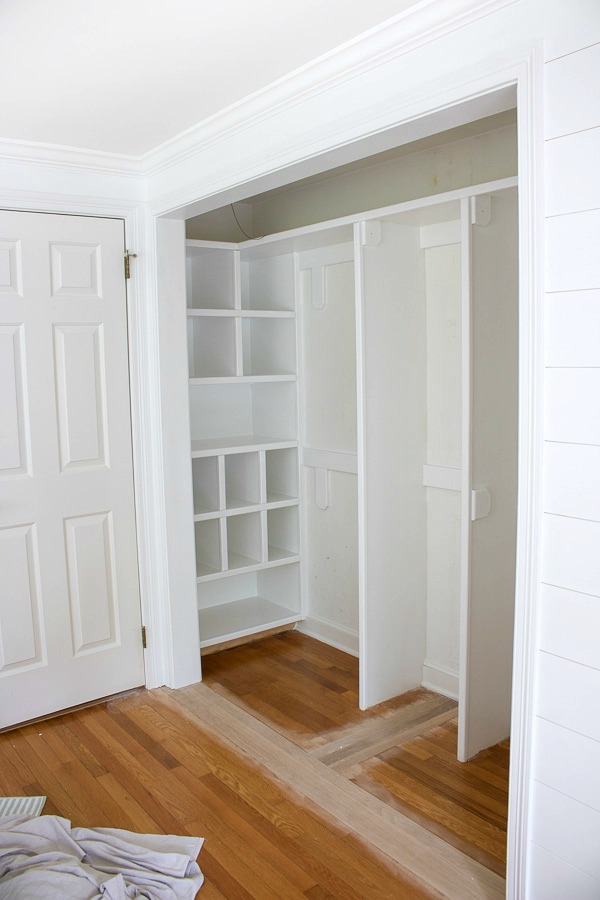
As you can see, there was a weird raised portion of hardwoods in the center of our closet that I ended up having them remove and patch too. Once that was done, I removed all of the previous closet hardware and painted all of that yellowed wood a new crisp white (Farrow & Ball’s All White):
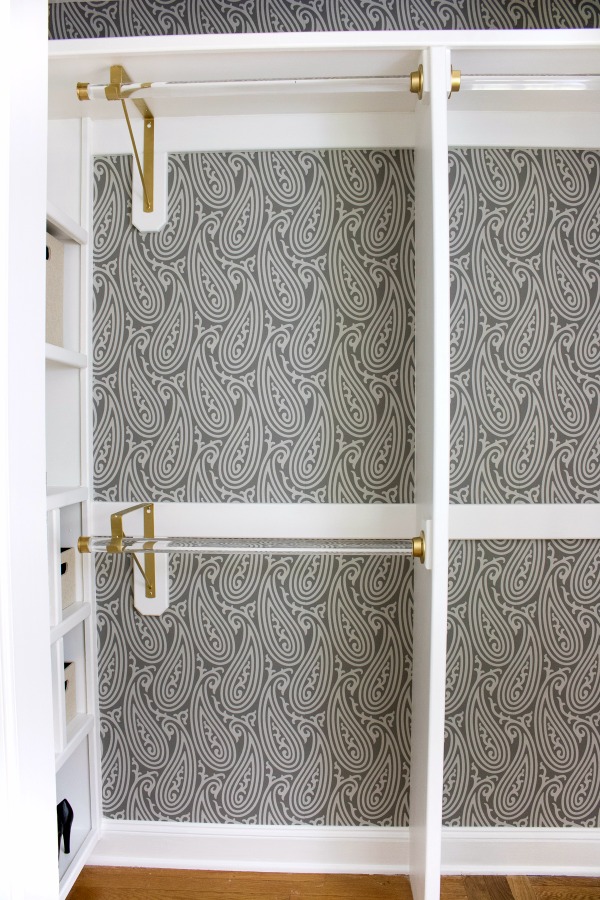
New Closet Rods & Wallpaper
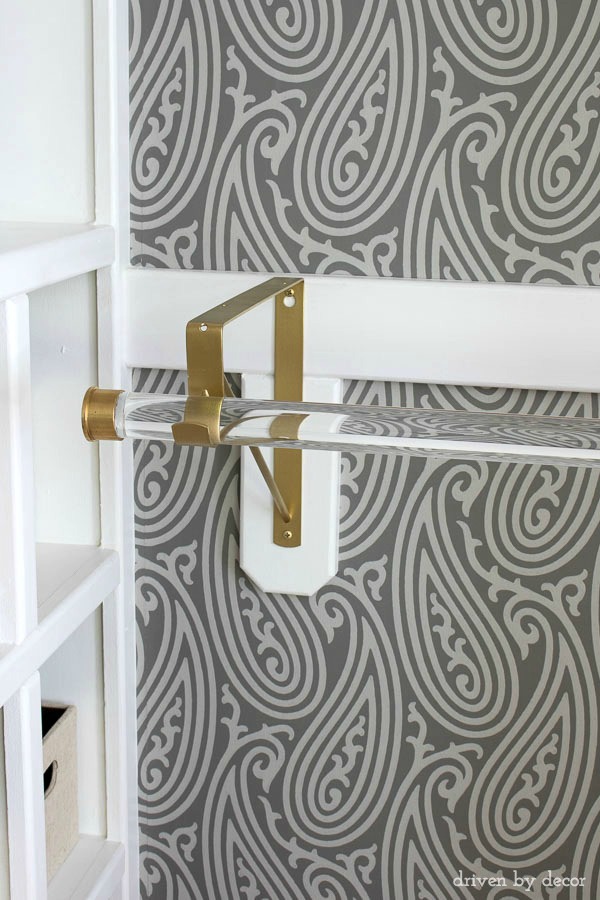
Since I had to take everything out of our closet to knock this closet curtain project out, it was the perfect time to pretty our closet up! I added {this} paisley wallpaper) to the back wall of the closet and new closet rods and hardware.
For the closet rods, I used 1 ¼″ cell cast acrylic rods from Curbell Plastics, which is the same source that I used for the acrylic curtain rods in our home office. They offered the convenience of cutting the rods into the exact length pieces that I needed prior to shipping.
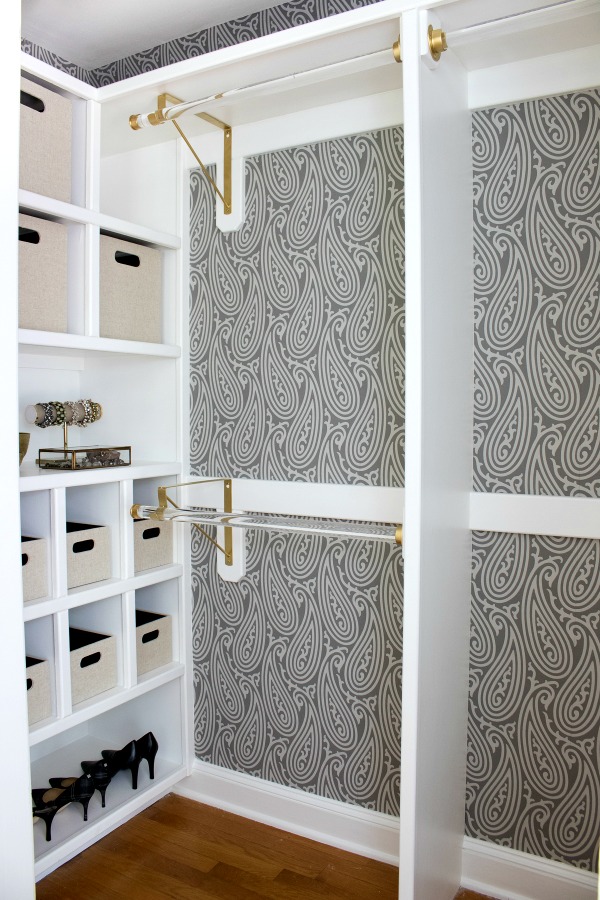
Most of the rod hardware that I used was my old closet hardware that I simply spray painted:
I wanted a finish that would last so I lightly sanded the hardware and sprayed it with primer first, followed by several light coats of spray paint. Be sure to use a respirator while spraying (such as {this one}) and read the application instructions on the spray can because they’re a little different than for most painting jobs in that you need to apply a second coat within 1 hour or after 24 hours.
The specific paints I used are {this spray primer} and {this metallic brass spray paint} (not to be confused with their metallic gold finish that is in an identical can).
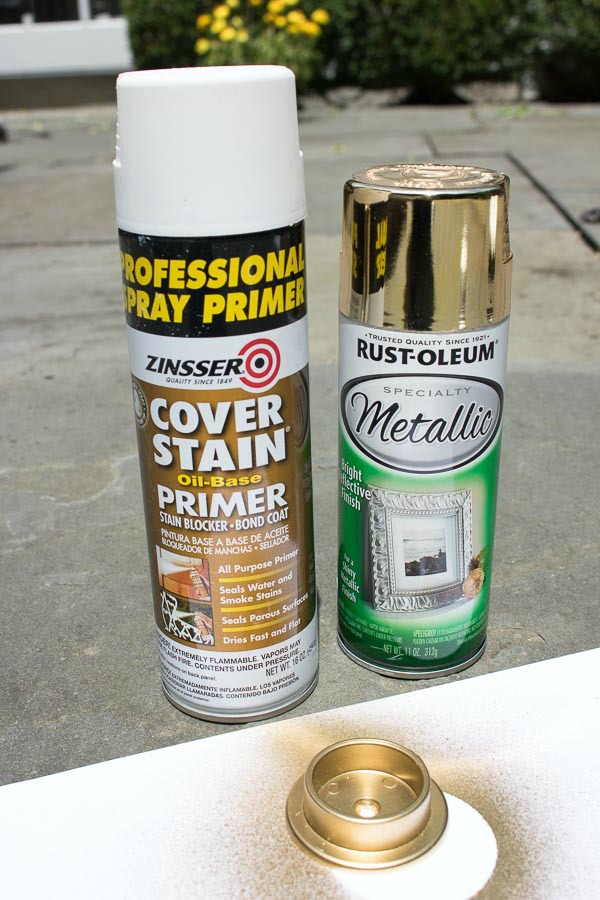
Update! Rustoleum came out with a primer + paint spray in brass that you can find {here} – it allows you to knock out both steps at once!
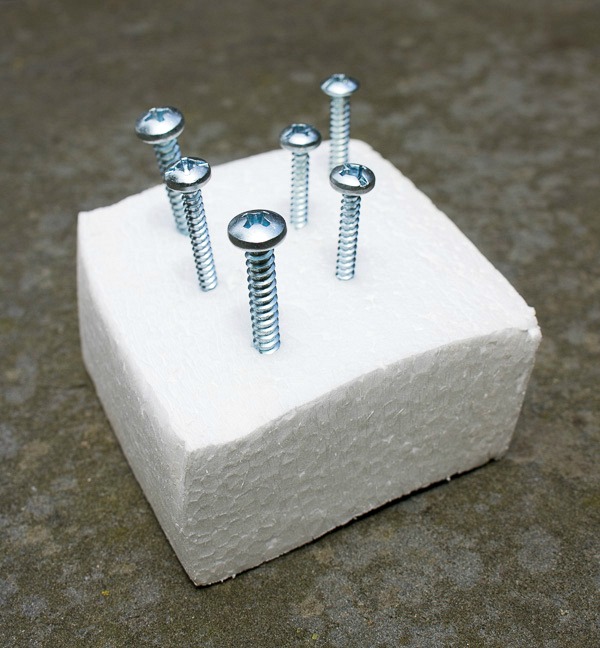
I sprayed everything this way – the rod brackets & flanges, the curtain rod and rings, the curtain rod brackets, and even the screws. My trick for painting the screws is to just stick them in some styrofoam before spraying:
The end caps that is used for the two rod pieces that are held up with brackets were {these 1 ½″ brass end caps} but they were actually too small to fit on the rods (the 1 ½″ measurement refers to the outside diameter – the inside diameter unfortunately is smaller than the 1 ¼″ diameter of my rods) so I hot glue gunned them to the ends. It’s worked fine but I’d try to find something that was a better fit if I do a similar closet in the future.
Adding a Curtain Rod For My Closet Curtains
My closet opening was 70″ wide which is too wide for a lot of curtain rods to span without having to add supports. So I ended up buying a 0.5″ copper plumbing pipe from Lowe’s to get the job done. It works well for my 70″ closet opening with very lightweight drapes but you might need to go with a solid rod if your opening is wider or your drapes are heavier.
I found my curtain rings & clips at Lowe’s too. The hardest thing to find was supports for such a small curtain rod but I eventually found {these brackets} and they worked beautifully.
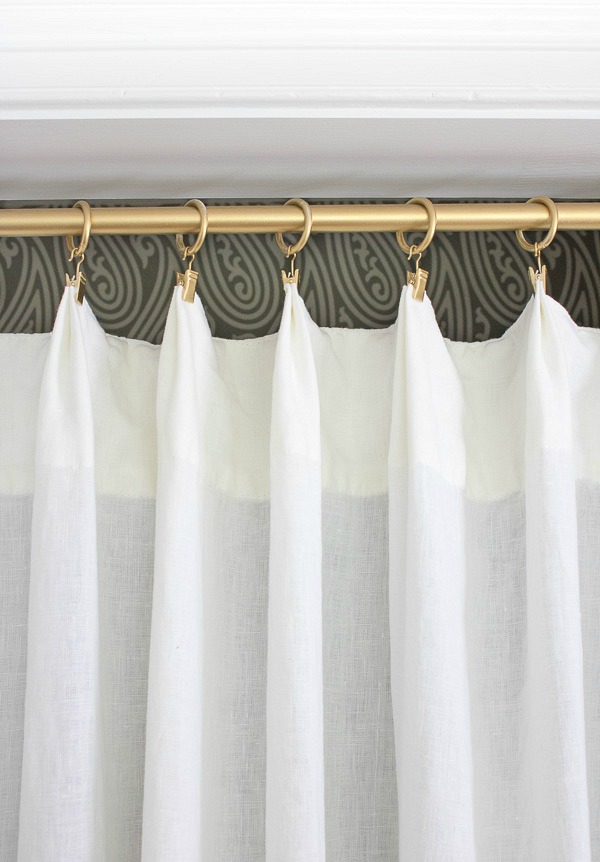
Of course the pipe and brackets were an ugly color so I spray painted them gold just like I had with my other closet hardware.
Choosing Closet Curtains
The closet curtains I used are inexpensive, lightweight AINA linen drapes from IKEA. I actually had a pair of these that I bought for another project and never used. I was all excited about not having to buy new curtains until I realized that they looked quite yellowy against my crisp white walls. I didn’t think that bleaching linen was the best idea so I gave {this Rit laundry treatment} a try and it worked awesomely! You can see the before and after change in color here:
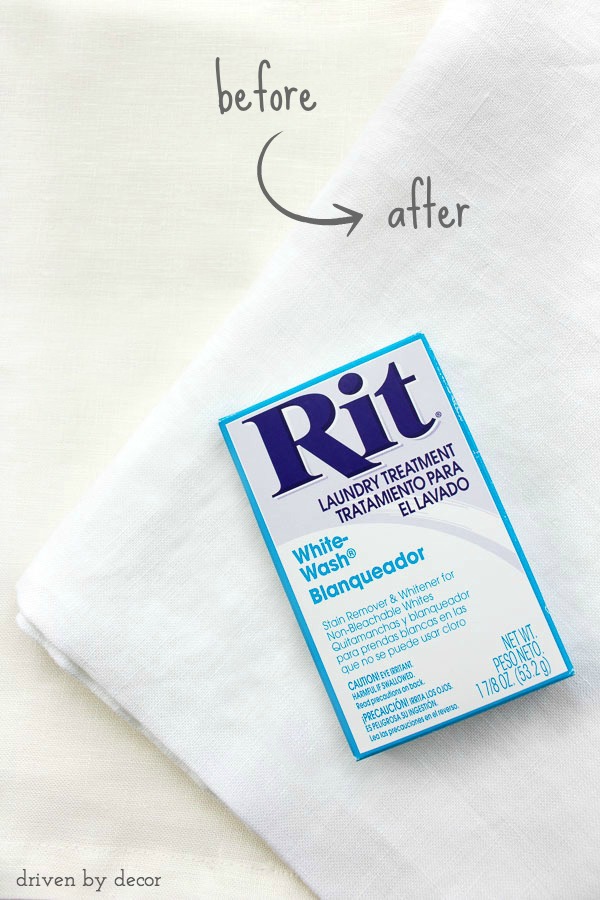
I simply filled up our large basement sink with hot water, added my drapes and the Rit treatment and stirred and soaked them for about ten minutes, after which I threw them in the washer. Super easy and I got the exact shade of white that I wanted. The final step was to simply hem them to the length that I needed (which I did using {this no-sew option}) and then fold little pleats at the top (you can see them in more detail two pics above) and clip the drapes to the cafe rings.
My pair of curtains was wide enough to cover my entire closet opening when I pull them closed:
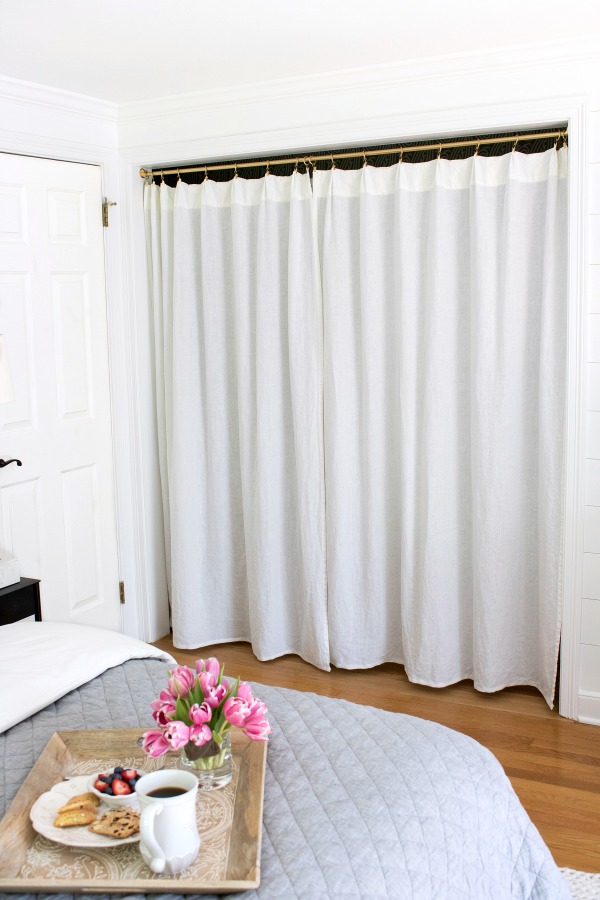
but my closet curtains have actually stayed open since the day I installed them because who minds looking at all of this prettiness?!
And I’ve found that having the wallpaper in the back of the closet has been great motivation for keeping my wardrobe pared down so I can still see enough of that pretty pattern 🙂
Update: Did I Like Having Closet Curtains?
After using our closet with curtains for several years, I can give a resounding YES to the question of whether I liked my closet curtains. I never had any issues with the curtain rod sagging, loved being able to easily access everything in my closet, and I thought it looked great too. I’d do it all over again in a heartbeat!
I hope I answered all of your questions but if I missed any, just leave me a comment and I’ll get back to you! Be sure to also see my post on closet door ideas that has several ideas for making your closet doors more beautiful and functional without spending a ton of money!
Hope you all have a great week!


Lisa says
I can’t wait to do this to our entrance closet and our wardrobe closet. I dont know what it is but my family has always had problems with closet doors. Its the accessibility thats the problem. If its closed they dont use it, if its open they end hanging stuff on the door itself, and it takes up a few feet on either side. Some of us, just can’t have closet doors, and that is okay. Whatever makes you happy right? Sure, it looks nice to have bifold doors but if everyone is avoiding the closet, its a waste of good storage space. I’d rather use curtains, and actually use our closets. In my opinion bifold and other doors are only good for space that is isn’t used on the daily, and to babyproof your home. Babies are grown here, so curtains shall reign lol
Michelle says
Couple of questions. My house is an older house as well. From the pictures it appears like our closets are similar in size. By chance could you share the measurements of your closets and the built in shelves that were there previously. I’m looking into adding some built in like that are in yours into mine. As wells as the lengths of the closet rods?
Kris Jarrett says
Hi Michelle – Unfortunately we recently moved so I no longer have the ability to take measurements of our closet that I featured in this post. 😊
Laila says
We took the bi-fold doors off in our bedroom a few years back and replaced them with curtains. I LOVE the extra room and not fighting with those doors. I’m ready to do it now in our two remaining bedrooms. Just curious what the depth of your closet is. I think it’s a bit roomier than ours.
JulieMS says
We removed a closet’s sliding doors and redid the closet interior but never put doors on. The bedroom door opens against the closet — the same as what you have in the above photo. This really limits the closet door possibilities. Your post is giving me confidence to hang a curtain!
MARIA R STANLEY says
Love it!!! I have closet doors that are dated and off the track in the guest room. It just came to me to do this and found your site. I love it. Can’t wait to get started on it!!!
Katie says
Love the curtain idea! But also love the closet system you have in place. Who makes it?
Kris Jarrett says
Hi Katie – it was actually a custom built closet system (it was there when we moved into the house) and I just swapped out the rods.
Martin says
Another solution is to find curtain hangers that ride in the old rail, or take that rail out and install one designed for curtains. That way the gap between frame and curtain can be smaller.