Our fireplace and built-in shelves looked pretty darn heinous when we bought our house:
Want to save this post?

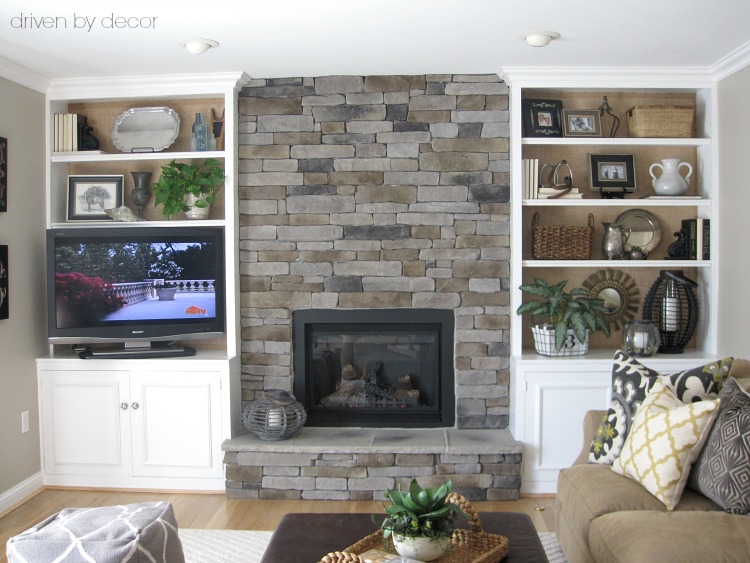
I finished the final step in their transformation and am so excited to share their new look with you:
I am loving the end result and how it has totally transformed the look of our family room! This was a long-term project (emphasis on L-O-N-G) that was done in three phases:
1. Painting the bookcases, trimming them out, and adding new knobs
2. Adding a new gas fireplace insert and installing stone veneer over the brick (see my post on stone fireplace ideas for details)
3. Lining the back of the bookcases with burlap and styling the shelves
Today’s post will walk you through “phase 1” (perhaps the least exciting but definitely the most transforming phase of the project) with posts about the remainder of the project coming later in the week (post includes affiliate links – see my full disclosure statement {here}). As you can see from this “before” photo, the original built-in bookcases had a lot of ugly going on, including wimpy shelves & crown moulding, ’70s-ish wood, and dated brass knobs.

I started by having the crown moulding replaced with more substantial moulding, which was continued around the entire room. Then I had a strip of moulding added to the front of each of the shelves to make them look more substantial as well (my contractor had to shave about ½″ off the back of each shelf to maintain the original shelving depth).

Next I tackled the ugly wood with a simple solution – paint. After lightly sanding all surfaces and wiping away the dust with a tack cloth, I primed with Zinsser Cover-Stain oil base primer, using a paintbrush for the trim and tight spaces and a WhizzFlock 4″ roller (my favorite roller for painting wood!) for the flat surfaces:

I then repeated the process with two coats of white latex enamel paint. Finally, I rollered the top of each shelf with a coat of polyurethane for some extra protection against scrapes and scuffs from the accessories I’d be placing on top. Then I had to do something about the ugly shiny brass knobs on the bottom cabinets. I picked up four of these knobs at Hobby Lobby to replace them:

It’s amazing what a difference some paint, trim, and a few knobs can make!
For more details on the built-in bookcase and fireplace transformation, check out my post on stone fireplace ideas
Thanks for stopping by!


Jonathan says
Looks great! I’m planning a similar project right now. Where did you buy the cabinets from? Are they custom?
Jonathan says
Nevermind, just reread more carefully and saw that you fixed up the one you already had.
michele says
Hi!
What is the name of the stone and manufacture? I have been looking for this kind of style and color tones!
BTW…Your home tour was so fun to visit today, beautifully done!! 🙂 mk
Kris Jarrett says
Hi Michele, Thank you! You can find information about my fireplace stone in this post: https://www.drivenbydecor.com/five-important-decisions-in-designing/
Therisa says
I will be looking up this stone for sure for my fireplace!! Was this an expensive project? I am worried about the price of the stone.
Kris Jarrett says
Hi Therisa! We actually did this project almost ten years ago now so I unfortunately can’t remember the price of the remodel. Stone veneer isn’t cheap but it didn’t take a ton to get the job done either!
Carol says
I just found your site, I really like it. I love that you give tutorials. Have a great night , carol
Anonymous says
What a beautiful job! Maybe there is hope for my 70’s double-side fireplace after all. You certainly have me thinking…Thanks. Lee
Kris @ Driven by Décor says
Thanks for taking the time to leave such a nice comment Lee! Tackle that old fireplace of yours – it can be beautiful!
Anonymous says
I popped over from “Better After” too. I love the new look, great job. Thank you for pointing out the paint roller, I have some trim to work on and will have to give it a try.
Kris @ Driven by Décor says
Thanks for the comment and good luck with your trim work! Be sure and read the directions on the roller packaging – they recommend lightly wetting the roller before use which definitely does make it work better!
Debra Leary says
Hopped over from “Better After” and can’t wait to see the rest of your “how to’s”! We have looked at plenty of snoozy suburban houses that were styled like your “before” and I am sooooo impressed with your “after”! It looks so fresh and lovely. Congrats!
Debra from RusticLodgeStyle.com
Kris @ Driven by Décor says
Thanks so much for the nice comment! Now if only I could finish off the zillion other snoozy aspects of my home… 🙂
Olga@Stardust-Decor&Style says
This is such a great transformation! I always admire the power of paint. Kris, i was wondering if you’re interested in guest posting at my blog Stardust? I host a guest blogger every Friday, so take a look around and shoot me an email. I know my readers would love this!
Love, Olga
Kris @ Driven by Décor says
So nice of you to ask! I will definitely shoot you an e-mail!
Megan Sloan says
Wow! I came over from Better After and that is a great transformation!!!
Kris @ Driven by Décor says
Thanks Megan – I appreciate you stopping in!
Rory Fugerson says
This comment has been removed by the author.