• Skip to primary navigation
  • Skip to main content
  • Skip to primary sidebar
  • Home
  • Home Tour
    • Master Bathroom
    • Kitchen
    • Kitchen Eat-In Area
    • Family Room
    • Living Room
    • Home Office
    • Laundry Room
    • Master Bedroom
    • Craft Room
    • Dining Room
    • Garage
    • Guest Room
    • Guest Bathroom
    • Patio
    • Powder Room
    • Teen Blue & White Bedroom
    • Teen Boho Chic Bedroom
  • Projects
    • Room Remodels
    • DIY Projects
    • Decorating Tips
    • Cleaning
    • Organizing
  • Subscribe
  • Shop My Faves
  • Instagram
  • About
    • Contact
    • Meet Kris
    • FAQs
    • Media
    • Disclosure
    • Privacy Policy

Driven by Decor logo

menu icon
go to homepage
subscribe
search icon
Homepage link
  • Home
  • Home Tour
    • Master Bathroom
    • Kitchen
    • Kitchen Eat-In Area
    • Family Room
    • Living Room
    • Home Office
    • Laundry Room
    • Master Bedroom
    • Craft Room
    • Dining Room
    • Garage
    • Guest Room
    • Guest Bathroom
    • Patio
    • Powder Room
    • Teen Blue & White Bedroom
    • Teen Boho Chic Bedroom
  • Projects
    • Room Remodels
    • DIY Projects
    • Decorating Tips
    • Cleaning
    • Organizing
  • Subscribe
  • Shop My Faves
  • Instagram
  • About
    • Contact
    • Meet Kris
    • FAQs
    • Media
    • Disclosure
    • Privacy Policy
    • Facebook
    • Instagram
    • Pinterest
  • ×

    Updated: Apr 11, 2022 by Kris Jarrett

    DIY Resized Jute Rug (From Standard to Custom!)

    It’s been musical rugs over at our house lately – I thought I had our entry rug all figured out when I placed my new West Elm geometric rug by the front door. But it ended up being a no-go for that spot (I’ll fill you in on why in a minute) so I decided that I was going to bite the bullet and go custom to get the 4′ x 5′ size that I needed for my odd little entry space. But after going to a few carpet and rug stores, I realized that the only carpets that I could get cut to size and bound without breaking the bank are all kinda ugly. So what’s a girl to do but take what she’s already got (a chunky 4 x 6 jute rug) and do a little DIY to make it the custom size that’s just right for the space:

    Driven by Decor - Jute Rug in Foyer

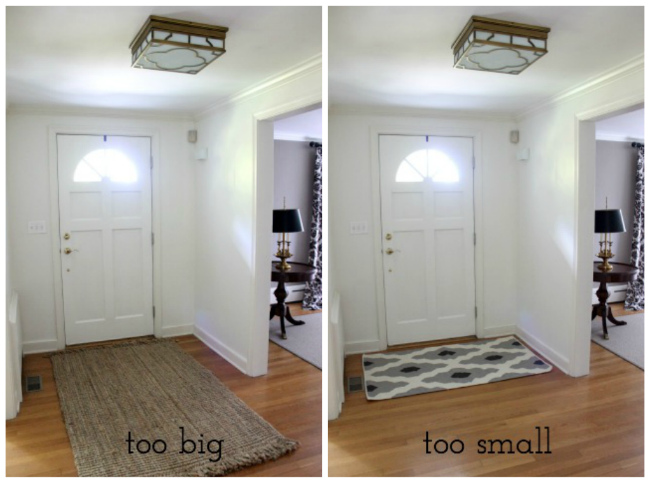
    Here’s how it all went down (post includes affiliate links; full disclosure statement available {here}). The 4 x 6 jute rug that I started with (you can find it {here}) worked perfectly in the entry of our old house but it wouldn’t fit widthwise in our new one so I had it running lengthwise down the hall. It was too big. So recently I replaced it with a 3 x 5 West Elm wool dhurrie rug that I loved but after living with it for a while I decided that it was too small (I know it doesn’t really look it in the picture but trust me that in ‘real life’ the size looked off).

    Foyer rug options

    What was the “just right” size? 4 x 5. Hmm, if only I could get rid of a foot of my 4 x 6 rug….

    Rug that fits foyer

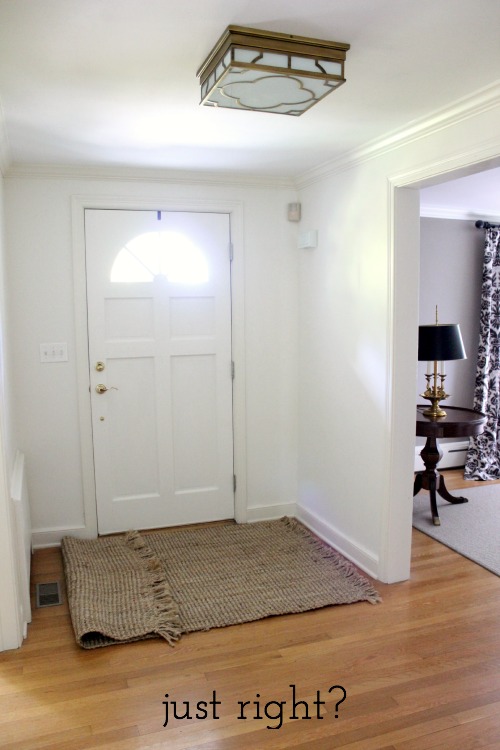
    That’s when I had the idea of doing a DIY resizing of my jute rug. A few hours later I said hello to my new 4 x 5 chunky beauty!:

    Driven by Decor - DIY Resized Jute Rug

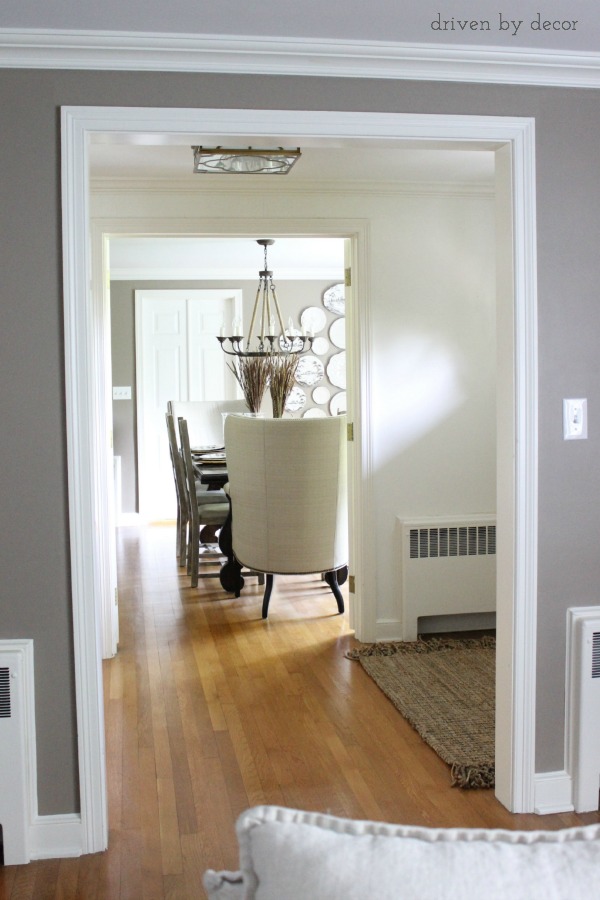
    And goodbye to the old size that annoyingly overlapped the doorways to the living and dining rooms:

    Driven by Decor View of Dining Room Across Foyer

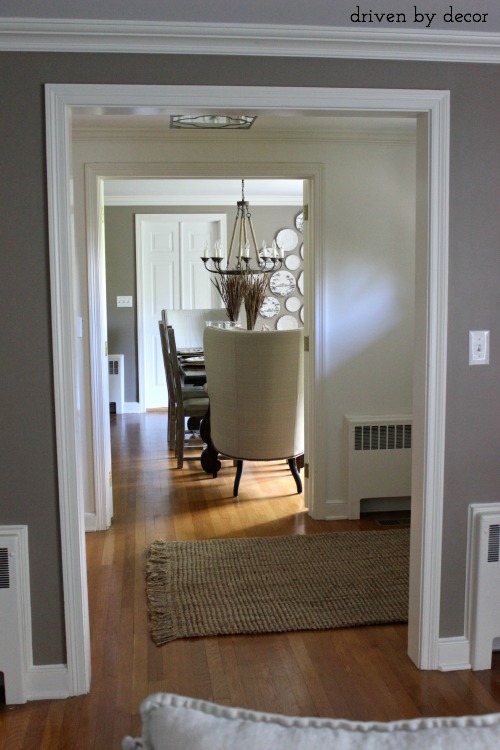
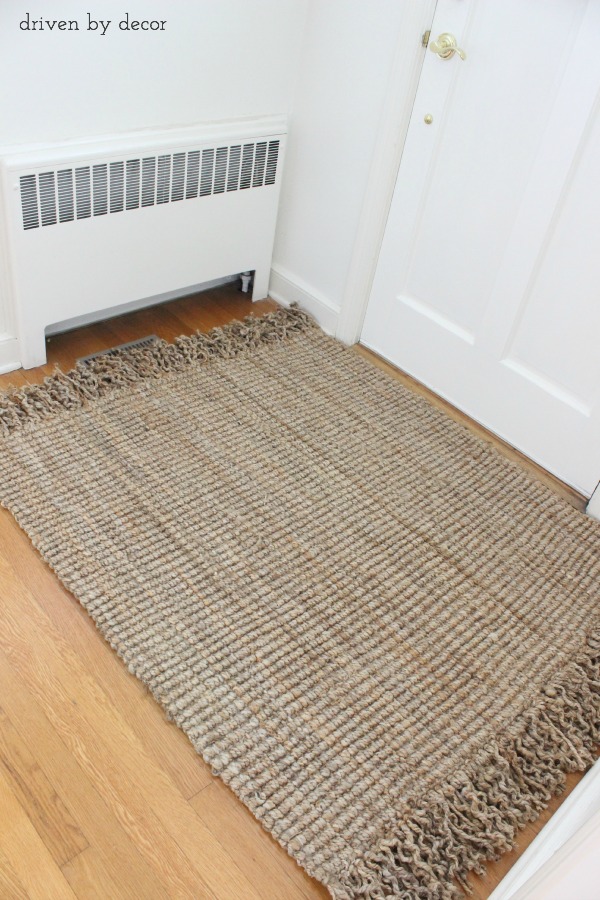
    My newly resized 4 x 5 rug is much better behaved – she’s big enough to fill up the entryway but not so big that she disrupts the flow from room to room:

    Driven by Decor - New Jute Rug with View into Dining Room

    The DIY rug resizing wasn’t the quickest of DIYs (it took me about 3 hours) or the cleanest (you wouldn’t believe how much junk/dirt comes out of the rug when you unweave it) but it was simple to do and so worth it in the end. The key to this DIY is to start with a natural fiber rug that is handwoven and has fringed ends (mine is this inexpensive chunky jute rug).  The width of the rug stays constant but you can shorten the length of it as much as you need to. You’ll want to  shorten it from both fringed ends so that the look of your final fringe is the same on both sides.

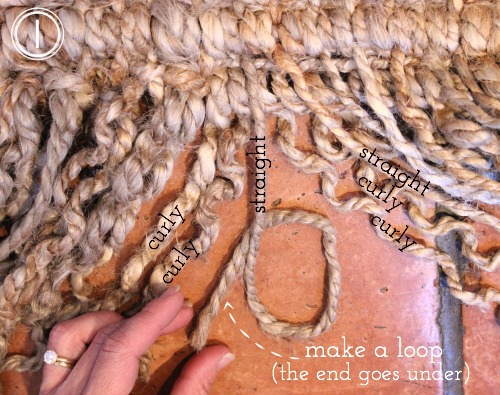
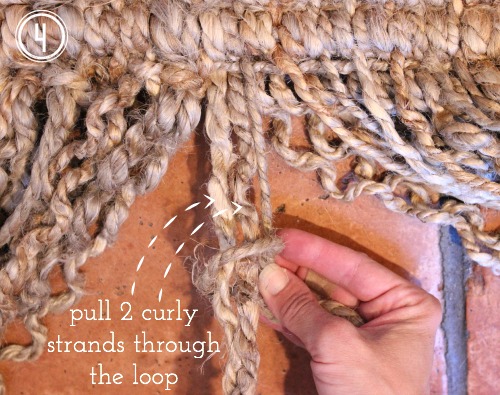
    Start by untying all of the fringe knots on one side, paying close attention to how they were tied. Once that’s done, start un-weaving it. Keep going until you have unwoven the number of inches that you had planned. Now, it’s time to reknot the end. For my rug, I noticed that there was an ongoing pattern of two curly strands and one straight strand. To retie the ends, I made a loop with the straight strand:

    Step 1 - Make a Loop

    and then put the end of the straight strand through the loop from front to back:

    Want to save this post?

    We'll email this post to you, so you can come back to it later!

    Step 2 - Put End Through Loop

    Step 3 - Knotted Loop


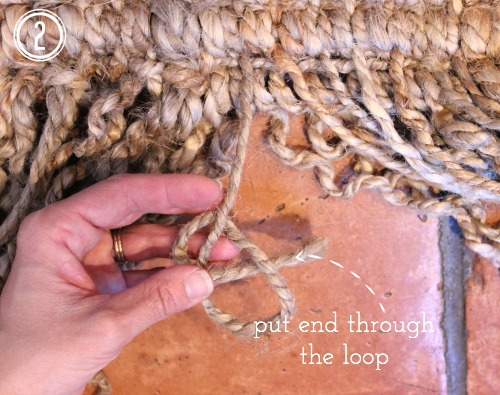
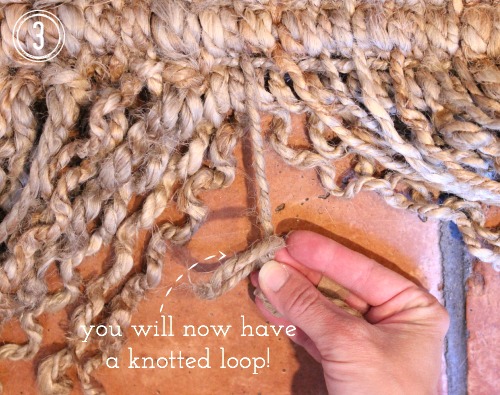
    Take the two curly strands to the left and put them through the loop you just made:

    Step 4 - Pull Curly Strands Through

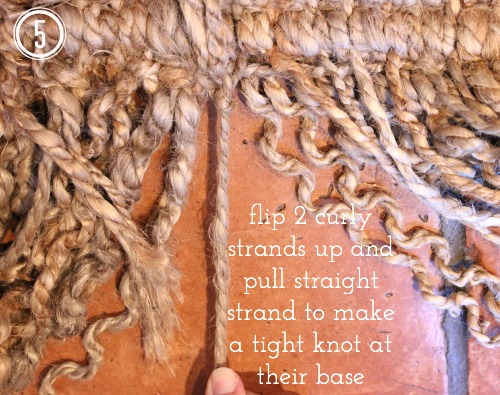
    Flip the curly strands up out of the way and pull the loop tight so that it becomes a knot.

    Step 5 - Pull Knot Tight

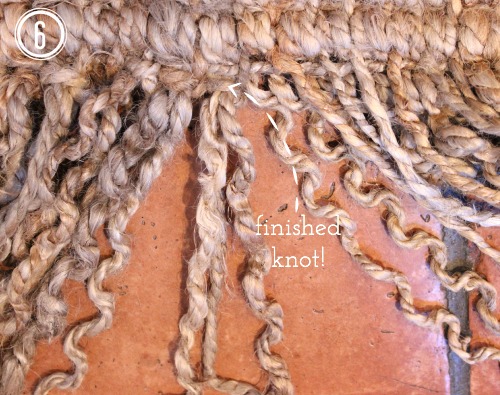
    You’ve finished your first piece of knotted fringe! Just keep moving down the line tying one knot after the next. At the end, trim your fringe to the length you want. Loud music and caffeine help.

    Step 6 - Finished Knot!

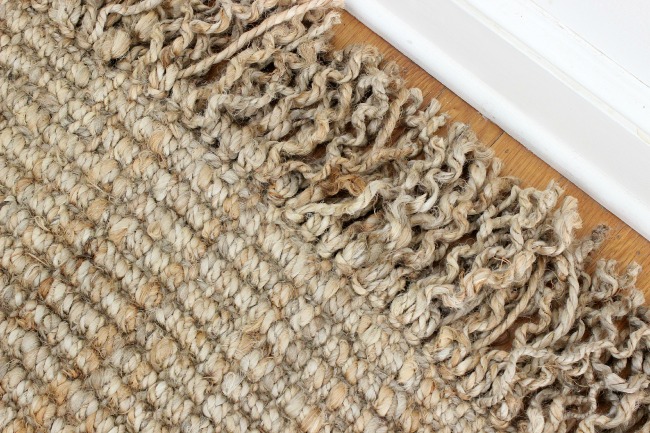
    What you’ll find is that your newly knotted fringe will be curly! I actually love the curly fringe and think it adds to the look of the rug but if you’re not a fan and are really ambitious, I’m guessing that you could iron the fringe straighter.

    Driven by Decor - Curly fringe on jute rug

    As a side note, for any natural fiber rug that’s being placed over hardwood, be sure to use a rug pad! I’ve learned the hard way that without a pad, the rug can rub and change the sheen of the area of hardwoods it’s covering.

    So I’ve gotten one more foyer project done….

    DIY Resized Jute Rug

    but I still have several left to go including adding some color to the walls (I’m choosing from these gray paint options) and possibly painting the door too – wouldn’t it look so much better if it was black like it is on the front? 

    • Share
    • Email

    ✉️FREE EMAIL SERIES ✉️

    5 Secrets to Reinventing Your Home on a Budget

    Simple tips to instantly transform five rooms in your home!

    Reader Interactions

    Comments

      Leave a Reply Cancel reply

      Your email address will not be published. Required fields are marked *

      This site uses Akismet to reduce spam. Learn how your comment data is processed.

    1. stephanie kraus says

      September 25, 2014 at 7:47 am

      very clever Kris and looks perfect!! xo

      Reply
    2. cassie says

      September 25, 2014 at 8:41 am

      WOW you are braver than me! it looks awesome, kris!

      Reply
    3. Marty@A Stroll Thru Life says

      September 25, 2014 at 9:13 am

      Wow, I am impressed. I would never in a million years have thought to shorten it and then to actually tackle this project. Amazing. Looks fabulous.

      Reply
    4. Pam @ Simple Details says

      September 25, 2014 at 9:44 am

      Oh wow, what a brilliant idea, Kris! I love the way you think out of the box!

      Reply
    5. Tracy Laverty says

      September 25, 2014 at 10:00 am

      Clever! I like that you used what you had and made it work. I love your style Kris!

      Reply
    6. Becky // This Is Happiness says

      September 25, 2014 at 10:24 am

      You are so smart!! Looks great Kris!

      Reply
    7. Taylor Greenwalt says

      September 25, 2014 at 10:55 am

      Now that was clever….it looks great!

      Reply
    8. Elizabeth @ The Little Black Door says

      September 25, 2014 at 10:57 am

      You always come up with the smartest solutions. I never would have thought of that. It looks great!

      Reply
    9. Sarah @ 702 Park Project says

      September 25, 2014 at 11:55 am

      You, my friend, are a genius!! Love it!

      Reply
    10. classic casual home says

      September 25, 2014 at 11:56 am

      This is awesome! I am having a seagrass rug resized for a client’s new home. We just need to cut one side and the carpet company is charging us $65 to sew a new binding on…not bad, but I like YOUR price even better.

      Reply
    11. VEL says

      September 25, 2014 at 1:55 pm

      Way to go Kris! I would have just looked for a new one, but your right in doing this since it now looks perfect!

      For winter and Fall, I do love oversize rugs but the entry since I don’t want anything wet going inside, so I usually switch mine to a 5 x 8 sisal rug up front. 🙂

      Reply
    12. Lauren@SimplyLKJ says

      September 25, 2014 at 3:11 pm

      Genius!! Love how you were able to repurpose what you already had.

      Reply
    13. Providence Hill says

      September 25, 2014 at 8:29 pm

      I have that EXACT same rug and it is also too big for my space! I’ve been thinking about doing just what you just did. Now I know it’s possible I’m all in!

      Reply
      • Kris @ Driven by Decor says

        September 29, 2014 at 11:37 pm

        OK – now that’s a crazy coincidence!! Go for it – it’s a little boring and backbreaking but worth it in the end!

        Reply
    14. splendid market says

      September 25, 2014 at 11:36 pm

      Okay, I am exhausted just studying the tying patterns, but good job, the final products looks great, and I actually, loved the study of how the rug was made.

      Reply
    15. Melanie @ The Painted Chandelier says

      September 29, 2014 at 10:16 am

      Oh my word! You are so smart to try that, Kris! You are really great at resizing things and making them work better in your spaces. I’m going to pin this for future reference 🙂

      Reply
      • Kris @ Driven by Decor says

        September 29, 2014 at 10:54 pm

        I got lucky on this one – I wasn’t sure if it would work of if I’d have an unwoven mess in the end!

        Reply
    16. Becca says

      October 04, 2015 at 5:48 pm

      You are so ambitious! It looks amazing. I have this same rug on a MUCH larger scale (13×10?) but my fringe is a matted mess! My MIL uses a walker and after a visit I noticed that the constant going over it destroyed the fringe. I’ve been trying to decide if there would be a safe way to remove the fringe without he rug unravelling. Any ideas?

      Thanks!

      Reply
      • Kris Jarrett says

        October 04, 2015 at 8:45 pm

        Hi Becca! Instead of cutting off the fringe, maybe your best bet would be to tuck each individual fringe piece into the weave on the underside of the rug. I think you could also cut the fringe shorter without it unraveling as long as you don’t go too short!

        Reply
    17. Reba says

      November 01, 2015 at 6:13 pm

      I can’t believe I found instructions to do this! Thank you thank you! I have a beautiful HUGH chunky loop Jute rug and need to shorten it, I have been terrified to do it myself with no instruction or encouragement. So thank you, now I will get on with re-sizing my rug.
      Reba

      Reply
    18. Sara M says

      February 22, 2017 at 7:00 pm

      Bless your heart, oh my gosh. I just ordered this exact rug in the mail at a size too long for my room… literally wider than the room. It’s $50 to return ship it… this may be my solution! YAY

      Reply
      • Kris Jarrett says

        February 26, 2017 at 3:16 pm

        Awesome – hope it works out for you!!

        Reply
    19. Bobbi says

      January 12, 2018 at 9:52 am

      Thank you so much for this tutorial! I have been looking for a jute rug for my dining room but, I’m having a hard time finding the right size. I’m going to get a quote for a custom size this week. But, this is a great option if the custom quote is too high. Thanks again!

      Reply
      • Kris Jarrett says

        January 15, 2018 at 9:59 pm

        So glad it was helpful! Sounds like one way or another you’ll find one that’s a perfect fit!

        Reply
    20. Sharron says

      February 17, 2020 at 8:22 am

      How would you shorten a table runner without further ends. Mine is 72 ” long so I could cut in half and use in my coffee table etc. It’s like a huge rug material

      Reply
    21. Kimberly says

      March 01, 2021 at 1:17 pm

      Hello,
      Would it be possible to unweave on the other side as well? I need something shorter and narrower.

      Reply
      • Kris Jarrett says

        March 05, 2021 at 6:37 pm

        With this particular rug I don’t think you could take the weave out of the long side without the rug falling apart…

        Reply
    22. Lisa says

      April 04, 2021 at 4:15 pm

      Kris you are a lifesaver! I bough some jute rugs for my RV and I love the color and everything about them EXCEPT they are, annoyingly, just too long. Took the first one apart today and got one done. Mine wasn’t frayed already so I had to work the strands out of the end, but the knots worked out perfectly all the same. Thank you!

      Reply
    23. Bri says

      October 24, 2023 at 6:19 pm

      Thank you sooo much for sharing this! I had the same jute rug rolled up in the corner because it was too big or small for my space. Now I can actually use it instead 🙂

      Reply
    24. Enteriörs says

      November 17, 2025 at 5:30 am

      I have a mostly “poetic question”, because looking at the pics, the rug I choose seem to have a slightly different waving pattern… do you think I could pull up a length wide shrinking on an Ikea Lohals 80×150 rug? Because of a door, I cannot use the 80 width, 70 would be the ideal size. I am entertaining the idea to resize it myself but I am not sure if it is even doable. 🙁 I am not even sure what I would use to cut it… Your rug turned out so nice!

      Reply

    Primary Sidebar

    ✉️FREE EMAIL SERIES ✉️

    5 Secrets to Reinventing Your Home on a Budget

    Simple tips to instantly transform five rooms in your home!

    Meet Kris

    Photo of Kris Jarrett

    Follow Me

    • Facebook
    • Instagram
    • Pinterest
    All images on DBD are copyrighted and taken by me unless otherwise noted. If you'd like to use any of my images, please request their use via my Contact page.

    I am a participant in several affiliate advertising programs (including the Amazon Associates program) and earn fees from qualifying purchases. For more information, see my full disclosure statement {here}.

    To view my privacy policy, go {here}.

    Copyright © 2026 · Driven by Decor | Privacy Policy