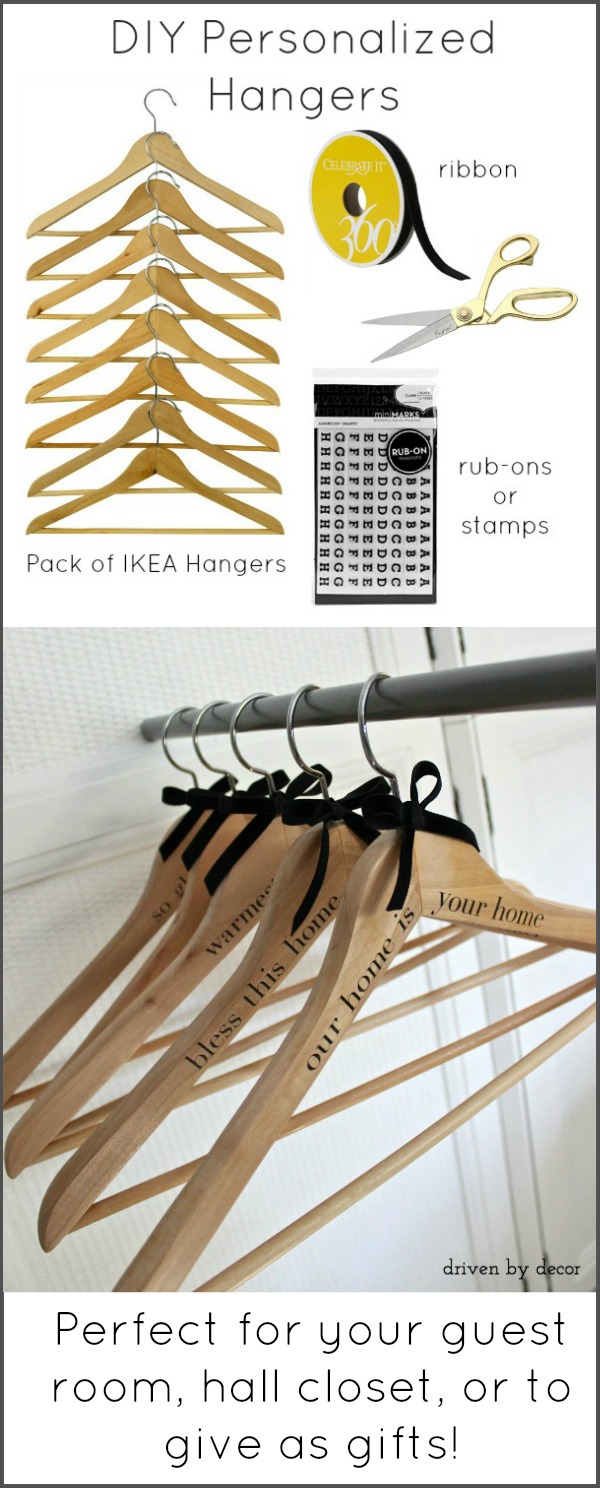
Living away from our extended family means that we have a lot of overnight house guests throughout the year. We love their visits and do what we can to make them feel comfortable and welcome during their stay. I recently got rid of my mismatched plastic hangers in the guest room closet and upgraded to wood ones. After using them as-is for a while, I decided to add a few personalized touches. It was a super simple DIY that makes our guests feel warmly welcomed and would make such cute gifts for bridesmaids or just about anyone!
Creating the personalized hangers couldn’t be a simpler DIY (includes affiliate links – see my full disclosure statement {here}):
- Start with some inexpensive wooden hangers – I got mine from IKEA but they don’t carry these exact ones anymore. There are several highly rated inexpensive wood hanger options {here}
- Find a pack of rub-on letters in a style that you love (most craft stores carry them). As a size reference, my tallest letters are ½″ (unfortunately the exact ones I used are no longer available).
- Cut out the letters that you need from your pack of rub-ons, arrange them on your hanger to plan your spacing, and then rub each letter (one at a time) where you want it to go on your hanger. You can apply your rub-ons with a transfer tool or just a popsicle stick – usually there’s one included in your rub-on pack. The key to rub-ons to to make sure you rub every little bit of the letter before pulling off the backing. Once you think you’ve done that, remove the backing slowly so that if you see a spot that you missed, you can lay the letter back down in it’s exact original position and rub that little piece.
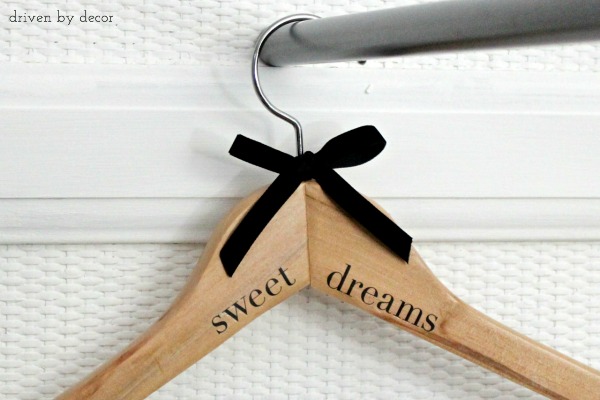
- (Optional) Use ribbon to add small bows to the top of each hanger once you’re done with the lettering.
(And by the way, if DIYing isn’t your thing, there are TONS of super cute options {here} for personalized hangers that you can buy!)
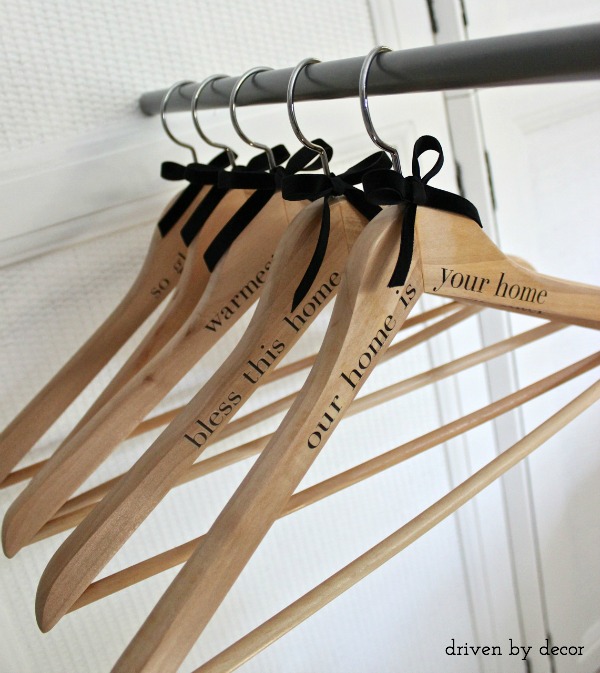
I personalized five of the wood hangers and mixed them in with the other hangers that I left as-is.
The phrases that I used are:
Want to save this post?
our home is your home
sweet dreams
warmest welcome
so glad you’re here
bless this home and all who enter
They’re great for our guest room but would also be perfect for use in a hall closet or to give as gifts. For a personalized holiday or birthday gift, you could personalize them with a monogram or clever saying (inside jokes would be great here!). For wedding gifts, you could personalize several with the bride and groom’s names and their wedding date. And child sized wood hangers with personalized sayings would make wonderful baby gifts!


Charles says
Having a devil of a time finding 1/2″ dry transfer letters. Anyone have a site they use?
Christy Roppel says
What size letters did you use?
Thanks!
Christy
Kris Jarrett says
Hi Christy – the tallest of the letters that I used is about 1/2″ – hope that helps!
Ruth says
They look lovely! What size font did you use?
I love the bold style.
Seaweed and Raine says
So clever! What a great welcome to guests.
At The Picket Fence says
What a cute idea! They look lovely and would definitely make such a great gift. 🙂 Thank you so much for sharing this last weekend at Inspiration Friday!
Vanessa
My Crafty Home Life says
I love this idea…pinning it. Those are my favorite hangers from Ikea. I have a bunch, great idea.
Pam says
Those are so darn cute! Great idea for sprucing up my coat closet hangers for all the Christmas company coming. I’m going to pin this!!!
Kris @ Driven by Décor says
I’m going to pick up some more next time I’m at IKEA and do the same! Thanks for stopping by Pam!
Elizabeth (Blue Clear Sky) says
I love wood hangers in our front entry coat closet too. They hold heavy coats so well (IKEA too) and they look nice empty. The rub on sayings are a great idea. Thanks for sharing.
Kris @ Driven by Décor says
I agree – they are perfect for coat closets and guest rooms. I love how they look but they just take up too much space for me to be able to use them in my own closet! Thanks for stopping by Elizabeth!