I’m sharing how to make a custom-sized DIY linen pinboard for much less than you’d pay for one that’s store-bought
For a while now, I’ve been dreaming of a large linen pinboard hanging in my kitchen. It would be perfect for pinning up all of the things (coupons, invitations, magazine page cut-outs, etc.) that end up in a messy, unorganized pile on my desk.
I fell in love with a large linen pin board from Restoration Hardware but it was super expensive. So I decided to create a DIY linen pinboard (actually, pinboards!) in the exact sizes I needed. Here are the simple steps to creating your own… (post includes commissionable links; for more information, see my disclosure statement {here})
Step 1: Gather Your Supplies
My first step was to find a frame for my pinboard. I ended up buying an open barnwood frame at Hobby Lobby where they have them in about 10-12 different sizes. They frequently go on sale at 50% off so you can get them at a very reasonable price.
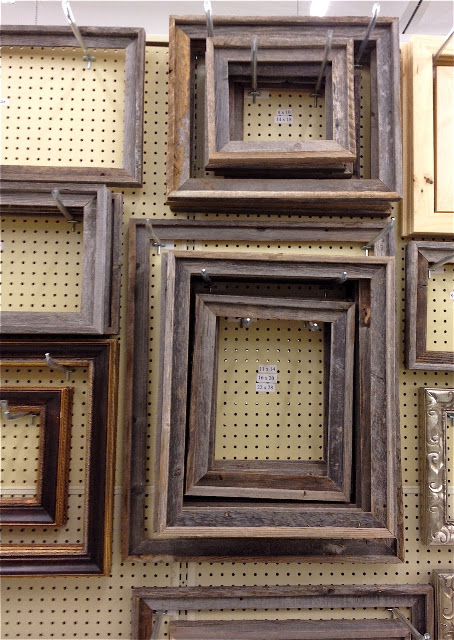
You can also find similar frames on Amazon in multiple sizes {here}.
Other supplies you’ll need for each DIY linen pinboard include:
Thick cork panel (½″ or more) in the same size or larger than your framed opening such as {this one}
Linen fabric
Utility knife
D-ring picture hangers (if none on your frame)
Step 2: Attach Ring Hangers
If your frame doesn’t already have hangers attached, add a pair of ring hangers onto the frame’s back. Then measure the recessed area on the back of the frame where your cork board will be placed.

Step 3: Cut YourCork Board to Size
Next, cut the cork board to your measured size using a utility knife. It’s key to make your cuts on the FRONT side of the cork board. This way, the edges around the front side of the cork board stay relatively straight (the back side will look like a mess but there’s no worries – you won’t see it).
Step 4: Staple The Fabric Around Your Cork
Next, wrap your fabric around the cork board and staple gun it to the back:

Step 5: Secure the Fabric-Covered Cork Board to the Frame
Finally, use your glue gun to make a line of glue along the recessed edge of the frame where your fabric-covered cork board will be placed. You need to work fast gluing so that the first glue hasn’t dried by the time you’ve made it all the way around the frame. Lay your cork board in the frame and apply pressure for a minute or two until the glue had dried. Then, to be sure that your cork board is secure in the frame, apply glue between the cork board and the frame all the way around the back of the frame:

Step 6: Hang It Up!
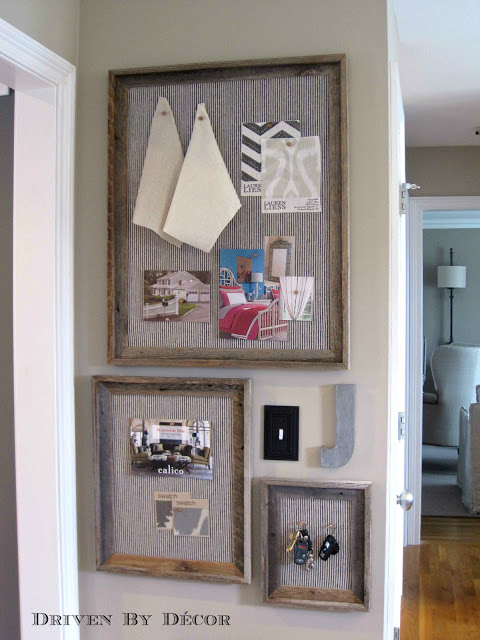
After repeating this process two more times and then putting screws into the wall at the correct locations for the ring hooks on the frames, I got all three of my framed cork boards up on the wall! I added a metal letter “J” to fill the awkward space to the right of my light switch and got everything lying on my desk pinned on my new boards:

Several months later I changed up my bulletin boards by replacing the natural linen fabric with some leftover black and cream ticking stripe fabric I had from another project:
I hope you enjoyed the post and are inspired to DIY a linen pinboard of your own!


Michelle says
Thanks for the tutorial on a cheap and easy project. It’s just what I was looking for! I love that you can also easily change out the fabric for a fresh look. Did you use the same cork board and put new fabric on top or did you have to use a new cork board? Just wondering how you removed the cork since you glue-gunned it to the frame.
Kris Jarrett says
Hi Michelle – yes I was able to reuse the cork board! It was really just the fabric that was glued to the wood frame and I was able to gently pull the two apart and peel off the strips of dried glue.
David says
Thanks for the great idea and inspiration Kris. It was an easy project. Modified it a bit for our needs. Created a magnetic board covered in fabric using sheet metal instead of a cork board. Same rustic frame, wrapped fabric around sheet metal, glue gunned it taught. Used a black laminated board for added thickness, rigidity and a finished look to cover the back side of the sheet metal and exposed fabric edges. Used metal frame offsets (screwed down) to hold it in place. Changing fabrics will be as easy as swapping a picture in a frame. For creative magnets, I purchased strong earth magnets and glued them to draw pulls of different types. Now my wife can display our son’s artwork and not poke holes in them or tape them down. The sheet metal, black laminate board are easily purchased at you local Home Depot or Lowes. Again, thanks!
Kris @ Driven by Decor says
Love this idea David – thanks so much for sharing it!
Kathy Piombo says
Love your rustic wood bulletin boards . Would love to have one made . Is that possible?
Let me know,
Thank you!
Kathy Piombo
415-336-4569
Kris @ Driven by Decor says
Thanks so much for asking Kathy – honestly, I’ve thought about making and selling these but right now it’s not something that I’m doing. It really is a pretty easy DIY though – you should give it a try!
Sara says
Thank you for the idea! I was able to get a 4×8 bulletin board through a garage sale and made this board to display my children’s art work. It is painted on the wood trim and covered in muslin fabric. It rests against my wall near the kitchen but I don’t know how to attach a picture to show you. Thanks again! What great tips!
Kris @ Driven by Decor says
Sara, that sounds so cute and I love that you’re using it to display your kids’ beautiful art!!
safaffect says
These look great! Might just be the solution for the clutter around my desk…
Toodie says
I love this idea! So many times I like the looks of something but it is sooooo expensive. The black and cream ticking is perfect!
Kelly @ View Along the Way says
Wow, this looks at least as good as the RH version! I love the mini-gallery wall to hide the lightswitch. WHY do builders do this to us?! Don’t they care about decorating?? 🙂 Thanks so much for linking up to Ditto DIY!
Kris @ Driven by Décor says
Thanks Kelly. You’re so right about the builders – you rarely get ones that think through the small details that the decorating obsessed like you and I would!
ingrid@nowathomemom says
Gorgeous! I love how the fabric looks against the frames! great idea! 🙂
stopping by from DITTO DIT link party!
Ingrid
Kris @ Driven by Décor says
Thanks for stopping by from the link party Ingrid!
Jennifer Eggers says
I was searching for a linen bulletin board when I found this post. I read this and ran to Hobby Lobby – and made it in about 30 minutes! Mine is a bit different because I chose a frame to match my office furniture…but the frame was 50% off, the linen material was 30% off and the cork was like $15.99! It’s gorgeous at a huge savings…and exactly what I wanted. Thanks so much for the idea!
Kris @ Driven by Décor says
Glad that it worked out so well for you – totally easy, right?! I also love that it would be no big deal to change out the fabric in the future if you want to switch it up!
kristin maynes says
That turned out so well! I love it! Great job!
Kris @ Driven by Décor says
Thank you Kristin! Of course, I can’t leave well enough alone and am thinking about changing up the fabric for something different….
Jennifer Varpness says
I’ve got my supplies waiting to be used, so excited! i even used a 40% off 1 item coupon for the cork board, the frame was 50% off, woot woot. Funny, I don’t even have a place to put it!!!! Keep the fabulous ideas coming.
Kris @ Driven by Décor says
Gotta love the deals at Hobby Lobby! Buying things that I love but don’t have a place for is totally my M.O. – glad to be dragging you down into the gutter with me – ha! Send me a pic when you get it done!
Carla says
WOW, it looks fantastic, I love it! We don’t have those shops here in Australia where you can buy such things like the frames, well not where I know of. Today I am moving my desk and making a new space, Im excited, you have inspired me to make something. Thanks
Kris @ Driven by Décor says
How fun – hope you love how it turns out!
jvw home says
FAB idea Kris!!
Thx for sharing..