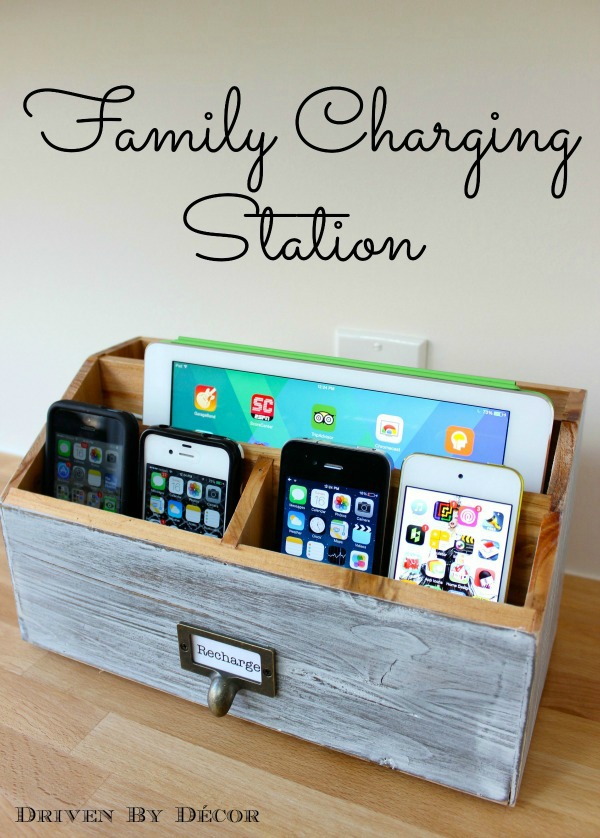
Would you love to have an uncluttered spot for charging your electronics? That’s exactly what I was looking for when I created my simple DIY charging station. It’s been a game-changer at our house!
Our charging cords now stay there 24/7 and our electronics all have a home for easy charging. Ready to make your own? I’ll show you how! (post includes commissionable links; for more information, see my full disclosure statement {here})
DIY Charging Station
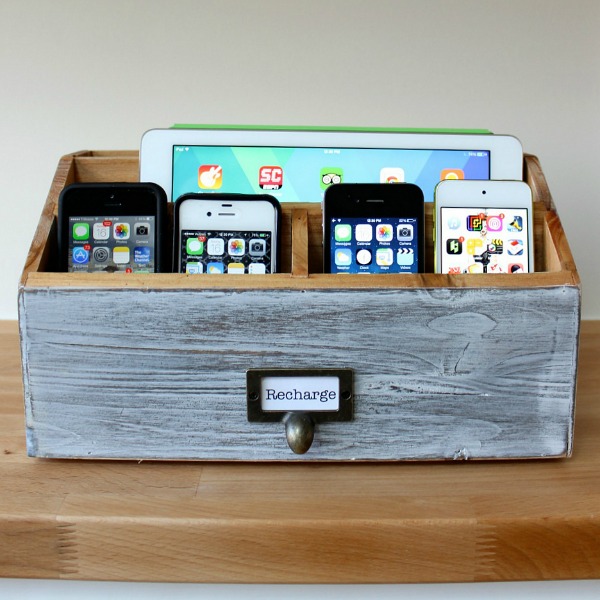
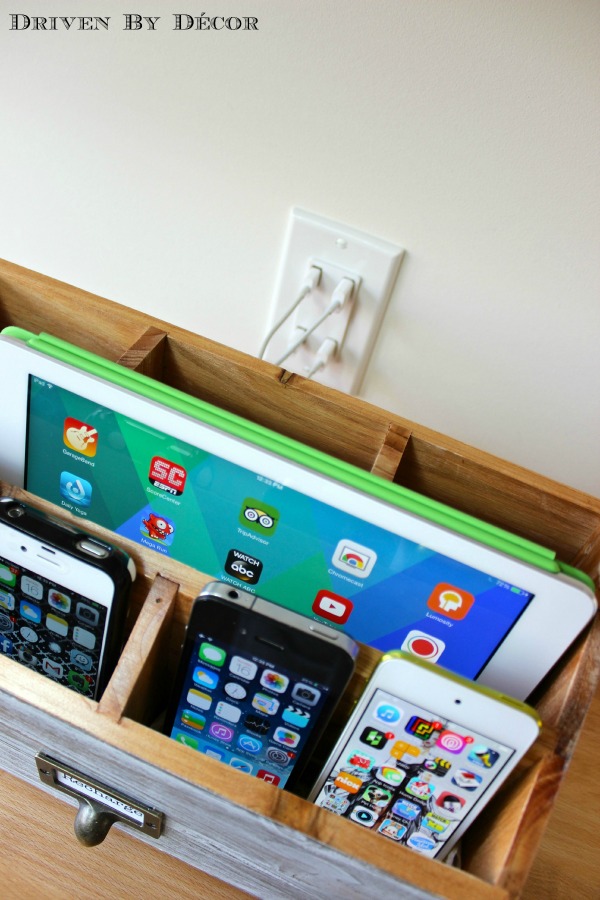
I created my charging station with an inexpensive open desktop wood organizer that I scored at HomeGoods. I wanted one where I could fit four iPhones across the front row and an iPad in the middle. Another great option that you can order online is {this desktop storage set}.
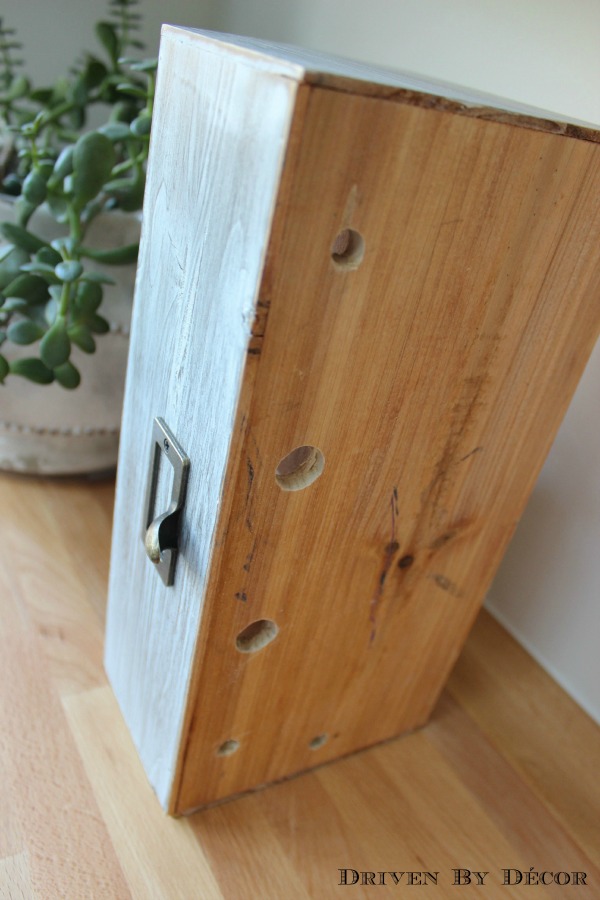
The first step in this DIY is to figure out where you want the holes for your cords, which will be coming up from the bottom. I drilled small pilot holes first to make sure they were in the right place and then drilled bigger holes that would fit the smallest sized end of each charger cord.
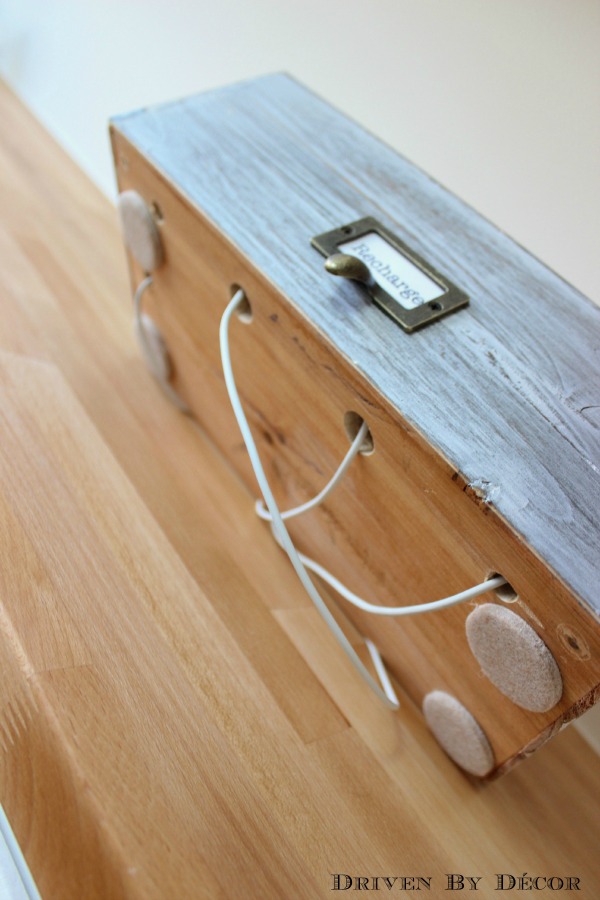
My charging station was right in front of my outlet so I used short charging cords similar to {these}. They stay in the charging station full time so there’s no more searching for cords!
You’ll also want to add circular felt pads such as {these} to the bottom of your organizer. They create just enough space for the cords for go underneath the charging station and plug in at the outlet behind it.
And I typed up a little “Recharge” label to add to the front:

Consider a USB Outlet
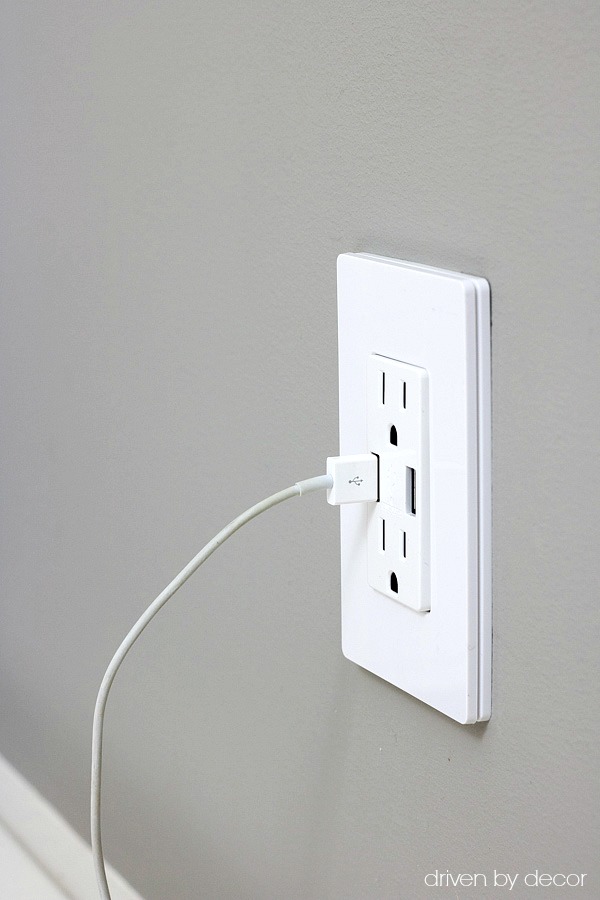
If you peek behind the charging station, you’ll see the other part of this project: an outlet that we converted to a 4-port USB charger:
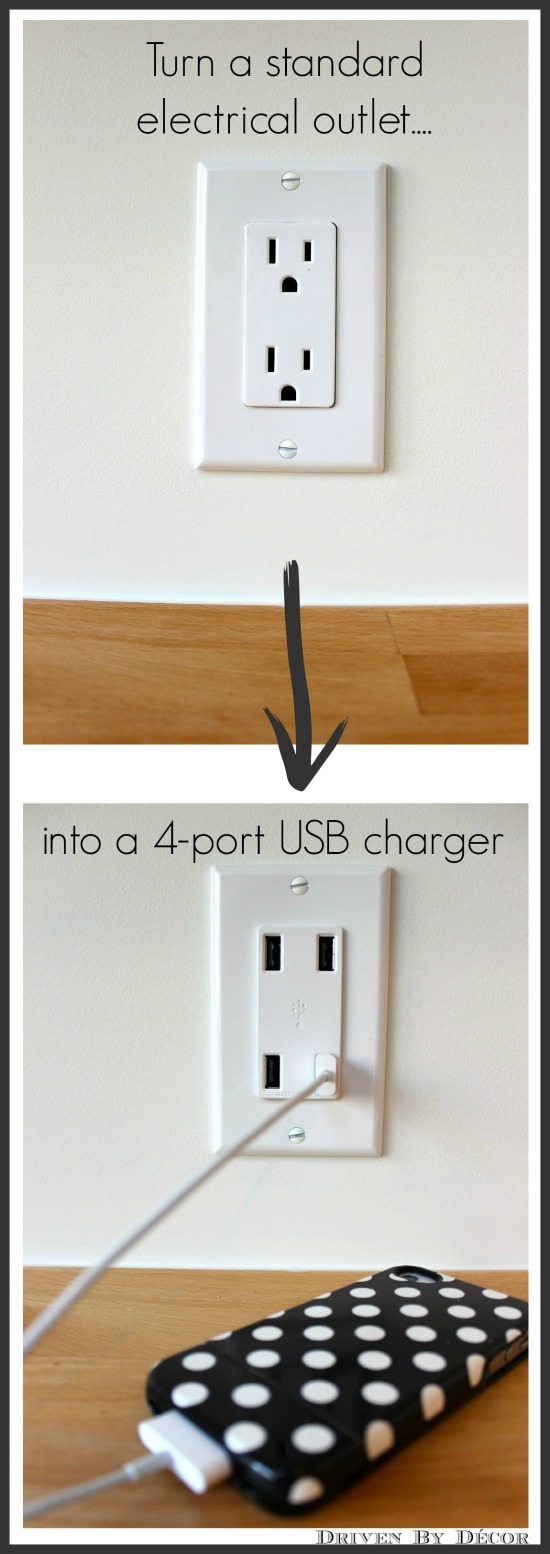
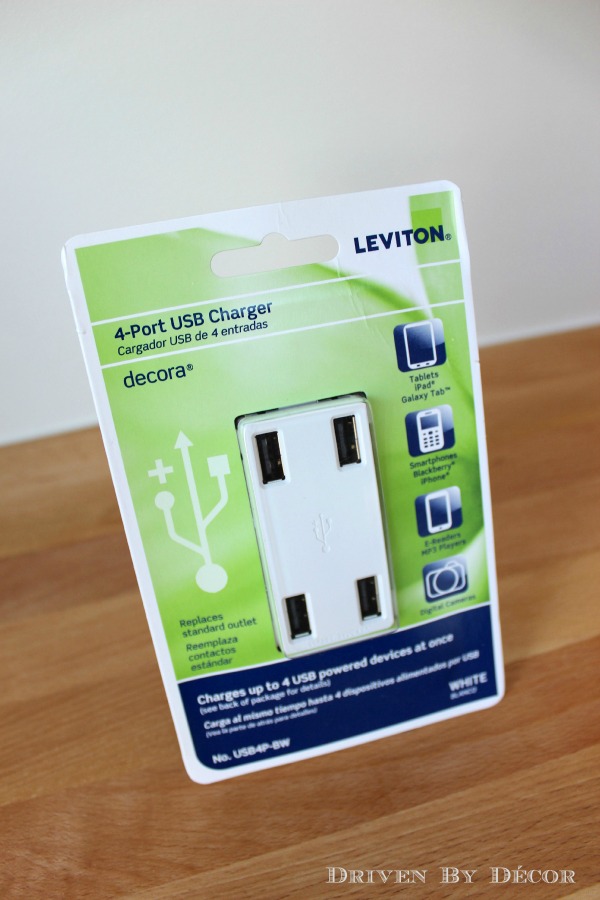
My husband and I rarely mess with anything electrical but this project was as easy as it comes. We used {this 4-port USB charger}. The faceplate isn’t included so add one of {these Decora wall plates} to your shopping list if your existing cover is the more traditional two hole type.
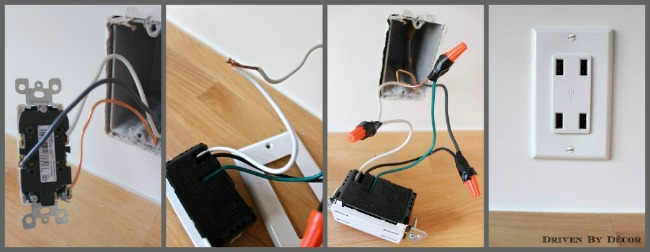
For installation, we followed the instructions included with the USB outlet. First we turned off the power to the outlet at the circuit breaker and tested it to be certain that the power was off. We then removed the faceplate from the old outlet, pulled the outlet out of the box, and removed the wires from it.
The USB charger comes with three colored wires connected to it – we connected these wires to the same colored wires coming out of outlet box, twisting the strands tightly together. We then screwed on the plastic connectors, secured them with electrical tape, and mounted the USB charger device in the wall box. Done in under five minutes!
A few things about the installation:
1.The Leviton USB charger is fairly deep and fits into standard electrical wall boxes but some older boxes may be too shallow to accommodate it. Make sure your wall box measures at least 3″ x 2″ x 2.5”
2. I am NOT an electrician – our install was very simple but your wiring may be different. Read the instructions included with the USB charger and consult an electrician if you are not sure about any part of them.
There’s also an option to have your regular outlet plus two USB ports that you can find that {here} (again, don’t forget to buy a wallplate too!).
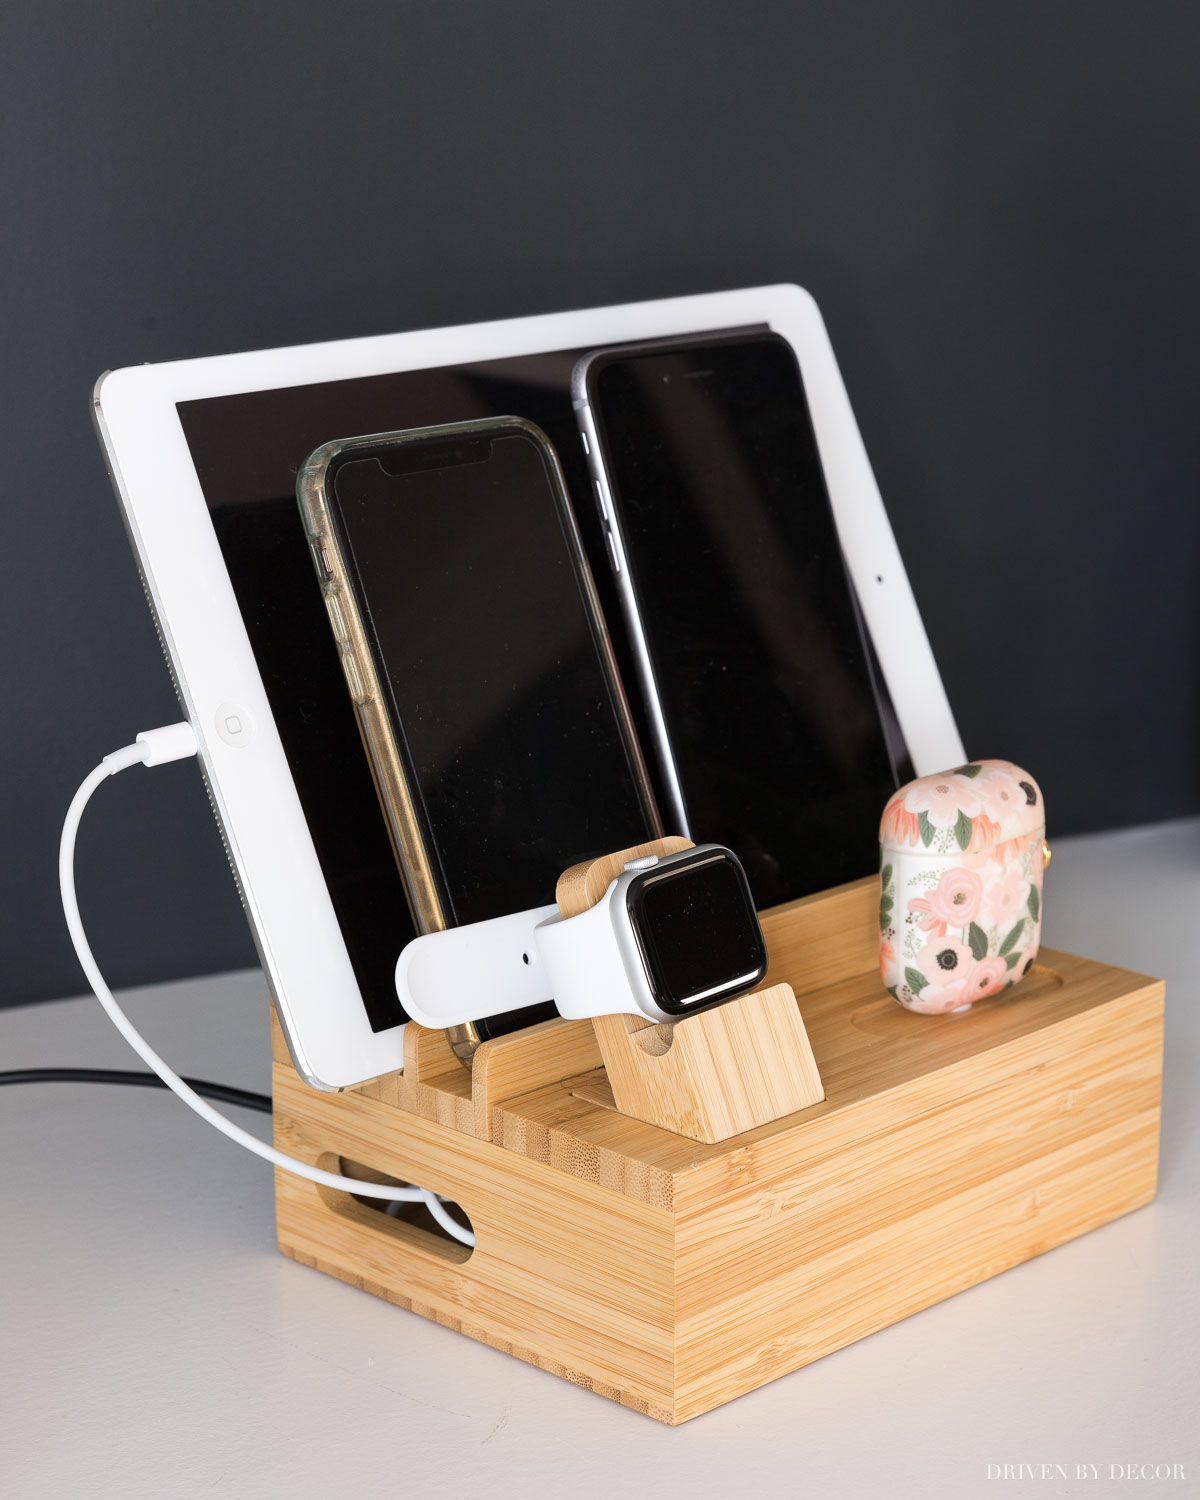
I’m so glad to have one of our little daily dilemmas solved! It really is the simplest of DIYs but if you don’t have the time or interest in doing your own DIY project, we have {this bamboo charging station} in our office and it’s also a great option:
If you want other ideas for whipping your workspace into shape, be sure to check out my post on favorite desk organization ideas.
Another option to consider is adding an outlet to the inside of a drawer for hidden charging of your electronics – we did that as part of our kitchen remodel:
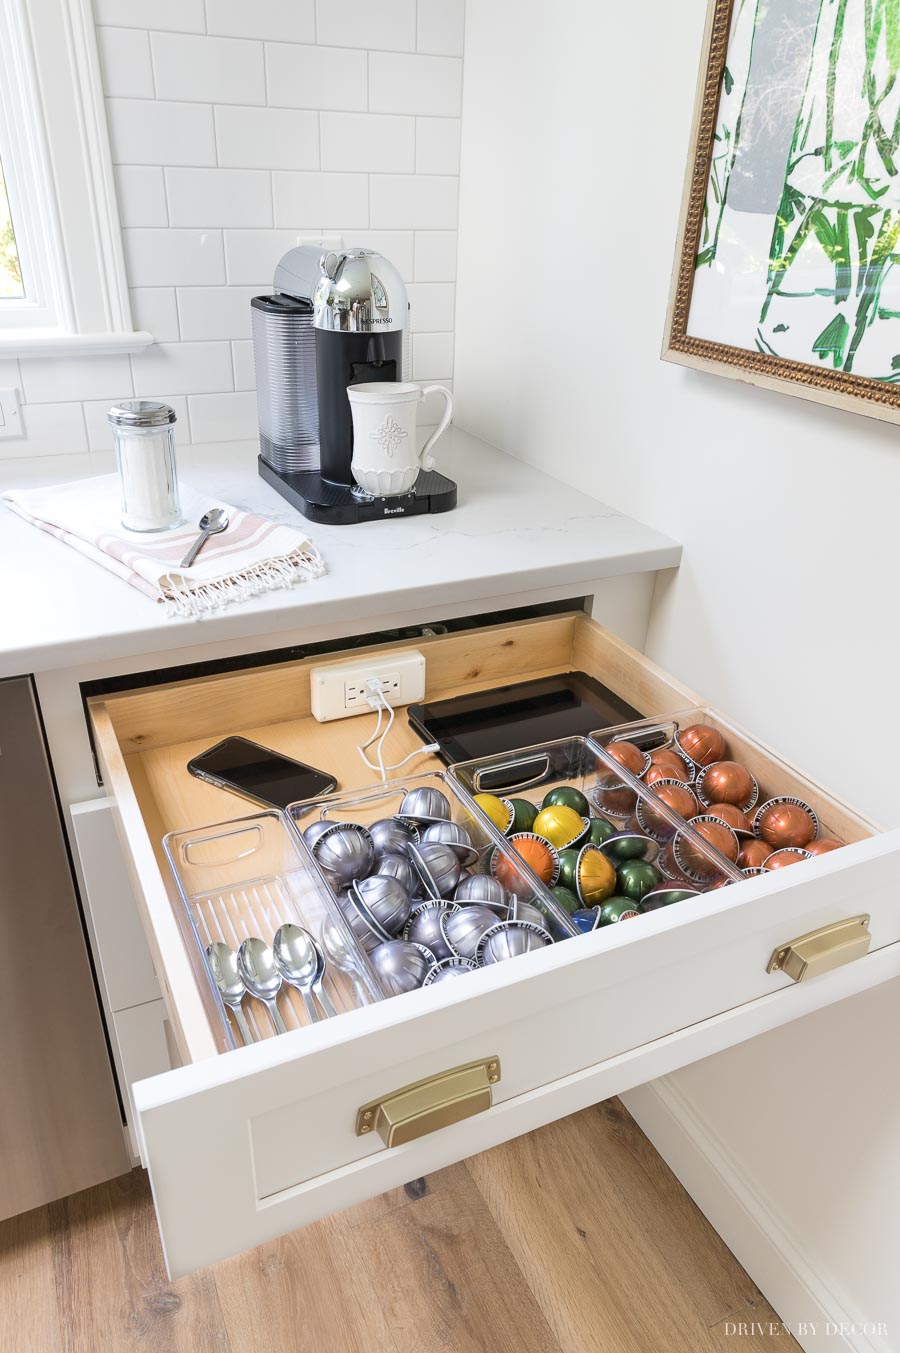
We ordered ours as part of our new kitchen cabinets but you can also buy {this in-drawer docking outlet} to add to an existing drawer in your kitchen. Check out my post on kitchen drawer organizers for more ideas of smart storage solutions for your kitchen.
And one last idea… if you’re looking to charge your phone easily at your bedside, consider a lamp with a built-in USB outlet in the base – both beautiful and functional! We have a pair of these USB lamps in our guest room and guests really appreciate how easily it is to charge their phones bedside:
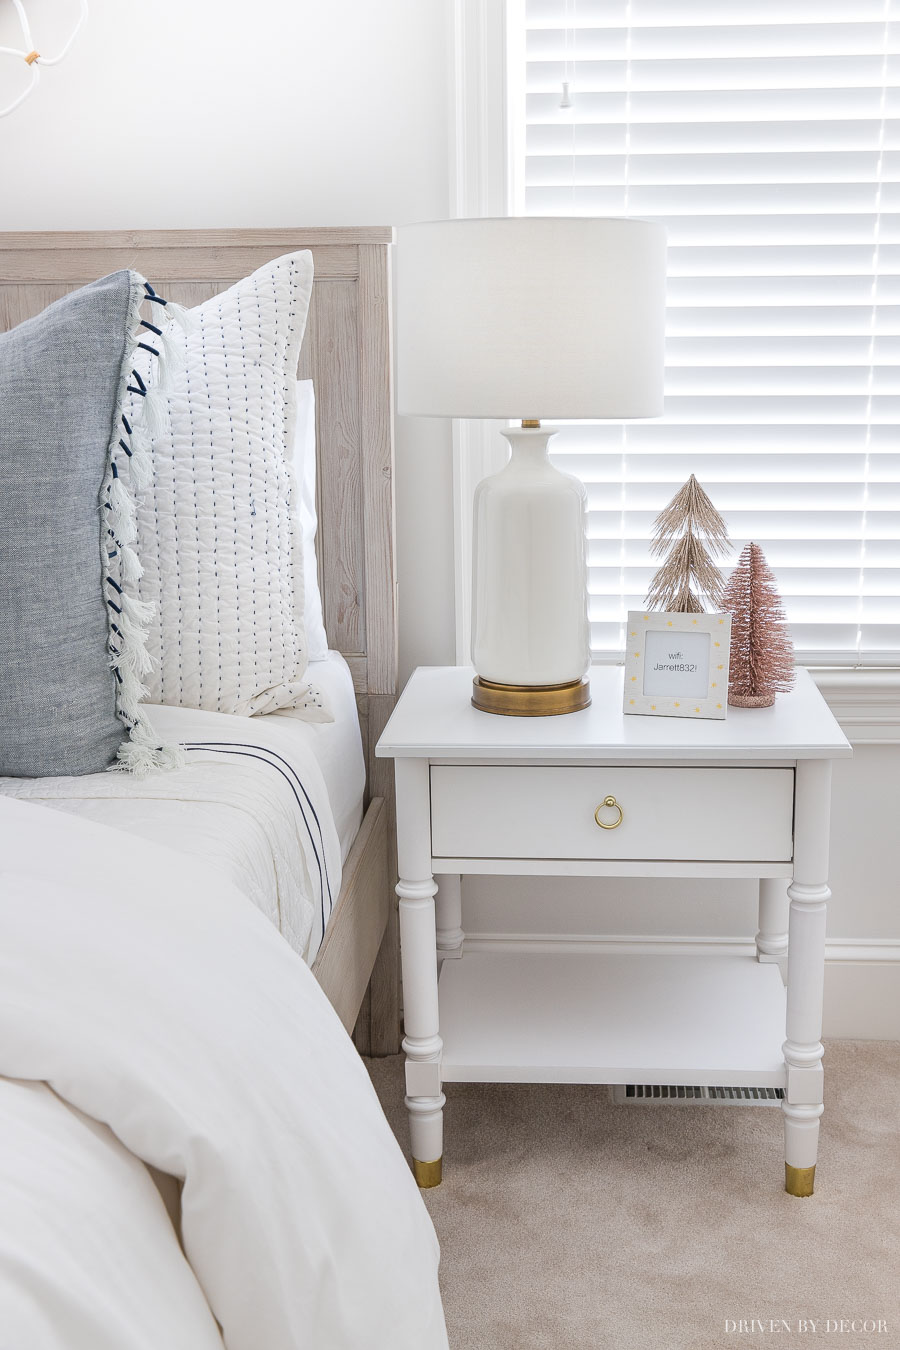
Our exact lamps are no longer available but you can find several options for table lamps with built-in usb outlets {here}.
Thanks for stopping by everyone! If you’re looking for more ways to get your home organized, be sure to check out my other home organization posts {here}!


Gretchen says
I love this idea!! I just completed my own – I used the Threshold Desk Organizer ($12.99 at Target). Instead of replacing my outlet with the USB hub (which I love, but couldn’t do since we have a GFCI outlet and I didn’t want to mess with it), I bought a 4 port USB ‘charge tower’ from Sharper Image (got it at TJMaxx for $20) and it just hides behind the charging station. So worth it to have all of the cords corralled in one place! And it looks nice too! Thanks so much for the idea!
Kris @ Driven by Decor says
Thanks so much for commenting Gretchen – I’ve had several people ask where they can get a similar organizer if they don’t have a HomeGoods and I had suggested trying that same organizer with the caveat that I hadn’t used it myself so I couldn’t be sure it would work. Thanks for letting me know it does! Love your solution for the charge tower too!
Gretchen says
Glad it helps! Thanks again for the idea! 🙂
Sharon says
I bought a similar box at Goodwill a few years ago ( for only about $2.00!), now I know what to do with it!
What font did you use for “recharge”?
Thanks!
Kris @ Driven by Decor says
That’s a great deal Sharon! I checked my computer but I guess I didn’t save my file that I used to create the “recharge” label so I’m not sure about the font – sorry!
Geoff says
Thanks for this post, I am surprised I was not aware these outlets existed. As I was searching for USB hubs to solve a very similar problem my family has (kids take charger cords and forget them places or they get broken from abuse). Anyway, I ordered my outlet tonight and I’ll be putting it in this week.
Hopefully my kids follow the no-taking-cords rule. We had the same rule before with just having a charger stuck in an outlet (didn’t work). I think not having that charging base (little square USB port) will hinder them, no need for just a cord by itself… maybe, we shall see. Worst case I’m thinking of buying a Safety 1st protective cover, they aren’t pretty but it keeps their hands out of it.
Thanks again.
Kris @ Driven by Decor says
I hope you like your new outlet – it’s been awesome for us! We had a few issues with cord-takers at the beginning so we ended up buying a few extra and now they all stay put! I’s so nice not to have to hunt down cords all the time!
Jennifer says
I’m also wondering about how the devices sit on the cords inside the organizer. The iPods and such look all nice and level in the pictures, but do they sit that nicely when they are plugged up or are they crooked from the bump of the cord? I would love to see a picture of the inside of the charging station. 🙂
Kris @ Driven by Decor says
Hi Jennifer! To be honest, most of the time we just attach our electronics and go – not worrying about them looking level because they’re usually just there overnight. But every now and then I want them to all sit nice and neatly like you see in the pic – all I do is pull on the cords from the back to remove the slack. It takes less than 30 seconds to do and then all five of our charging electronics will sit perfectly level. I’ll try to add a pic of the inside of it at some point!
Anonymous says
Thanks so much! I found a cute little ‘charging station’ last week that has been working great for us. We haven’t drilled holes in the bottom yet. We’ve just been plugging through the top. I am getting tired of having to pick the cords up out of the floor each day though, so maybe we will get those holes drilled this week. 😉
melanie says
This is absolutely awesome I will be doing this for sure!!!
Kris @ Driven by Decor says
Thanks Melanie. We have really loved having it and hope you will too!
Becca says
I love this project and would love to make one myself. Im wondering how this has held up for you and how well the USB outlet works for you? I’ve heard several times that the USB outlets just don’t work well, especially with apple products. Not sure if it’s because there’s not a strong enough power supply or what. Would love to get an update on yours!
Thanks so much 🙂
Becca
Kris @ Driven by Decor says
Hi Becca – everything has held up great! We haven’t had any problems at all with the USB outlet and we’re an all-Apple family, often leaving four things plugged in and charging at the one outlet overnight. I’ve loved having it and we have a no-taking-the-cords rule so the hunt for cords to charge our electronics doesn’t happen anymore. Good luck putting yours together!
Gina says
Now officially on top of my long house makeover list. But everything I want to do husband fights but since,we all have these smartphone, tablets , Ipad2s and laptops (not sure if i will make one or two for my daughters and husband’s stuff and more. Very electronic family so think he’ll love it and my kids do have their stuff upstairs but so far they are only alloted a small window of time and.are young so we moniter along with parental controls..So now I’ll need a few. No one kid has cell. They don’t have cell phone. they,are too young but when they,do they’ll have a location for charging. I am making a desk for daughter and may build right on top.
ElleSee says
i think the slots at the back would be the perfect place for the headphones. I can never find mine when I want them. Just a suggestion if you haven’t filled it already
Kris @ Driven by Decor says
LOVE that idea!!
T. Plain says
U think HG still has these? I’ll get there if so. Lol
T. Plain says
I live 100 miles from HG. 🙁
Can I order online, u think?
Kris @ Driven by Décor says
You can try Target (either in store or online) – if you Google “desk organizers” a few come up that look like they would probably work for this!
pcb says
Excited to see this; just about to have some shelving wired for charging and this is exactly what I needed (and didn’t know existed!).
Jennifer Nettesheim says
So how do the cords look inside it? do they get bent from the device sitting on it? Does the cord hold out with it sitting like that?
Kris @ Driven by Décor says
Hi Jennifer, I just attach each device and then sit it down in the charging station so yes, it is resting on a portion of the cord. The cord is curved underneath it but I wouldn’t say it’s “bent” so I’m really not worried about the cords getting harmed. If it is something that worries you, it would be easy to lift up the charging station after all of the devices were plugged in and pull the cords taut from underneath so that the devices aren’t resting on top of them. Hope that helps!
Sarah says
I’m not sure how you have the cords in there, but it’s probably not healthy for the cords, even if they don’t look bent. That’s too much pressure on that area of the cord. The whole thing would be better if the phones/iPods laid on their sides, like the iPad.
Kris @ Driven by Decor says
Hi Sarah! We’ve been using the family charging station on a daily basis for almost a year now and I’m glad to report that we haven’t had any problems at all with wearing of the cords! If it’s something that concerns you, you could choose to lay the iPhones sideways, but you’d then only fit two in the front row instead of four.
Lisa Marie Wells says
I have passed by those little organizers a hundred times and never thought to make a much needed charging station! So creative! Thanks for sharing!
Emily (Laundry and Lullabies) says
I wish I could find this online instead of at HomeGoods! I don’t want to take 4 kids on a trip there to “maybe” find what I’m looking for…but I LOVE this charging station! Any idea where I could get something similar without a trip to the store?
Kris @ Driven by Décor says
Hi Emily – I don’t know where you could buy a charging station like this pre-made but you can find organizers similar to the HomeGoods one I bought at places like Target and office supply stores – I’m sure there are some online options!
Stacey says
This is genius!! Love!
Ashley @ The Honest Room says
I almost picked up the same organizer at HomeGoods this weekend. This project makes me want to go out and grab it right now! I love how organized you are.
Ashley says
I almost picked up this exact little organizer at Homegoods this weekend. 😉 That looks amazing. Now you’re making me wish that I had. Maybe I’ll go back and copy this. Love how organized you are!