• Skip to primary navigation
  • Skip to main content
  • Skip to primary sidebar
  • Home
  • Home Tour
    • Master Bathroom
    • Kitchen
    • Kitchen Eat-In Area
    • Family Room
    • Living Room
    • Home Office
    • Laundry Room
    • Master Bedroom
    • Craft Room
    • Dining Room
    • Garage
    • Guest Room
    • Guest Bathroom
    • Patio
    • Powder Room
    • Teen Blue & White Bedroom
    • Teen Boho Chic Bedroom
  • Projects
    • Room Remodels
    • DIY Projects
    • Decorating Tips
    • Cleaning
    • Organizing
  • Subscribe
  • Shop My Faves
  • Instagram
  • About
    • Contact
    • Meet Kris
    • FAQs
    • Media
    • Disclosure
    • Privacy Policy

Driven by Decor logo

menu icon
go to homepage
subscribe
search icon
Homepage link
  • Home
  • Home Tour
    • Master Bathroom
    • Kitchen
    • Kitchen Eat-In Area
    • Family Room
    • Living Room
    • Home Office
    • Laundry Room
    • Master Bedroom
    • Craft Room
    • Dining Room
    • Garage
    • Guest Room
    • Guest Bathroom
    • Patio
    • Powder Room
    • Teen Blue & White Bedroom
    • Teen Boho Chic Bedroom
  • Projects
    • Room Remodels
    • DIY Projects
    • Decorating Tips
    • Cleaning
    • Organizing
  • Subscribe
  • Shop My Faves
  • Instagram
  • About
    • Contact
    • Meet Kris
    • FAQs
    • Media
    • Disclosure
    • Privacy Policy
    • Facebook
    • Instagram
    • Pinterest
  • ×

    Updated: Jul 14, 2022 by Kris Jarrett

    The Cutest Little Mummy Pillow (That’s Super Simple to Make!)

    I love popping into Pottery Barn for holiday inspiration and after seeing a super cute mummy pillow there last week, I thought it would be the perfect little thing to DIY and add to our Halloween decor. It turned out to be about as simple of a DIY as there is – so simple that it would be a great activity to do with kids!

    Halloween mummy pillow - so cute and a super simple DIY!

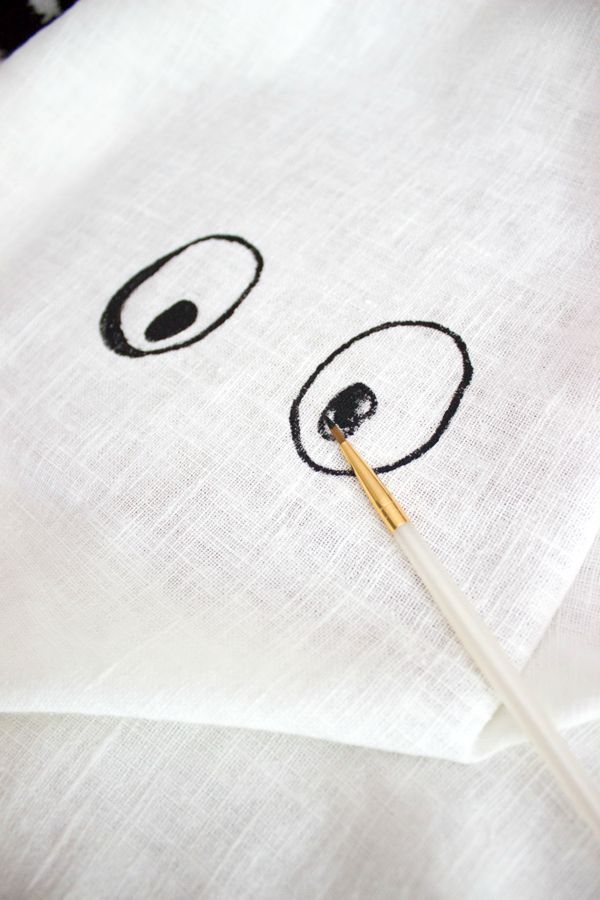
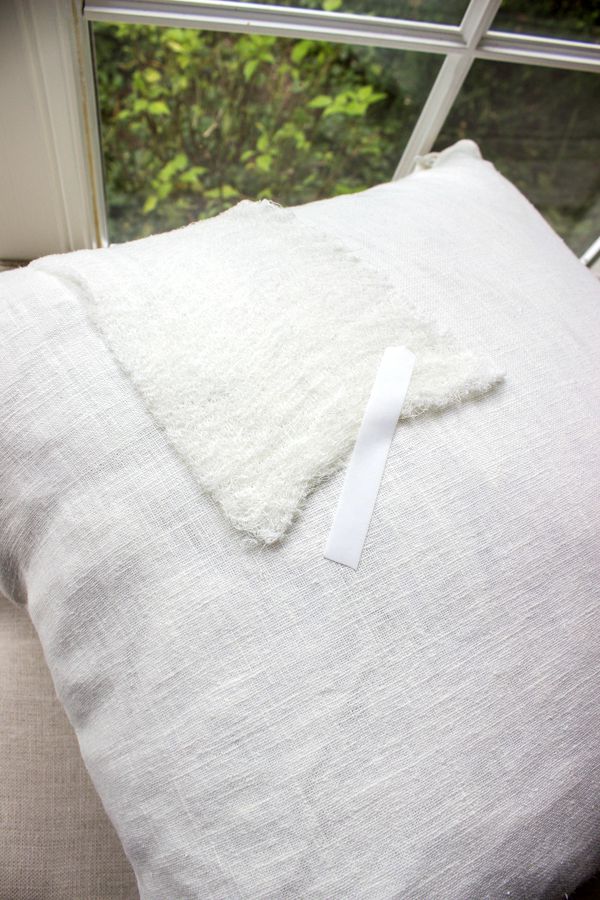
    The supply list is short – a white VIGDIS pillow cover from IKEA (only $7), black craft paint, a fine brush, two 3 yard rolls of cotton gauze (mine was 4.5″ H), and white medical tape. The first step is to paint the mummy eyes on your pillow with the black craft paint and a piece of cardboard in between the front and back of the pillow so the paint doesn’t bleed through. And guess what? Mummy eyes aren’t perfect so if they’re a little lopsided or uneven, all the better – no perfectionism needed here!

    Paint eyes on pillow with craft paint

    Once the painted eyes are dry (they dry pretty quickly!), take your first 3 yard roll of gauze and tape it to the back of the pillow (white medical tape will blend in best):

    Tape gauze on back of pillow

    Wrap the first roll of gauze around the top half of the pillow several times, giving it a twist here and there. Either secure the end of the roll to the back with tape or tuck it into a loop of rolled gauze. Repeat the same process around the bottom half of the pillow using the second roll of gauze. Done!

    Halloween mummy pillow that's a 15 minute DIY!

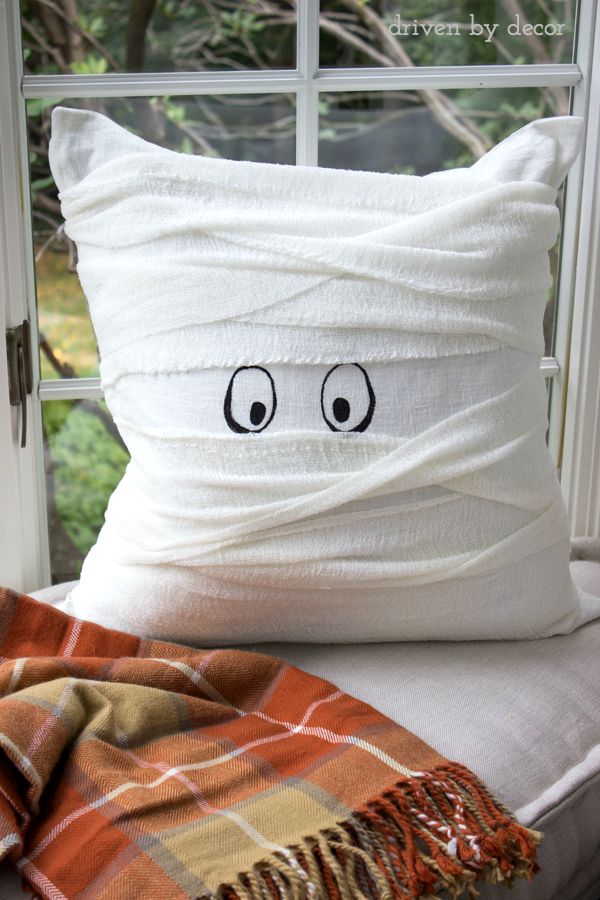
    I’m not really doing my poor mummy pillow justice just propping him up on a plaid throw when he would look best snuggled among several other fall pillows on the couch but this is the scene behind the scene right now in our house:

    Torn up living room

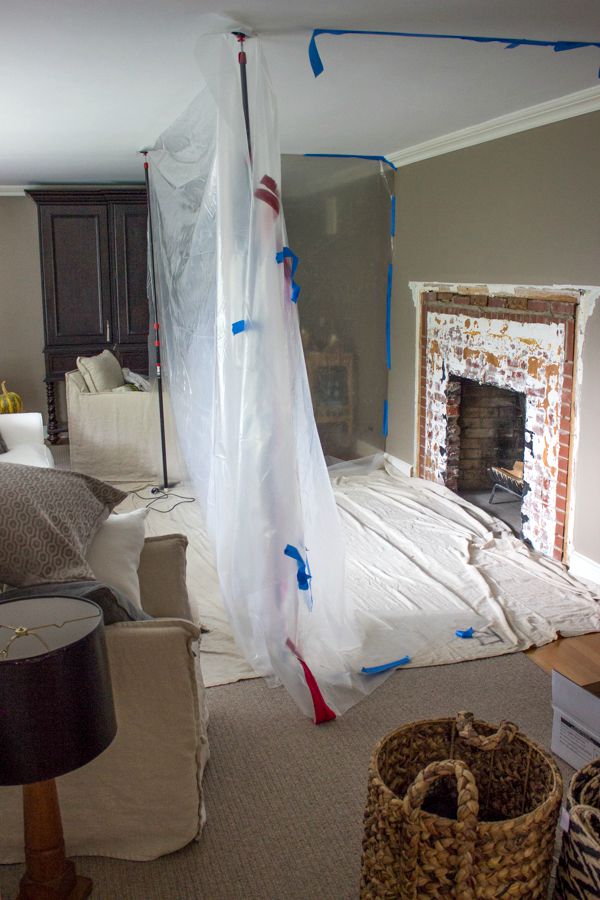
    My contractor demolished our fireplace weeks ago (and set up the plastic walls to keep the demo dust from spreading all over the room) and then it’s been one delay after another with the tile guys (they have sworn that they are finally coming on Monday!). But that’s how it goes with remodeling – it has to get worse before it gets better, right?! I’m trying to be patient because I’m thinking that the new fireplace will be worth it in the end.

    Hope you guys enjoy your day. I’ll see you back here later in the week!

    KJ Signature

    • Pin
    • Share
    • Email

    Categories: holiday decorating

    ✉️FREE EMAIL SERIES ✉️

    5 Secrets to Reinventing Your Home on a Budget

    Simple tips to instantly transform five rooms in your home!

    Reader Interactions

    Comments

    1. lisa @ Shine Your Light says

      September 29, 2015 at 8:42 am

      That is seriously the cutest Halloween decor ever – right up my alley. Easy and not too obnoxious! So excited for you on your fireplace makeover!!!!!!!

      Reply
      • Kris Jarrett says

        September 29, 2015 at 8:53 am

        Thanks Lisa! I’m not much for lots of blaring orange like you see for so many Halloween decorations so this one fit this neutral-loving girl’s bill 🙂

        Reply
    2. Flavia says

      September 29, 2015 at 9:53 am

      Oh my goodness Kris, that is the cutest and simplest DIY ever! I have a hard time spending money on Halloween decor because is such a short holiday. Although, I think I make it shorter by getting things out on October 30th !!! (blush) – I think even my 5 year old would enjoy this DIY so much. – I can’t wait to see your new fireplace, and just in time for the cooler weather!

      Thanks for keeping me inspired!

      XOXO

      Reply
    3. classic•casual•home says

      September 29, 2015 at 11:53 am

      Adorable! Can’t wait to see your fireplace done…and I know you must feel the same!!

      Reply
    4. Ann says

      October 29, 2015 at 9:23 pm

      What a great pillow! Emma and I are making one tomorrow for our front porch.

      Reply
      • Kris Jarrett says

        October 30, 2015 at 10:09 pm

        I hope it turned out awesome! Hope you guys have a fun Halloween!

        Reply

    Leave a Reply Cancel reply

    Your email address will not be published. Required fields are marked *

    This site uses Akismet to reduce spam. Learn how your comment data is processed.

    Primary Sidebar

    ✉️FREE EMAIL SERIES ✉️

    5 Secrets to Reinventing Your Home on a Budget

    Simple tips to instantly transform five rooms in your home!

    Meet Kris

    Kris of Driven by Decor

    Follow Me

    • Facebook
    • Instagram
    • Pinterest
    All images on DBD are copyrighted and taken by me unless otherwise noted. If you'd like to use any of my images, please request their use via my Contact page.

    I am a participant in several affiliate advertising programs (including the Amazon Associates program) and earn fees from qualifying purchases. For more information, see my full disclosure statement {here}.

    To view my privacy policy, go {here}.

    Copyright © 2023 · Driven by Decor