Right before moving in, we refinished the hardwood floors in several rooms of our North Carolina home. I got so many questions from those following along on Instagram Stories that I decided to share a post with all of the details about my floors and the start to finish process of hardwood floor refinishing.
Having moved around a lot, this is the fifth time that we’ve refinished hardwoods and each time I learn something new that helps me make better choices next time. I’m going to dish everything I’ve learned so you can be a pro from the get-go! (post includes commissionable links; for more information, see my full disclosure statement {here})
Our Newly Refinished Hardwood Floors
Let’s kick things off with a look at our hardwood floors before and after refinishing. Previously our hardwoods were finished with an oil-based polyurethane that ambered over time. They actually looked so orangey that when our refinishers came to estimate the job they weren’t even sure whether they were red or white oak:
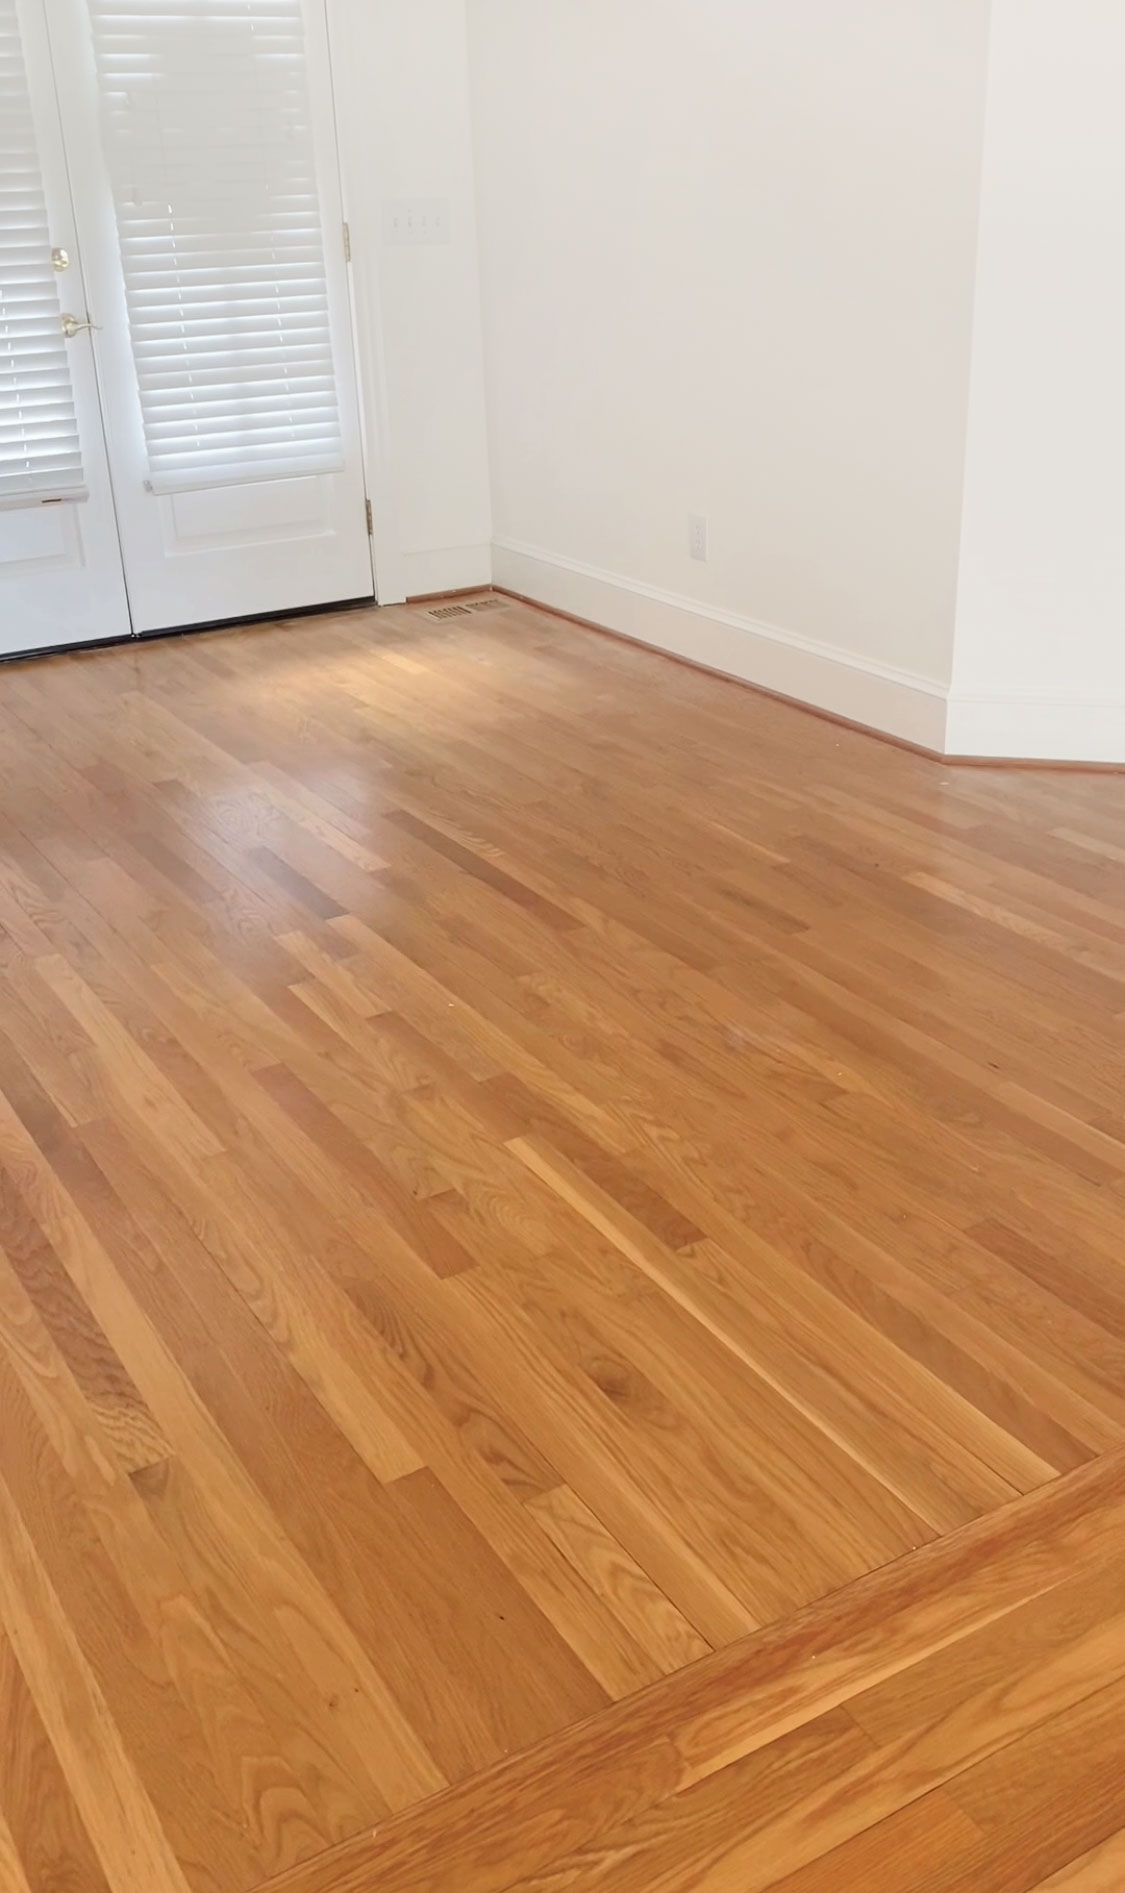
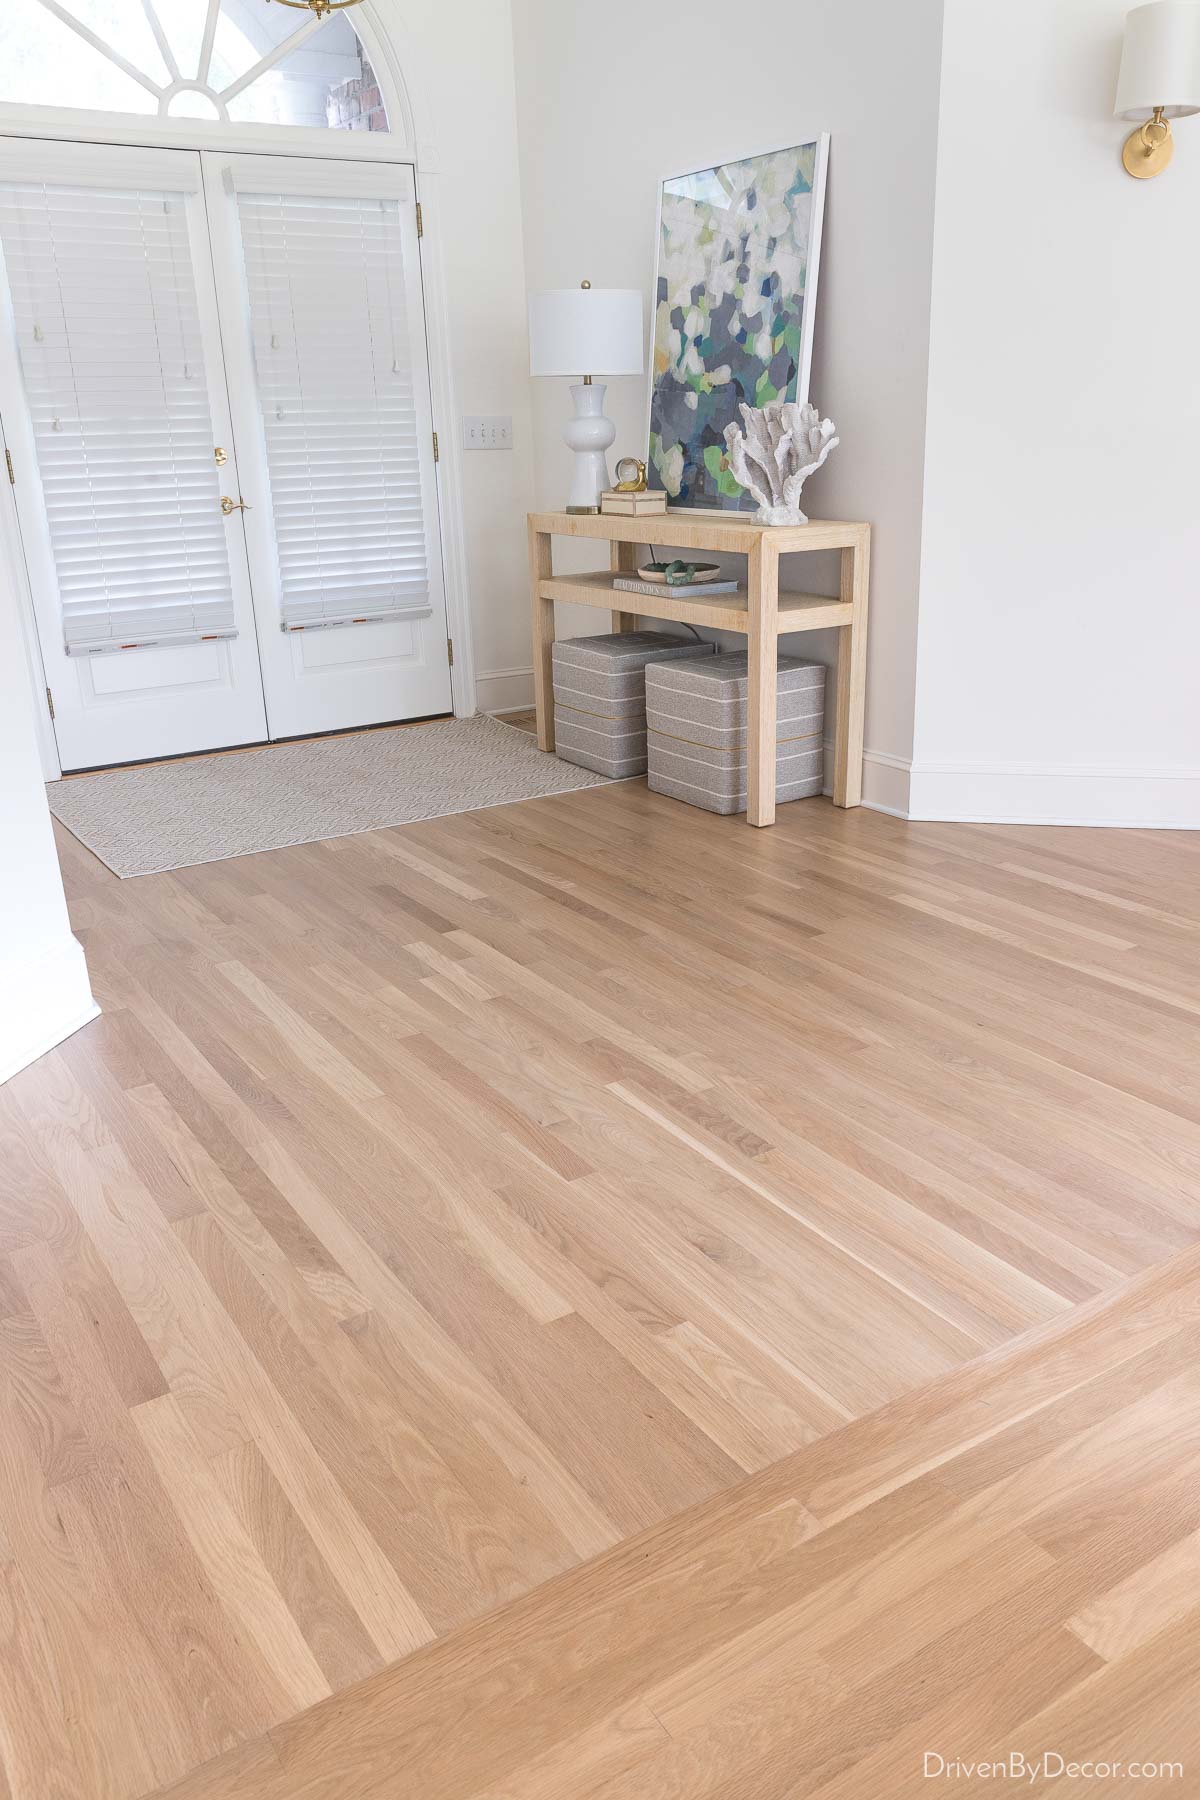
Thankfully, it turns out that they were white oak (it’s harder to get a non pink-tinged natural look with red oak) and after our hardwood floor refinishing, I couldn’t be happier with their new look:
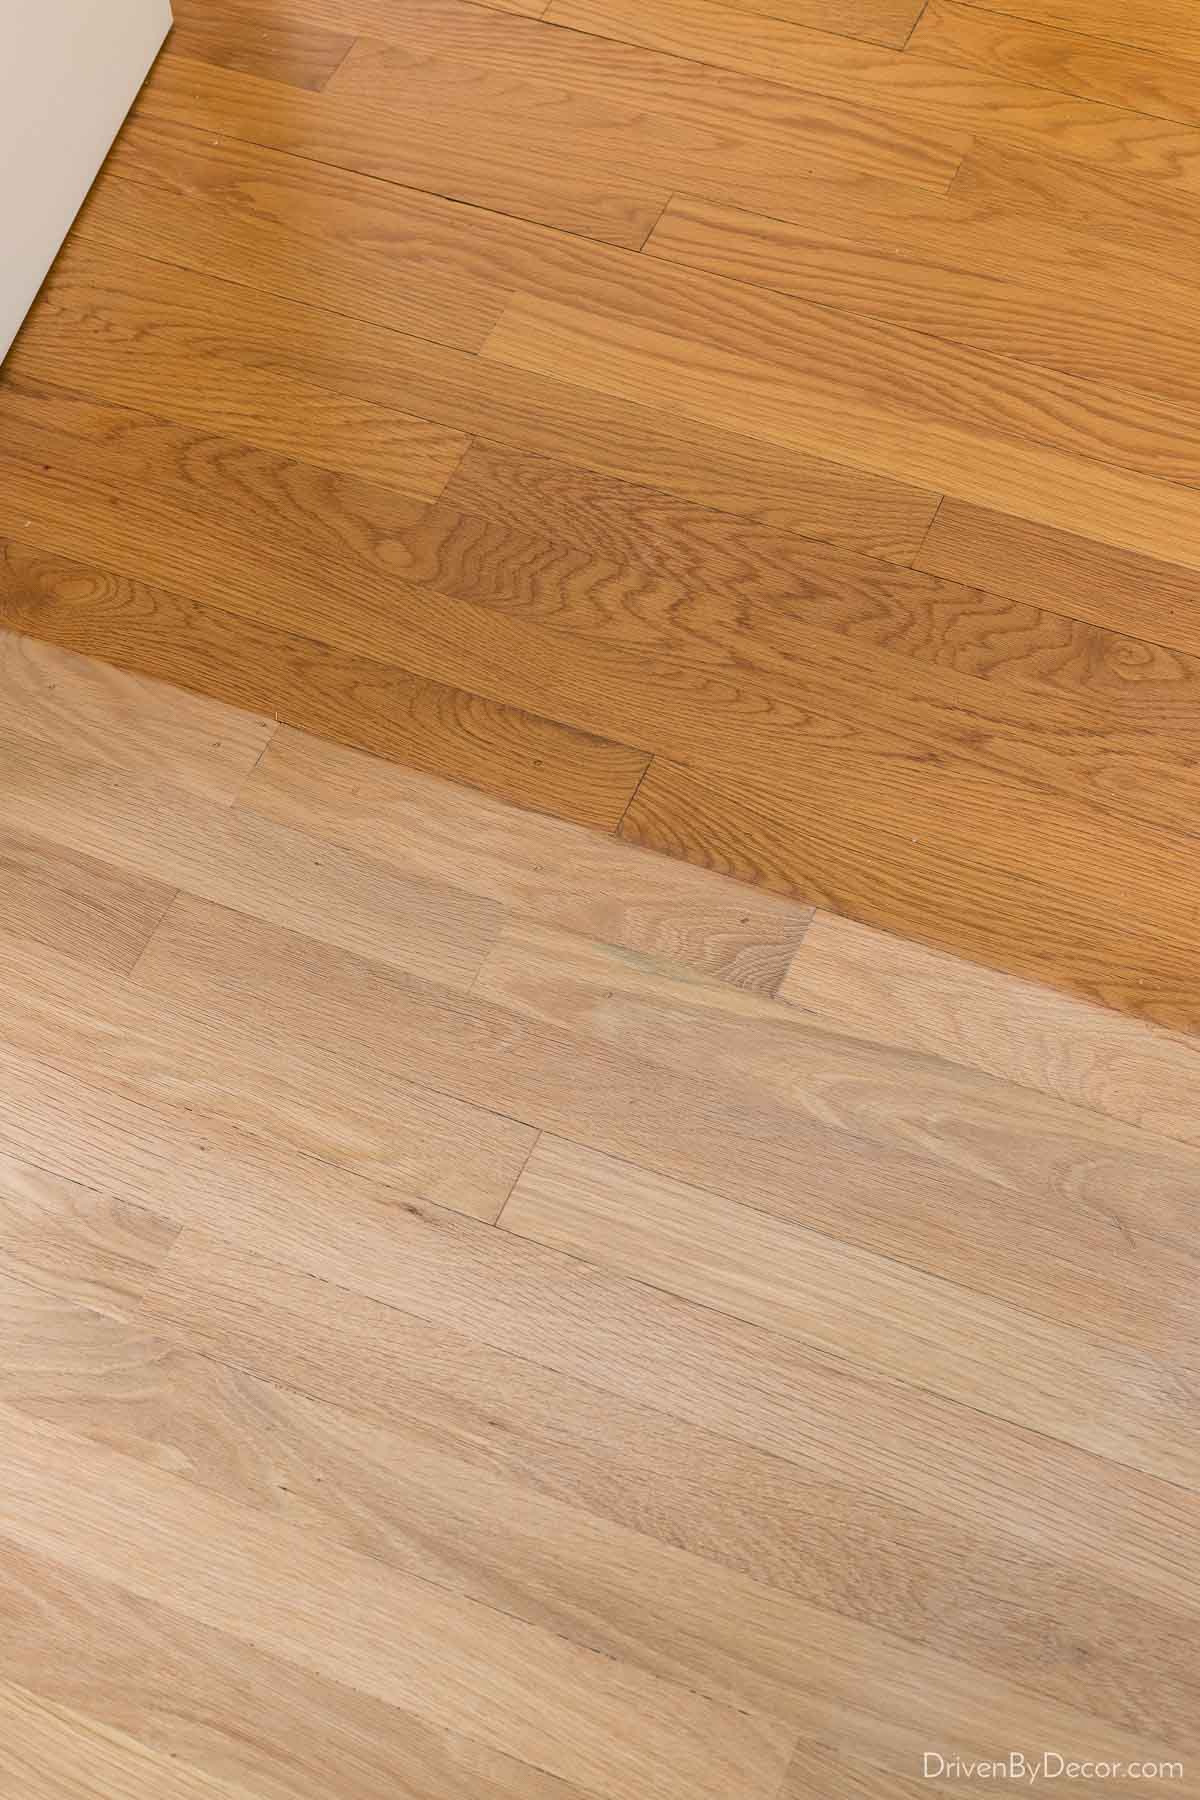
This side-by-side comparison shows what a difference it made – we did our hardwood floor refinishing in two phases (phase two was after the remodel our kitchen and sunroom where we replaced the carpeting with hardwoods). You can see both the “before” at the top and the “after” at the bottom when you look at the current transition between the two spaces:
Planning & Preparation for Hardwood Floor Refinishing
Before you jump into refinishing your hardwood floors, take some time to plan and think a few things through. It’s more important than you might think to have a good idea of any future remodeling plans that could affect the floors in that space.
For example, we knew we’d be remodeling our kitchen down the road, including changing the size and shape of our kitchen island. So it didn’t make sense to refinish our kitchen hardwoods right away because we’d just have to redo them all over again a few years later after remodeling.
Another thing to consider is any future changes to bathrooms with hardwoods you’re planning to refinish. Our hall bathroom was part of the area we refinished and I knew I would be swapping out the toilet and vanity sometime soon so I had a plumber remove them prior to the floors being refinished:
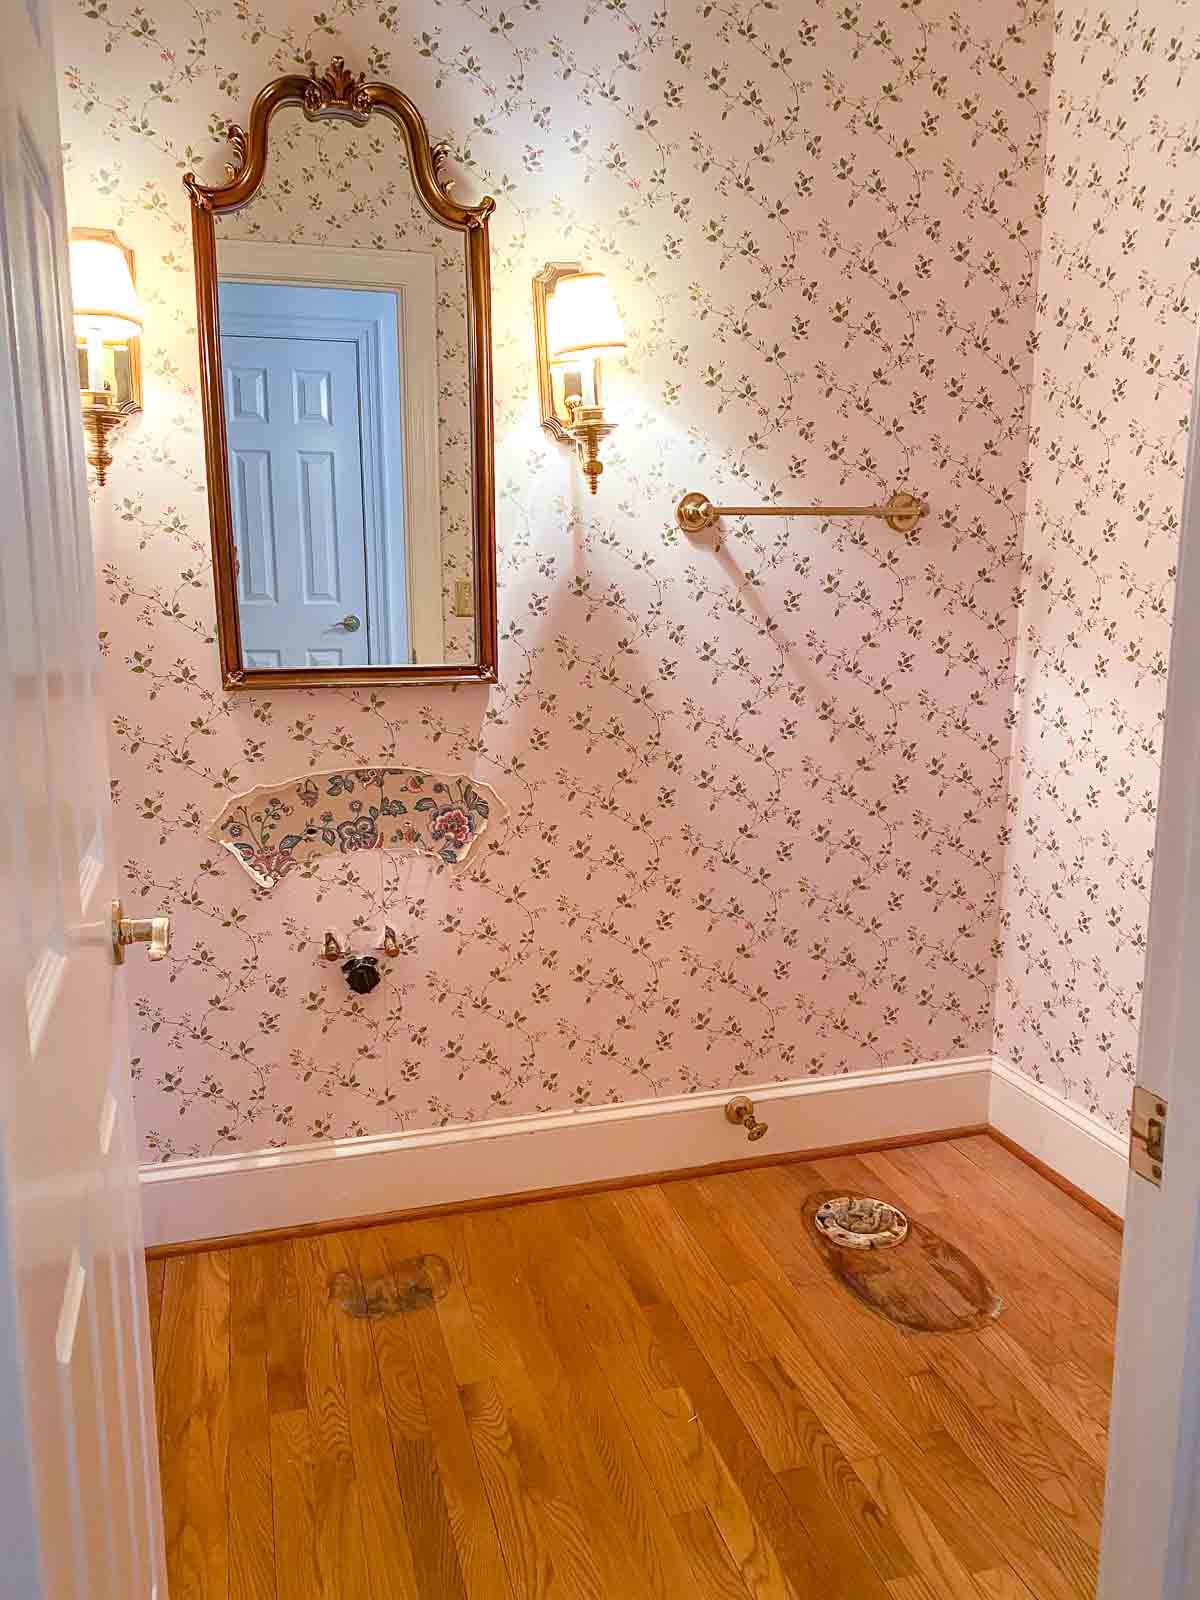
If I hadn’t pulled them, the hardwood refinishers would have refinished around the base of the toilet and pedestal sink that were there. Then when I replaced them with pieces that had a different footprint (for example, putting a vanity with an open base where the pedestal sink once was), you’d see some of that orangey footprint of the old hardwood floors. If you remove your sink and toilet, after your floors are refinished you can put back your same bathroom pieces until you’re ready to remodel or move ahead with replacing them at that time.
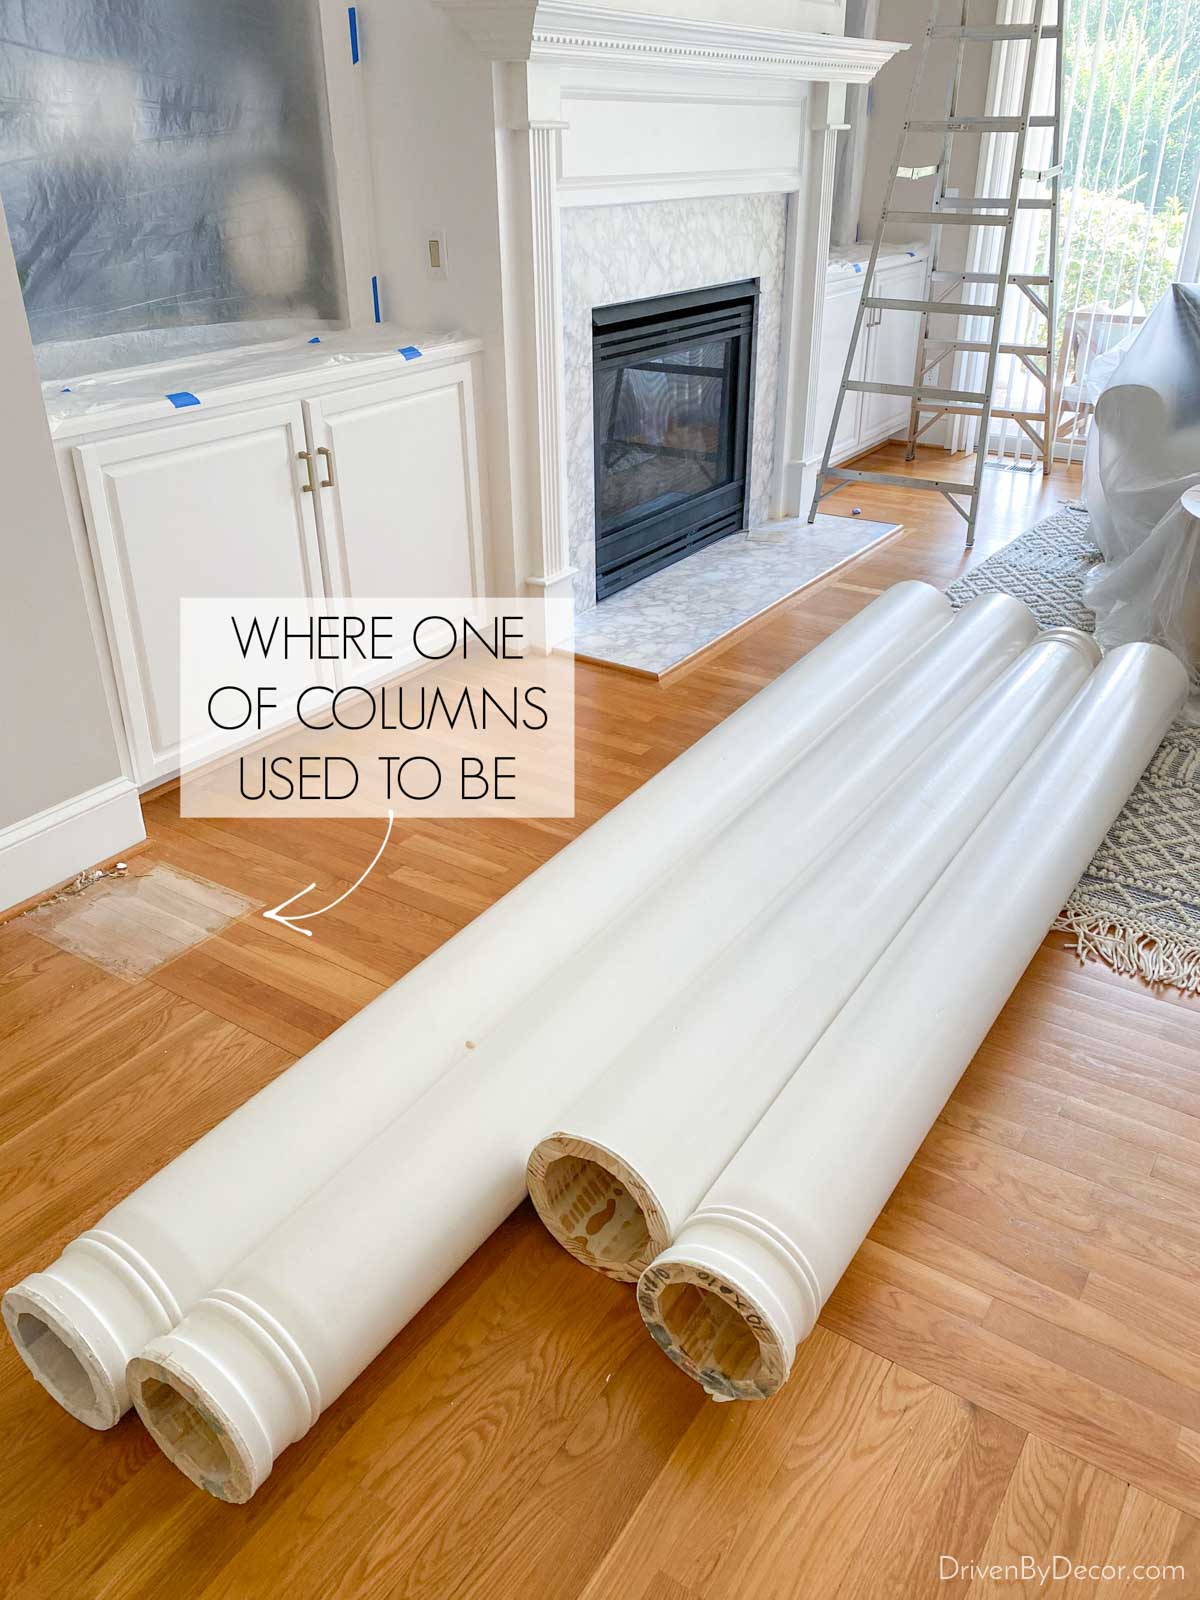
Another thing that we had to knock out before refinishing our hardwoods is the removal of our decorative interior columns. The base of the columns rested on the hardwoods so if we removed those after refinishing, we’d be left with a square footprint that didn’t match our new floors:
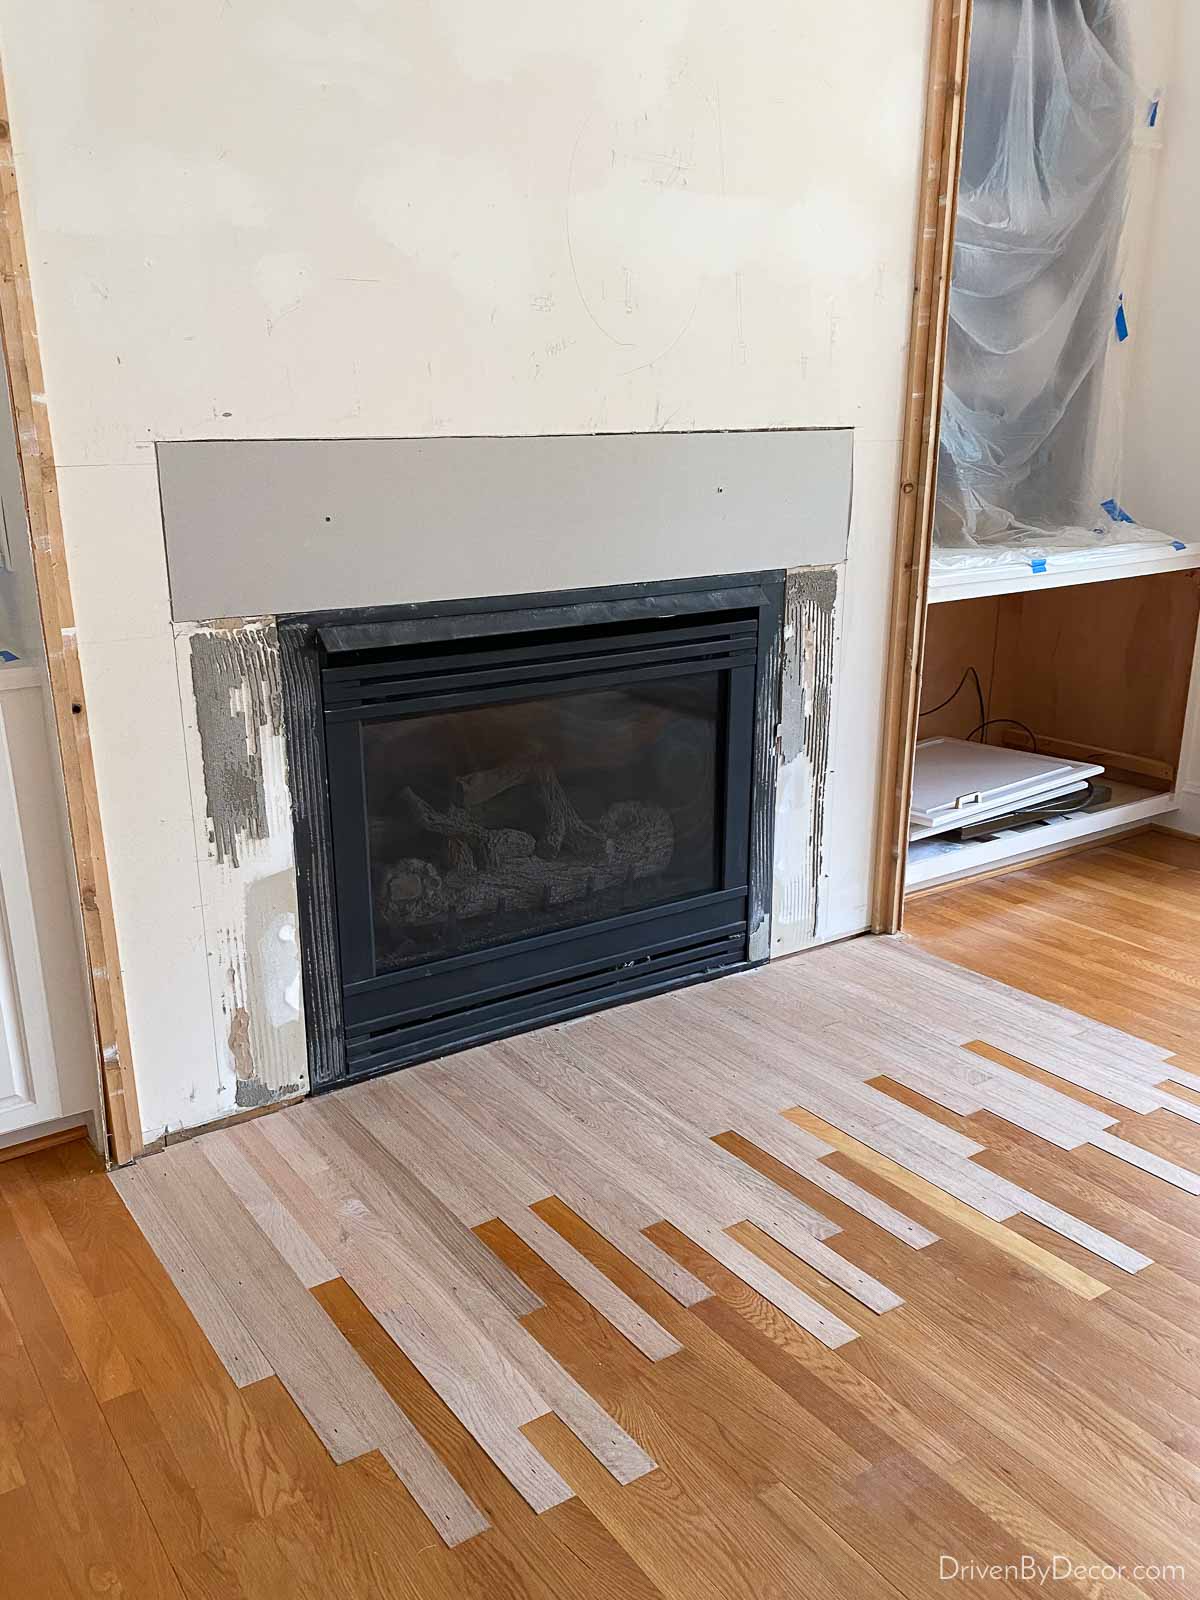
Additionally I went ahead and removed our fireplace hearth (we have a gas insert so are able to do this) and had new hardwoods placed where our hearth used to be in prep for our future fireplace remodel):
I also removed the doors and wall enclosing the washer and dryer in our laundry room and had new matching wood flooring added (again, because of future remodel plans to add a counter and cabinets above the washer and dryer):

So basically we tore our house the heck up before refinishing our hardwoods – ha! It can truly be a domino effect but you don’t want to have to refinish the same floors twice in a short period of time due to poor planning so take the time to think it through!
Another part of planning for your hardwood floor refinishing is planning the logistics of the best time to refinish your floors. If you can have them refinished before you move into a new home, DO IT! It makes life so much easier!
I scheduled ours so that I was at our house for the first day of refinishing to meet the crew doing our floors and to pick the stain and then I headed back to CT to work on getting everything packed and prepped for our move. I also made sure I did it far enough in advance of the moving truck so that it would be safe to have a rug and furniture placed on our newly refinished floors on move-in day.
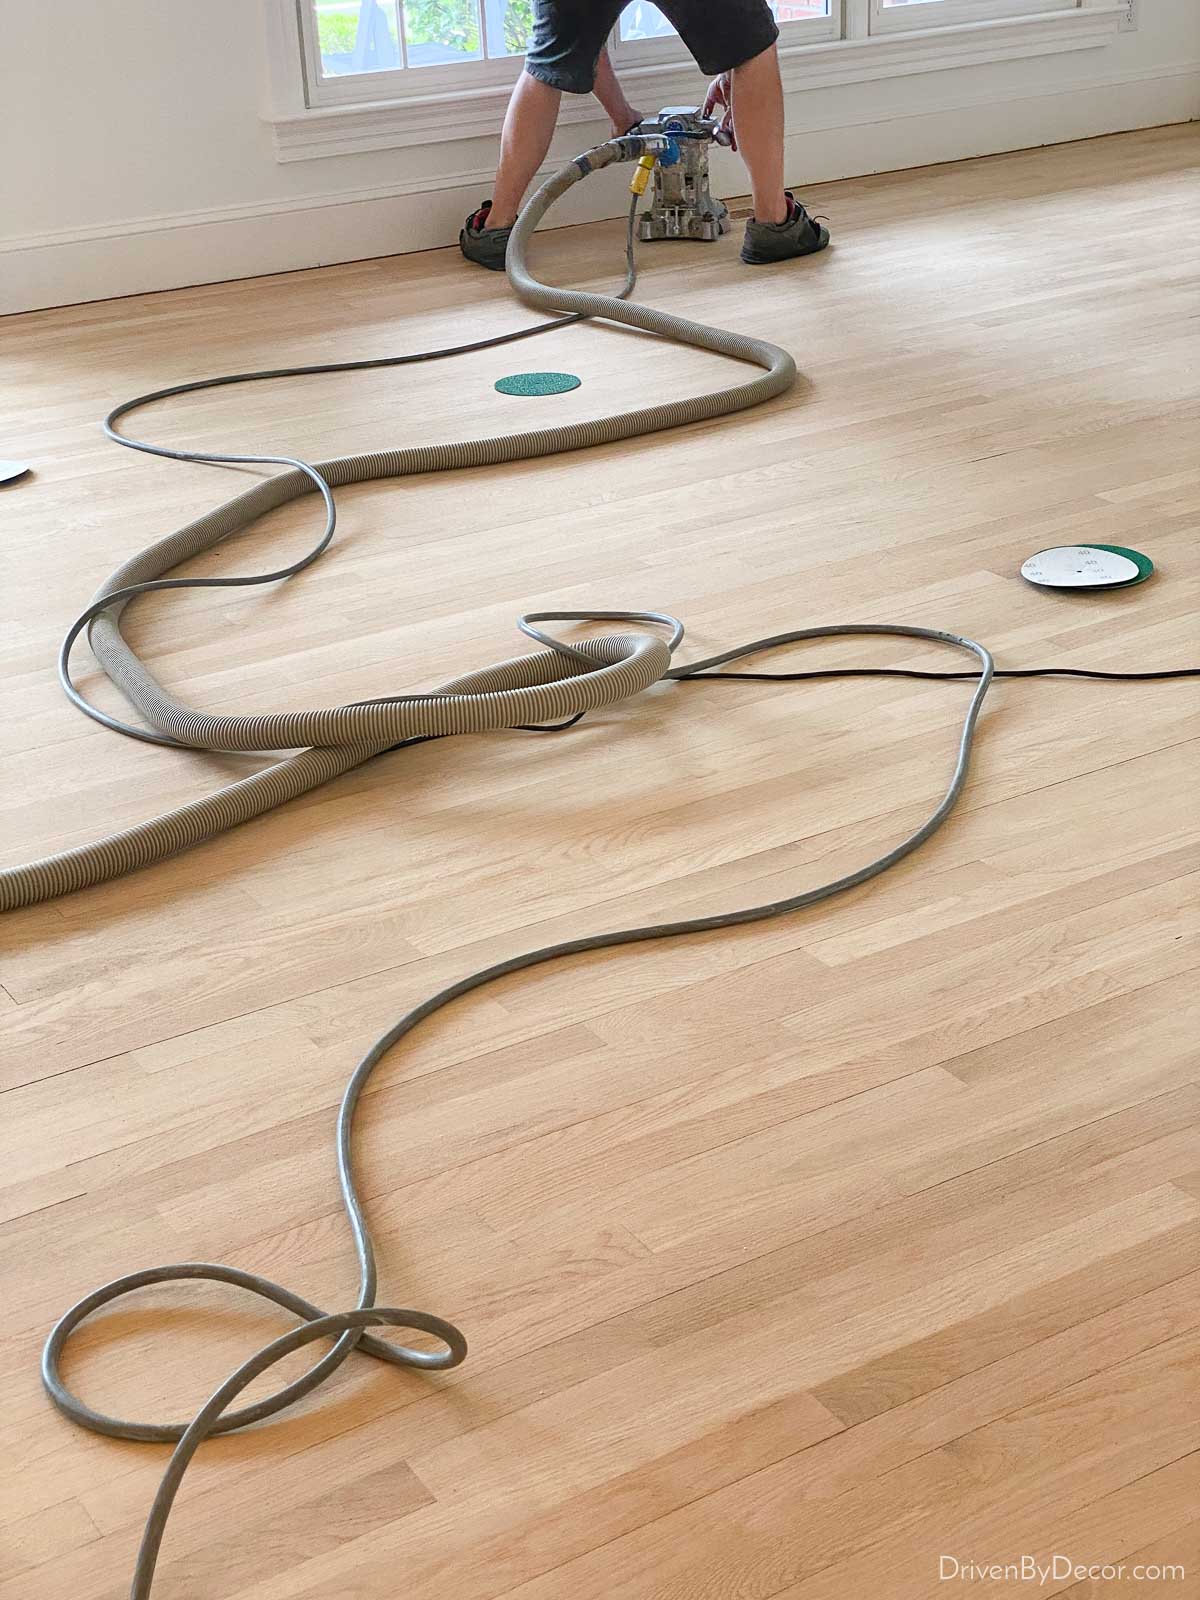
The Sanding Process
The actual hardwood refinishing process starts with taking off the shoe molding by your baseboards and sanding down your floors. It was pretty exciting to see more and more of our orangey floors disappear with each pass of the sander:
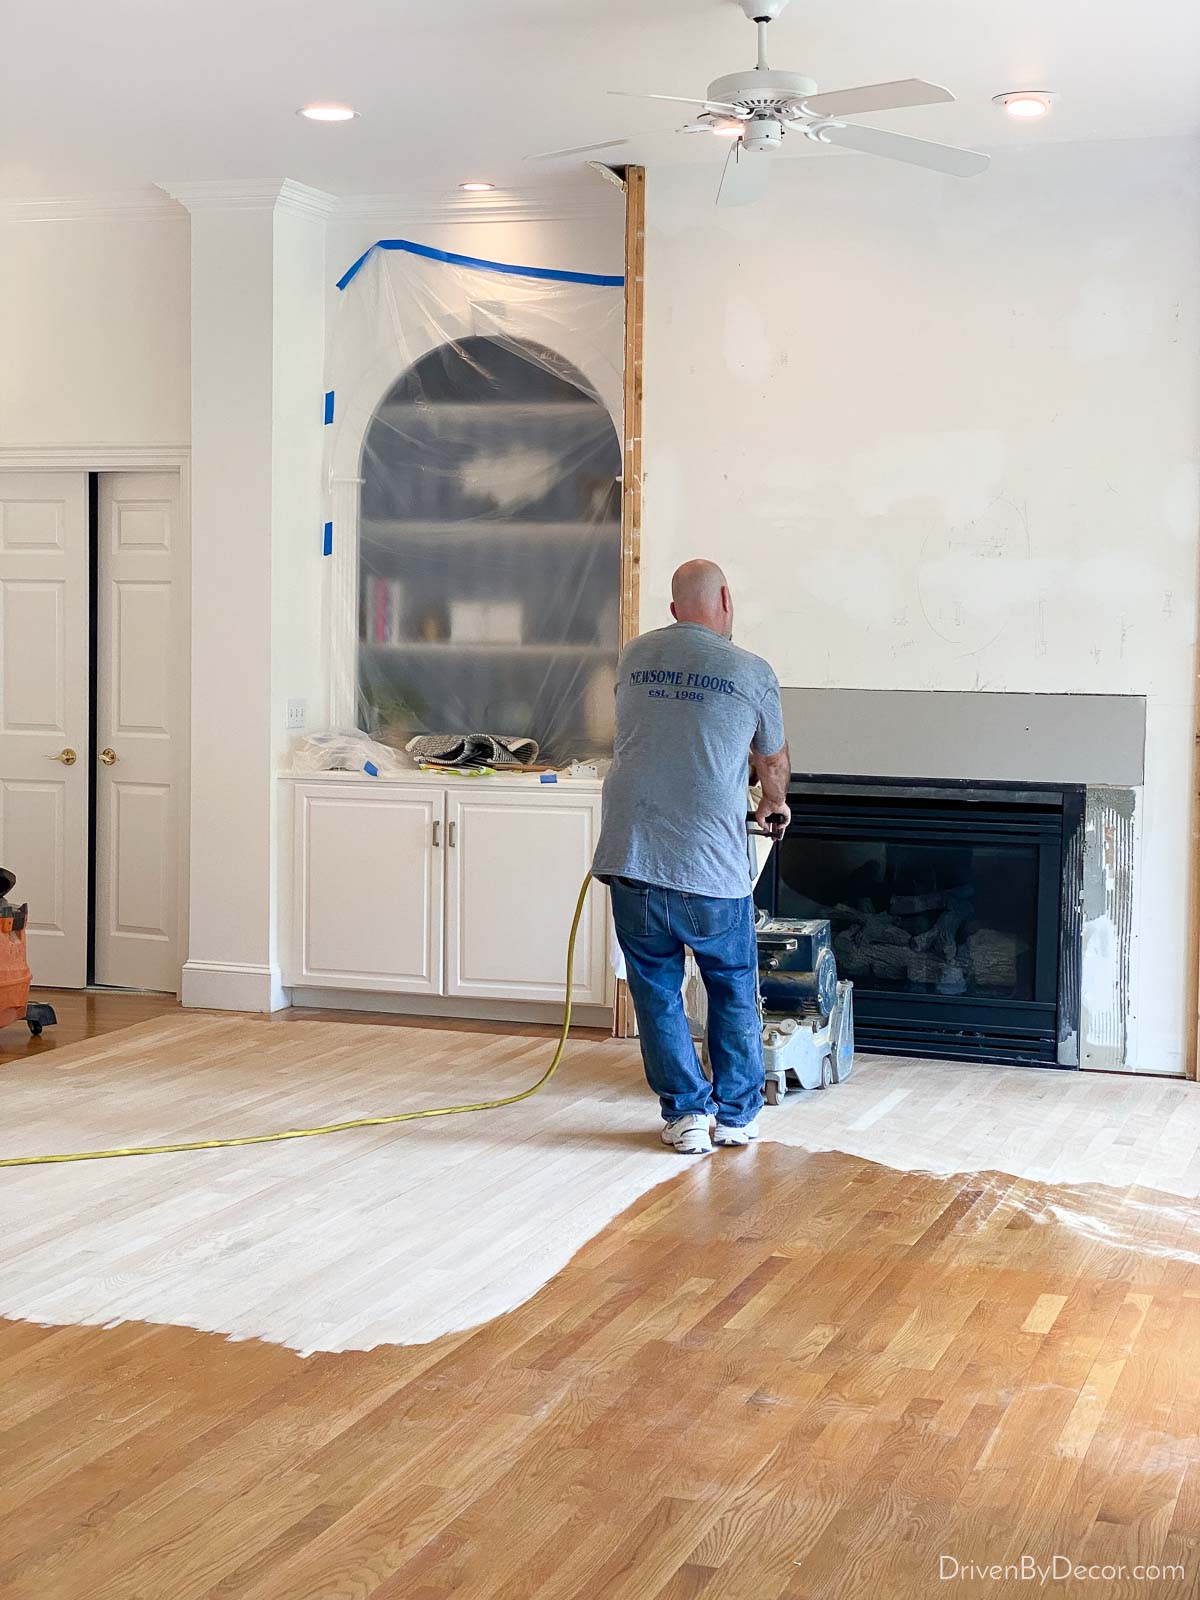
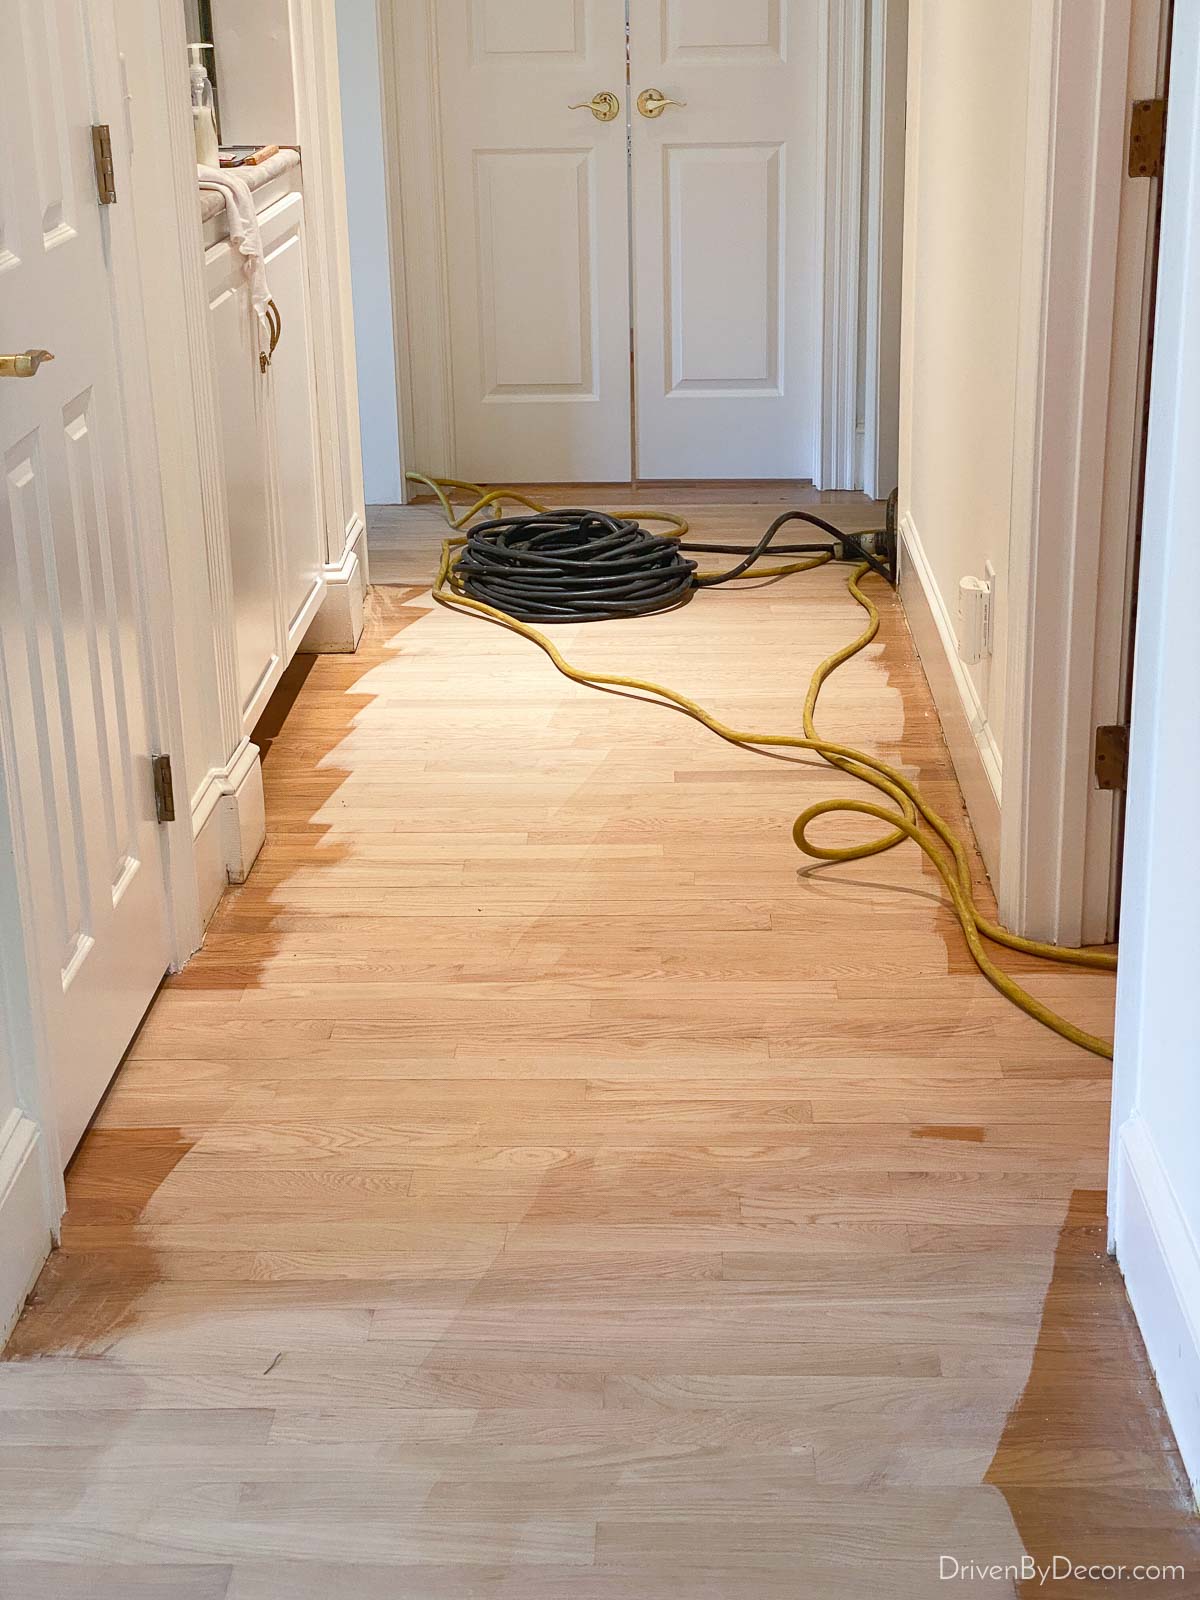
They use larger sanders to do most of the room and handheld sanders to sand around the edges close to your baseboards:
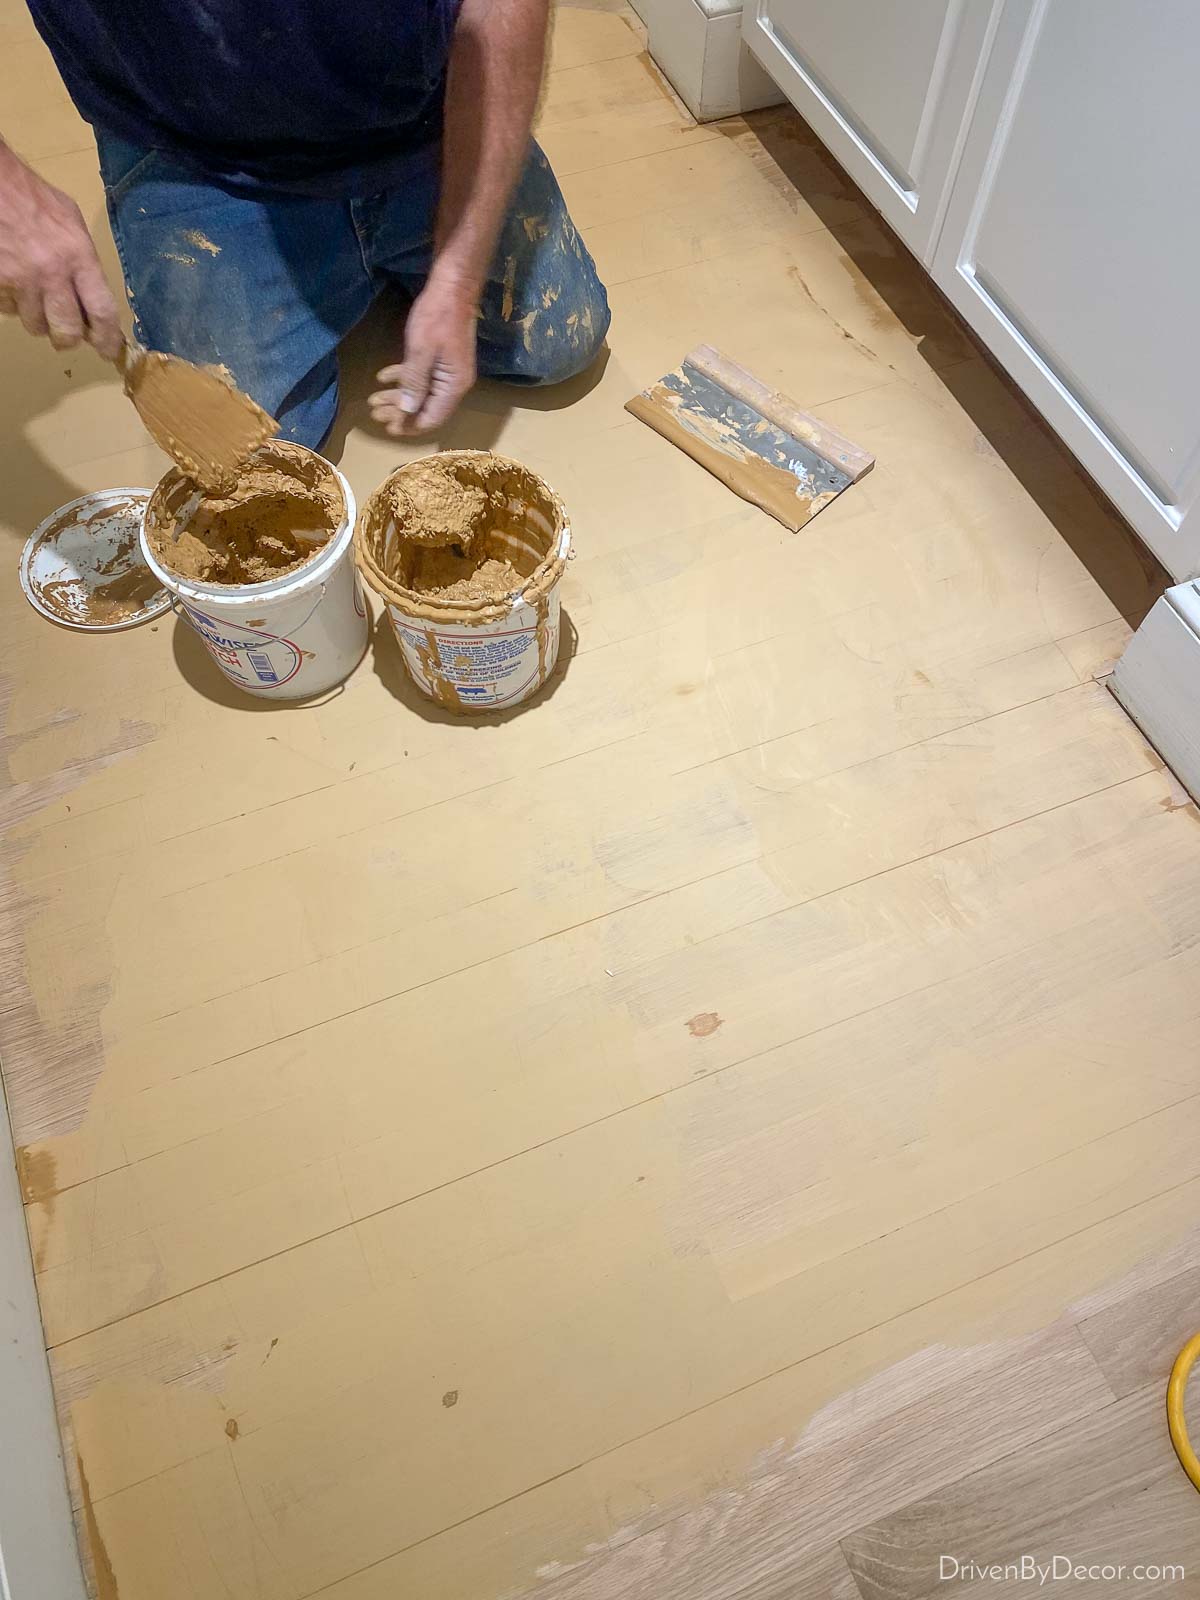
If you have any gouges in your floors or gaps between your boards, they can patch those with wood filler between sandings. Some areas of our floors had so many boards with gaps between them that they applied wood filler to the entire space (it looked amazing once done!):
As you can imagine, sanding the floors creates dust and I got a lot of questions from you guys about exactly how dusty it is when you’re getting hardwoods refinished. Honestly, it depends a lot on the equipment being used, as some refinishers have sanding equipment hooked up to vacuums that remove most of the sanding dust:
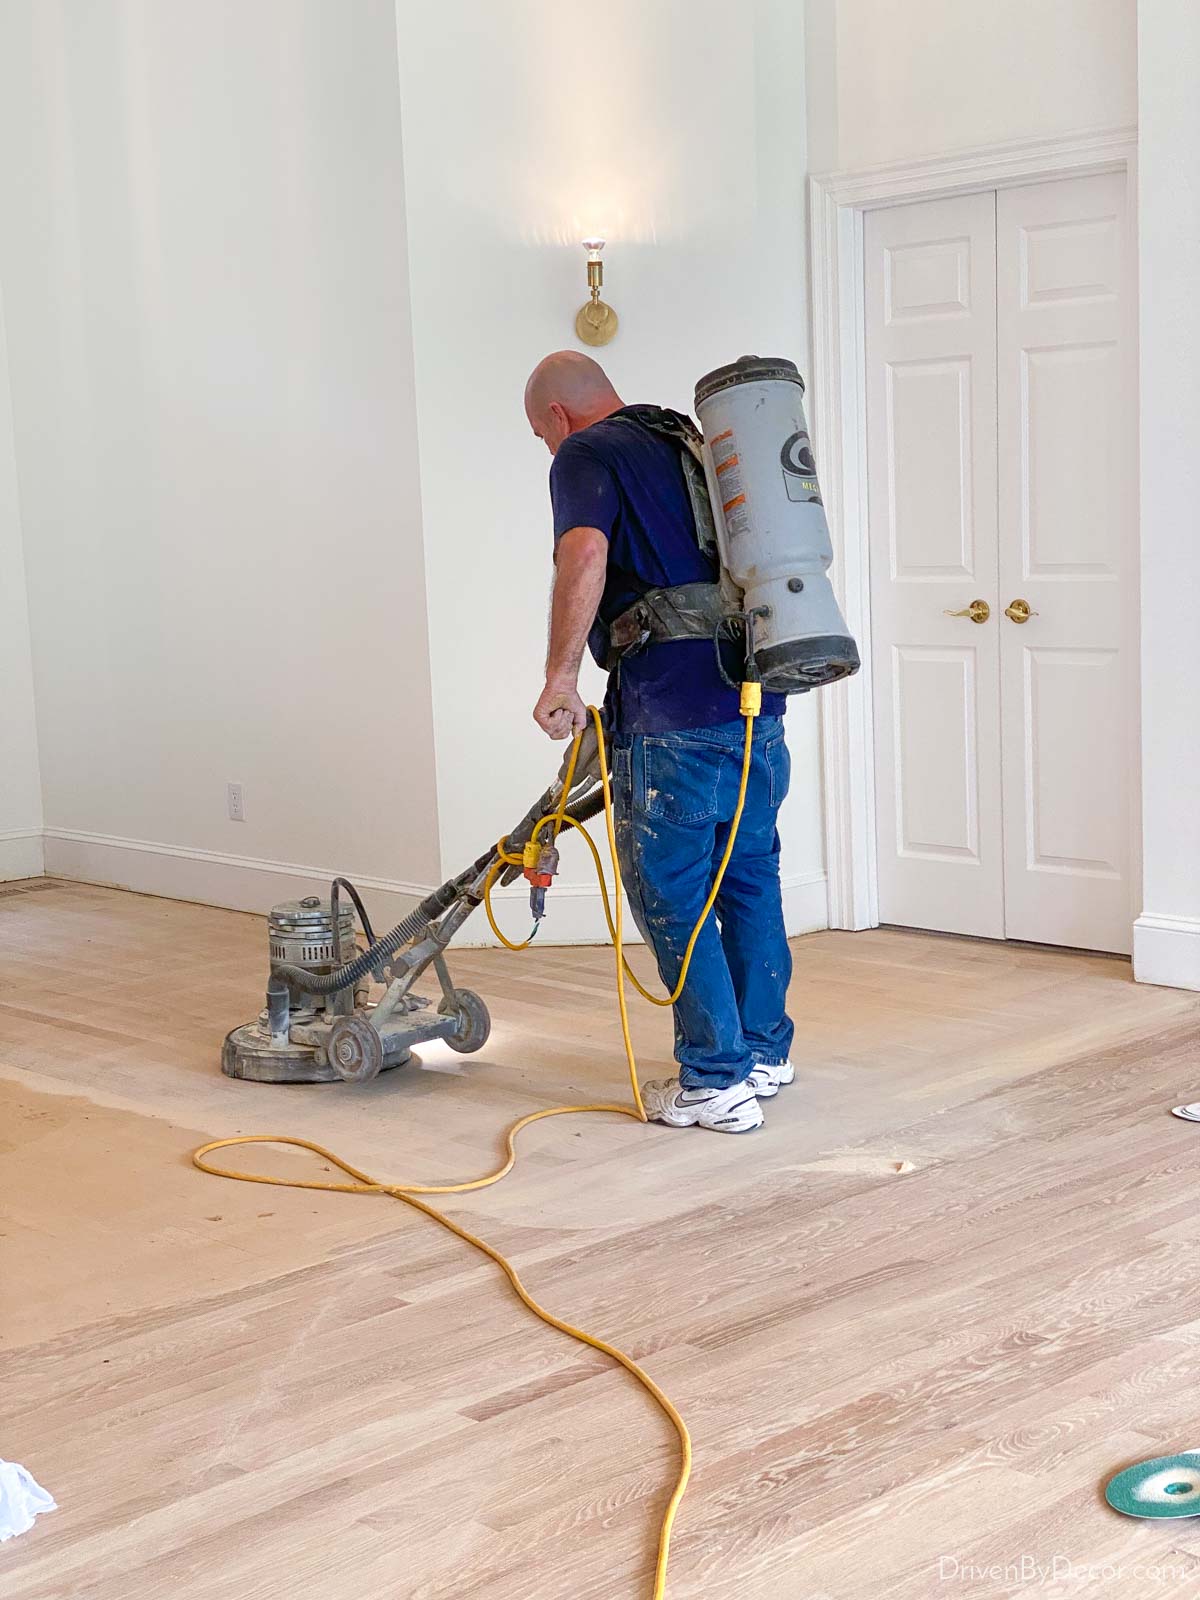
while others don’t. When we lived in Cincinnati, the refinisher had both types of equipment and charged an extra fee if you wanted dustless sanding. I’ve done dustless sanding, regular sanding, and a combo (for this recent job the first large sander they used didn’t have a vacuum attachment option but the rest of their sanders did) and even “dustless” doesn’t entirely eliminate the sanding dust in your house.
Just be diligent about covering what you can (for example, we put plastic over our built-in bookcase shelves) and know that you’ll have to wipe down everything that’s not covered when it’s all over (including your walls!). One thing I didn’t cover during our recent sanding job that I wish I had is our wood window blinds – they had a thick layer of dust on each slat.
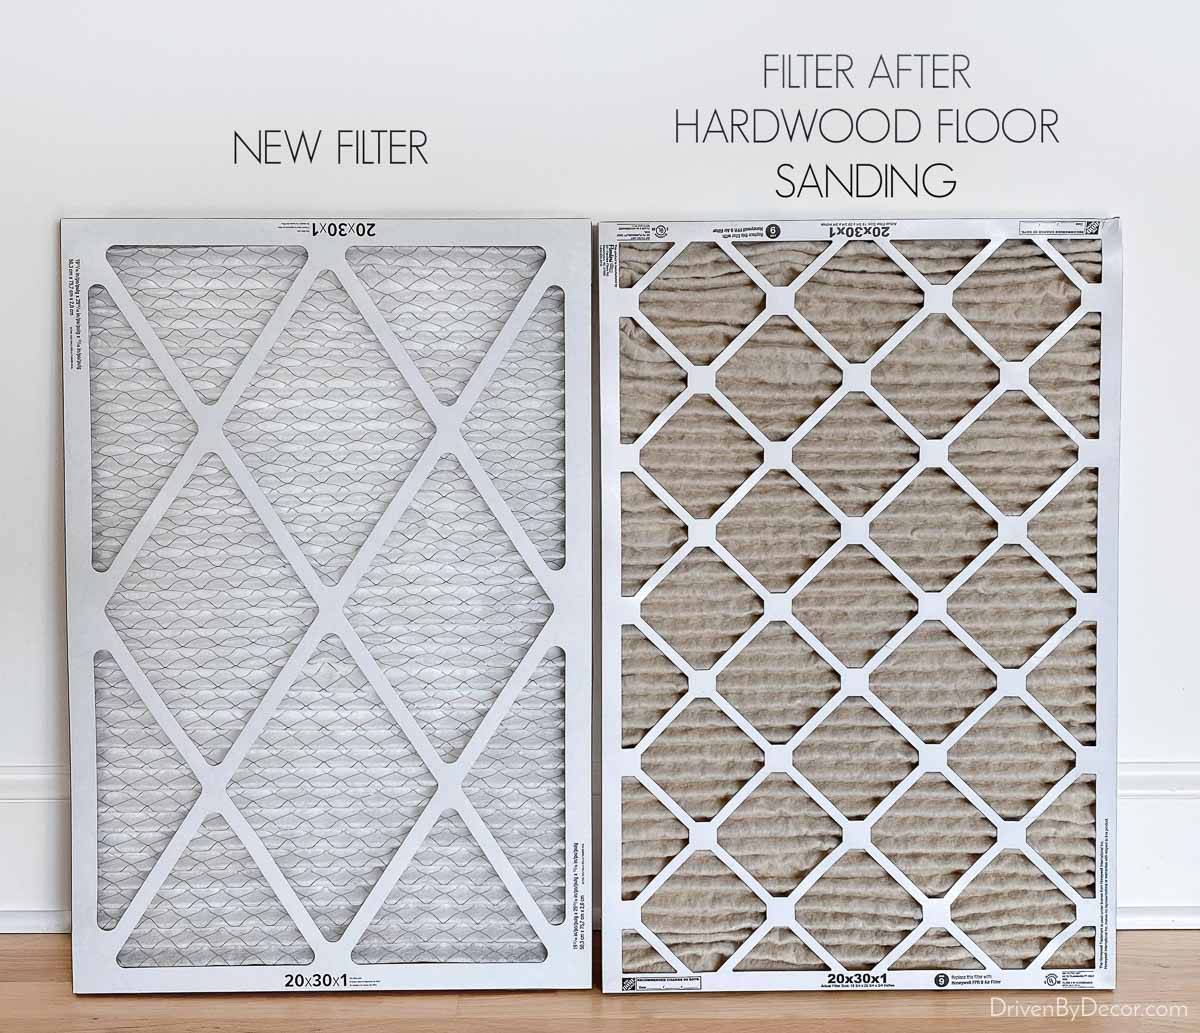
Also be sure to change your air filters immediately after refinishing – they tend to get pretty gross from the sanding dust:
Choosing a Stain
After the sanding of your floors is totally done (which can take 2+ days depending on the size of your space), it’s time for staining them. Choosing a stain is a REALLY important part of making sure you love your floors, and testing stains on your actual floors is the best way to go.
Before your refinishing job starts, you should talk to your floor guys about what you want your floors to look like so they have a good idea of what stains to have on hand to show you. Also, do your own research and if you find certain stains from photos that you like the look of, ask if they are stains you could test out.
I wanted our floors to have a very light and natural look and was considering a subtle white-washed look too. I also knew from experience that I wanted my floors coated with a water based polyurethane instead of oil based (more on that later) for the top coats. Based on what I was looking for, these are the different options we tried out:
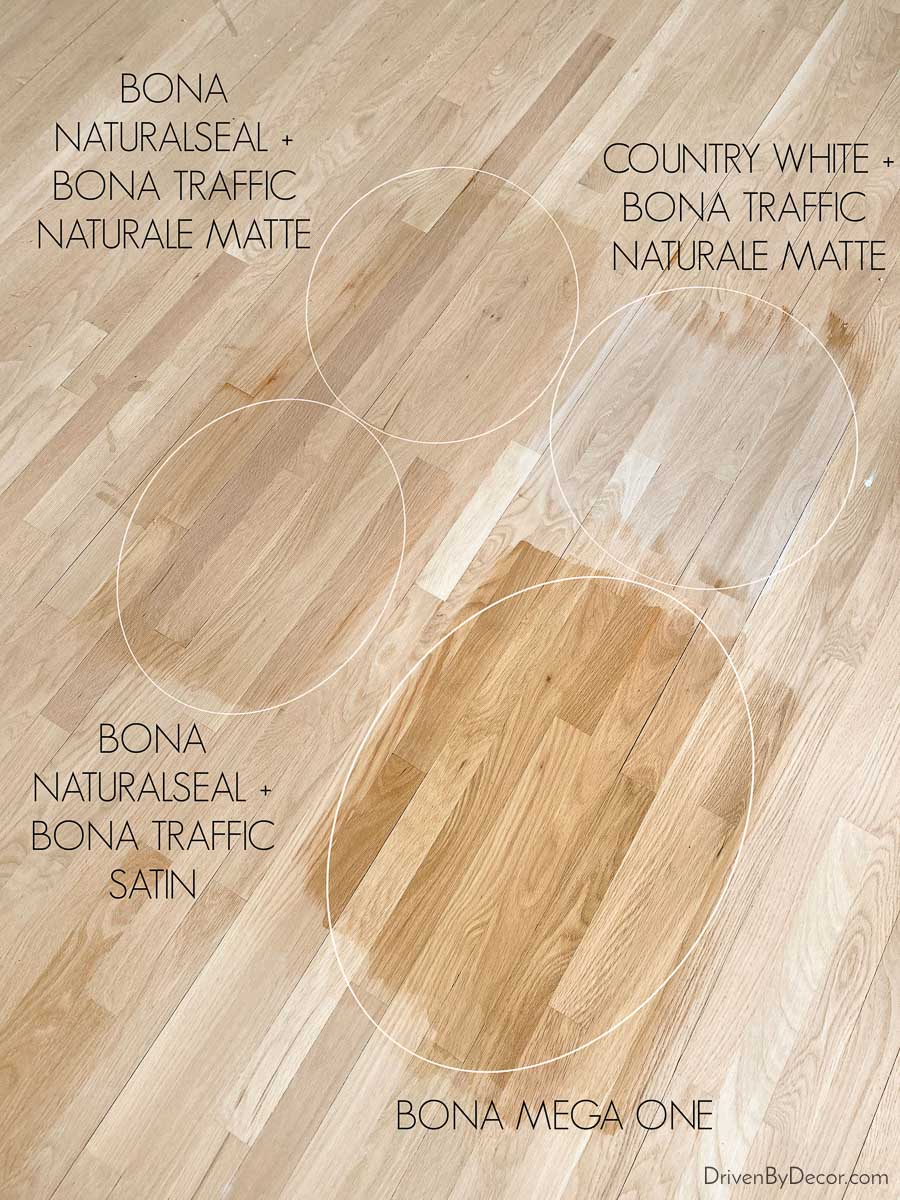
1. Bona Mega One (bottom right) – this is simply a clear, water-based finish with no stain or tinting. It looked a bit more yellowy/orangey in person than in this pic. My refinisher said that after multiple coats it would darken and be somewhat similar to the look of my old floors.
2. Bona NaturalSeal (left) – this finish is designed to give you the look of freshly sanded wood and includes a touch of white. You can see that there’s not a huge difference from the unfinished floors surrounding the test spot – the NaturalSeal just darkens the floors a touch. I originally thought I wanted to do a matte top coat but the refinisher recommended satin and did a sample of both to show me the difference. He was right! It’s subtle but the satin finish added a touch more warmth and a more finished look with a very subtle sheen (it was much less shiny than I expected which is a good thing). The matte left the floors looking a bit too dull to me.
3. Country White (top right) – we tried Country White to see what I thought about a more white-washed look. We also tried it in half strength (which I didn’t show here because it hardly changed the look of the original floors). The Country White brought out the pink tones in my floor more than I had hoped so it was a no-go.
You might have guessed that we ended up going with Bona NaturalSeal topped with Bona Traffic in the satin finish. I honestly wasn’t sure if I had made the right decision because seeing it in a small square is different than seeing it in a large room but I’m SO happy with my choice and would choose the same finishes all over again.
Oil Based vs. Water Based Polyurethane
All of the Bona top coats we tested are water-based which was important to me because oil based polyurethanes yellow over time. With water-based, the way your floors look today is close to how they’ll look ten years down the road – you don’t get that same ambering over time.
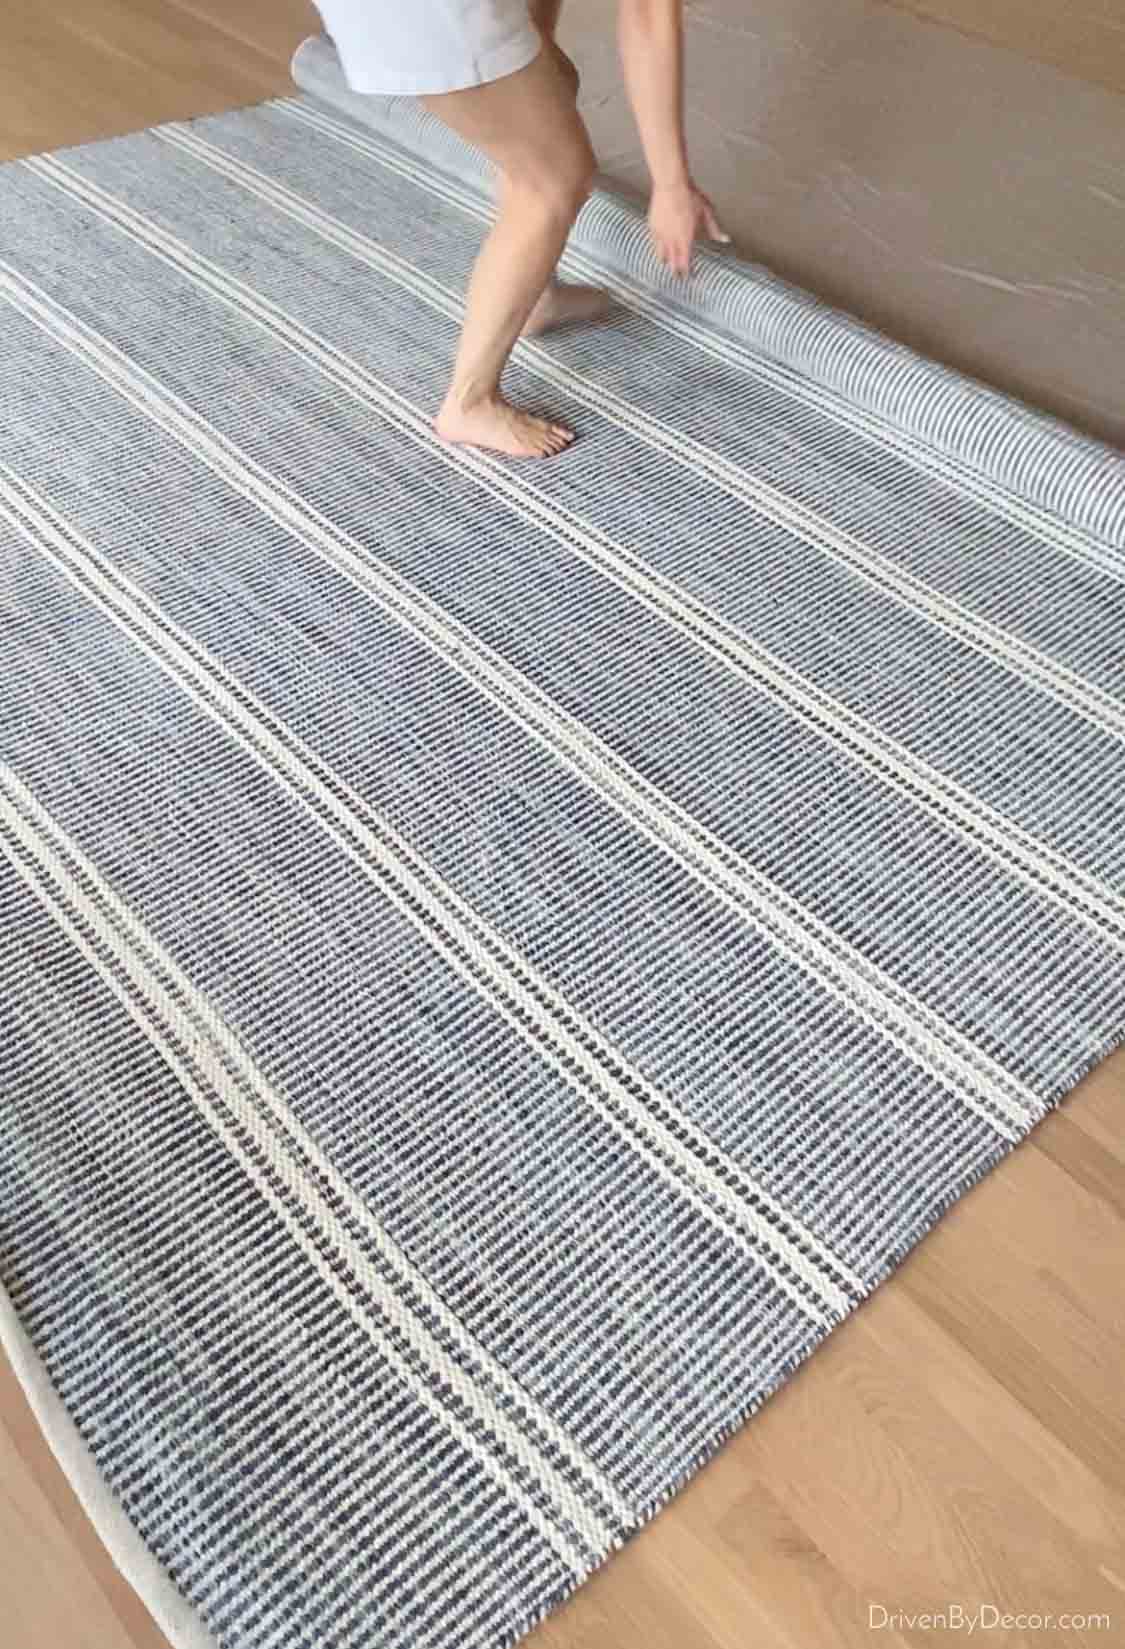
Other benefits of water based polyurethanes are that they don’t have nearly as significant of an odor and they dry much more quickly so you don’t have to stay out of your house as long and can move furniture and rugs back onto your refinished floors sooner. The full cure time for Bona Traffic is 7 days so one week after my floors were refinished, it was safe to lay down {our new rug}:
With oil-based polyurethanes, the full cure time is often 30 days so you have to wait a month before laying down rugs.
The main disadvantage of water based top coats is that they’re more expensive and a bit more difficult to work with since they dry quickly (you want to make sure your refinisher has experience working with these products). For more details on choosing between the top coat options, see my post on oil- vs. water-based polyurethanes from several years back where I compare the two in more detail.
Once your hardwood floors are refinished, be sure you’re using the right cleaning products to keep them looking like new. My post how to clean hardwood floors has all the details!
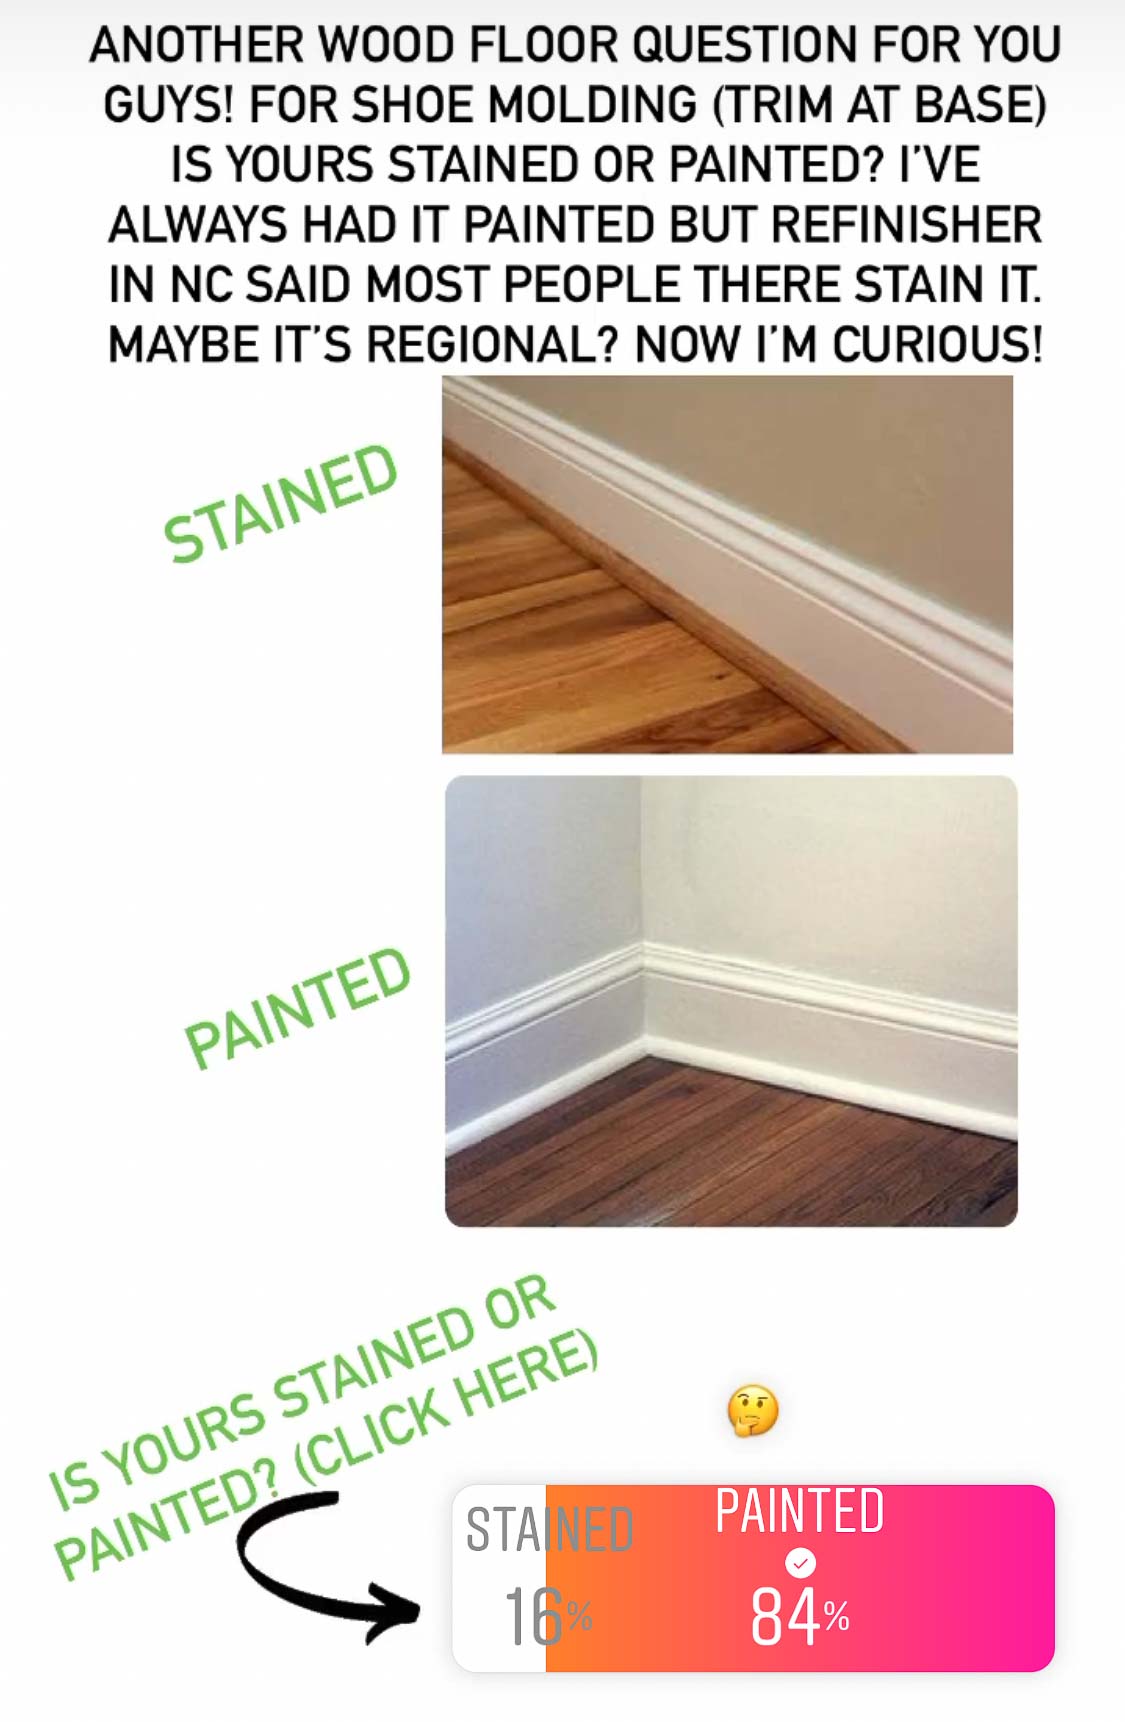
Replacing Shoe Molding – To Paint or Stain?
After your hardwood floor refinishing is done, it’s time to replace the shoe molding. You can choose to have your shoe molding stained to match the floors or painted to match your baseboards. I was interested in what option most people choose so did a little survey on Instagram Stories and found that 84% went with painted over stained!:
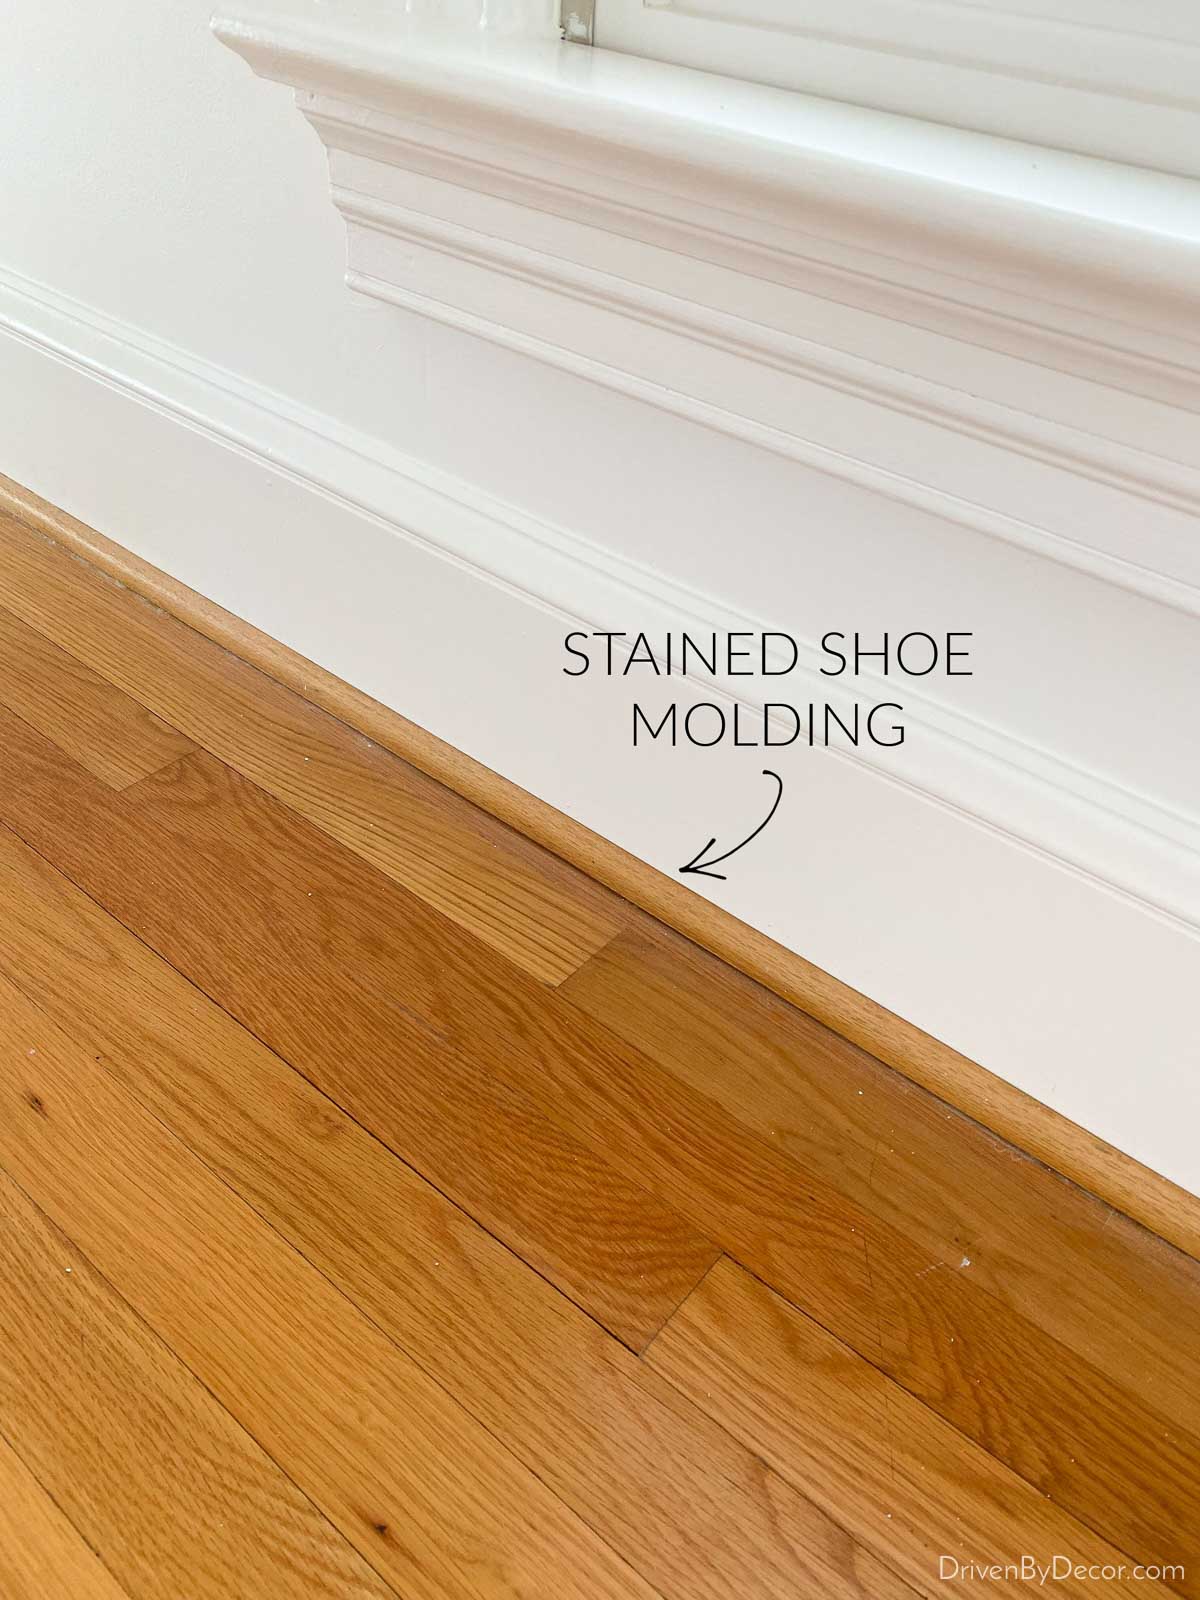
That’s what we chose to do with ours and I like the look SO much better! Here’s what our floors looked like prior to refinishing with the stained shoe molding:
And here’s what our newly refinished floors look like with painted shoe molding:
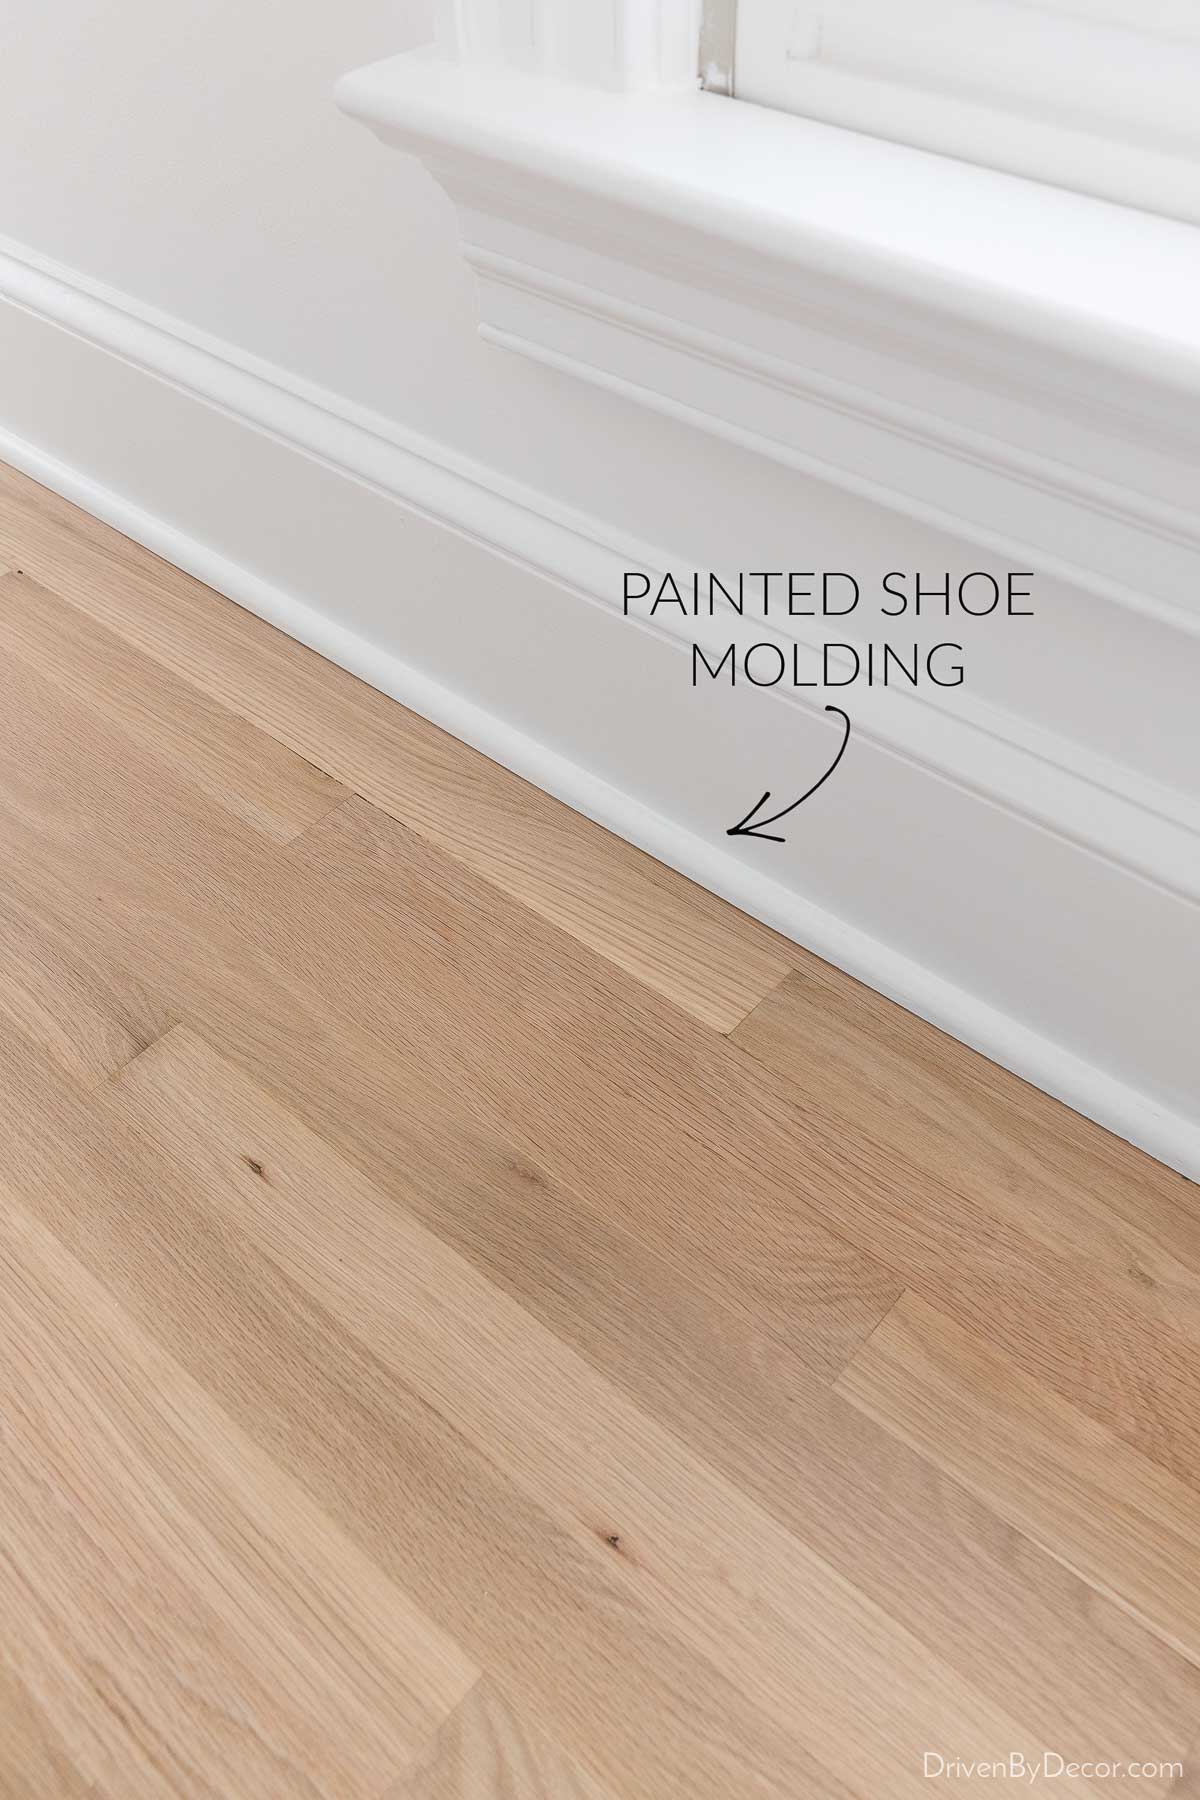
Our flooring company used simple painted quarter round (which technically is a little different from shoe molding, which is a bit taller and narrower) but you can mix it up and choose more decorative molding too. Regardless of the design of the shoe molding you choose, I personally like the look of it painted so much better!
How Much Does It Cost for Hardwood Floor Refinishing
The cost to refinish hardwood floors is going to vary quite a bit depending upon what part of the country you live in and what products are being used in your refinishing job (water-based finishes are generally more expensive). Costs typically range from an average of $3-$6 per square foot of flooring. The cost to do mine (Wilmington, NC in 2021) was:
Sand, stain, and finish (water-based) – $4.75 per square foot of flooring x 635 sf = $3016.25
Supply & install painted shoe molding – $2.50 per foot x 215 feet = $537.50
Total = $3553.75 + tax
One way you can save money is by painting/staining and installing your own shoe molding if you’re handy with a miter saw and brad nailer since you can buy quarter round shoe molding for 0.50 to 0.75 cents per foot. I did this part of the work myself for some of our previous hardwood floor refinishing jobs but had too much going on with our move to have the time to do it this go-round.
I had some “extras” in my hardwood floor refinishing project too including the company supplying and installing matching oak flooring where our fireplace hearth used to be and in our laundry room. Your cost for any repair work like this is going to vary widely depending on how large the area is and the specific type of flooring being installed.
I also paid extra to have our metal vents replaced with white oak flush floor vents that match our new flooring. I didn’t take a “before” pic of the vents in our now-refinished space, but they looked exactly like this one in our kitchen:
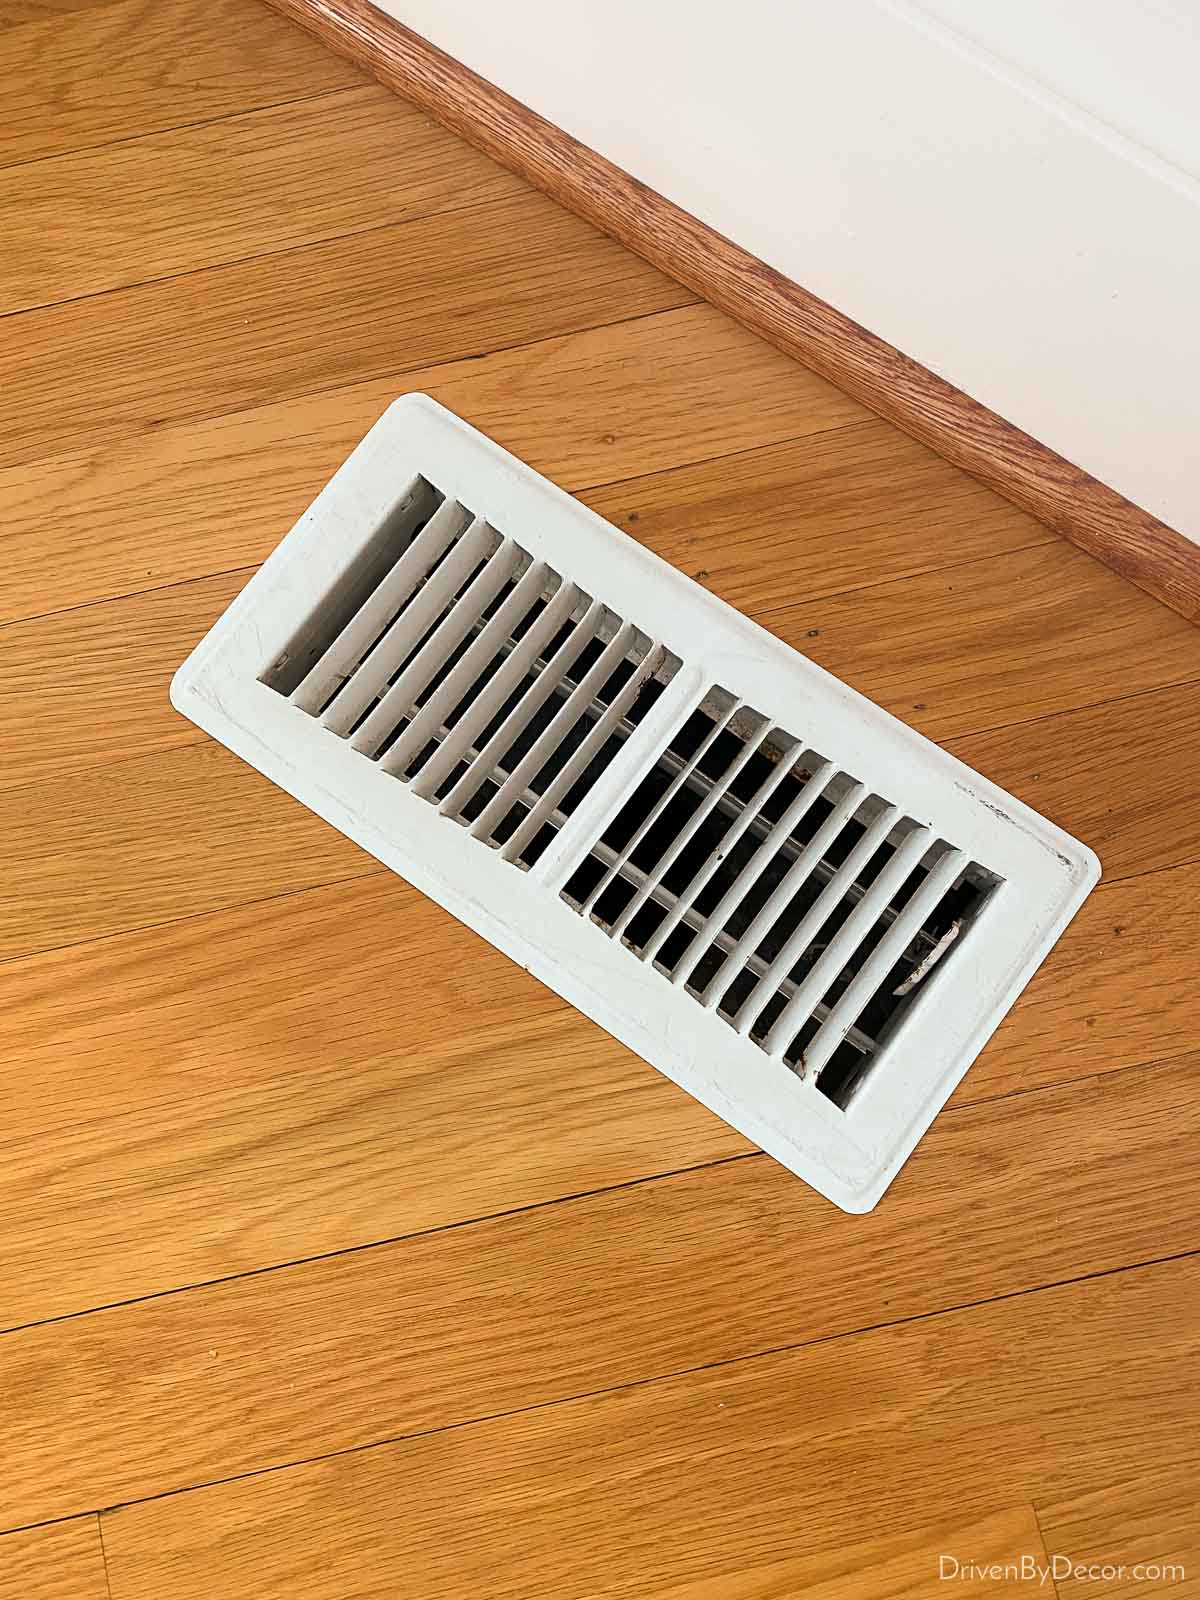
But with matching flush floor vents they now look like this – such a difference!
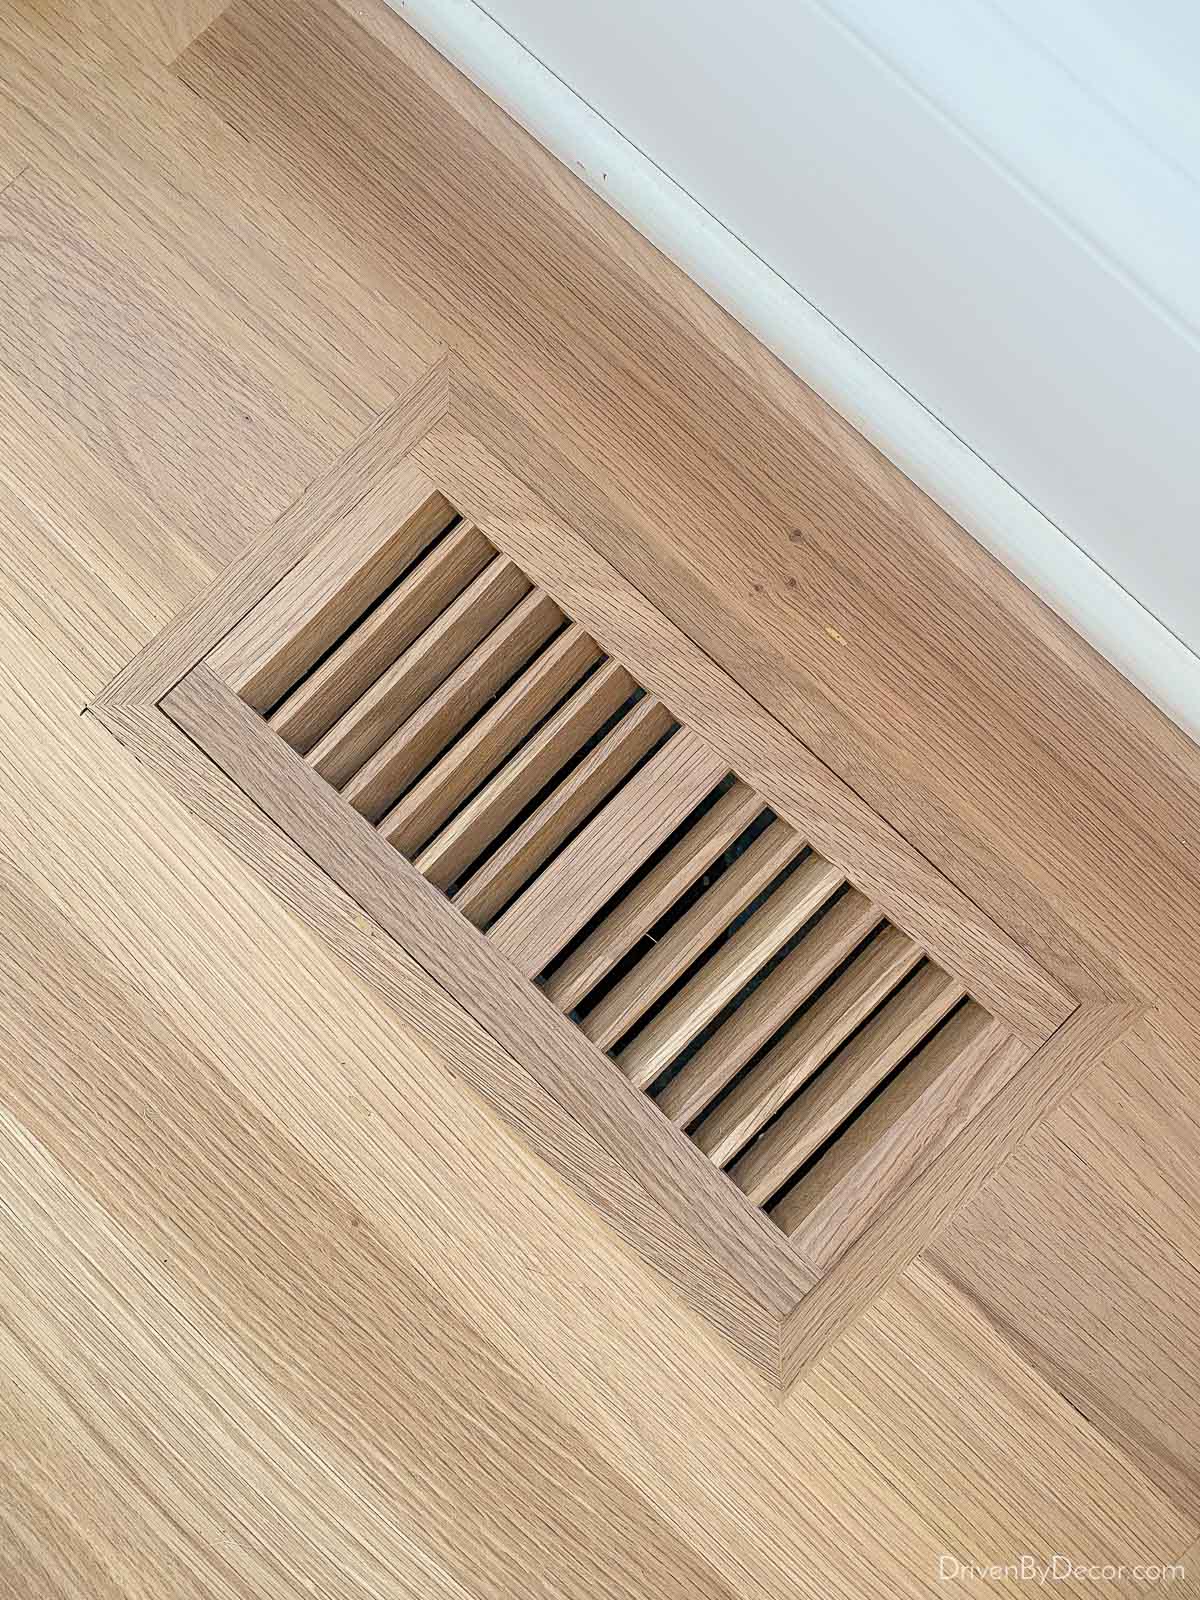
The price tag on these suckers was not cheap at $100/vent which included framing each opening and supplying and finishing each floor vent. I had a total of five in my space which added $500 to my bill. If you’re doing an entire house of hardwoods, this is a cost that could add up to quite an additional expense!
I also got asked by some of you in the Wilmington area about which flooring company we used – we used Newsome Floors based on several local recommendations and were happy with them! I hope that answers all of your questions but if you have any more, leave them in the comments! I’ll try to get back to you in between the endless unpacking of boxes… 🙂
And if you haven’t checked out my Shop page lately I just added a bunch of new things – you can see all of my latest favorite finds {here}.


Marisa says
Hello. I was wondering how many coats of both the Bona natural sealer and the high traffic HD did you use. The floor looks beautiful.
Laura says
Do you know how I can get that same look with red oak?
Lauren says
They look great! We’re getting ready to do this. The spots that you added new white oak to the existing….did it stain the same or was there a visible difference in the existing and new when finished?
Kris Jarrett says
It stained exactly the same – you can’t tell the difference between the new and the old now that it’s refinished. It’s important for your hardwood person to be sure they are using the same exact flooring for new & old.