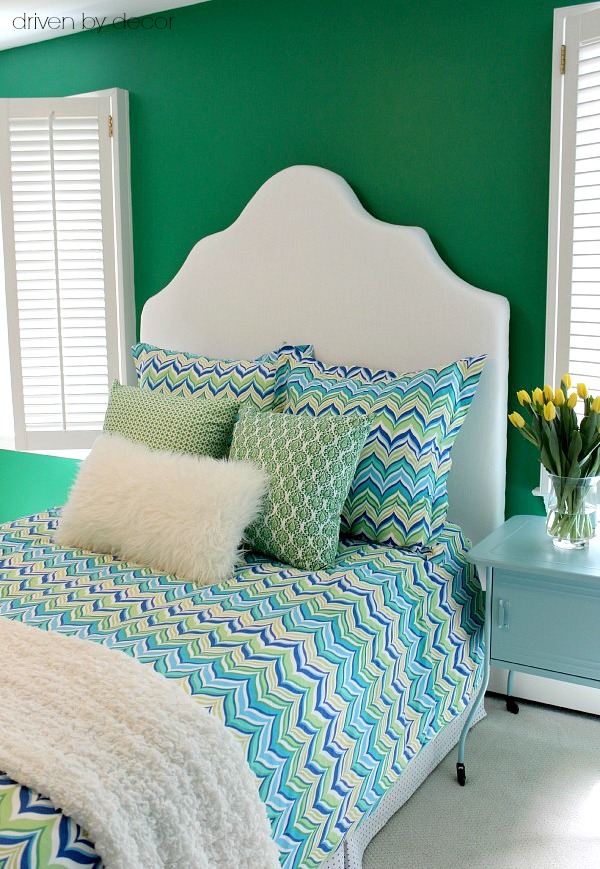
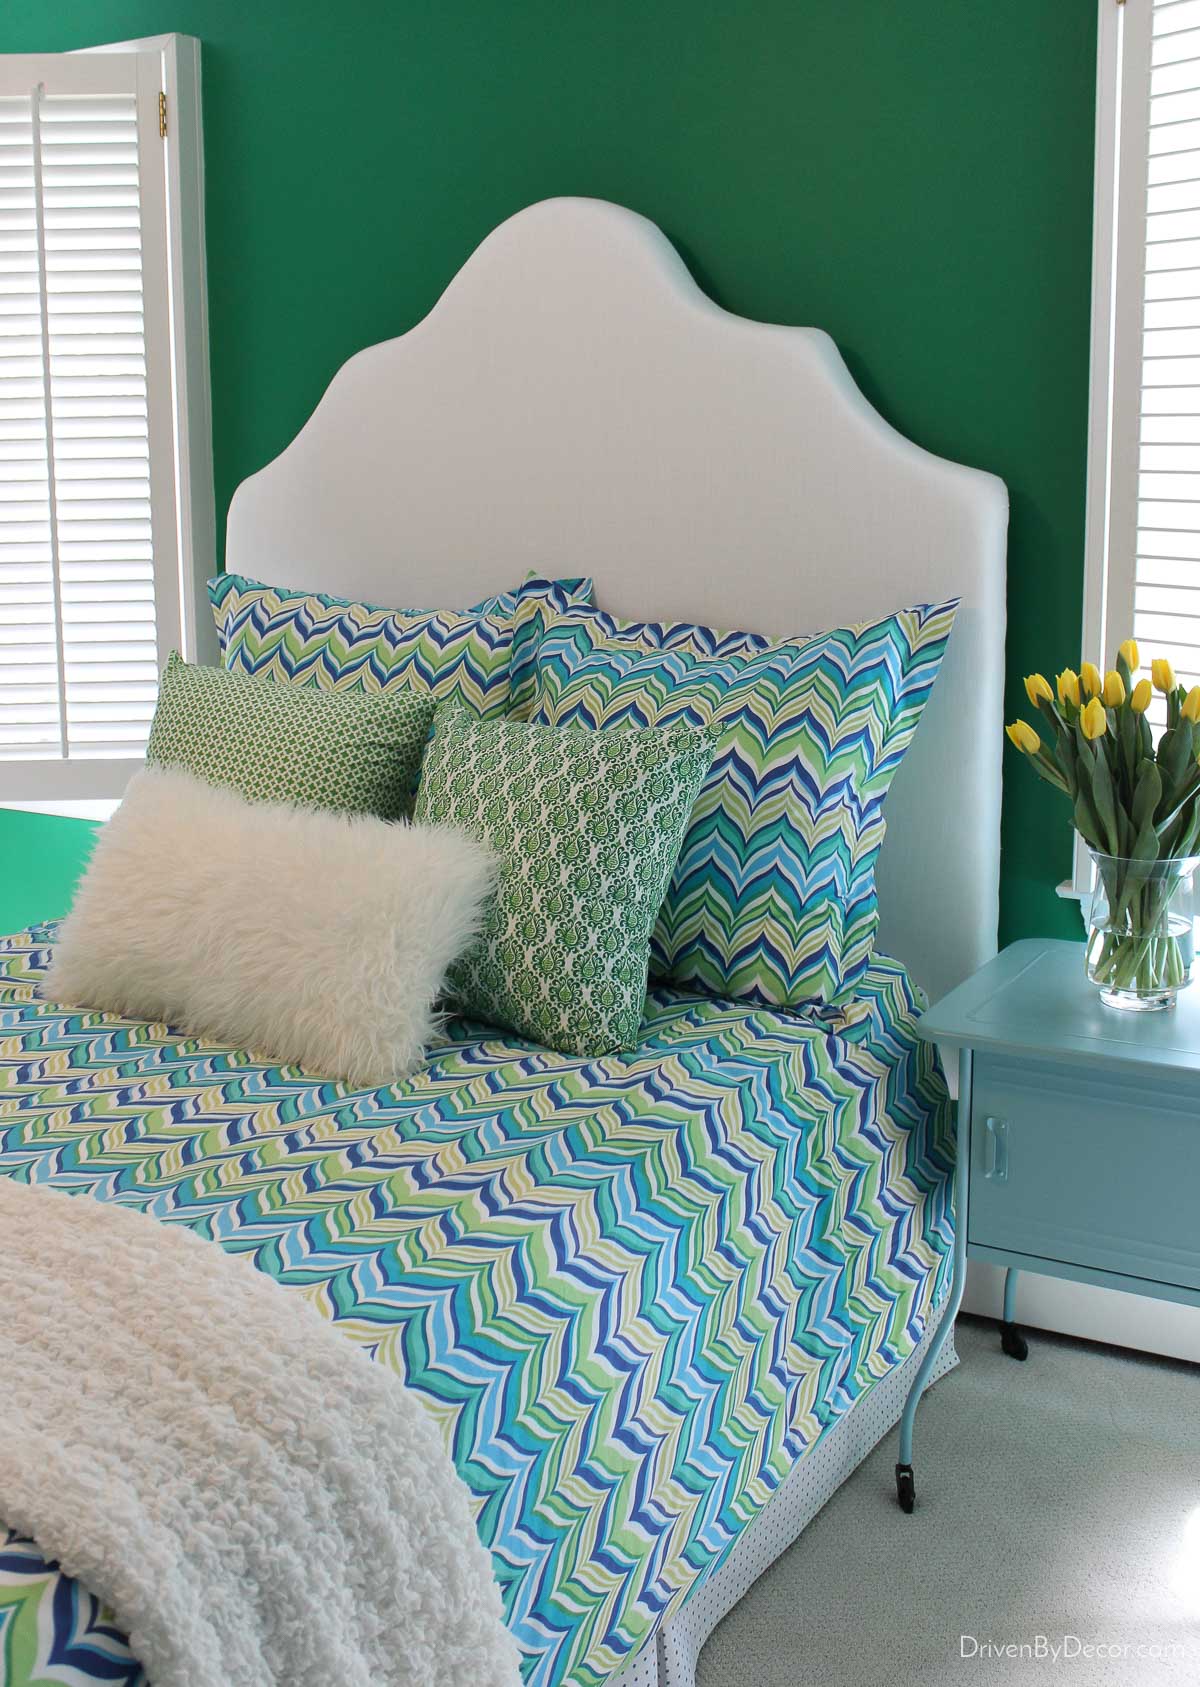
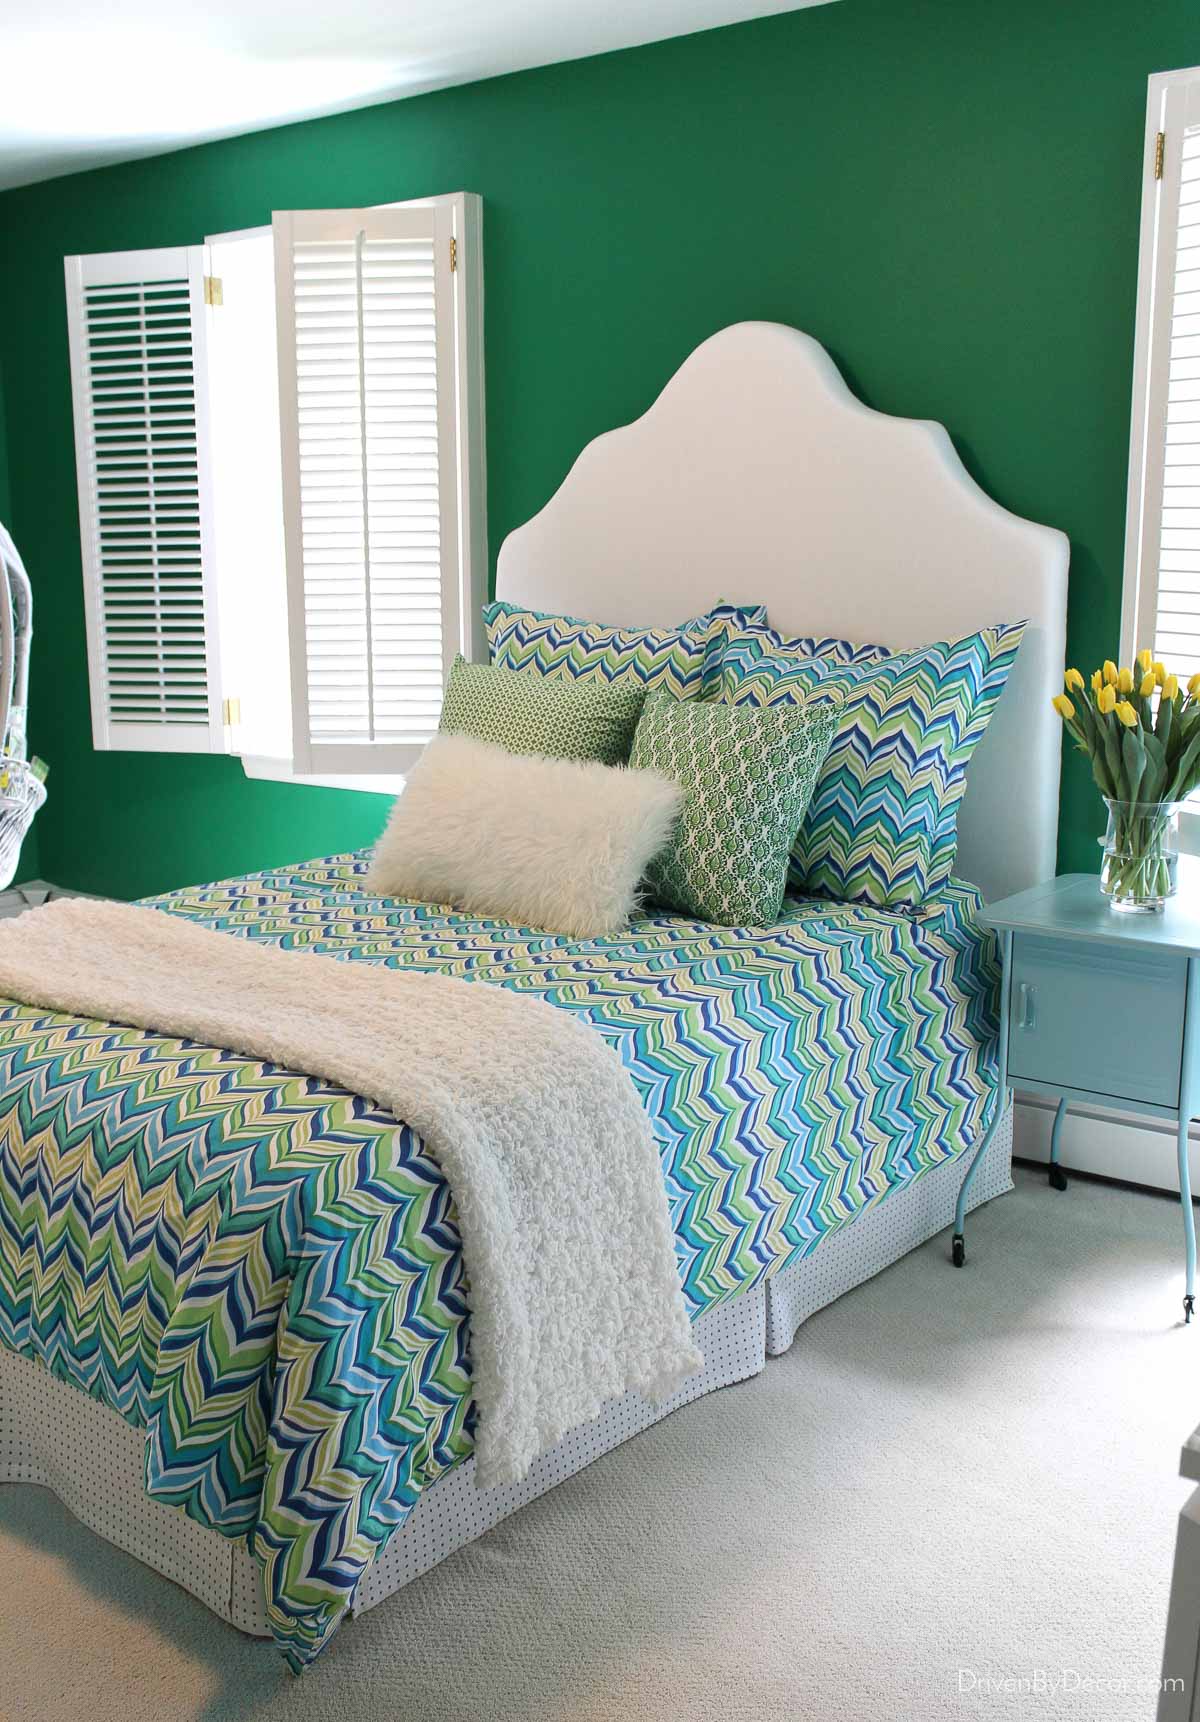
Want to create a DIY upholstered headboard for a fraction of what you’d buy it for? I’ll walk you through how I made mine step by step!
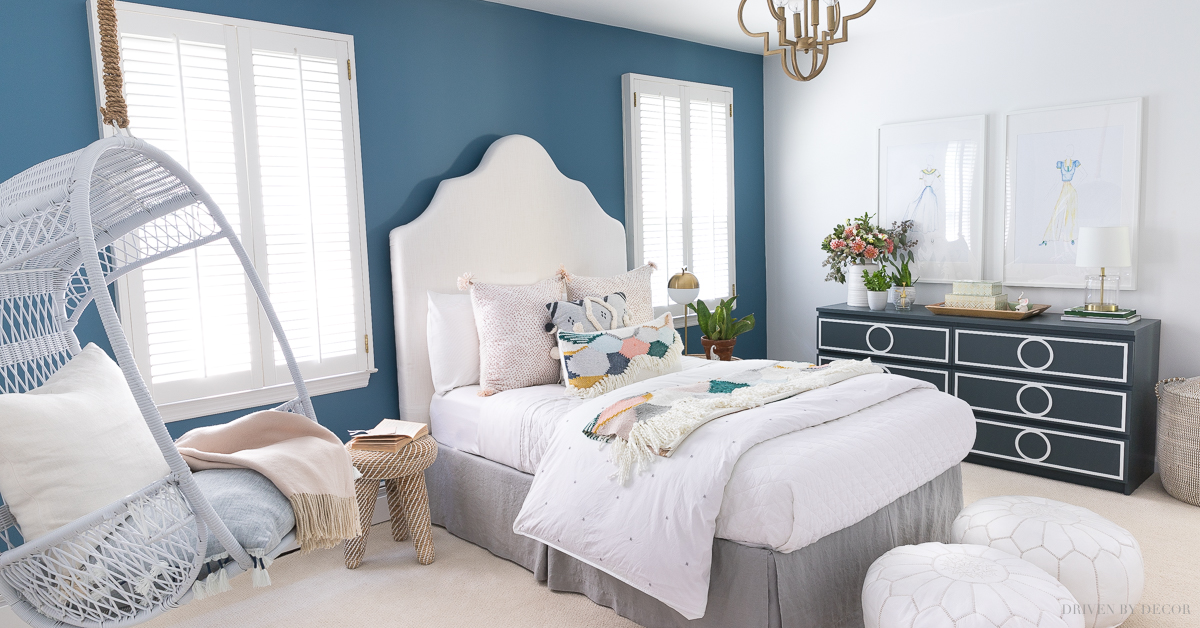
When it came time to decide on a headboard for my daughter’s tween bedroom, she knew exactly what she wanted. Unfortunately her dream headboard was a gorgeous upholstered headboard that cost four figures. That’s when I knew it was time to figure out how to DIY one instead. Making her a DIY upholstered headboard took some time and patience but it was actually much easier than I expected. You can definitely do it too! Let me show you how… (post includes affiliate links – full disclosure statement available {here})

Supplies
- ½″ MDF or plywood sheet
- Jigsaw (or a friend with one)
- Mending plates, wood glue, and a 2 x 4 (optional)
- Rolls of 2″ foam (enough to cover the surface of your headboard)
- Adhesive spray
- Fabric and 2-3 layers of batting (enough to cover the headboard + several inches on each side)
- Electric knife
- Staple gun
- French cleat picture hanger
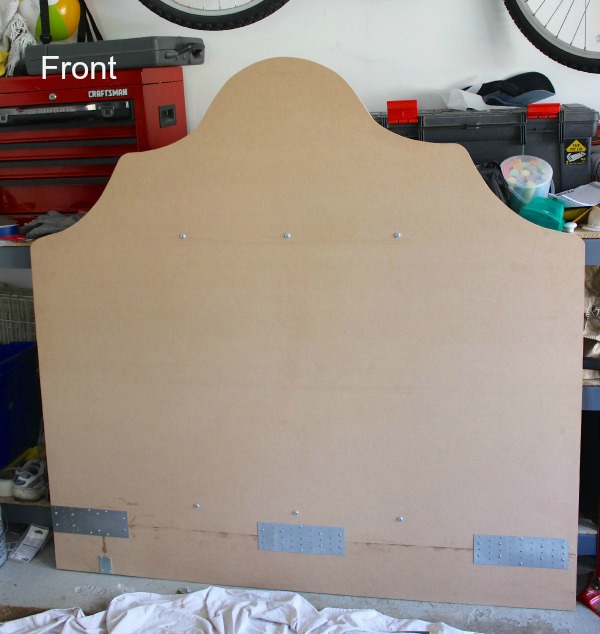
Step 1: Get a Piece of MDF or Plywood for Your Headboard
Head to your local home improvement store for a ½″ sheet of MDF or plywood (I used MDF) and have it cut to the desired width of your headboard (Lowe’s & Home Depot will do it for you for free! Keep the extra that they cut off too.

2. Trace the Outline of Your Headboard
Draw a line down the center of your MDF/plywood sheet and sketch out the shape of your headboard. If you want your headboard to have an arched top like mine, trace a plate or use a compass to draw a circle in the top center of your board and use it as the base to draw your headboard shape:

3. Cut Out Your Headboard Shape
The next step in making a DIY upholstered headboard is to use a jigsaw to cut out half of the headboard shape. Then use the cutoff piece as a template to trace the design on the other half of the sheet and cut it out too, ensuring that you have a symmetrical design. I didn’t have a jigsaw so a handy friend of mine did this part for me – he had it cut out in under ten minutes!
4. For Extra Tall Headboards, Attach an Additional Piece at the Bottom
This step is optional but if you love tall headboards, there’s an easy way to make one that’s taller than your MDF sheet. Simply take the scrap piece of MDF/plywood that was first cut off of your sheet and cut off pieces in the sizes needed to add some extra inches to the bottom. Secure these pieces to the main part of the headboard with glue and mending plates on both the front and the back:

I added 6″ to the bottom of my headboard and didn’t have one scrap piece long enough to span the entire bottom of the headboard so I patched together two pieces. It will all be covered up with the foam, batting, and fabric so don’t worry about how it looks.
Before you go too crazy adding extra inches to your headboard height, make sure that you’re not going to have any problems with it being too tall to get through doorways or up stairs to the room where it’s going to end up!

5. Add a Wood Spacer to the Back if Needed
Most of you can skip this step but I wanted to mention it because I haven’t seen it addressed before. My daughter’s headboard has windows flanking it on either side and I plan on adding drapes to them. Instead of hanging the headboard flush to the wall, I wanted there to be a few inches of space between the headboard and the wall so that the window drapes can fall behind the ends of the headboard. My solution was to attach two 2′ boards (one about ⅓ from the top of the headboard and about 8-10″ from the bottom) to the back of the headboard and hang the headboard on the wall from the top board.
Choose screws that are slightly shorter than the combined depth of the MDF + board to attache each board to the MDF. Screw them in from the front of the headboard.

 <
<
6. Install the Hanging Hardware
Congrats! Your MDF/plywood sheet is officially prepped and ready to rock! Now’s the time to install the hardware for hanging it on the wall. Take your soon-to-be-a-headboard up to your room and figure out the height that you want to hang it (I liked the bottom of my headboard even with the top of the box spring).
Tip: Installing the hanging hardware before you upholster the headboard makes the job easier because the board is lighter and easier to handle and you don’t have to worry about getting the fabric dirty.

Based on my smart friend Lisa’s recommendation, I used a french cleat hanger to mount the headboard on the wall. There are two different parts to the cleat hanger – one part is screwed into the wall. There are multiple screw hole options along the length of the cleat so you can screw it into the wall where you’ll hit studs.

It even comes with its own little level to make sure it’s mounted straight.

The other part of the cleat gets screwed onto the back of the headboard and the two pieces lock into place together to mount your DIY upholstered headboard on the wall. You can buy a similar french cleat {here}.
7. Cover It With Foam
It’s finally time to upholster, starting with the foam. I recommend 2″ foam in rolls like {these}. You will likely need 2-3 rolls to cover your headboard depending on the roll length and headboard size. Roll out your foam, place your cut-out headboard on top of it, and trace the foam to the shape of your headboard.

Cut the foam along the lines that you traced. An electric knife like {this one} works amazingly well for smoothly cutting the foam!

Once the foam is cut out to the shape of your headboard, use spray adhesive (I used 3M’s 77 Super Adhesive Spray found {here}) to adhere the foam to your MDF or plywood.
8. Layer with Batting

Now take 2-3 layers of batting and lay them over the foam attached to the front of the headboard. Flip the headboard over and staple the batting to the back, pulling it taut as you move around the headboard. While a heavy duty stapler is what’s usually recommended, I used a light duty stapler and it worked great. It stapled the batting and fabric securely into place and the staples were easy to remove in areas where I found I needed to pull the batting or fabric tighter.
9. Cover with Fabric
After stapling on the batting, it’s time for the fabric. If the fabric you’ve chosen isn’t large enough to cover the entire headboard you may first need to seam pieces of it together. Using fabric window panels for the fabric covering your headboard is a great cost saving option! I used white cotton Target window panels that are $24.99 for a 54″ x 84″ panel which ends up being only about $10/yard.

Just like you did with the batting, cover the front of the headboard with your fabric, flip it over and staple it securely to the back, being careful not to leave any fabric wrinkles on the front or sides of the headboard. Once I stapled the fabric all of the way around the headboard, there were several staples that I had to remove and restaple to get the fabric as taut as possible and eliminate wrinkles.
Tip: In curved areas of the headboard, cut slits in the fabric on the back, allowing you to pull the fabric as tightly as possible and eliminate wrinkles.

10. Hang It Up!
Your hanging hardware is already in place so simply lift your finished DIY upholstered headboard into place on the wall so that the pieces of the french cleat lock together. Done!
Update! Several years later we changed up this room again but the headboard worked beautifully in the new space too! See all of the details in my post on her boho bedroom colors.
Thanks for stopping by the blog! If you love to DIY check out my other favorite DIY home projects too!

Want to save this post?


Holly Hold says
Your daughter and I have precisely the same taste in headboard shape and height. Lovely. And, now, because of you, I have the confident know-how to execute a long-held dream. Thanks so much!
Joyce Stokes says
Great job need a new one , have a sleigh type ,takes up to much room this looks ?.
robyn says
can you give us an approximate cost on the whole project (headboard)? Good job !
Kris @ Driven by Décor says
Hi Robyn – my total cost for the project was just under $150 including the lumber (sheet of MDF plus a 2 x 4), mending plates, foam and batting (both 40% off at Hobby Lobby), fabric, and cleat wall hanger. I already had the wood glue, spray adhesive, and staple gun so I didn’t need to buy those. Hope that helps!
Vel Criste says
This is a great step-by-step tutorial Kris! You did an amazing job on that headboard, no one can tell it was a DIY project!
Becky {This Is Happiness} says
Awesome job! Great tutorial and tips 🙂 Love her room!!
Jennifer@decoratingdelirium says
I love your practical tips! My favorite is to make sure you can get it through door before deciding to add any height 🙂 The things you learn only by doing! It turned out great and you have the form, so you can always change up the fabric later!
Georgina Irving says
You are a genius! Her headboard is gorgeous, Kris! I cannot wait to make one myself. Thank you for sharing!
Kris @ Driven by Décor says
I’m glad you’re going to give it a go – hope it turns out beautifully!!
Patty Day @Pattys Epiphanies says
This is fantastic. I am saving this post for future use!!!!
Thanks.
Sarah Gaylor says
Thanks so much for sharing this! I can’t wait to try it!! 🙂
marty (A Stroll Thru Life) says
Great tutorial. I love the shape you chose. Such a pretty room.
pam {simple details} says
So fabulous, my friend!! I love the shape and the simple white against the bold and fun pattern was brilliant! Great tutorial, too!
Krystine @ www.KrystineEdwards.com says
Kris LOVE this!!!! Great job!!!
Rebeca Francis says
You did a great job! Rebecca
Kris @ Driven by Décor says
Thank you Rebeca!
Lisa @ Shine Your Light says
This is one of my favorite elements of your daughter’s room, Kris. I love the shape you created and the smart ideas for adding height and covering it with affordable fabric! Smarty. Looks beautiful!!
jvw home says
Kris this is amazing….i still think it might be hard for moi, but sometimes ya never know, when i’m determined! I’ll keep this in my DIY file b/c it’s a great shaped headboard and a great tutorial….