• Skip to primary navigation
  • Skip to main content
  • Skip to primary sidebar
  • Home
  • About
    • Contact
    • Meet Kris
    • FAQs
    • Media
    • Disclosure
    • Privacy Policy
  • Home Tour
    • Master Bathroom
    • Kitchen
    • Kitchen Eat-In Area
    • Family Room
    • Living Room
    • Home Office
    • Laundry Room
    • Master Bedroom
    • Craft Room
    • Dining Room
    • Garage
    • Guest Room
    • Guest Bathroom
    • Patio
    • Powder Room
    • Teen Blue & White Bedroom
    • Teen Boho Chic Bedroom
  • Projects
    • Room Remodels
    • DIY Projects
    • Decorating Tips
    • Cleaning
    • Organizing
  • Subscribe
  • Shop My Favorites
    • Shop My Faves
    • Shop My House

Driven by Decor logo

menu icon
go to homepage
subscribe
search icon
Homepage link
  • Home
  • About
    • Contact
    • Meet Kris
    • FAQs
    • Media
    • Disclosure
    • Privacy Policy
  • Home Tour
    • Master Bathroom
    • Kitchen
    • Kitchen Eat-In Area
    • Family Room
    • Living Room
    • Home Office
    • Laundry Room
    • Master Bedroom
    • Craft Room
    • Dining Room
    • Garage
    • Guest Room
    • Guest Bathroom
    • Patio
    • Powder Room
    • Teen Blue & White Bedroom
    • Teen Boho Chic Bedroom
  • Projects
    • Room Remodels
    • DIY Projects
    • Decorating Tips
    • Cleaning
    • Organizing
  • Subscribe
  • Shop My Favorites
    • Shop My Faves
    • Shop My House
×

Updated: Apr 6, 2022 by Kris Jarrett

How to Paint a Door: My Best Tips for Painting Interior Doors!

Want to know how paint a door like a pro? Painting interior doors with my simple step by step tips is a breeze and will get you the professional finish you’re looking for!

The last two houses we’ve lived in have been older homes with doors that were yellowed and not in great shape so as I make over each space, I also paint the doors. It’s pretty amazing what a difference a fresh coat of paint makes, especially if you’re changing out the hardware too!  Years ago, a professional painter gave me tips on how to paint a door, including the order for painting paneled interior doors and the results are so much better than when I used to just paint a door from the top to the bottom. I’ve also experimented with different painting tools and methods over the years and figured out what works best so today I’m sharing my how-to for painting interior doors like a pro! (affiliate links included in post – full disclosure statement available {here})

1. Choose an Interior Door Paint Color

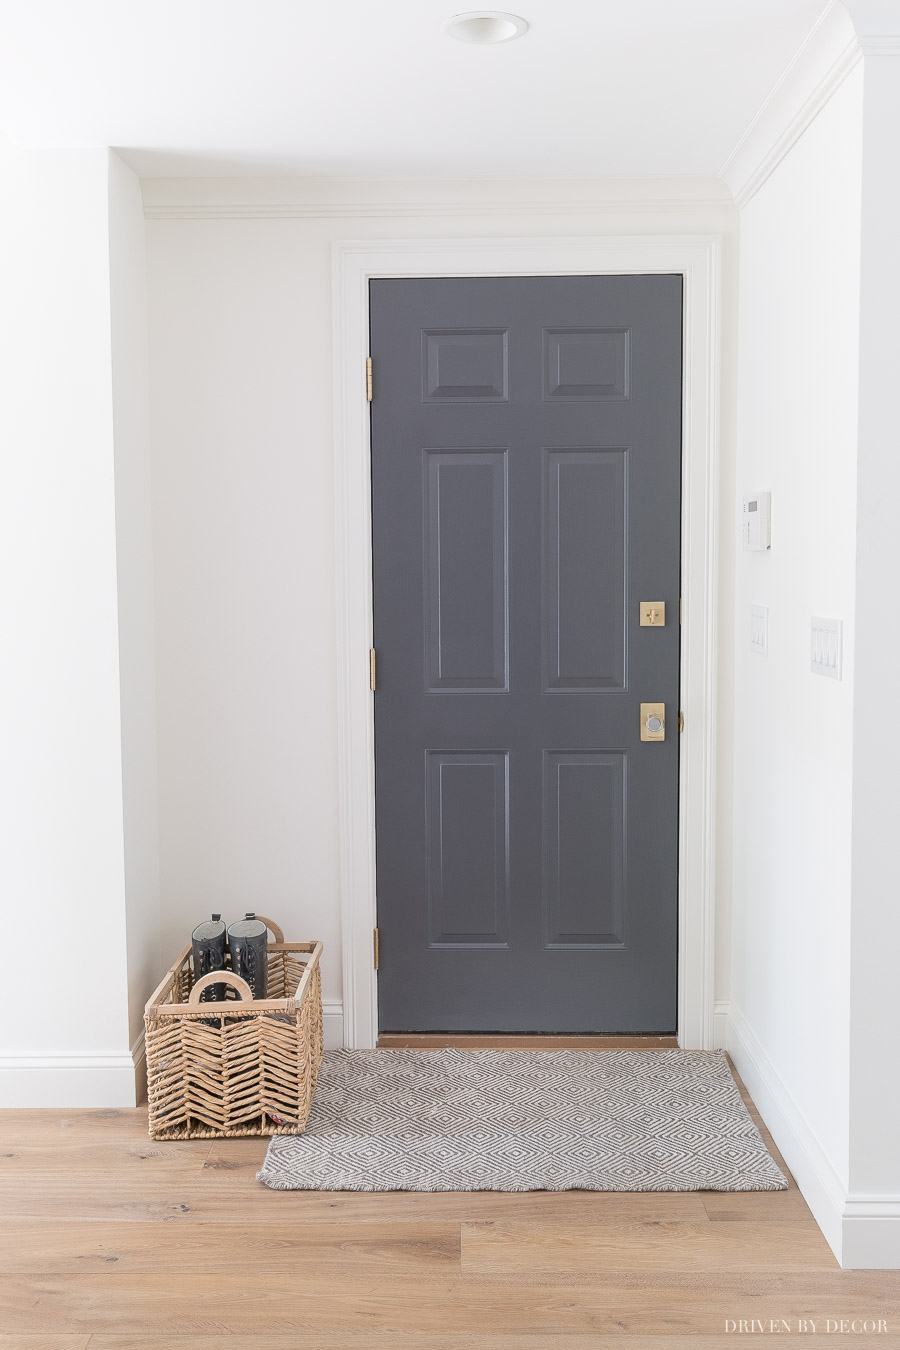
If you’re painting your door white and have white trim around it, I recommend using the same paint color and finish as the trim. Some of my favorite whites for trimwork and doors are Benjamin Moore’s Cloud White and Dove White in either semi-gloss or satin. You might also want to consider painting your doors a color other than white – interior doors in dark black or gray are a beautiful choice! I recently painted the door from our kitchen to the garage a dark gray (Benjamin Moore Charcoal Slate) and love it:

Tips for painting interior doors including choosing a paint color. Love this dark gray!

While there are an endless number of door colors you could choose to paint your front door, I personally think sticking with white or a gray for the interior is your best best. These are my six favorite paint colors for interior doors:
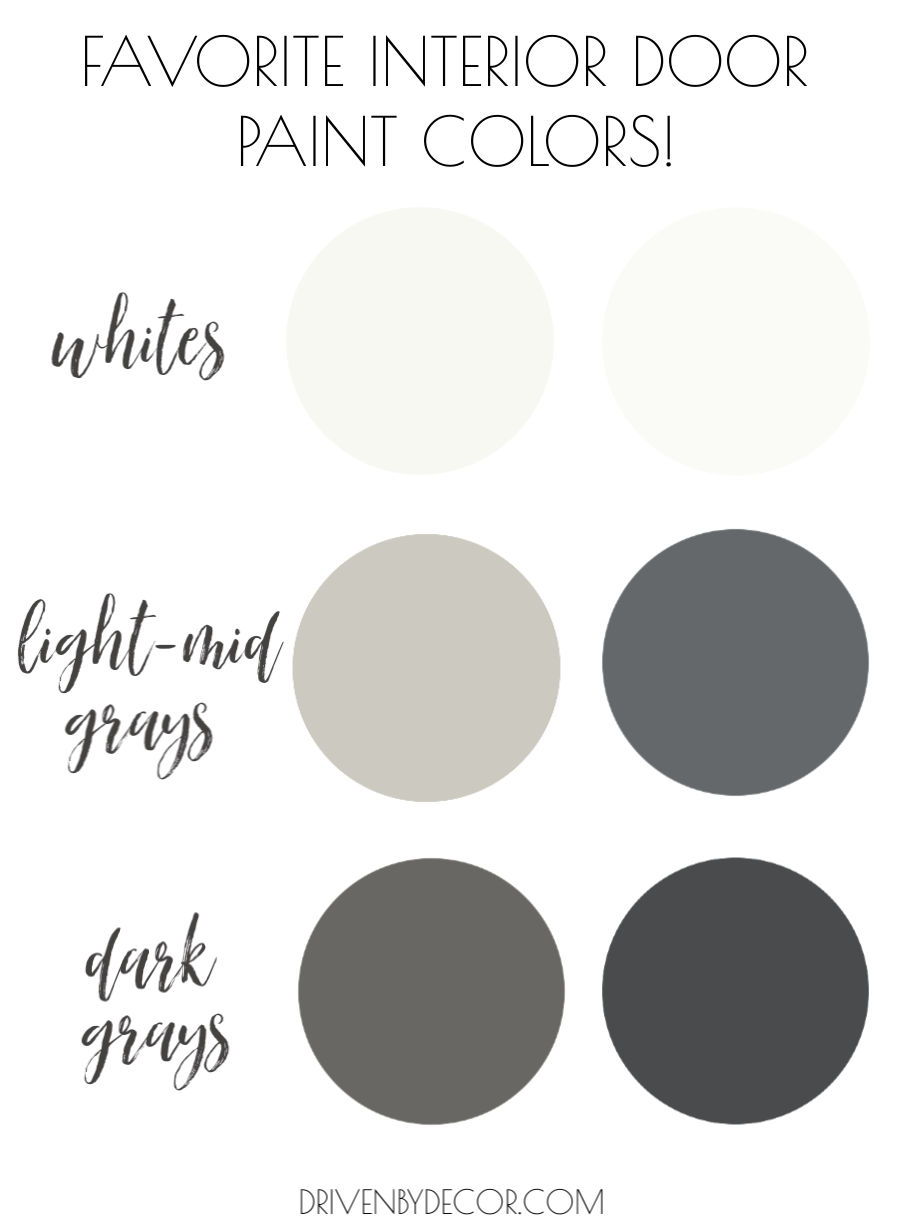
My six favorite interior door paint colors!

Whites: Benjamin Moore Dove White | Benjamin Moore Cloud White (Cloud White has a bit less yellow undertone)

Light – Mid Tone Grays: Sherwin-Williams Repose Gray | Benjamin Moore Charcoal Slate

Dark Grays: Benjamin Moore Kendall Charcoal | Benjamin Moore Wrought Iron

2. Gather Your Painting Tools

Other than your paint, there are just a few things you’ll need to knock out your door painting job including: 

Wood filler if it’s an old door with nicks ({this filler} is my favorite – it doesn’t dry out as quickly as filler in a regular container) and a putty knife
Sandpaper  – I use 150 grit and 220 grit

Tack cloth

Canvas or plastic drop cloth to protect your floor (I use {these} that you can wash and reuse)

Roll of painter’s tape such as {this one}

Utility knife such as {this one}

Paintbrush – {this 2″ angled brush} is my favorite – it works with both oil and latex paints

4″ woven rollers with ¼″ nap such as {these rollers} or 4″ foam rollers such as {these rollers} – both work well

 Roller handle for 4″ rollers such as {this one}

Mini roller tray like {this one}

3. Prep Your Door for Painting

The success of any paint job always starts with good prep work. You can either paint your doors in place or take them down and paint them on sawhorses. If your door already has knobs on it, I recommend removing them – it’s easier than painting around them. If you want to leave the knobs on, cover your knobs and your hinges with painter’s tape. For the door hinges, I use a utility knife to gently trace the outside of the hinge, cutting the tape as I go:
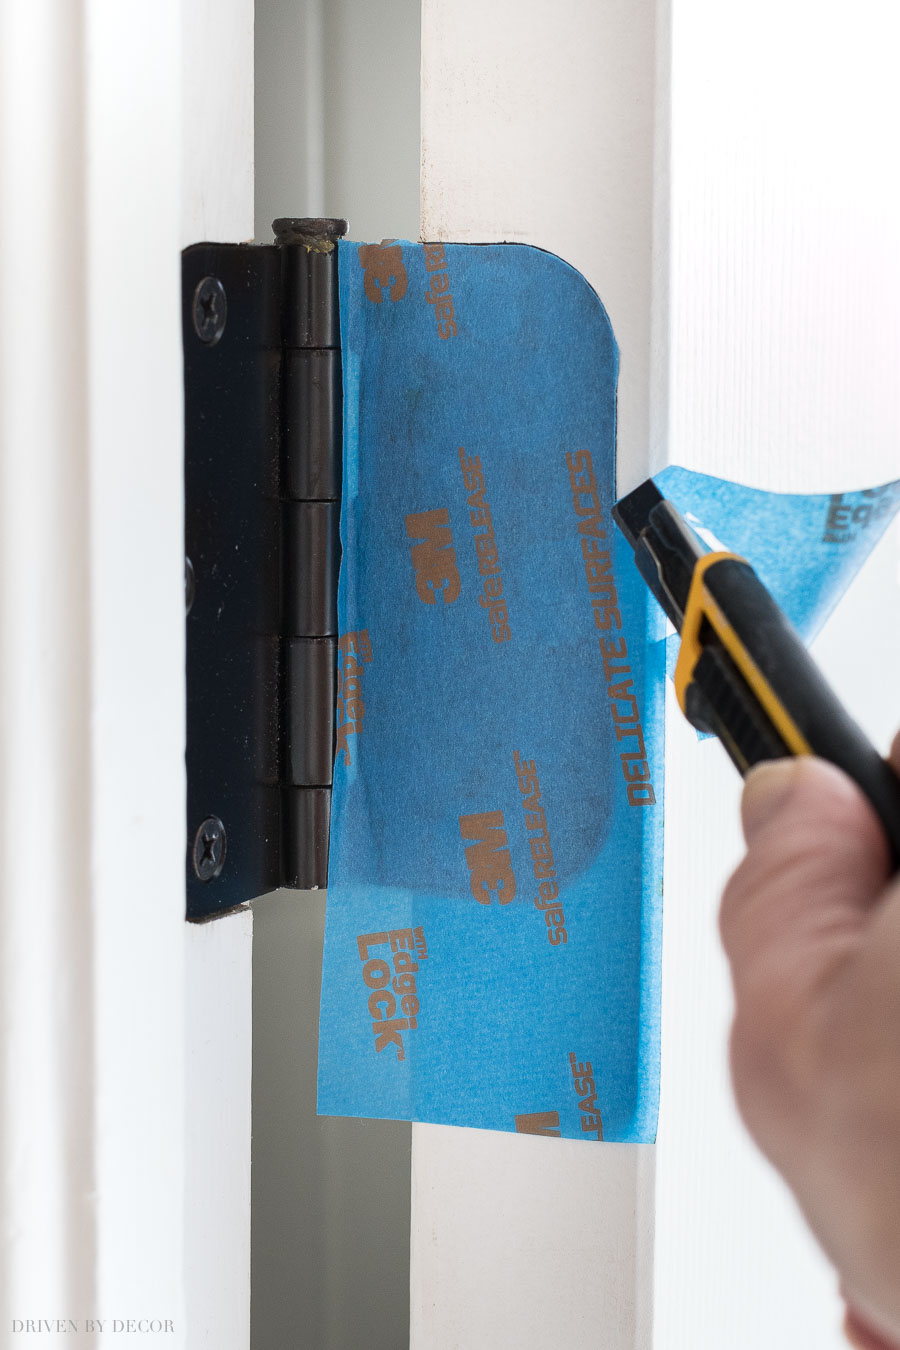
To prep your door for painting, cover hinges with painter's tape and use a razor cut away extra tape by tracing around them!

If you’re repainting an older door, the first step is to fill in any gouges or imperfections with wood filler and sand those areas until smooth (I use 150 grit for this) and then lightly sand the entire door with fine grit (220) sandpaper. Use a cloth to remove most of the sanding dust and then go back over the entire door with a tack cloth to get the rest of it. Note: If your door was previously painted prior to the ’80s, it could be lead paint which you wouldn’t want to sand without appropriate precautions so be sure to test for lead paint if that’s a possibility

The next step is to prime your doors if needed. You will need to prime if:

  • You are working with a new, unprimed door
  • You are using a standard latex paint on a door that was previously painted with an oil-based paint. How do you know if your door was previously painted with oil-based or latex paint? Put rubbing alcohol on a rag (I use a dark rag if it’s white paint so it’s easier to see) and rub it on your door – if paint comes off on your rag it’s latex, if not it’s oil-based.  

You don’t need to prime if:

  • You are working with new, pre-primed doors
  • You are using latex paint on a door that was previously painted with latex paint
  • You are using Benjamin Moore Advance paint over a previously painted door – this paint can be used over either latex or oil-based paint and is awesome for not leaving roller or brush marks so it’s my go-to paint for trim and doors. 

Priming is ideally done in the same order (edges first, etc. as I’ll describe for painting below). 

3. Paint Your Paneled Door in This Order

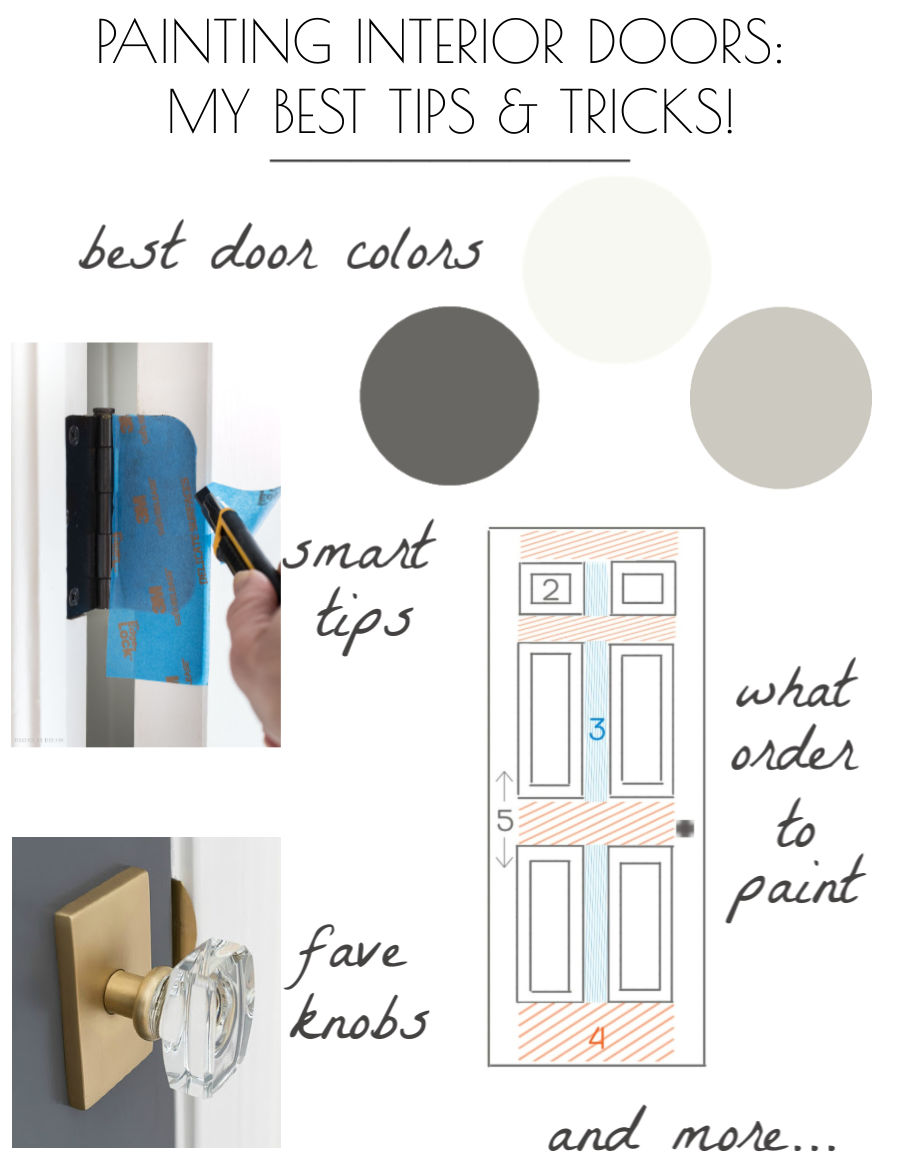
Now it’s time to paint! Many people have success painting doors using just a brush, but I like to use a combination of a brush and a small roller because it gets the job done faster and results in a much smoother finish. Rather than simply painting the door from top to the bottom, you can get the best paint job by painting paneled doors in a certain order. For a standard 6-panel door, this is the order to go in:
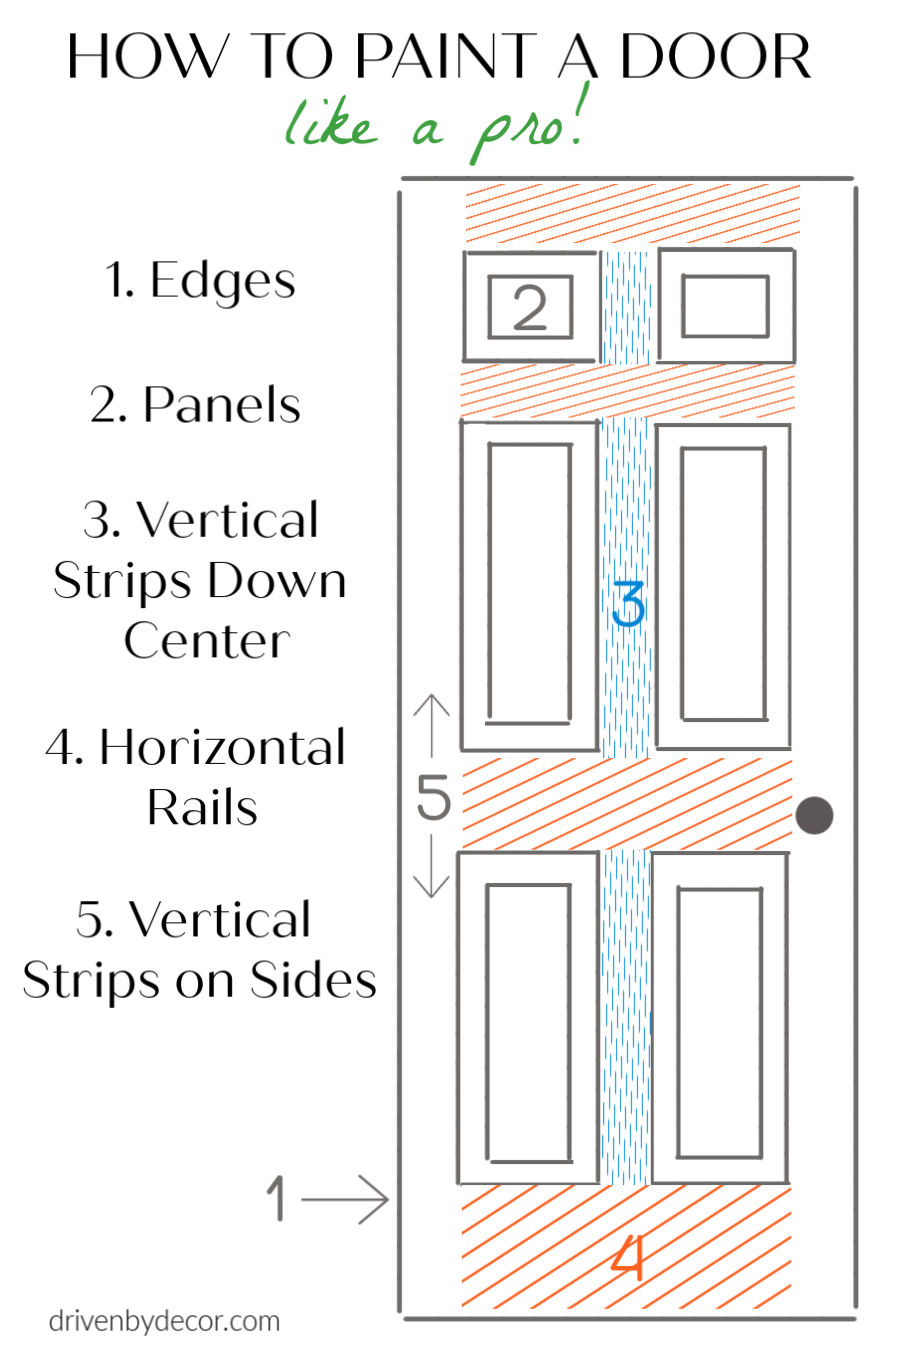
How to paint doors like a pro! Painting interior doors is a snap with this simple how-to!

1. Start by painting the edges of the door with either the brush or roller

2. Next, paint the door panels. I like to use a 1 ½″ brush to paint the recessed molding areas followed by a 4″ roller for the flat surfaces in the middle. 
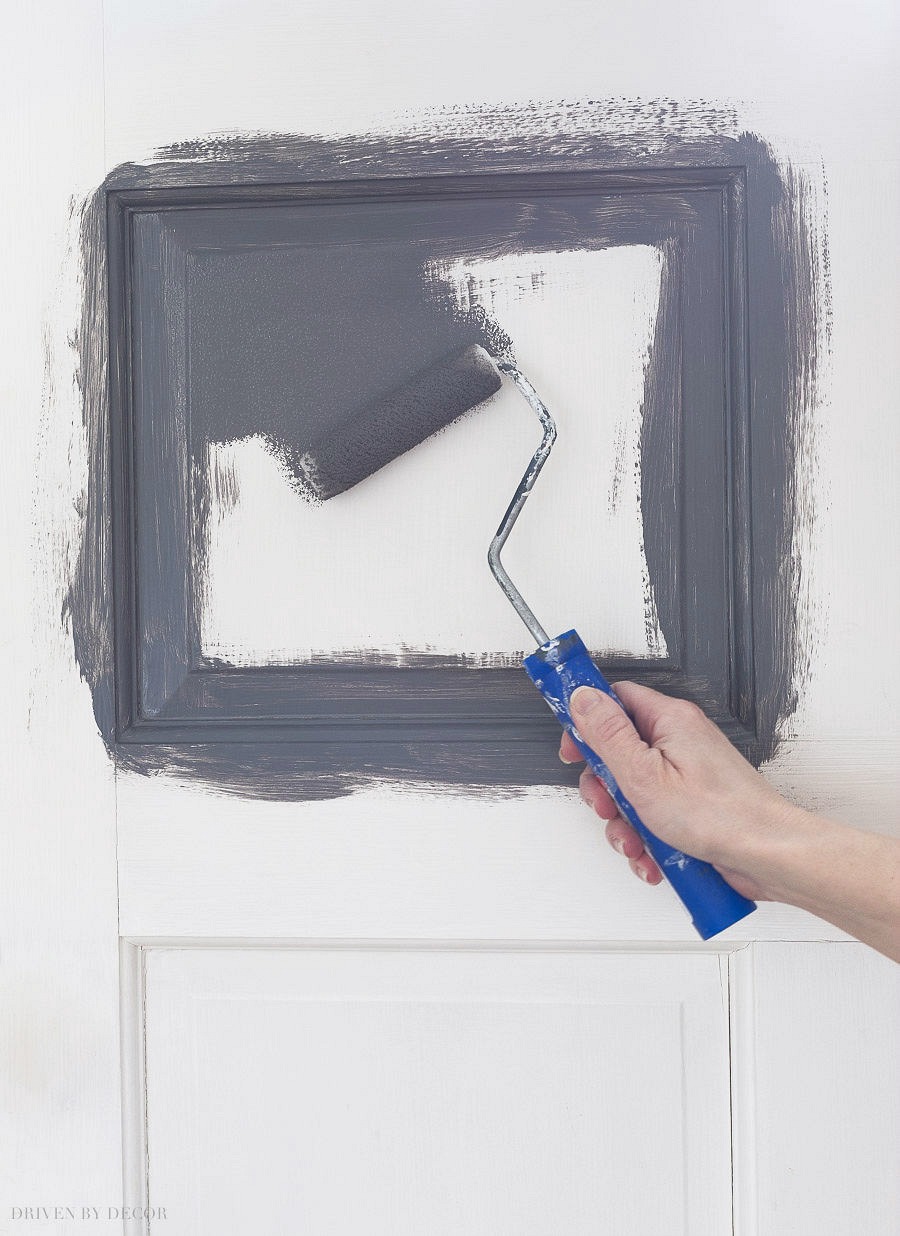
Such helpful step by step tips for painting interior doors!

Make sure to feather the edges of the molding you’re brushing – you don’t want any hard edges.

3. Then paint the three vertical strips down the center with the 4″ roller.

4. Next, paint the four horizontal rails with the 4″ roller.

5. Finally, paint the two vertical strips on the sides with the 4″ roller


4. Sand & Recoat

Once you’re done, allow the paint to dry (if you’re using Benjamin Moore Advance note that it has a longer than typical dry time), give your door a quick, very light sanding with with 320 grit sandpaper, remove the sanding residue with a tack cloth, and then apply a second coat of paint. If you’re using sawhorses and painting one side at a time, allow the paint to dry at least 24 hours before flipping the door over on the sawhorses and repeating for the second side.  Cover your sawhorses with a cloth to prevent the newly painted door from sticking to them (and make sure that the cloth you use is smooth with no texture to it, or you could end up with a textured pattern in your door once it comes of the sawhorses). Once your second side is dry, simply rehang your doors and reinstall your door hardware. Done!
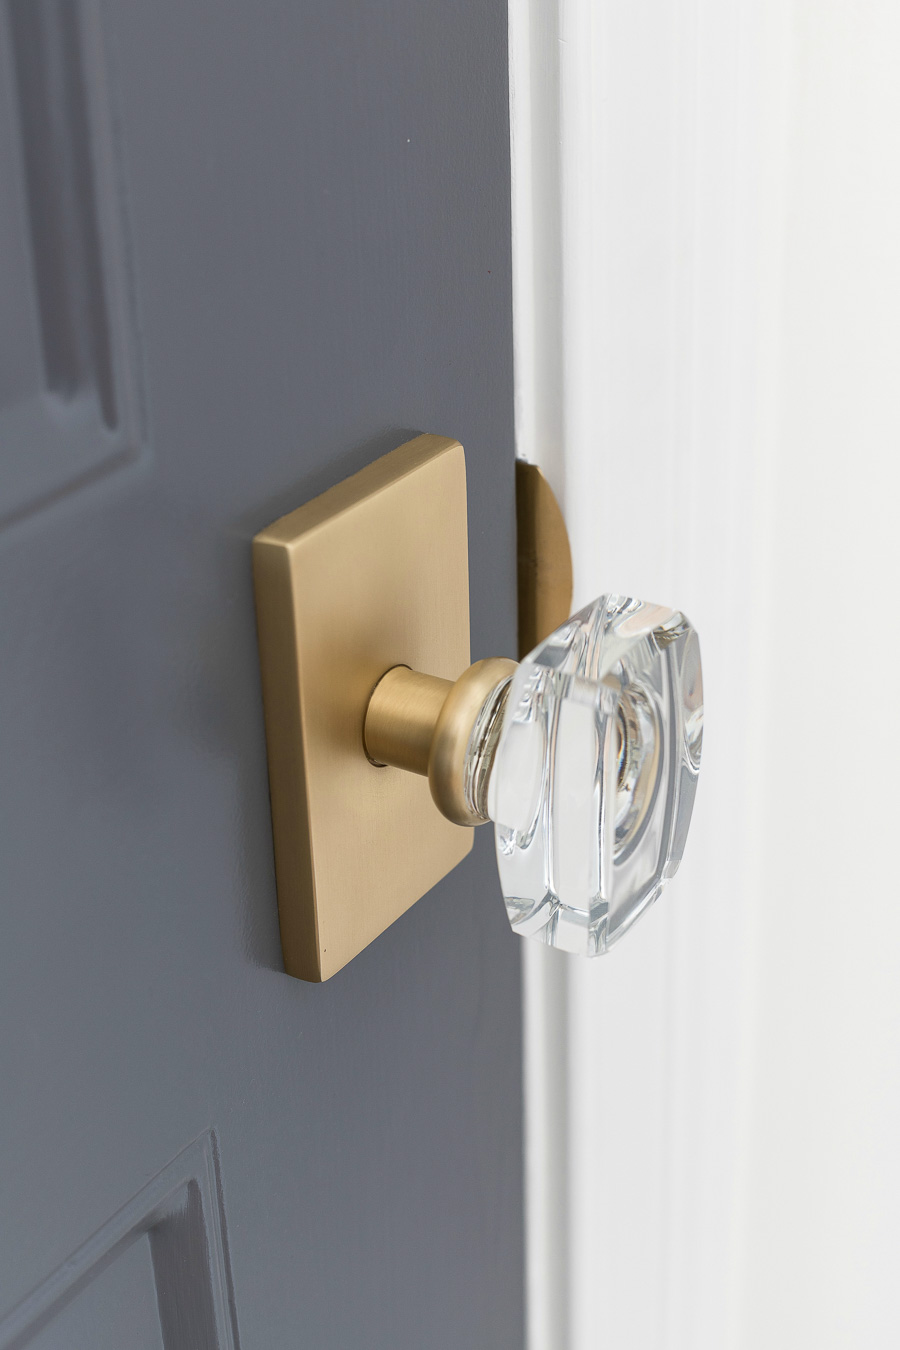
GORGEOUS door hardware! Love the combination of the crystal knob with the rectangular brass rosette! Source linked in post!

(Our new brass + crystal door hardware can be found {here})

I know talking about painting doors isn’t the most exciting DIY project ever 🙂 but I hope you’ve found a tip or two to help on your next door painting project! Let me know if you guys have any questions! And if you want to make sure you can find this post easily in the future, Pin the image below:
How to Paint a Door: My How-To for Painting Interior Doors!

XOXO,
  • Pin
  • Share
  • Email

Categories: DIY Projects

✉️FREE EMAIL SERIES ✉️

5 Secrets to Reinventing Your Home on a Budget

Simple tips to instantly transform five rooms in your home!

Reader Interactions

Comments

  1. Jenna White says

    February 12, 2019 at 10:39 am

    Thank you!! I am gearing up to repaint all the doors in our house (as my children are now old enough to not beat down a closed door with a toy if either of us parents are trying to claim some privacy). I would also love similar tips on repainting window frames!

    Reply
    • Vic says

      January 21, 2021 at 1:12 am

      It looks like no paint brush marks. Is that possible? Impressed.

      Reply
  2. Karen Bunch says

    February 12, 2019 at 10:31 pm

    What a great tool. The mister is the painter in our family. I don’t have much patience for the task, but this detailed instruction will be helpful to everyone who has ever had to paint a door. I love the colors.
    xo,
    Karen

    Reply
  3. Mona says

    February 15, 2019 at 9:06 am

    Hi Kris, any tips on dealing with old, torn sweeps at bottom without having to remove the entire door from its hinges? I have tried sliding, tearing old sweep but I think it’s glued on. Maybe just not possible… Thank you!

    Reply
  4. Penny Streets says

    February 25, 2019 at 8:32 am

    Hi, I am painting my bathroom trim and 6 panel doors, white on the inside. The doors open into the bathroom, however when closed the one is part of the bedroom and the other part of the hallway. My bathroom color is Behr Bright White but I wanted to use Behr Delicate Lace on the other side which faces into bedroom and the the other into the hallway. What color do I paint the door edge?
    Thanks,
    Penny

    Reply
    • alyr says

      September 08, 2019 at 12:36 pm

      You paint it the color that will show when you have the door open, which, assumingly will be most of the time.

      Reply
  5. Sheryl says

    June 19, 2019 at 9:47 am

    Thanks

    Reply
  6. Carole Nguyen says

    August 24, 2019 at 9:54 am

    Hi I am repainting the doors and With same paint color and do you have to have a second coat and do you have to sand after the first coat? I am using oil base

    Reply
  7. Sharlene King says

    September 09, 2019 at 9:56 pm

    Your painting tips were very helpful. I would have only used a brush, but will also try a roller after reading your tips.

    Reply
  8. Deloris says

    February 10, 2020 at 6:54 am

    Great instructions. I’m painting a 2 panel door and using a roller. However, I’m finding it difficult not to have roller marks. How do you prevent them?

    Reply
    • Vicky says

      February 17, 2020 at 9:52 pm

      Hi
      Just wondering are you using semigloss or eggshell, from the photo it seems not as shine as semi-gloss finishes.
      Thanks

      Reply
  9. Nettie says

    February 25, 2020 at 5:17 am

    My white painted over wood 6 panel doors are splitting away at the panel edges. What happened? Any ideas on how to fix?

    Reply
    • Jen says

      April 15, 2020 at 7:16 pm

      You need to use construction adhesive. Then take a clamp, and leave for a whole day. If you still have any tiny gaps, spackle lightly then proceed with prep/paint.

      Reply
  10. carole a branch says

    April 14, 2020 at 1:10 pm

    I am painting over 6 panel doors with a acrylic latex primer plus paint. The new paint is peeling off the old doors. What am I doing wrong?

    Reply
    • Jen says

      April 15, 2020 at 7:21 pm

      Can be a couple of things. You need to dry wipe them then clean them very good with some little dawn and water, rinse/dry. Sand remember to wipe very well, and when you think you have it all do one last time. Go top to bottom, use dry brush to get in panels, use a good primer. Lot of people use Kilz, I am not a fan, and use Zinsser

      Reply
  11. John says

    June 01, 2020 at 8:20 am

    Did you use any additives in the paint to help paint flow or slow drying times?

    Reply
  12. Marlana Byrne says

    July 13, 2020 at 9:27 am

    I Painted my interior doors a dark Gray over the original white. I’ve noticed some of the paint scratching off mostly around the door knob. Would it help to put a sealant Over the paint to protect it?

    Reply
    • Kris Jarrett says

      July 17, 2020 at 10:43 am

      I’ve never polyurethaned over paint on a door but you could if you make sure you choose one compatible with the type of paint you used. Also make sure that you didn’t use water-based paint for the gray if the white underneath it was oil-based – if you did, the paint is never going to adhere well. I’d be inclined to sand down the scratches and repaint the door using a high quality, high sheen paint such as Benjamin Moore Advance that wears super well.

      Reply
  13. Linda says

    July 27, 2020 at 8:51 am

    Your tips were great!

    Reply
  14. Vicki lavender says

    September 27, 2020 at 11:03 pm

    Have learned to paint doors recently ……….Full Gloss is not a good idea, shows the brush marks & imperfections too easily, Semi Gloss is the best, I didn’t undercoat so the door, using white gloss paint, needed 4 coats, so from now on I will always use an undercoat …………… Undercoat has more Titanium in it & it hides and covers better , Titanium makes it more opaque than normal white top paints , Titanium is an expensive addative so it only has a little used in the manufacture of white top coating paints .
    In Painting Rooms white…………..I’ve found a paint that looks white but is not white is the best to use, covers better., and is easier on the eyes. Pale Creamy Gold Colour is a great feature wall or as a feature colour, goes well with Navy or Grey or Black. Especially if you want to show off black furniture or brass or royal blue & white vase decorations.
    Dark colour lounges coverings , are easier to keep the lounge room looking smart and tidy rather than medium colours.

    Reply
  15. Patri says

    October 03, 2020 at 9:26 pm

    This post is a saver! I am about to paint my front door and will follow these directions. Thanks! 👏👏

    Reply
  16. Sarah says

    November 14, 2020 at 3:38 pm

    Is it necessary to paint two coats if they’re new doors? Thank you

    Reply
  17. Ellen McDonald says

    November 19, 2020 at 6:45 am

    Hi, we have poly doors in our condo. I’m wanting to paint them a gray tone. First with sanding and primer can this be done? Also can I leave the oak trim? Or would it be best to paint that the same color gray?

    Reply
  18. Ellen says

    November 19, 2020 at 6:48 am

    Hi, we have poly doors in our condo. I’m wanting to paint them a gray tone. First with sanding and primer can this be done? Also can I leave the oak trim? Or would it be best to paint that the same color gray?

    Reply
  19. Ellen O'Donnell says

    December 03, 2020 at 5:56 pm

    Why do you paint a door in this order?

    Reply
  20. Jannette Falcon says

    January 02, 2021 at 12:05 pm

    Hello, thank you for the door tip, i definitely learned.
    Can you post something similar for interior window shutters please and thank you.

    Reply
  21. Nadia E says

    January 13, 2021 at 1:49 am

    This was so helpful and I appreciate the details and links! Thank you! Was going to hire someone to do this but I’ll try your techniques and do it myself!

    Reply
  22. Tariq says

    March 12, 2021 at 10:10 pm

    Fantastic step by step door paint DIY post. This will help me to paint my new doors . Thanks for sharing

    Reply
  23. Tom meister says

    March 14, 2021 at 2:30 pm

    How munch paint need one door on inside of house

    Reply
    • Kris Jarrett says

      March 15, 2021 at 10:31 pm

      One quart will be more than enough!

      Reply
  24. Ben says

    April 05, 2021 at 4:34 pm

    We recently purchased an older house in Ct . The interior doors are in pretty bad shape .

    We wanted them cleaned up and painted and we were quoted
    8 hours per door and there are 25 doors

    That’s 200 hours @ $35 dollars per hour
    That’s $7,000 seems ridiculous

    I’m not expecting them to be perfect
    And told them to spend 3-4 hours
    Per door

    Any thoughts ?
    Please

    Thanks
    Ben

    Reply
    • Kris Jarrett says

      April 18, 2021 at 7:42 pm

      8 hours per door seems like a LONG time to me as well – it can take several hours to prep and paint both sides of a door if they’re in really bad shape with peeling paint but I can only see it taking that long if your doors have a LOT of detailing on them or if the painters are accounting for waiting around with dry time between coats. However since you have multiple doors to paint, there should be no waiting since they can move on to working on another door while one is drying. I think 3-4 hours per door is reasonable.

      Reply
  25. Renae says

    April 09, 2021 at 9:17 am

    I’m going to paint my front door ASAP

    Reply
  26. Carien Brewis says

    May 24, 2021 at 4:16 pm

    Thanx for the tips!
    I just want to know…when you say: “Paint the edges”…does that include the bottom of the door??

    Reply
    • Kris Jarrett says

      May 25, 2021 at 10:54 pm

      Yes, ideally you would paint all six “sides”

      Reply
  27. Alexis says

    October 23, 2021 at 11:42 am

    Hi there. I live in a townhouse where the front door and garage entry door both open into a small entryway (like a 5×7 ft entryway that goes right to staircase to second floor). I’d like to paint the interior of the front door a grey/blue color (haven’t decided just yet). My question is, if I paint the interior of the front door, should I also paint the interior of the garage door? They’re both white currently, white trim/molding, and light grey/beige walls. Thank you!

    Reply
  28. Karen Worsell says

    November 05, 2021 at 11:03 am

    Can I pai

    Reply
  29. Robert says

    April 20, 2022 at 10:05 am

    The door in your “site” is painted with Benjamin Moore Advance charcoal slate-correct.

    It’s very beautiful.

    Is the door pictured, painted with B.M. Advance a semi-gloss base or a high-gloss base?

    Thank you for your excellent primer on how to paint a door.

    Reply

Leave a Reply Cancel reply

Your email address will not be published. Required fields are marked *

This site uses Akismet to reduce spam. Learn how your comment data is processed.

Primary Sidebar

✉️FREE EMAIL SERIES ✉️

5 Secrets to Reinventing Your Home on a Budget

Simple tips to instantly transform five rooms in your home!

Meet Kris

Kris of Driven by Decor

Popular Posts

All images on DBD are copyrighted and taken by me unless otherwise noted. If you'd like to use any of my images, please request their use via my Contact page.

I am a participant in several affiliate advertising programs (including the Amazon Associates program) and earn fees from qualifying purchases. For more information, see my full disclosure statement {here}.

To view my privacy policy, go {here}.

Copyright © 2022 · Driven by Decor