Every time I share an interior design mood board I’ve created, I get tons of emails and messages asking how I made it. There are LOTS of different ways to interior design mood boards with no one way being the “right” way. But many of you were frustrated by the fact that many programs used to make them such as Photoshop have a STEEP learning curve. They’re pricey too! So today I’m sharing a step by step guide for creating interior design mood boards with ease so you’ll be whipping out your own boards in no time! (post includes affiliate links – full disclosure available {here})
Why Create a Mood Board?
I create interior design mood boards all the time because when I’m making over a room in our home and purchasing multiple items (rugs, lighting, etc.), it helps so much to see everything in one place. It’s a great way to be more confident with your design decisions instead of spending money on something that’s unlikely to work! For example, this is the mood board that I created to help plan out which products to use in our primary bathroom renovation:
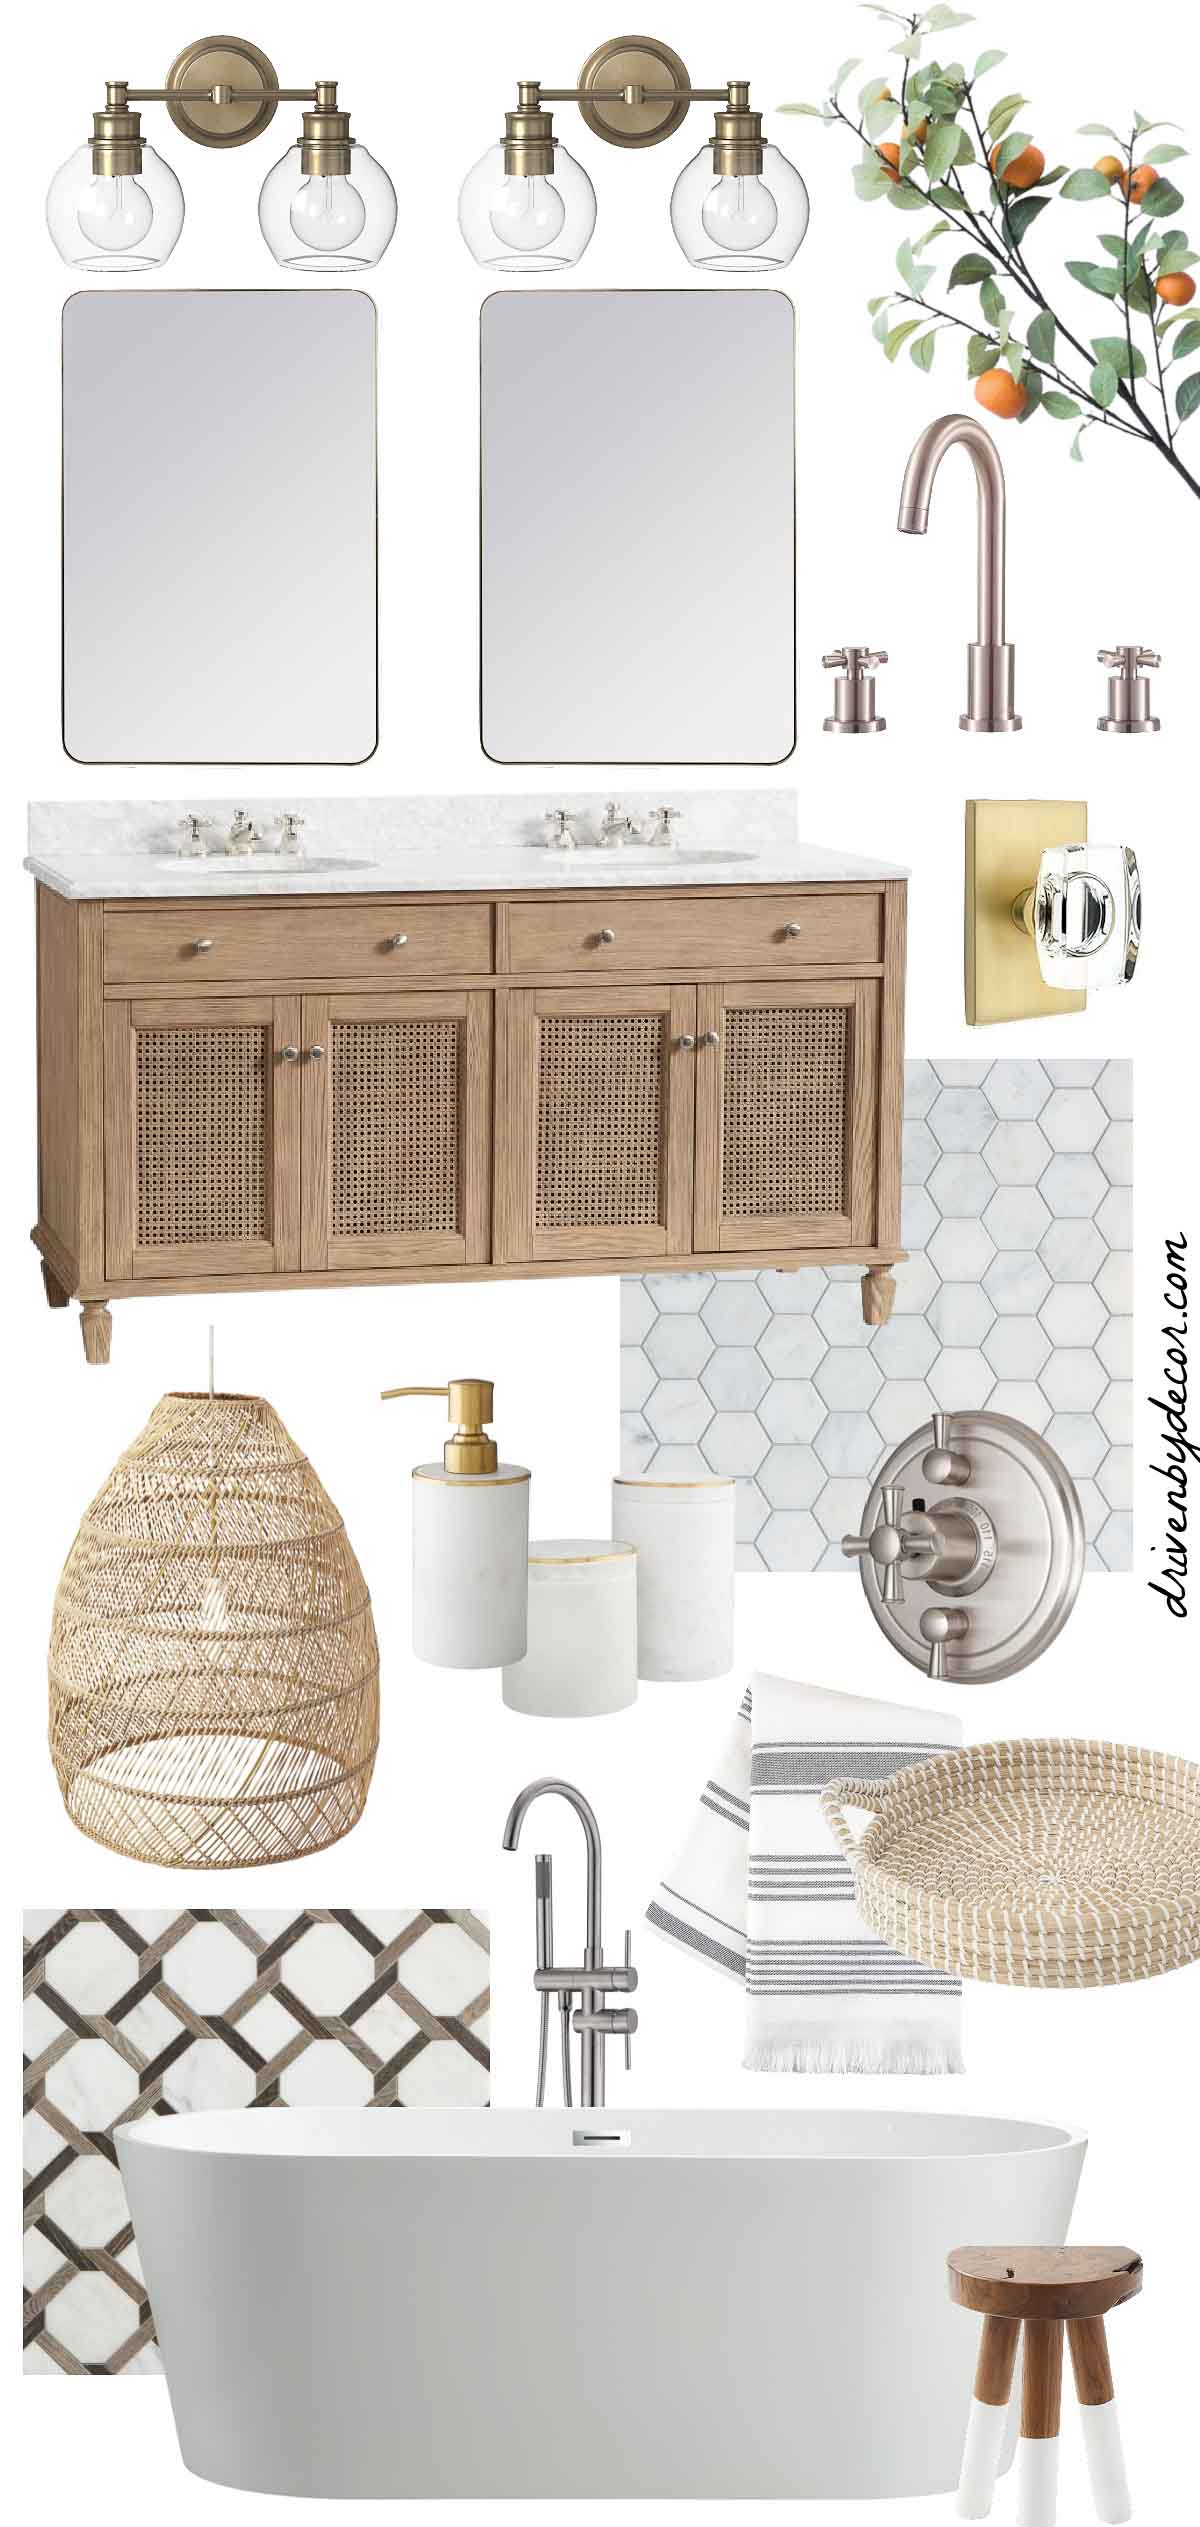
Click for Sources: 2-Light vanity lights | Mirrors (gold) | Double vanity | Faucet | Crystal & brass door knob | Marble hexagon shower floor tile | Marble & brass canisters | Marble & brass soap dispenser | Woven pendant | Cross handled shower valve trim | Gray striped towel | Round woven tray (similar) | Accent tile | Tub filler | Bath tub | Stool
I was actually planning on buying a different vanity mirror until I created my mood board (and realized I didn’t like how it went with everything else I had planned) and it helped me to figure out the best lighting for my space too. Are you ready to create your own interior design mood board now? Here’s my step by step:
1. Save The Images You Want to Use on Your Mood Board
The first step is to save each individual image that you want to use on your mood board to your desktop, laptop, or phone. Choose an image on a white background if you have that option because that will make removing the background much easier. Most of you already know this but to save an image on most laptops or computers that means right-clicking with a mouse or two-finger clicking with a laptop touchpad and then selecting “save image as”. On some websites you have to click on the image to enlarge it before it will allow you to right-click and save it:
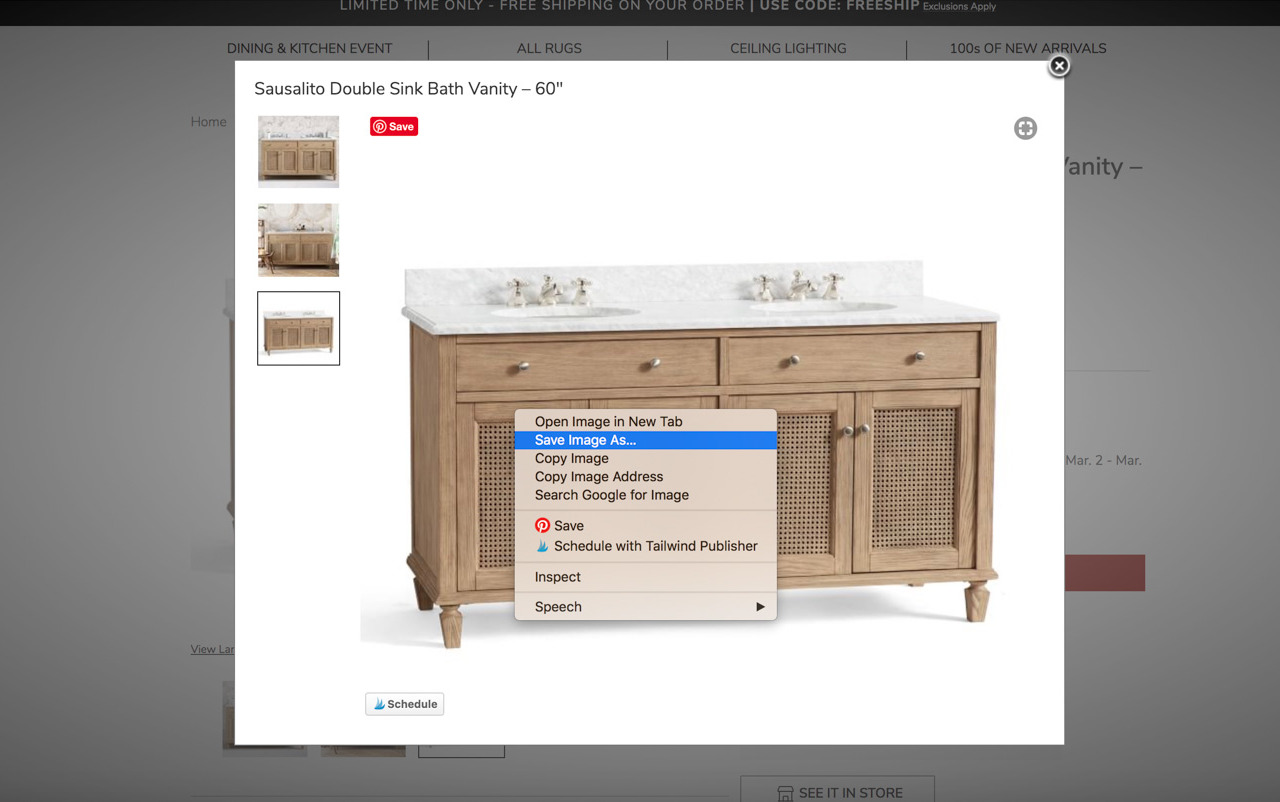
For a small number of websites, you don’t have the option to save the image to your laptop/computer doing it this way. In this case, simply take a screenshot of it (on a Mac, you can do that by pressing shift-command-4 – the screenshot image will show up in your files under “Desktop”).
2. Remove Image Backgrounds
You don’t have to do this step if you just want to do a super quick mood board but I always remove the backgrounds from images for my mood boards. Having the background (white space) removed allows you to place images close together without having to deal with the background of one photo overlapping another. There are many different ways to cut out backgrounds from images. A few of the most popular ways are through Canva Pro or PicMonkey (which have a monthly fee), PowerPoint, or by using a free app on your phone such as Background Eraser.
3. Arrange Images on a Mood Board
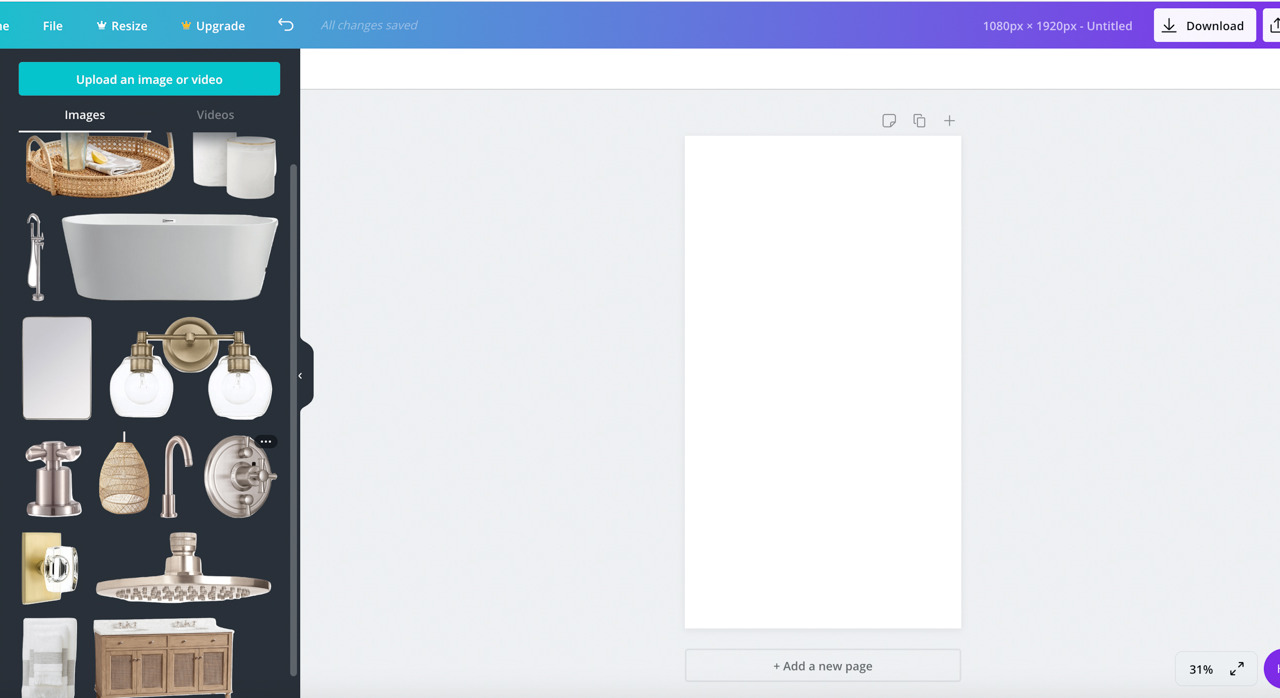
Once you’ve cut out the backgrounds of your images, you can arrange them on a mood board using the free version of Canva {here}. After creating a free account, start by clicking the aqua “Create a Design” button in the upper left corner and then “+ Custom Dimensions”. A size I often use is 1080 (width) x 1920 (height) but you can play around with those dimensions to get the size that you want. To add your images to it, click “Uploads” on the left and then the button “Upload an image or video” and select your images that you want on your mood board. You’ll see them all pop up in the black space on the left:
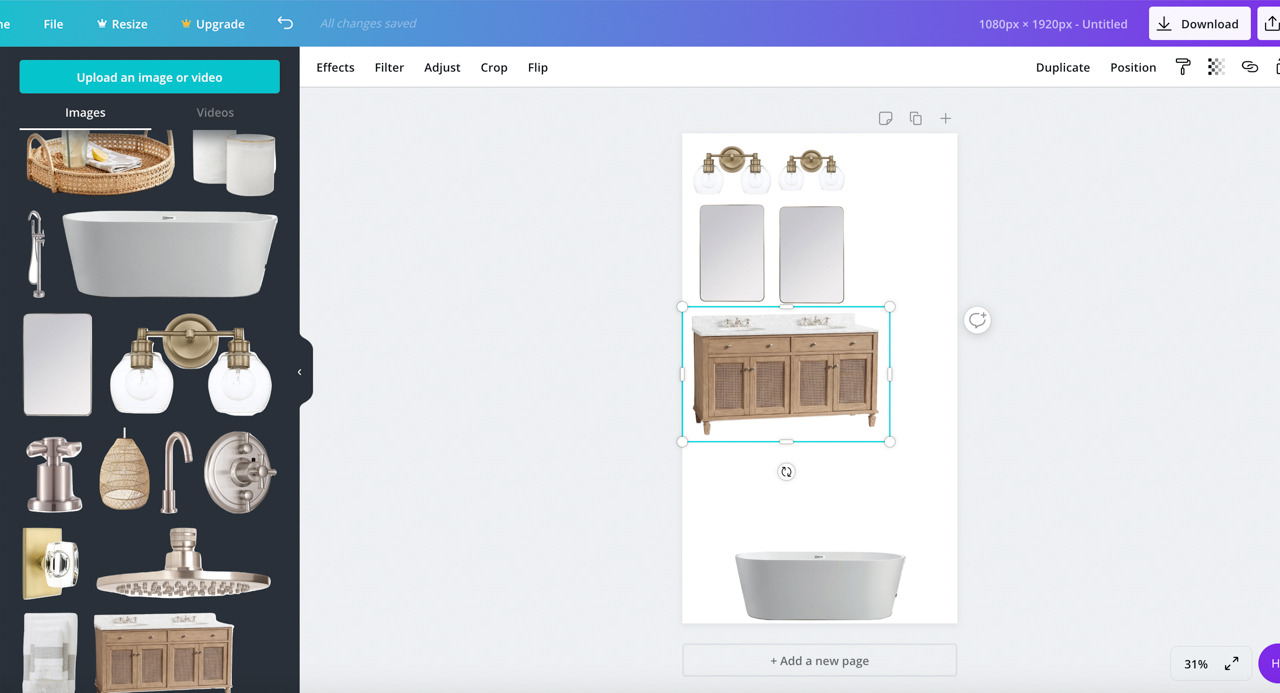
To add an uploaded image to your blank mood board, you can either click the image or drag it over. To make an image smaller or bigger once it’s on your mood board, click it to highlight it (you’ll see a highlighted box like the one around the vanity in the pic below) and then click on one of the circles in the corner of the highlighted box to drag it in or out to reduce or enlarge the image:
Want to save this post?
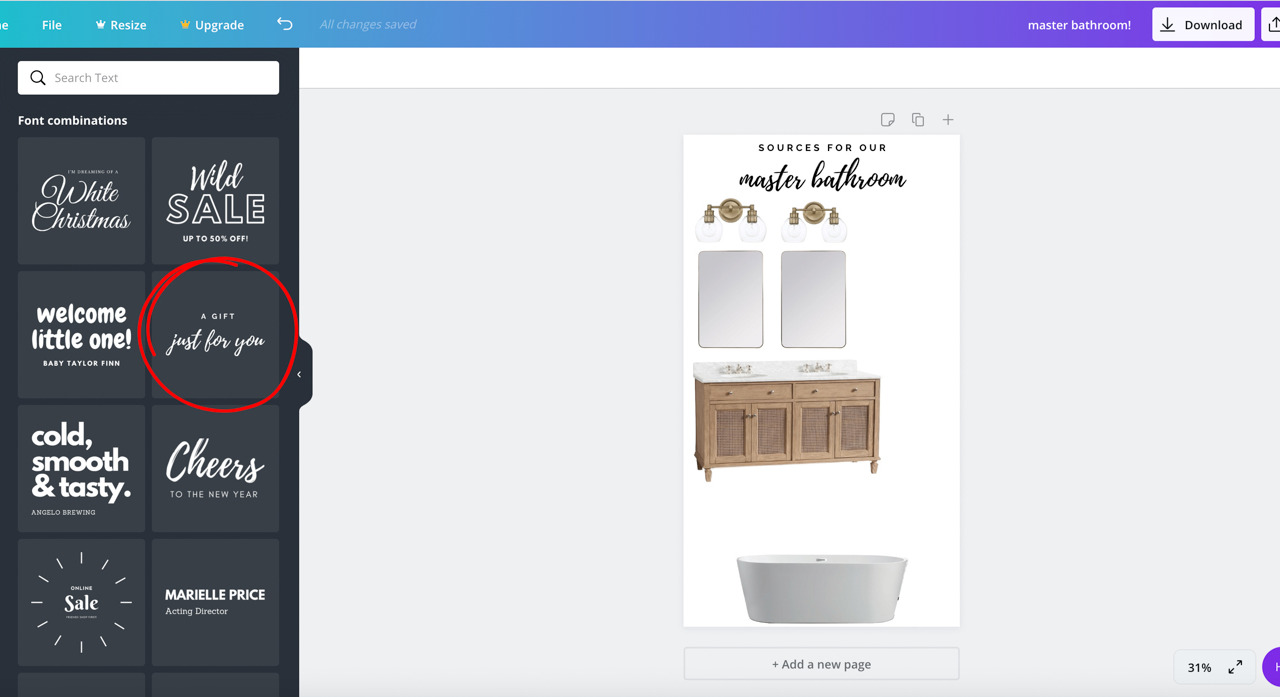
That’s it! The rest is just playing around with all of your images to find an arrangement where everything fits and you like the look of it. You can also easily add text to your interior design mood board if you want! Just click “Text” on the far left and then click one of top options to add simple text or scroll down through font combination options to choose one of those. As an example, I selected the font circled in red on the left and used it to title this mood board:
Once you’re completely done designing your mood board, simply click “Download” in the upper right corner to save it! Done!
Interior Design Mood Board Uses
Once you get good at creating mood boards (the first one you do takes the longest by far – you’ll get faster and faster at them!), you might just find that you use them more than you thought you would! I mentioned earlier that I use mood boards when I’m making over an entire space to see if everything I’m planning “goes together” well or if I need to rethink certain parts. A good example is this mood board for my kitchen remodel:
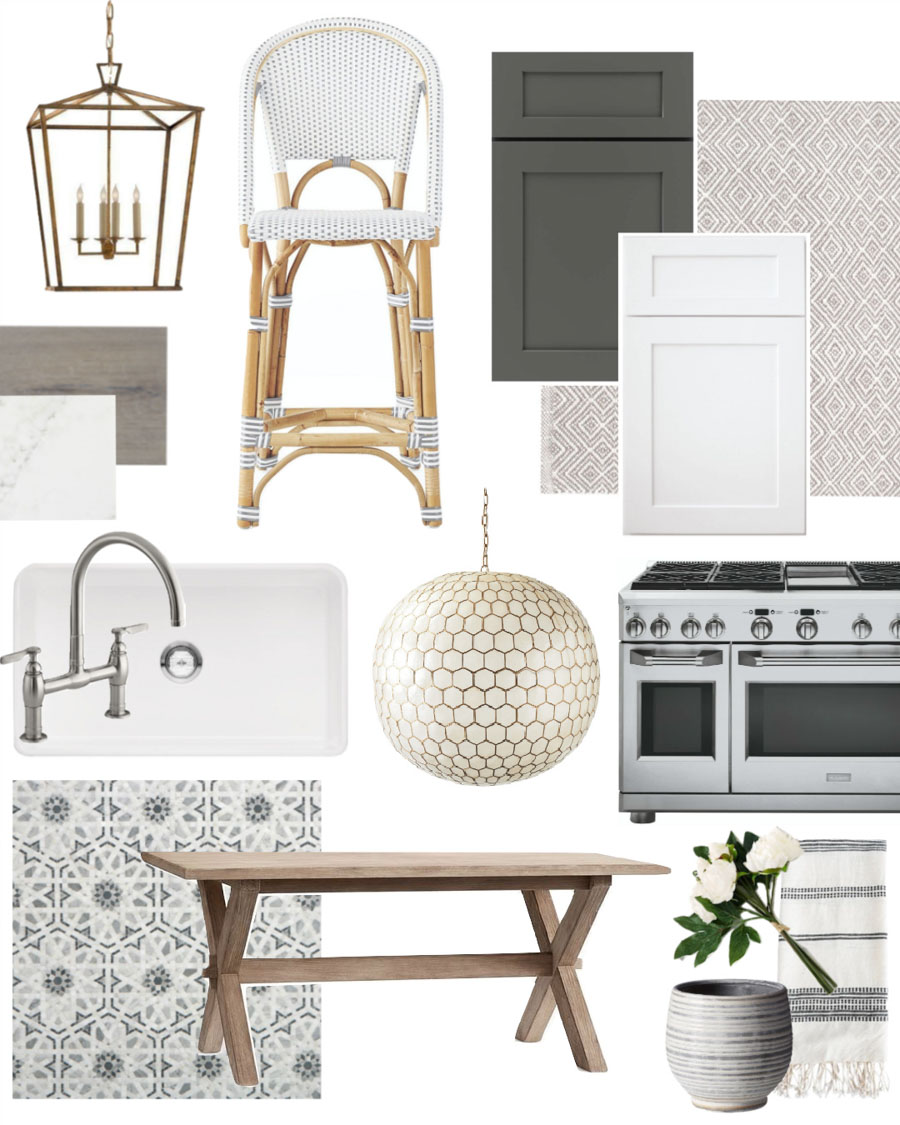
Click for sources: Brass pendant | Gray & white woven counter stools | Cabinets | Geometric rug | Engineered wood floor | Marble look-alike countertops | Sink | Faucet | Capiz pendant | Range | Mosaic backsplash | Kitchen table | Black & white hand towel | Striped planter | Faux white peonies
I also use them frequently when I’m just adding one item to a space to figure out what’s going to look best. For example, after deciding on my vanity and mirrors I wasn’t sure which of the lighting options I had found would be the best fit so I created this mood board with the four options I was deciding between:
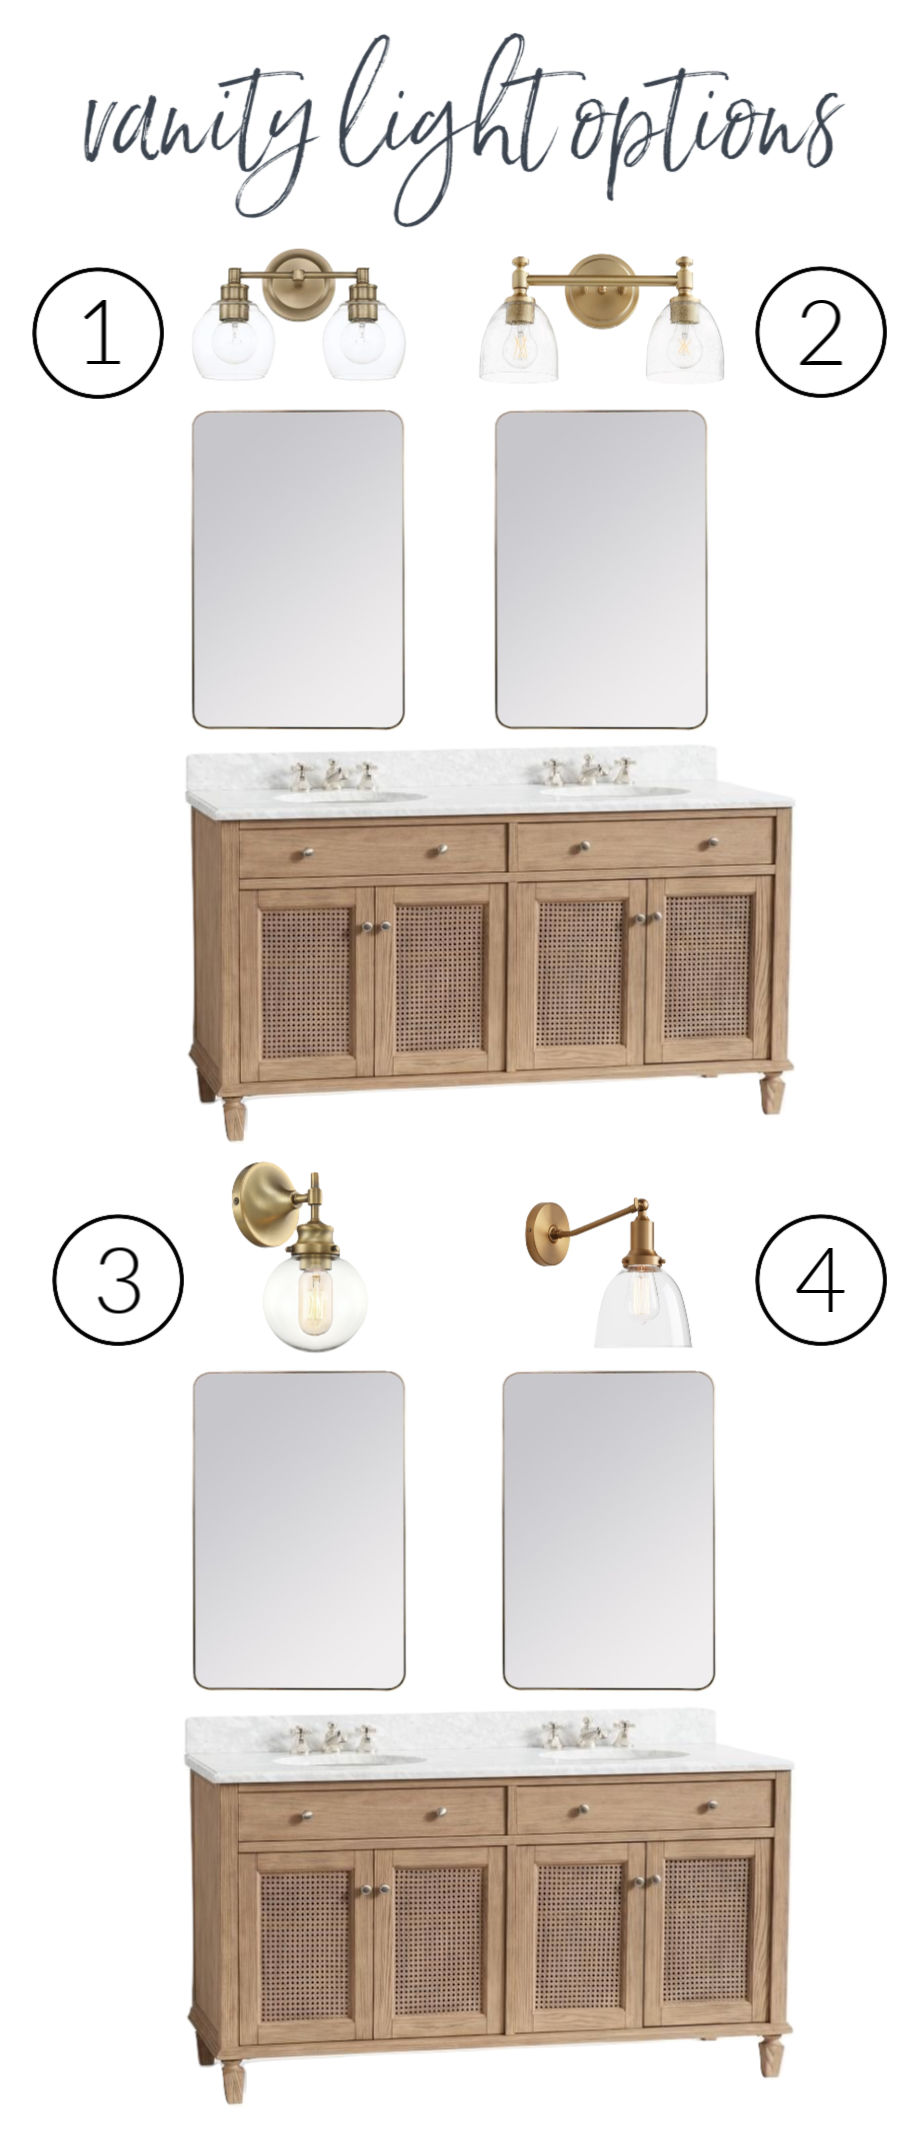
(1) 2-light brass globe fixture | (2) 2-light traditional brass fixture | (3) 1-light brass globe sconce | (4) 1-light brass swing arm sconce
After doing this, it was a no-brainer which one was the right choice for my space (any guesses as to which one I picked? – If you guessed #1 you’re right!). I’ve also found them helpful for sticking to a budget – I can swap in a lesser priced second choice item into my mood board if I’ve gone over budget and decide if it still gives me the look I’m after.
Hope that you guys found this helpful – leave me a comment or shoot me an email if you have any questions!
XO,


Kathy says
I’m sad that the Background Eraser app is no longer available, but love your ideas. Thank you!
Tracey says
This is SO helpful! I have been playing around with it some, but I have a couple of questions. I have tried burning the backgrounds of some of the images in burner, but some still have a white border around them. This coffee table, for example,
I saved an ottoman from Serena and Lily and no matter how many times I tried to erase the background it came up with a white square around it. Do you know how to get rid of that? Also, it seems like I can only fit a few (3-4) images on a page before it looks crowded and cluttered. I used the size you recommended, and you kitchen board above looks great. I don’t know how to make mine look less busy. Any tips? Thanks so much! This is really great!
Cindy says
This is soooo helpful. Thank you.
I see that on your blog you are able to link to sources at the bottom of images. Any suggestions on how to save where my cleaned up images are from, so I can find them again easily?
Thanks!
Corinne says
Love it! Thank you!
Jenni Katz says
THANK YOU FOR SHARING SUCH AN EASY(AND FREE) WAY TO MAKE MOOD BOARDS! I JUST TRIED IT AND IT TOOK ME ABOUT 10 MINUTES TOPS! I AM A KITCHEN AND BATH DESIGNER AND ALWAYS DREAD TAKING THE TIME TO MAKE A BOARD, BUT KNOW THAT IT’S A GREAT TOOL TO HELP CUSTOMERS SEE EVERYTHING COME TOGETHER.
THANK S AGAIN!
JENNI
mary wilburn says
Wow!! Mind blown on how wonderfully you explained this tutorial Kris! I have always wondered how will i compile all of my saved Pinterest and screen shot inspo photos and now i can start making mood boards! Thank you for taking the time to post and share with us!
Elle says
This is the most helpful tutorial I’ve seen…ever. I like to see things collected together, sure, but not so often (nor am I a pro) that I can justify paying for a tool to do it. I’ve been using Google Docs, which is great for collecting inspiration photos into separate slides, and I can see using Canva for the final look. I will definitely start using the Background Burner to better show the details of the pics I’ve been saving. Thanks so much!!!
Kim May says
Great post! I am exciyed to try my first board. This should make my decorating so much more refined and directed. Thank you!
Nee says
This is an awesome post. I have never seen a post outlining how to create a mood board. Many thanks!!!
Jennifer Wheeler says
Thank you for explaining everything so well. It was very helpful!
Christy says
Thank you for these great instructions – I’m always impressed when I see mood boards, but have never dug into the ‘hows’ before. It’s easier than I realized!
Melissa says
Thank you — your instructions are so clear and helpful.
Lucie says
Wow! This is a great tutorial, Kris. I’ve used Canva for different projects but had trouble figuring out how to remove backgrounds on images. Thanks so much for taking time to do this.
Karen B. says
Kris,
This is really helpful information. I’ve never made a mood board (mostly because I never learned how). This is going to be fun. I love finding a new skill on the computer. I can see how helpful it would be to have every item you’re considering grouped together.
I love the components of your newly refurbished master bath.
xo,
Karen
elle says
This is very very helpful –thank you! Question — how do you make sure the scale is correct between items? For instance, on your bathroom mood board, single lights #3 and #4 look like they are much larger compared to the mirror than they would be in real life. And are lights #1 and #2 the same scale as each other — would #2 really be wider than the mirror?? Hope you can help me understand how to scale properly.
Kris Jarrett says
That’s a great question! How much I pay attention to scale kind of depends on my reason for doing the mood board – in the case of the lights, I knew the size of any of them would work so I was just looking at style. But earlier this week I created a mood board to figure out what lighting I should choose for over the tub and I did that totally to scale (I knew how wide the windows in my tub nook were so estimated scale based on that measurement compared to my light measurements). I ended up ruling out the one I was originally planning to use 100% because of scale (it was clear that it was too small). Hope that helps!