With every new house we move to, I take what I learned from the projects we did in our previous home to make better decisions about what to do in our new one. Some things we decide to do totally differently, while others go on repeat! Something that was a definite “go on repeat” no-brainer was building out a Caséta by Lutron smart lighting system like we had in Connecticut.
It’s one of those things you’re initially not sure you need but once you have it, you wonder how you ever got by without it! From being able to set multiple lights in our house on a on/off schedule when we’re gone on vacation (no more timers!) to dimming the lights in our TV watching room without leaving the sofa, and having the luxury of controlling lights in multiple rooms of our home with our phones, the push of a remote, or even our voices, we LOVE the peace of mind and convenience!
Since moving to NC, not only have we built out a great Caséta smart lighting system but we also added something new – Lutron’s Serena Smart Shades. They are AMAZING! I’ve gotten so many questions on Instagram about how our smart shades work, how to start creating your first smart home system, and more so I’m excited to be partnering with Lutron to share answers to all of your questions and help you start making your home smart too! These are six of the ways that my Caséta by Lutron smart lighting system has made my home smart! (post includes affiliate links; full disclosure statement available {here})
1. Our Serena Shades Automatically Go Up At Sunrise and Down At Sunset
As I mentioned, the newest addition to our Caséta by Lutron smart lighting system is our Serena Smart Shades. The first place that I installed them was on our glass front doors. While I love that glass doors make our house so much lighter and brighter, I don’t love our house being a fishbowl at night where anyone walking or driving by can see right into our family room.
The previous owners solved the privacy issue by installing wood blinds on both front doors. It did the job but even when they were tilted open, the wood blinds blocked a lot of light plus they were a pain to clean, clanged on the door when we opened it, and didn’t look so great either. I measured for new Serena Smart Shades and was so happy when the day came to take my wood blinds down and put my Serena Roller Shades up!
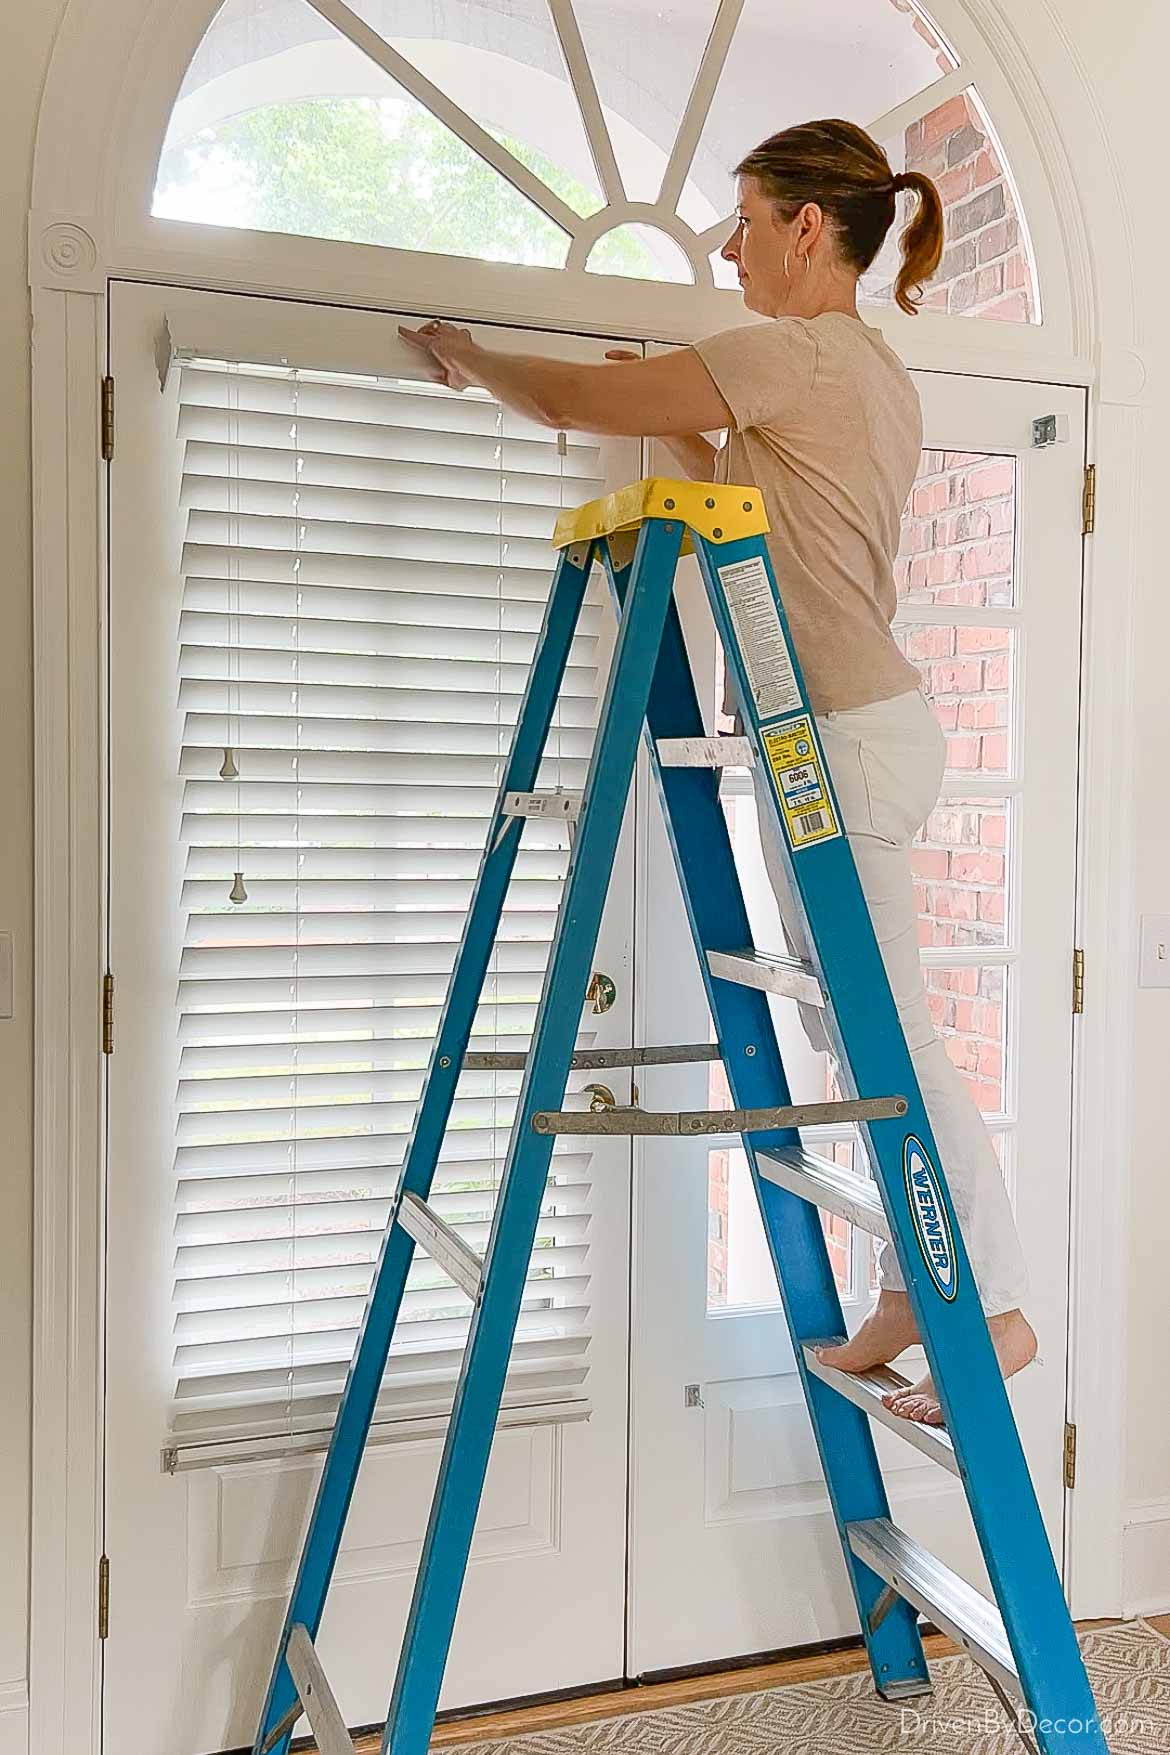
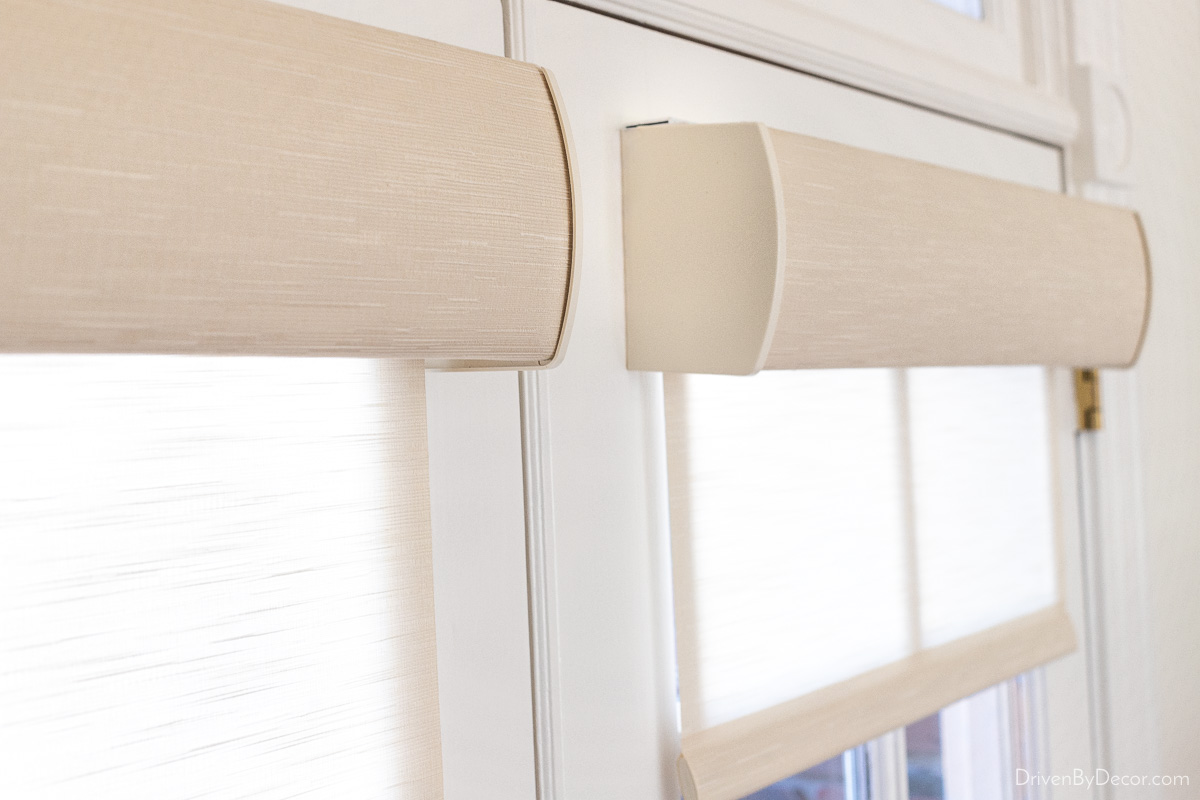
I measured and installed them myself (I used {this installation video} to guide me) and thought it was simple and straightforward to do but you can also choose to connect with a pro {here} and have it done for you. My Serena Smart Roller Shades are SUCH an improvement – we love them! Not only do they look really nice:
but when the shades are up we get so much more natural light pouring into our home than we did with the blinds:
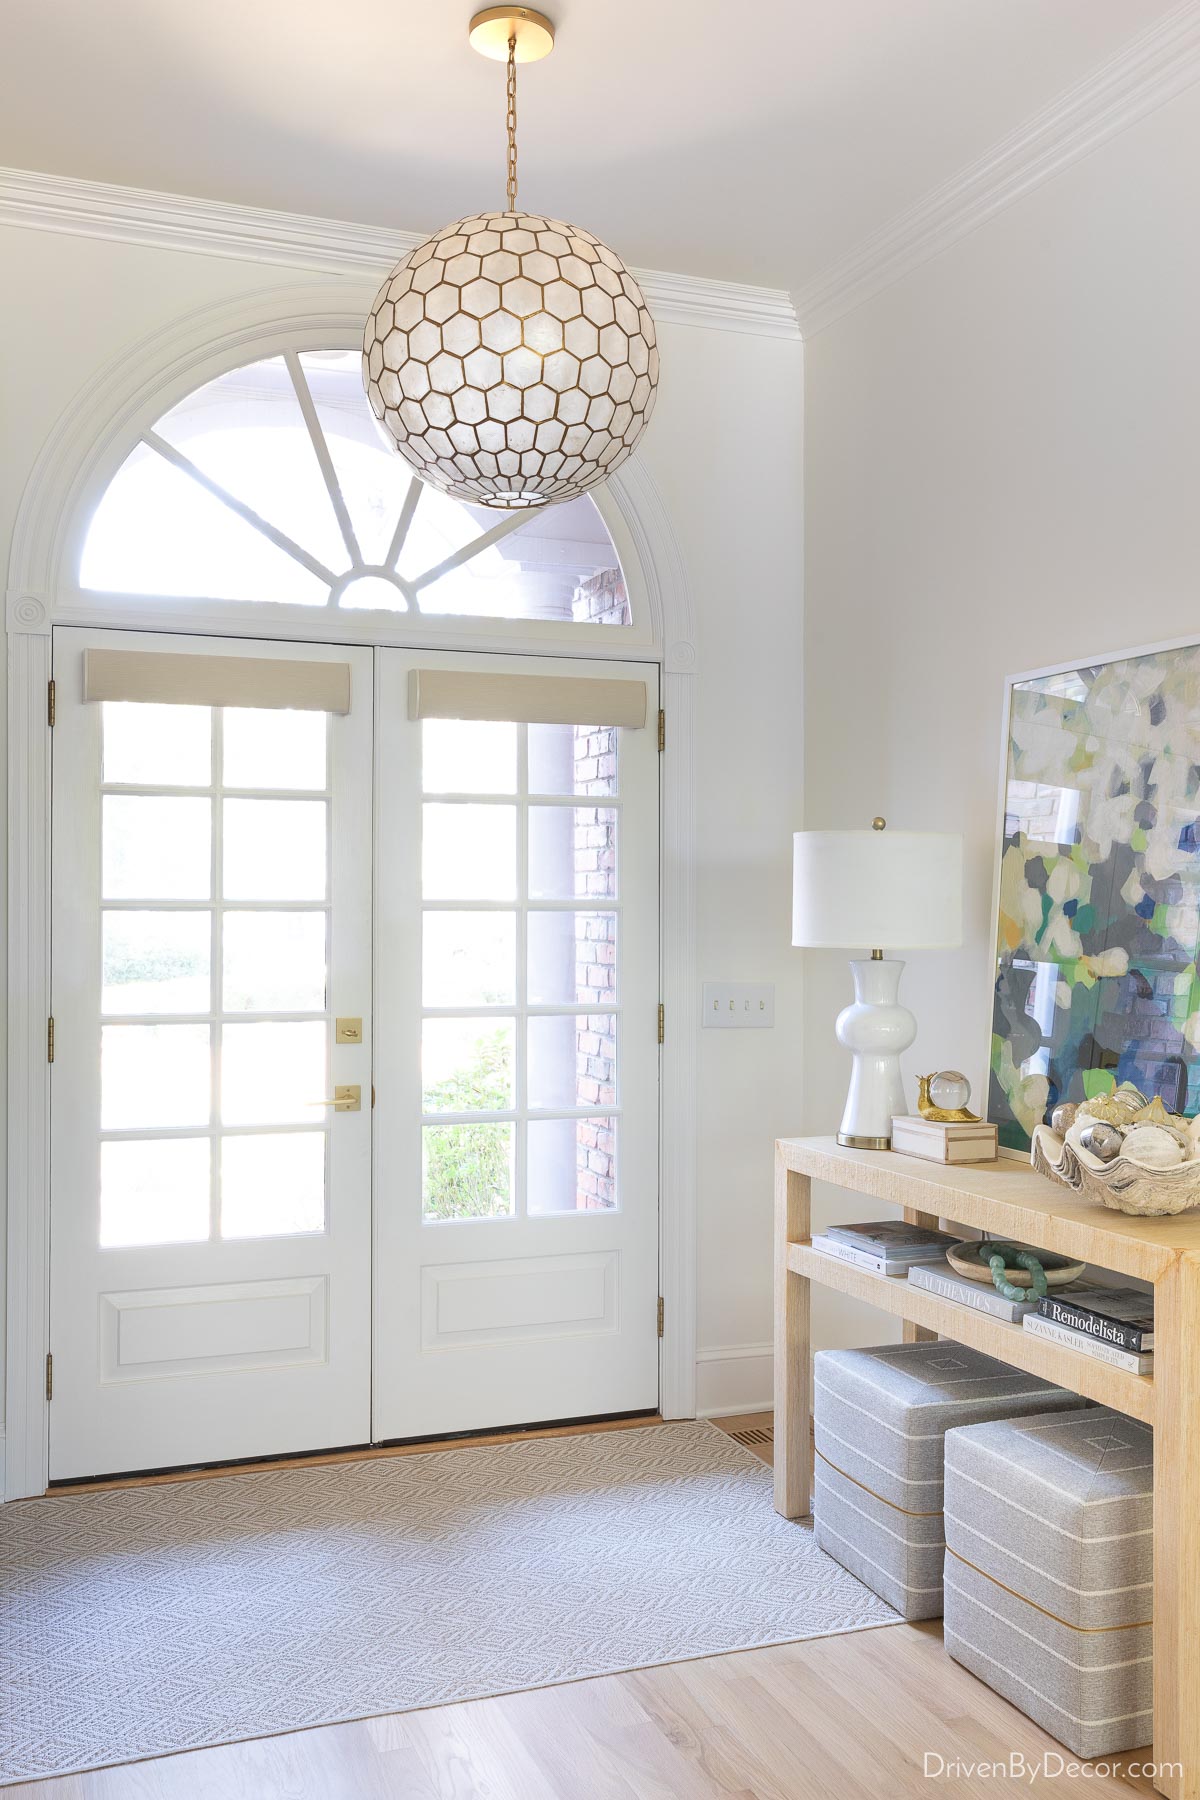
Entryway Sources: Serena Smart Shades on entry doors | Capiz chandelier (22.5″) | Rug | Linen console (also see {this similar console}| White table lamp | 30″ x 40″ Framed art print | Decorative ivory box | Decorative snail | Decorative clam shell | Shallow wood bowl | Glass beads | Cube ottomans
And when they’re down at night, we have complete privacy:

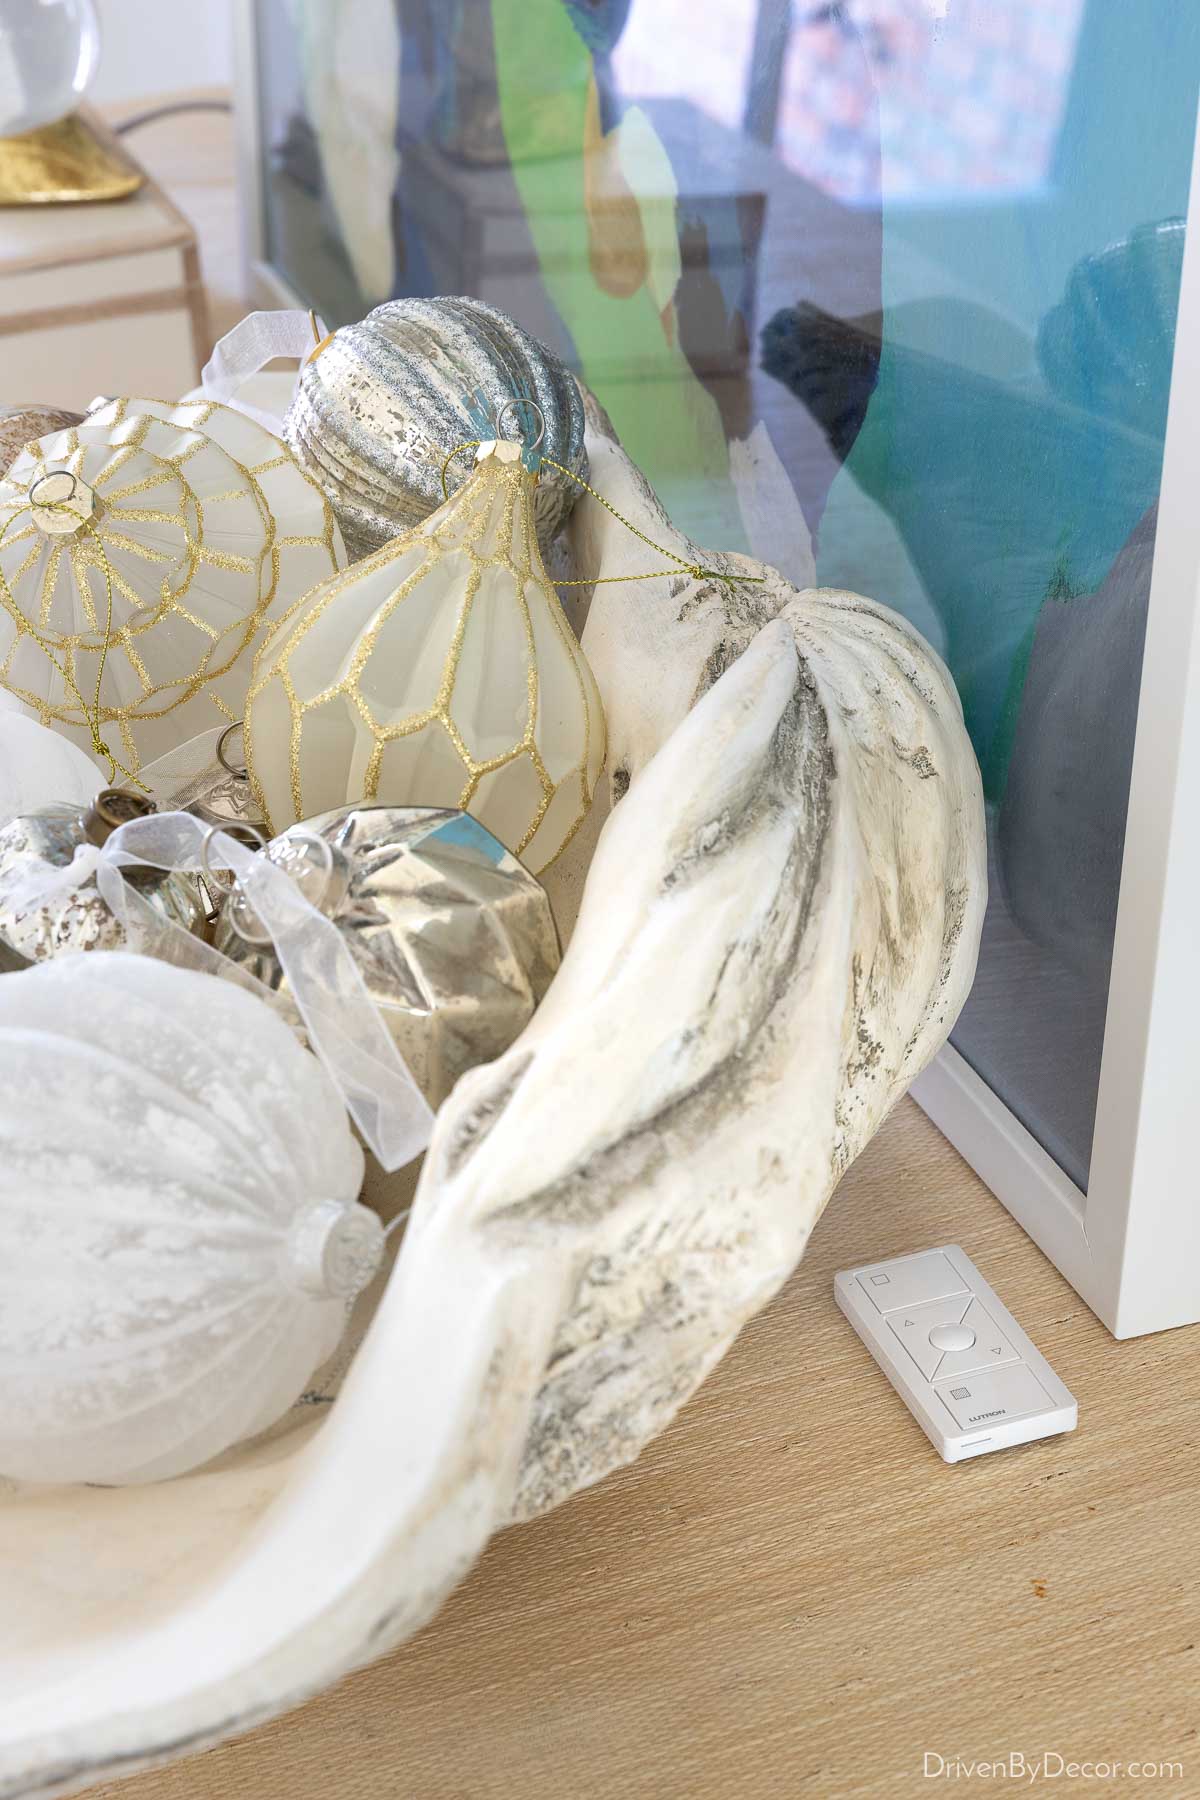
And unlike your typical shades, they’re smart! I connected them to my Lutron app (the same one I use for my Caséta smart lighting system!) and have them scheduled to automatically go up at sunrise and down at sunset every day. Serena even automatically adjusts the schedule as the seasons change. And if I want to control them manually, I can do that through the app, voice control via Alexa, or using the Pico Smart Remote that I keep on our entryway console. It raises and lowers our shades with the touch of a button:
If you’re thinking about getting Serena Smart Shades, you can design your shades online {here} to see all of your options and get pricing. For all three spaces where I have Serena Smart Shades (front doors, girls’ room, & sun room), I chose the roller shades (they also have smart honeycomb shades & wood blinds) in the Harbor Sand fabric and the fabric wrapped fascia (valence). The other fabric options I had considered are Mirage Sand, Harbor Pearl, and Highland Linen:
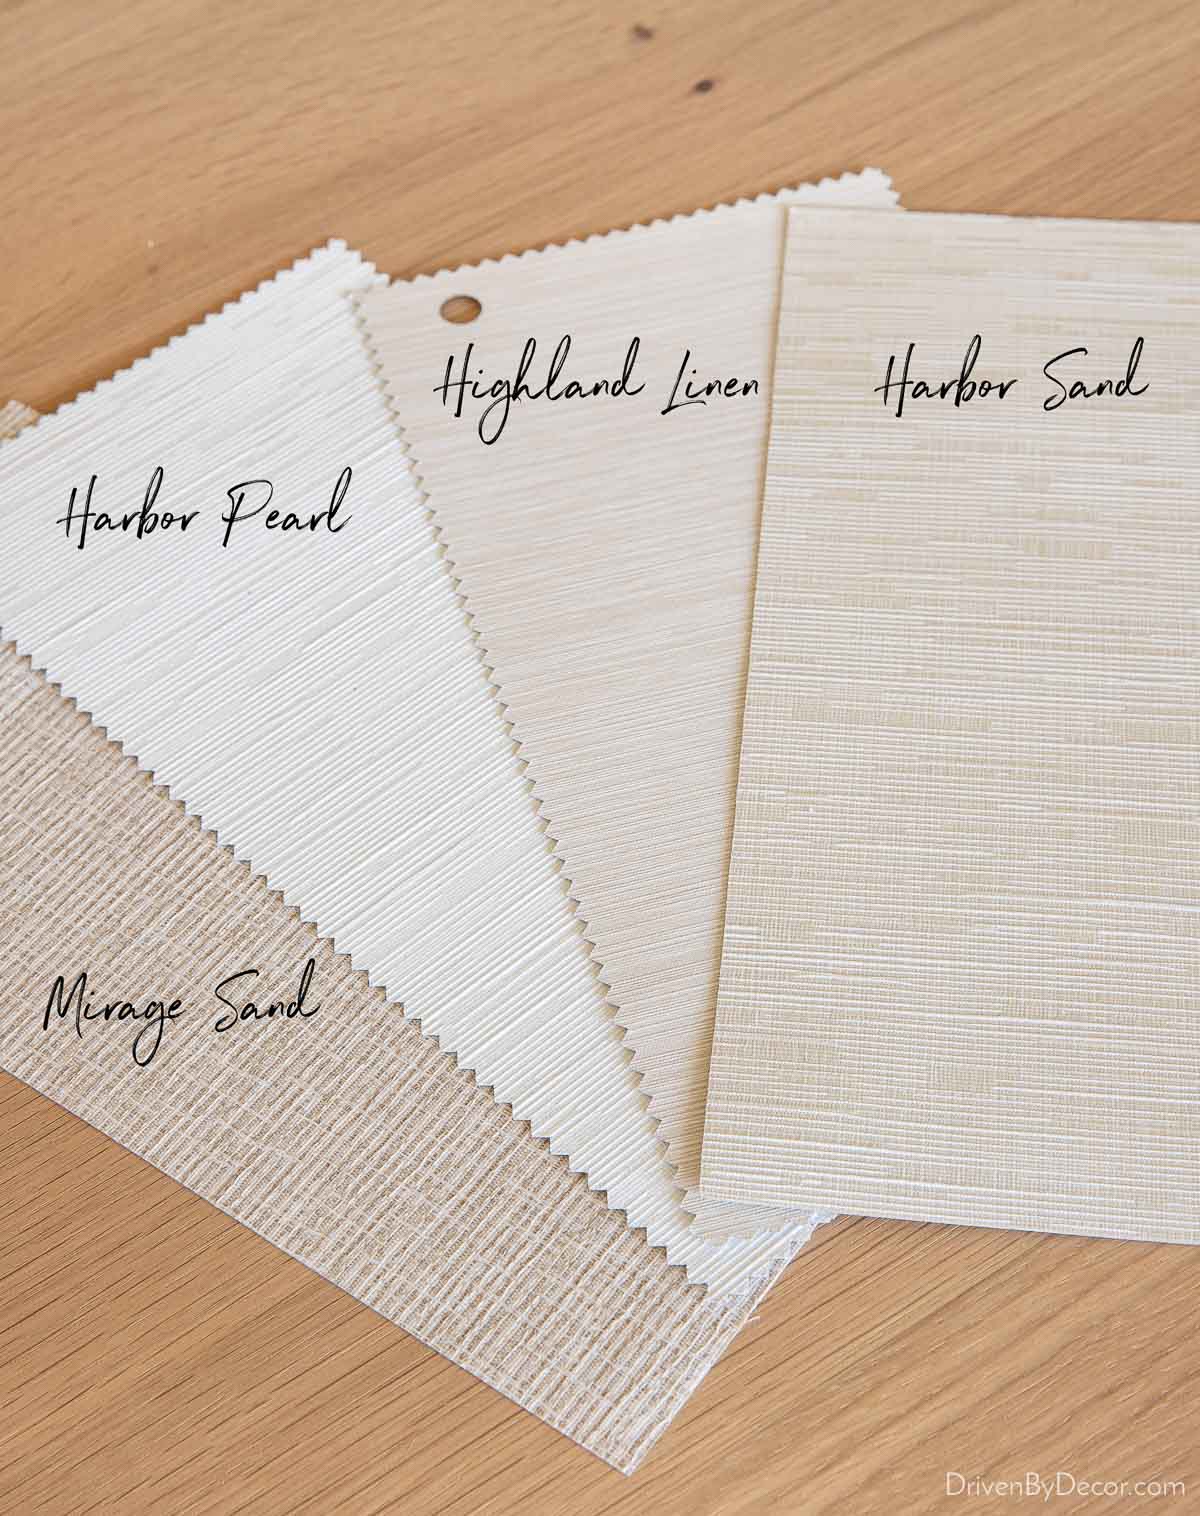
For our front doors and sunroom windows, I chose the translucent (privacy) lining and for the shades in my girls’ room I chose the blackout lining. You can order up to 10 free fabric samples {here} to try out in your home. They’re generously sized and gave me a lot of confidence in deciding what to choose. If you want to see my Serena Smart Shades in action, you can check them out on Instagram {here}.
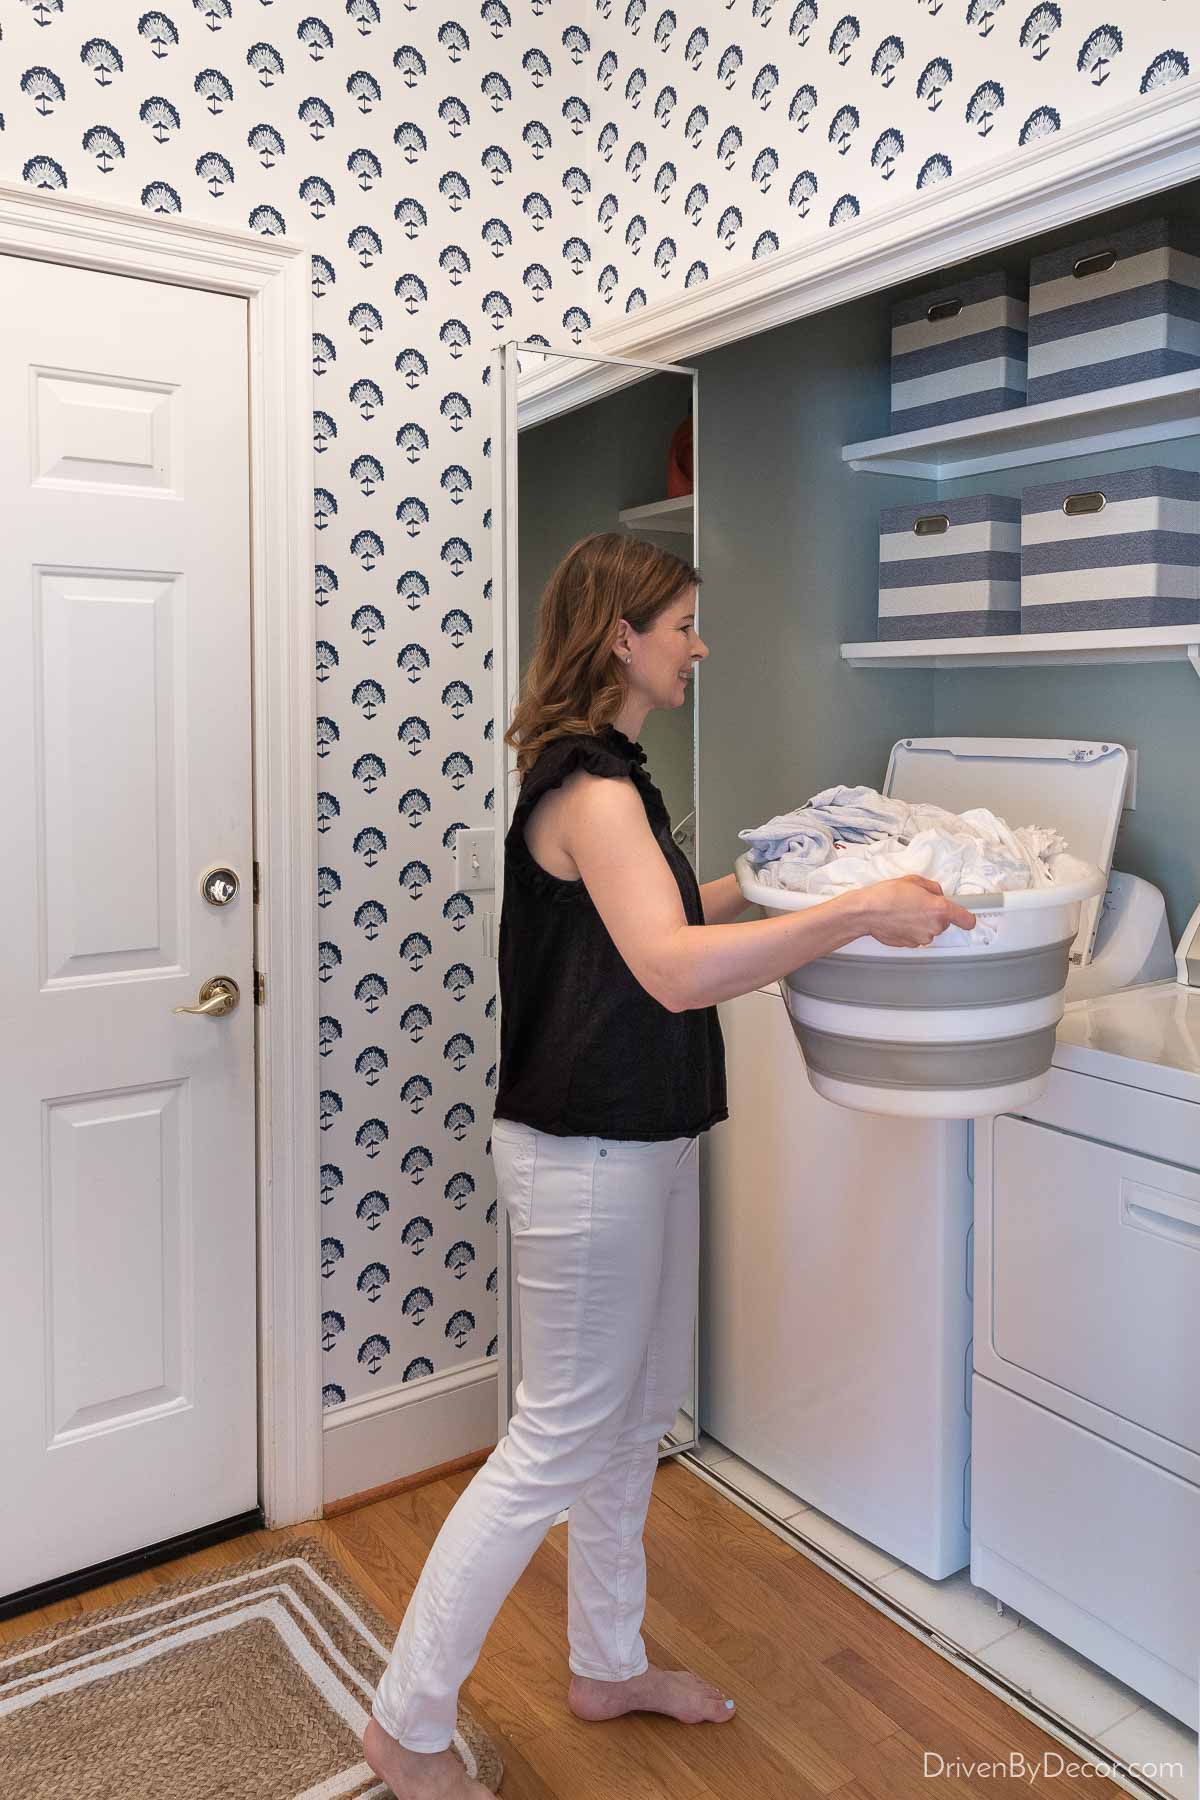
2. Our Lights Turn On When We Walk In The Door
We enter and leave our home through our laundry room which connects to the garage. When we’re coming home at night and open the door to the laundry room, the lights in that room immediately go on to light our way. Often I’m coming in with my hands full of groceries or packages or I’ve got Cricket on the leash, so it’s so nice to not have to worry about fumbling for the light switch in the dark. It also comes in handy when I’m walking into the laundry room with my hands full of laundry:
Light motion sensors that detect motion and turn on the lights are nothing new, but my Caséta Smart Motion Sensor has a superpower that most motion sensors don’t have. I can locate my motion sensor wherever I want! That might not seem like such a big deal, but it is – with most motion sensors the sensor is in the switch itself which would mean that my laundry room lights would go on EVERY time we walked down the hall in front of it. Which is a zillion times a day. By locating my Caséta Smart Motion Sensor above the door to our hallway so that it faces our garage door,
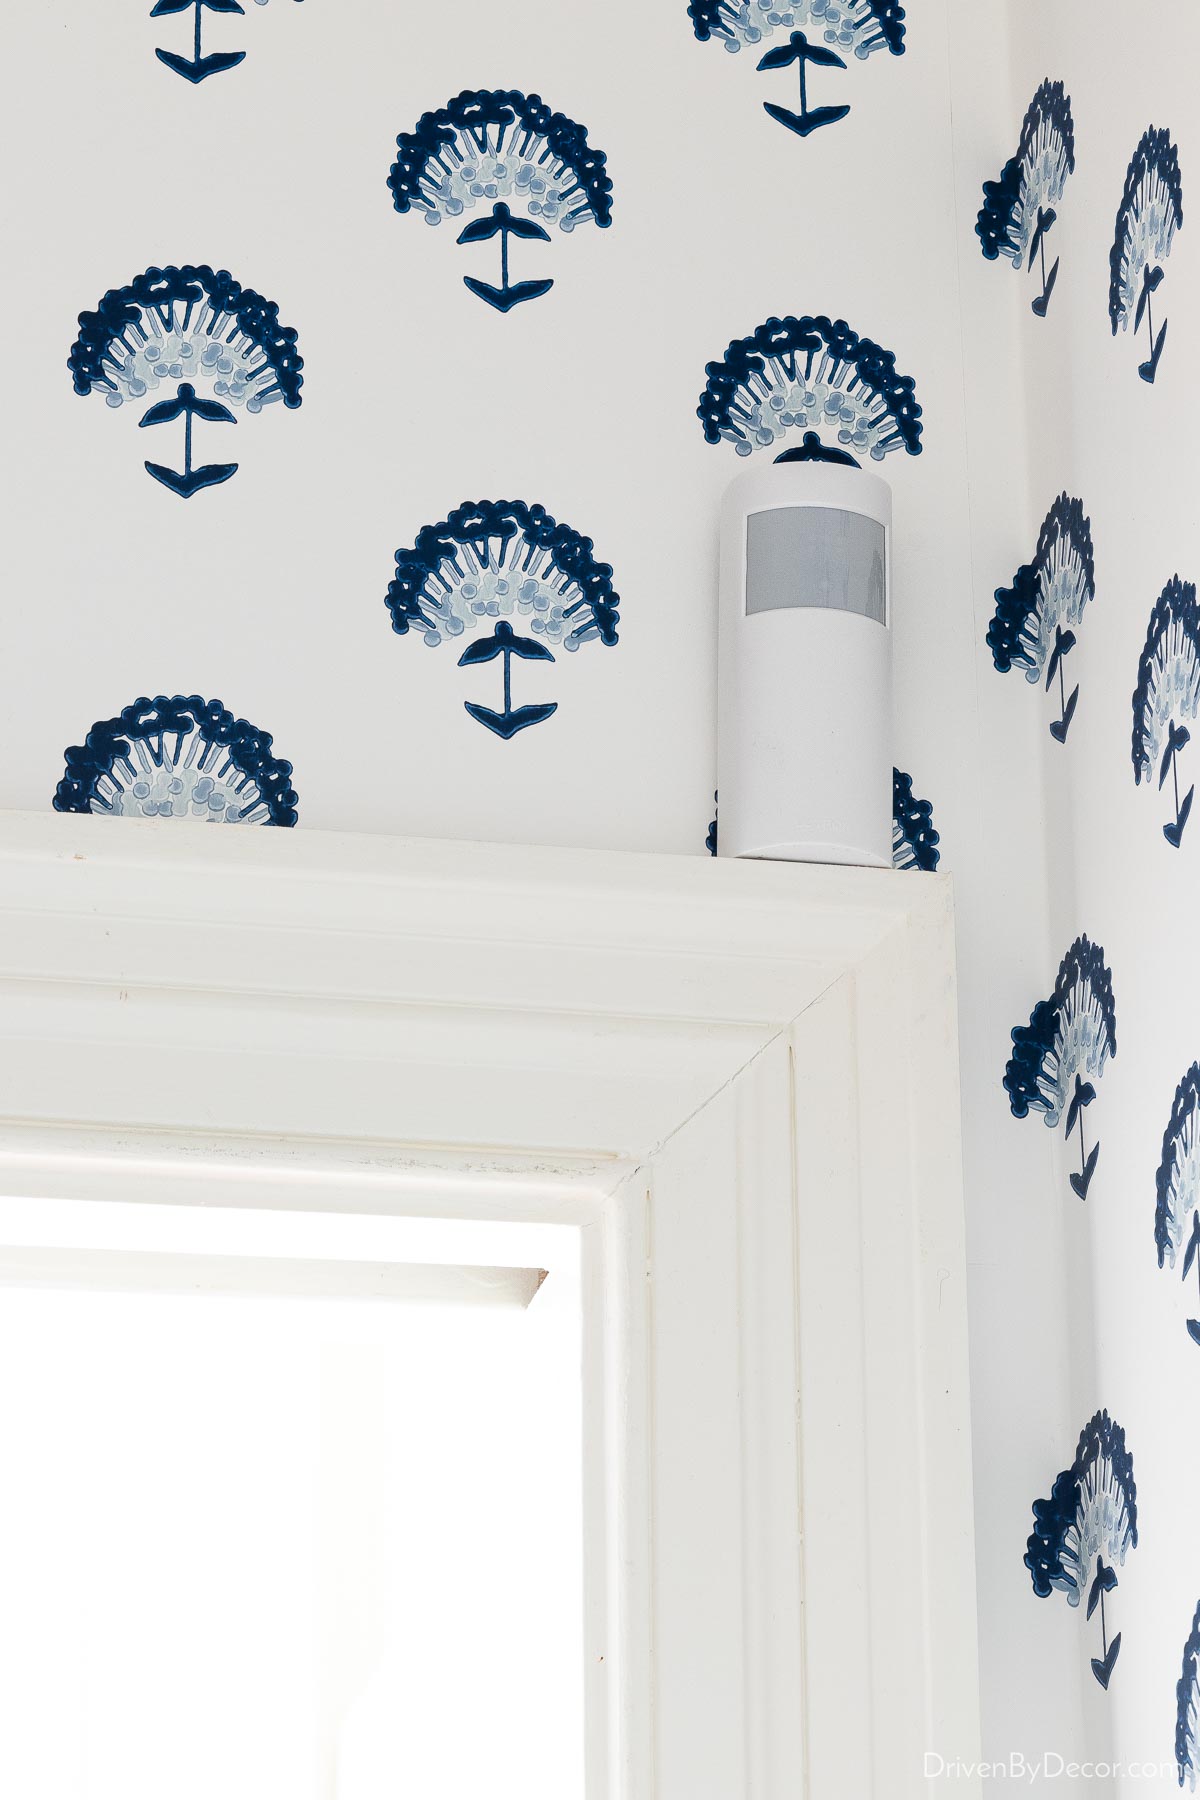
it only picks up motion when we’re coming in from outside or walking fully into the laundry room. The sensor is freestanding so instead of wall mounting it, it can also sit on a shelf or other flat surface in the room and it has an impressive 180° field of view. It also turns the lights OFF for you after your preferred number of minutes if it senses that the room is vacant. And it can control multiple switches so if you want both your laundry room and hall lights to go on when you walk in the door, no problem!
3. We Can Add a Light Switch Wherever We Want – No Wiring Needed!
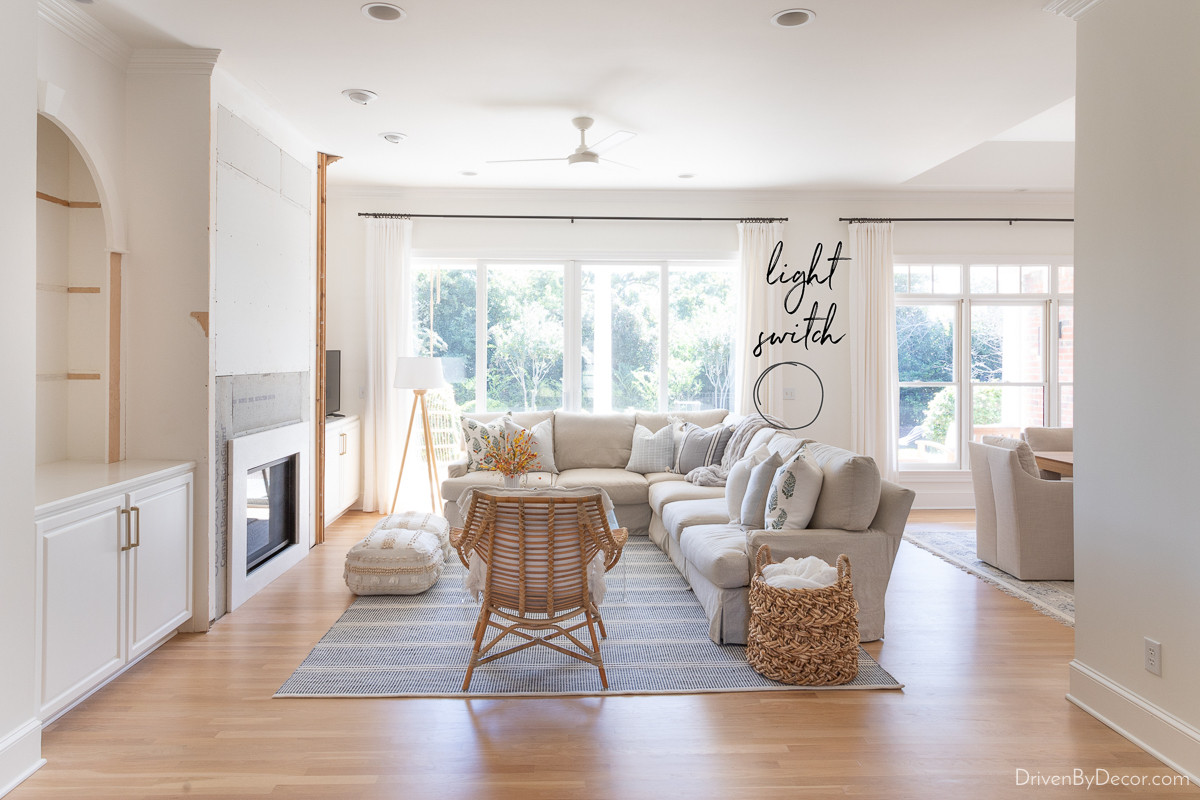
If you’ve ever wished that a light switch was in a different location, there’s an easier solution for it than you might think (no electrician needed!). We had this exact problem in our family room where the overhead lights are controlled by a single switch that’s in the most awkward location. It’s on the outside wall of our family room when 98% of the time we enter the room from the other side of it:
Room Sources: Patterned rug | Drapes | Drapery rod | Drapery rings | Tripod lamp | Sectional sofa | Rattan chair | Floor poufs | Ceiling fan
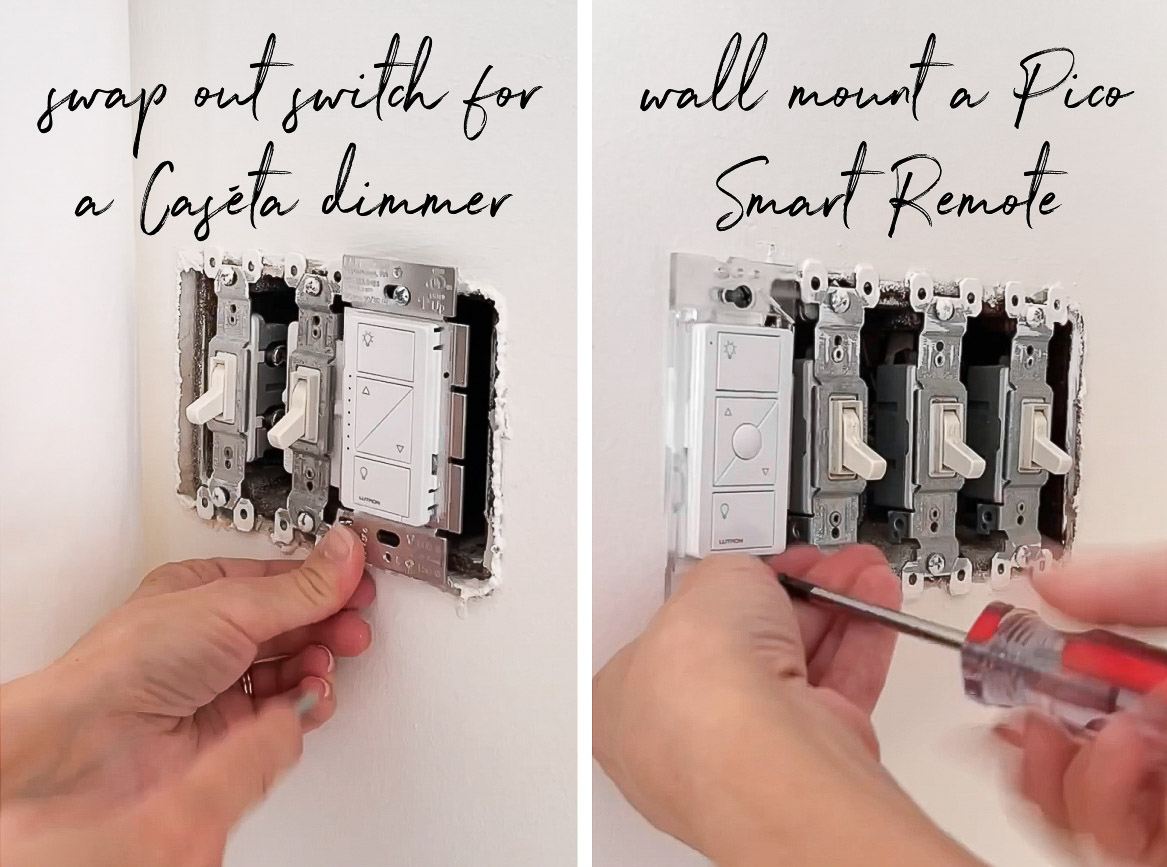
The Pico Smart Remote can be mounted on ANY wall (it doesn’t need to be located near other switches), and it will operate as an additional switch. I decided to mount mine next to an existing group of three switches where we enter the room and then cover them with a new 4-gang switch plate that makes it look like it’s always been there:
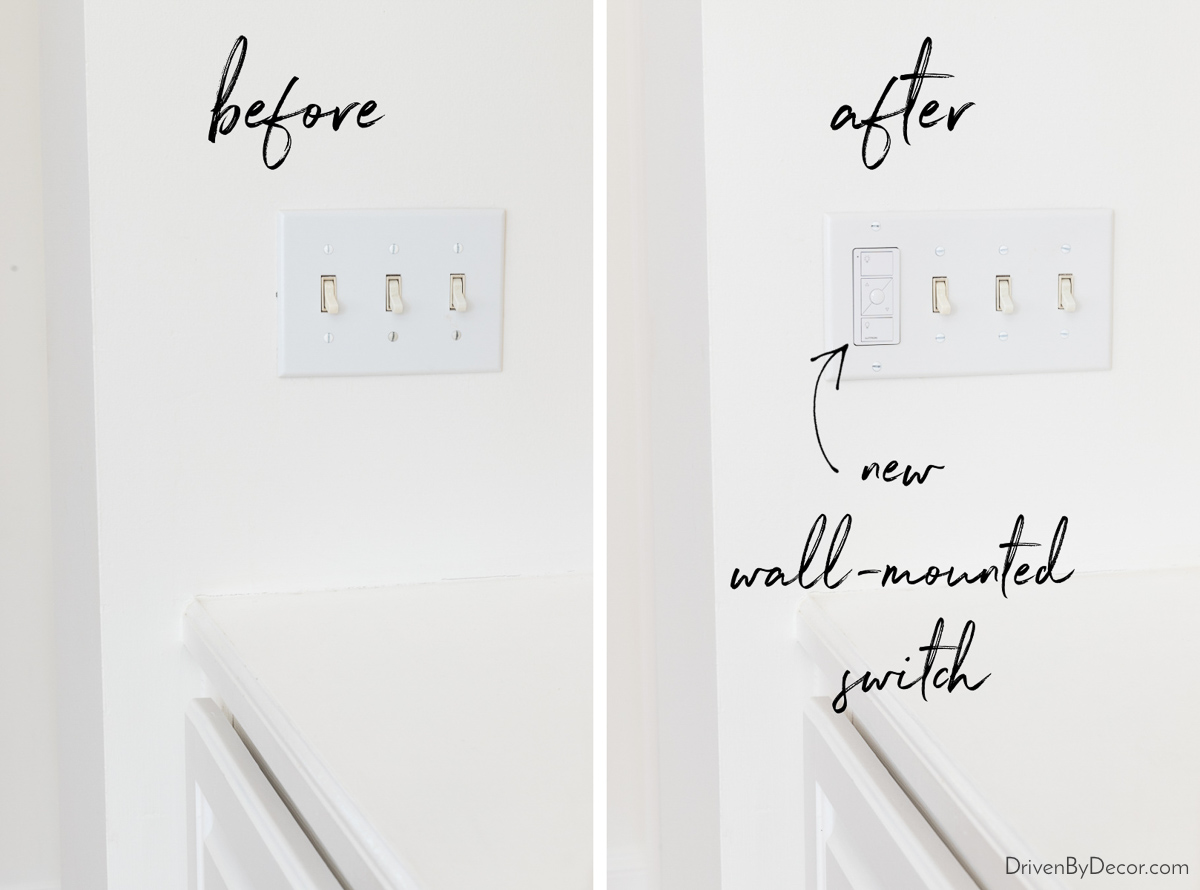
Done! Now we essentially have a 3-way switch for our overhead lights since they can be controlled on either side of the room (and as an added bonus, they’re now dimmable too)!
I used this same solution in our previous home where the only switch for the light above the stairs to our second floor was at the top of our stairs. That meant that at night, you had to grope your way up the stairs in the dark. The solution was to swap out the second floor switch controlling the stair light with a Caséta Smart Dimmer Switch and then wall mount a Pico Smart Remote at the bottom of the stairs. That remote worked as a second switch so we could finally turn on the light before starting up the stairs at night.
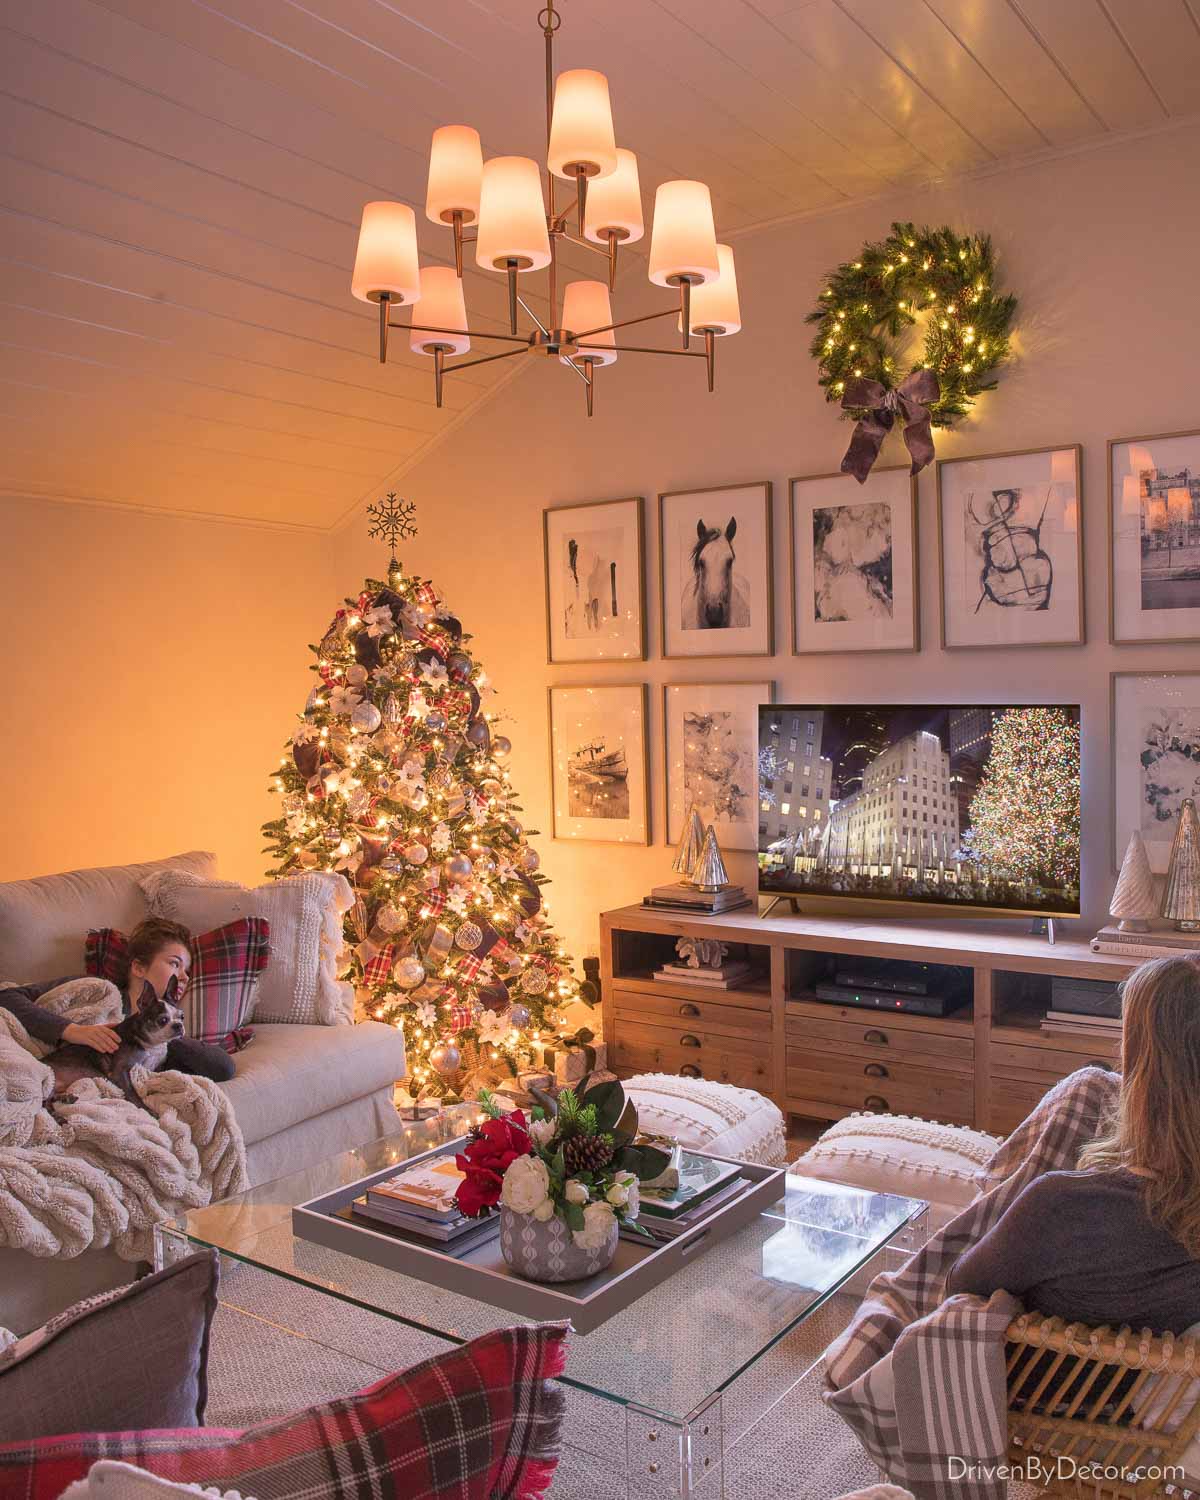
4. We Can Control Our Family Room Lights Without Leaving The Couch
When Jeff and I finally make it to the couch at the end of a long day, neither of us wants to get up to mess with the lights. Swapping out the light switch controlling our overhead family room lights with a Caséta Smart Dimmer Switch not only solved our issue with the location of the switch, but it also solved this little problem! We can now control our overhead lights with a Pico Smart Remote that we leave on our coffee table, the Lutron app on our phones, or by voice control via Alexa.
Want to save this post?
We even programmed the lights to dim to a certain level on command by setting a Movie Lights “scene” in the Lutron app:

When we press the Movie Lights button in the app or say “Alexa, turn on movie lights,” the overhead lights in our family room dim down to 15% which is the perfect lighting for watching TV or movies at night. We had this same set-up in our previous home and at Christmas time, we plugged our tree lights into a Caséta Lamp Dimming Smart Plug and added that to our Movie Lights scene too so they dimmed at the same time as our overhead lights:
Room Sources: TV console (similar) | Chandelier (satin bronze) | White tasseled pillow cover | Faux fur throw | Rug | Pair of floor poufs | Art prints | Acrylic coffee table (similar) | Coffee table tray (28″ square) | Rattan chair
A few of the other scenes we created in the Lutron app are a cooking scene and a dishes scene that allow us to have hands-free control of our kitchen lights while cooking and cleaning up. Saying “Alexa, let’s get cooking” turns on the lights above our cooktop:
and “Alexa, it’s time to do dishes” turns on the lights above our sink. It’s such a convenience when your hands are messy with meal prep or full with dishes!
5. My Girls Can Let Natural Light Be Their Alarm Clock
After seeing what an amazing solution Serena Smart Shades were for our front doors, I knew they’d be perfect for my girls’ room too. Since their windows are recessed into a niche, the drapes that used to hang on either side of them covered up a huge chunk of the windows and made that room a bit dark. I took both the drapes and the wood blinds on those windows down and installed new Serena Smart Shades (I chose the same Harbor Sand fabric but this time, in the blackout option). I love that they hardly cover any of the window, allowing natural light to pour into this space (see them in action {here}):
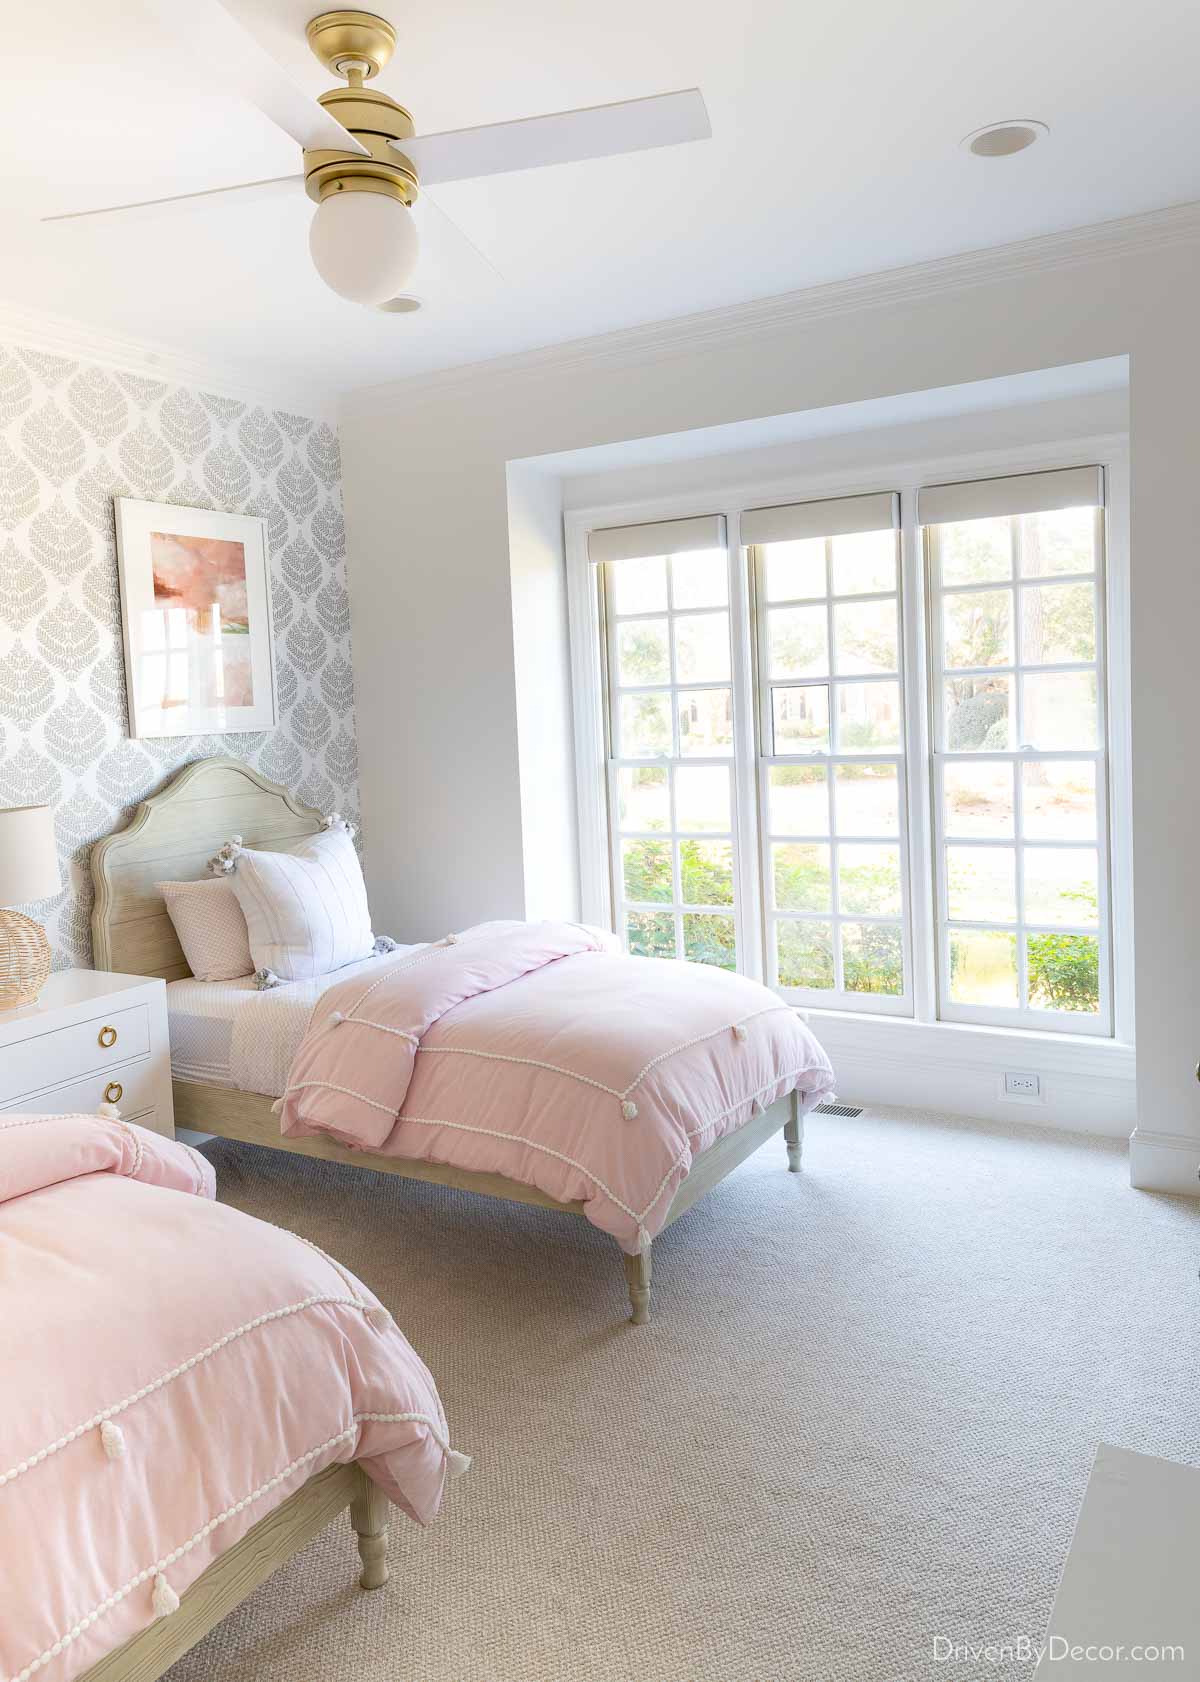
Room Sources: Framed art print (left) | Framed art print (right) | Gray damask peel & stick wallpaper | Curved wood beds | White chest | Rattan lamp | White quilts | Tassel duvet covers | Globe light fan
As with my front door, we have the shades programmed to automatically go down at sunset since this bedroom faces the street. In the morning, they can be raised with a push of this Pico Smart Remote that sits on their nightstand:
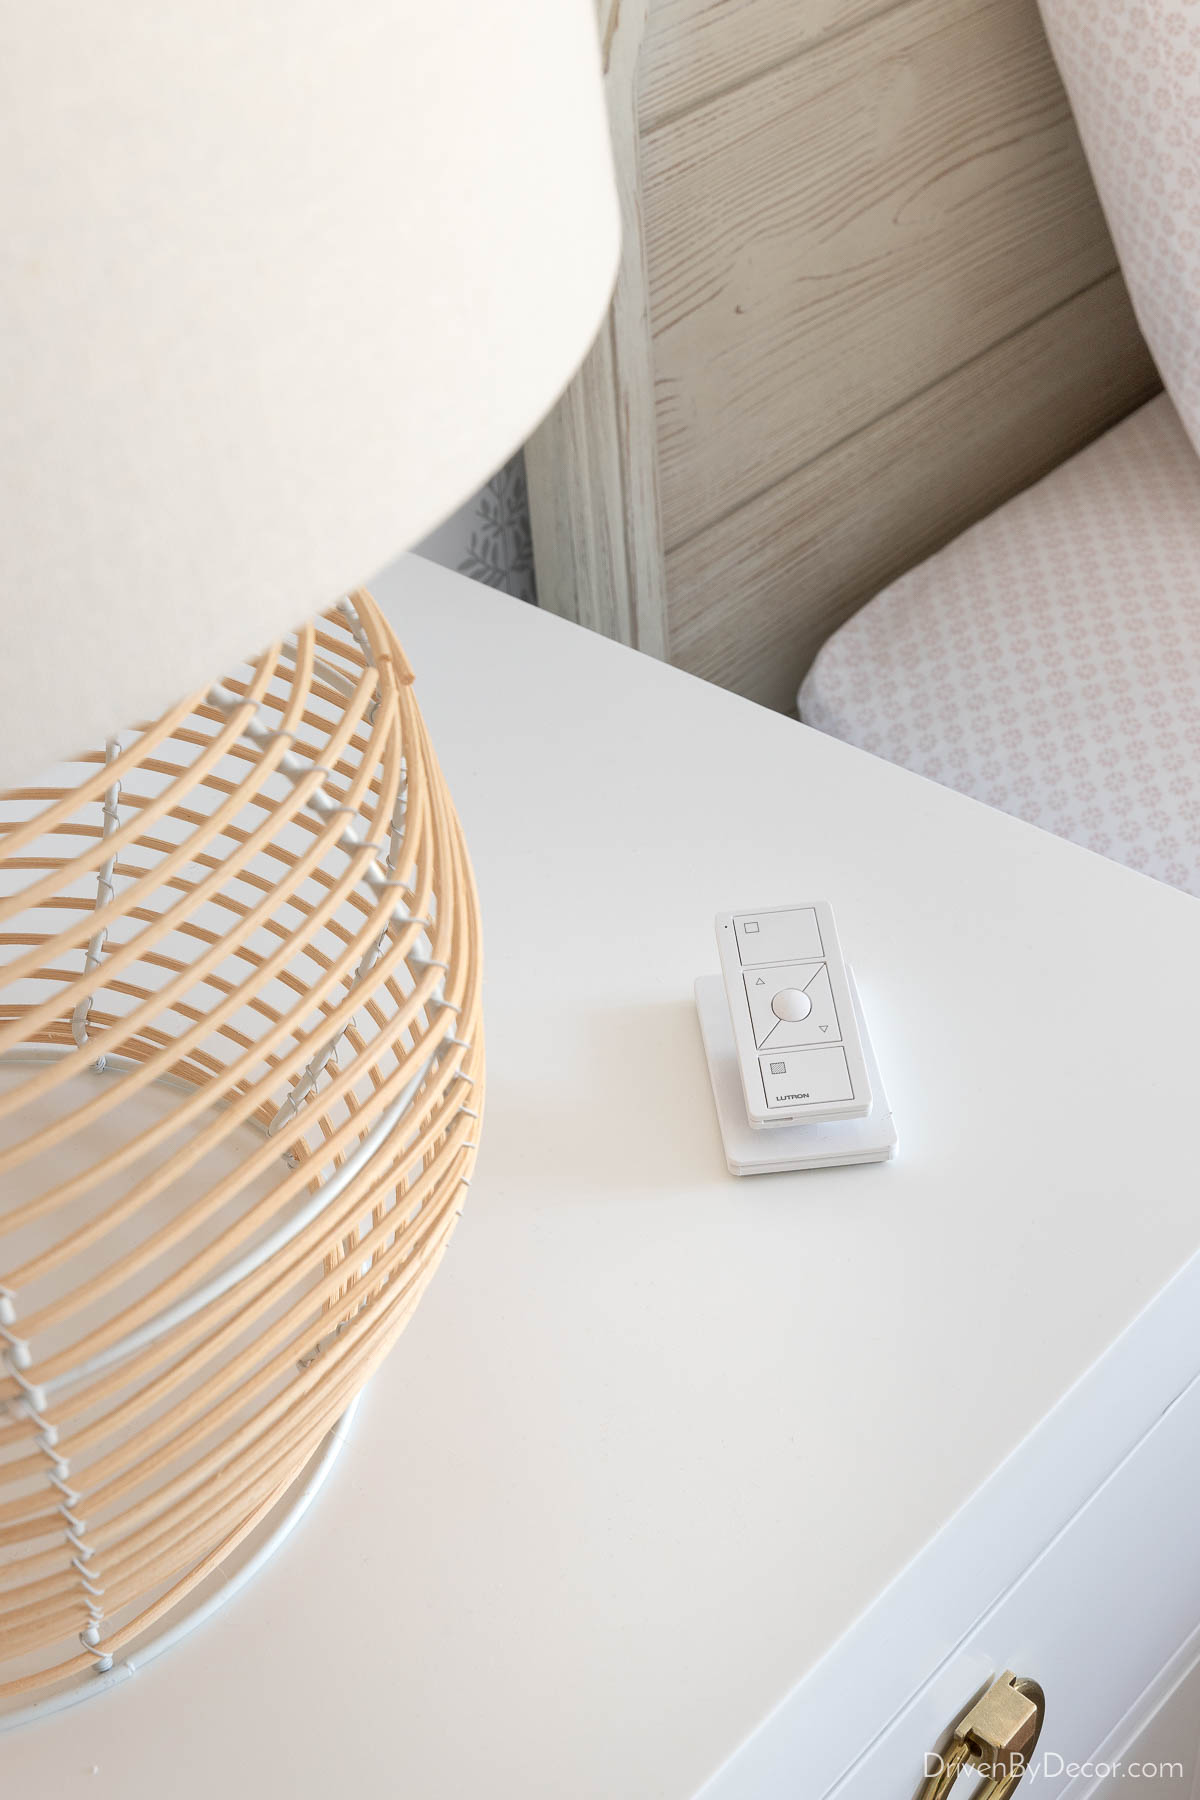
or through the Lutron app on their phone. They can actually use their shades as an alarm clock, setting them to go up at the time in the morning that they need to wake up. If you don’t want to wake up to full-on light, you can program them to just go up halfway or you can even schedule them to raise gradually (such as 25% of the way up at first, 50% of the way up five minutes later, and all the way up ten minutes later).
Many of you had questions about what powers the shades so I wanted to be sure to show you – believe it or not, it’s simple store-bought D batteries:
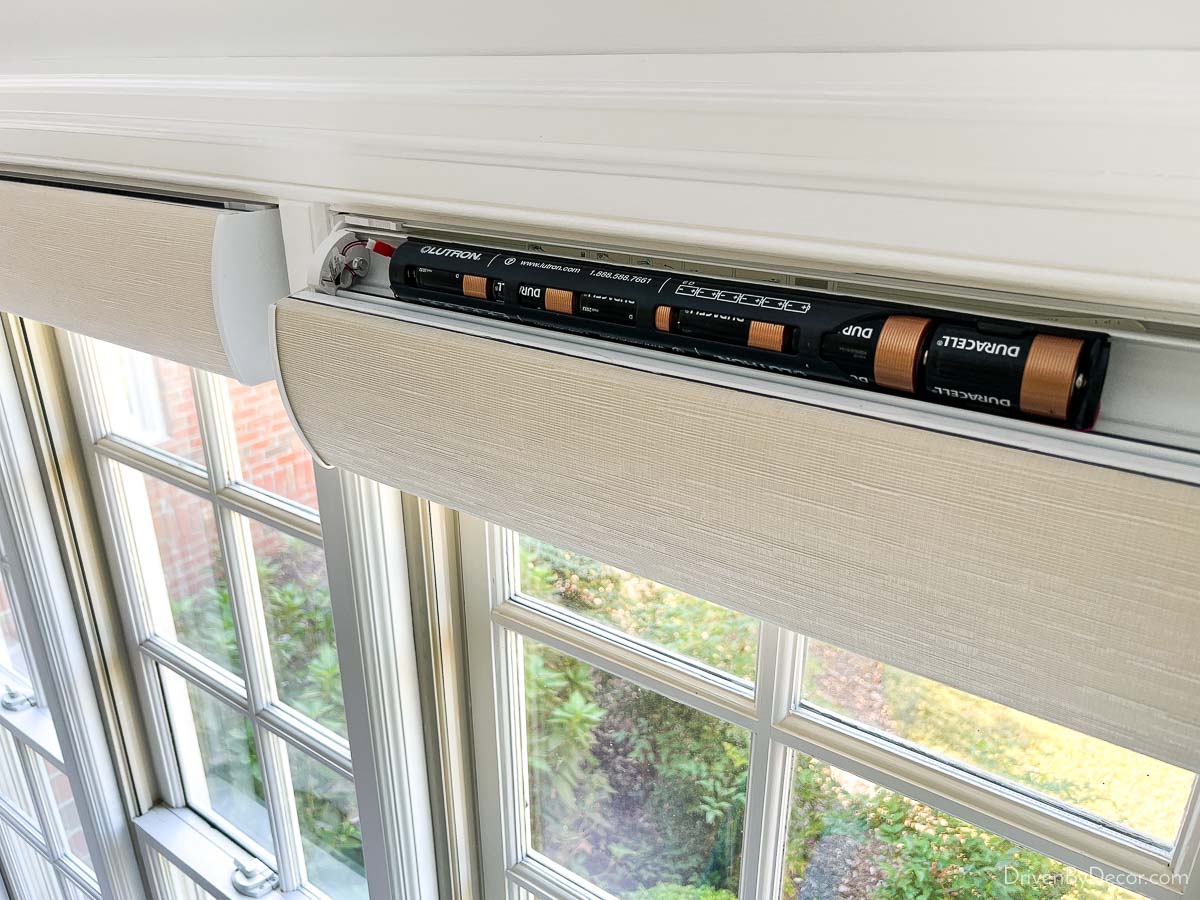
Battery life depends on the type of shade, the shade size, and the number of times shades are opened and closed each day. But to give you a ballpark idea, they’ll last about 3 years on a 3’x5’ light filtering shade that moves up and down twice a day every day. You can also order your shades with the hardwire option which would be great for a new construction home.
6. We Never Have to Set Light Timers When on Vacation
One of my favorite perks of having Caséta Smart Dimmer Switches in our home is that we can control our lights with the Lutron app on our phones from anywhere, even if we’re hundreds of miles away! It has completely eliminated the need to set light timers when we go on vacation. So when we’re heading out on a trip, there’s no more running around at the last minute setting timers everywhere. Instead, I simply open my Lutron app and schedule my lights to go on and off at whatever times I want throughout the time we’re gone. Or I can select lights that I want to have randomly turned on and off between my specified hours to make it look like someone is home (simply press the “Smart Away” scene).
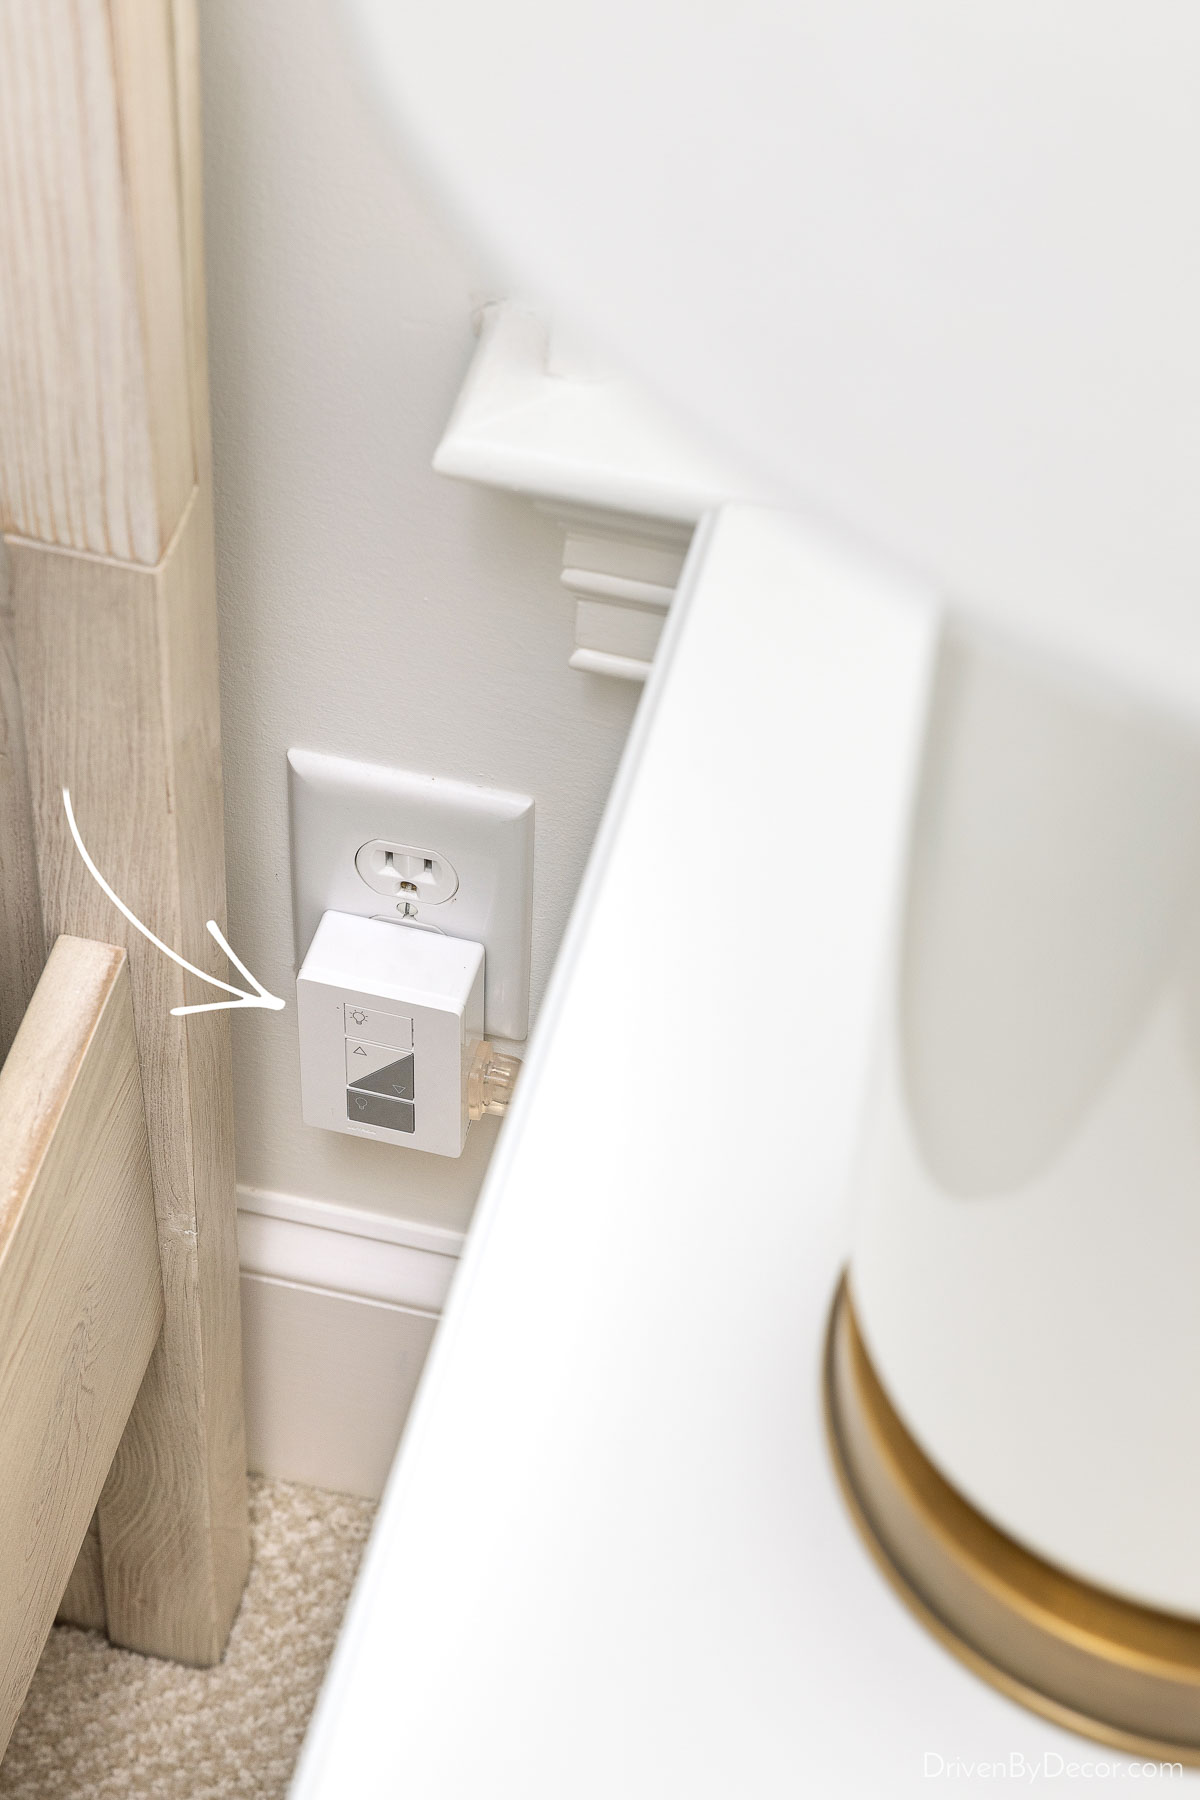
If you have any table or floor lamps you also want to turn on and off while you’re away, simply plug your lamp into a Caséta Lamp Dimming Smart Plug and you’ll be able to control that lamp with your phone too:
Where Do I Start?
Getting started with a Caséta smart lighting system is simple – grab one of {these} Smart Home Starter Kits that contain a Caséta Smart Hub. The Smart Hub is the brains behind the system – it plugs right into your router and controls your Caséta devices wirelessly without using your home’s Wi-Fi network (which is important because other smart home systems that are reliant on your Wi-Fi can slow it down):
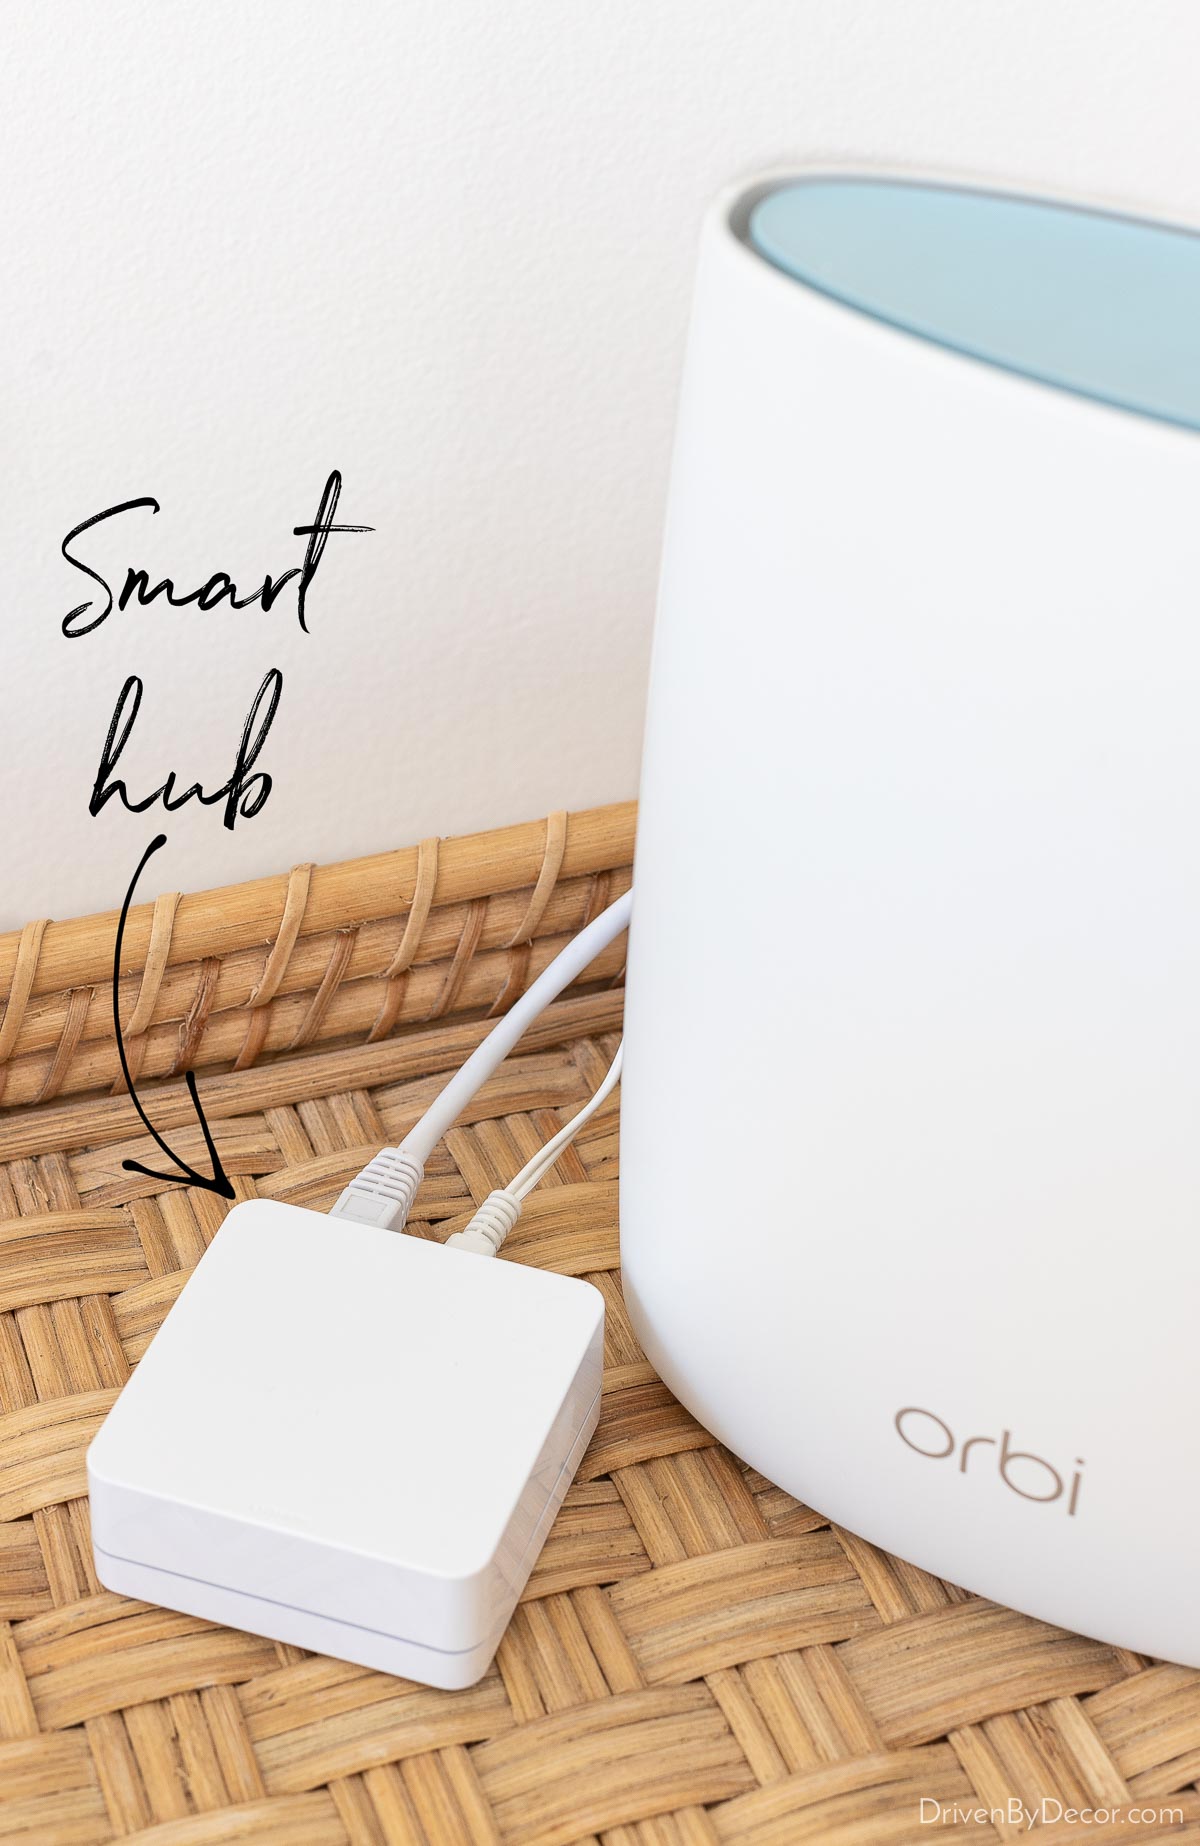
The Smart Hub is also what allows you to link to other systems (Caséta is the most connected smart lighting control brand!). For example, you can connect to Ring and set your entryway and/or outdoor lights to turn on when someone rings your Ring doorbell! A few of the many other systems it works with are Sonos, Amazon Alexa, Google Assistant, and Apple Home Kit.
You only need one Smart Hub so after you’ve set up your system with the starter kit, you can add on to it from there depending on your needs. Go {here} and click “Where to Buy” to find both online and local options (including Home Depot) for buying your starter kit and add-on kits. A Smart Home Starter Kit would actually make a great holiday gift (or you can give yourself a little pre-holiday gift for the peace of mind while traveling & added convenience when you’re at home for the holidays)!
My most recent addition to our Caséta smart lighting system is this Caséta Outdoor Smart Plug that I used to control my outdoor holiday lights last season:

You can see it in action on my Instagram Reel {here}.
I hope you enjoyed today’s post and that I answered all of your questions, but if you still have any, leave them in the comments and I’ll be sure to get back to you!
Have a great week,


Julie says
Those smart shades sound great. We have lumbered blinds everywhere and I hate cleaning them.
Kris Jarrett says
Same! I still have them in a few rooms of our home but will gradually swap them out for smart shades!
Nancy says
Ha, I just installed some motion detector light switches and bought a remote control candle set so I know you’re light years smarter than I am. However, my husband worked in IT security and would throw a fit I mentioned bringing Alexa into our home.
I do love those window shades. We have 2 bedrooms with French doors. I didn’t realize how hard it would be to make a comfortable bedroom with these. Thanks for all your wonderful ideas.
Kris Jarrett says
Glad you found my post helpful! Luckily everything in the Caséta system works without Alexa too (it’s just an option to use it if you prefer to use it). And I’m with you on the French doors – we have a set going from our bedroom to our bathroom that are the worst (they are glass paneled with wood blinds on them – who thinks up this stuff? 😂)
Elle says
These shades and light controls are amazing. But, it seems in order to use them you MUST have a ‘smart phone’ or the Alexa system. Can these items be used by people without these expensive phones and appliances? Sadly, not everyone in the USA has an expensive phone and the added pieces of equipment. Can you give me any information?
Kris Jarrett says
Hi Elle,
You can use the Caséta lighting system without a smart phone and would be able to control your lights with the Pico Smart Remote. However, without a smart phone you wouldn’t be able to take advantage of many of the smart features that this lighting system offers including scheduling, scenes, voice control, etc. Hope that helps!
Joanna says
Smart blinds are on my To Do List in the new year. After our recent renovations, I need to save up. I did have under cabinet lights installed in both baths so they turn on and light your way at night, a smart light in my walk in closet, and I have remote controlled ones in the living room. I wish I had installed under cabinet lights in the laundry too but I can still install a remote so the ceiling light comes on when you enter. Thank you for the advice on where to install the sensor.
Kris Jarrett says
I love the idea of the under cabinet lighting in your bathroom – smart! I’m sure you’d love the Serena Smart Shades as much as I do!
Jayne Mansfield says
Thank you for this information. I looked at Hunter Douglas smart blinds for my patio but they had to plug in and I didn’t like that look. The batteries are a great idea.
Kris Jarrett says
I agree – I wouldn’t want to see the cords! Glad my post was helpful! 🙂