• Skip to primary navigation
  • Skip to main content
  • Skip to primary sidebar
  • Home
  • Home Tour
    • Master Bathroom
    • Kitchen
    • Kitchen Eat-In Area
    • Family Room
    • Living Room
    • Home Office
    • Laundry Room
    • Master Bedroom
    • Craft Room
    • Dining Room
    • Garage
    • Guest Room
    • Guest Bathroom
    • Patio
    • Powder Room
    • Teen Blue & White Bedroom
    • Teen Boho Chic Bedroom
  • Projects
    • Room Remodels
    • DIY Projects
    • Decorating Tips
    • Cleaning
    • Organizing
  • Subscribe
  • Shop My Faves
  • Instagram
  • About
    • Contact
    • Meet Kris
    • FAQs
    • Media
    • Disclosure
    • Privacy Policy

Driven by Decor logo

menu icon
go to homepage
subscribe
search icon
Homepage link
  • Home
  • Home Tour
    • Master Bathroom
    • Kitchen
    • Kitchen Eat-In Area
    • Family Room
    • Living Room
    • Home Office
    • Laundry Room
    • Master Bedroom
    • Craft Room
    • Dining Room
    • Garage
    • Guest Room
    • Guest Bathroom
    • Patio
    • Powder Room
    • Teen Blue & White Bedroom
    • Teen Boho Chic Bedroom
  • Projects
    • Room Remodels
    • DIY Projects
    • Decorating Tips
    • Cleaning
    • Organizing
  • Subscribe
  • Shop My Faves
  • Instagram
  • About
    • Contact
    • Meet Kris
    • FAQs
    • Media
    • Disclosure
    • Privacy Policy
    • Facebook
    • Instagram
    • Pinterest
  • ×

    Updated: Jun 26, 2022 by Kris Jarrett

    8 Simple Steps to Using Tagxedo to Create Personalized Word Cloud Art

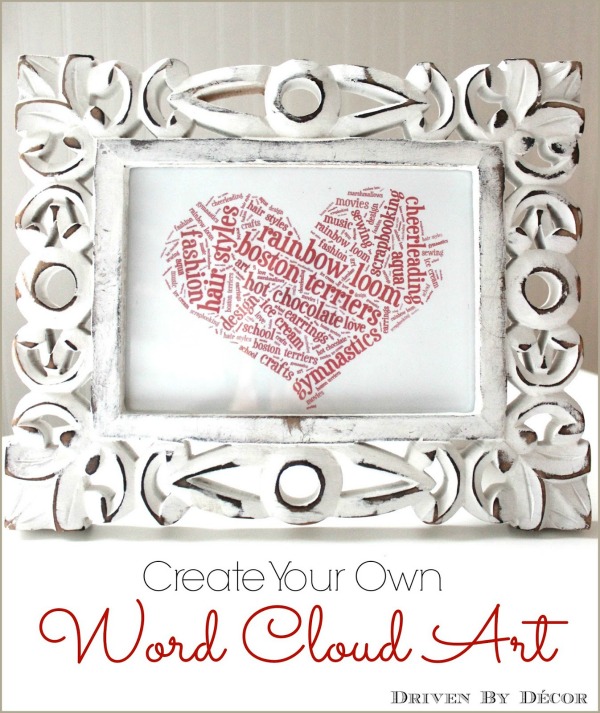
    Have you ever heard of a word cloud? Not me. At least not until my youngest daughter told me that she worked on word clouds at school and found this website called Tagxedo where you can create your own personalized word cloud. She showed me the ropes and we’ve created word cloud after word cloud, including this one where we took some of the things my daughters loves most, made them into a word cloud heart, and framed it for her room:

    Using Tagxedo to create your own word cloud art! This post walks you through with simple steps!

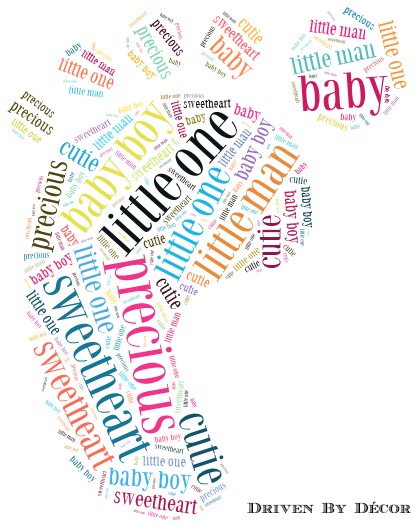
    There are endless options for what you can create – like this little footprint for a baby boy’s room:

    SO fun to create word cloud art in different shapes using Tagxedo with the steps shown in this post!

    this fun high heel (made from the words of my “Best of Driven by Decor” blog post):

    Creating your own word cloud art is super simple with this free online site!

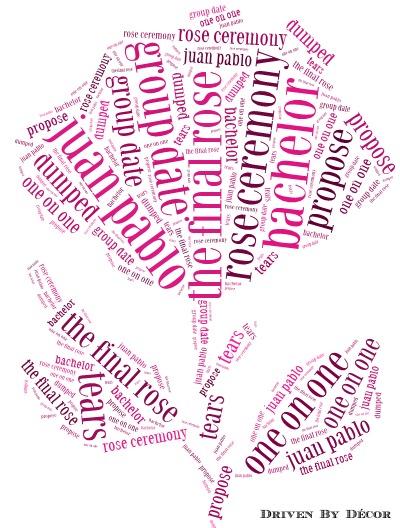
    Or how about a “final rose” word cloud in honor of The Bachelor (um, not that I watch that kind of mindless trash TV or anything….):

    Creating word cloud art online is super simple with this Tagxedo tutorial!


    Ready to create you own personalized word cloud art (for free!)? With my daughter’s help, I’ve created an easy tutorial to show you how:

    Create your own word cloud art with Tagxedo

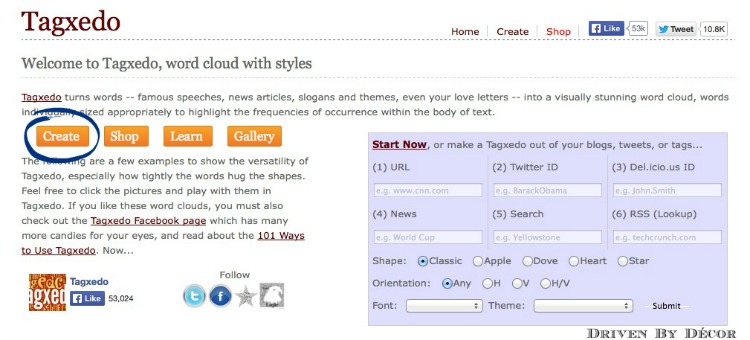
    1. Start by going to Tagxedo’s website {here} – you must be on a desktop or laptop and be using a browser other than Google Chrome. Once on the Tagxedo website, click the “Create” button:

    A great tutorial for using Tagxedo to create online word cloud art!

    If you don’t have Silverlight installed on your computer, you may be prompted by a pop-up window to download and install it, as Tagxedo requires it to run. After installation you might need to reboot your computer.

    2. Next, choose a shape by clicking on the arrow to the right of “Shape” and selecting the one you want:

    A step by step tutorial of using Tagxedo to create word cloud art!

    3. Next, click the arrow to the right of “Theme” and choose a color combination – it changes the colors of both the text and the background. You can also click on the circular arrow if you prefer to scroll through your color options one at a time.


    4. Next, click on “Load” – this is where you’ll enter the words that you want in your word cloud. If you want to use all of the words on a particular webpage for your word cloud, type the URL of the page to the right of “Webpage”. Otherwise, you can enter the words that you want to use in the box to the right of “Enter Text”. Put a space between each of the words. If you have any two-word text items, use a tilde symbol between the words (for example, if you want to use “Boston terrier” in your word cloud, type “Boston~terrier”). When you are done, press “Submit”.

    5. Click the arrow to the right of “Font” to change your font to the one you want to use:


    6. If you love how it looks, you’re done! But if you want to see other layout options where the words are in different positions, click the circular arrow to the right of “Layout” as many times as needed until it’s what you’re looking for. You can also click the circular arrow to the right of “Color” if you want to switch around which words are which colors.


    7. Another option is to change the orientation of the words by clicking the arrow to the right of “Orientation” and selecting the best option for you. I prefer the default orientation but the horizontal orientation has a nice look too:

    At any time while making your word cloud, if you make a mistake or want to go back to a previous version, click “History” and select the thumbnail image that you want to revert to.

    8. Congratulations, you’ve finished your word cloud! Now click on “Save” and save your image as a JPG or PNG file. Or you can click the Print tab to print it.  Your word cloud will print out in about an 8 x 10 size. If you want a different size, save your image, paste it in a document where you can resize it, and print.

    Create your own word cloud art!

    Thanks go out to my youngest daughter for sharing this how-to with me so that I could then share it with you. Hope you have as much fun with it as we have!

    • Pin
    • Share
    • Email

    Categories: Decorating Ideas

    ✉️FREE EMAIL SERIES ✉️

    5 Secrets to Reinventing Your Home on a Budget

    Simple tips to instantly transform five rooms in your home!

    Reader Interactions

    Comments

    1. jeanette says

      January 15, 2014 at 9:24 am

      ok so this is brilliant Kris…..i’m SO hoping i’ll get organized and do this , this wknd….would make GREAT Valentine’s gifts for my kids……thx so much for sharing!!!

      Reply
    2. thistlewoodfarm says

      January 15, 2014 at 10:37 am

      This is amazing. Seriously. Thank you so much for sharing and what a great teacher’s gift!!!!!

      Happy day to you friend!
      karianne

      Reply
    3. pam {simple details} says

      January 15, 2014 at 11:20 am

      Ha! When I read the title I thought, oh my gosh Kris is so high tech I don’t even know what she’s talking about! 🙂 Tell your daughter I LOVE this idea, and thanks for sharing it!

      Reply
    4. Simply LKJ says

      January 15, 2014 at 11:44 am

      Thanks for sharing. I used to use Wordle, but it isn’t that user friendly!

      Reply
    5. Vel Criste says

      January 15, 2014 at 12:08 pm

      OMG, I will be addicted for sure too! Thank you for sharing this wonderful resource Kris! Love it!

      Reply
    6. therelishedroost says

      January 15, 2014 at 12:30 pm

      So Much Fun! Thanks for sharing!!

      Reply
    7. Lisa @ Texas Decor says

      January 15, 2014 at 3:41 pm

      I’ve never heard of a word cloud either, but this sure is a great idea! You could create countless things, so fun!

      Reply
    8. Elizabeth @ The Little Black Door says

      January 15, 2014 at 4:09 pm

      What a cool thing! Thanks to you, and your daughter, for introducing me to this!

      Reply
    9. Lisa @ Shine Your Light says

      January 15, 2014 at 4:18 pm

      So fun, I will definitely be making one for Valentines Day (and St. Paddy’s Day, Easter, 4th of July!)!! Love it for inexpensive holiday art!!

      Reply
    10. Carrie @ Cosy Carolina Interiors says

      January 15, 2014 at 5:07 pm

      How fun! I can’t wait to give it a try. 🙂

      Reply
    11. Ralinn bsirious says

      January 15, 2014 at 7:53 pm

      I’ve never heard of this. I just made my first one. Thanks to you and your daughter. I want that cool frame of yours. Do share where we can find one.

      Reply
      • Kris @ Driven by Décor says

        January 15, 2014 at 9:27 pm

        So impressed that you already tried it out! Thanks for the compliment on the frame – I’ve had it for years but I think it was originally from HomeGoods.

        Reply
    12. Stacey says

      January 16, 2014 at 1:18 pm

      This is very cool! I will have to try this with my 4 year old!

      Reply
    13. Becky {This Is Happiness} says

      January 16, 2014 at 10:32 pm

      Never heard of it, but super cute. Will be checking it out!!

      Reply
    14. Kris @ Driven by Décor says

      January 16, 2014 at 11:54 pm

      My girls have been so entertained by it and I’m sure yours will too. Hope you have fun with it!

      Reply
    15. Lyn Hughes says

      January 25, 2014 at 1:08 pm

      How fun!

      Reply
    16. Sheryll And Critters. says

      January 26, 2014 at 2:12 am

      I can’t do this, but gosh, I sure wish I could.

      This does remind me of the old typewriter art………very lovely. I wish I had he technology to do this…….. so very beautiful.

      Reply
    17. Laurel Stephens says

      January 26, 2014 at 3:53 pm

      I love this project. Thank you so much for sharing your tutorial. I’m excited to try it myself.

      Reply
    18. Suzanne J Dean says

      January 29, 2014 at 9:33 pm

      Oh how I love this…thanks so much for sharing. My daughter is off to college this fall to study Marine Biology so I’m going to make a few prints for her dorm…marine life of course 🙂
      hugz,
      Suzanne

      Reply
      • Kris @ Driven by Décor says

        January 29, 2014 at 9:53 pm

        What an awesome idea! I spent a summer studying marine biology in college – loved it!

        Reply
    19. Tina Matteson says

      January 30, 2014 at 11:12 pm

      Wow, thank you for this very helpful tutorial. I just spent a while making word cloud art for my kids and a friend! It’s so much fun.

      Reply
      • Kris @ Driven by Décor says

        January 31, 2014 at 9:55 am

        It’s addictive, isn’t it?!

        Reply
    20. bigwhitehouseonthehill says

      March 04, 2014 at 10:15 pm

      Love this idea and your great tutorial. I made one for my oldest for Valentine’s Day and am adding a link to tomorrow’s post sending readers your way. Such a fun project. Thanks!

      Reply
      • Kris @ Driven by Décor says

        March 05, 2014 at 12:05 am

        So glad that you found a good use for it and thanks so much for linking up to my project!!

        Reply
    21. Sue says

      March 26, 2014 at 7:08 am

      Thankyou for this. I’ve just done one but I’m getting a shadowing around the words when it’s printed. is there a way to get rid of it please?

      Reply
      • Kris @ Driven by Décor says

        March 26, 2014 at 8:04 am

        Hi Sue, My daughter and I have done tons of these and we’ve never had a problem with shadowing around the words. Could the shadowing be part of the font that you selected? I would try changing the font and see if that solves your problem or checking your printer and making sure you are printing at “best” quality.

        Reply
    22. Karen F. Snider says

      January 11, 2018 at 5:23 pm

      This is January 2018. I have tried to use Tagxedo on my computer. But even though I have silverlight installed. It would not work in Internet explorer firefox. Do you know of any way else you can run this program besides silverlight

      Reply
      • Kris Jarrett says

        January 15, 2018 at 10:02 pm

        Sorry Karen – I’ve never tried it with Firefox so I’m not sure – I’d give it a go with another browser. Also if you haven’t already tried restarting your computer after installing Silverlight you might need to do that!

        Reply
        • Lynn B. says

          November 17, 2020 at 2:50 pm

          It works with internet explorer

          Reply
    23. Lynn B. says

      November 17, 2020 at 2:48 pm

      Is there a way to change font size. Some of the words are way too small for heat transfer vinyl?

      Reply

    Leave a Reply Cancel reply

    Your email address will not be published. Required fields are marked *

    This site uses Akismet to reduce spam. Learn how your comment data is processed.

    Primary Sidebar

    ✉️FREE EMAIL SERIES ✉️

    5 Secrets to Reinventing Your Home on a Budget

    Simple tips to instantly transform five rooms in your home!

    Meet Kris

    Kris of Driven by Decor

    Follow Me

    • Facebook
    • Instagram
    • Pinterest
    All images on DBD are copyrighted and taken by me unless otherwise noted. If you'd like to use any of my images, please request their use via my Contact page.

    I am a participant in several affiliate advertising programs (including the Amazon Associates program) and earn fees from qualifying purchases. For more information, see my full disclosure statement {here}.

    To view my privacy policy, go {here}.

    Copyright © 2023 · Driven by Decor