Happy Friday friends! Are you moms looking forward to a little bit of spoiling this weekend? Mother’s Day weekend is one of my favorite weekends of the year – I get to be part of all of the fun kid stuff but all of the less glamorous duties (fixing meals, breaking up sisterly arguments, etc.) fall to Mr. Driven by Décor. I may even be putting in a request to have Mother’s Day dinner in the dining room this year – I just finished up making a table runner that that needs some oohing and aahing from the whole fam. I had been putting the project off because it involved that dreaded six letter word (SEWING) but after gaining a little confidence with my faux sheepskin pillow, I decided to go for it. (this post contains affiliate links – full disclosure available {here})
My inspiration was Serena & Lily’s Cadiz Racing Stripe Runner – I fell in love with the beautiful macramed fringe on the edges but it doesn’t come in a size long enough for my dining table. So I channeled my inner Girl Scout (so what if it’s been 30 a few years since I made that macrame plant holder) and went for it. And much to my surprise, it was not an epic fail! Hello beautiful!:
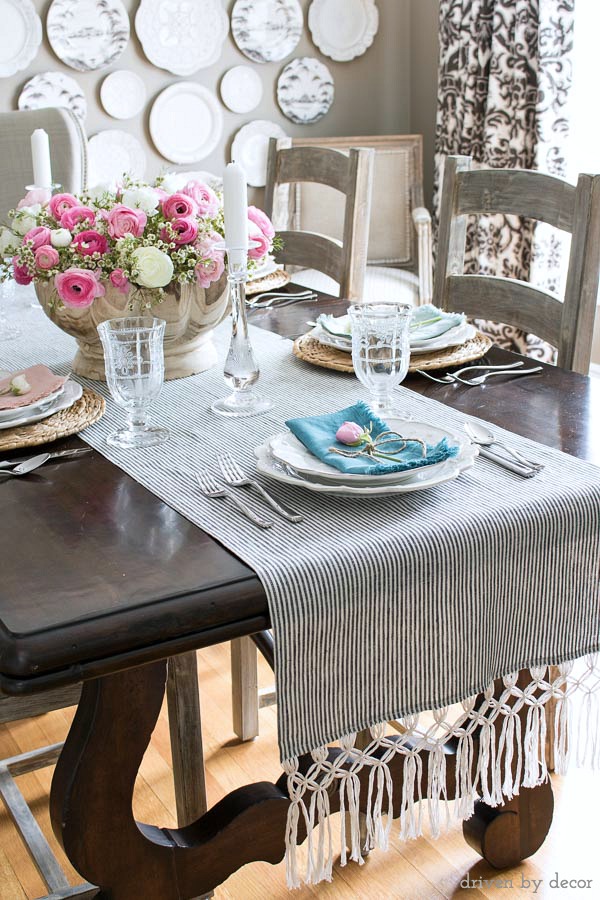

If the fabric looks familiar, it’s because it’s the same ticking stripe fabric (found {here}) that I recently used to update my DIY Reclaimed Wood Bulletin Boards. It’s a classic black and cream ticking stripe that coordinates well with the rest of the fabrics in the room and goes a long way in softening up the space.

It took some experimenting to figure out how to make the fringe, but once I got my macrame groove on, it was pretty easy! I’ll break it down for you step by step in case you want to DIY your own fringed runner.

Of course, first you need the runner – I had to sew my own since none of the standard sized runners fit my long table but if you can find a runner that fits your table, you can skip the sewing altogether and just add the fringe! If you end up sewing your own runner, figure out the ideal length and width for your finished runner (standard runners are 16″ wide but I made mine about 20″ wide since I have a big table), add 2″ to these measurements to allow for the seams, and cut your fabric to this size. Finish the edges of the runner by sewing a simple ½″ double fold hem around all four sides or you can do a double fold hem with mitered corners if you want to be a showoff. To make the macrame fringe, I chose to use embroidery floss because there are tons of color choices and it was an ideal thickness but natural hemp cord is a great option too. To make the fringe, cut the embroidery floss into several 4′ long pieces. I used a total of 104 pieces of floss to macrame both ends of my runner so don’t underestimate how much embroidery floss you will need!

Thread your needle using a wide eyed needle and a needle threader (you really do need the threader or it will take you forever to thread the thick floss). Center your needle in the middle of the piece of floss.

Now for the worst part of the project – you have to do some math before you start so that your fringe is evenly spaced. Each section of fringe will consist of four threaded pieces of floss roughly ¼″ apart. Then you will move about 1″ down and add another section of four pieces of floss, etc. (see pic below). Do the math ahead of time to make sure that (#1) when you get down to the right end of your runner, you finish with a full four piece section at the very end and (#2) you end up with an odd number of sections. For my 20″ runner, I had 13 four-piece sections of floss. Unless you did the math BEFORE you cut your fabric (which is the easiest way to go if you are flexible about the finished width of the runner), you will likely need to make the distance between the sections of floss a little more or a little less than 1″ in order to have everything evenly spaced. After you’ve figured it out, double and triple check that you are right and mark the sections on your fabric with pins because you don’t want to get all the way to the end of your runner and realize that you miscalculated and have to start over.
Moving on with creating the fringe, starting near the left edge of the runner, insert the needle through the fabric and pull the floss all of the way through so that the end with the needle is even with the cut ends. Then cut the floss at the needle – you will now have four strands of embroidery floss of the same length. Move ¼″ down and repeat – do this three times so you now have a four-piece section of floss with a total of 16 strands. Then move about 1″ down (this measurement will depend upon what you calculated!) and repeat.

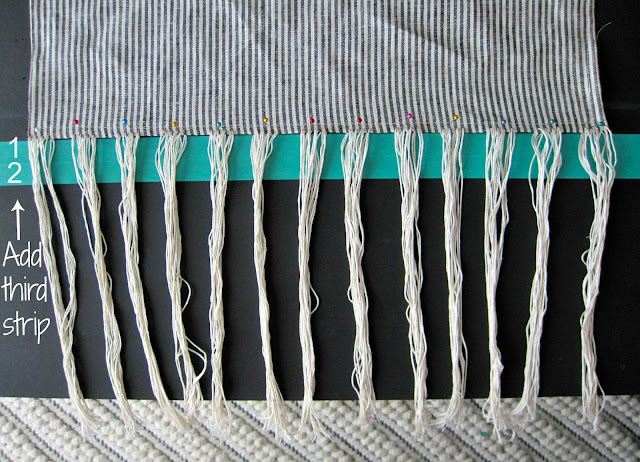
When you get done with this part, it will look like this:
Want to save this post?

For the next step, get a foam board and turn it lengthwise. In about the middle of the board, draw four straight lines ¾″ apart along the length of the board or use three ¾″ wide strips of tape butted up next to each other. {The image below shows only two ¾″ strips of tape butted up next to each other – I added a third strip of tape (a red one) a couple of steps later but I learned it would be easiest to start with all three strips in place!} Once you have your tape in place or lines drawn, pin your runner along the top of the first line.
The macrame fringe is simply a series of left facing square knots done one section at a time. To start, take your first four piece section and divide it into three parts:

Place two pins in the foam board ¾″ down from the runner (on the line between the two tape strips) and fairly close together to the immediate left and right of the middle eight strands. Pull the first part of your knot tight. To make the second part of the knot, it’s the same process in reverse. Take the red strands (which are now on the right), and loop them over the middle strand. Then take the blue strands (which are now on the left) and go over the red strands, under the middle strands, and through the center hole.

Pull tight to make your square knot.


Once your first row is complete, it’s time to move on to the second row. Once again, you will be making a square knot with three pieces. Starting at the left end, take the four left strands of floss and half (four) of the center strands of floss from your first knot and move them to the side – you won’t be using them right now. The three parts of our second round of knots will be made with:

Repeat all of the way across to make a second row of knots. The third (and last) row of knots will be done the same way. Place a pin on the tape line ¾″ down from your second round of pins (at the bottom edge of your third row of tape) centered under your first knot in the first row. The three parts of our third round of knots will be made with:

You can now unpin everything and take the runner off of your foam board.

Place the runner on your table and cut the fringe to your desired length. Done!

There was a definite learning curve in doing the runner – I macramed the second end in about half the time as the first. If you are looking to sit down and do this project from start to finish, it will take a good half of a day. That seems more like work than fun to me so I sewed the runner over the weekend and then did the macrame at a leisurely pace, keeping it in our family room and working at it a little bit at a time as I was watching TV the next several evenings. I’m thrilled with how it turned out and glad to check off this project that’s been on my to-do list for months!
Not up for macrame? Try out this no-sew burlap table runner {tutorial here} – it couldn’t be easier and you can choose from all sorts of different colors for the jute border:


vanesa says
This is so beautiful. And your explanation with all the pictures is awesome! Can’t wait to try it
Kris Jarrett says
Thanks Vanessa! It takes a bit of time but really is quite easy – hope you love how yours turns out!
jvw home says
you’re incredibly talented….the table runner is amazing!!
Kris @ Driven by Décor says
Thanks Jeanette – We had to take a leaf out of the table in our new house so I just realized my table runner won’t work in it! Bummed… Guess I gotta go at this again!
Diana W. says
OMG! Love, love, love it! I’m always on the lookout for new projects (because I don’t have 47 already in progress….)! I’ve never done macramé before so your tutorial is just the thing! So well written and clear. I’ve been thinking about a macramé project for months but have done no research. Now that your tutorial has inspired me I’ll be starting with your table runner. Brilliant! I really appreciate all the time and attention to detail you put into your tutorial! Thank You.
Kris @ Driven by Décor says
Thanks Diana – you sound like me – juggling a zillion projects but always looking for more to add to the list 🙂 Good luck with your macrame project!
Paula@SweetPea says
I love this! I haven’t done macrame since I was a kid and your project just may be the reason that I need to revive my skills. I’m pinning this!
Kris @ Driven by Décor says
Thanks Paula – next thing you know, we’ll be talking about reviving our latchhook skills (or not…) 🙂
Korrie@RedHenHome says
This is really beautiful! I can see you starting a whole new trend for macrame!
Kris @ Driven by Décor says
Thanks so much Korrie – it was a fun project!
Kris
Sarah K says
Omgoodness..This is amazing. Great job.
Sarah
Kris @ Driven by Décor says
Thank you Sarah – I wasn’t sure how this one would turn out so I’m glad you like it!
Lindsay, Xo Lindsay says
I mean, if I could just get a little bit of your creativity and talent, I’d be happy. Looks great! And happy mother’s day!
Kris @ Driven by Décor says
Thanks for the Mother’s Day wishes – looking forward to a day of spoiling!!
stephanie says
Kris — looks great! love the idea of attempting an “oldie but a goodie” crating project! Thanks for reminding me — looks beautiful!
Kris @ Driven by Décor says
Thanks Stephanie! Never in a million did I think I’ve ever whip out those macrame skills again 🙂
Stacey {steward of design} says
Your runner is so cute! Great job.
Have a happy Mother’s Day!
Kris @ Driven by Décor says
Thanks Stacey – hope you have a great Mother’s Day too!