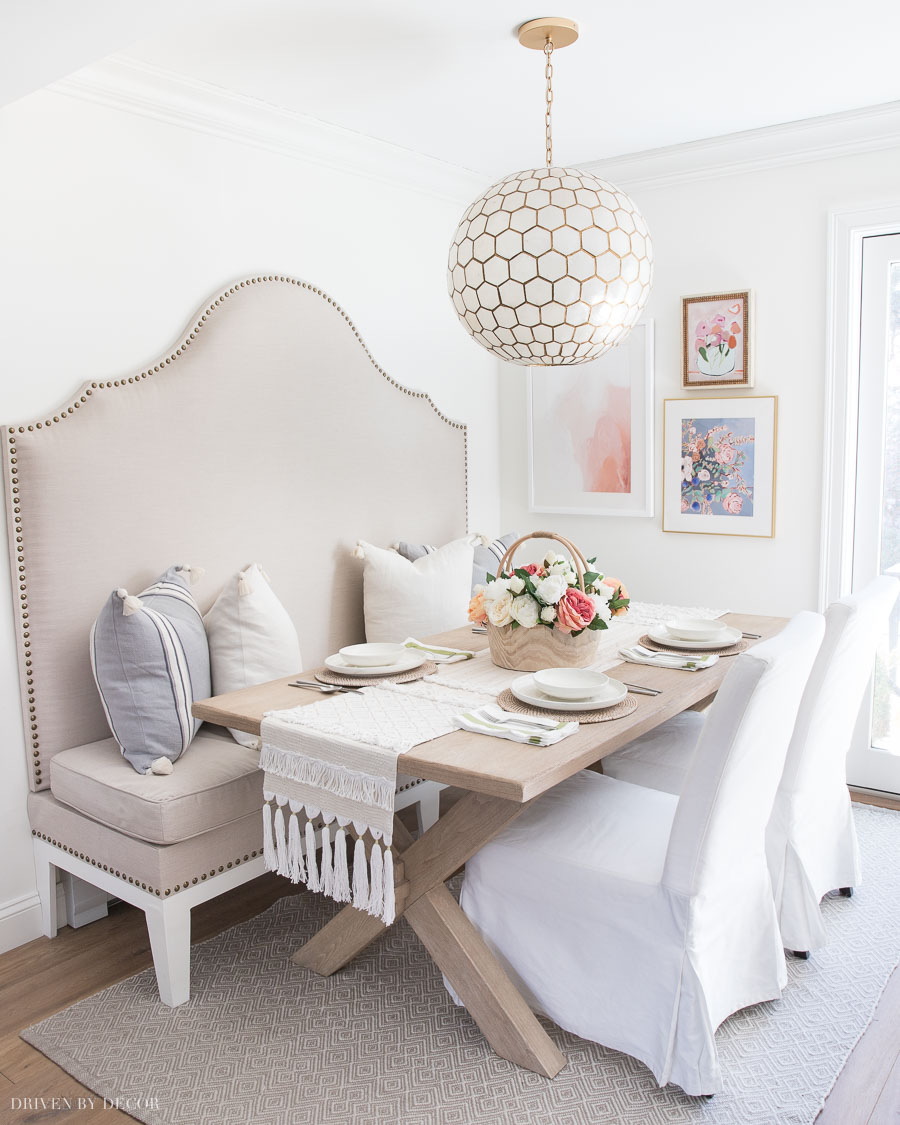
I’ve always wanted a banquette for our kitchen eat-in area but couldn’t find one that was a good fit for my space. So I decided to DIY one 🙌🏻. It’s finally done and I couldn’t be more thrilled with how our DIY banquette seating turned out!
Today I’m going to walk you through the process of creating it with a step by step DIY tutorial, including lots of detail pics in case you decide to take on the project yourself (post includes affiliate links – full disclosure statement available {here}).
Kitchen Eat-in Area Sources: Paint color: Benjamin Moore Cloud White | Dining table | Slipcovered dining chairs (similar) | Gray patterned rug | Capiz pendant (22″) | Large abstract art piece | Potted Pink print | Colorful floral art print
Before I jump into my tutorial, I want to make note that I had to get creative with the construction of the base of my banquette because I have baseboard heating on my banquette wall (so if I used a typical furniture piece in this spot, it would have to sit several inches away from the wall). By creating a custom piece where the entire back of the bench is supported by a wall cleat (the back leg you see is just for looks), we were able to have a banquette that rests flush against the wall.
For any of you wondering about the safety of building a wood bench over baseboard heaters, ours are NOT electric and they don’t get very hot so my contractor was confident that we were fine building an open bench over top of them. Every situation is different though so check with a professional to make sure you’re ok to do something similar if you have baseboard heating to work around too.
Now are you ready to see how this baby came together? Our DIY banquette seating was constructed in two pieces – (1) a headboard portion (the backrest) and (2) a bench seat. Let’s start with the headboard…
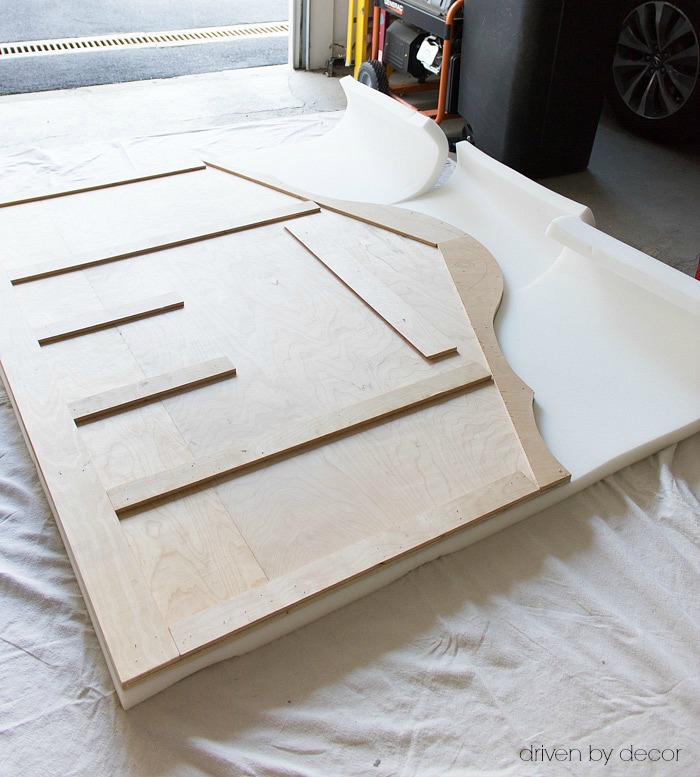
Step 1: Cut Out The Headboard
I created the upholstered headboard very similarly to how I made the DIY upholstered headboard for my daughter’s room. Start by getting a large ½″ sheet of MDF or plywood at Lowe’s or Home Depot and have them cut it the exact width that you want for your banquette (keep the cut-off piece too). Then, once home, draw a penciled line down the middle of the headboard from top to bottom. Sketch out the shape of the top of the headboard and cut it out with a jigsaw.
Quick tip! To make sure the design at the top of your headboard is symmetrical, cut out only one half of the design at the top and then use the cut-off piece as a template to trace the same design on the other half.
As with my daughter’s headboard, I wanted my banquette headboard to be taller than my wood sheet. To do this, I glued a 12″ tall strip to the bottom edge of the headboard and connected this strip to the full wood sheet with four long ½″ thick wood strips on the back.
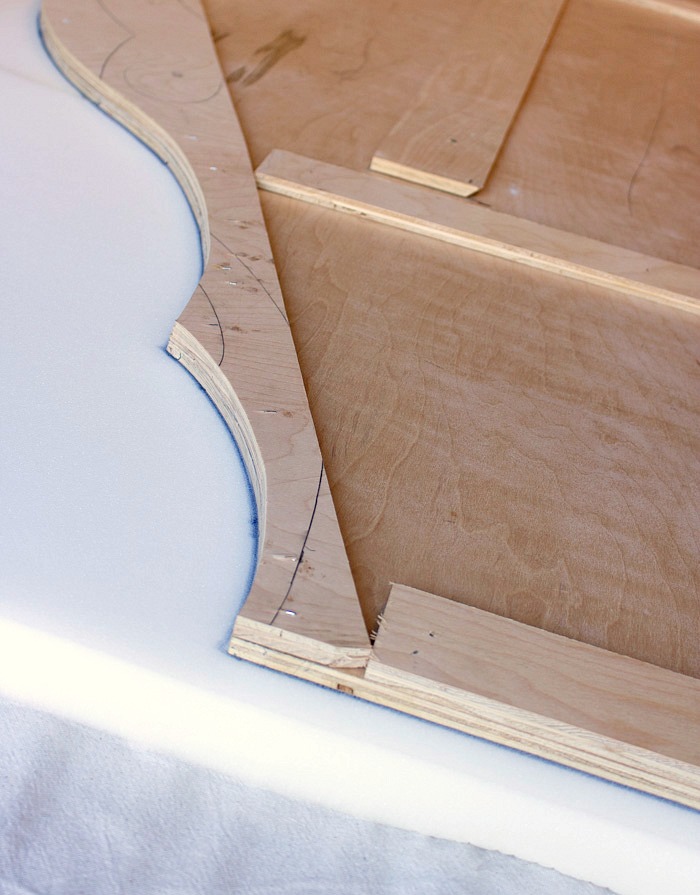
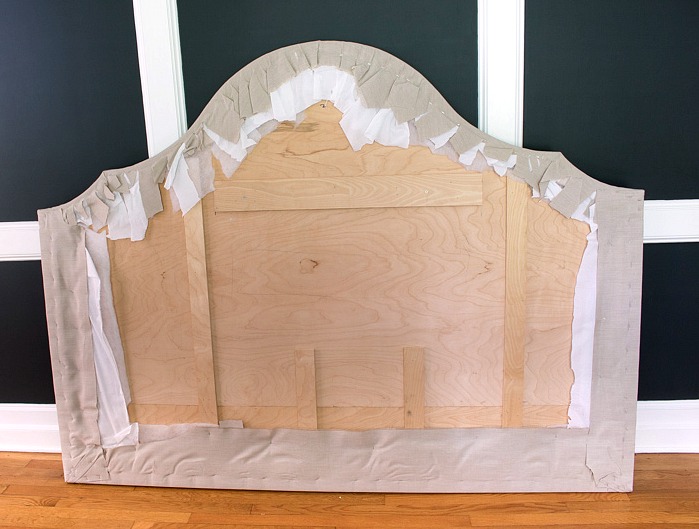
Step 2: Add a Second Plywood Layer Around the Edges
Now that your headboard is cut to your desired size and shape, the next step is to add a second layer of plywood around the edges on the back of the headboard using nails and/or glue. At this stage, it will look like this:
Why did I add plywood edging around the back? For a few reasons including (1) to make the edges thicker (they would have looked kinda wimpy from a side profile view otherwise) and (2) to give the decorative nailheads I used on the upholstered front enough depth of wood to drive into. Also, (3) it allowed my headboard to be installed flush to the wall since the built-up edges were the same depth as the wood cleat (the horizontal wood strip) that it was hung on the wall with.
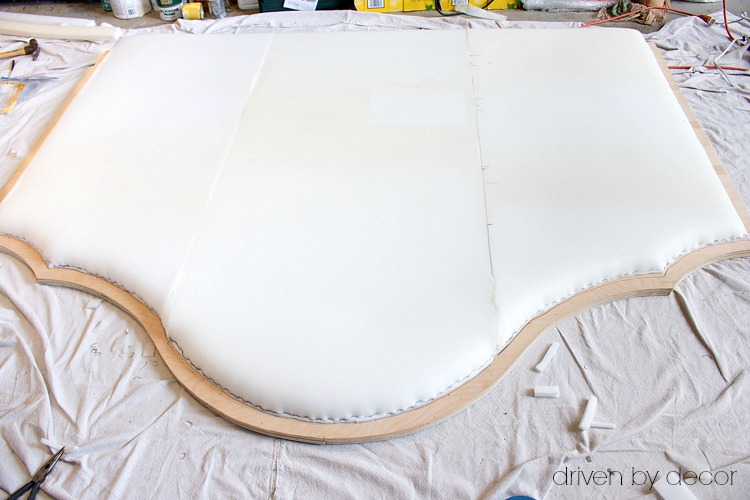
Step 3: Add Foam to the Front of the Headboard
The next step is to add foam to the front of the headboard. I used three rolls of 2″ foam like {these}. I rolled them out side by side, and then carefully laid my headboard on top of them with the front of the headboard facing down:
After tracing around the entire piece, I lifted it off the foam and then drew a second outline along the sides and the top that was 1 ¼″ inside of the one that I just drew. Then it was time to cut the foam along that second inside outline. I learned from my last foam experience that an electric carving knife is by far the best way to do it. It does dull your knife quite a bit so I would recommend buying an inexpensive electric carving knife like {this one} just for this purpose rather than using a nice one you might already have.
Once your foam is cut, adhere it to the plywood (lined up with the outline you made 1 ¼ in from the side and top edges) with spray adhesive (I used {this exact adhesive}). Now it’s time to staple! Using a staple gun, simply go along the entire length of the side and top edges and staple the foam down just a little bit inside of the marked outline. Don’t hesitate to use a LOT of staples!
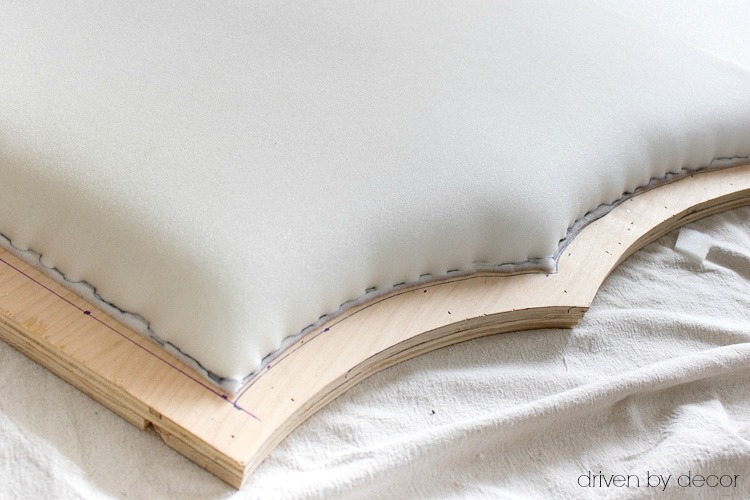
This is what it will look like when you’ve gone all of the way around (don’t staple the bottom – leave that as-is!). If your foam has a gap at all between the strips, now’s a good time to spray some adhesive in that gap and hold the foam pieces together to adhere to one another so you have a solid, smooth surface:
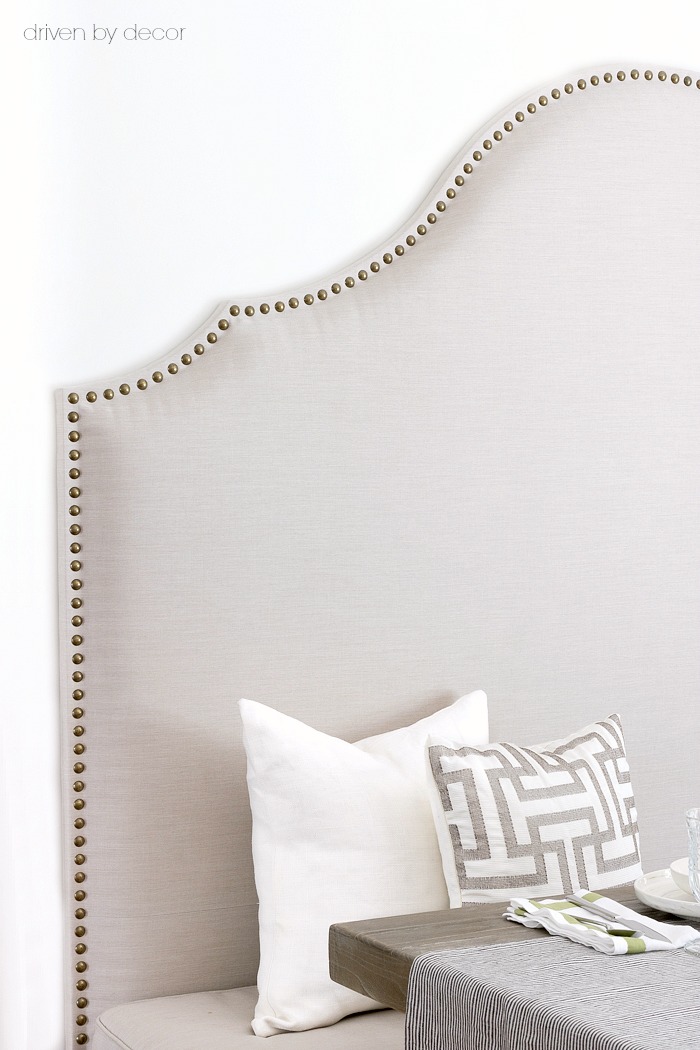
Step 4: Upholster the Headboard
Now it’s on to the upholstering our DIY banquette seating! Place a large piece of batting on a clean, flat surface and place the headboard (front side down) on top of it. Staple the batting to the back with a staple gun, pulling taut as you move around the headboard. Next, do the same thing with a layer of muslin, which helps create a smooth surface for your fabric layer (I bought my batting and muslin at JoAnn Fabrics).
Finally, it’s time for the fabric – I wanted a fabric that could be spilled on without worry so after looking at a zillion options I went with {this Sunbrella fabric in Canvas Flax (5492)}. I LOVE the linen look of it and the price is actually pretty great for a performance fabric. A standard fabric width wasn’t big enough to cover my entire headboard so I first seamed two pieces together.
Then just like you did with the batting and muslim, lay the fabric on a clean, flat surface, place the headboard on top and staple the fabric a little at a time to the back, being careful not to leave any wrinkles on the front of the headboard. As you go around the top, you’ll have to cut some slits in the fabric so you have more flexibility in positioning it. The back of the headboard will look like a hot mess – but that’s ok because no one will ever see it:
Step 5: Add Nailheads
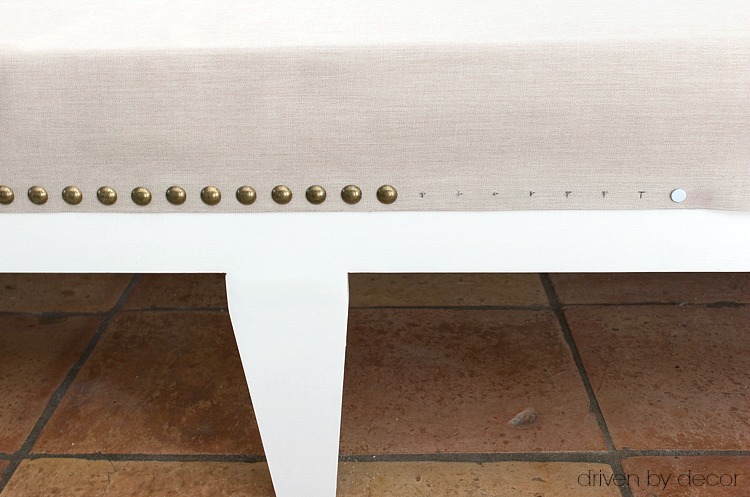
Now let’s talk nailheads – I used {these ⅝″ antique gold upholstery nails} and love them – so pretty and a great price for nailheads! What wasn’t so pretty was my first attempts at hammering in the nailheads:
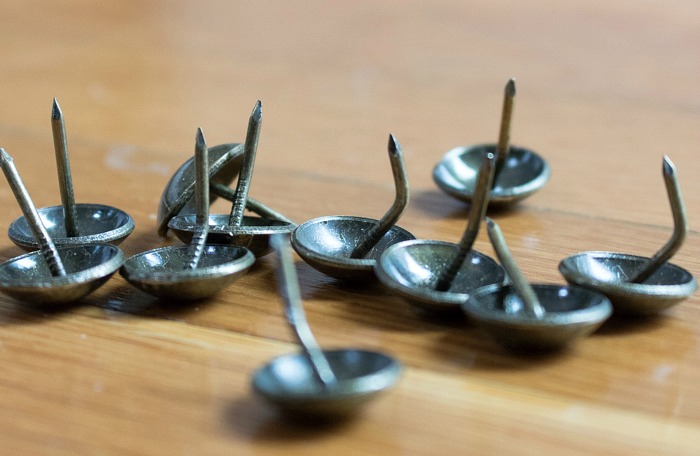
Ugh! The nails kept bending and my line of nailheads was looking all wonky. But after some trial and error, I figured out a great trick to get them lined up straight and nailed in easily without bending. It’s pretty simple – first, use a ruler and a pencil or fabric marking pen to mark out the future placement of your nailheads. Then the trick is to predrill a hole in the exact spot you want your nailhead to go, being sure to use a drill bit that’s smaller than your nails so that it’s a snug fit once they’re nailed in.
For the brass nailheads that I used, a 1/16″ drill bit worked perfectly. Because it’s a really tiny bit, it breaks easily – I went through five or six of them so be sure to have a few extra on hand – an inexpensive pack of ten 1/16″ bits like {this} would be perfect. I also recommend that you drill slowly because in a few cases some of the batting wrapped around the drill bit and pilled up – the solution is to slowly pull the drill bit out, pull the pilled up batting out through the hole in the fabric, and then go at it again.
What about spacing of the nailheads? I played around with spacing options before starting and ended up going with 1 ⅛″ spacing between the centers of the nailheads and a spacing of ⅝″ from the center of each nailhead to the edge. I kept this spacing all of the way around the perimeter of the headboard until I got to about a foot from the end. Then I measured things out to see how the nailheads would fall at the end if I kept going at the 1 ⅛″ spacing and I adjusted the spacing of the several nailheads accordingly, making it either a little shorter or longer so the last nailhead would fall in the right spot. The small difference in spacing for those last ten or so nailheads is totally unnoticeable.
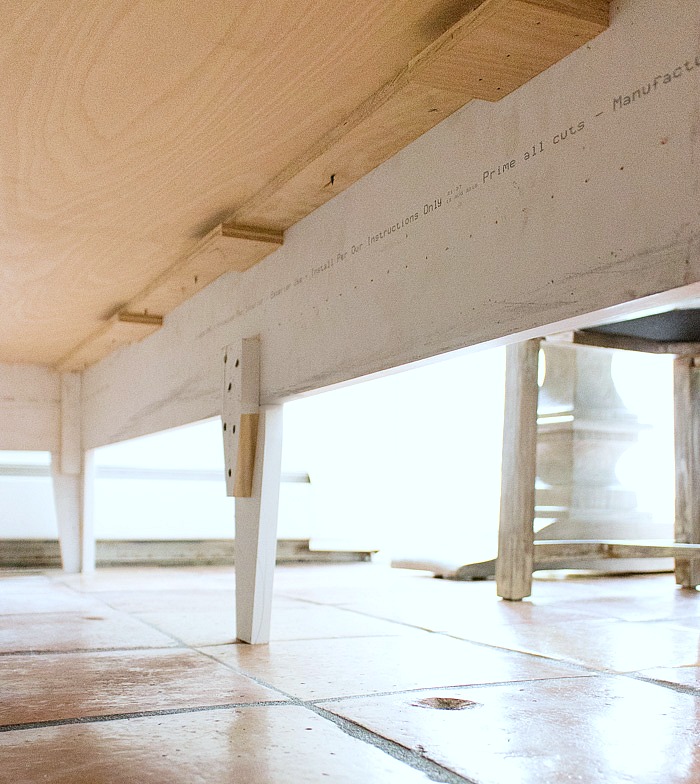
Step 6: Construct the Bench Seat
Now on to the bench seat portion of our DIY banquette seating. The bench was built on a frame of 7″ tall boards on all three sides that are both nailed and glued together. The seat of the bench is a piece of plywood that sits inside this frame, resting on a cleat that runs all the way along the inside of the front of the bench (shown below) and a second cleat that is attached to the wall and runs all the way along the back of the bench.
The legs were cut separately (we went through a bunch of size and shape options!) and attached to the bench with wood dowels, glue, and screws along with extra supports along the back of them where it’s not visible (shown below). You should base the length of the legs on how high you want to sit once the cushion is on it. Make sure it’s a good height for the table that you’re using with it!
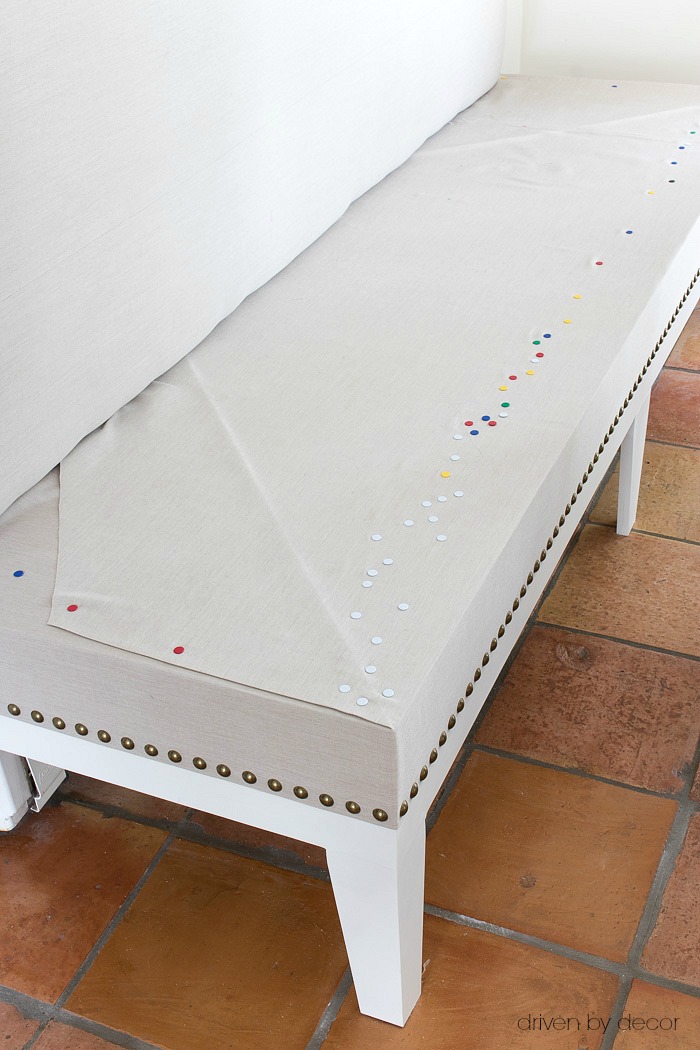
Step 7: Add Upholstery and Nailheads to the Bench Seat
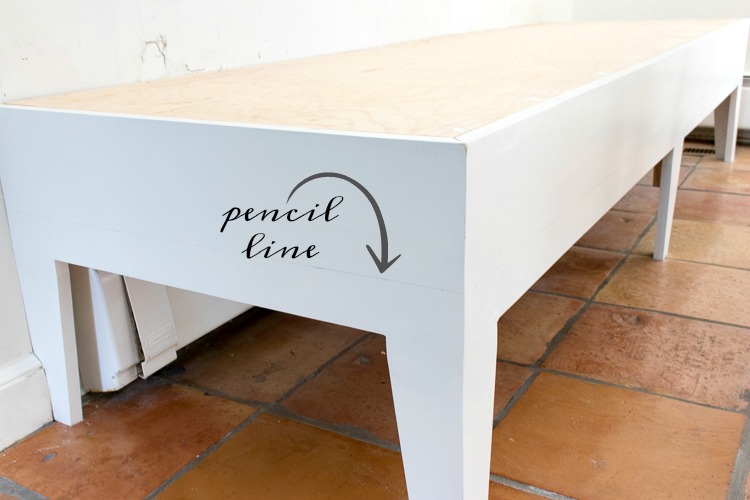
Once the bench seat was put together, I filled the nail holes and sanded & painted it. Then it was simply down to adding the fabric and nailheads. I wanted the fabric to have a nice finished edge all along the base, so using an iron, I made a ¾″ fabric fold along the entire length of the fabric and then tucked and ironed ⅝″ fusible bonding web in the fold to hold it in place. You could also fold your fabric and use a sewing machine to stitch the fold in place along the length of it but I’m not even trustworthy enough to sew a very straight line so I took the easy way out with the bonding web + iron method.
To prep the base, draw a straight line all around it where you want your fabric to end (mine is 5″ from the top):
Then starting along the first side, I predrilled holes for the nailheads on both ends, lined the fabric up along the penciled line, and added the two end nailheads:
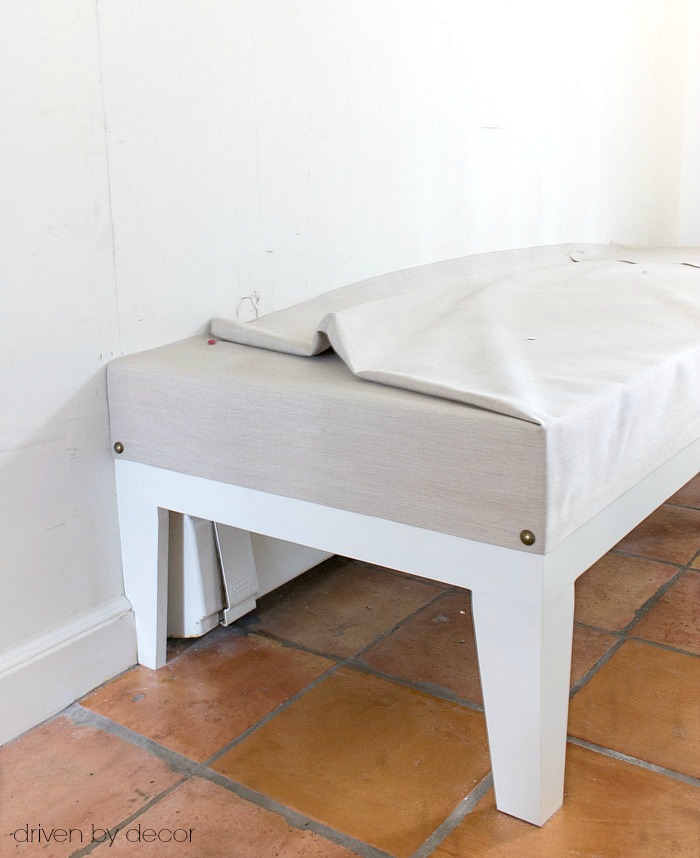
Then I filled in the nailheads in between, adjusting the spacing a bit as I got closer to the end so that the last nailhead ended in the right spot. I then continued around the long side of the bench the same way:
I used a coated thumbtack to hold the fabric taut as I went along and also used a bunch of them along the top to keep the fabric pulled tight in that direction. I was originally planning to replace the thumbtacks on top with staples once I finished and make things look a little more professional than my thumbtack hack job but I ended up deciding to leave things as-is with the thumbtacks since they aren’t visible once the cushion is in place. The last thing to notice is how I handled the corners – I just made a simple fold and tacked it down:
Step 8: Hang the Headboard on the Wall with a Cleat
The last step in creating our DIY banquette seating was to mount the headboard on the wall with a cleat. You could use a store-bought cleat like {this one} that I used to mount my daughter’s upholstered headboard or make your own wood cleat where the top of the cleat attached to wall is at an angle that fits the bottom of the wood cleat that’s attached to the headboard.
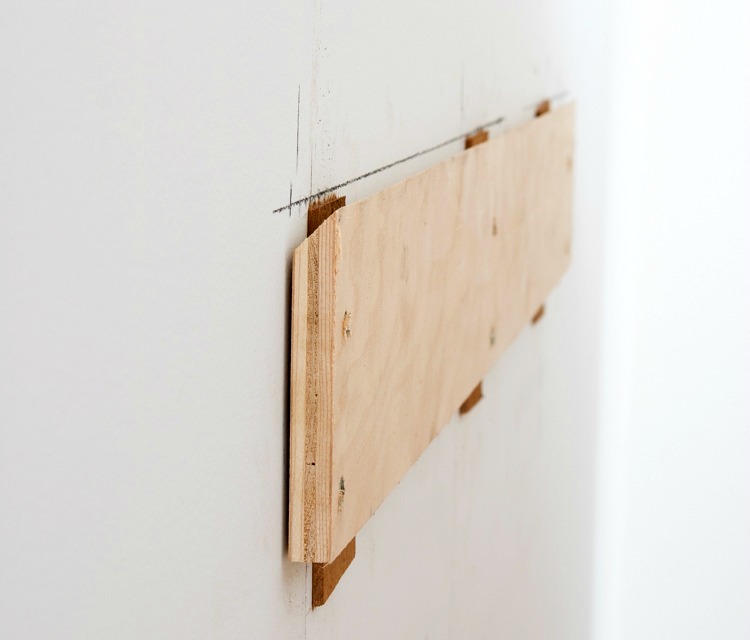
In either case, be sure the cleat is mounted to wall studs so that it’s secure:
Step 9: Add a Cushion
The very last thing needed was a bench seat cushion – I totally hired out for that sucker! My sewing skills are VERY limited so I wasn’t even going to attempt to make it. I chose to use foam that’s thicker and less firm than the average kitchen bench seat because I wanted this piece to be more like a sofa/kitchen bench hybrid.
And with that, our DIY banquette seating is done! It was such a great addition to our kitchen:
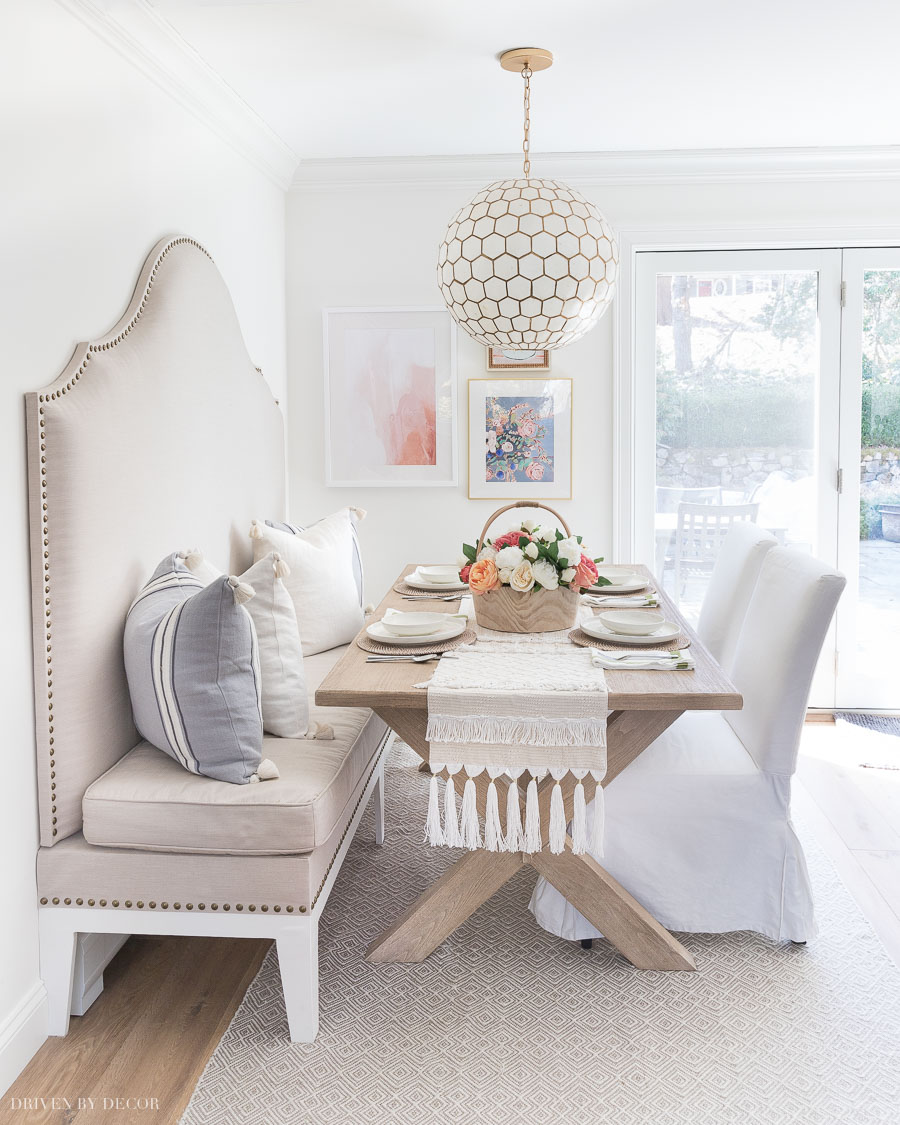
You might notice another change to this space since I first started creating this banquette – we changed out the flooring! Check out my post on our kitchen remodel for all the details on that! You might also enjoy my post on trestle dining tables with several other beautiful options.
Let me know if you have any questions!


Anna DaCosta says
The design you have shared is simple yet elegant – very nice! I want to redo my small “formal” dining room to a more casual look, by installing some bench seating around the 3 walls, and a use a large round table. At present, we have a rectangular table with 6 chairs and a banquette which would be replaced. It would be a big change, but more suited to our lifestyle.
M says
How is the bench attached to the wall? Is that where you are getting the support from? Is it screwed into studs?
Claire says
Wow! This is because I just love it. Thank you for sharing, Im going to try but I know for sure mine will be so ugly.???
Jennifer Christenberry says
Okay… call me crazy, but I think I’m going to attempt this in a few months on our home we’re remodeling. It’s exactly what I’ve been looking for and unless I farm it out completely custom I can’t find anything close! Can you tell me how tall the bench is at the highest point? And how wide? And then how tall the wood portion is? Thank you sooo much for inspiring me!!!!
Karen says
Hi Kris,
Thank you for the posting of the DIY Banquette bench.
I was looking all over for the perfect fit banquette in the perfect color of choice.
I’ve made construction pieces before such as wall units, counters and bars, but never a banquette bench.
If it wasn’t for your step by step instruction, I would of never tried to conquer making a bench! Not only did I make the bones of it, but I also upholstered it in my favorite color.
I just wanted to say thank you and to encourage others to try pushing yourself and you too will do a fabulous job!
Karen