I’m excited to share the “after” of my daughter’s boho bedroom makeover with you guys! While reusing all of her major furniture pieces, I was able to totally transform the look and feel of her bedroom with the power of paint. We used a palette of boho bedroom colors and we both love how it turned out. Ready to see? (post includes affiliate links; full disclosure statement available {here})
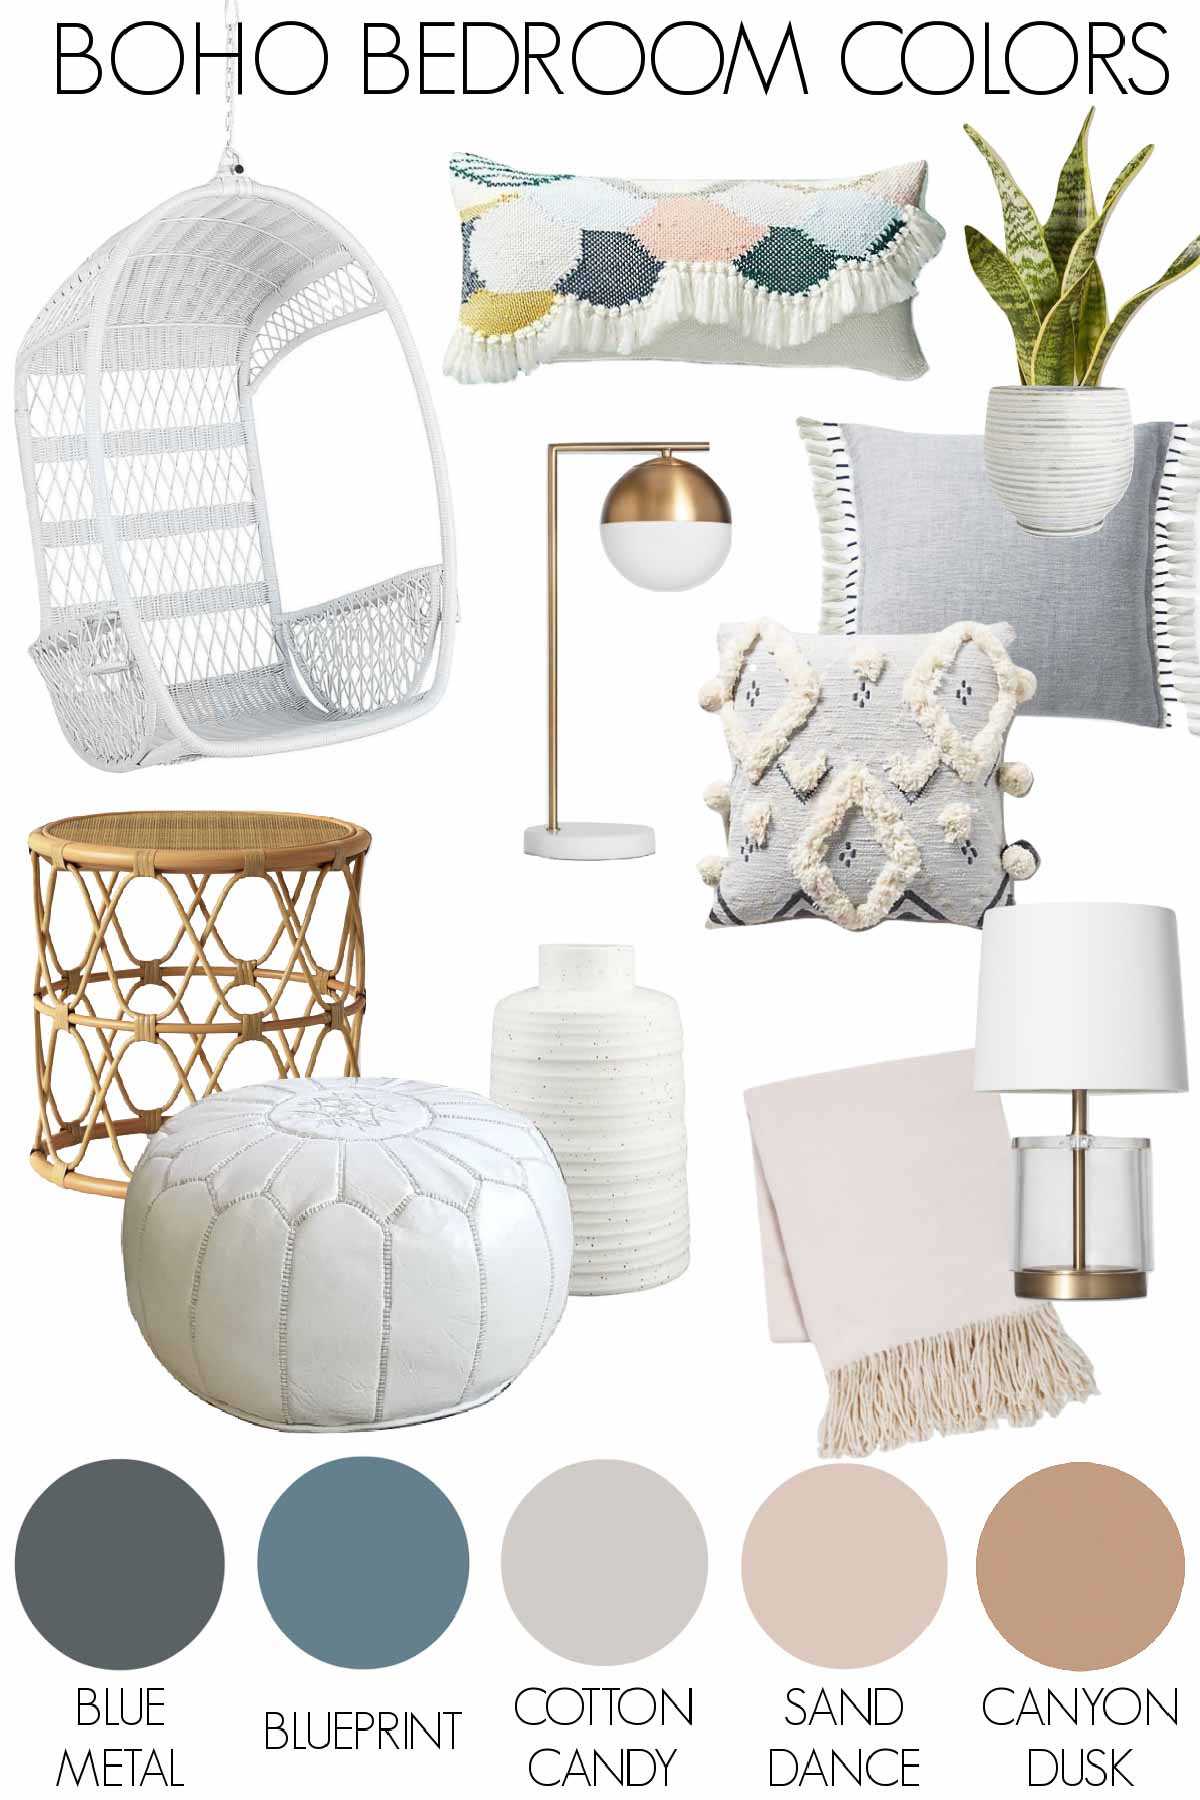
Our Color Palette
Using Behr’s Blueprint as our jumping off point, we settled on a color palette of blue tones (also including Behr’s Blue Metal which is a dark blue/gray) balanced with some softer pastels including Behr’s Cotton Grey and Sand Dance to keep the room colorful without being loud. We also added some woven neutrals to bring in a color similar to Canyon Dusk. All of the colors blend beautifully together for the perfect boho bedroom color palette.
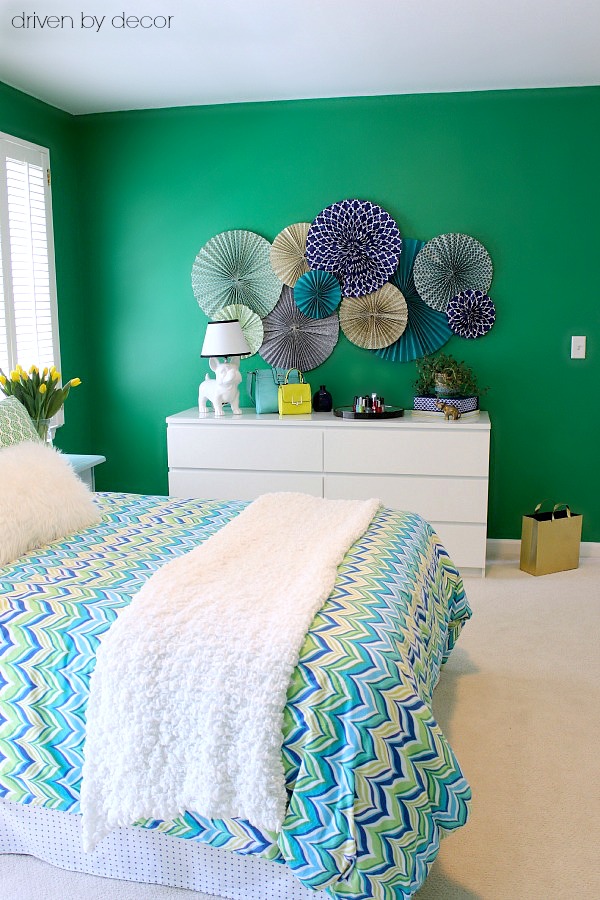
Bye bye bright green walls and hello to Behr Blueprint:
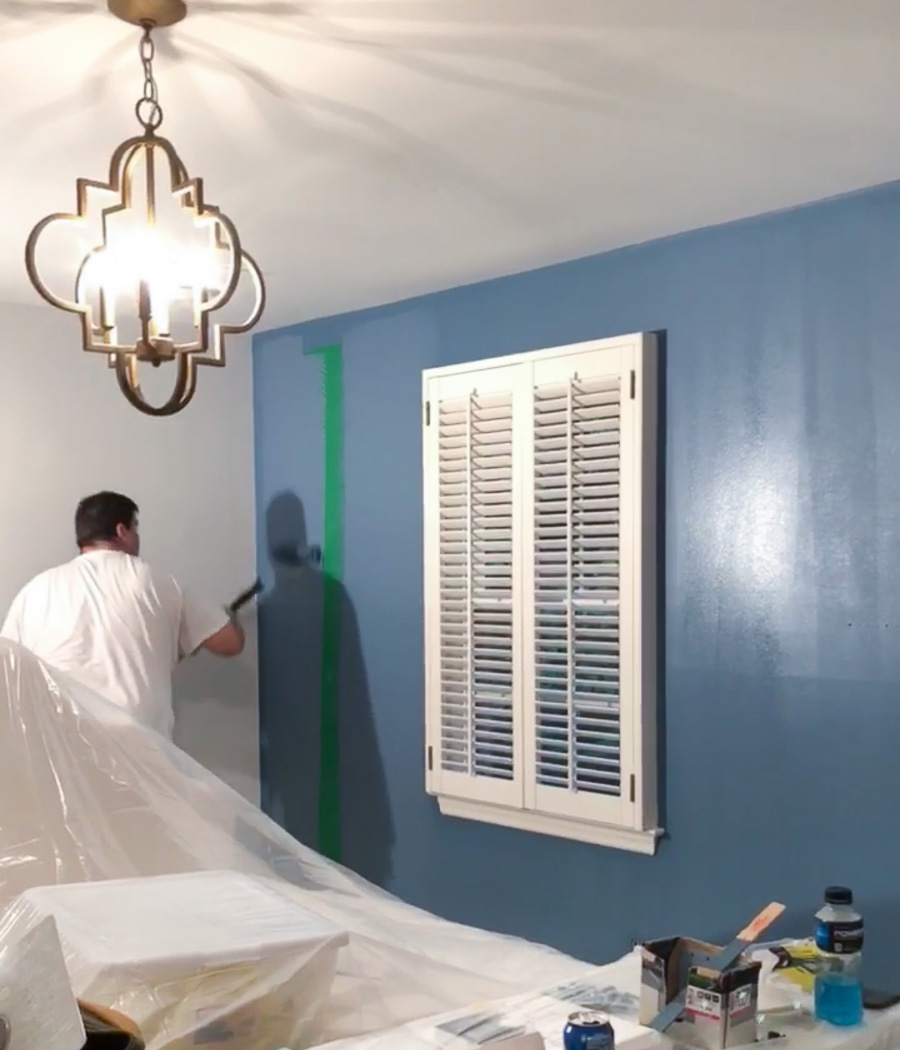
Once dry, I knew we had landed on the perfect color for this space – Blueprint is colorful yet still soft and sophisticated without being overpowering. For the other three walls of the room, we went with a complimentary white (White 52) in the Matte finish. It’s a true white that’s not too warm and not too cool. We painted the trim and doors with it too in the Satin finish.
After the painters were done, I went to town on some painting projects of my own involving her dresser and closet, we finalized the bedding and accessories to bring into the space and put the room together – my daughter and I are both so thrilled with how it turned out!
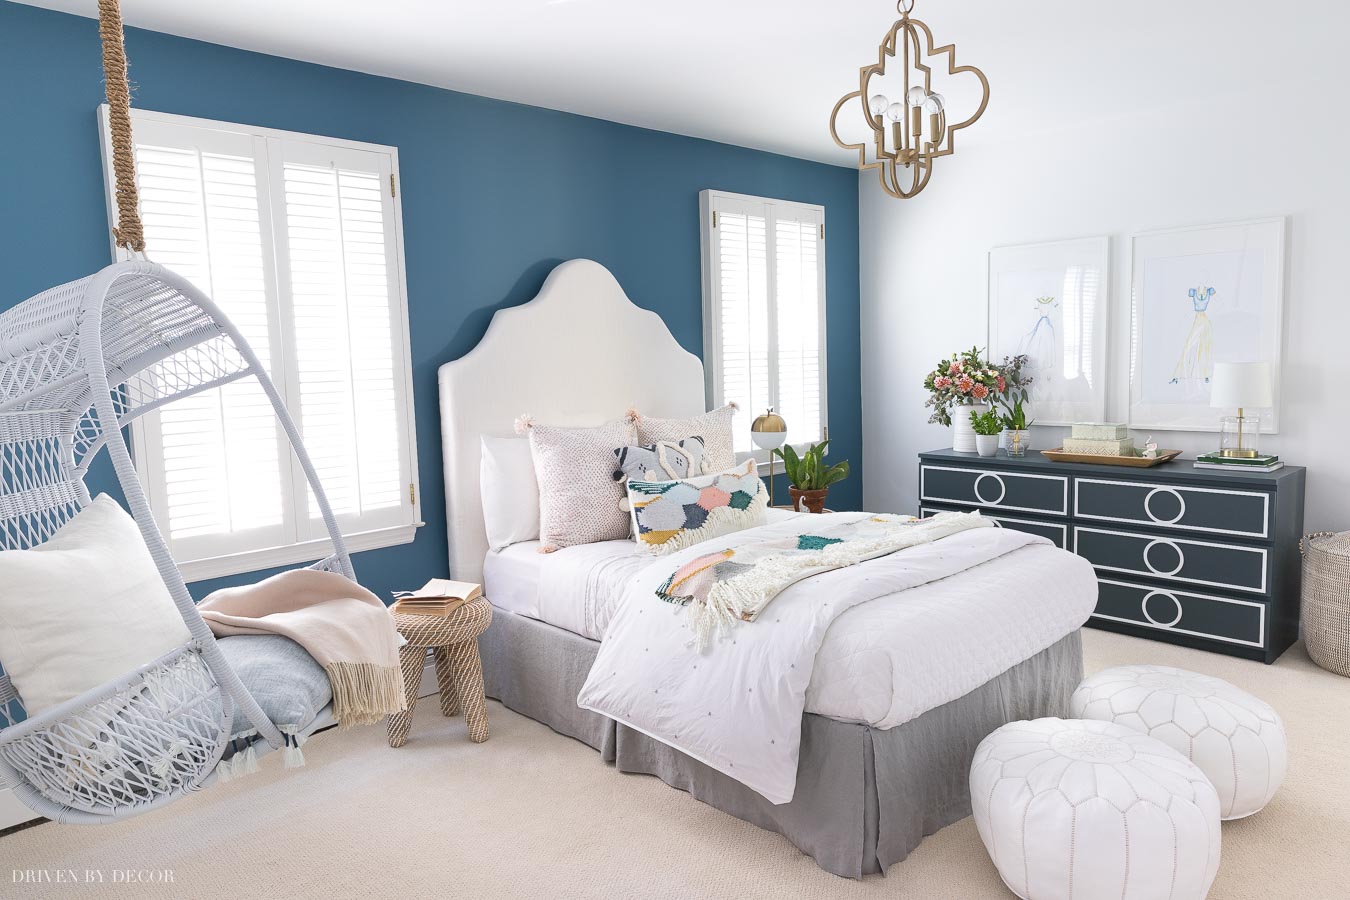
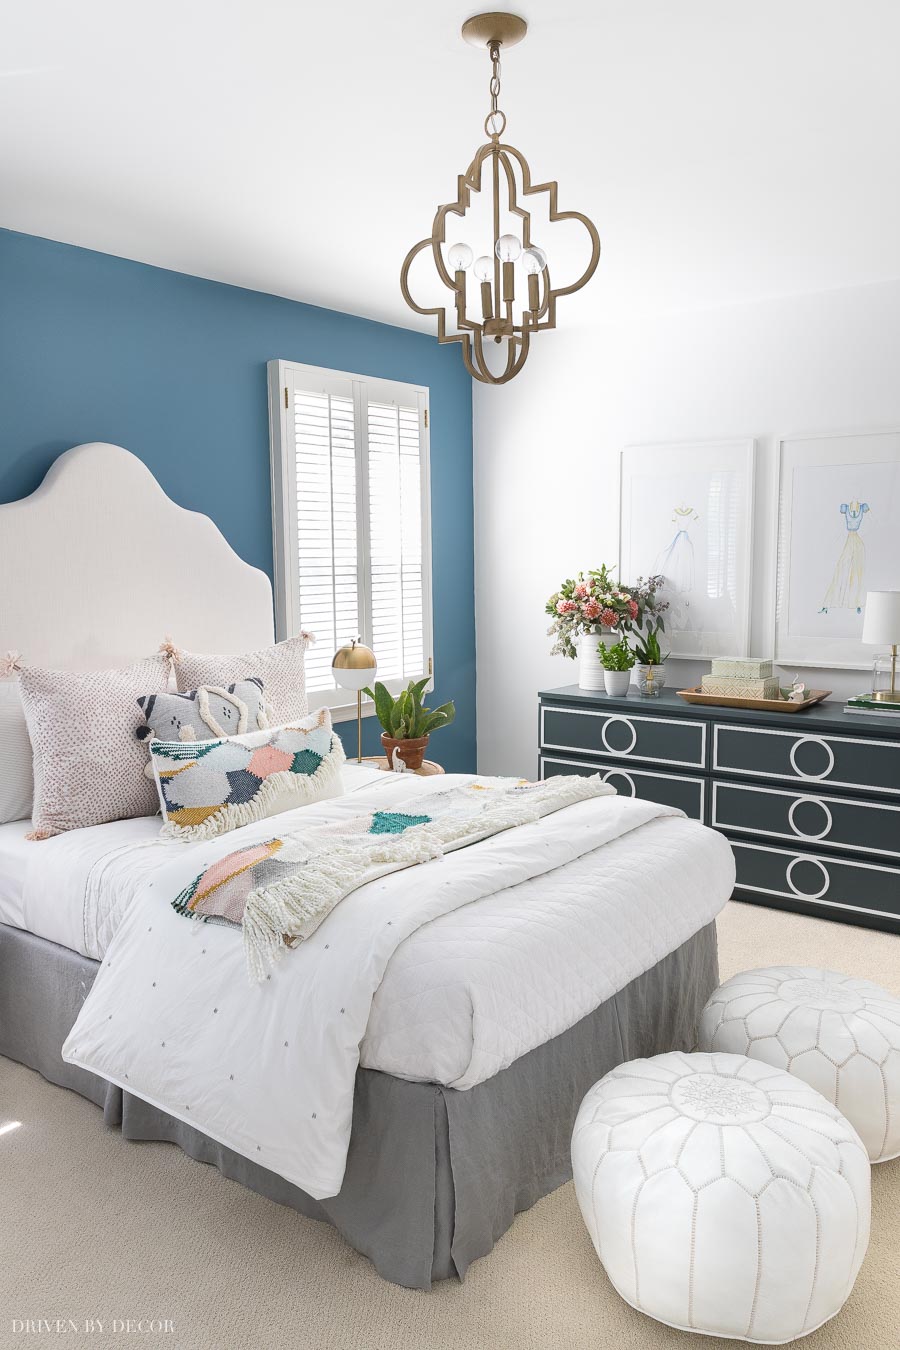
Room sources: DIY upholstered headboard | Quatrefoil pendant | White quilt | White leather poufs | Acrylic lamp on dresser | Other bedding & accessories no longer available
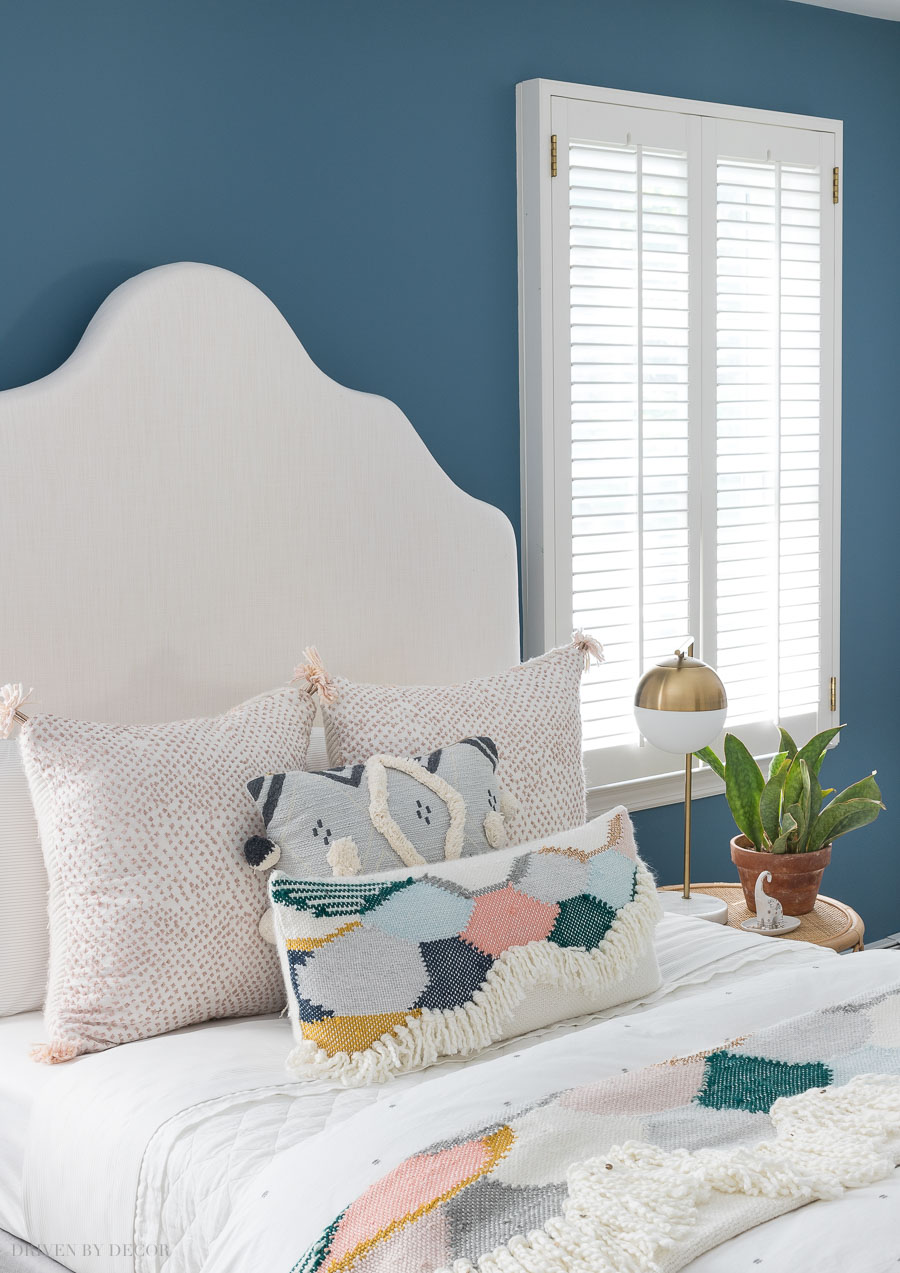
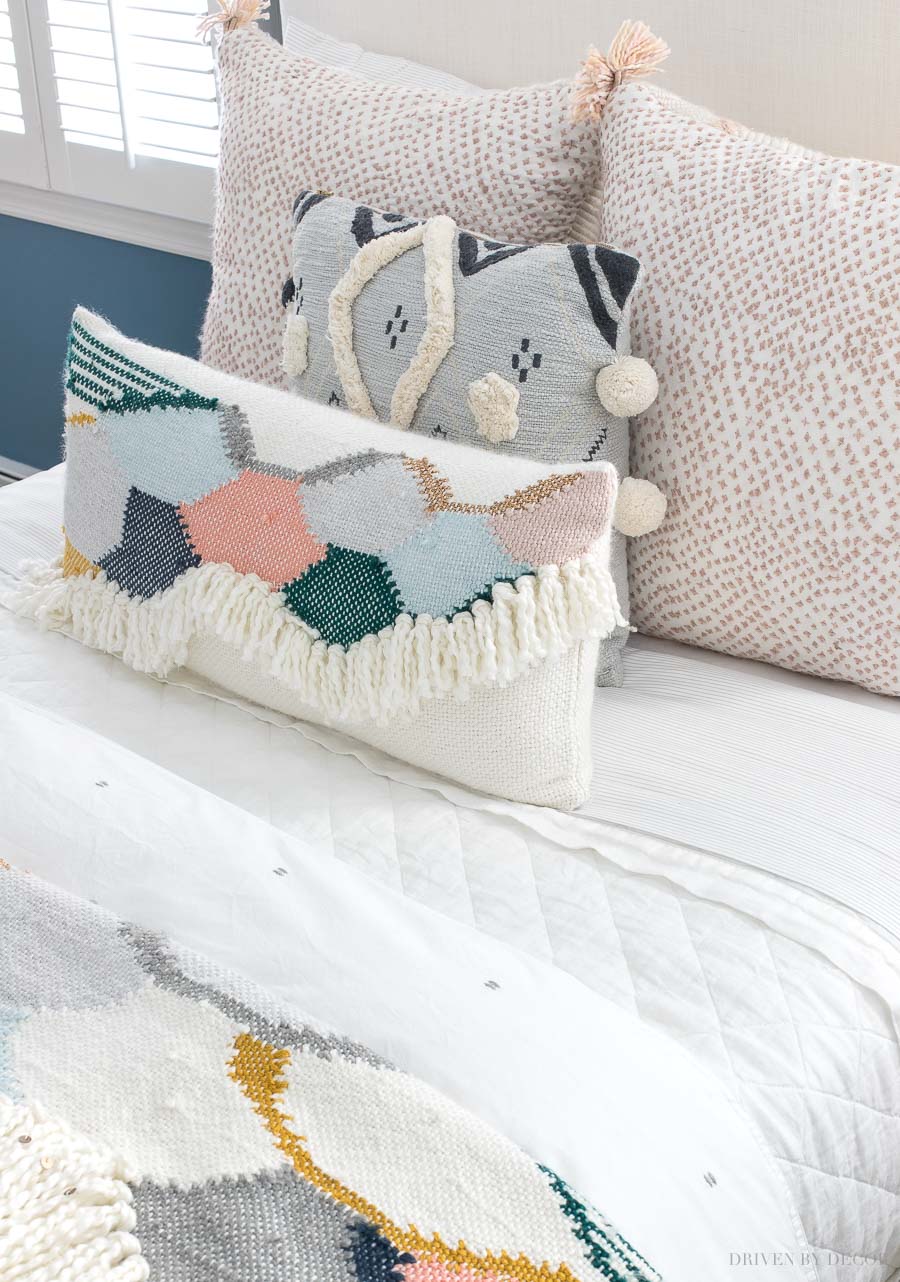
We ended up landing on a colorful mix of pillows including two blush mini polka dot pillows, a patterned blue pillow, and a scalloped lumbar pillow (unfortunately no longer available).
While the throw is pretty colorful and taste specific, we stuck with basics for the major bedding pieces so that if years down the road my daughter wants to change up her room, we don’t have to buy a new quilt and duvet – the ones we chose will work with anything! We stole {this white quilt} from our guest bedroom (I now have it in three of our bedrooms and love because it washes like a dream) along with a simple white duvet with gray dots:
The headboard is a DIY upholstered headboard I made several years ago that worked beautifully to reuse in this newly made-over space. Along with bringing our palette of boho bedroom colors into the room with new bedding, there are several other ways we found to add color to this space.
Paint a Furniture Piece
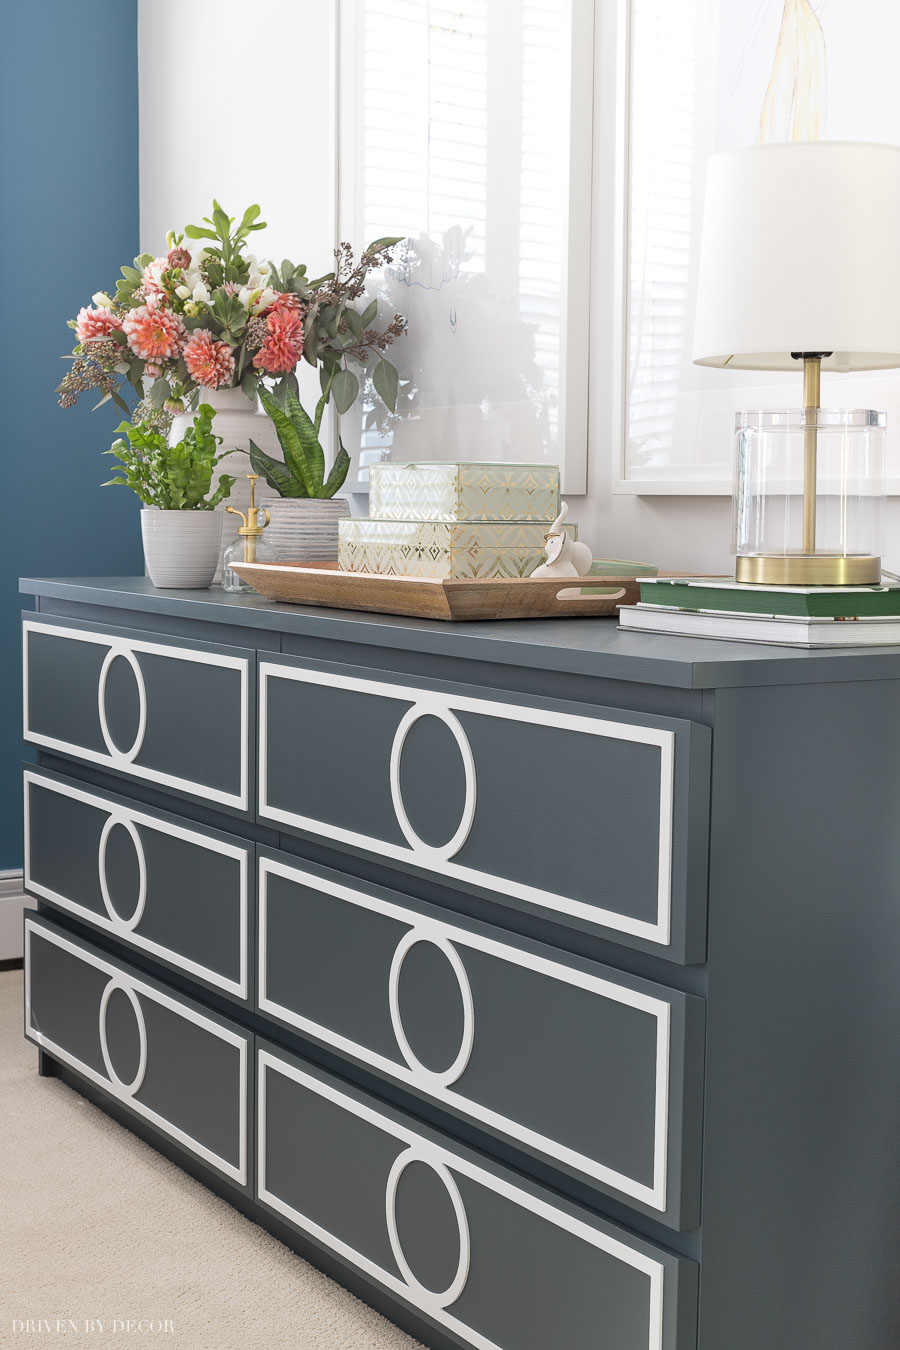
Prior to the makeover, my daughter had {this white IKEA dresser} that was the perfect size for her room (and has a ton of drawer space!) but honestly couldn’t be more boring if it tried:
After making it over with new paint and overlays, it looks like a brand new piece!
The steps that I took to transform her dresser are pretty simple:
(1) I gave the whole piece a light sanding followed by using a liquid sander/deglosser like {this one} – either sanding or the liquid sander alone would probably be sufficient but I used both to make sure the primer would stick since it’s such a shiny surface.
(2) I took out the drawers and primed the body of the dresser and the drawer fronts, using a small roller for smooth surfaces – I’ve found a ¼″ nap roller like {this one} works best
(3) I then painted the dresser the same way that I primed it. The trick to not getting any roller marks is to work quickly enough that none of the paint dries as you’re rolling it (since these small rollers apply thin coats, they dry quickly!). I used Behr’s Blue Metal for my paint color which is a gorgeous deep blue-gray. As you can see, one coat covered beautifully over the primer but I always do 2-3 thin coats (allowing the paint to dry well in between) when painting furniture pieces for maximum durability.
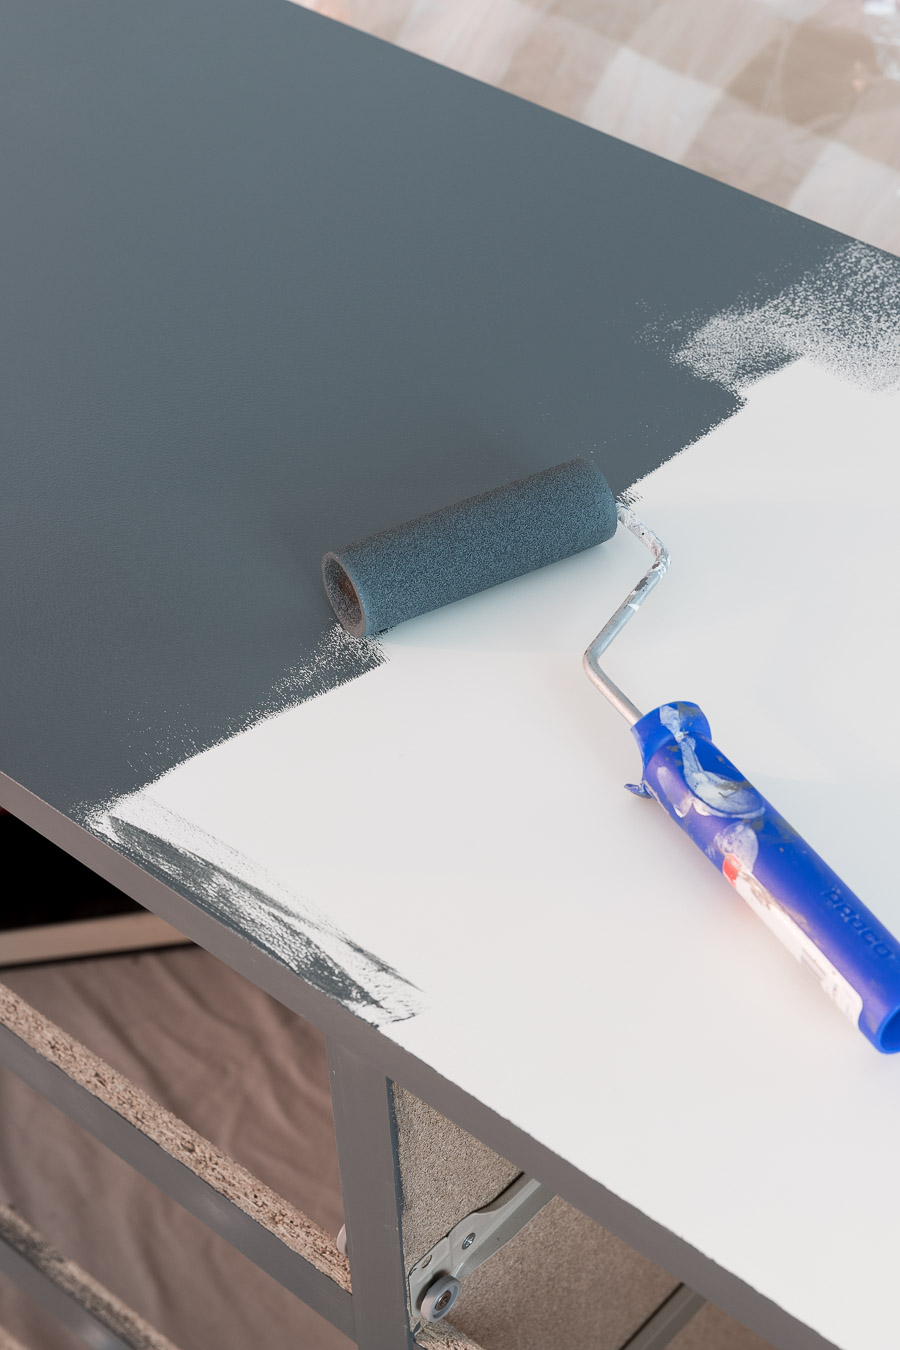
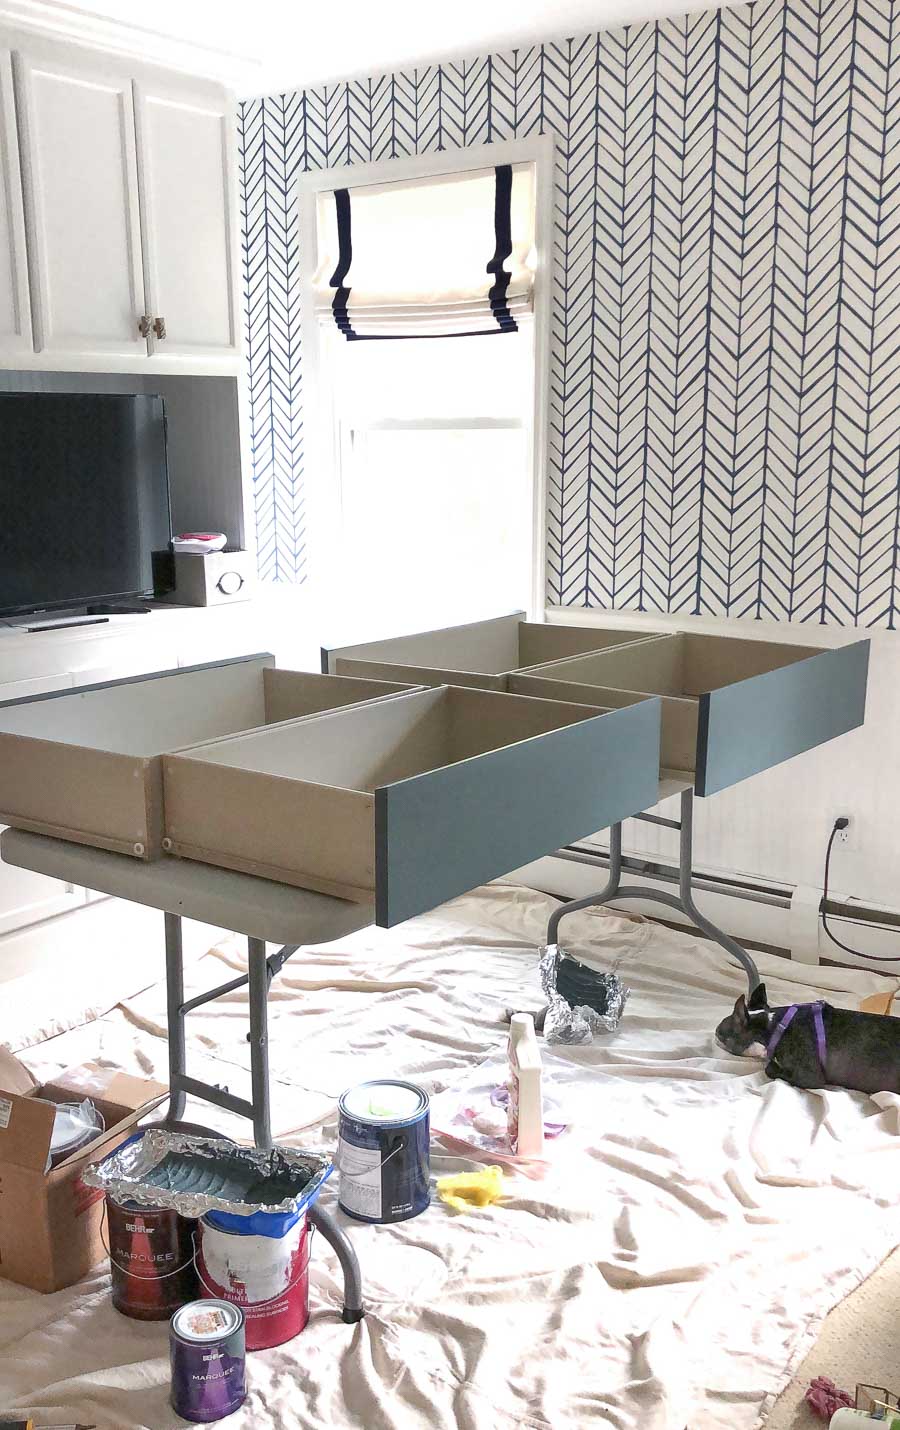
To paint the drawers, I laid them on an old folding table with the front ends facing out (as you can see, my furry project supervisor kept a close eye on me to make sure I stayed on task!):
(4) As a last step, if the piece is going in a space where it will be getting a lot of use, it’s a good idea to add a protective coating like a water-based polyurethane to at least the top of it. Once done, let your painted furniture piece dry at least a week before using it so the paint is fully cured.
Usually once I’m done painting, that’s the end of my furniture project but for this dresser I took it a step further and added {these overlays} to the front of each drawer. They come in various sizes to fit the most common IKEA dressers and are added to the dresser with an adhesive (I used Liquid Nails). Super easy and makes such a difference!
Add Art that Complements Your Color Palette
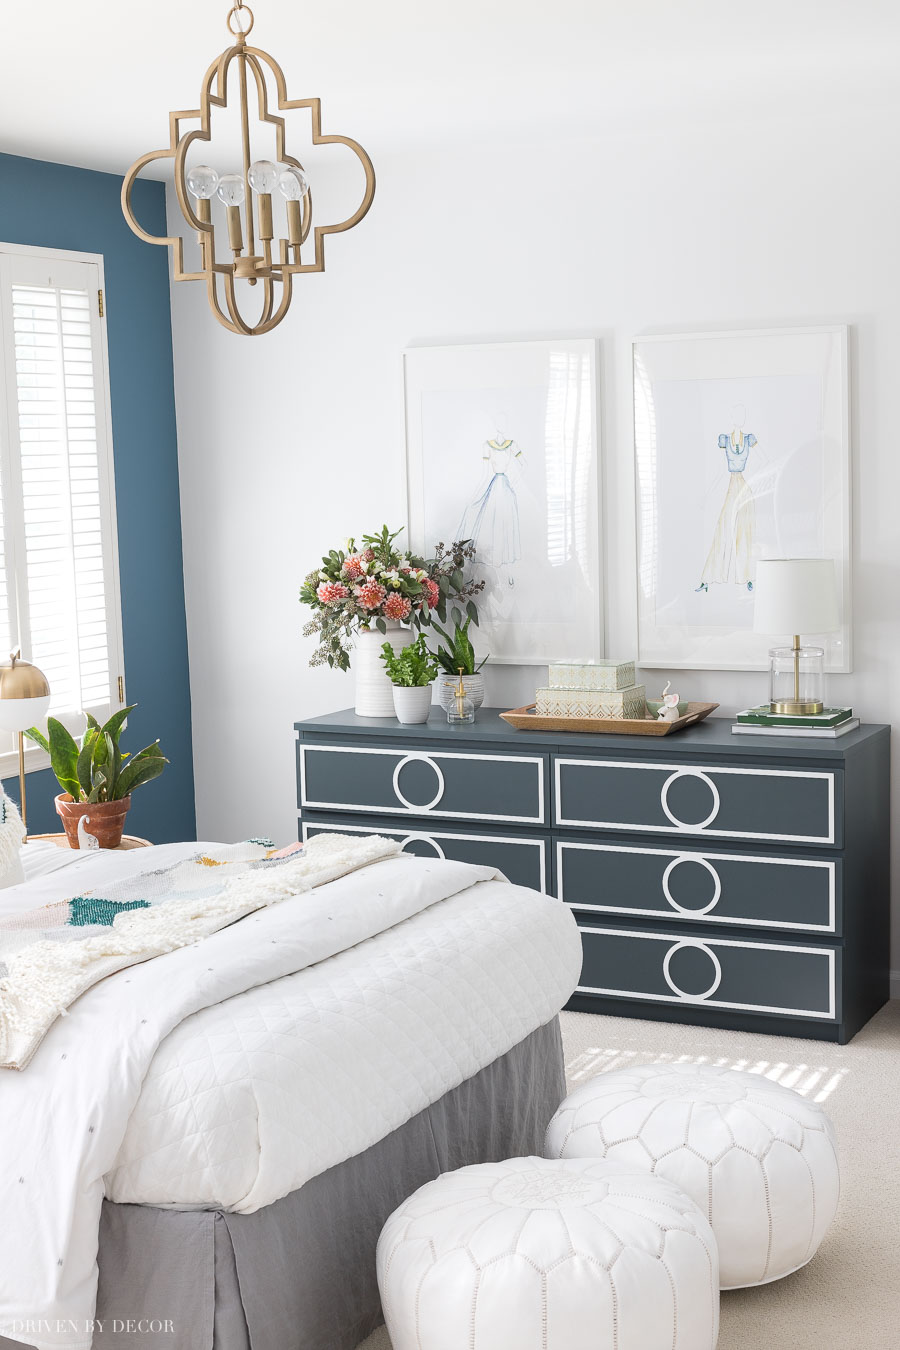
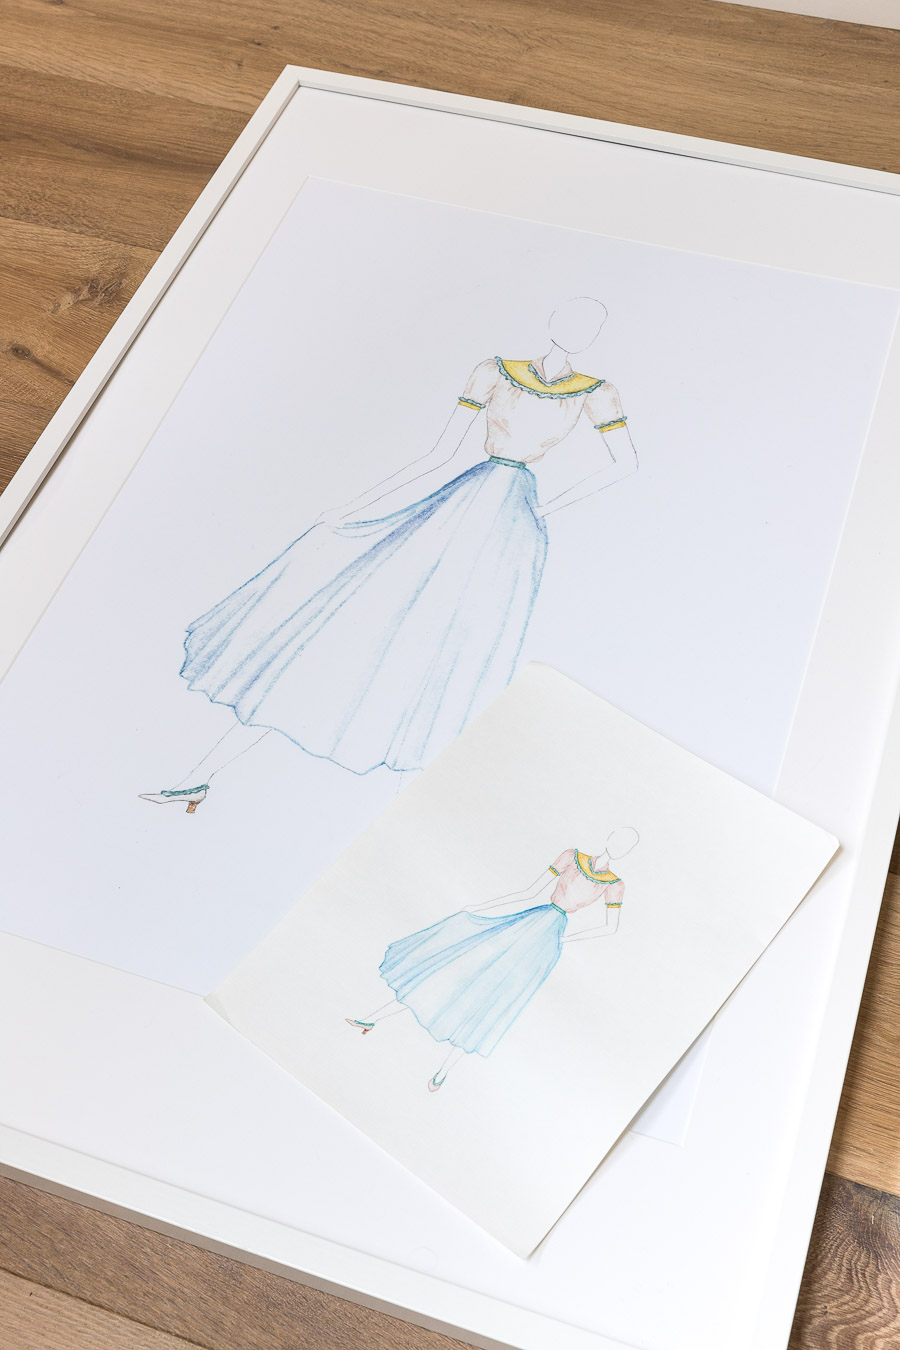
Above the dresser we added two large framed prints that are actually enlargements of two of my daughter’s fashion design sketches:
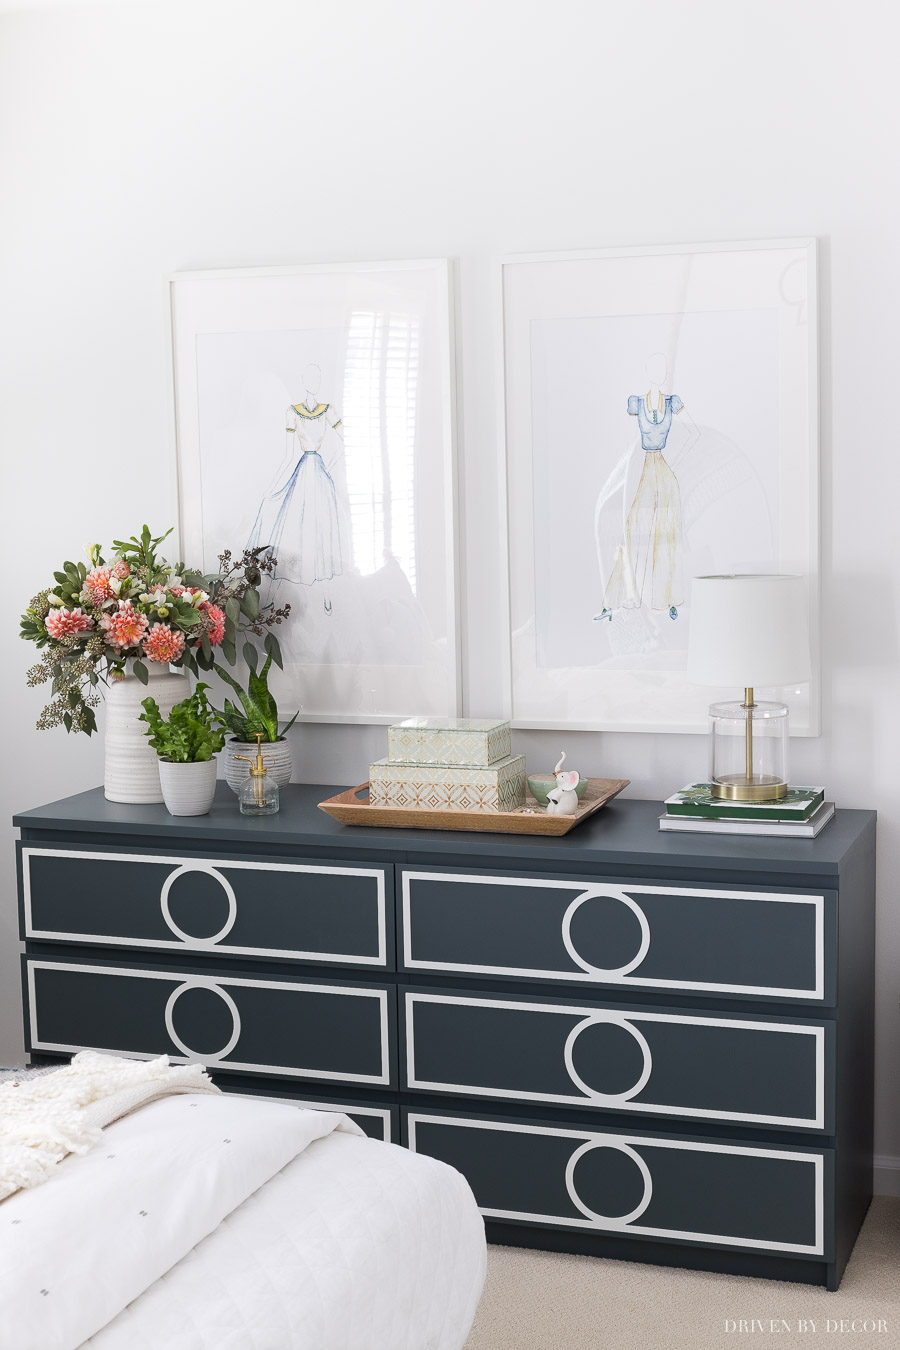
I love framing my girls’ art! Not only is it inexpensive (especially when you use simple, inexpensive frames like {these frames} that I used) but it’s much more special and meaningful than anything you could buy in the store. I simply took two of my daughter’s sketches to the local copy shop and had them enlarged to the perfect size to fill the frames:
Add Life With Greenery
Along with the art prints, we added several plants to her dresser which bring so much beauty and life to the room! Unlike me (a total black thumb), my daughter is really good with plants and loves having them so this was a no-brainer:
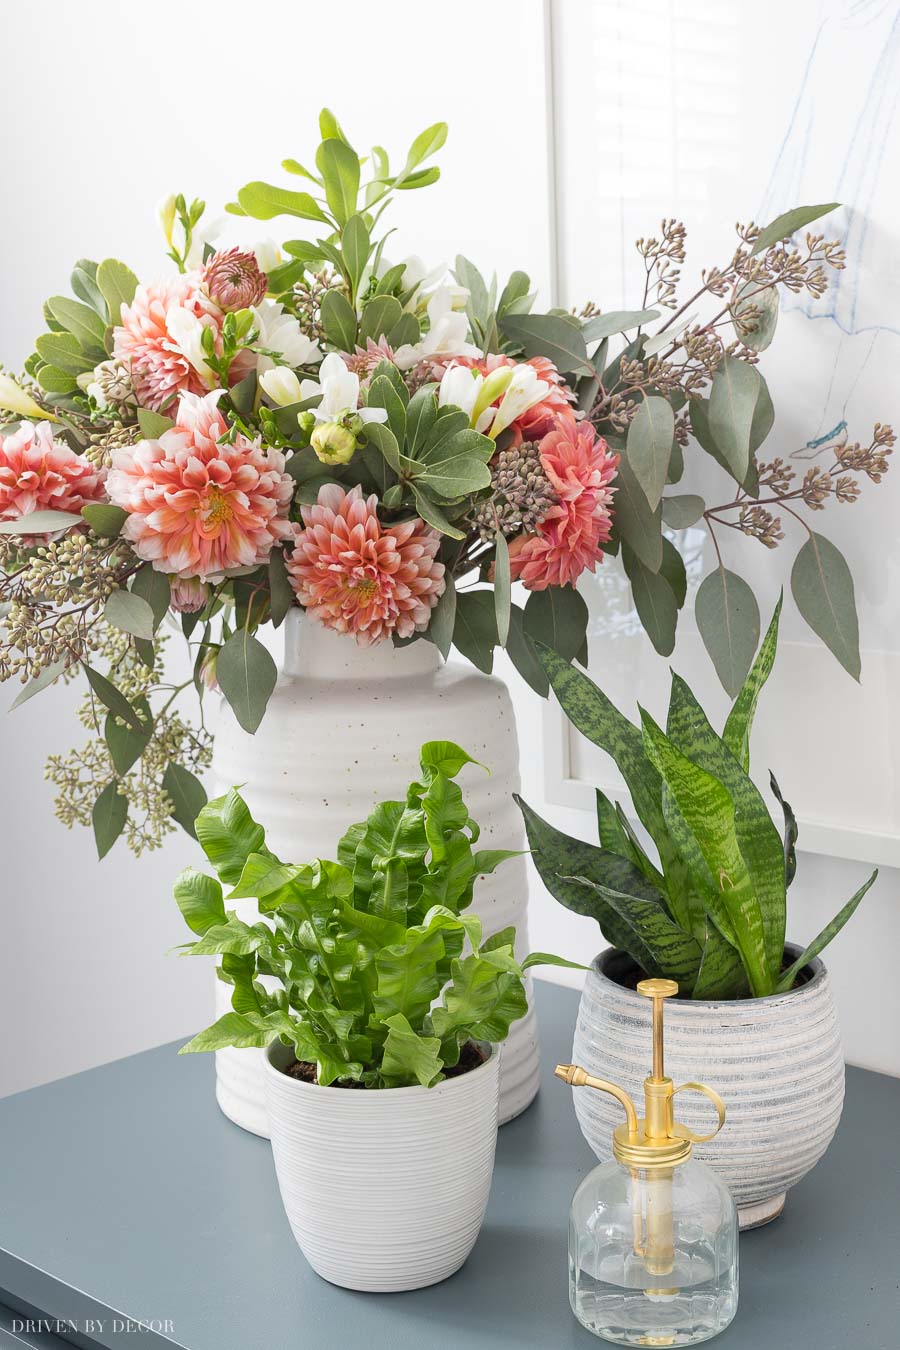
Sources: Tall vase holding flowers | Gray stripe planter | Plant mister
Mix in Woven Neutrals to Add Interest
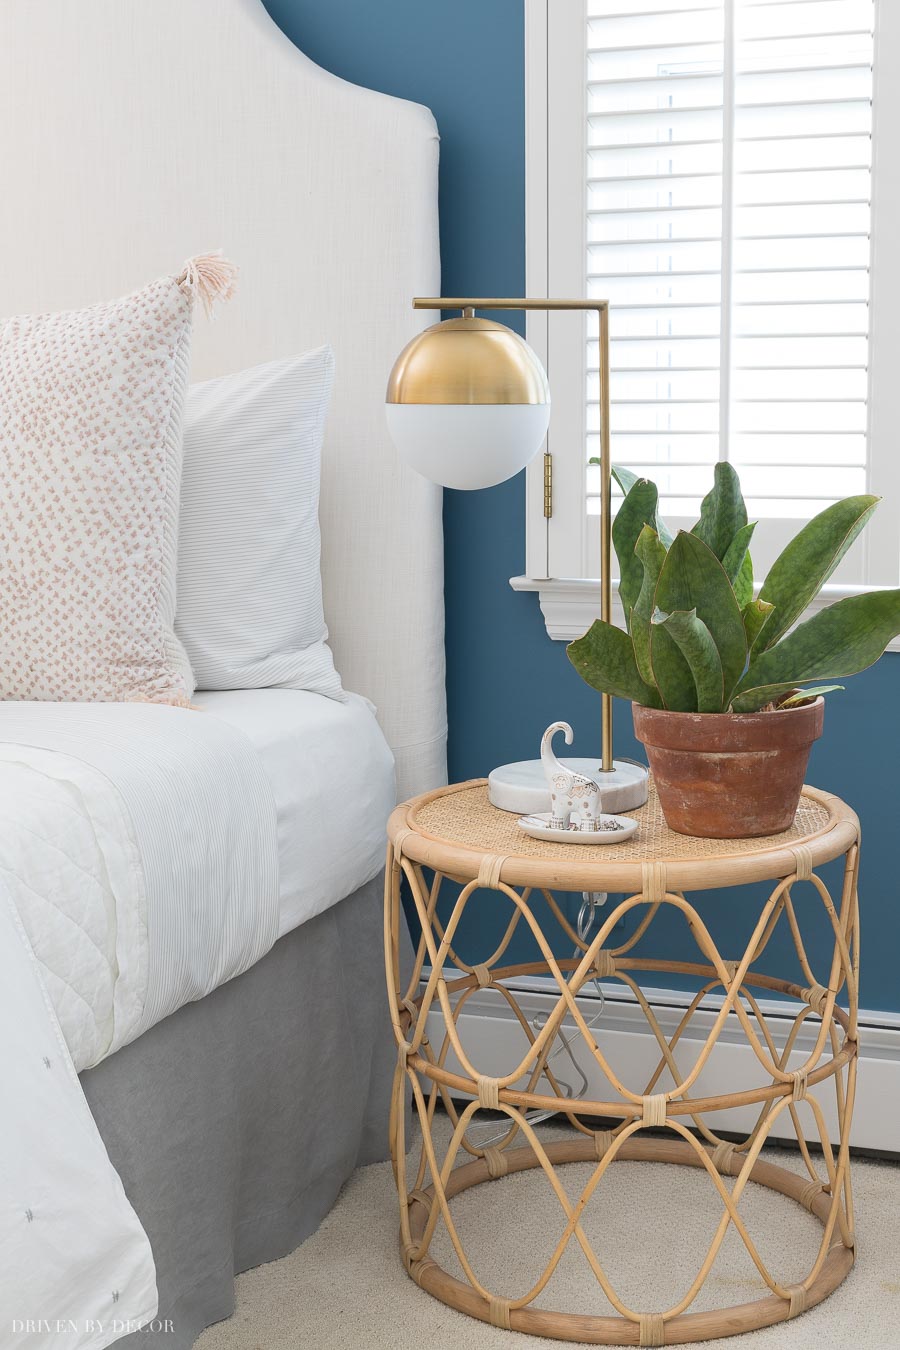
We also added some texture to the room with {this rattan nightstand}:
and by wrapping a length of rope around the chain holding my daughter’s swing chair – so easy to do and it looks so much cuter!
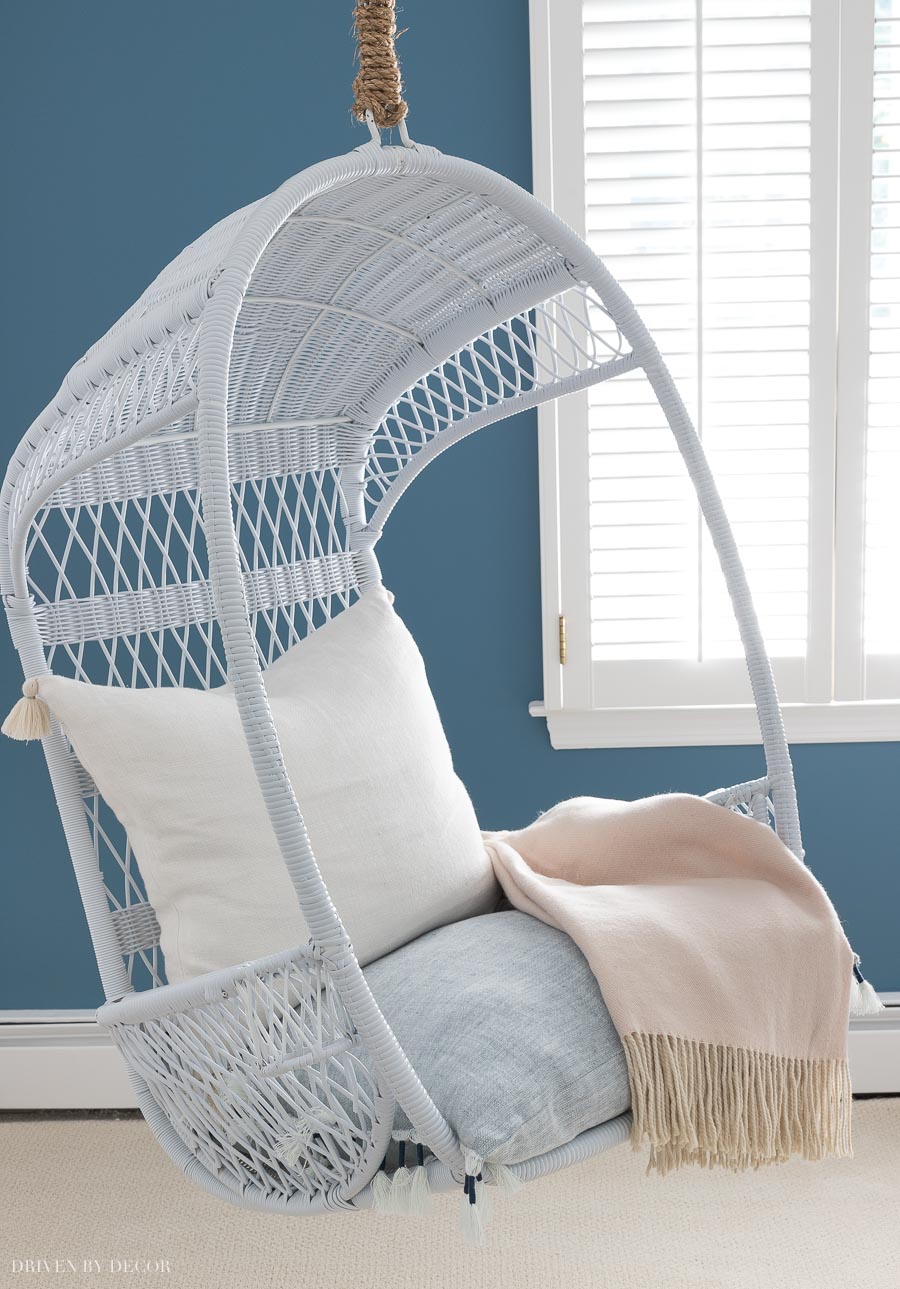
The blue tasseled pillow used as a chair cushion and blush throw also add to its new look.
Choose Small Accents for Painting Complementary Colors
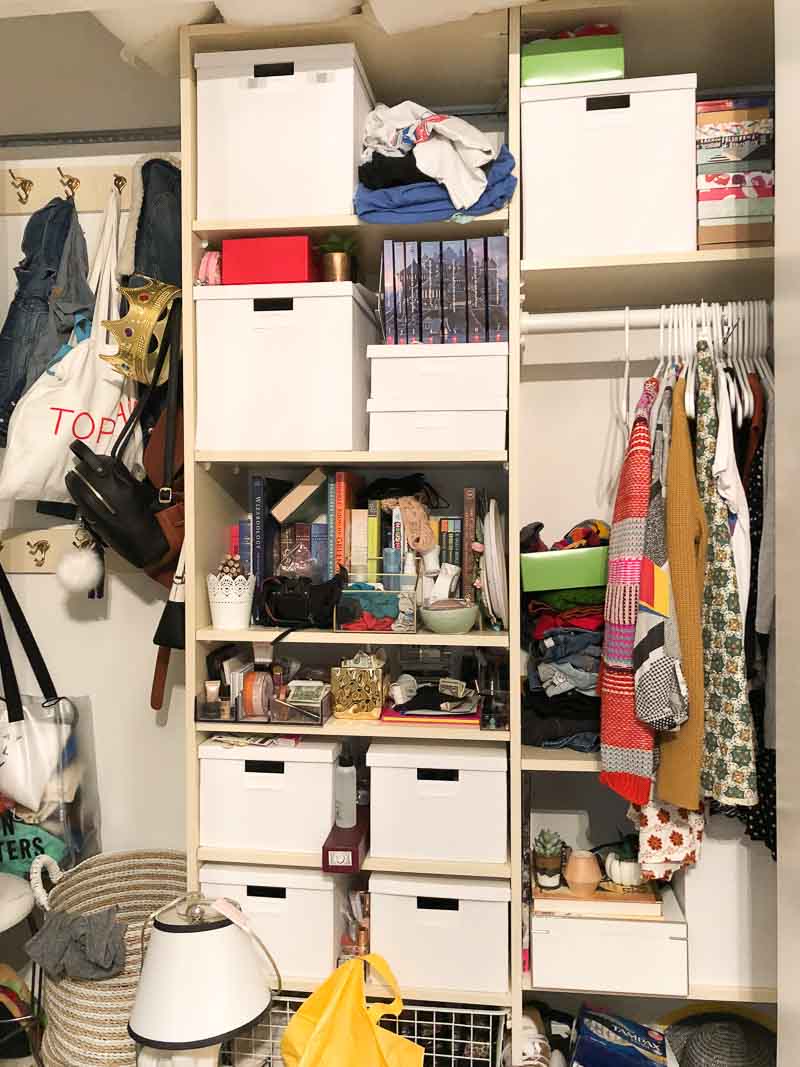
We even tackled my daughter’s closet! We were lucky to inherit nice closet organization systems in both of my girls’ closets that add great storage and functionality but they didn’t look so pretty – they were that ratty beige color from the ’80s:
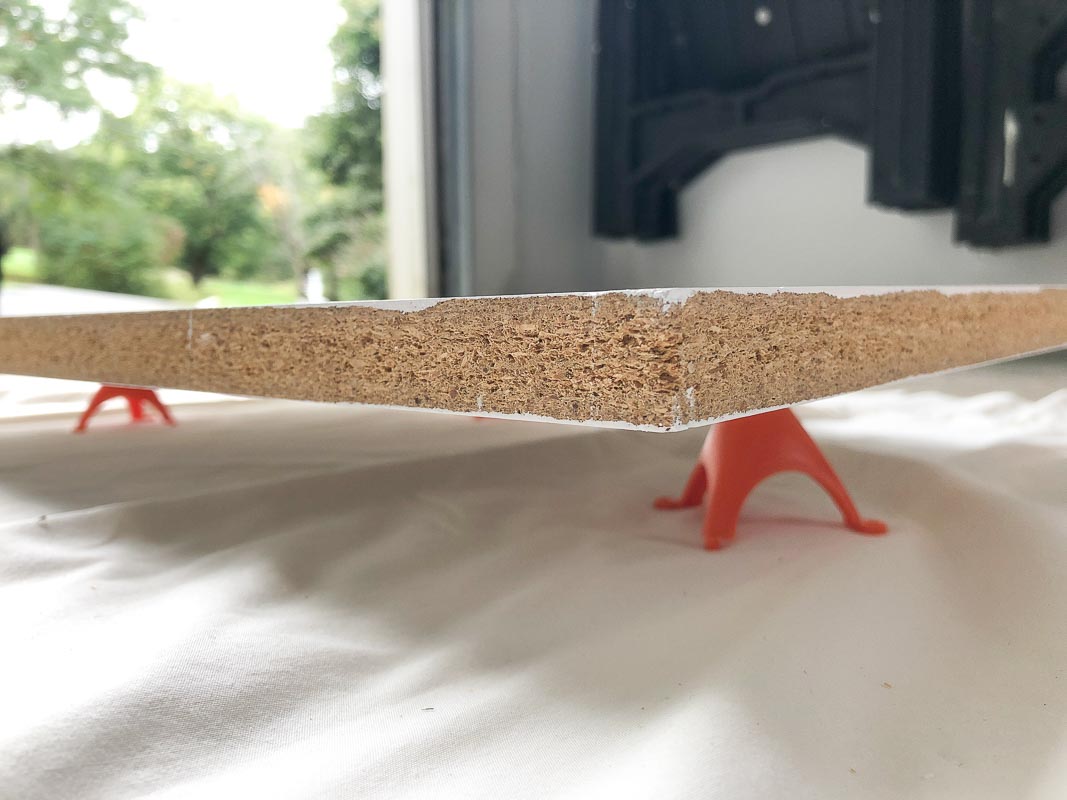
Just like with my daughter’s dresser, I used paint to give her closet a newly refreshed look! I took the same exact steps including prep, priming, and painting with Behr’s White 52 in Satin. I painted everything in place except for the shelves which I removed and painted on my folding table. After painting one side of the shelves, I let them dry for a day and then flipped them over resting on {these painter’s tripods} so I could paint the other side:
With a fresh coat of paint, this is what my daughter’s closet looks like today:
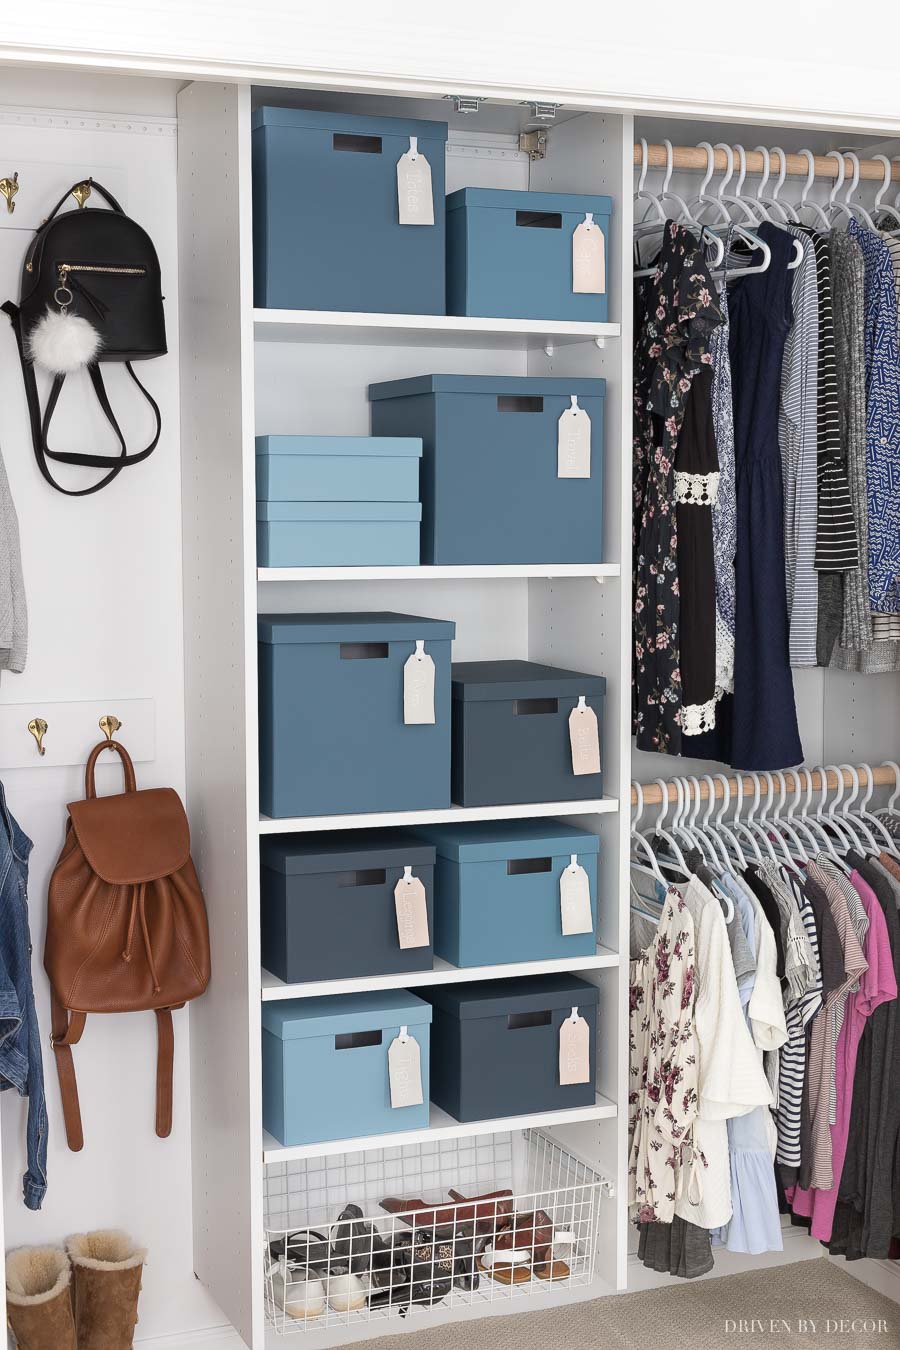
So much better! I also added a second closet rod so she could have two rows of hanging clothes and did something kind of fun with her storage boxes too. She had several of {these} inexpensive boxes that I painted in four shades of blue from the color strip that Behr’s Blueprint is on. No prep or priming on this one! I simply rolled on one coat of paint (which covered amazingly well) and they were good to go!

The four colors I used from darkest to lightest are Behr’s Undersea, Shipwreck, Blueprint, and Dolphin Blue:
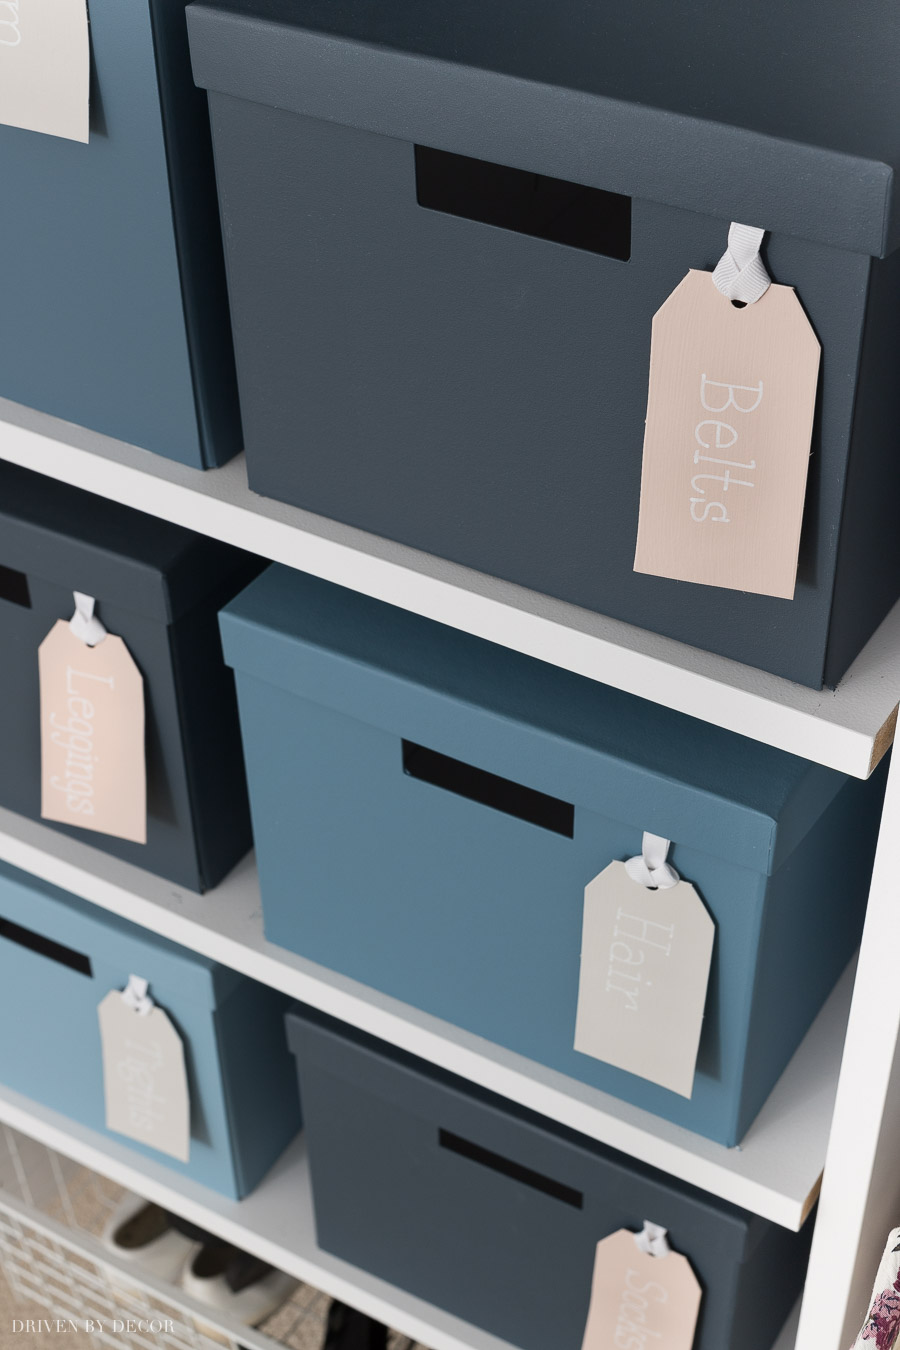
I even brought in the blush and neutral tones we used in the rest of the room by painting cardboard tags with Behr’s Sand Dance (the blush) and Cotton Grey (the neutral) and writing the contents of the boxes on the tag with a chalk pen. I looped ribbon through the top and taped the ribbon to the inside of the box to keep the tag in place. Both cute and functional!
Phew. That was a lot of work to get done in just a couple of weeks but so so worth it to see my little one so happy with her new space!

I hope you all enjoyed the tour of her newly refreshed bedroom and are inspired to kick off a project of your own! Check out my post on kids room decorating ideas for more inspiration!


