Thinking about a kitchen remodel? I’m sharing our kitchen cabinet design including brand, finishes, and all the extras!
Several of you have told me that you have plans for a future kitchen remodel but don’t even know where to start. I hope that by walking you through my entire kitchen design and renovation process from start to finish, it will make it that much easier for you to plan your own renovation down the road. With our kitchen, everything started with our kitchen cabinet plans so today I’m sharing all of those details with you!
There was a lot of work and thought that went into arriving at our final design plans:
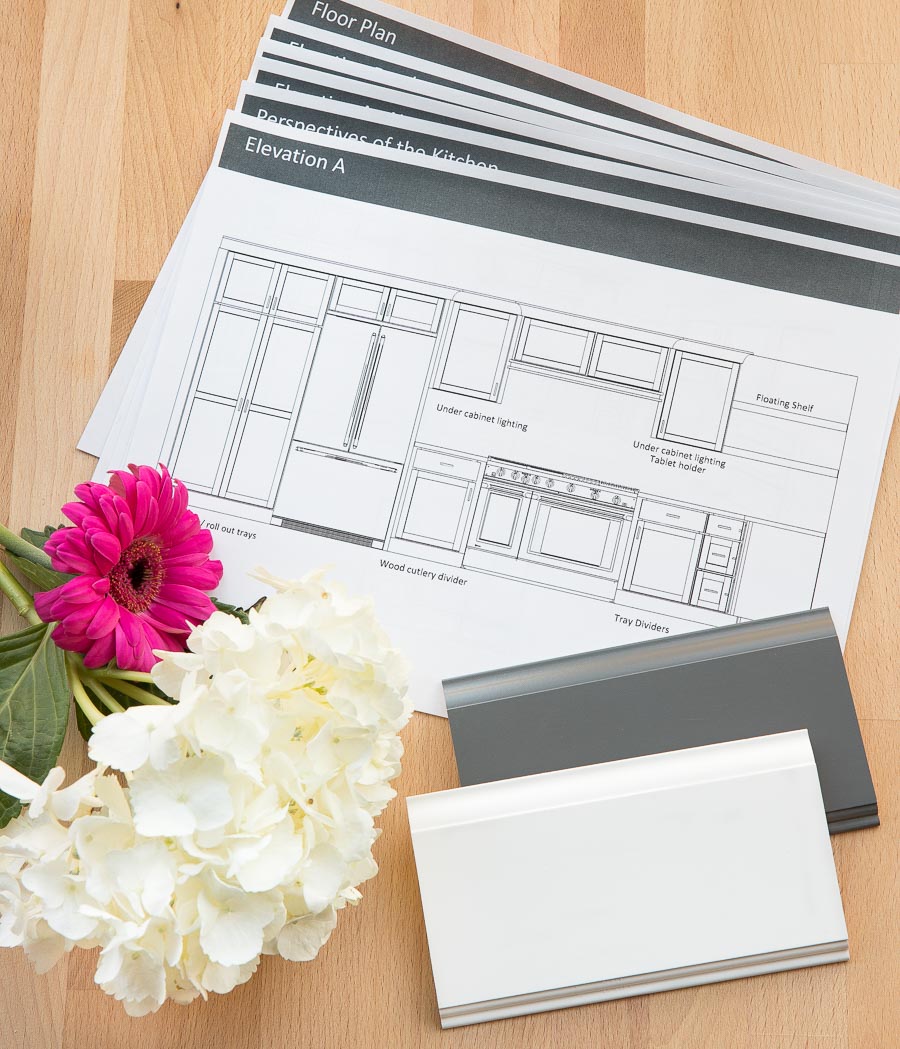
But it was so worth every minute, because our kitchen ended up EXACTLY like the vision I had in my head:

If you haven’t seen it, after reading about my cabinet plan in this post, hop over and check out my kitchen reveal post {here}!
Choosing a Brand of Kitchen Cabinets
Cabinets are a huge chunk of most kitchen remodel budgets and not something that you’re likely to change again for a long, long time so choosing the right brand of cabinets is important. And overwhelming! A good first step before jumping into cabinet shopping is to figure out your cabinet budget and whether that translates to looking at stock cabinets (such as cabinets on the shelves at home improvement stores), semi-custom cabinets, or custom cabinets. Also, make a list of what cabinet features are most important to you.
My main cabinet must-haves were a semi-custom line with the option for all plywood construction (vs. less durable particle board), good interior cabinet organization and storage solutions, and a nice palette of color stains and paints to chose from. My old kitchen rated high on the scale of dysfunctional spaces so features like this paper towel cabinet where I would not only have a pull-out can for my trash but also one for my recycling AND a spot for a paper towel roll had me drooling!
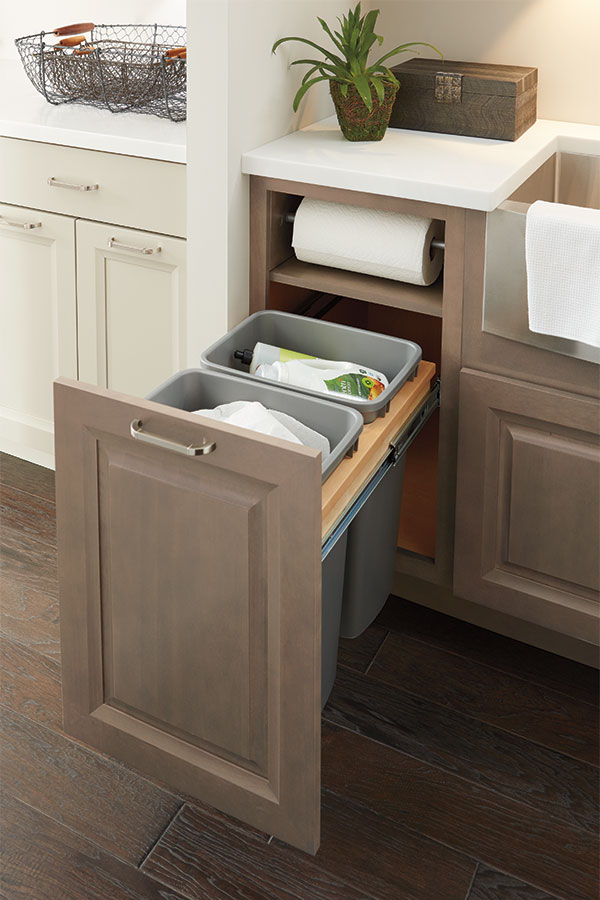
Diamond Cabinets: Base Paper Towel Cabinet
Once I had a good sense of what I was looking for, I asked anyone and everyone in “the know” about cabinet brand recommendations. While the advice of friends is always helpful, reaching out to contractors who frequently remodel kitchens along with interior/kitchen designers who have worked on lots of kitchens is key. I was lucky enough to be attending a conference early last year with several interior design friends so you can bet that I picked their brains not only about cabinets, but countertops and appliances too! I found that several of the brand names recommended to me (KitchenCraft, Decorá, & Diamond) all linked back to the same parent company, MasterBrand Cabinets. I also asked my contractor who recommended that I look at Schrock cabinets because he had a great experience with them and chose them for his own home and I found myself right back on MasterBrand’s website yet again.
So I dove into exploring MasterBrand Cabinet’s different lines and used their tool to select a budget and then compare the features of their different brands. Their Diamond cabinets seemed to be the perfect fit for me since they had all of my must-haves without any expensive extras that I didn’t need. After making my decision to go with Diamond cabinets, I reached out to MasterBrand about partnering with me on my kitchen remodel and was so excited that they loved the idea of working together.
My next step was to get a kitchen designer involved, which often occurs through the store where you’re planning to purchase your cabinets. A few of my friends (and even my husband!) were surprised hearing that I was going to be working with a kitchen designer on my renovation since they thought I would just do it on my own but designing a kitchen is an entirely different thing than decorating a room. Mistakes in a kitchen design can mean lots of extra time and money and I wouldn’t dream of doing a remodel without working with an experienced kitchen designer. It doesn’t mean that they take any design decisions away from you – they just take exactly what you want and translate it into the cabinet design that will work best for your space. I worked directly with one of MasterBrand’s kitchen designers and was sooo excited to share the plans that she came up with!
Choosing Cabinet Colors
Just like when you’re choosing paint colors for your walls, I found that the key to choosing finishes for my cabinets was to get finish samples to view in my own home. For stain finishes, the same stain can look quite different on different types of wood so be sure to keep that in mind (I liked all of the stains on maple and oak the best!). Going into choosing my cabinet finishes, I knew that I wanted to have white cabinets around the perimeter of my kitchen because not only do I love the look but I wanted to make sure I used a color that wasn’t too taste-specific since I have an eye on resale a few years down the road (and who doesn’t love white?!). There are about 1001 different shades of white out there but I didn’t need to go seeking anything custom because Diamond’s white color is perfect – not too cool or too warm.
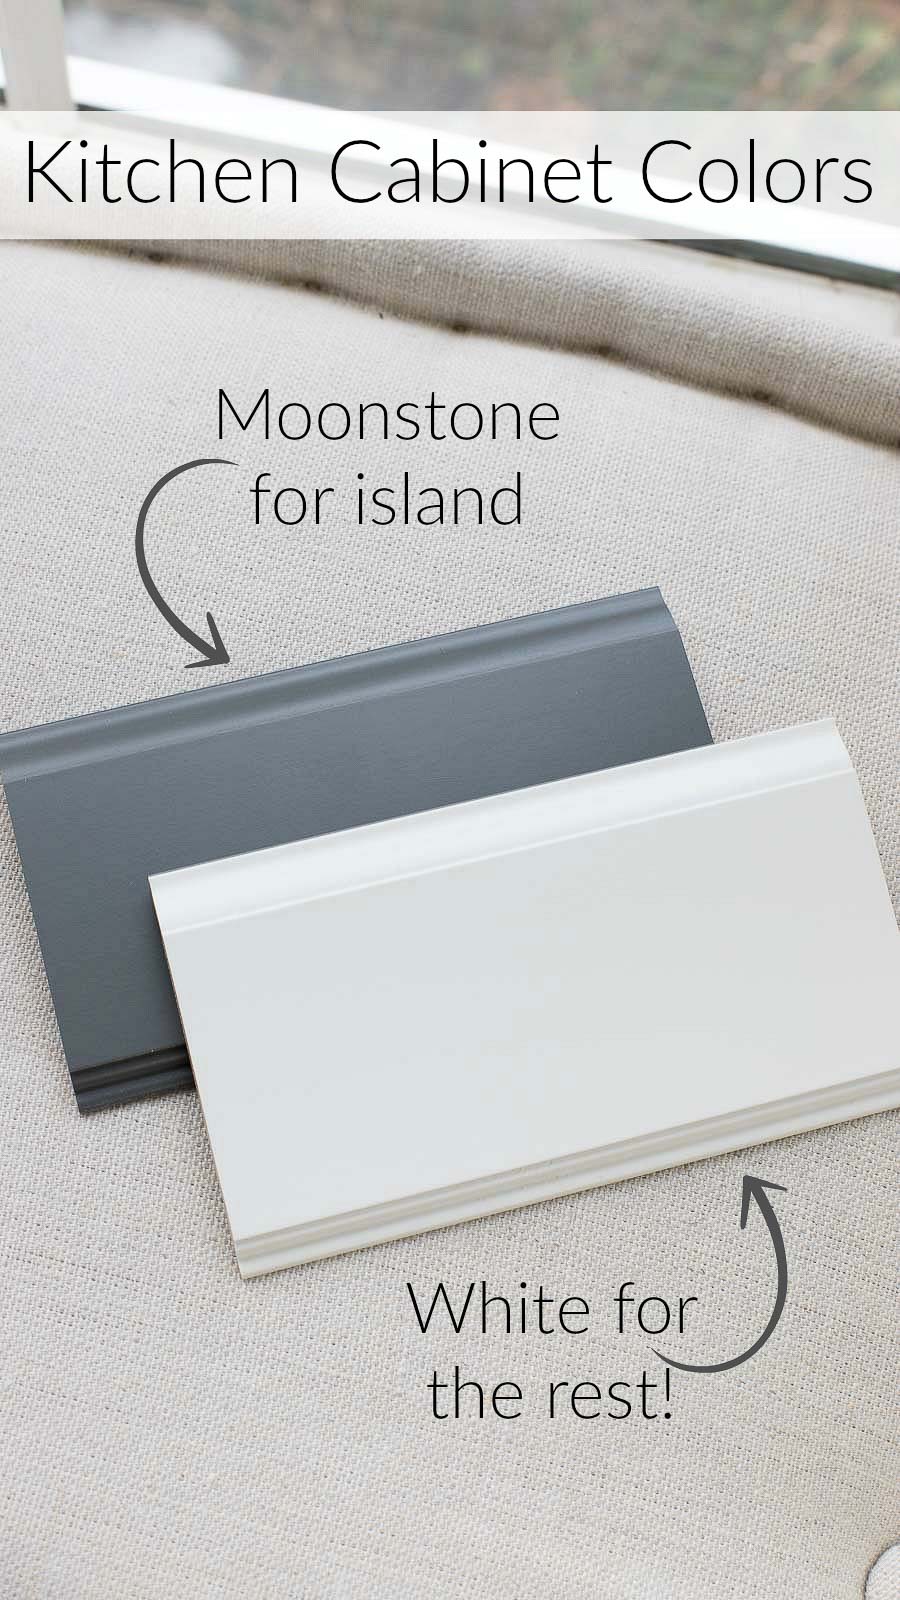
My decision for the kitchen island was a lot harder because there were so many beautiful options that would have been great choices. I love the look of a wood island and considered going with a wood stain but since our floors are going to be wood I decided that it might be a little bit of wood overkill. I thought that Diamond’s Seal (a gray stain), Morel (a midtone wood stain with just a touch of gray), and Storm (a charcoal gray/black stain) were all gorgeous so if any of you are looking for a beautiful wood cabinet finish, definitely check those out. For paint finishes, I loved Moonstone (a dark, rich gray), Cloud (a beautiful light gray), Egret (a light taupey neutral), and Maritime (a rich dark blue). The winner was… Moonstone! I LOVE this color so much and being the gray loving girl that I am, it will flow beautifully with the colors in the rest of my home.
Choosing Cabinet Door Style
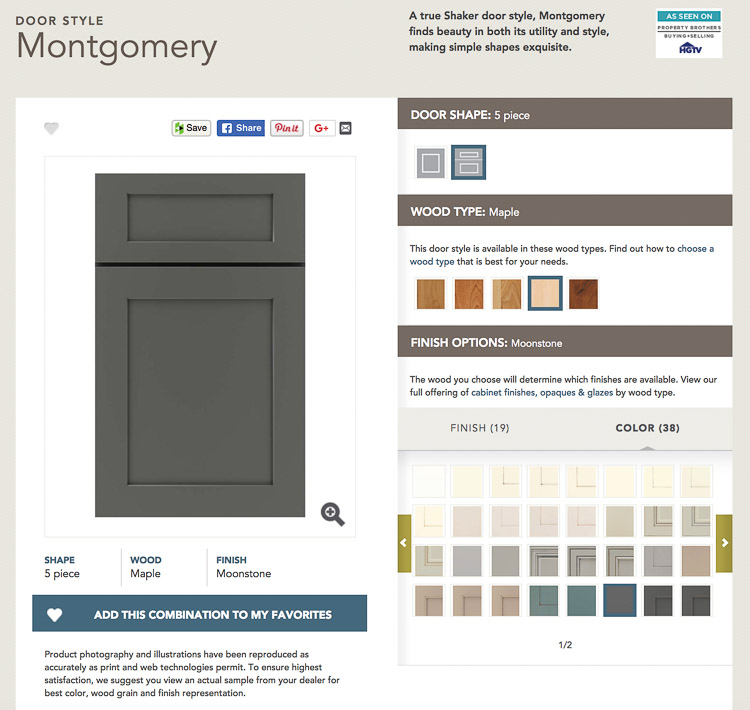
Next step… door style! There are a ton of different door styles to choose from which can be kind of overwhelming but this is where my kitchen designer was another huge help – I told her what I had in mind and she quickly narrowed it down to four or five that she thought I would like best. There is an online visualizer for Diamond cabinets {here} that I used to look at the final contenders and figure out which cabinet style I liked best. I wanted a simple Shaker design that would stand the test of time and the Montgomery door style was perfect:
The Kitchen Design / Layout
So now that you have the whole backstory of my cabinet choices, let’s get to the good stuff… my kitchen design plans! First off, the cabinet design plan for the long wall that my sink and dishwasher were on:
looked like this:
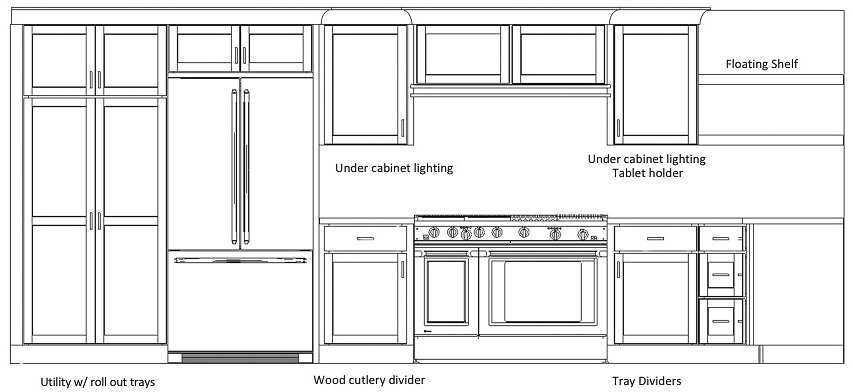
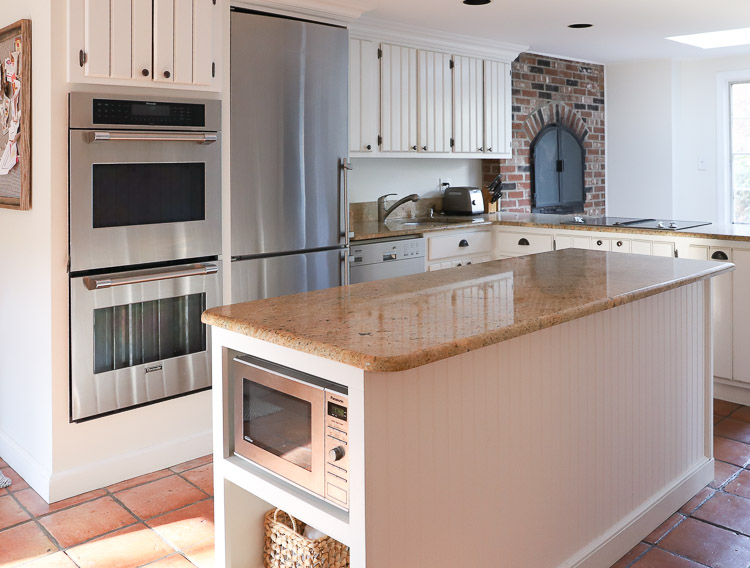
The space where the double wall oven used to be was turned into pantry space (the current pantry across the room will be demoed), my new range was planned for the current location of the sink, and the cabinetry extended all of the way down to the far wall of the kitchen since we’ve removed the fireplace. Up top we planned a combination of closed storage cabinets and open shelving (Diamond has open shelving options that match their cabinet colors and stains which is so nice!).
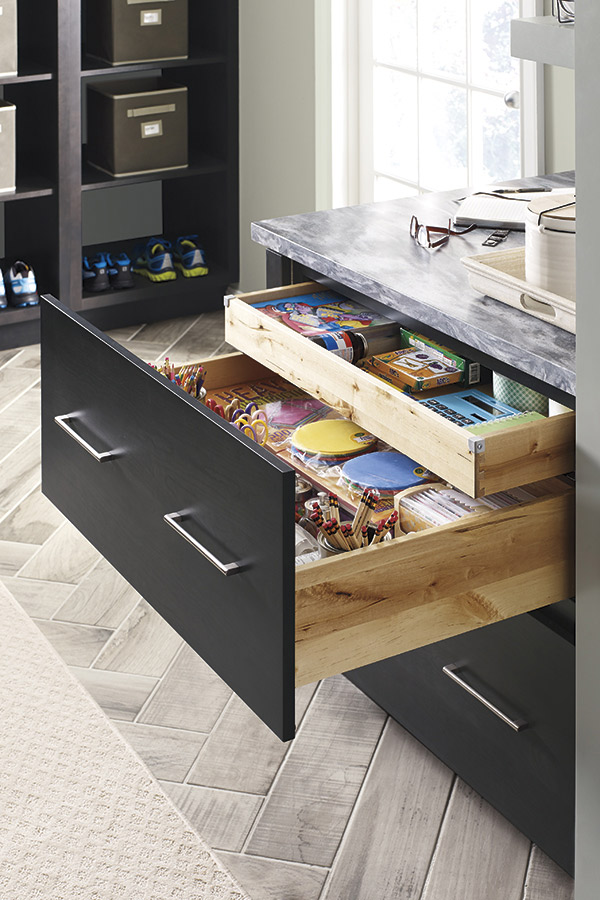
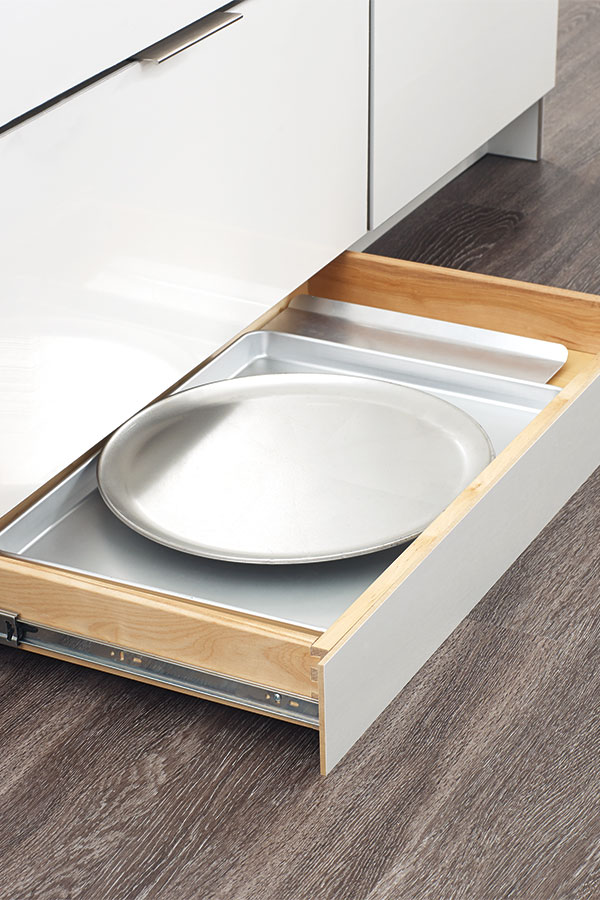
I was ridiculously excited about the new layout and how much more space I would have to work with since the kitchen fireplace was gone but what I was REALLY dying over is all of the cool features hidden inside of cabinets. In the drawer to the left of the stove, we planned to add a tiered wood cutlery divider to give me double the amount of storage for silverware. Then the base cabinet to the right of the range was slated to have tray dividers to hold baking sheets and cutting boards.
At the corner of our kitchen, we added base cabinets with {these pull-out corner drawers} – how clever is that?! So quick and easy compared to a typical difficult to access corner lazy Susan!
Want to save this post?
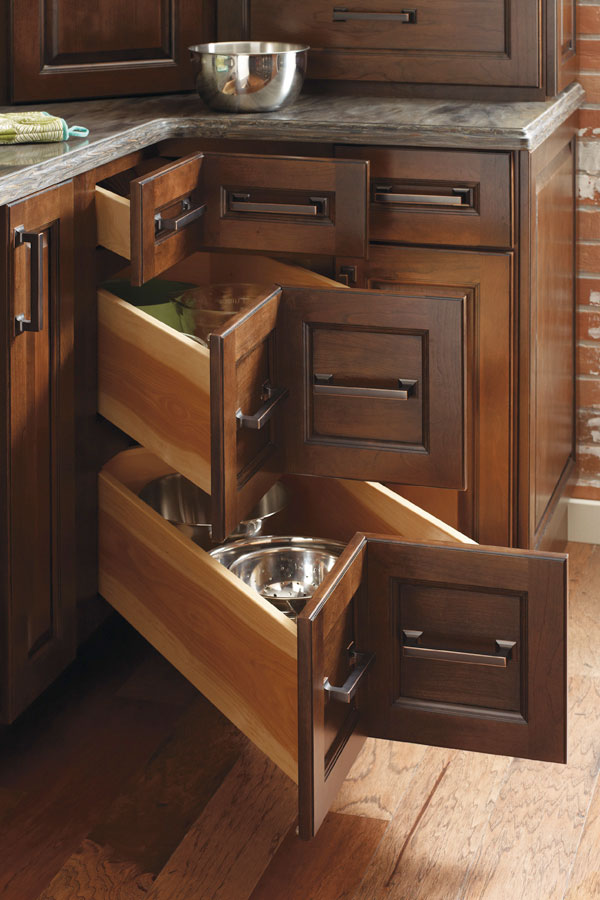
Diamond cabinets: Three Drawer Corner Cabinet
Then along the window wall that previously looked like this and had no cabinetry other than the narrow row of cabinets to the right,
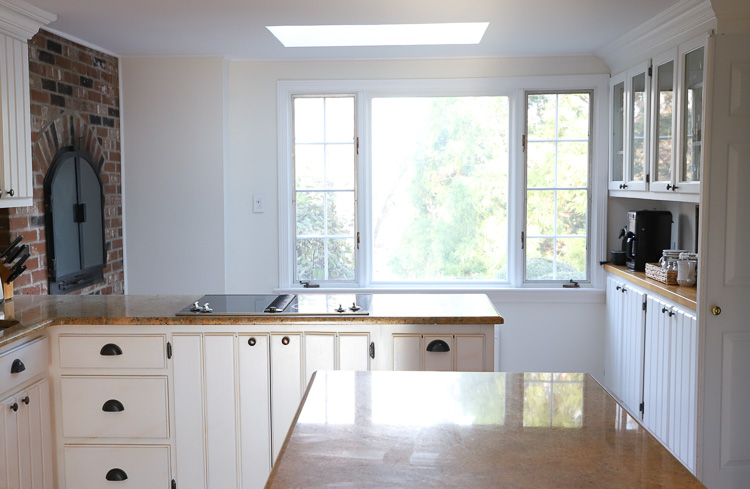
the cabinets were designed wrap around and run the entire length of the wall with my sink centered on a newly installed window:
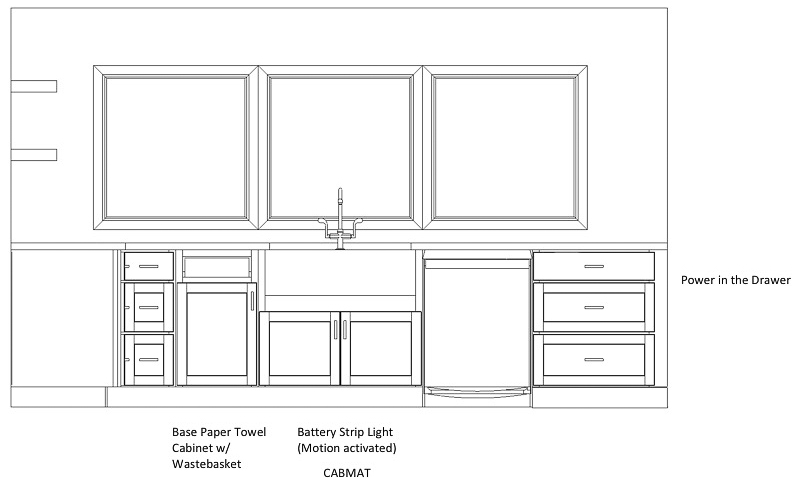
I can’t tell you how thrilled I was that my view while doing dishes was changing from looking at a wall to a beautiful one looking out our front window. And like the other side of my kitchen, my Diamond cabinets have some super cool features including the built-in paper towel holder above the pull-out trash cans that I shared earlier, {this outlet in the drawer} to the right of my dishwasher that’s perfect for setting up our new family charging station for our phones and iPads:
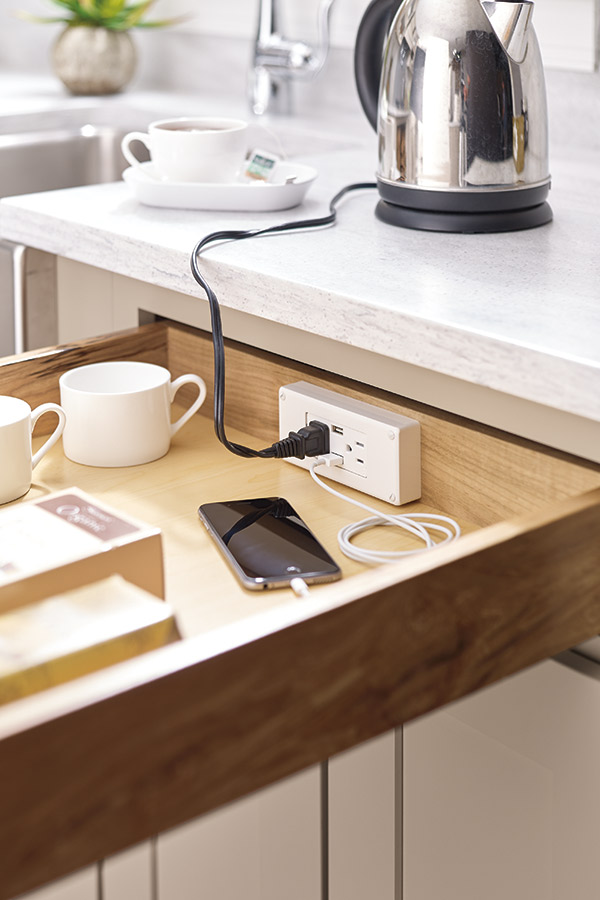
Diamond Cabinets: PowerGlide Cabinet Drawer Outlet
a protective Cabmat that covers the bottom of the cabinet under the sink to protect it from spills and leaks, and battery sensor lighting that illuminate the interior of my cabinet when the doors are opened. No more reaching into a dark hole for cleaning supplies!
And talk about black holes… in our old island island I had pots and pans precariously stacked Jenga style in the front while others were in the dark reaches of the back where I had to pull out half of what’s in front to get anything out:
My new kitchen island was designed to be ALL drawers (thanks for that advice you guys!) and it is heavenly being able to pull out a drawer and easily grab what I need!
And while I was originally worried about losing the long shallow top drawer that I always used as a sort of desk drawer to hold paper, coupons, pens, etc., Diamond had the perfect solution – {this two drawer base cabinet} has a shallow roll tray nested within the top drawer:
Diamond cabinets: Two Drawer Base Cabinet with Roll Tray
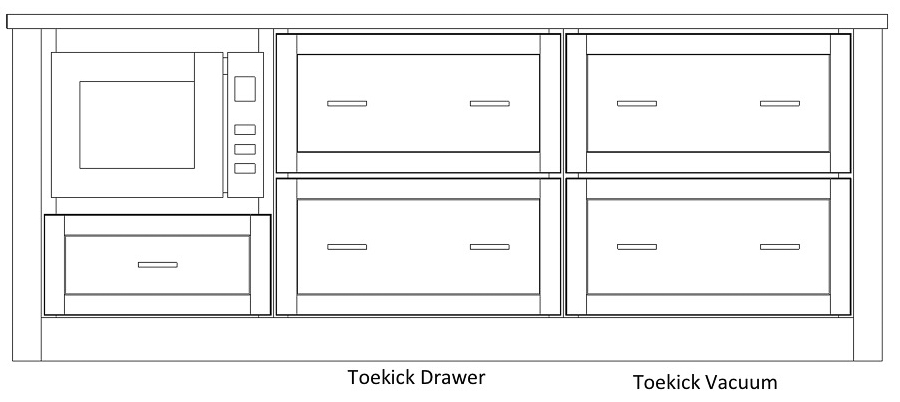
I also loved that I’ wase to put pretty much every square inch of my island to work by adding some cool features to the toekick of it. Under the middle stack of drawers, we added {this toekick drawer} that opens with the tap of your food and is perfect for holding some long, shallow trays:
Diamond cabinets: Toekick drawer
And under the stack of drawers on the right, we added {this Toekick Vacuum}! You simply use your foot to turn it on and then you can sweep anything on your kitchen floor right into it!
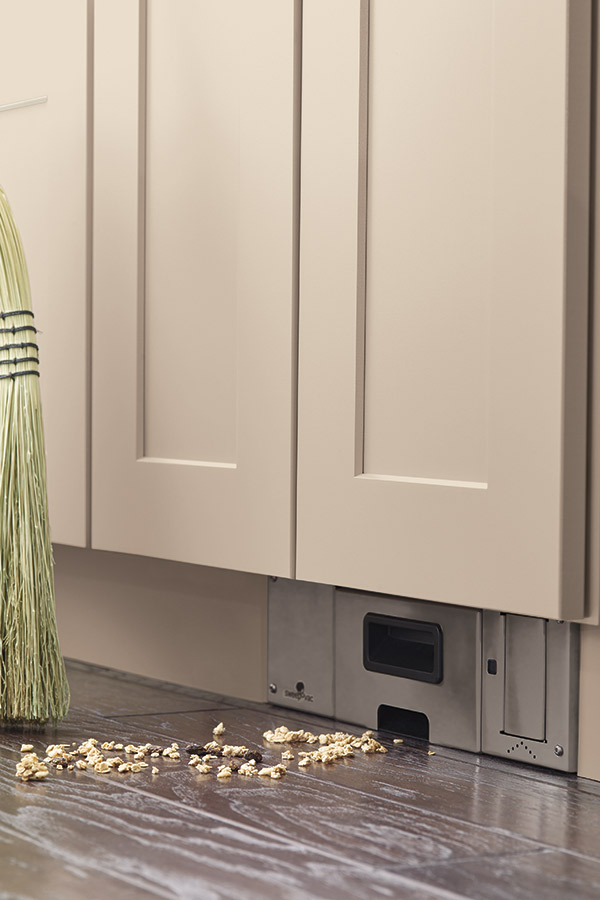
Diamond cabinets: Toekick Vacuum Cabinet
And it doesn’t require a central vac system or anything special other than a power source. How sweet is that?
I hope you’ve found this helpful! If you want details on some of our other choices for our kitchen, check out these posts:
Our Kitchen Flooring – Hallmark Engineered Hardwoods
And if you want to make sure you don’t miss any blog posts during the course of my remodel, be sure that you’re subscribed to my emails! It’s only about 2 posts per week and you can unsubscribe at any time – CLICK {HERE} TO SUBSCRIBE!
Thanks as always for stopping by!


Lina says
Hi Kris, your kitchen is stunning! I love following your blog. I’m redoing part of my kitchen and I want to ask you about your windows. Do they open? If not, do you have access to fresh air from elsewhere? I’m looking to put in openable windows. Any ideas how to get a nice clean look (like yours) and still allow them to open?
Kris Jarrett says
Thank you! Yes the two windows on the ends open while the one in the middle is stationary.
Linda says
I am so thrilled to find your site. I originally was looking for ceiling fan info, loved the site, then found your outstanding kitchen. I am going to be renovating my kitchen, which just happens to have the exact layout of yours. I do have one question, right now I do have a countertop between my fridge and stove, however I find I don’t have enough continuous counter space and had been considering moving my stove beside the fridge. Love the island set up, vacumn, paper towel and having a light under the sink, such brilliant conveniences. I love the look of yours, so now am undecided about moving it. Can’t wait to explore the rest of your site, thank you!
Kris Jarrett says
I think my preference would be to leave that bit of counter space between the two – I don’t like the look of a stove when it’s immediately next to the fridge…
Anonymous says
Pls provide me a design of kitchen..thanks
maura padula says
Thank you for sharing and inspiring us with this incredible renovation! Your choices are just swoon-worthy!. May I ask the approximate dimensions of your kitchen ‘rectangle’? I am starting to ponder my own kitchen reno and have a similar space. I will definitely incorporate some of your fantastic ideas. Thank you!
Keely Brewer says
Kris, stunning, just stunning. My husband and I just bought a tudor home that needs a SERIOUS remodel and our dream kitchen literally has the exact same footprint, look, and feel that you did in yours. It’s like you pulled the kitchen right out of my head. I have some questions for you (that most likely are better suited for a private message, like $$$) so that I can kinda get a better idea of where we are facing. Would that be ok?
Again, lovely job and looking forward to a chat 🙂
Scott says
Beautiful kitchen. What material and brand backsplash tile did you use?
Ty
Kris Jarrett says
Hi Scott – you can find details and links on the different tiles I used in the Source List at the end of this post: https://www.drivenbydecor.com/gray-white-kitchen-remodel/
Ashly says
Can you tell me the length of the wall that you have your fridge and range on? We are embarking on a remodel and this layout is exactly what we are wanting to do!
Mike says
Where can I find floating shelf’s like the ones your used for your kitchen ?
Kris Jarrett says
Ours were made from white oak we sourced locally – here are all of the details of how they were put together and installed: https://www.drivenbydecor.com/diy-floating-corner-shelves/
Alisha Kistenmacher says
We are just in the planning stages of a brand new gut job of our 1950’s kitchen! Your remodel had has been a huge inspiration for us! I don’t know if you mentioned this in other blog posts, but do you have a total cost of of this kitchen renovation? We have a pretty good budget but just curious how your renovation costs looks like just for comparison! What you thought the biggest splurge was for your kitchen and things you saved money on! Thanks for sharing! ?
Elite Cooker says
Amazing kitchen!! Exited to see your kitchen, specially the diamond cabinets are awesome… Thanks for sharing!!
Diana says
Such a beautiful kitchen! I’d love to know the dimensions to see if something like this would be feasible for us.
Kimberly says
Love your kitche reveal! It is great inspiration for our project. We are undergoing a similar remodel (including tearing down the strawberry/floral wallpaper with matching curtain!). Do you recall offhand the dimensions of your pantry? And the measurement of the walkway between island and counters/wall? Thank you!
Dana says
Hi! I’m remodeling my kitchen now with Diamond. Is that hood made by Diamond or is it custom? Thanks!
Kris Jarrett says
Hi Dana,
The hood was custom made since I have a larger than typical hood insert and lower than typical ceilings, Diamond didn’t have a standard hood to fit it.
Bridget Kapala says
Kris, I am begining a kitchen remodel and am also using Diamond cabinets. You mentioned the importance of getting samples. Could you tell me how you got your samples. When I when I emailed Masterbrand, they told me to go through a dealer. However, the dealer only has a few samples. How did you get your samples for stain or color?
Kris Jarrett says
Sorry for the late reply – I missed your comment when it came through! I worked directly with MasterBrand on this project so got my samples a bit differently than typically but you should definitely be able to get them from a dealer. The dealer should be able to order any that you need from MasterBrand to give or lend to you!
Joy Butler says
My husband is now in charge of the renovation of our house while I am assigned on researching what we need in the kitchen. I guess he should check this out as you’ve just shared a very helpful information. I’ll discuss this with my husband and see what he thinks. Thanks for the great tips!
Vickie says
Can’t wait wait see the final reveal. Love your present kitchen so know the new one will be dynamite.
Kris Jarrett says
Thanks Vickie!