You guys have been asking for a post with tips on how to decorate a Christmas tree with a designer look for years now and I’ve finally put one together sharing the step by step of how I decorate mine! Even years that I stick with simple Christmas decoration ideas, I like to go all out with my trees. I usually put up two trees including a family tree with all of our treasured ornaments plus a “pretty tree” that I have fun decorating with beautiful ribbons and ornaments.
I’m going to share the step by step of decorating one of our “pretty trees” but you can also use the same exact steps to give a new look to your tree with family ornaments! I’ve included lots of details so settle on it and let’s get to it… (post includes commissionable links; for more information, see my full disclosure statement {here})
Step 1: Choose Your Christmas Tree
Some of you might use fresh Christmas trees while others go with faux. You can use these same decorating steps for both! There are a ton of options for faux Christmas trees and I’ve had some disappointing ones in the past but also several winners. One must-have when I shop for a tree is to get one that’s pre-lit – it saves SO much time and your lights are perfectly spaced out.
If you have the budget for them, Balsam Hill trees are stunning! I have {this prelit 6.5′ Noble Fir tree} and think it’s absolutely gorgeous:
It’s nice and full, super easy to set up, and even up close the branches look quite realistic:
Balsam Hill is now also selling trees through Amazon with several that are Amazon exclusive and MUCH less expensive including {this Balsam Hill pre-lit foot tree} that’s about half the price and comes in various height options!
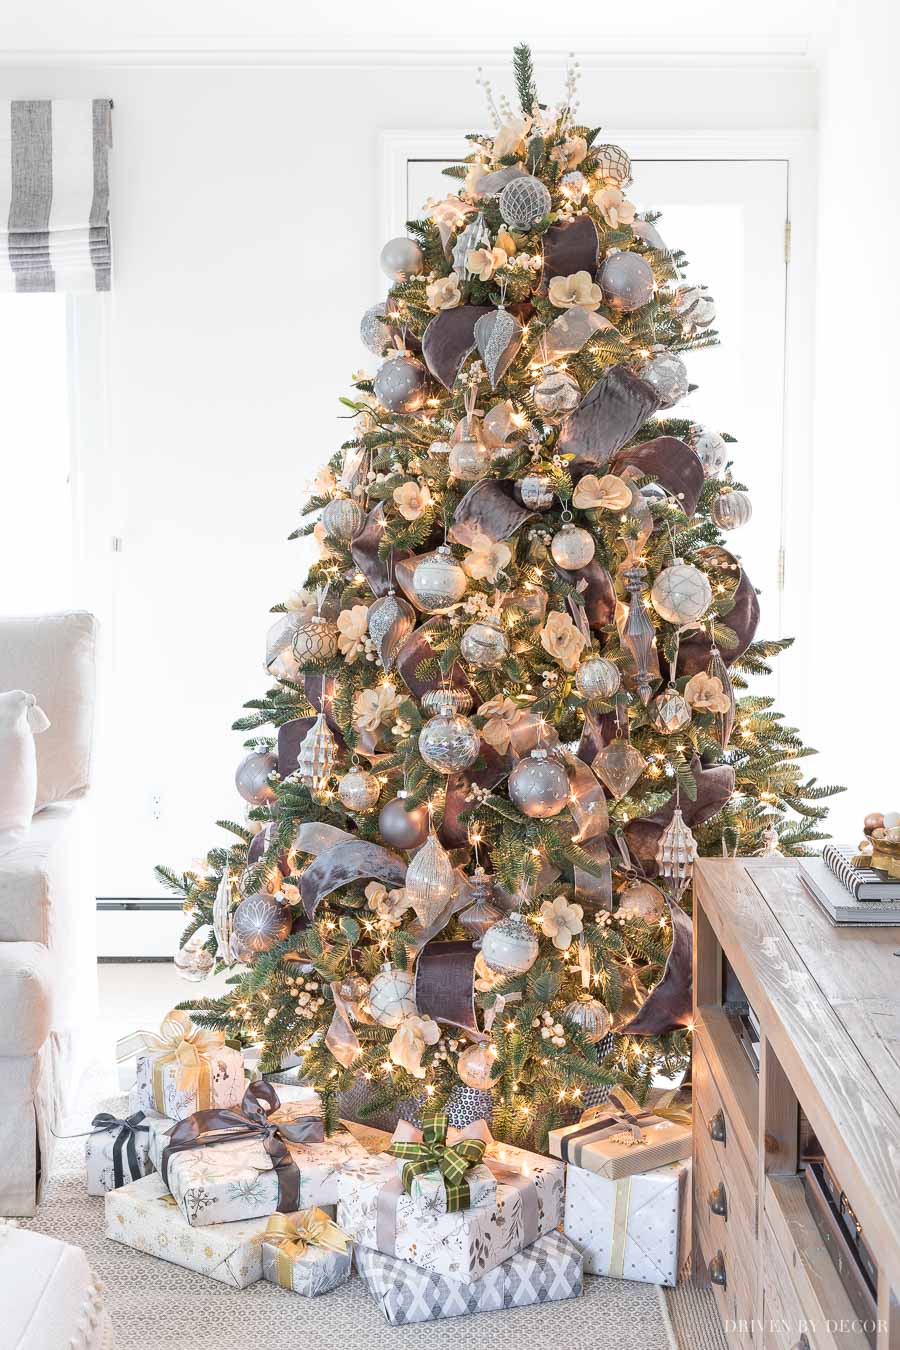
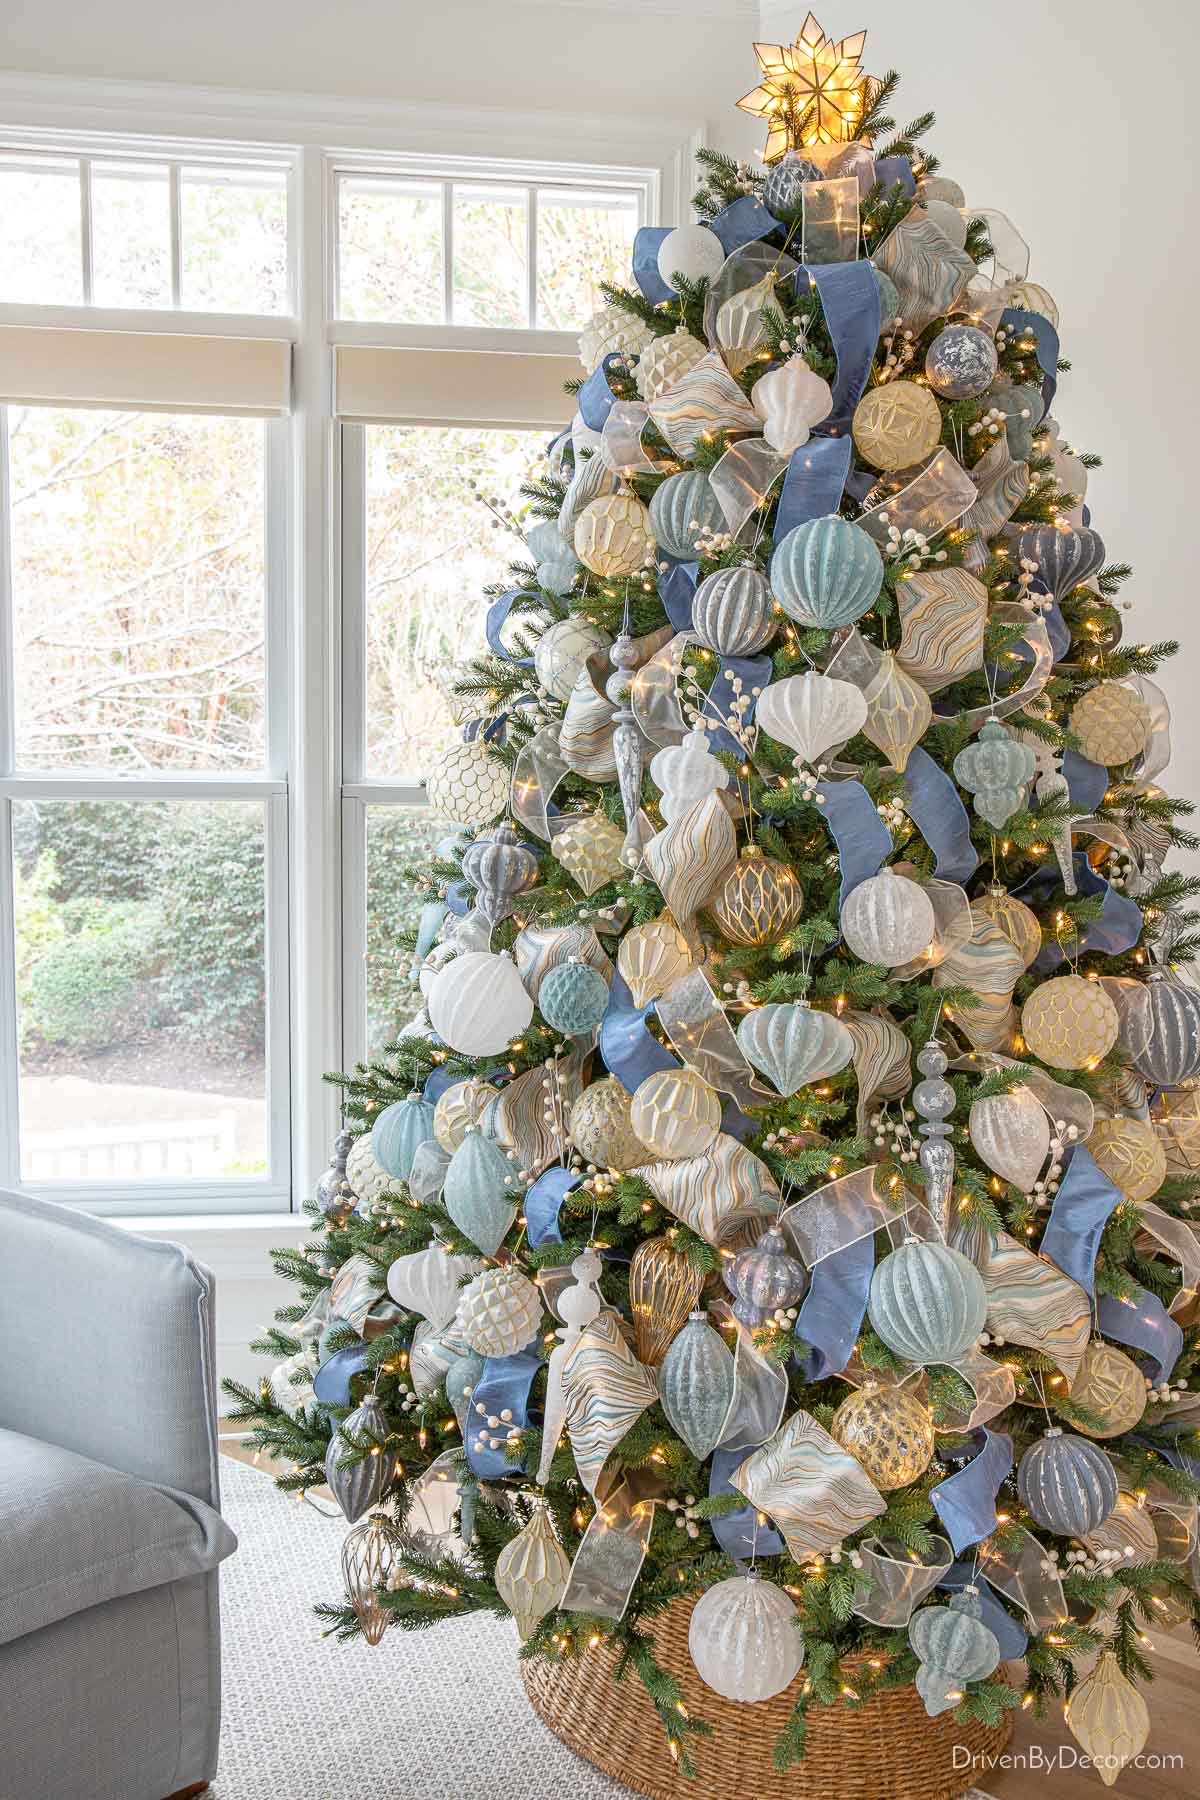
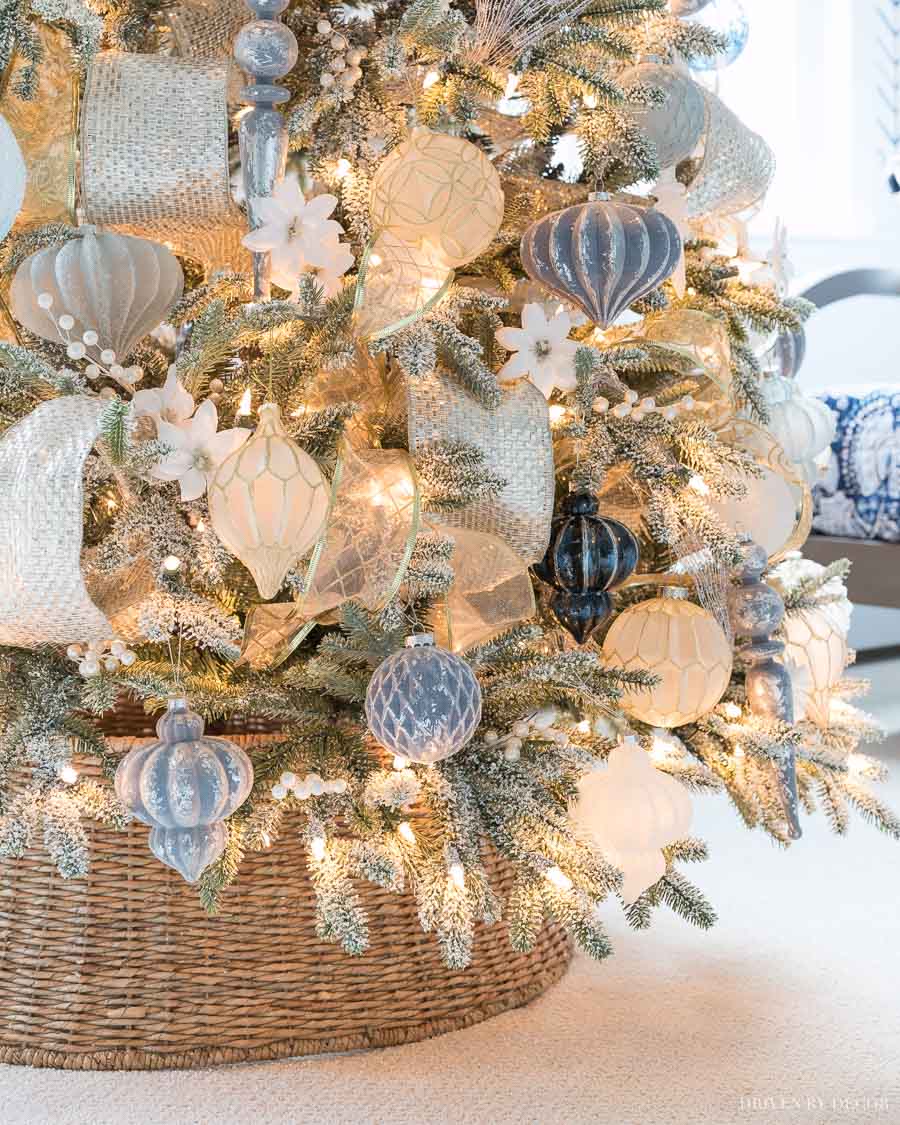
The other Balsam Hill tree that I have is {this 7.5′ frosted fraser fir} – it’s a bit more narrow than the other tree (which is what I needed in this space) and is flocked (covered in faux snow). Here’s a pic of it all decorated up:
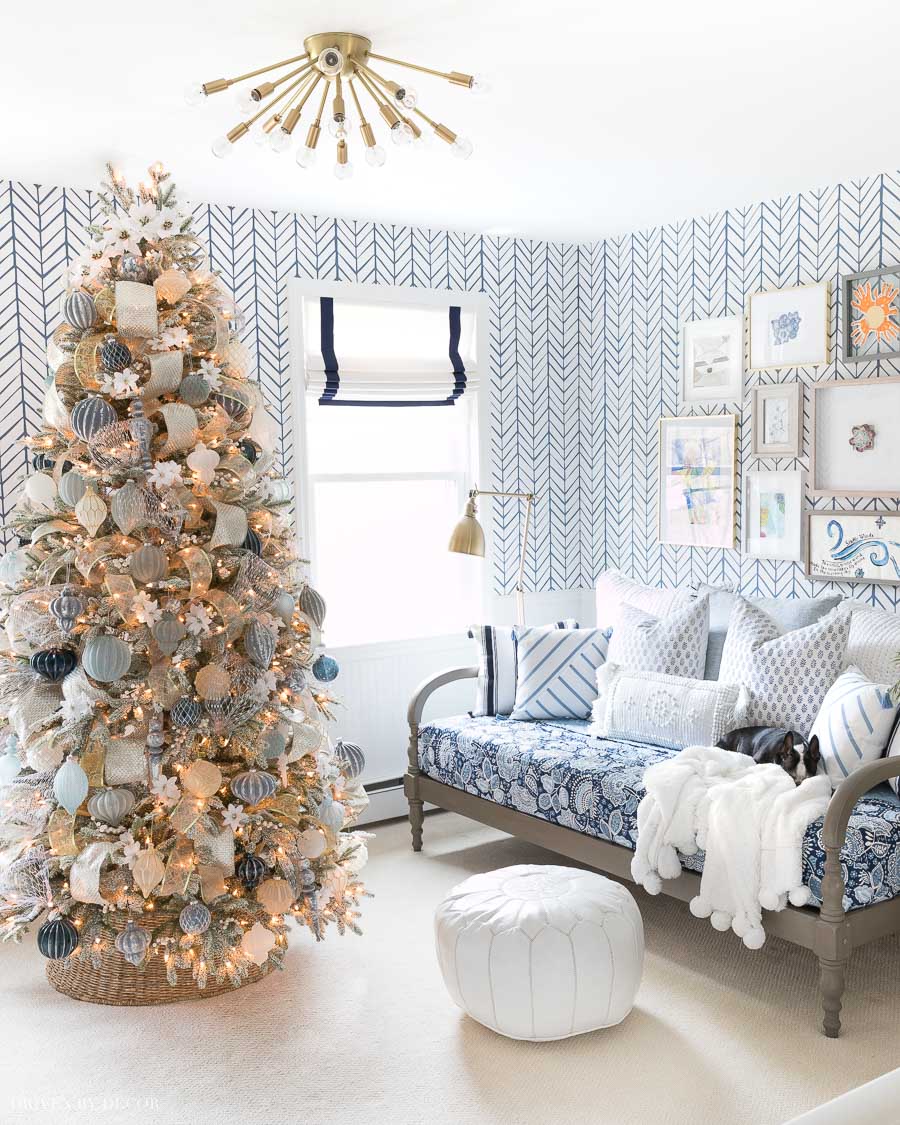
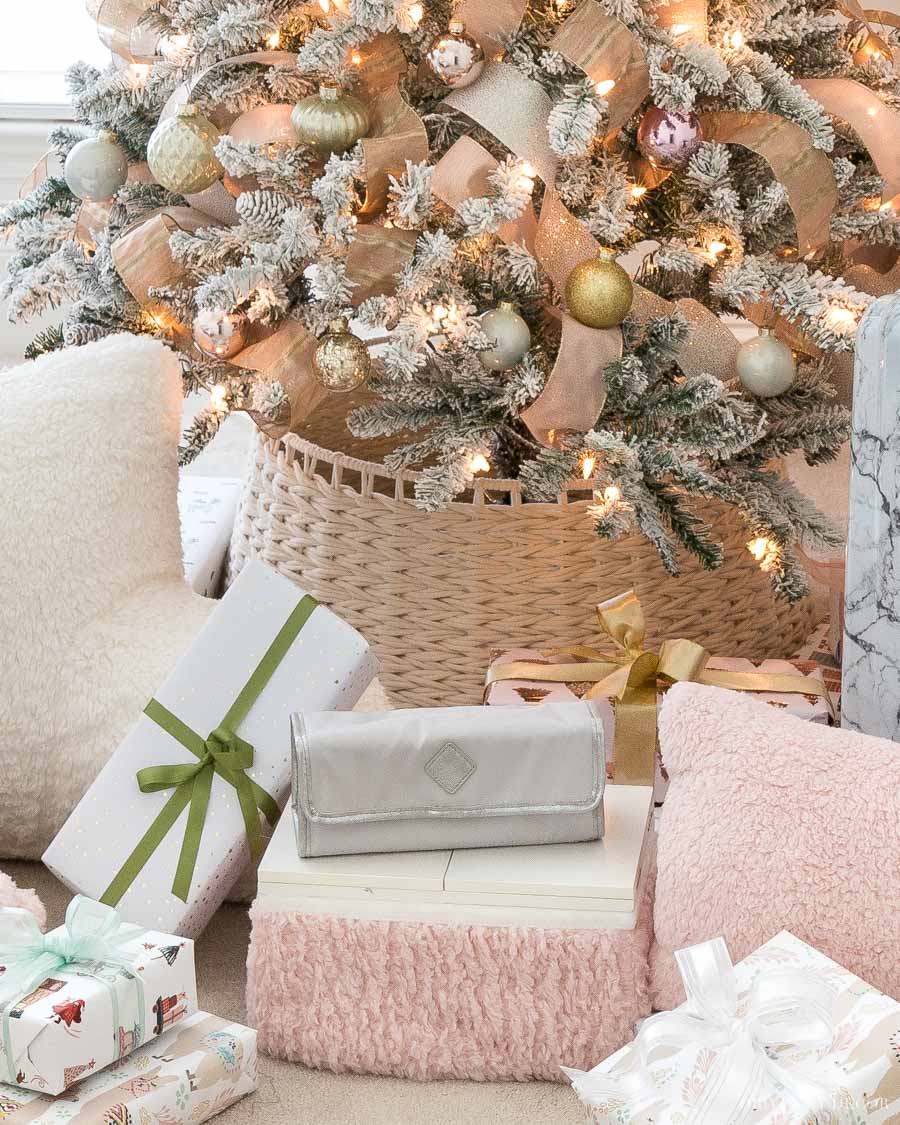
For a more budget-friendly option, {this snow flocked tree} (also available {here} without lights) is beautiful and full! I have it in the 7.5ft height but it comes in several other height options too:
Last year I put up {this tree} in our sun room (aka circus room) and it’s a stunner! It requires virtually no fluffing and looks great right out of the box:
It’s also a winner if your family has different opinions about white lights vs colored lights on your tree because you can choose either or a variety of light patterns including both.
Step 2: Put Your Tree Collar in Place
Do you use a tree collar or a tree skirt? If you have a live tree I think either works well (although I have had some people tell me it’s harder to water your tree with a collar which makes sense). But if you have a faux tree, I personally think a tree collar is the way to go because it covers the trunk of the tree which is the part of faux trees that I think looks the most faux.
The tree collars I’ve used include a white rope tree collar similar to {this one},
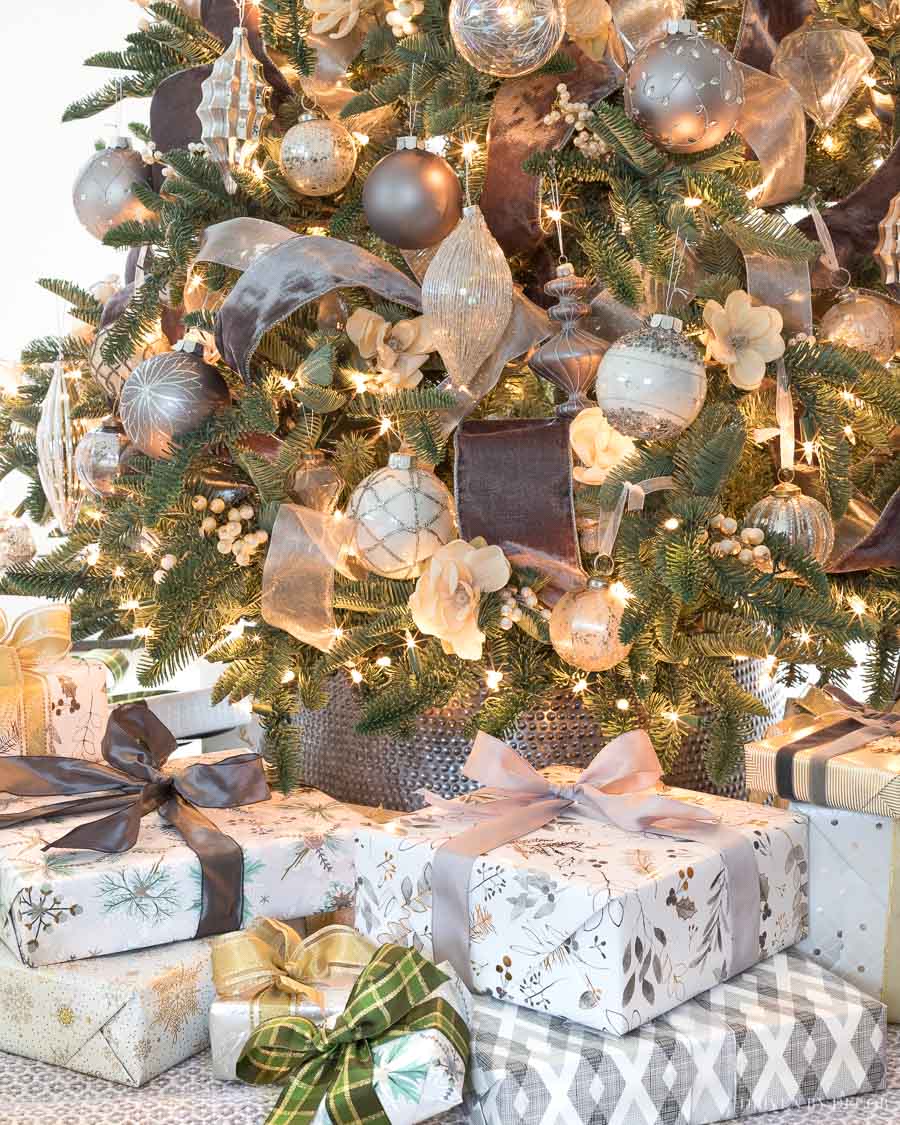
a hammered silver tree collar that I found at HomeGoods many years ago ({this tree collar} is very similar),
and a natural woven collar similar to {this one}:
When shopping for a tree collar just make sure it has a big enough diameter to accommodate your tree stand. You absolutely want to put your tree stand in your tree collar at the beginning of the decorating process before you do anything else! It will be near to impossible to get it over your tree stand once you have your tree in it!
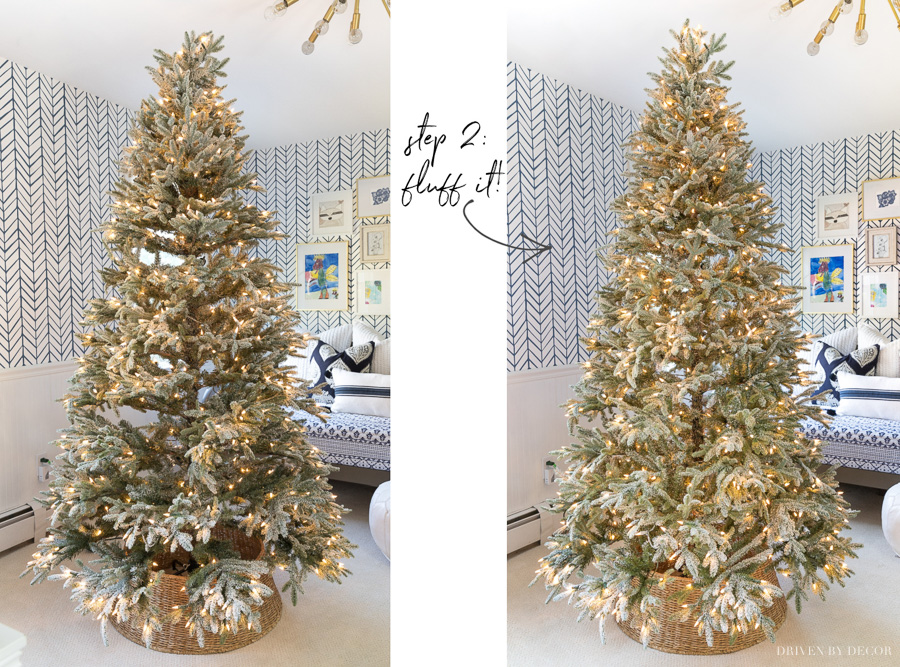
Step 3: Assemble Your Tree & Fluff
If you’re using a faux Christmas tree, the next step in how to decorate a Christmas tree is to assemble your tree and fluff the branches! For most trees, fluffing is a huge part of making an artificial tree look real and most people don’t take the time to do it.
Starting at the back of each branch simply fan the tips of the branches out, moving them straight up or to the side so that they all go in different directions instead of laying flat like they do when you take them out of the box. Separate the different layers of the branches a bit too. Take your time and work your way around your whole tree – it will be worth it!
My tree is one that looks fairly good right out of the box but you can still see what a difference a little fluffing made to make it look more full and fill in some of the gaps:
Once your tree is fully fluffed, add your strings of Christmas lights to it if you don’t have a pre-lit tree.
Step 4: Add Loops of Ribbon
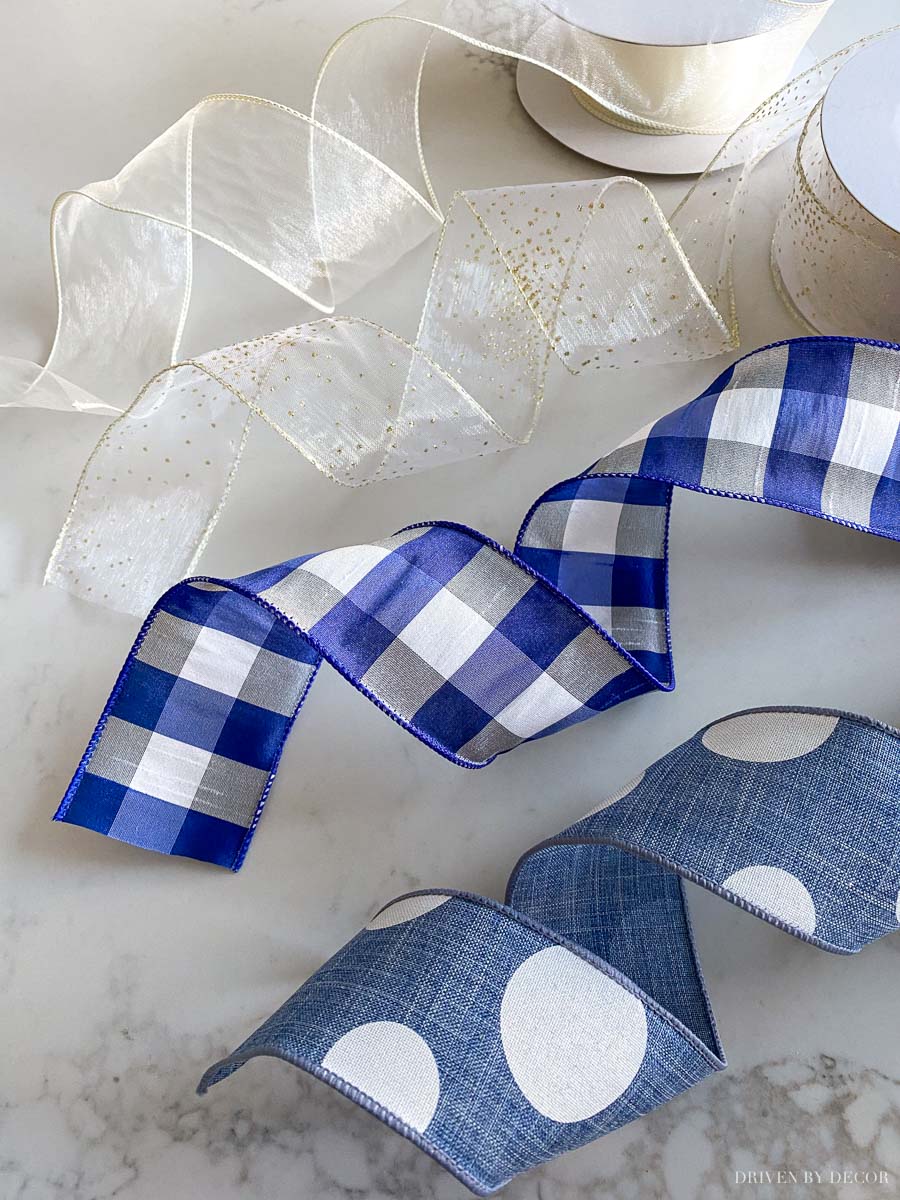
Adding ribbon to your tree is optional but it’s what will really make it a stand-out! Give it a try – it’s easier than you might think! First off, let’s talk about the type of Christmas ribbon to add – you want it to be wire-edged ribbon. This is important because it’s what allows you to shape it into loops that will maintain their shape.
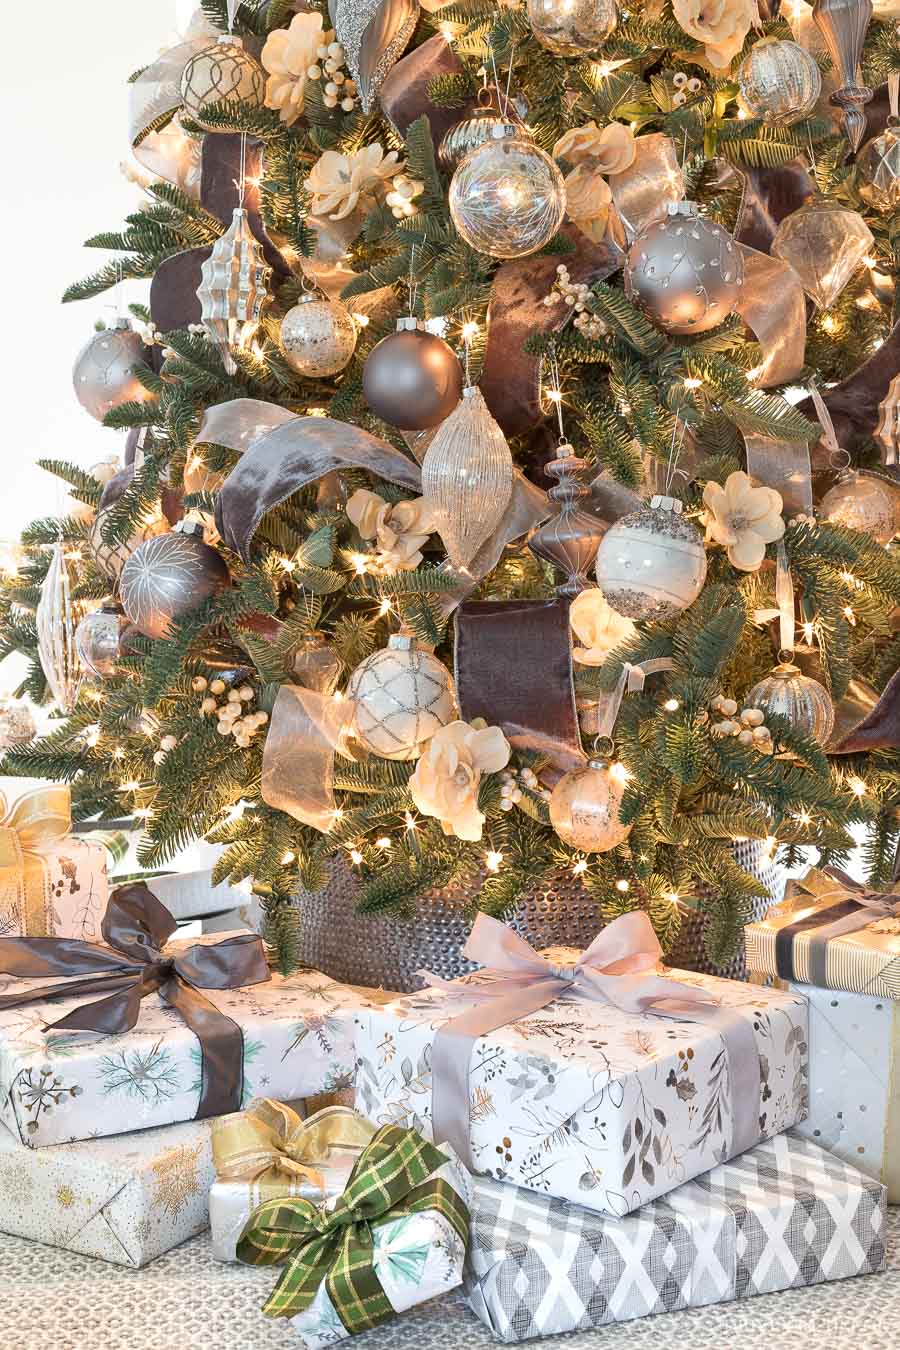
For ribbon width, I recommend ribbon between 2″ and 4″ wide – I use mostly 2.5″ ribbon. The wider the ribbon, the harder it is to work with so if you’re new to doing this you might want to stick with just 2.5″ ribbon the first time around. I also recommend a mix of opaque and sheer ribbon and that you go with a color scheme. I’ve tried everything from classic red and green to blue and white, rich gray velvet with gold and silver, and other combinations of colors and textures.
Here’s what I used on the tree I’m sharing in this post (you need more than you might expect but can reuse it from year to year!):
4″ silver basketweave ribbon (from Balsam Hill but no longer available) – about 15 yards
2.5″ blue & gray plaid ribbon found (no longer available) – about 28 yards (I bought three 10 yard rolls)
2.5″ denim polka dot ribbon similar to {this one} – about 28 yards (I bought three 10 yard rolls)
2.5″ gold mini dots sheer ribbon similar to {this one} – 25 yards (I bought one 25 yard roll)
2.5″ sheer ivory ribbon found {here} – about 30 yards (I bought one 50 yard roll)
You can get all of my favorite sources for Christmas ribbon {here} to find the prettiest ribbon for your tree, presents, wreaths, & more.
The order that I put my ribbons on the tree is from widest to narrowest. For ribbons of the same size, I add the opaque ribbon first, followed by the sheer. So for this tree, I added the 4″ basketweave ribbon evenly around the entire tree followed by the blue & gray plaid and denim dots and finally the two sheer ribbons:
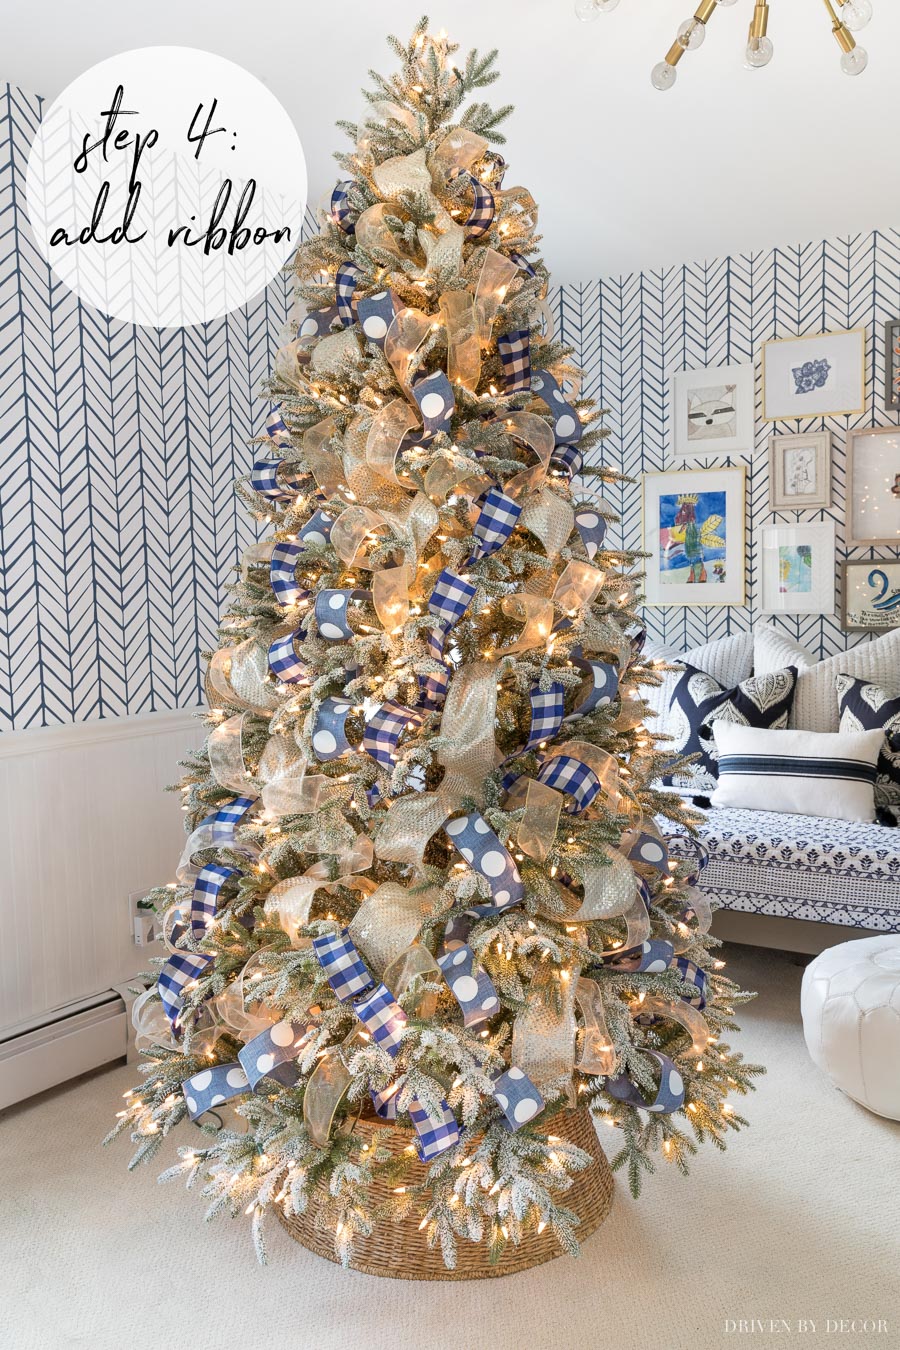
The ribbon might look like a continuous chain woven throughout the tree but it’s actually pieces of ribbon cut in strands. While you can definitely do it in one continuous strand, about four years ago my smart friend Kelley Nan gave me the tip to try smaller pieces and once I did, I never looked back!
I typically create 2-4 ribbon loops with each strand and generally do them at an angle instead of horizontally or vertically. Ribbon is great for covering any spots that are more sparse so I look for those when planning where to put it.
While putting my ribbon on our tree, I took pics to share the simple step by step of what I do. My first step is to plan where I’m placing my ribbon – in this case I planned to make two loops to help cover up these two gaps:
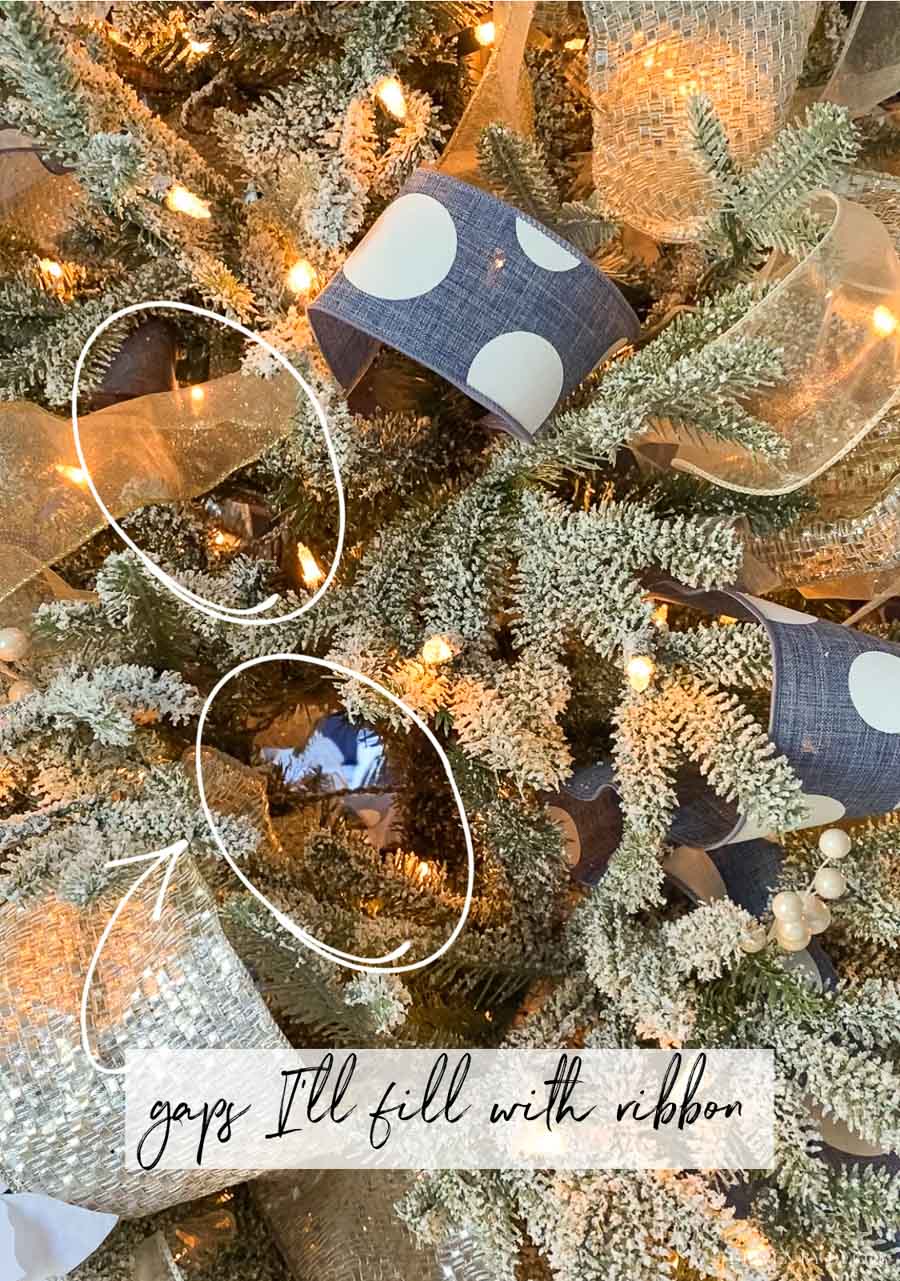
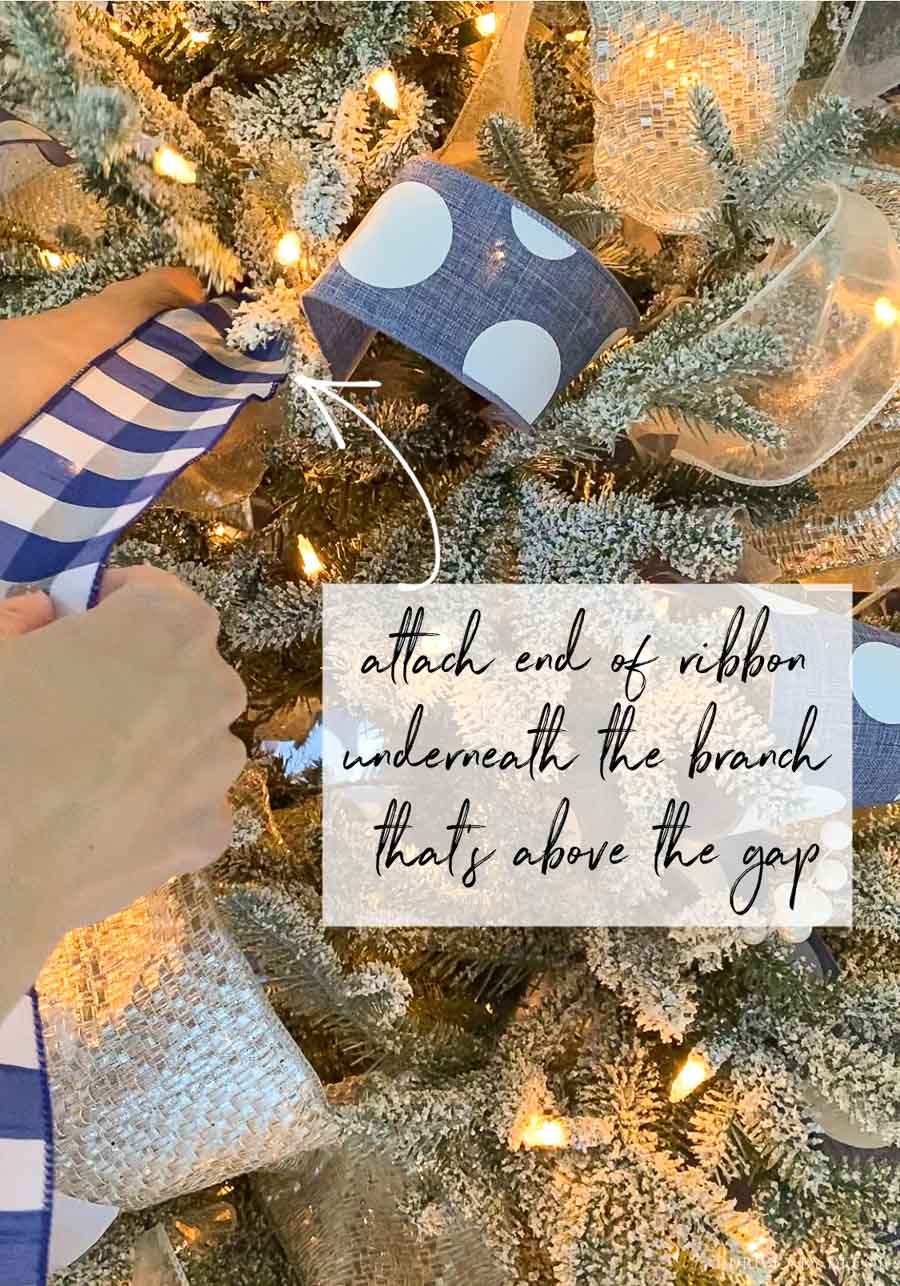
Leaving the ribbon on the spool, I attach the free end of ribbon to the underside of the branch above the space where I’m going to make my first loop. If you just wrap the ribbon around the branch and squeeze it together, the wire should make it stay put:
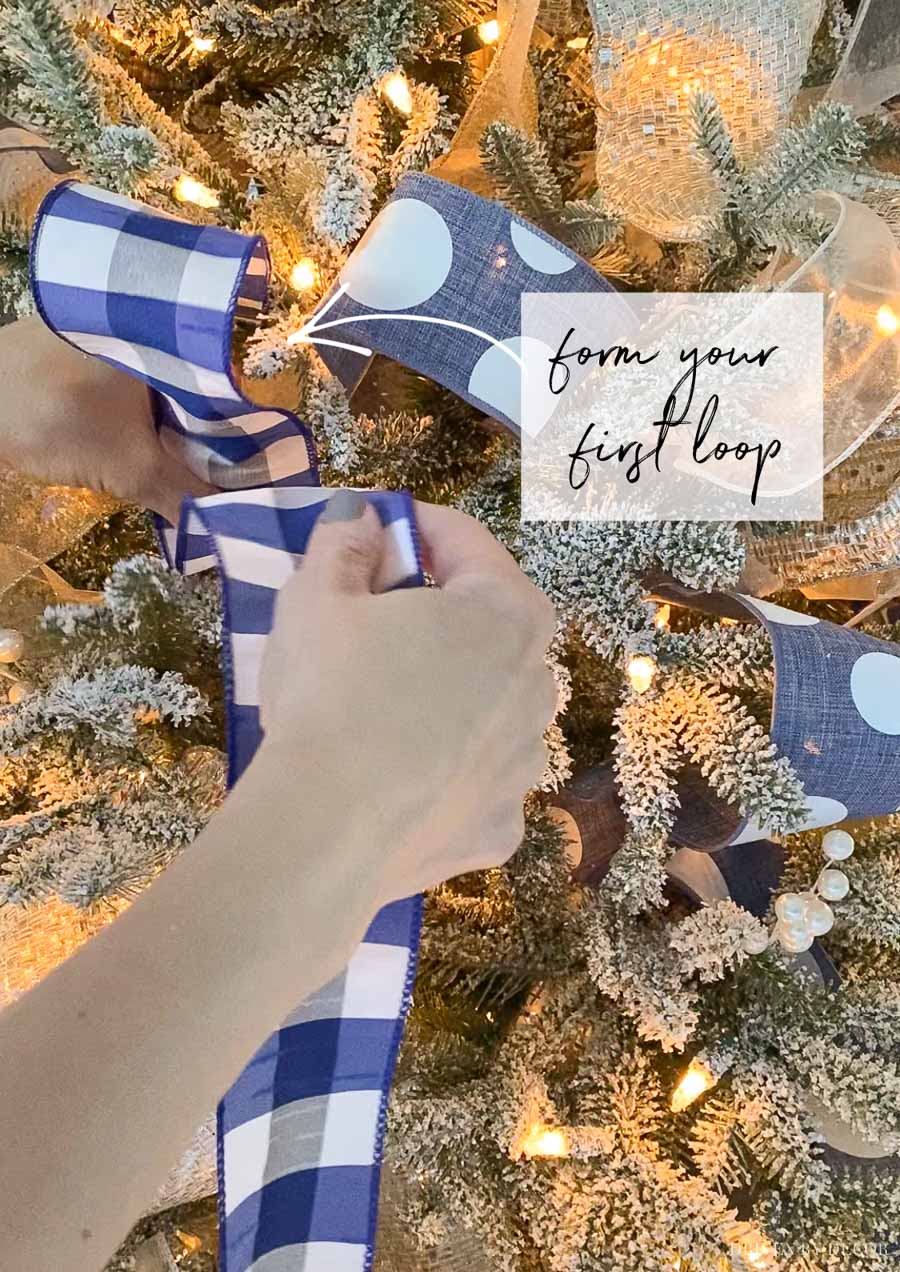
Then bring the ribbon out to form your first loop while tucking the remaining ribbon back into the tree:
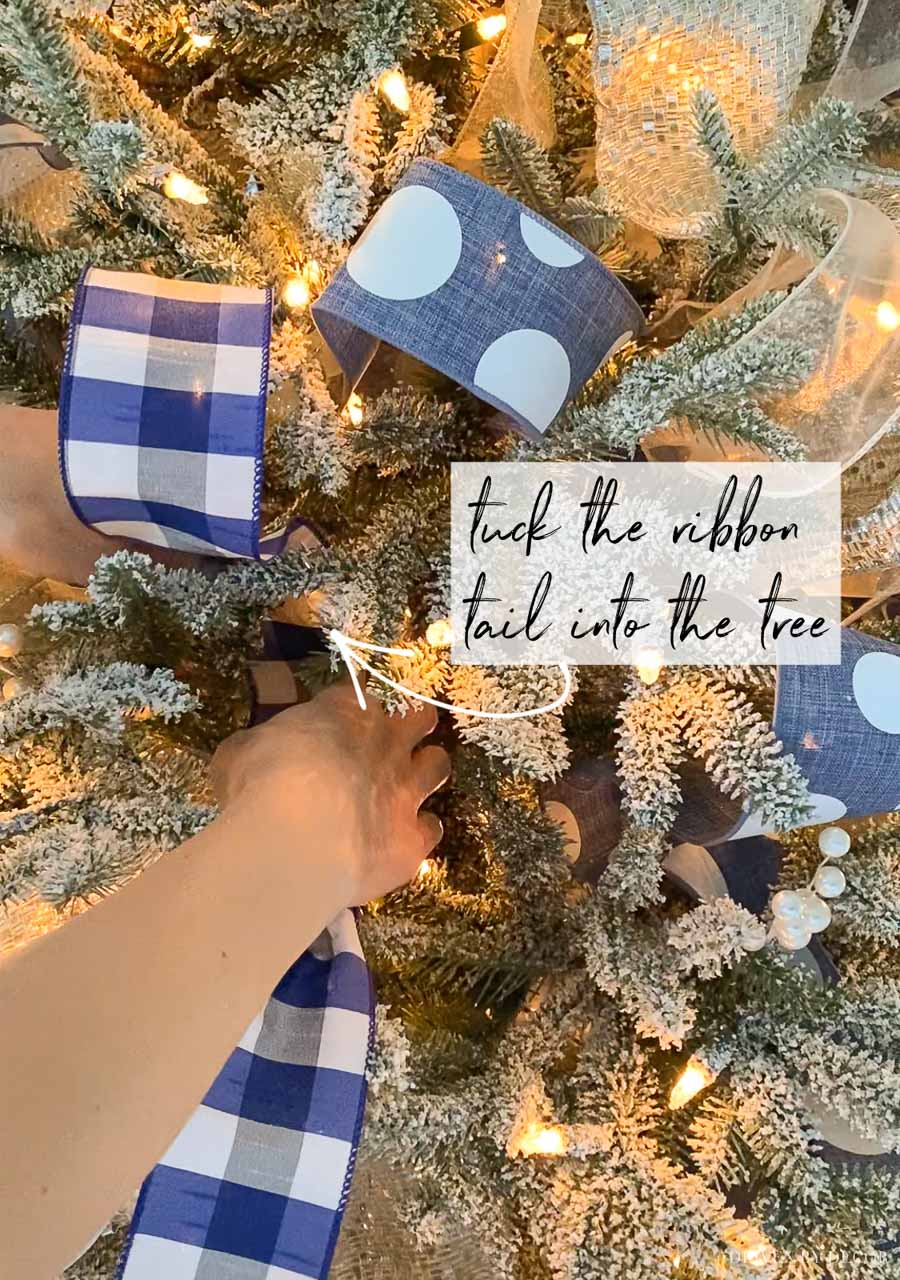
Often I’ll move a branch to the side to scooch the ribbon behind it:
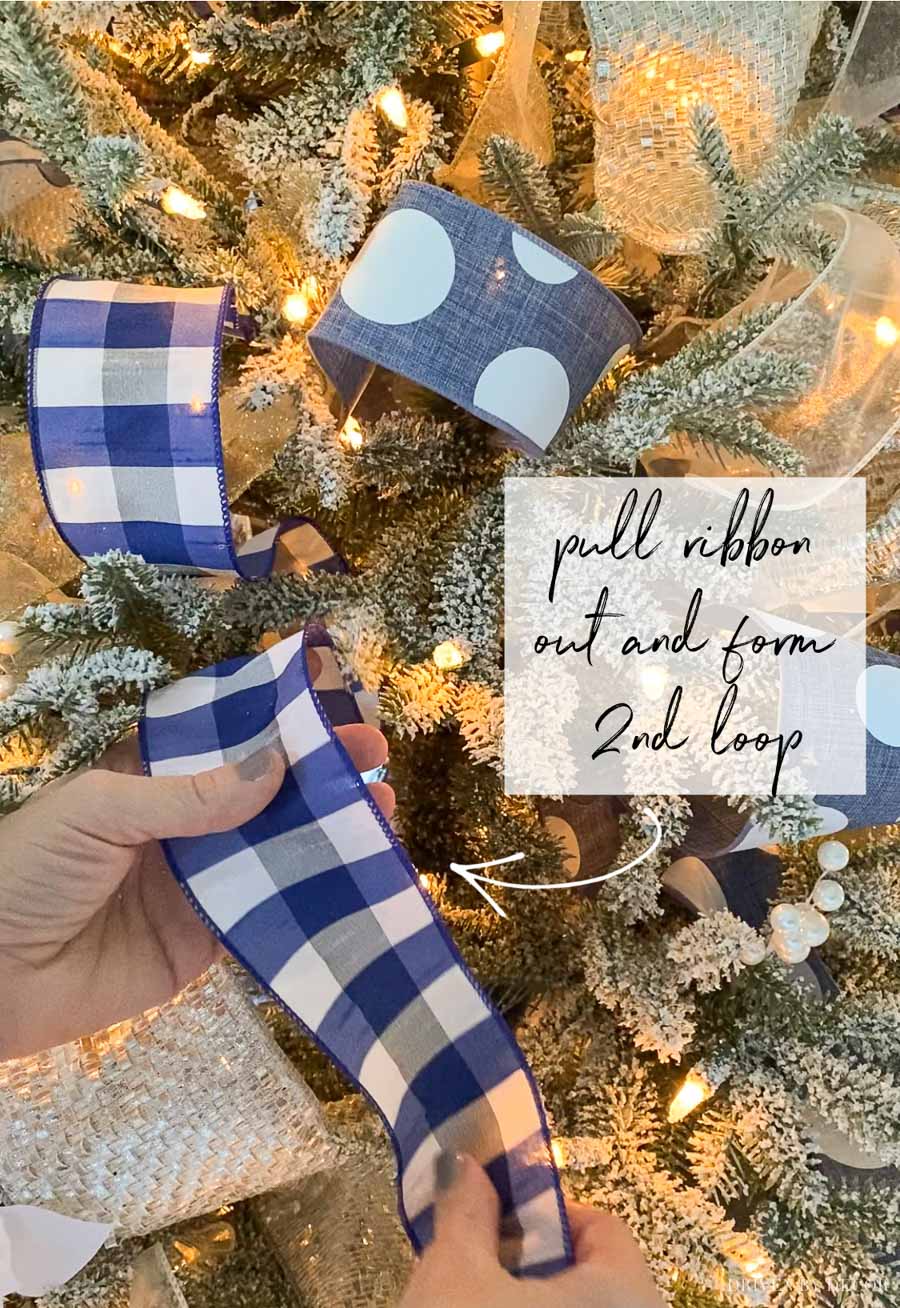
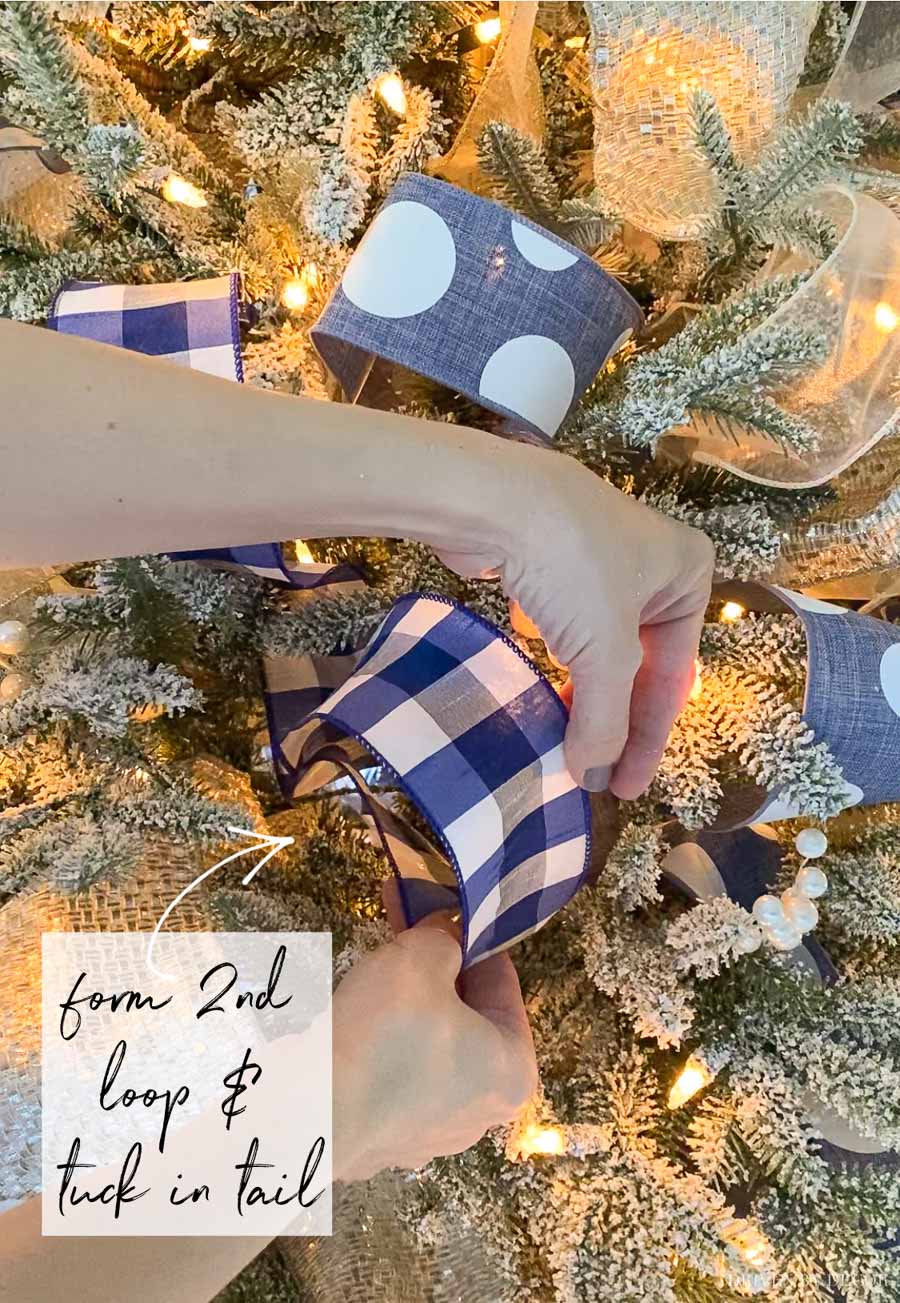
Now pull the ribbon back out above the space where you’re going to make your next loop and repeat:
Continue with as many loops as you’d like (I’m just doing two with this demo since I started fairly low down on the tree but if you start closer to the top you can do several with one ribbon strand). Once you’re on your last loop, cut off the strip of ribbon from the spool, making sure you have enough to make a full loop with a tail that goes back into the tree:
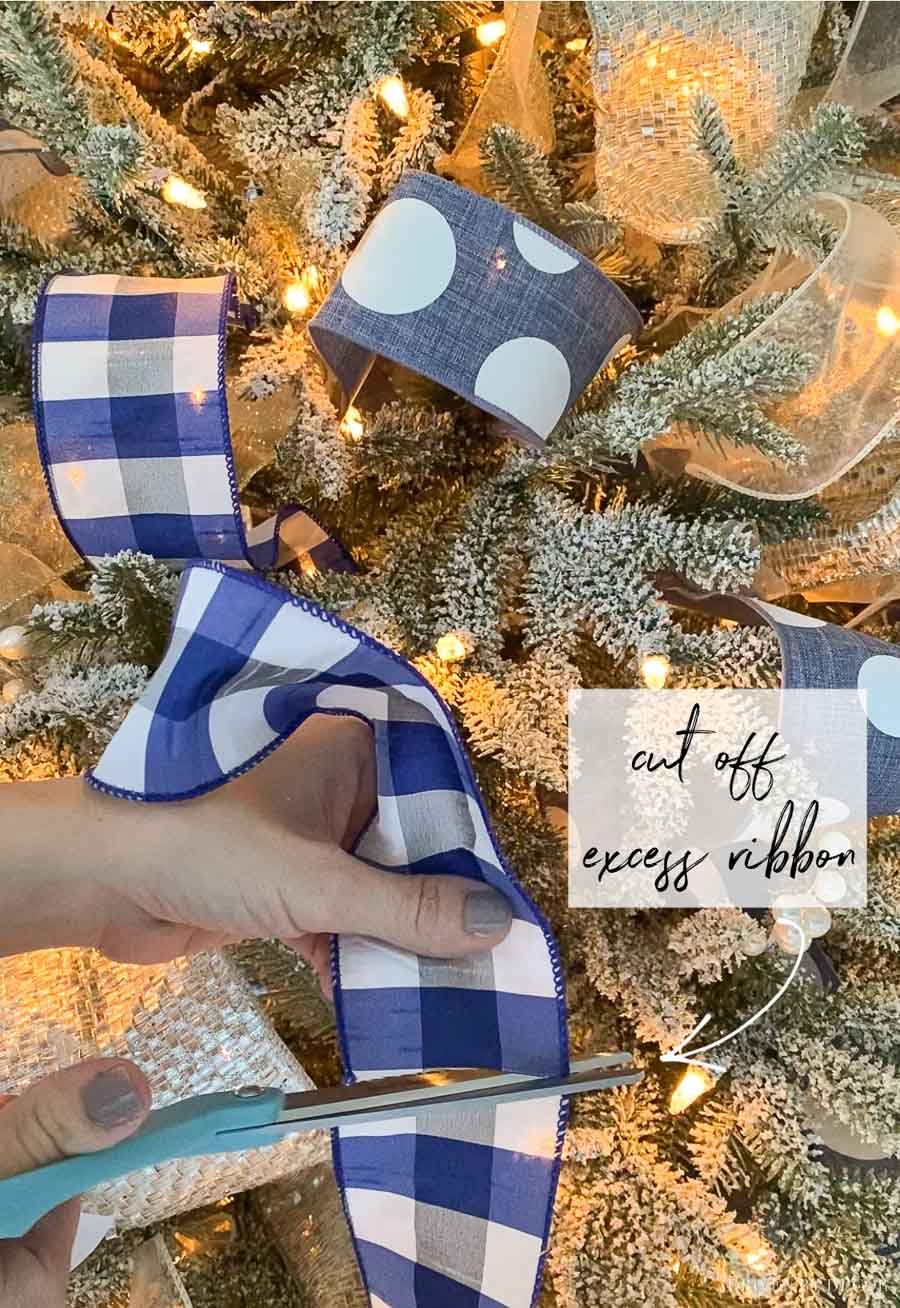
Often the ribbon end can just lie on top of the branch below the loop without being secured but you can also wrap it around a branch to keep it in place if needed:
And… you’re done!
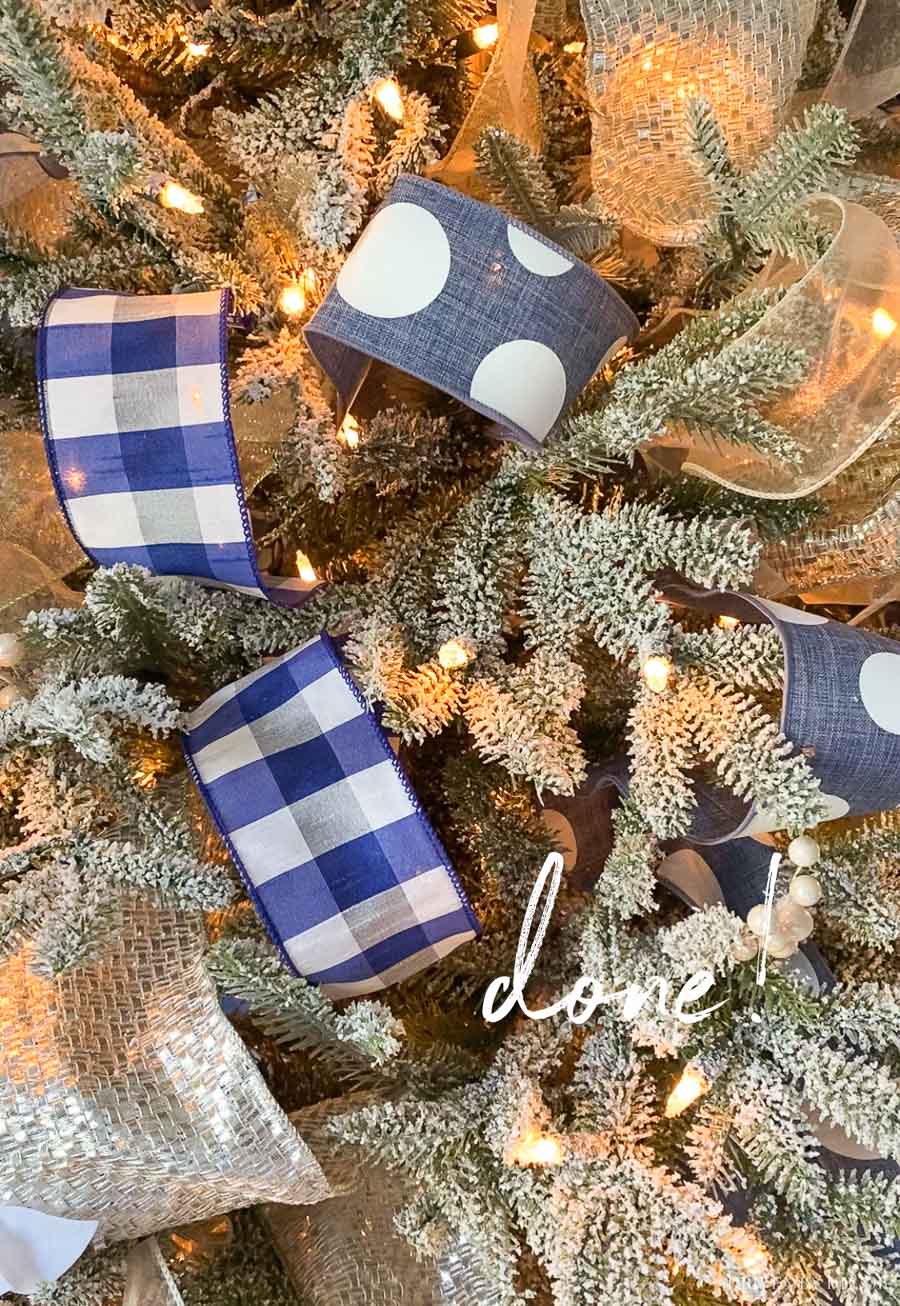
Simply repeat that process around the entire tree (remember to space out your ribbon quite a bit if you’re using multiple different ribbons so you have room for all of them). Do NOT worry about perfection! When you start trying it, some of your loops might not look quite right but once your tree has the other ribbons on it plus the ornaments and any embellishments those imperfections simply disappear.
Now would also be the time to add any garlands if you want to use those instead of ribbon or in addition to it.
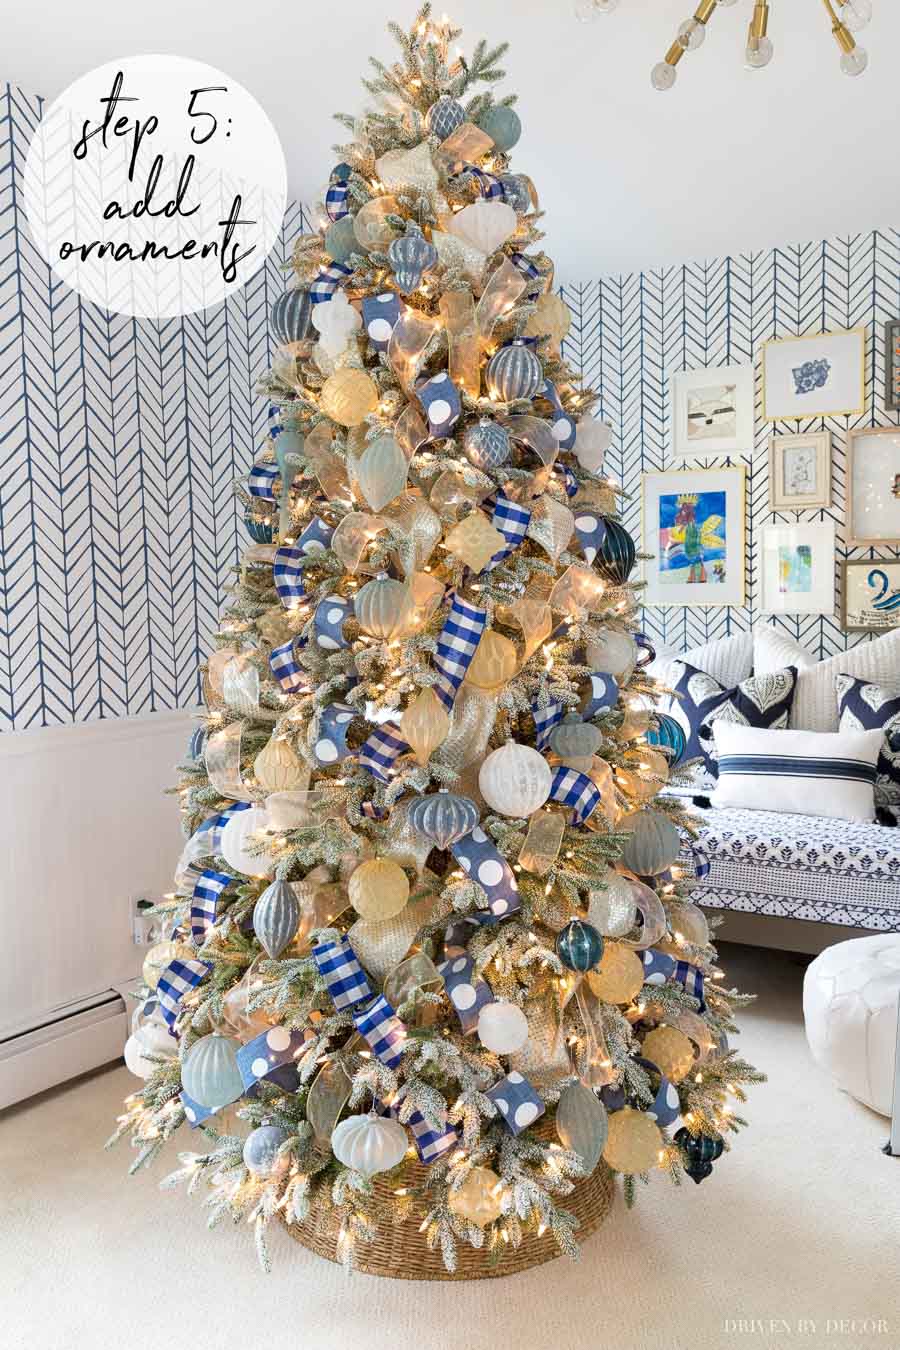
Step 5: Add Ornaments
Now it’s time to add all of your ornaments! Start with any larger ornaments to fill any gaps that are left and work your way down to the smaller ones. I store some of mine in tissue paper and have found that instead of unwrapping them from the paper one by one and hanging them from the tree, it’s more efficient to unwrap them all and then start hanging them. My 7.5′ tree has about 120 ornaments on it which includes some fairly large ones – if you’re using smaller ornaments you’ll need to use a few more.
If you have several of the same ornaments, be sure to distribute them around the entire tree. Here’s what my tree looked like once I added the ornaments:
Balsam hill has stunning ornaments {here} if you want to invest in some high quality ornaments that you’ll have for years (it’s where most of mine are from). But there are great budget-friendly ornaments out there too like {this ornament set} that I bought from Amazon and have been really happy with.
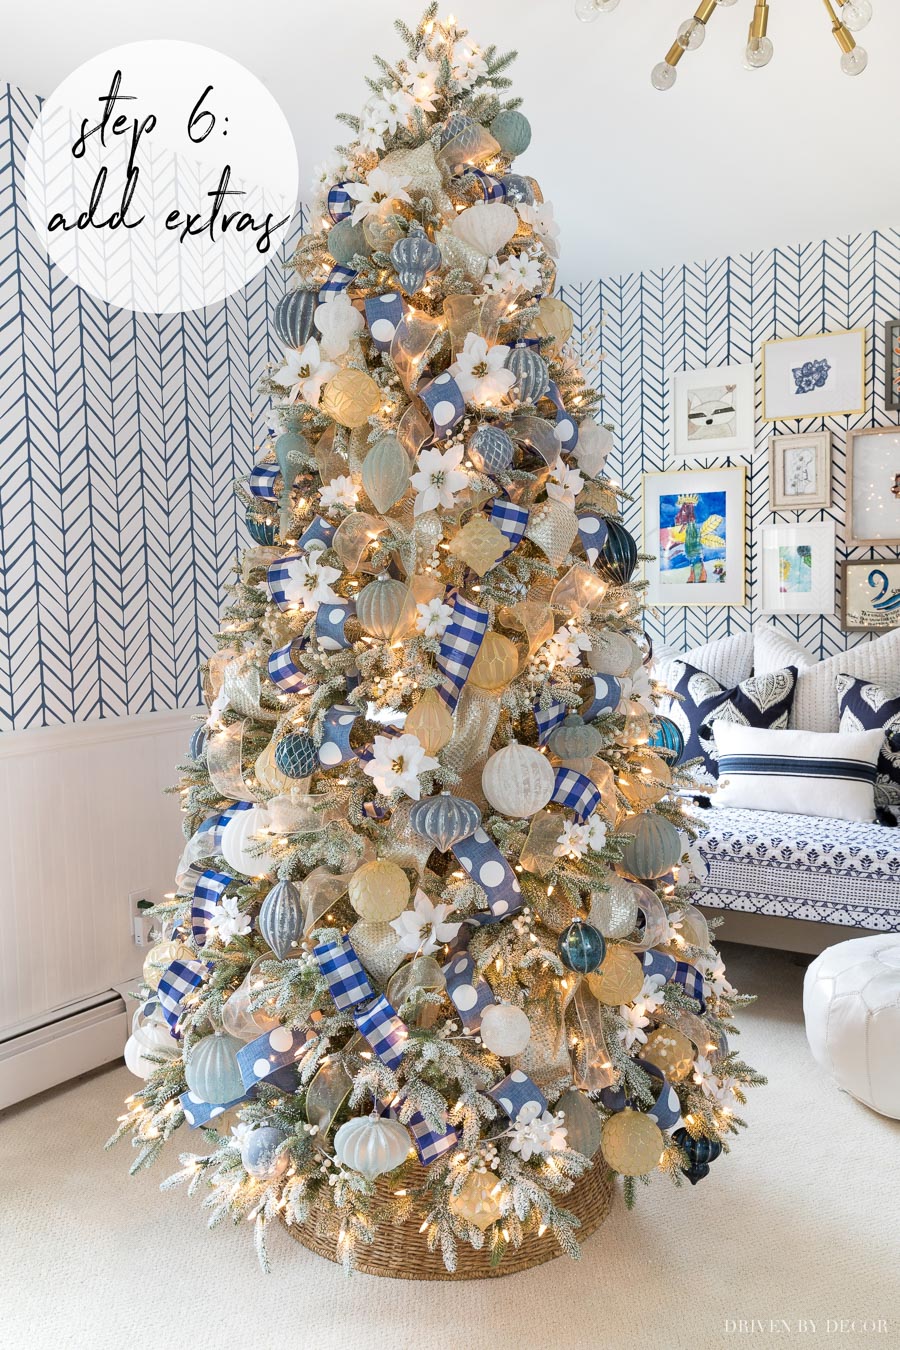
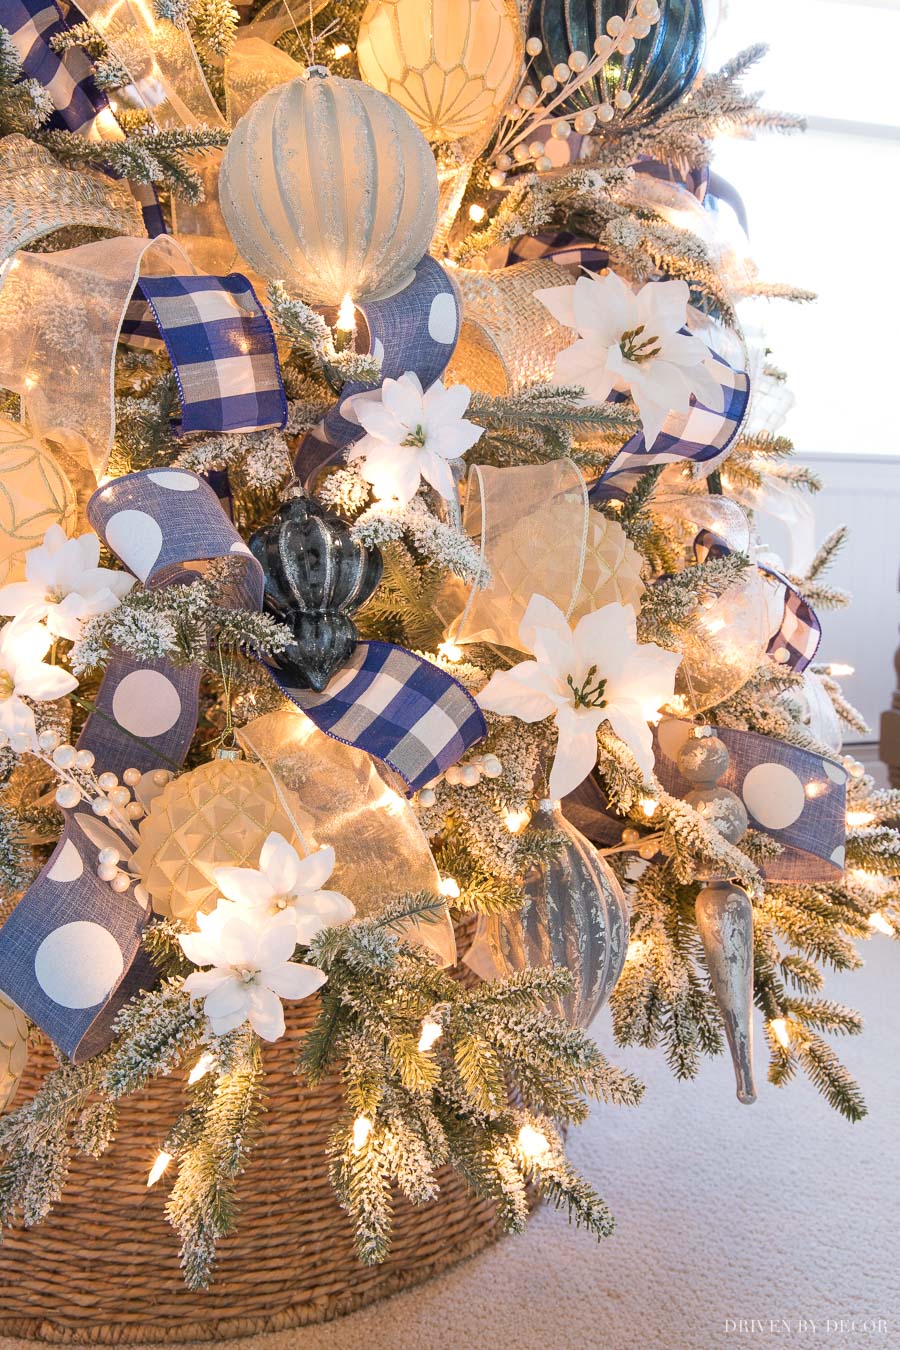
Step 6: Add Other Christmas Tree Decorations!
I love adding other unique Christmas tree decorations even if it’s as simple as a few berry sprigs or flowers! You can use tree picks (I added the cutest pinecone picks one year!) or floral sprays that they are mounted on a long wire or piece of plastic. Or you can use typical faux floral or berry branches (like in the faux flower aisle at Michael’s) and cut them apart into individual flowers or sprigs of berries.
I added white poinsettias and berries to mine including cascading some of the smaller poinsettias down from the top of the tree:
My poinsettias came in a bundle (I found them at Michael’s a few years back) and I simply cut them apart:
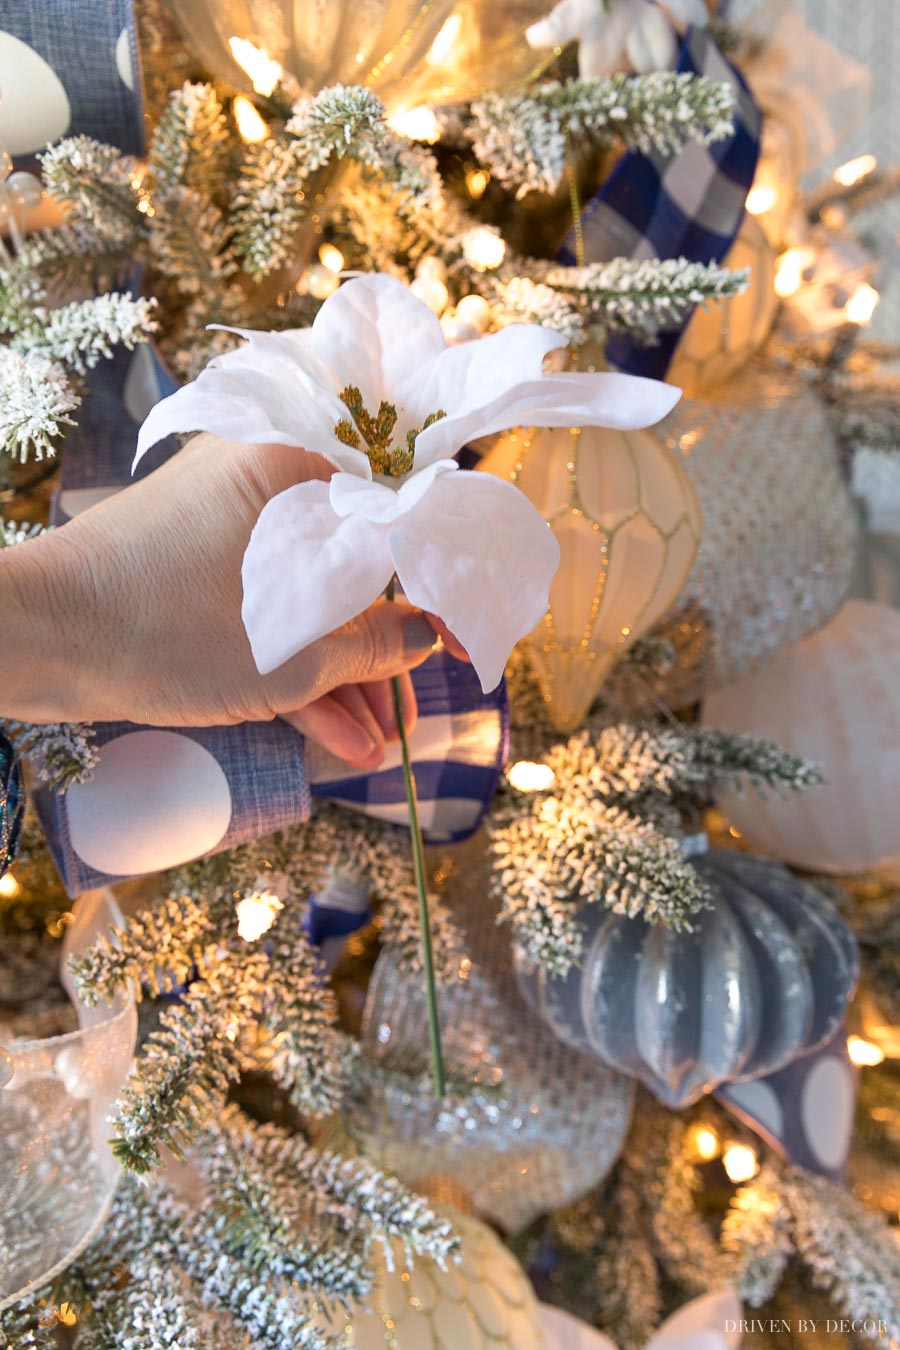
and then distributed them evenly around the tree:
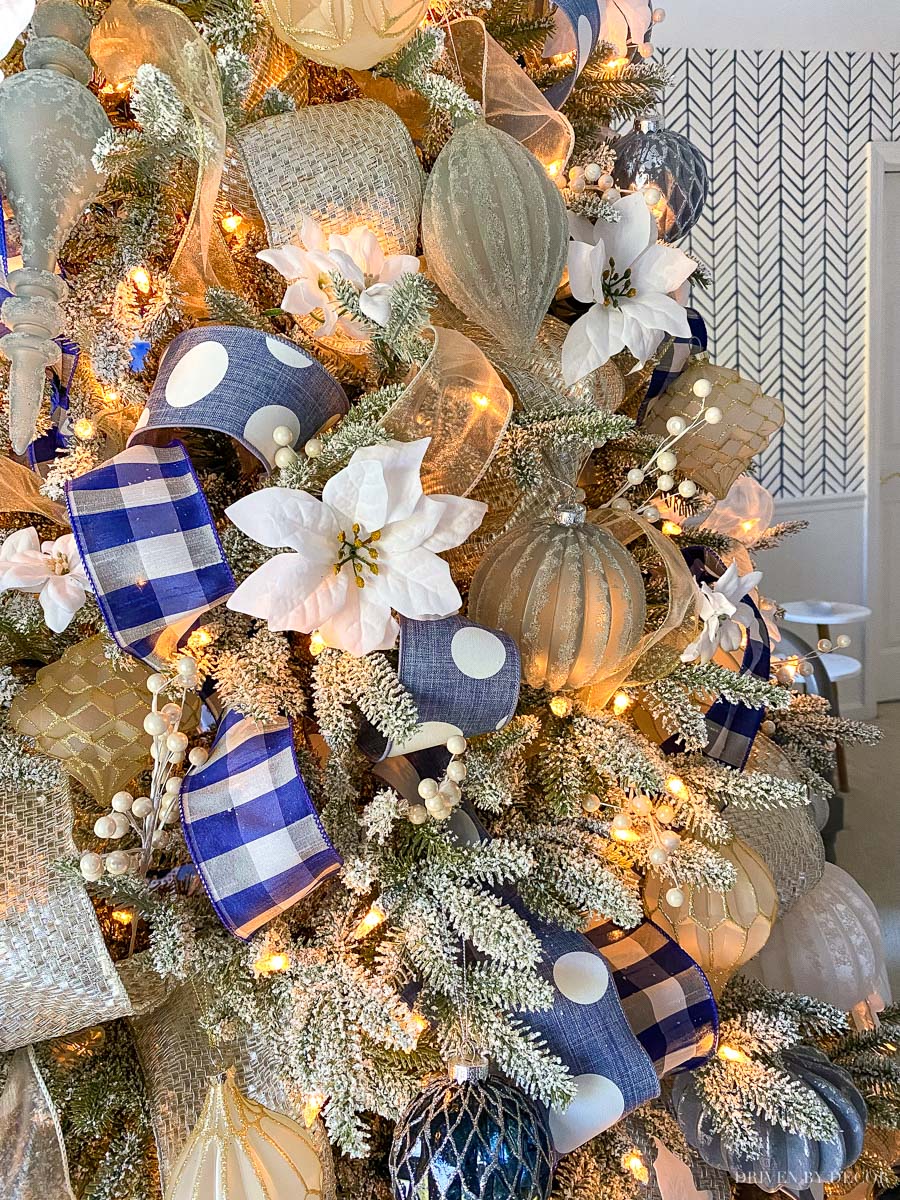
I also added some sprigs of white berries similar to {these} that I cut apart into smaller pieces and added throughout the tree:
If you want a more traditional Christmas tree, you can add tinsel, candy canes, or whatever else you’d like.
Step 7: Add a Christmas Tree Topper
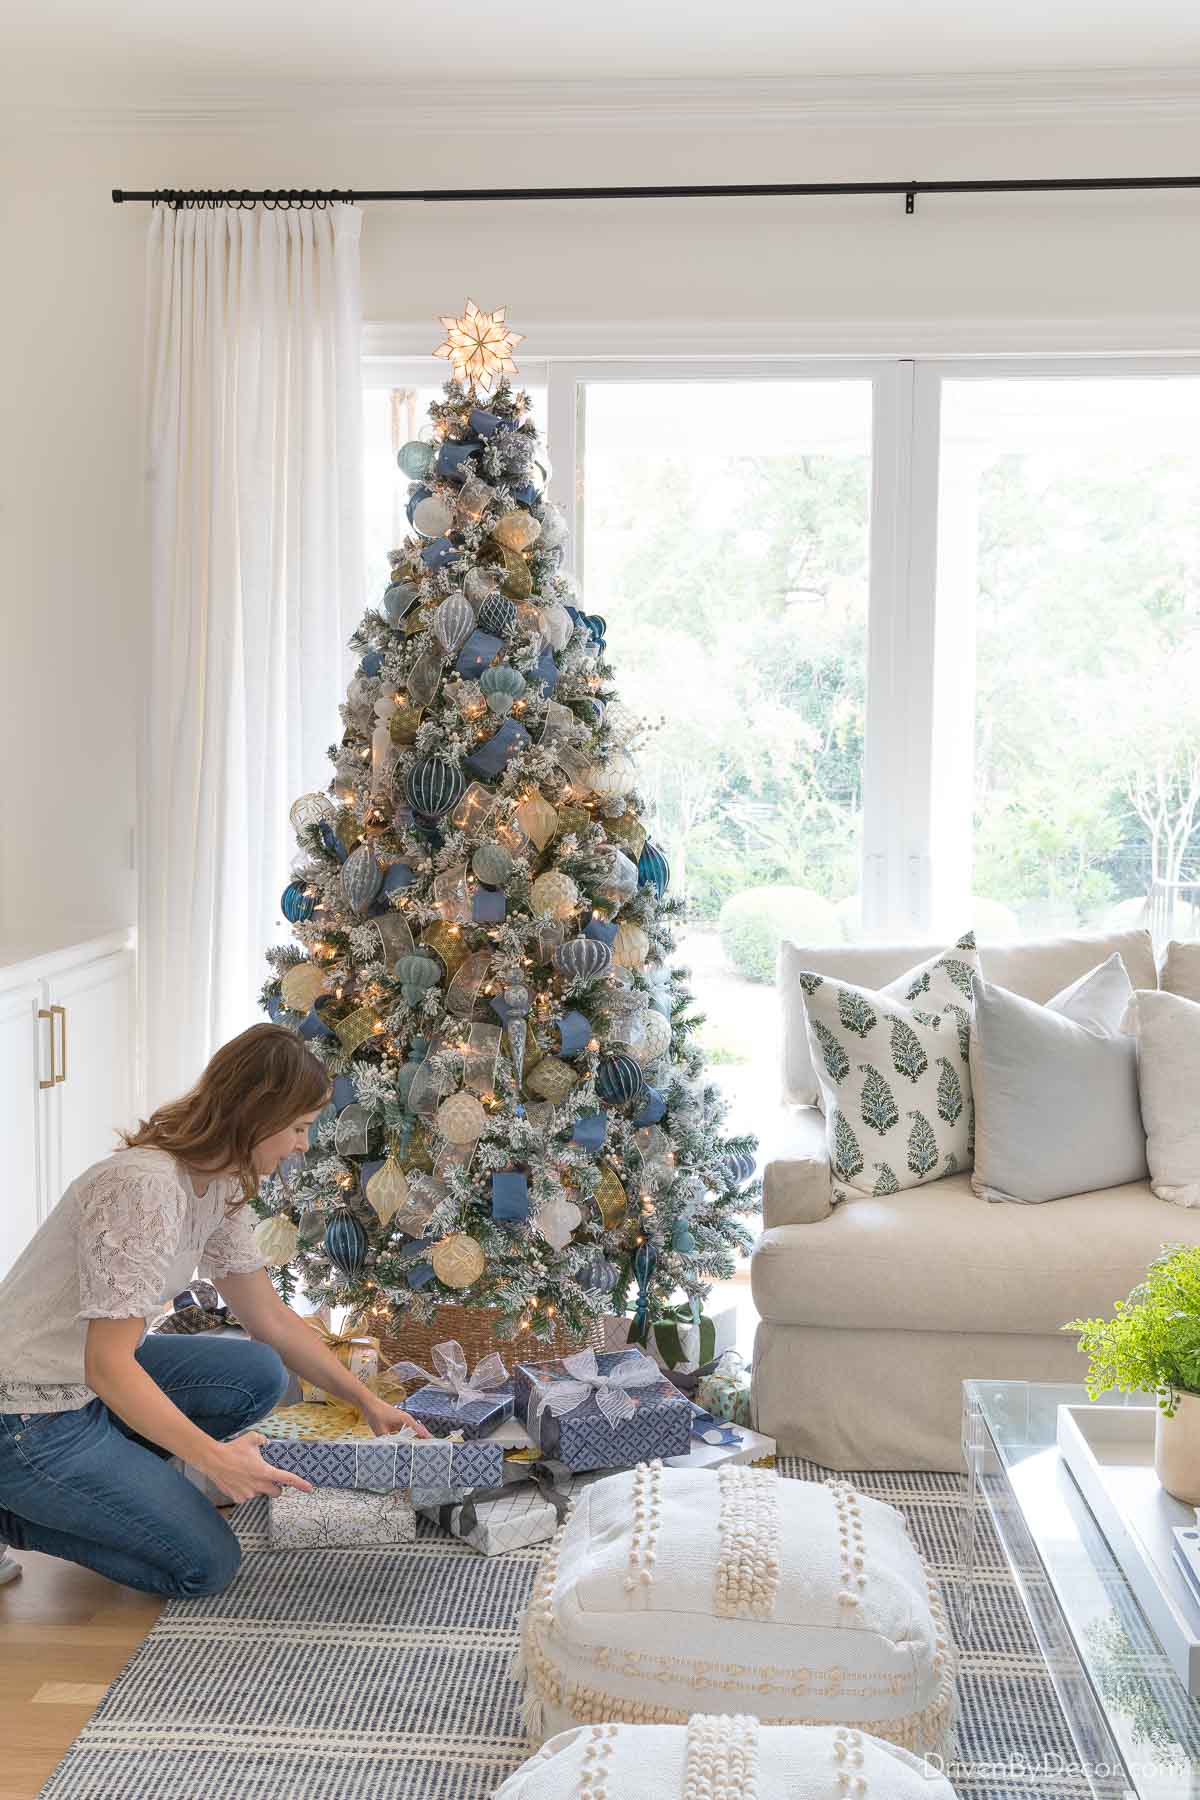
This is my favorite step in how to decorate a Christmas tree – adding the tree topper! For the last few years I’ve used {this capiz star tree topper} that lights up – it’s so gorgeous:

Another super simple option is to tie a large bow on top or of course you can add a traditional angel. Along with the tree topper, now’s the time to add your Christmas tree skirt if that’s what you use instead of a tree collar.
My 10th annual post on my family’s favorite things is live!! Check it out {here} for the best holiday gift ideas!
Step 8: Add a Plug-In Timer or Smart Dimmer
As a last step, save yourself the hassle of having to reach behind your tree every night to turn your tree lights on and off by plugging your lights into a timer like {this one} or a smart dimmer. I have the Caséta smart lighting system in our home (which I LOVE by the way) so I plug mine into {this plug-in dimmer switch} that I can turn on and off with my phone or program to go on and off at the same time every day.
And with that… you’re done!
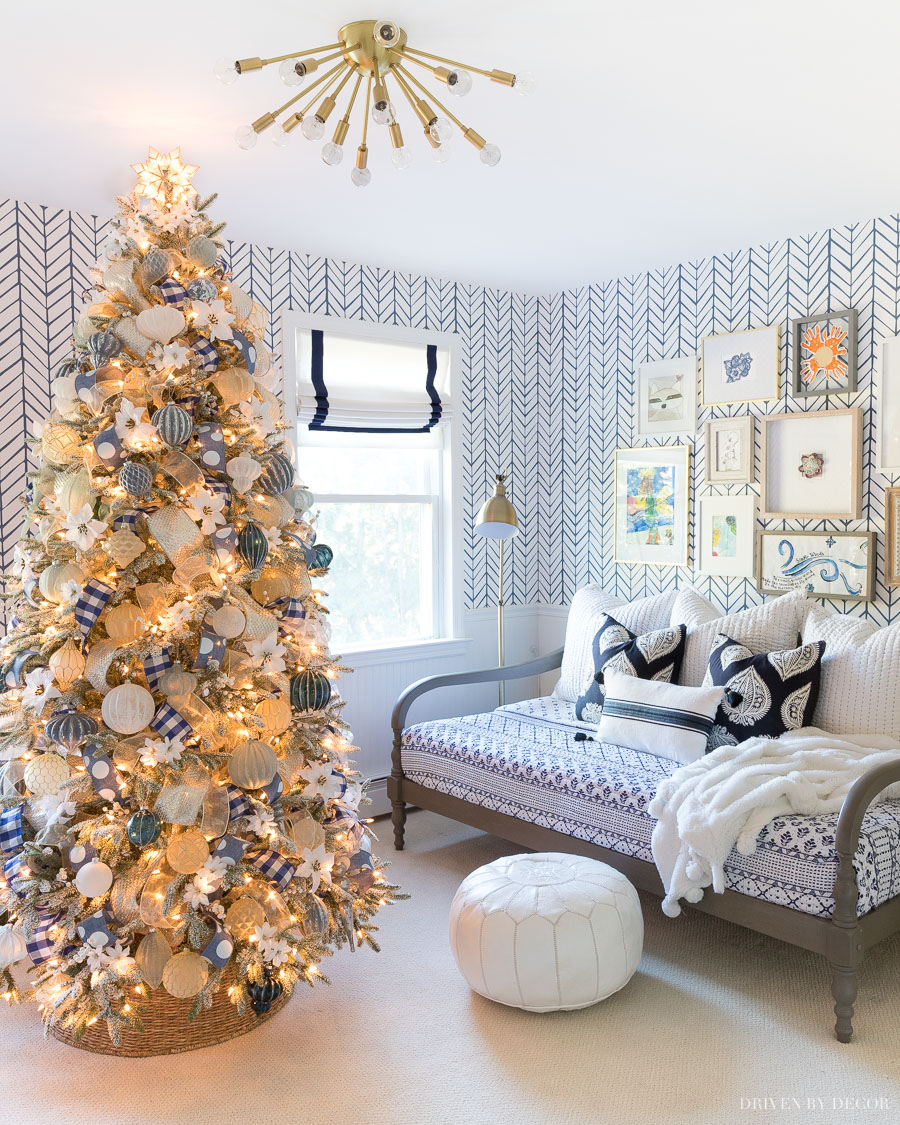
Room Sources: Herringbone wallpaper | Daybed (no longer available) | White leather pouf (similar) | Blue & white quilt | Pom pom throw | Ribbon trimmed window shades | Brass floor lamp (similar) | Sputnik ceiling light fixture (similar) | Blue stitch Euro shams (similar) | Other pillows no longer available
I hope you guys found this helpful and picked up a new tip or two to try when dressing up your tree this year! Want some other ideas for what to put under your Christmas tree? Check out my post on Christmas wish list ideas where everyone in my family shares their favorite things. Also check out my post on wrapping Christmas presents to find some tips and ideas for wrapping your presents!
Thanks for stopping by!


Patricia says
Hi – I searched all your Christmas posts to see if you mention where you purchased the ornaments. Looking for large balls similar to yours but cannot find them. Can you share a link please?
Kris Jarrett says
Hi! I got most of my large ball ornaments from Balsam Hill!
Grandma Lu says
I can’t wait to get started! I’m going to add ribbon this year, so thanks for the tips. I’d like to add a tree this year for out 5 year old grandson to decorate at our house, so I will buy a “budget friendly tree” for him. Would you please post the link for the Walmart tree? Thanks so much.