Hate your ugly countertops? Using marble contact paper for countertops is a simple, inexpensive way to completely change their look! I’ll show you how!
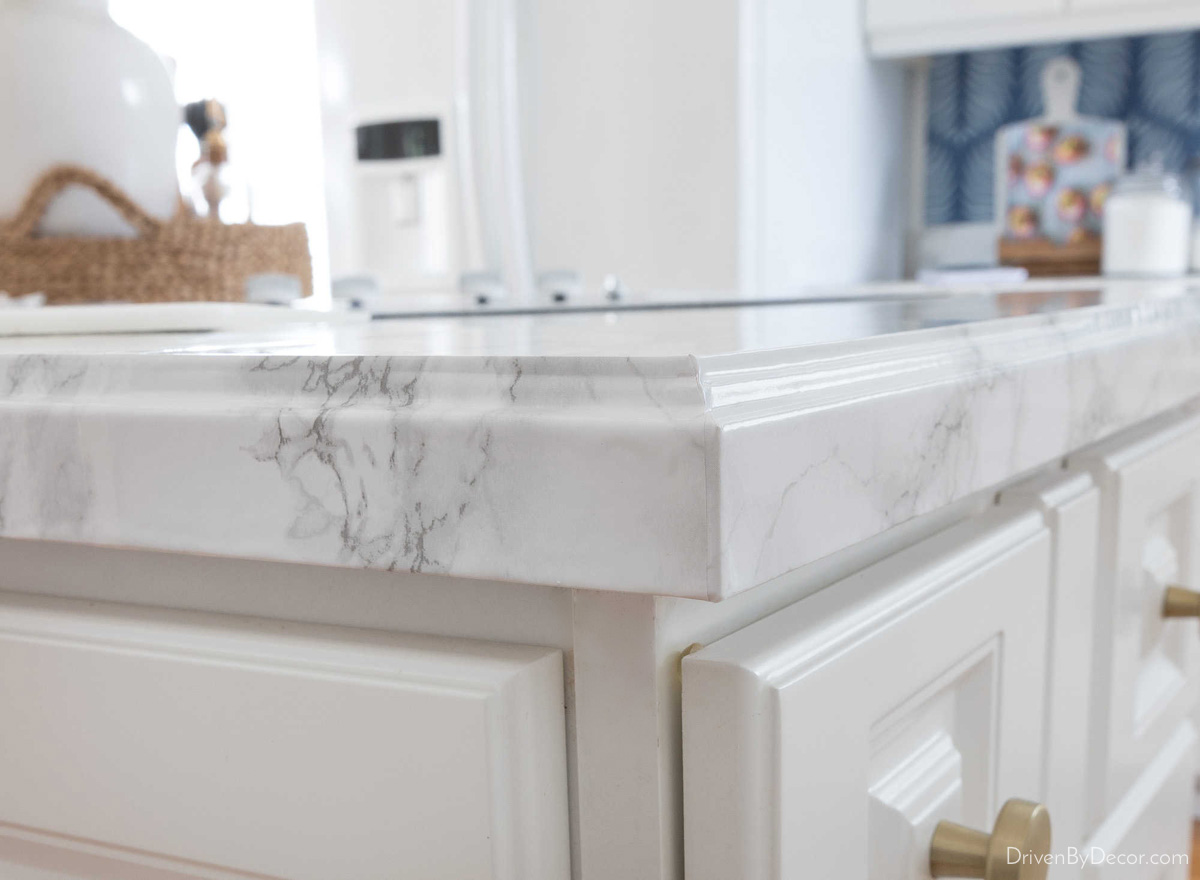
We have a major kitchen renovation in our future so I didn’t want to put a lot of money into temporary fixes. But I’m all about making a few budget-friendly upgrades to dress it up a bit until that time comes. I decided to use one of my kitchen remodel ideas on a budget and install marble contact paper for countertops to cover our ugly white laminate wood-edged countertops:
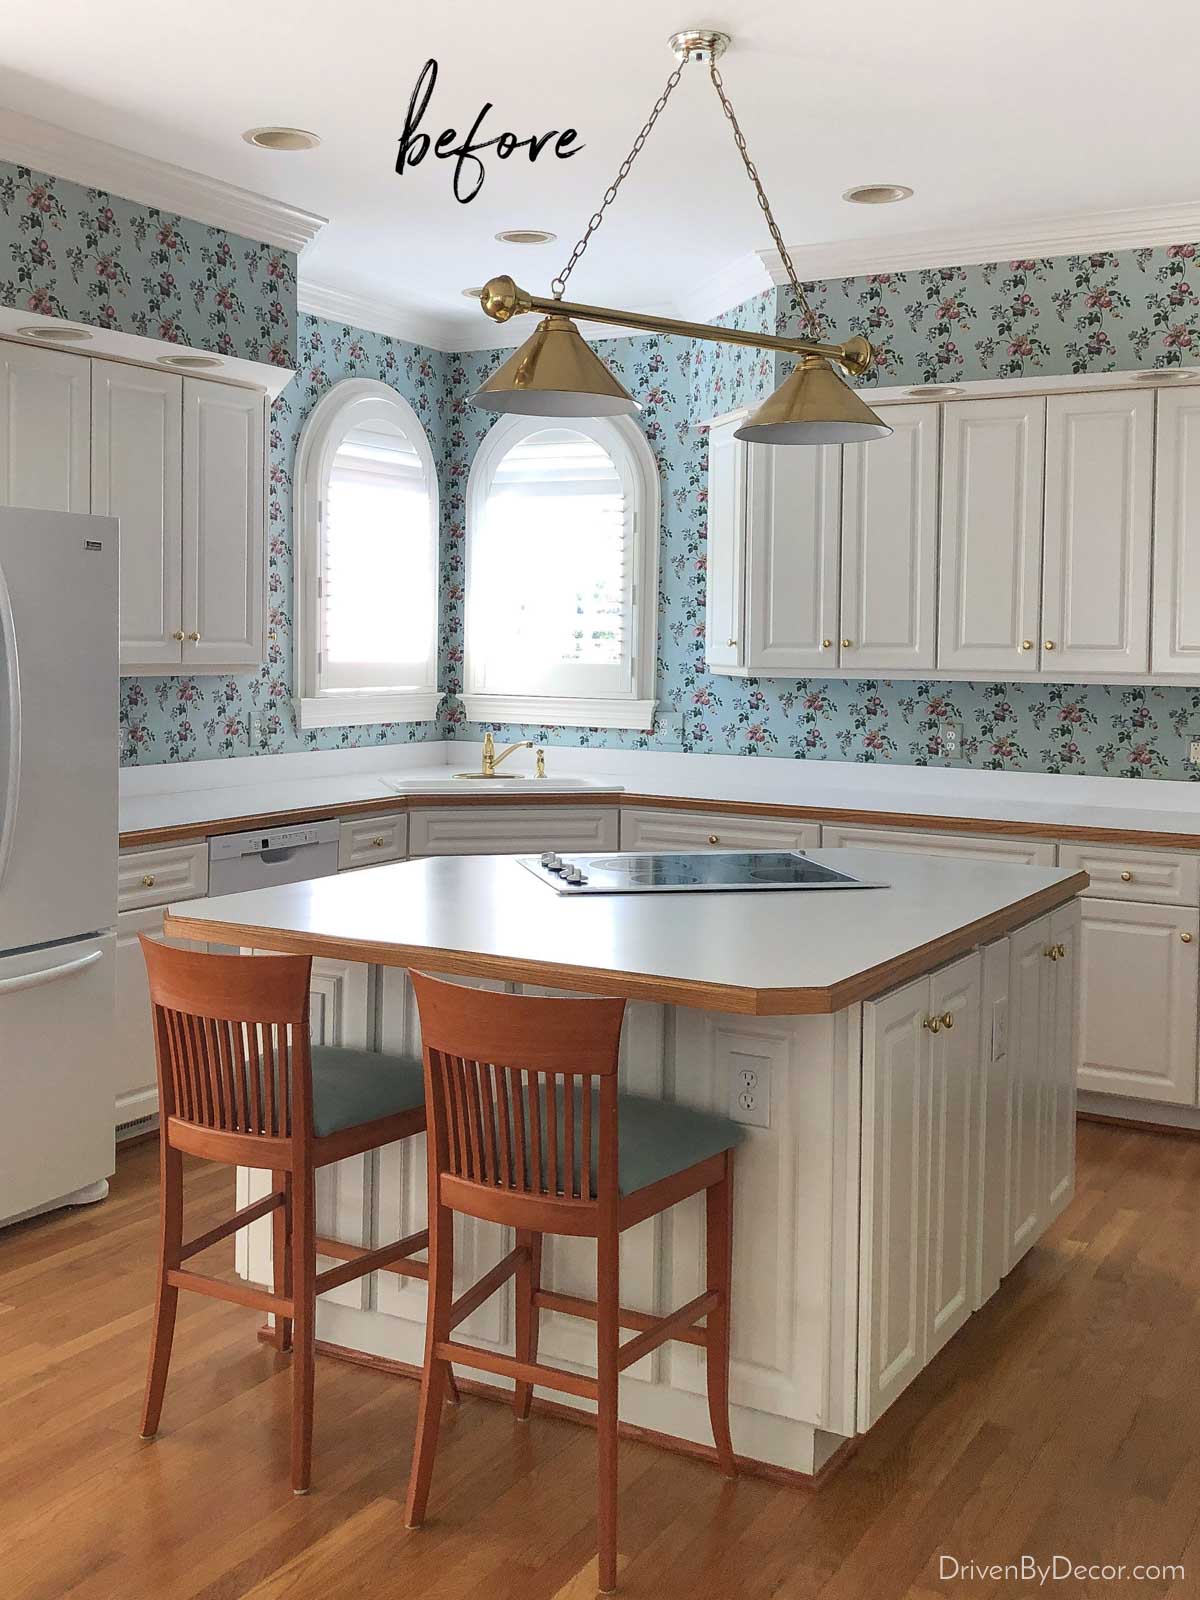
I was skeptical about it working but decided that the risk of trying it out was pretty minimal since I could just peel the contact paper off if I decided I didn’t like the look. It ended up turning out SO much better than I expected! Here’s my kitchen’s new look after finishing the countertops and making a few other budget-friendly upgrades:
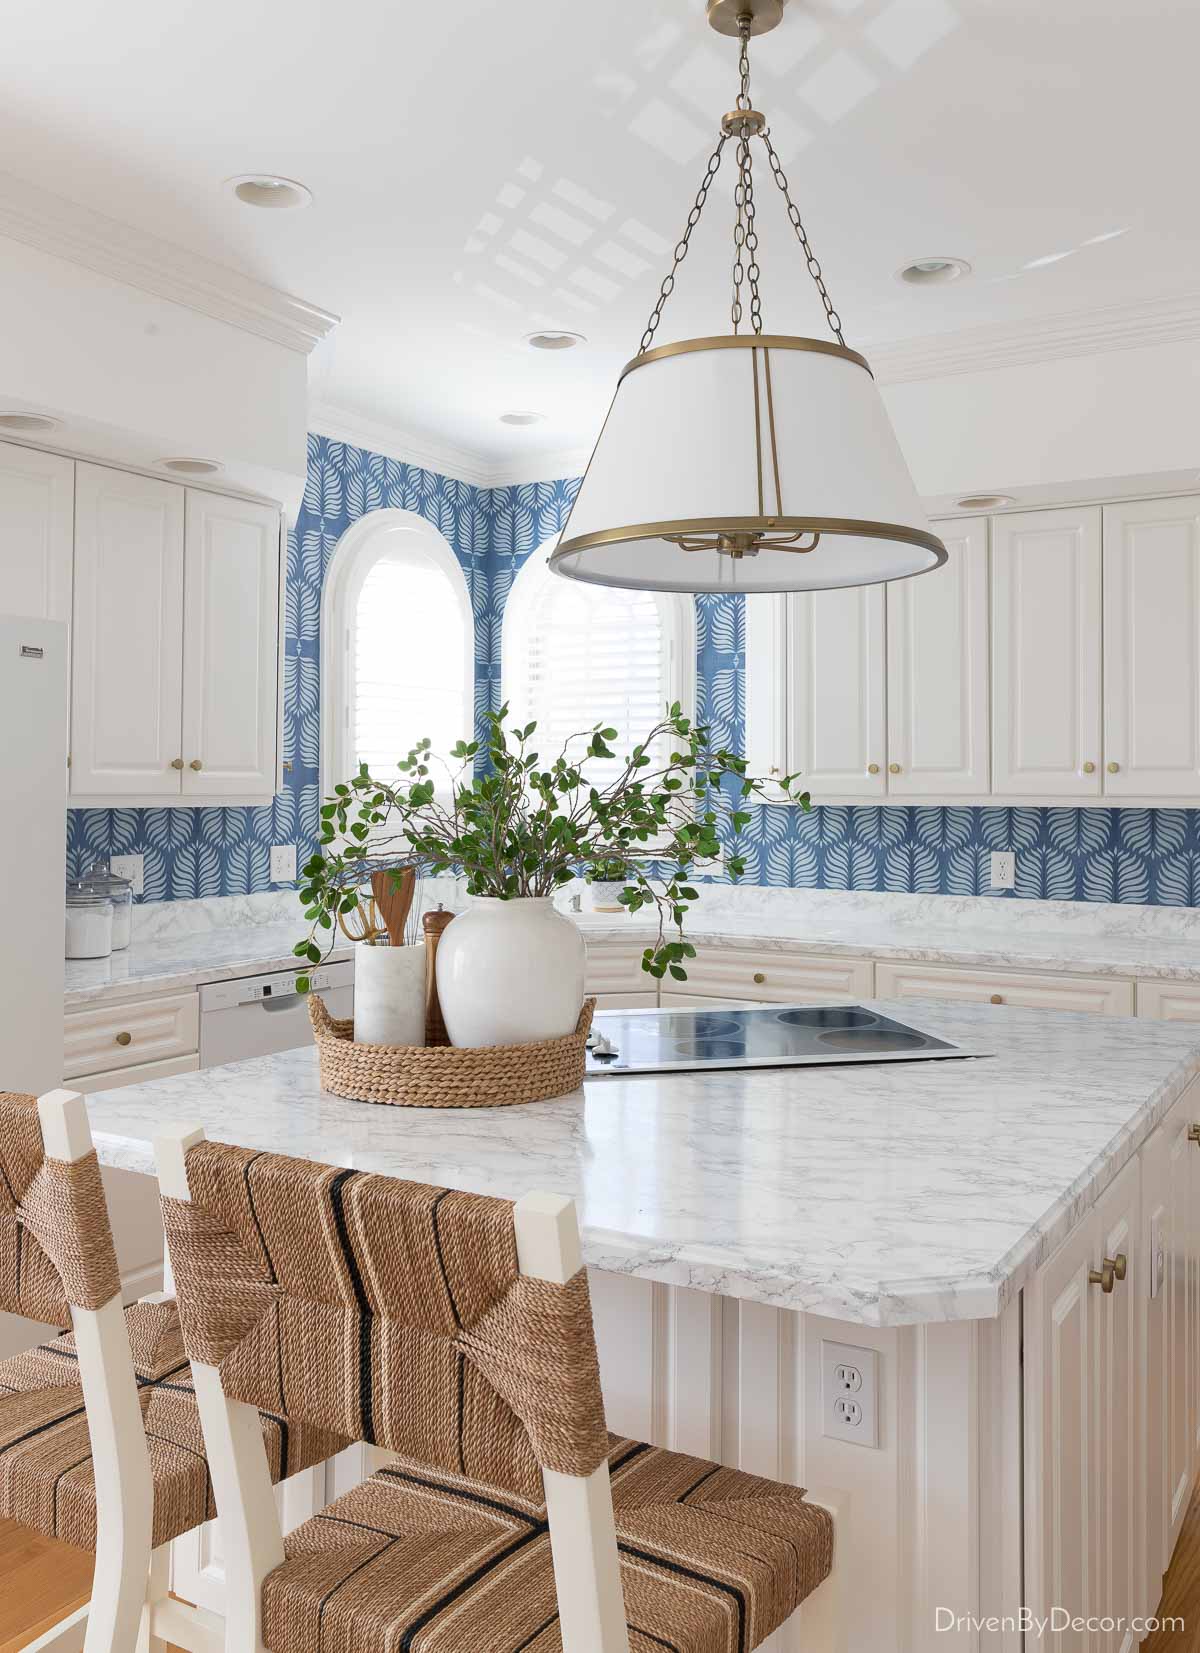
Sources: Woven counter stools | Wallpaper | Marble film covering countertops | Pendant over island | Cabinet knobs | Round woven tray | White vase – no longer available | Faux leafy branches | Marble utensil holder (similar)
I thought I’d share the steps for using marble contact paper for countertops in case you want to try it out too!
Read on for the 3-year follow-up on how my marble contact paper countertops fared!
1. Choose Your Marble Contact Paper
There are a lot of different faux marble contact paper options out there. While you obviously want contact paper that has the look you want (for example, some have a lot more veining than others) there are a few other features to consider too.
One of the most important is the width of your contact paper. If you’re covering countertops that are the typical 24″ depth, choose a paper that’s at least 26″ wide. 26″ wide paper will allow you to run it along the entire length of your countertop (including going around and under the front edge of it) without any seams (except where your roll runs out if you have a long countertop).
It’s also extremely important to consider the material it’s made of and how well it stands up to water if you’re using it in a kitchen or bathroom. I went with {this gray marble vinyl film} from Amazon that checks all the boxes. It looks pretty realistic, is 26.5″ wide, and is made from vinyl/PVC film so it’s easier to clean and water resistant:
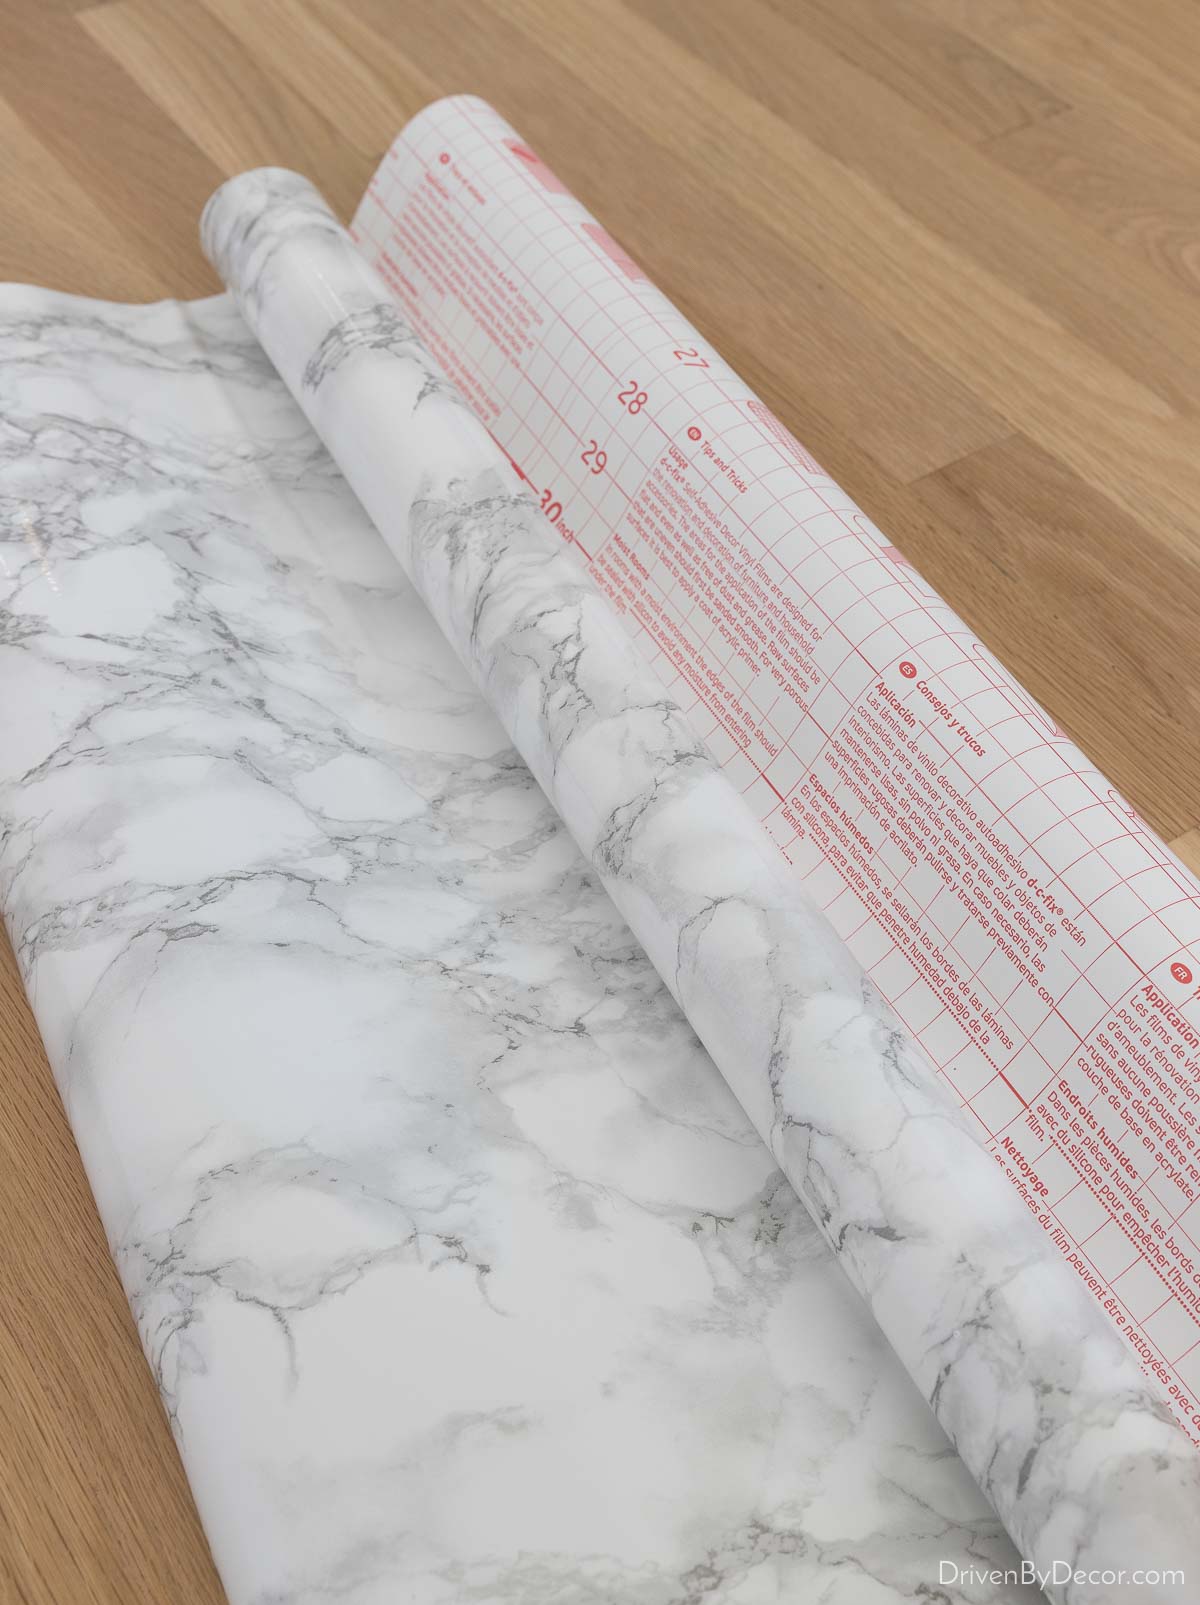
It also has grid lines on the back which are really helpful for making straight cuts. Estimate how many rolls you’ll need and then get about 20-30% more to allow for mistakes and waste due to pattern matching.
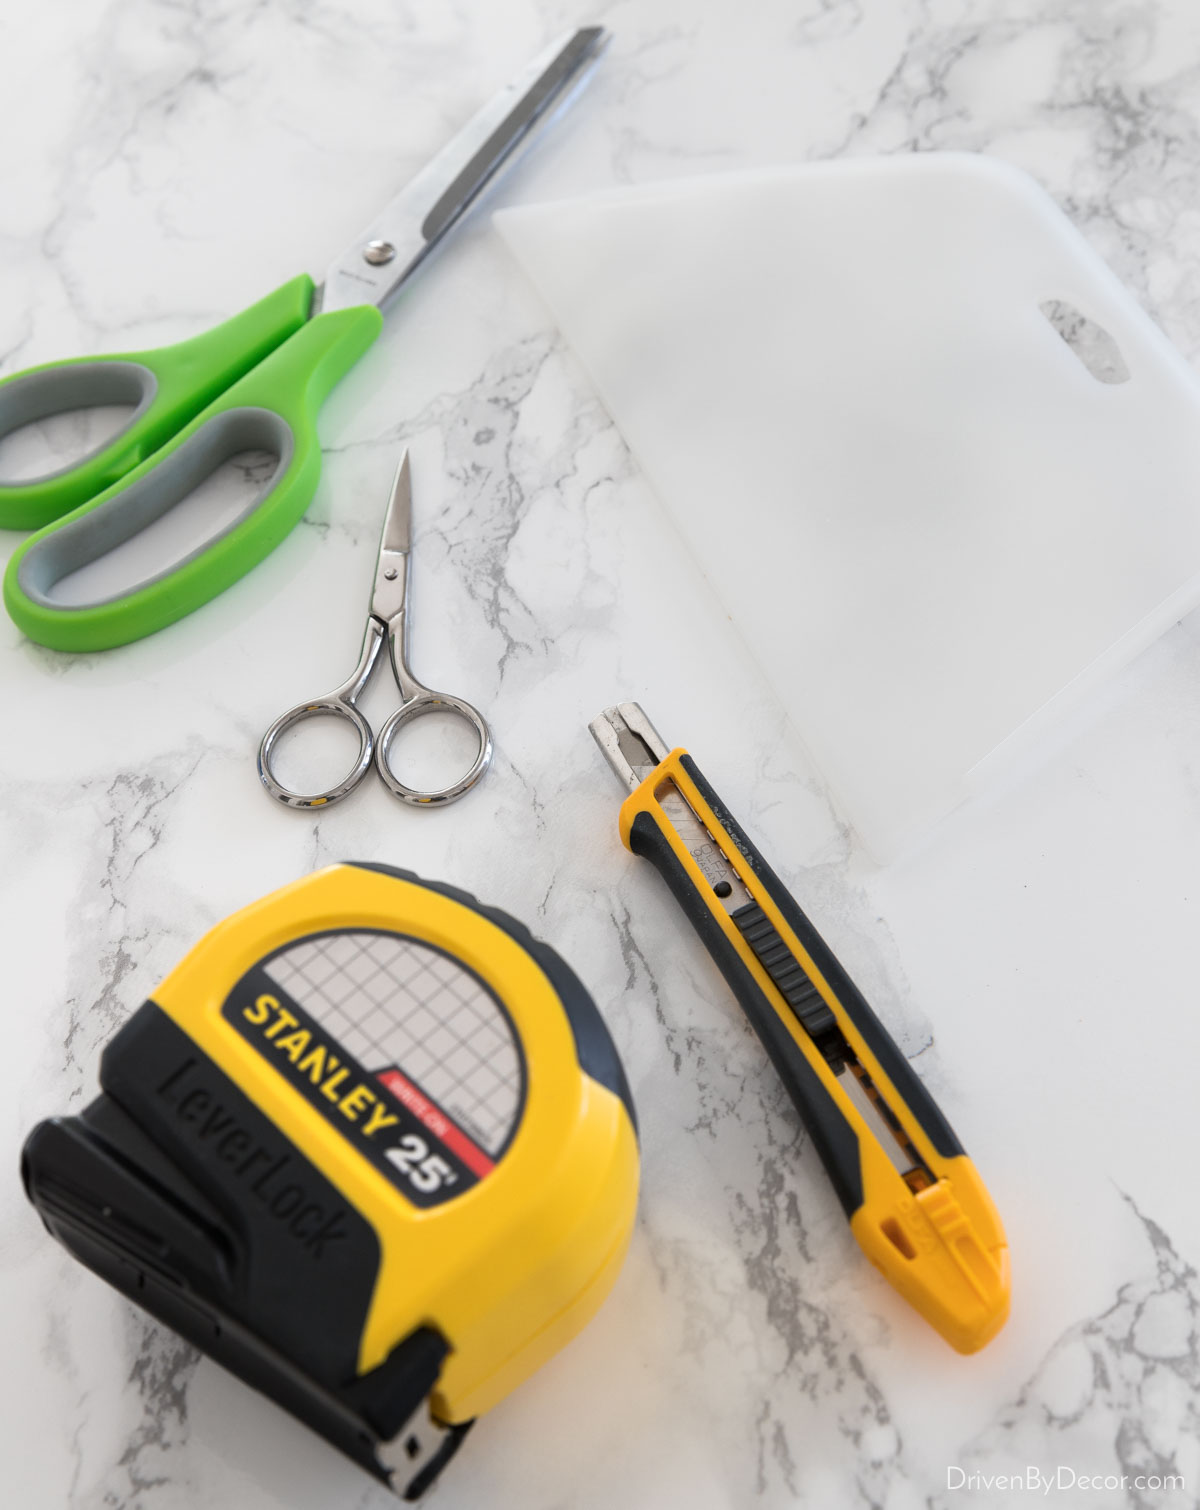
2. Get Your Supplies Ready
Along with your contact paper, the supplies you’ll need to gather together to knock out this DIY are:
1. A measuring tape & pencil
3. A small utility knife with snap-off blades like one of {these}
4. Scissors (I used a large pair for cutting paper off the roll & also found a small pair like {these} is super helpful for more detailed cuts like in the corners)
3. Clean & Prepare Your Countertop Surface
Before you add contact paper to your counters, make sure they’re clean so that your contact paper adheres well. A mix of a little dishwashing soap (one with a good degreasing agent like Dawn) in water followed by a water rinse will do the trick!
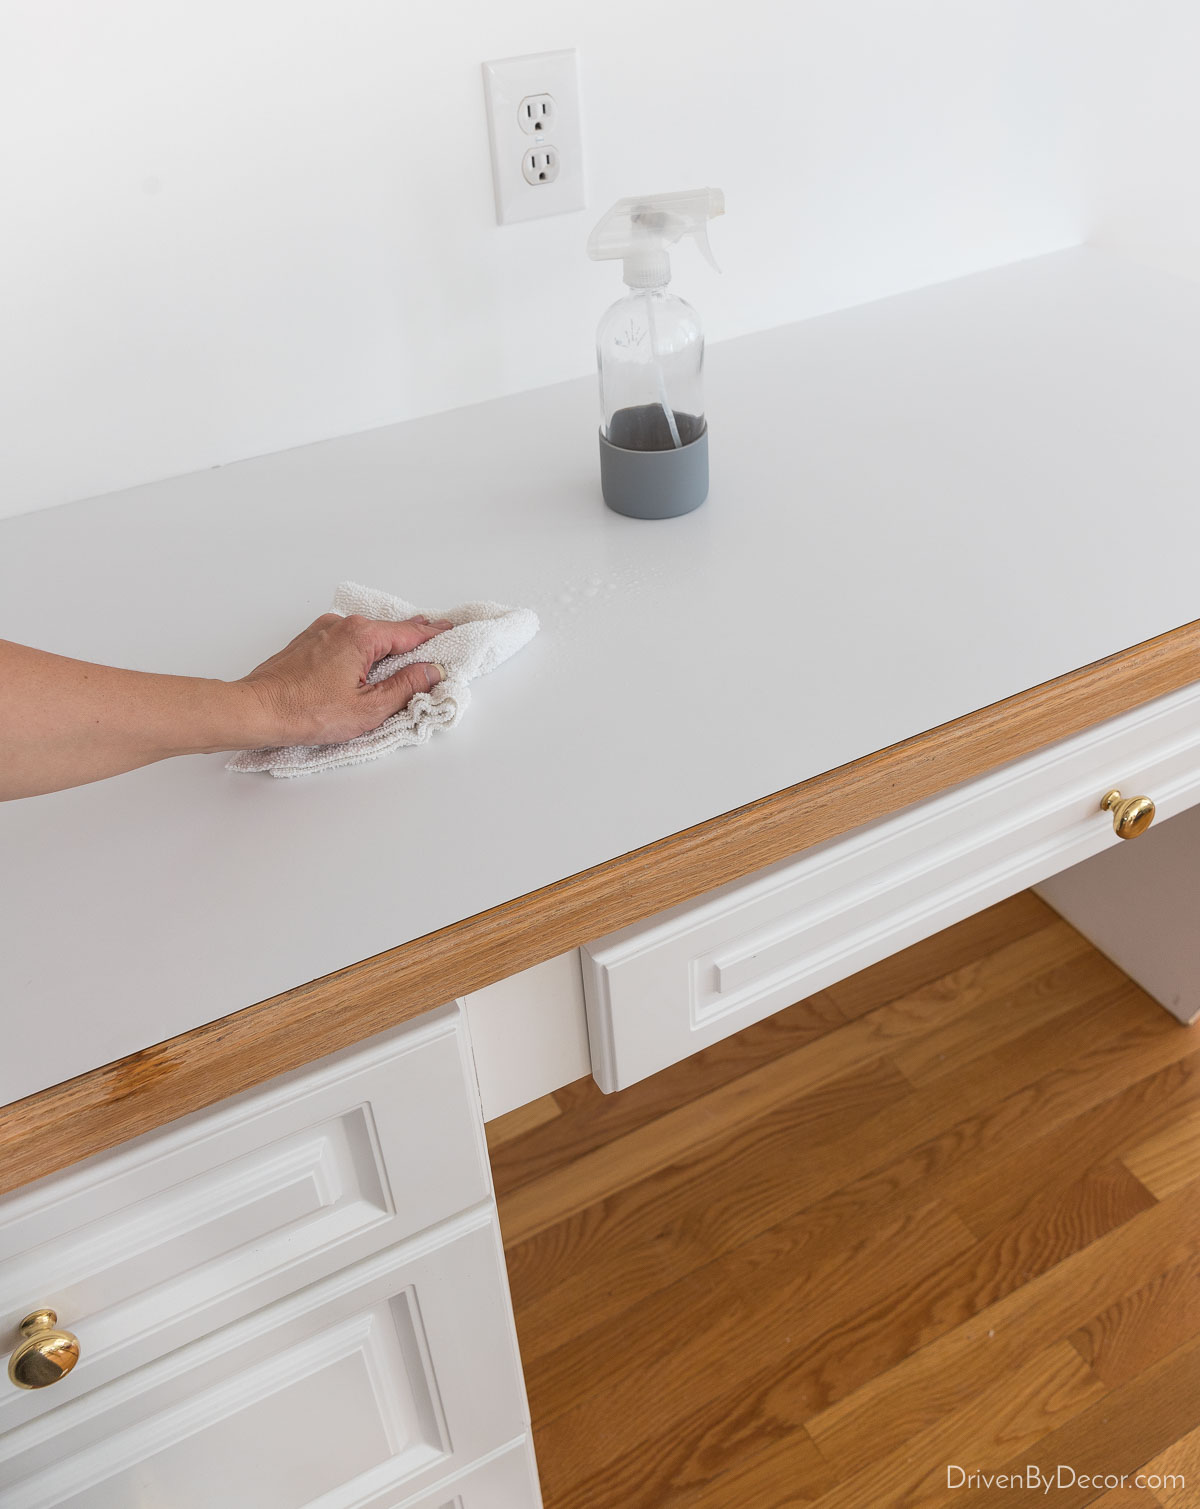
If there’s anything stuck onto your countertops, I’ve found that using a cooktop scraper like {this one} works well for removing it.
4. Measure & Cut Contact Paper to Size
Next you want to measure the length of the area that you’re covering and cut your contact paper a few inches longer than what you think you’ll need. Along with measuring the flat countertop surface, don’t forget to take the edge into account too if you have a finished edge like I did. In this case (putting contact paper on my desk), the length of the countertop plus the amount needed to cover the wood edge was about 57″:
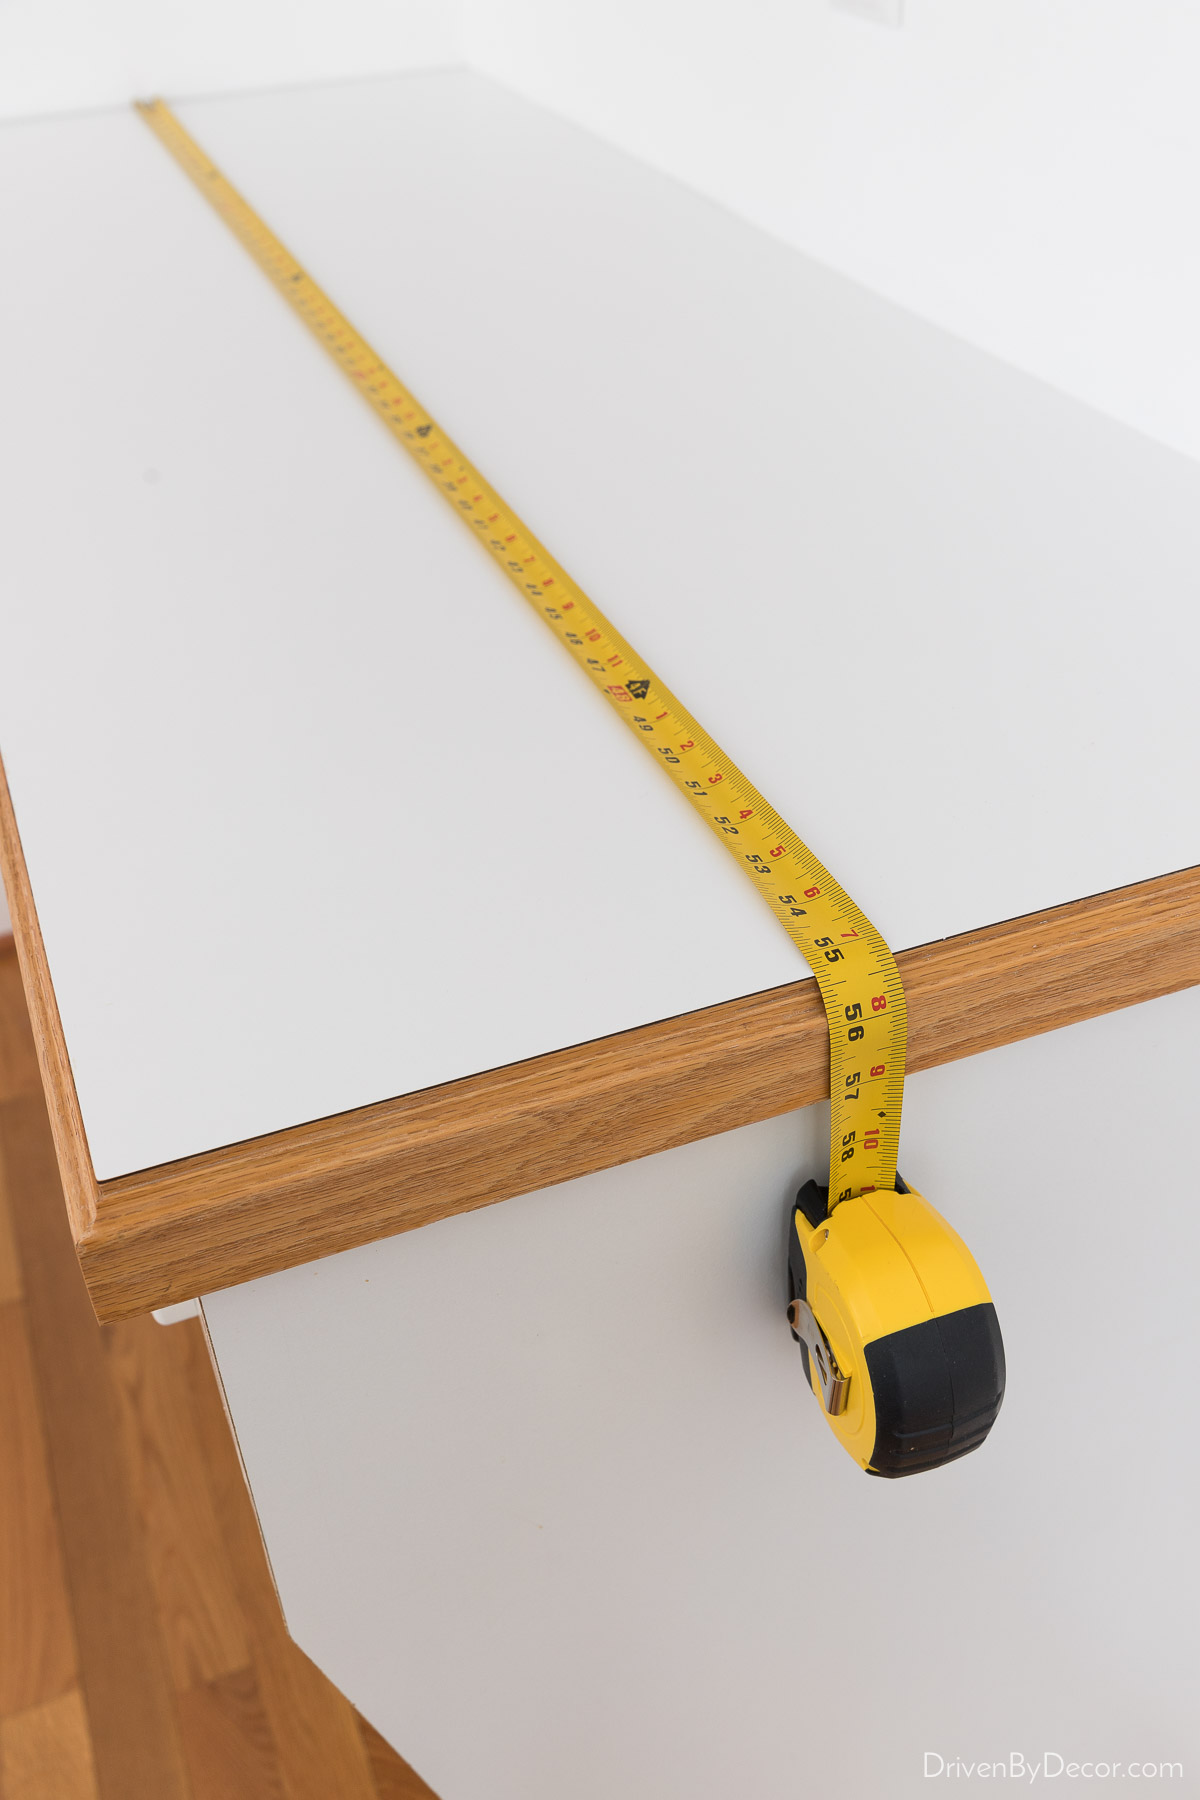
so I cut the paper at about 59″ long. If your contact paper has a printed grid on the back of it, use it to ensure that you’re making a straight cut. If you don’t have a printed grid, use something that you know to be square (like a sheet of paper) to guide you.
5. Apply the Contact Paper
The most important part in applying the contact paper to your countertop is to take the time to make sure you line it up well from the beginning. If you start it slightly off, it can end up majorly off by the time you’ve made your way down to the end of the counter.
To make it easier to handle your contact paper and get the first bit aligned right, I recommend that you start off by removing only about a small piece of the contact paper backing in the corner that you’re starting in. You can do this by lifting that section of backing up and using scissors to cut it off.
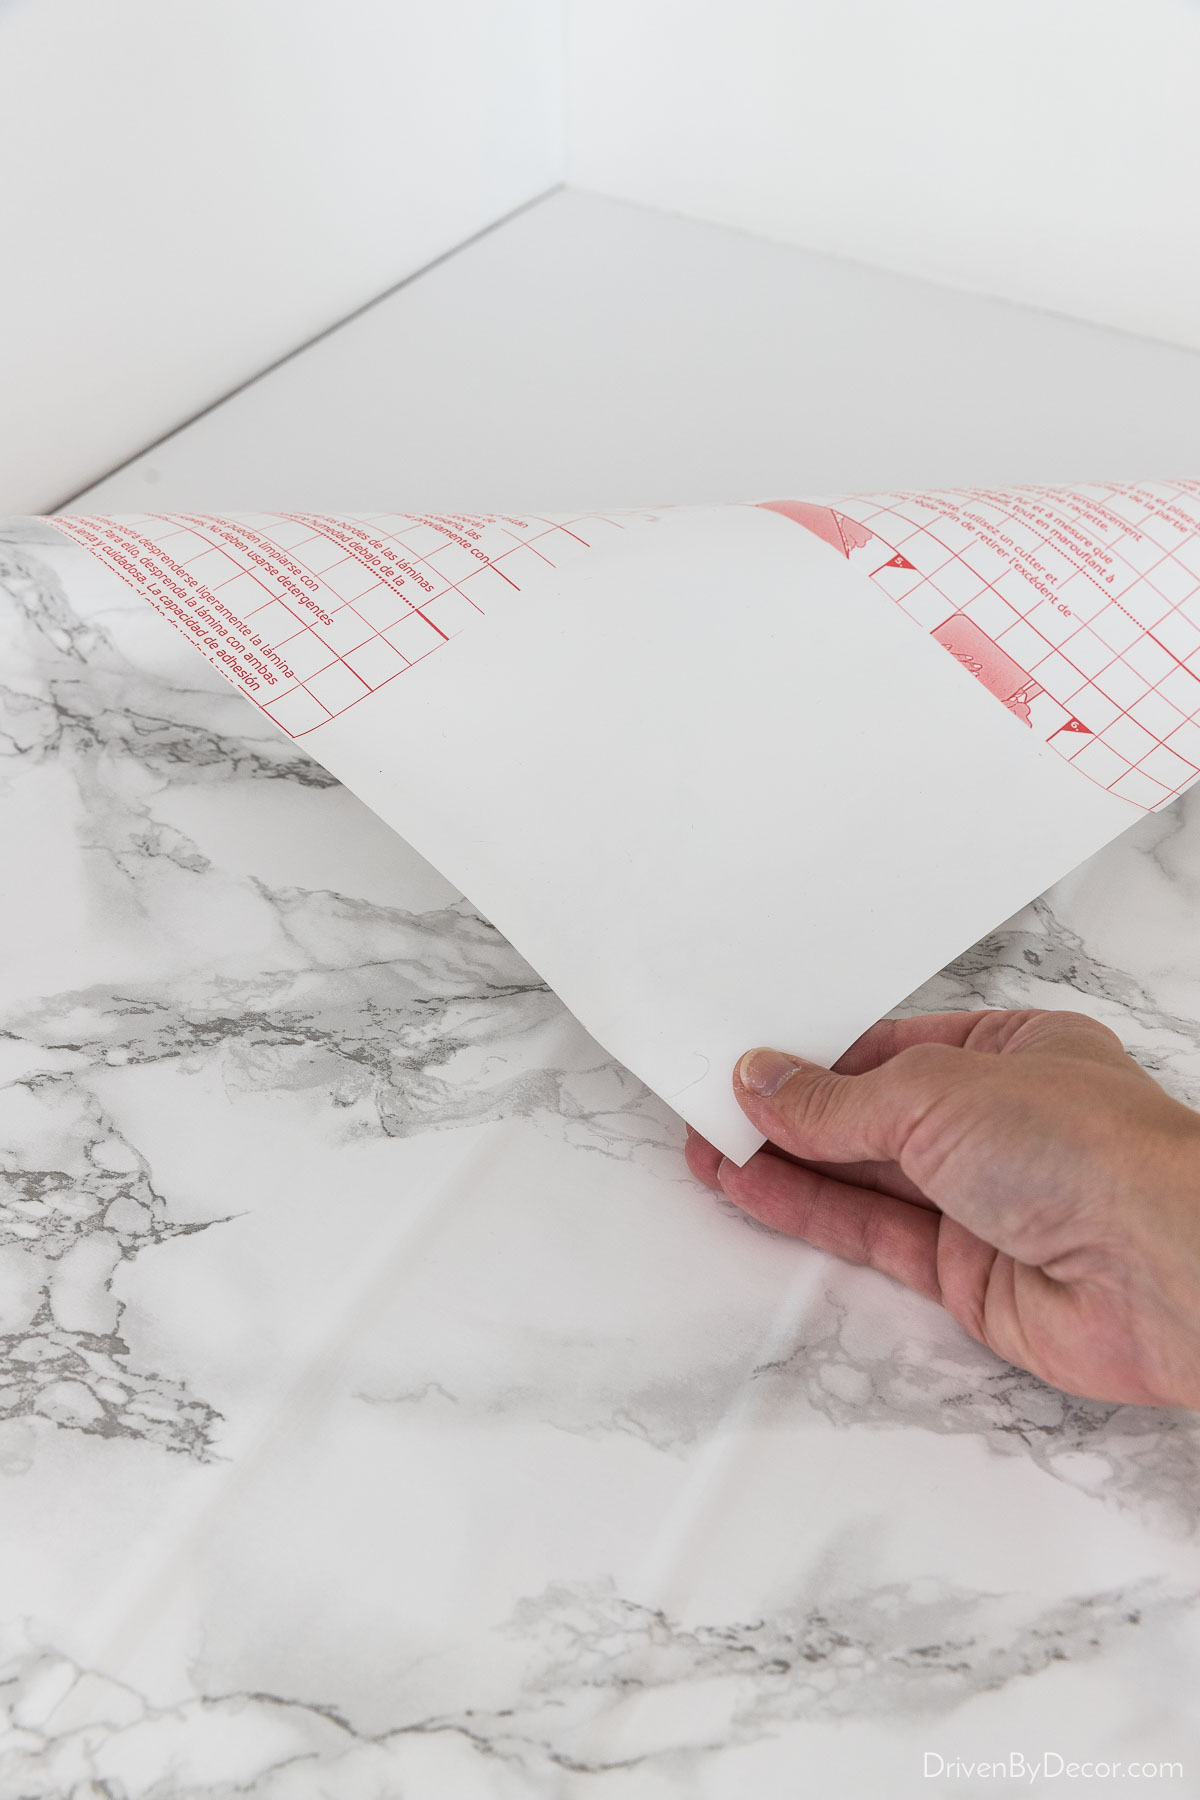
When you lay down that first corner, the goal is to align it so that you have about ¼″ to ½″ of extra paper along the back and along the left end that you’re starting from. The extra paper will be cut off at the end. You may need to lift your sticky area of contact paper up and put it back down a few times to get the angle just right.
Once you have placed it where you want to keep it, use {this smoothing tool} to smooth your square of contact paper out. If there are any air bubbles, use the smoother to push the bubble toward an open end.
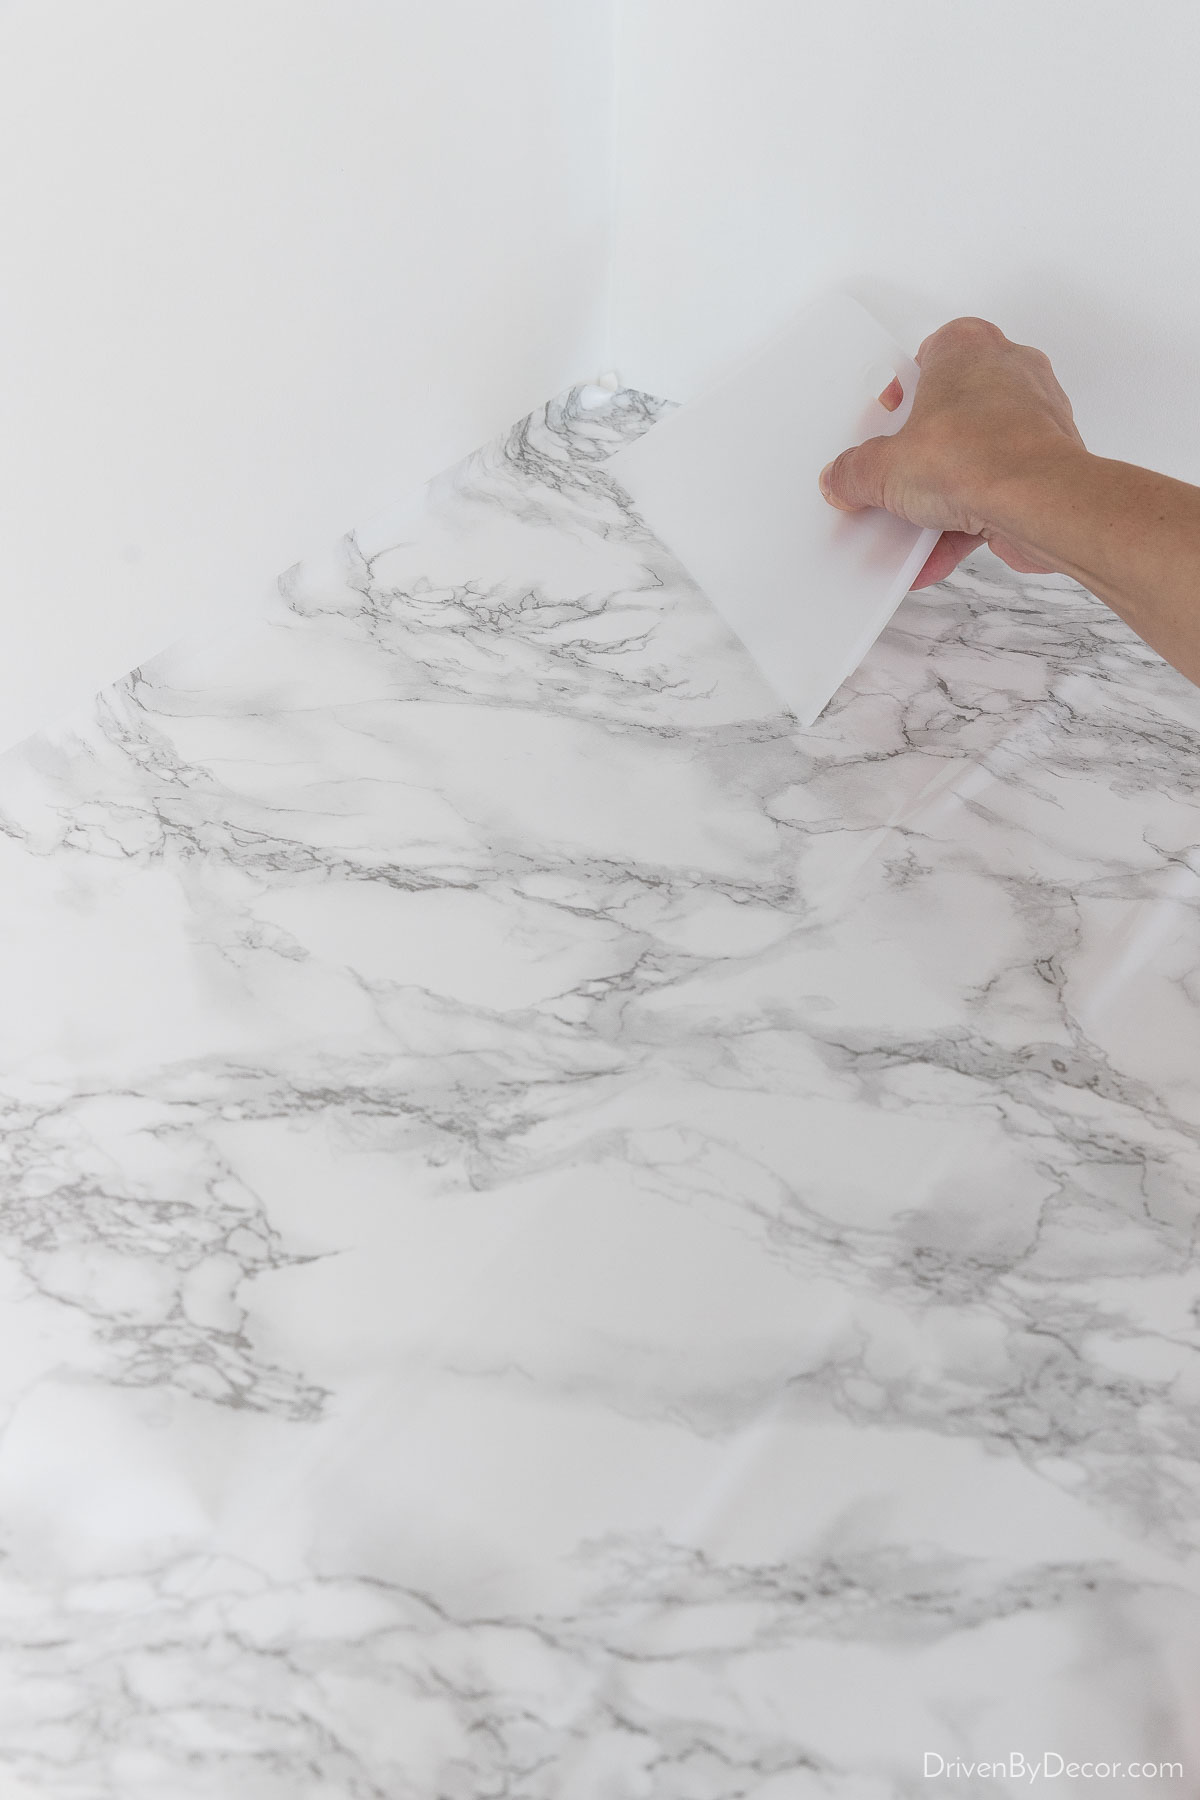
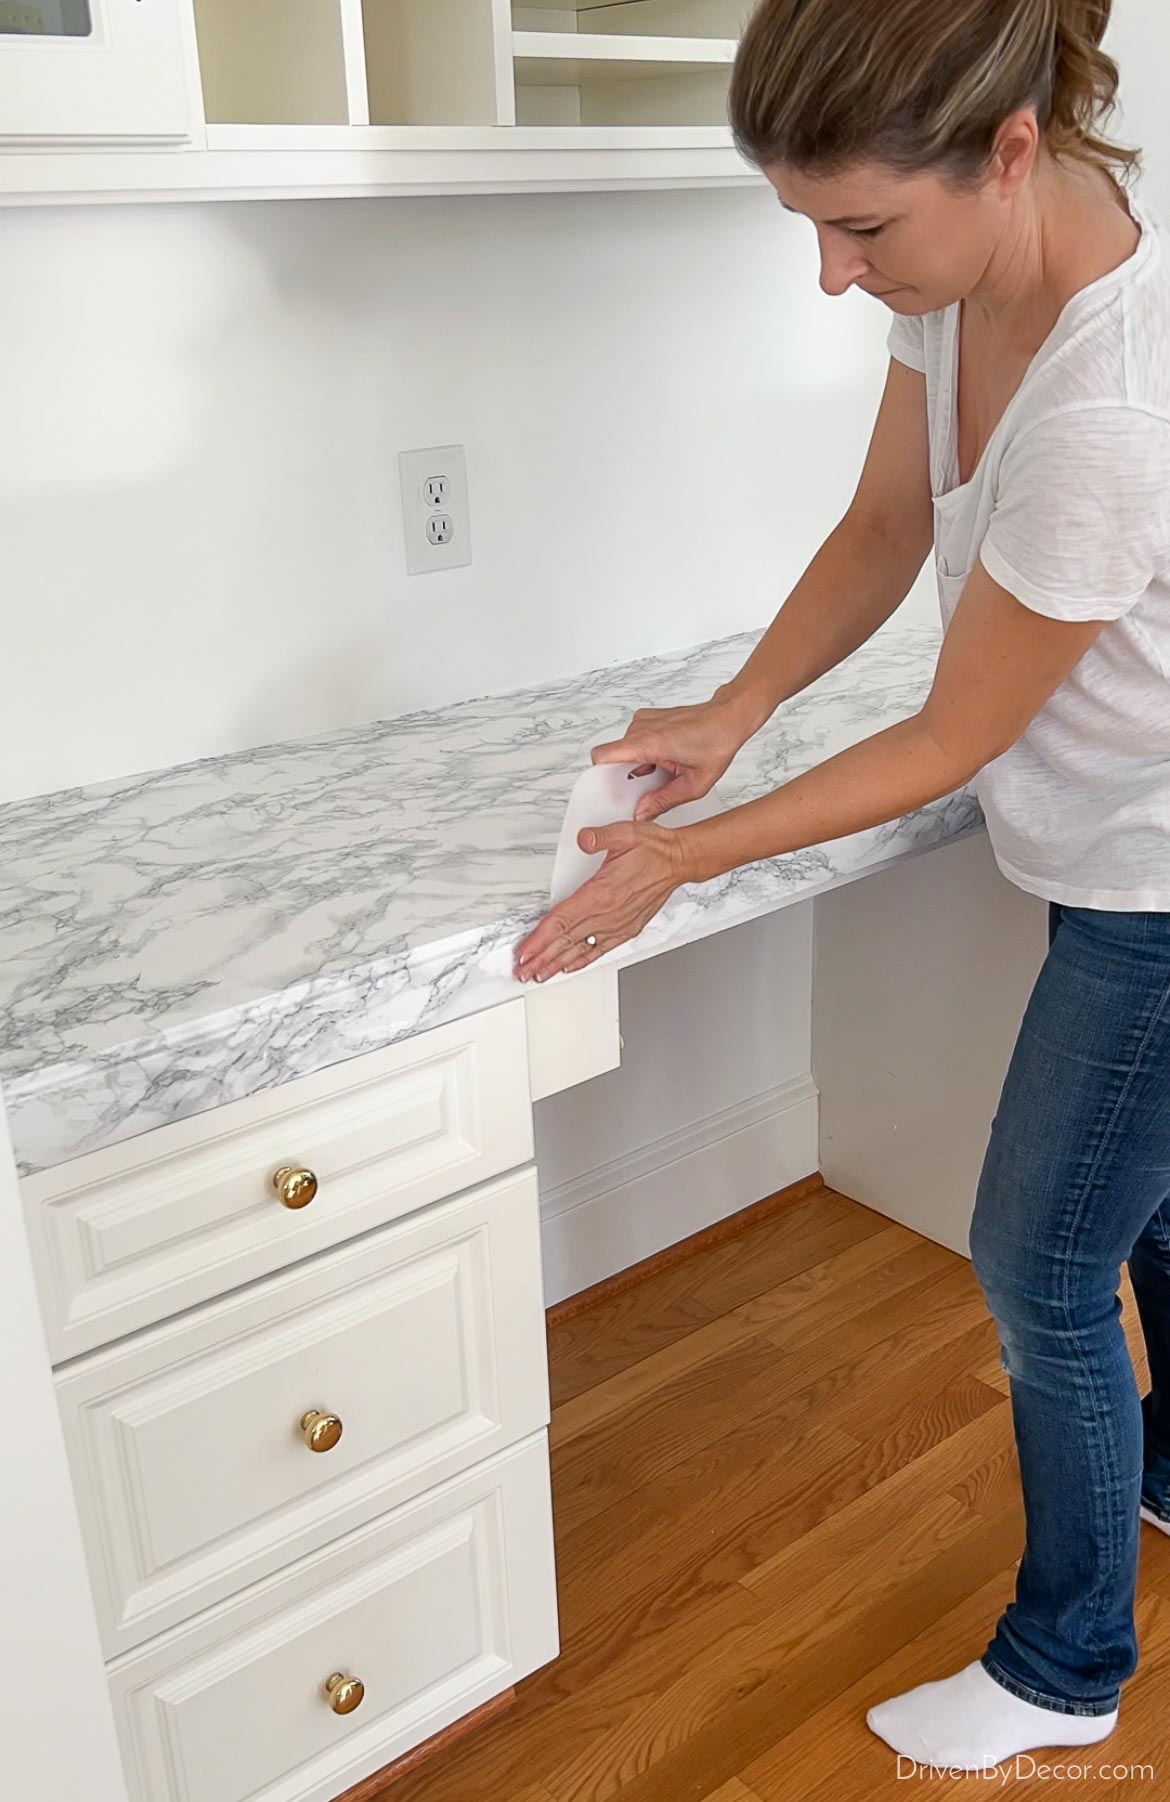
Next, start pulling the rest of the backing off of the contact paper just a little bit at a time,
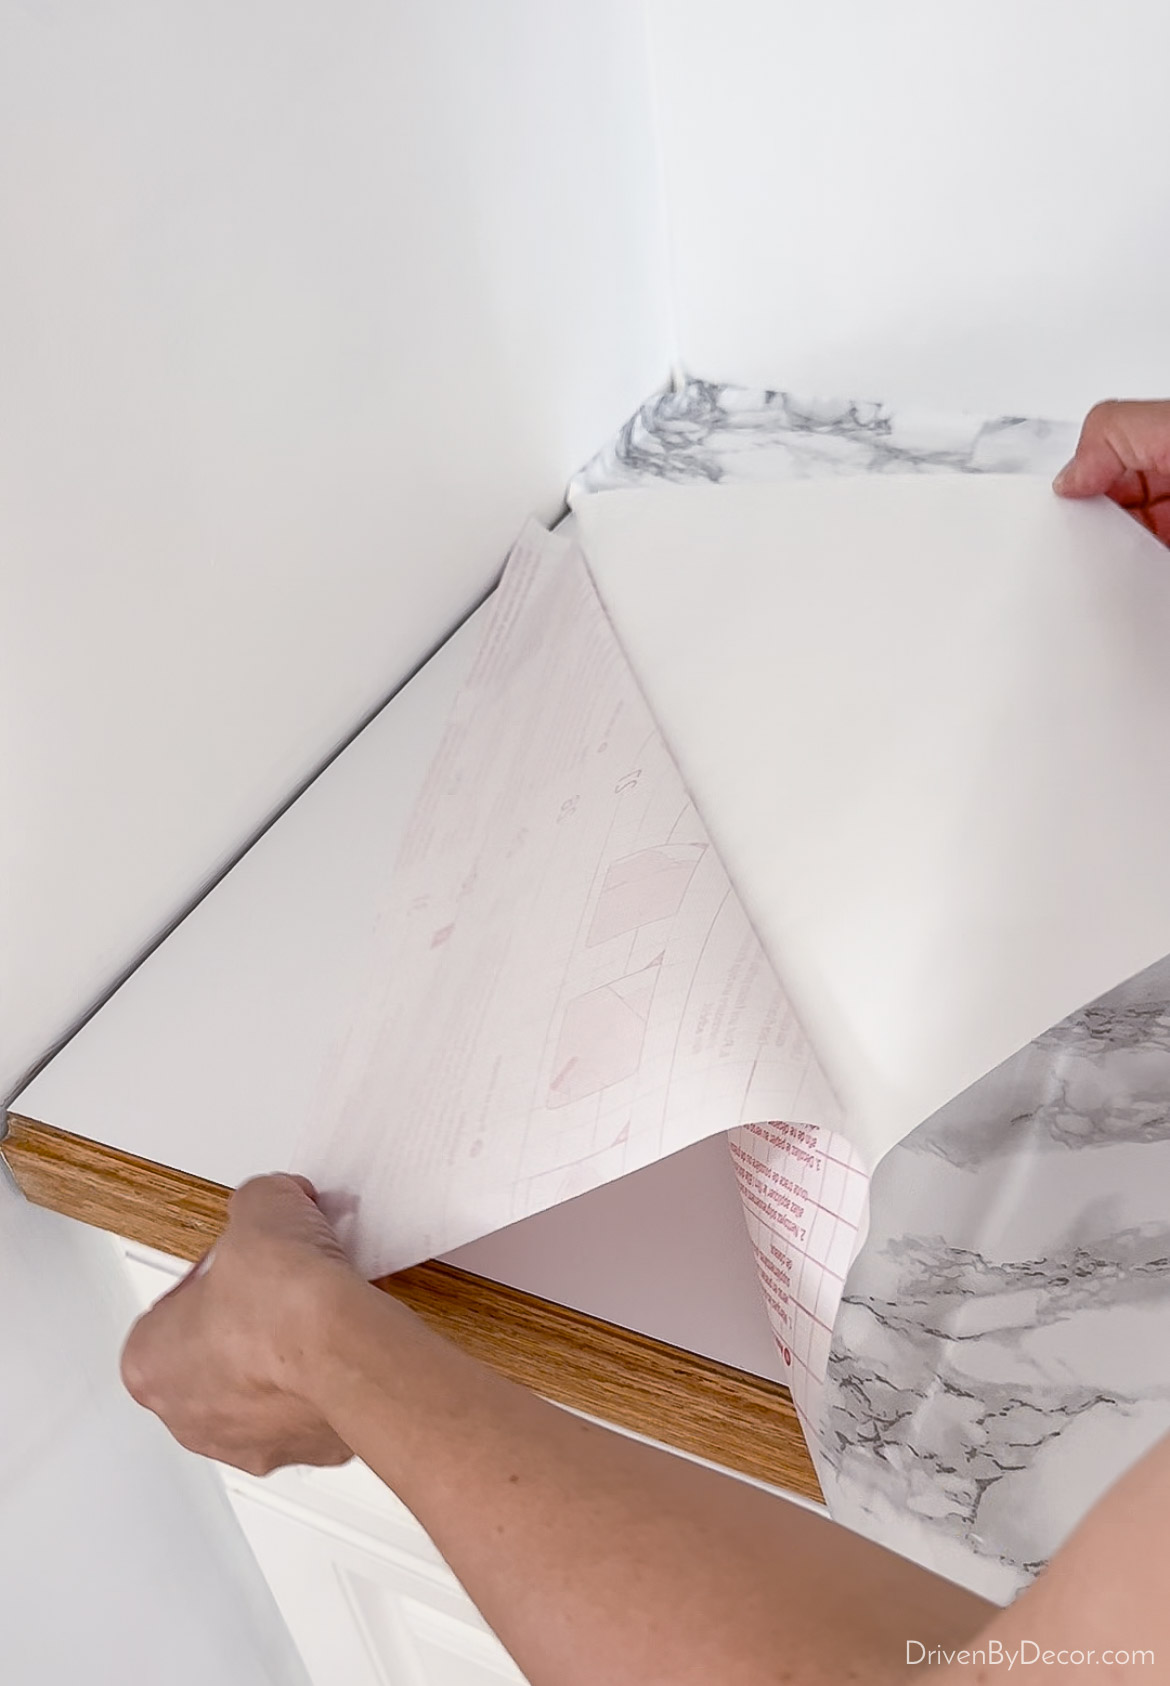
adhering it to the countertop and smoothing as you go before lifting up the next section.
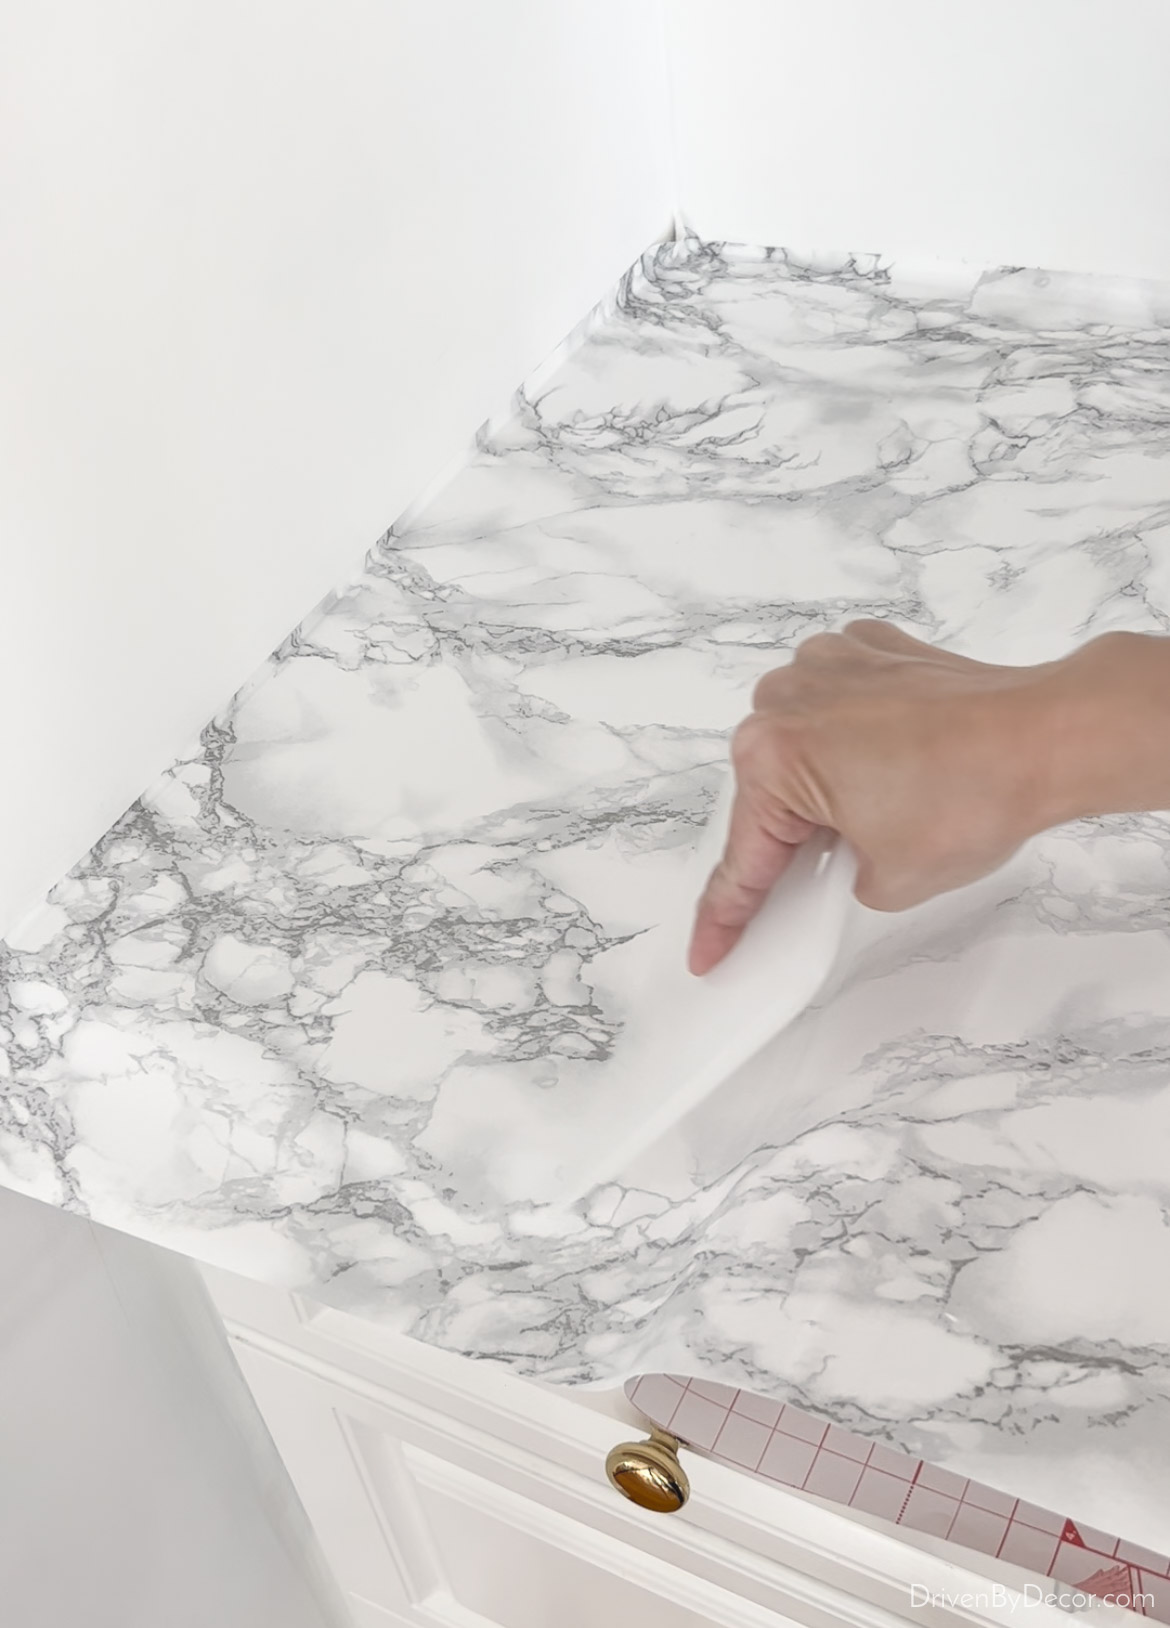
My biggest piece of advice is to not rush it and sure each area is smooth (no bubbles!). Sometimes the bubbles are difficult to see from above so once you’ve done one section, look at it from a few angles to confirm you got all of the bubbles out before moving to the next section.
6. Cut Off Extra Paper
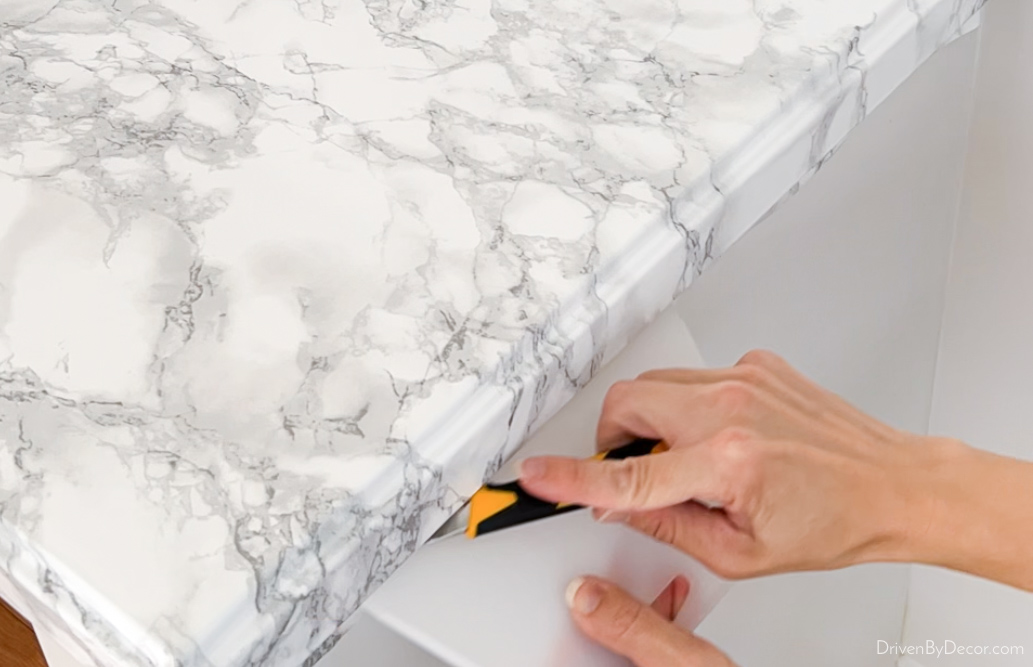
Once you’ve covered your countertop, it’s time to cut off the extra paper along the sides where the countertop meets the wall (in my case, the left side and along the back). The simplest way I found to do this well is by using the same trick as when I wallpaper. Place your smoothing tool in the crevice between the countertop and wall and then place a utility knife with break-off blades like {this one} right on top of it (use a new sharp blade!). Move both the smoothing tool and the razor down the wall in unison to make your cut (don’t lift up your razor) – it will be nice and smooth and even:
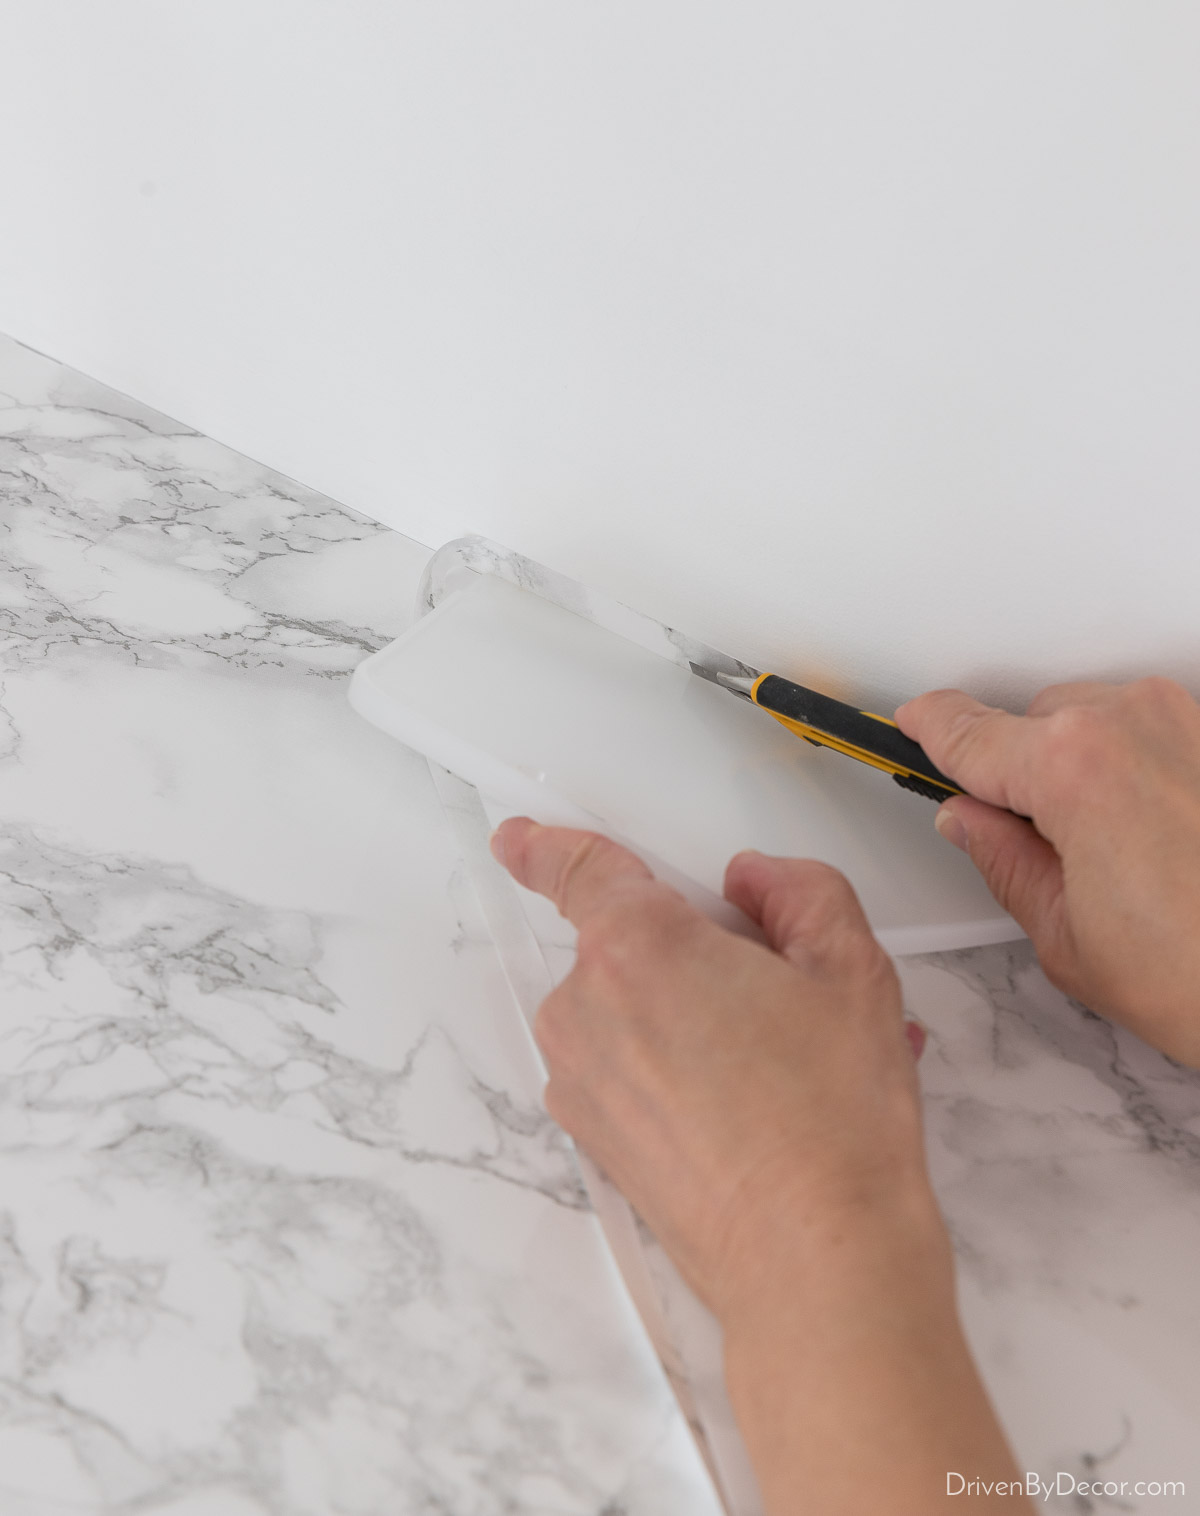
Then you can simply lift up and discard your trim piece:
It’s hard to get into the corner with the razor so you might need to lift up the corner a bit and use scissors to make the cut there (the small scissors I mentioned are great for this). This method of cutting with the smoother + utility knife is also how you’d cut around the sink if you’re doing bathroom or kitchen countertops.
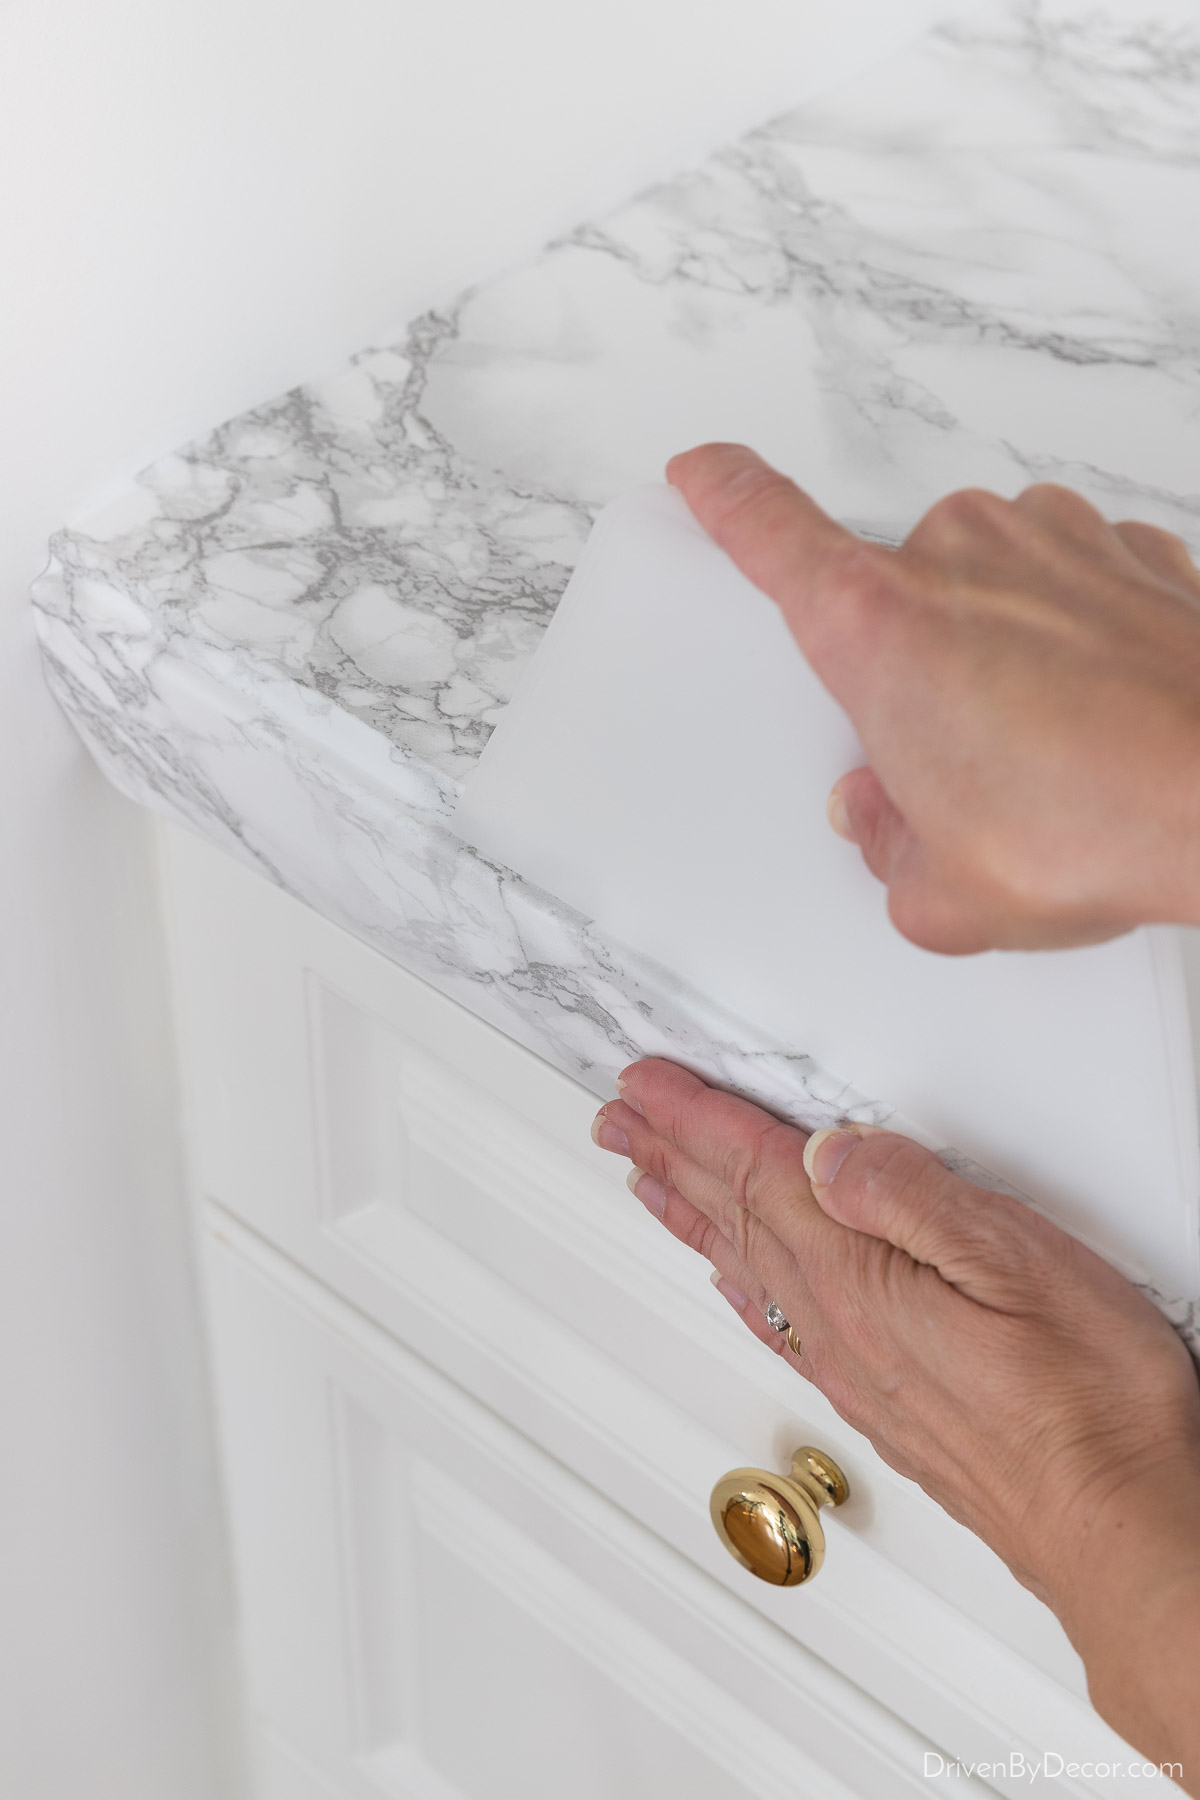
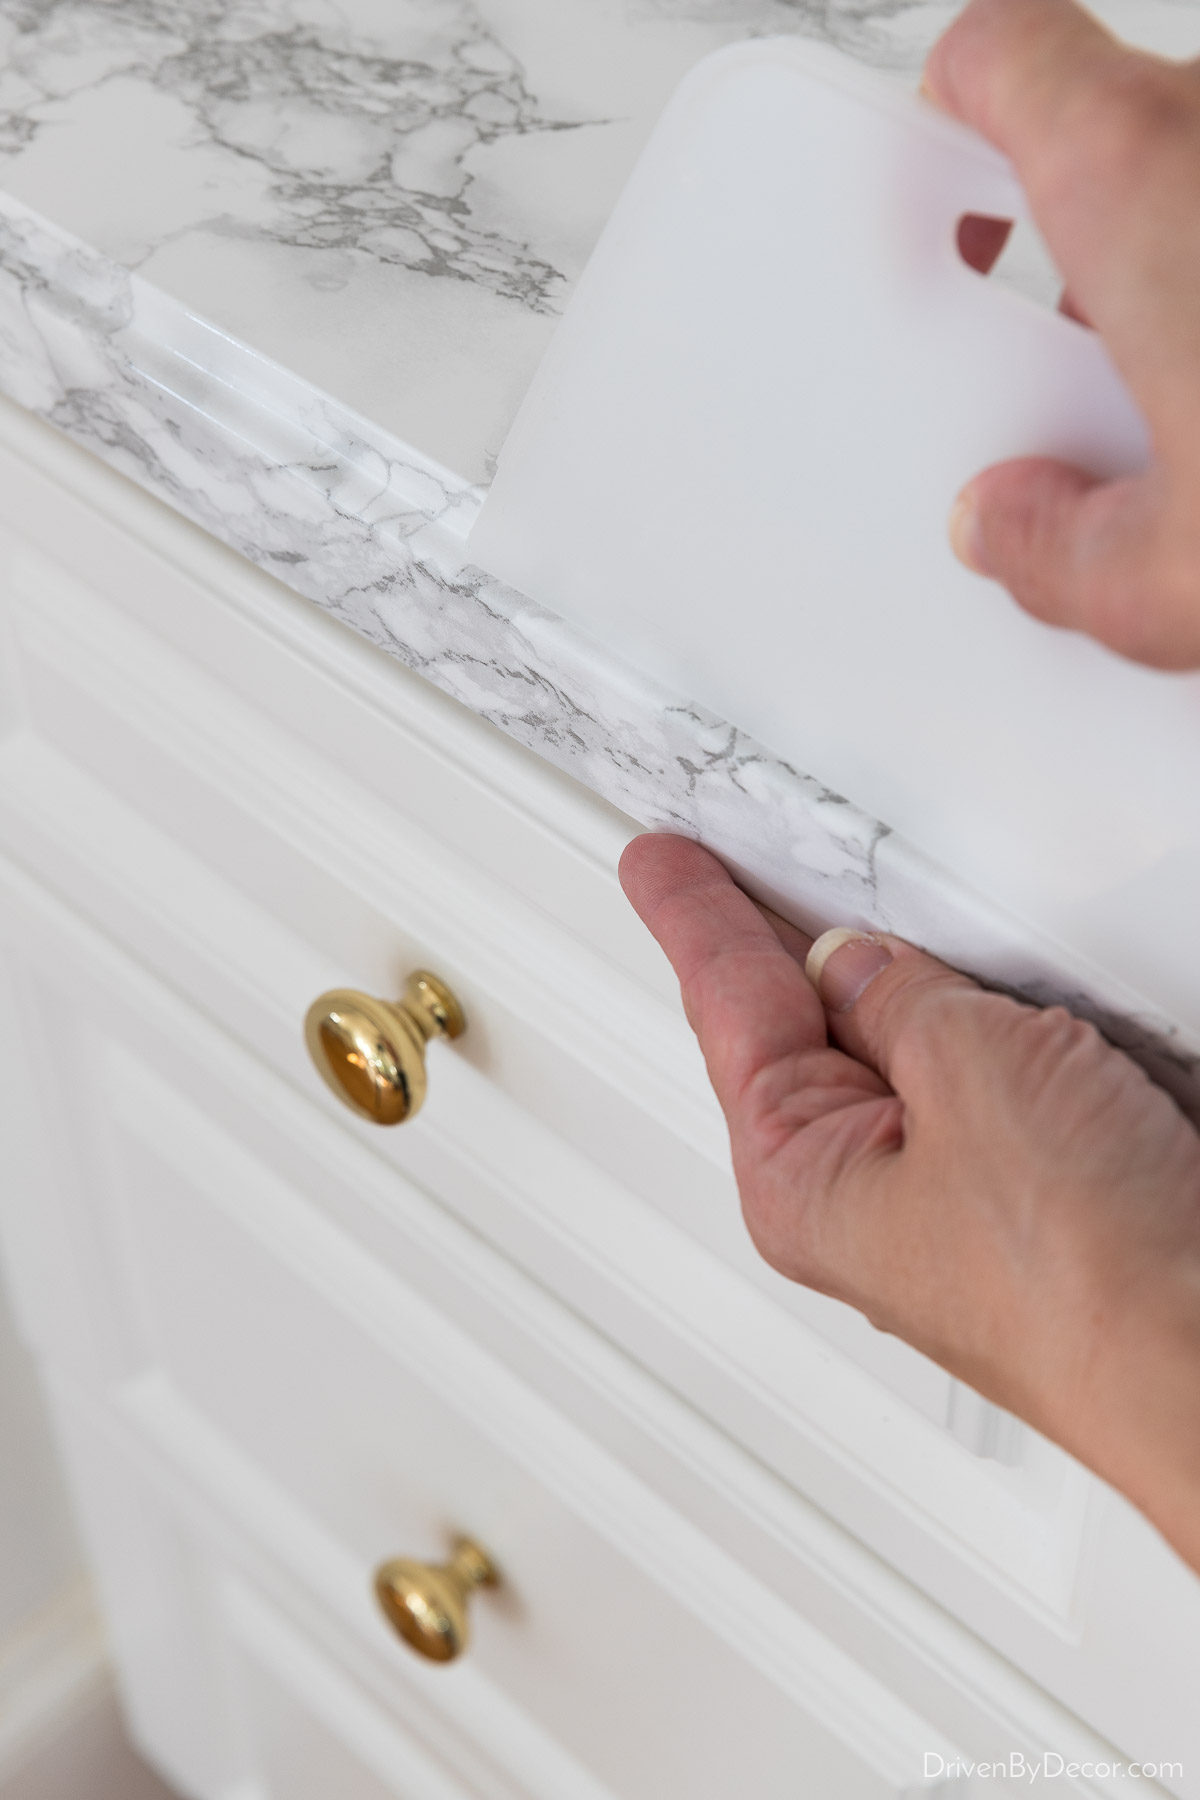
7. Fold The Corners & Edges
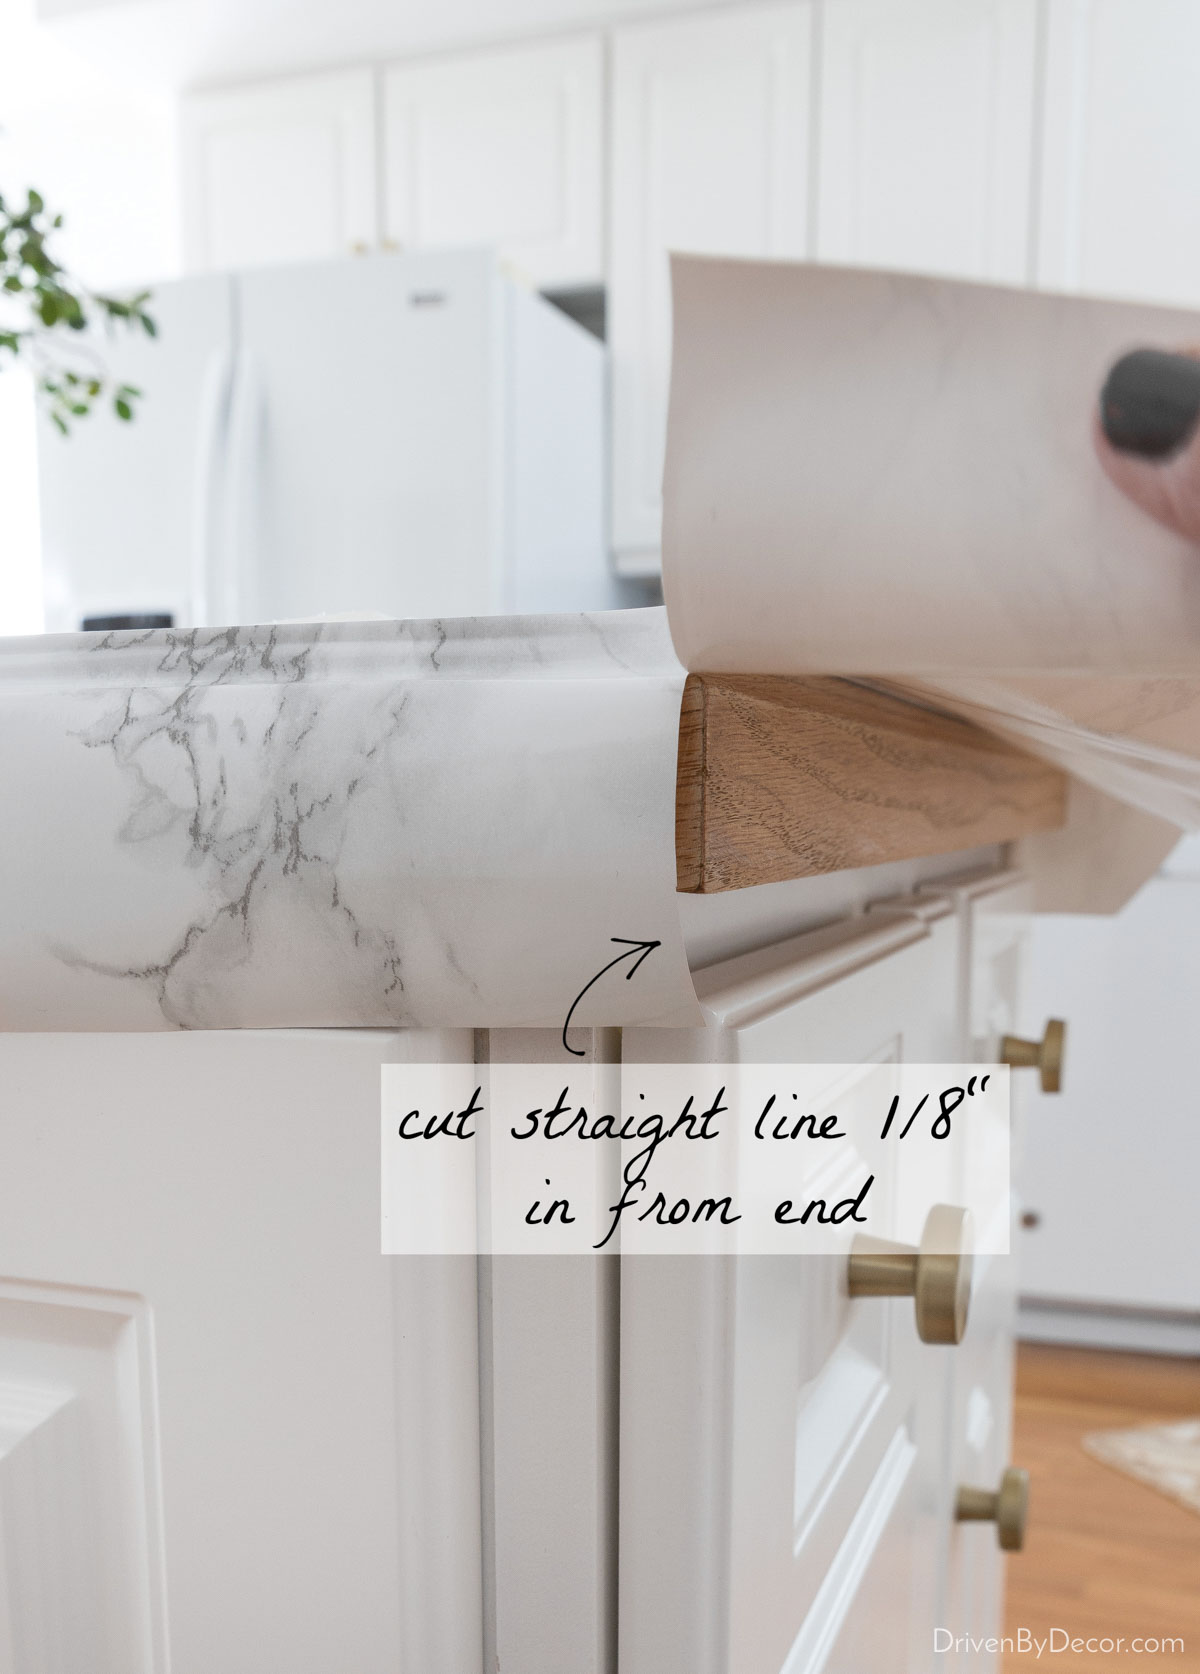
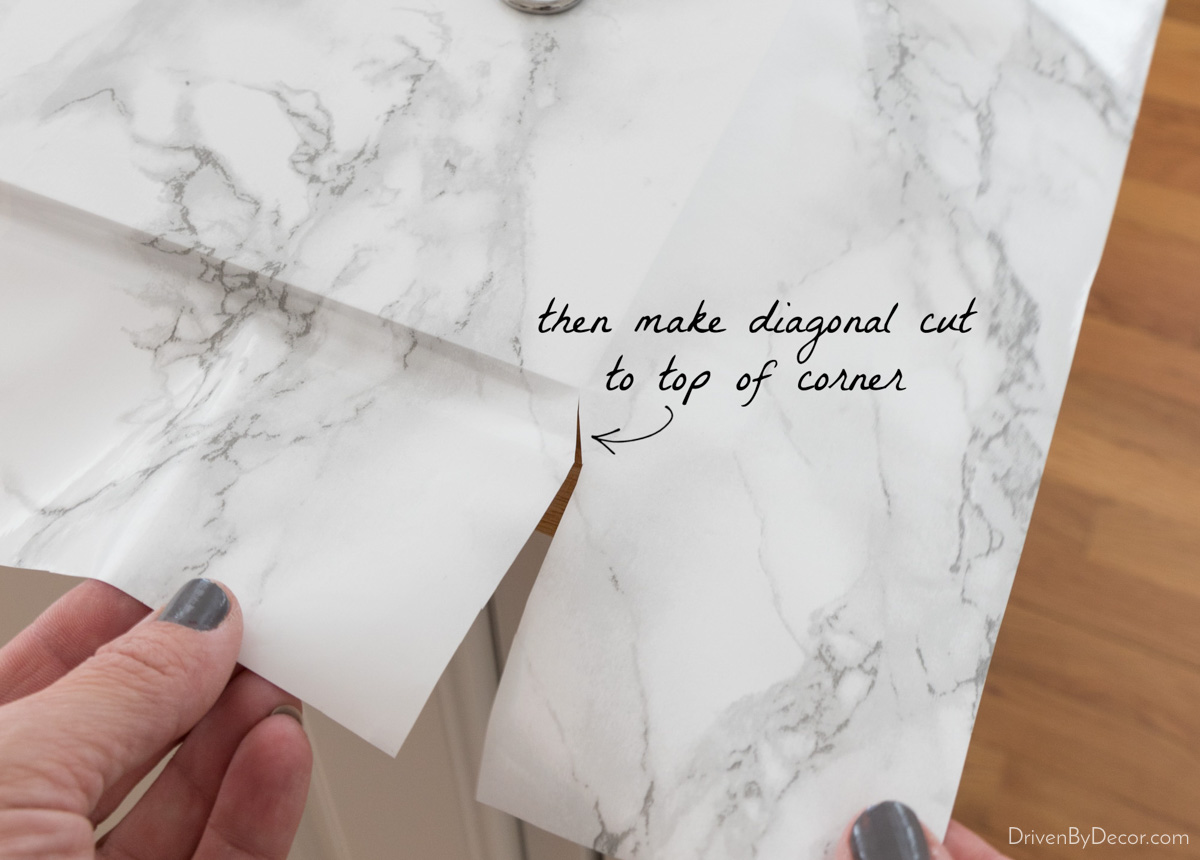
Before you wrap your paper around the edge of your countertop, it’s time to tend to any outside corners. What I found worked best is to first make a straight cut up one side about ⅛″ in from the corner:
If you have detailing on your countertop edge like I do, stop your straight cut at the point where your corner starts to angle in. Then make a second cut on the diagonal that starts where you left off and ends at the top of the corner:
Next wrap your paper over the edge of the second side (the one NEXT to the side you made the initial straight cut on). I share a few tips for wrapping the edges later in this post but let’s continue on with talking about the corner first.
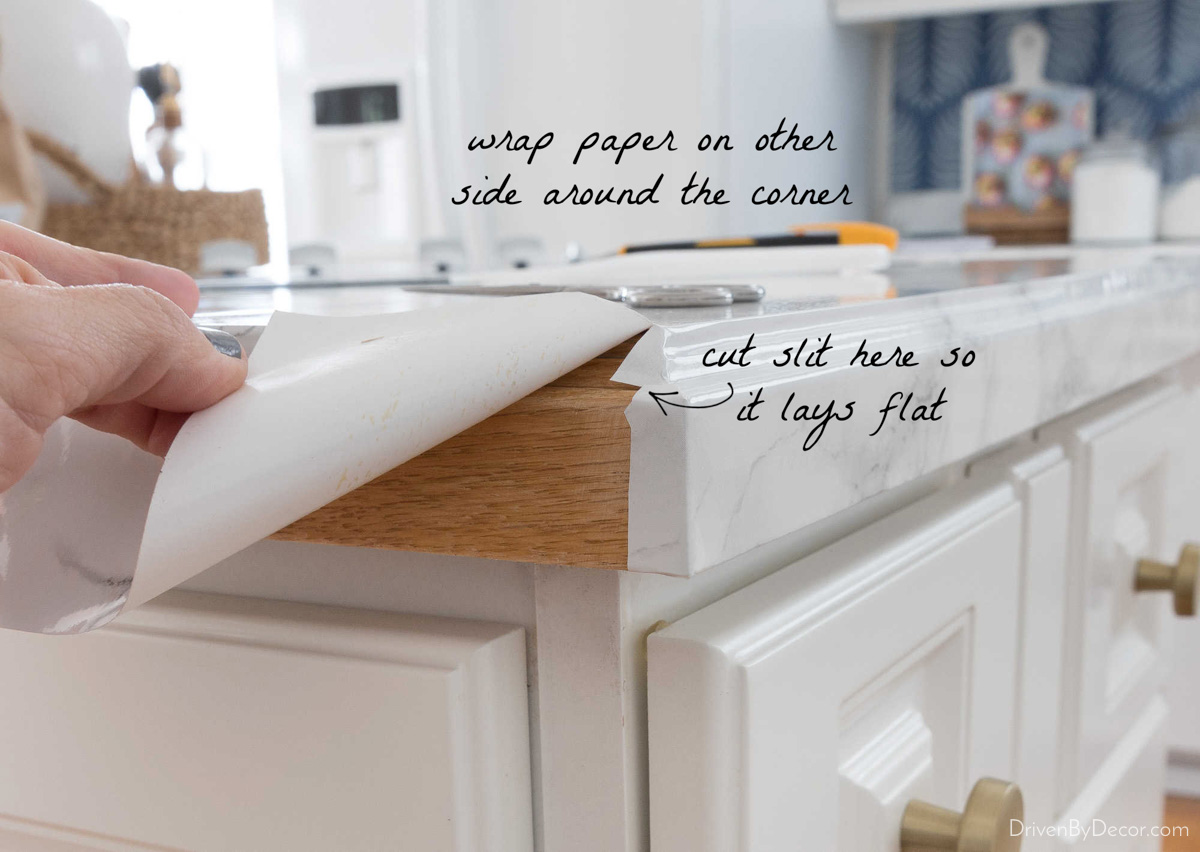
Once you’ve wrapped your paper over the length of the countertop edge, wrap it around the corner too so there’s about ¼″-½″ of paper wrapped around (cut off any extra). If you have edge detailing like I do, you might need to cut a slit or two in your paper to get it to round the corner and lay flat. It doesn’t have to look pretty:
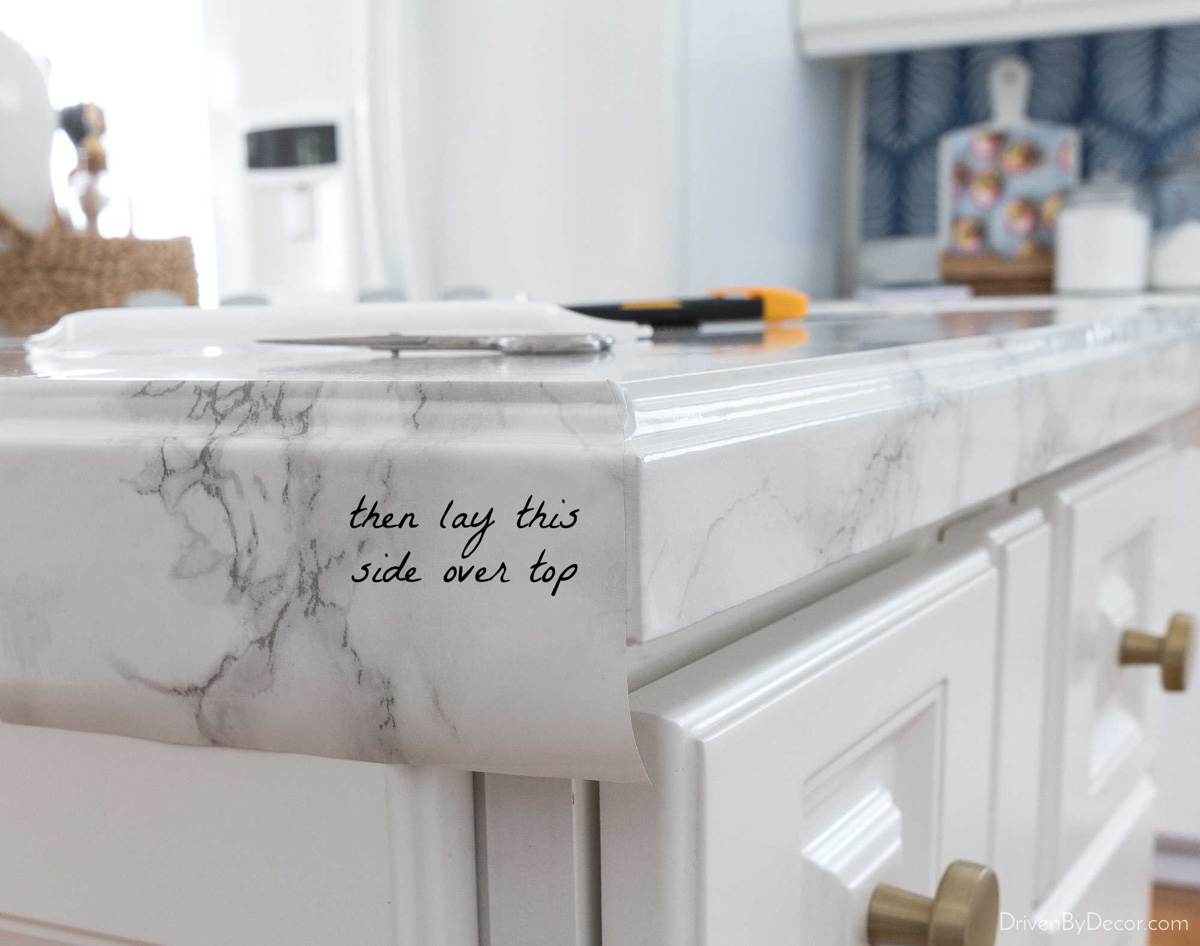
Now you can wrap your paper around the other countertop edge. It will overlap and cover the paper that you rounded the corner with:
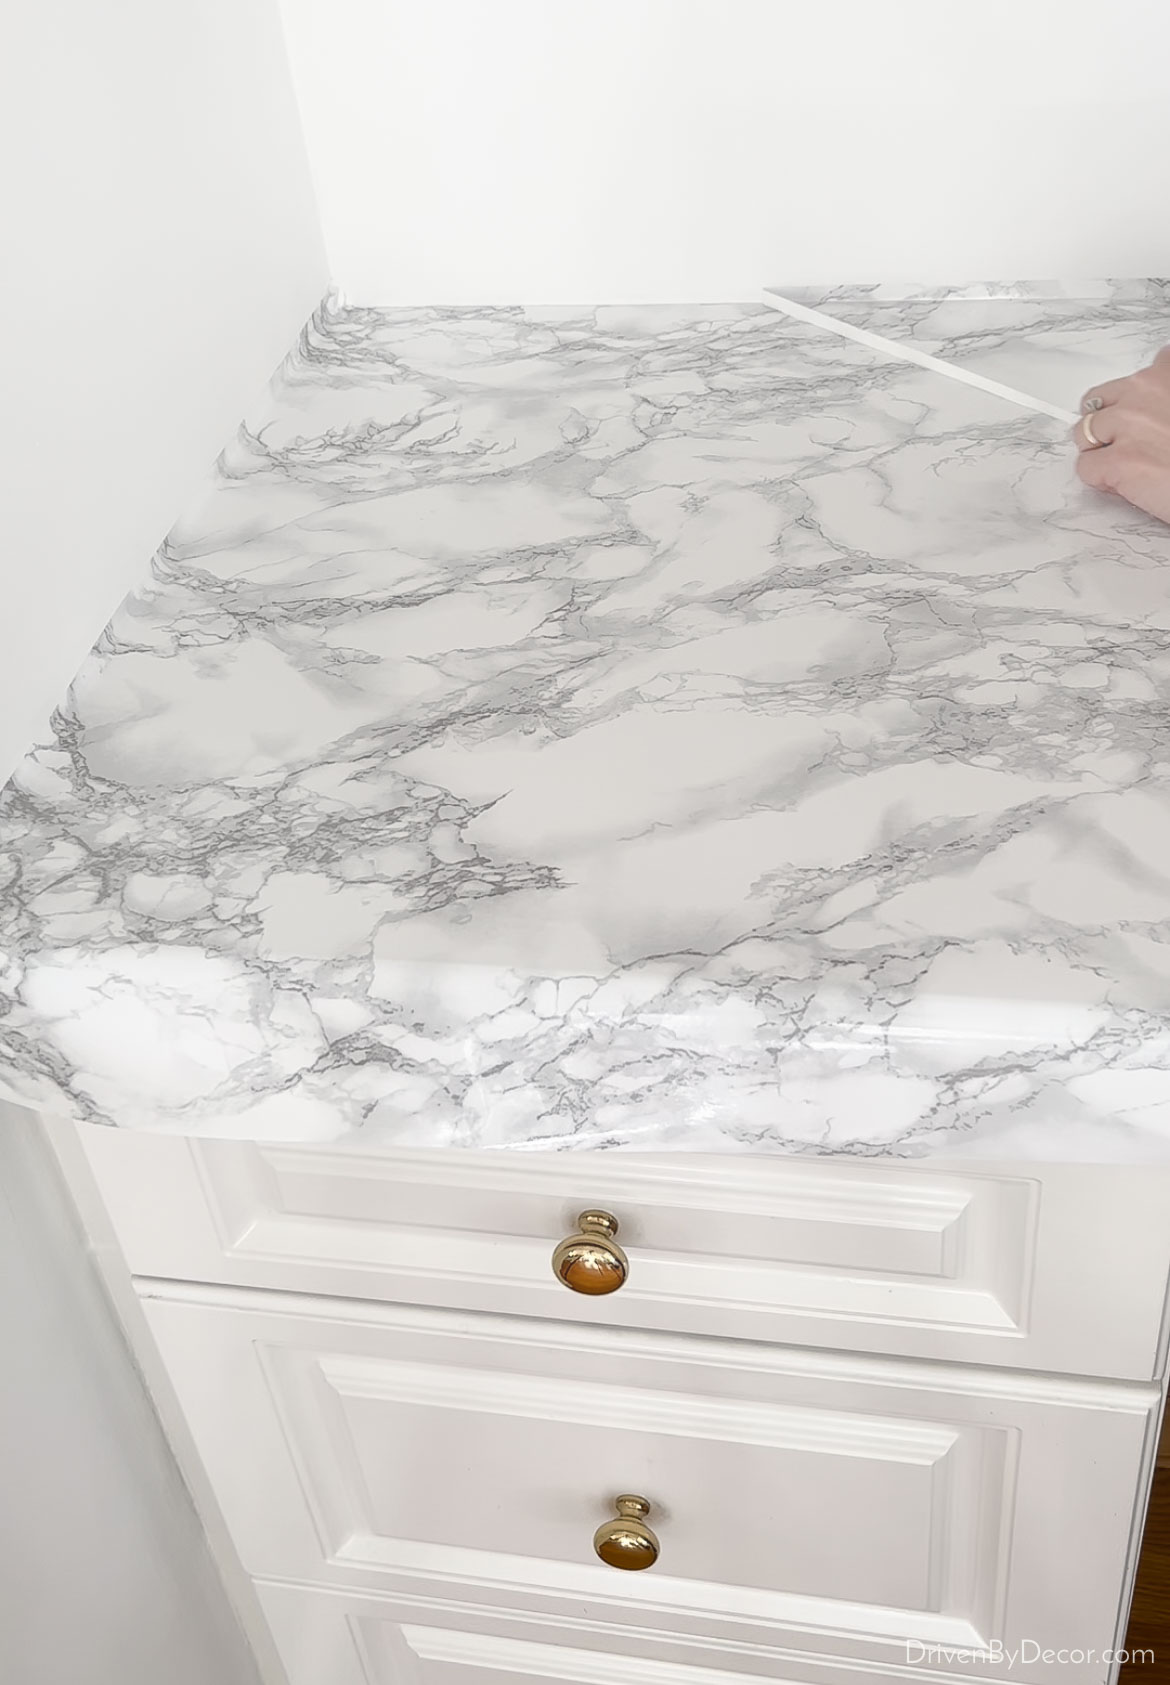
Done!
Tips for Wrapping the Edges
When wrapping the contact paper over the countertop edge, push the paper into any dips or crevices in your edge design and smooth it down well as you go:
Once it’s smooth along the entire length of the edge, tuck the remaining bit of contact paper under the edge of the countertop and press it firmly in place.
If there’s any extra paper (i.e. your paper covers the entire underside of your edge and keeps going), cut the extra off underneath with a razor guided by your smoother:
8. Smooth Out Any Bubbles You Find at the End
While it’s key to smooth out as many bubbles as you can while applying it, odds are you’ll find a few areas you missed. If you have a bubble or two, pricking them with a needle and smoothing them down with your smoother usually does the trick. You can also try using a hairdryer to slightly warm up the bubbled area before smoothing it down.
What About the Seams?
Depending upon the layout of your kitchen, you may or may not have to seam your countertop paper. I experimented with a few different ways to handle the seams that we had on our large kitchen island. I found that it looked best to pattern match – the only downside of doing this is that it involves using a good bit more paper so be sure to buy extra!
First, find the spot on the roll that matches the pattern on the strip you just placed down. This is where the paper waste comes in – as you can see there’s about 6″ of overlap:
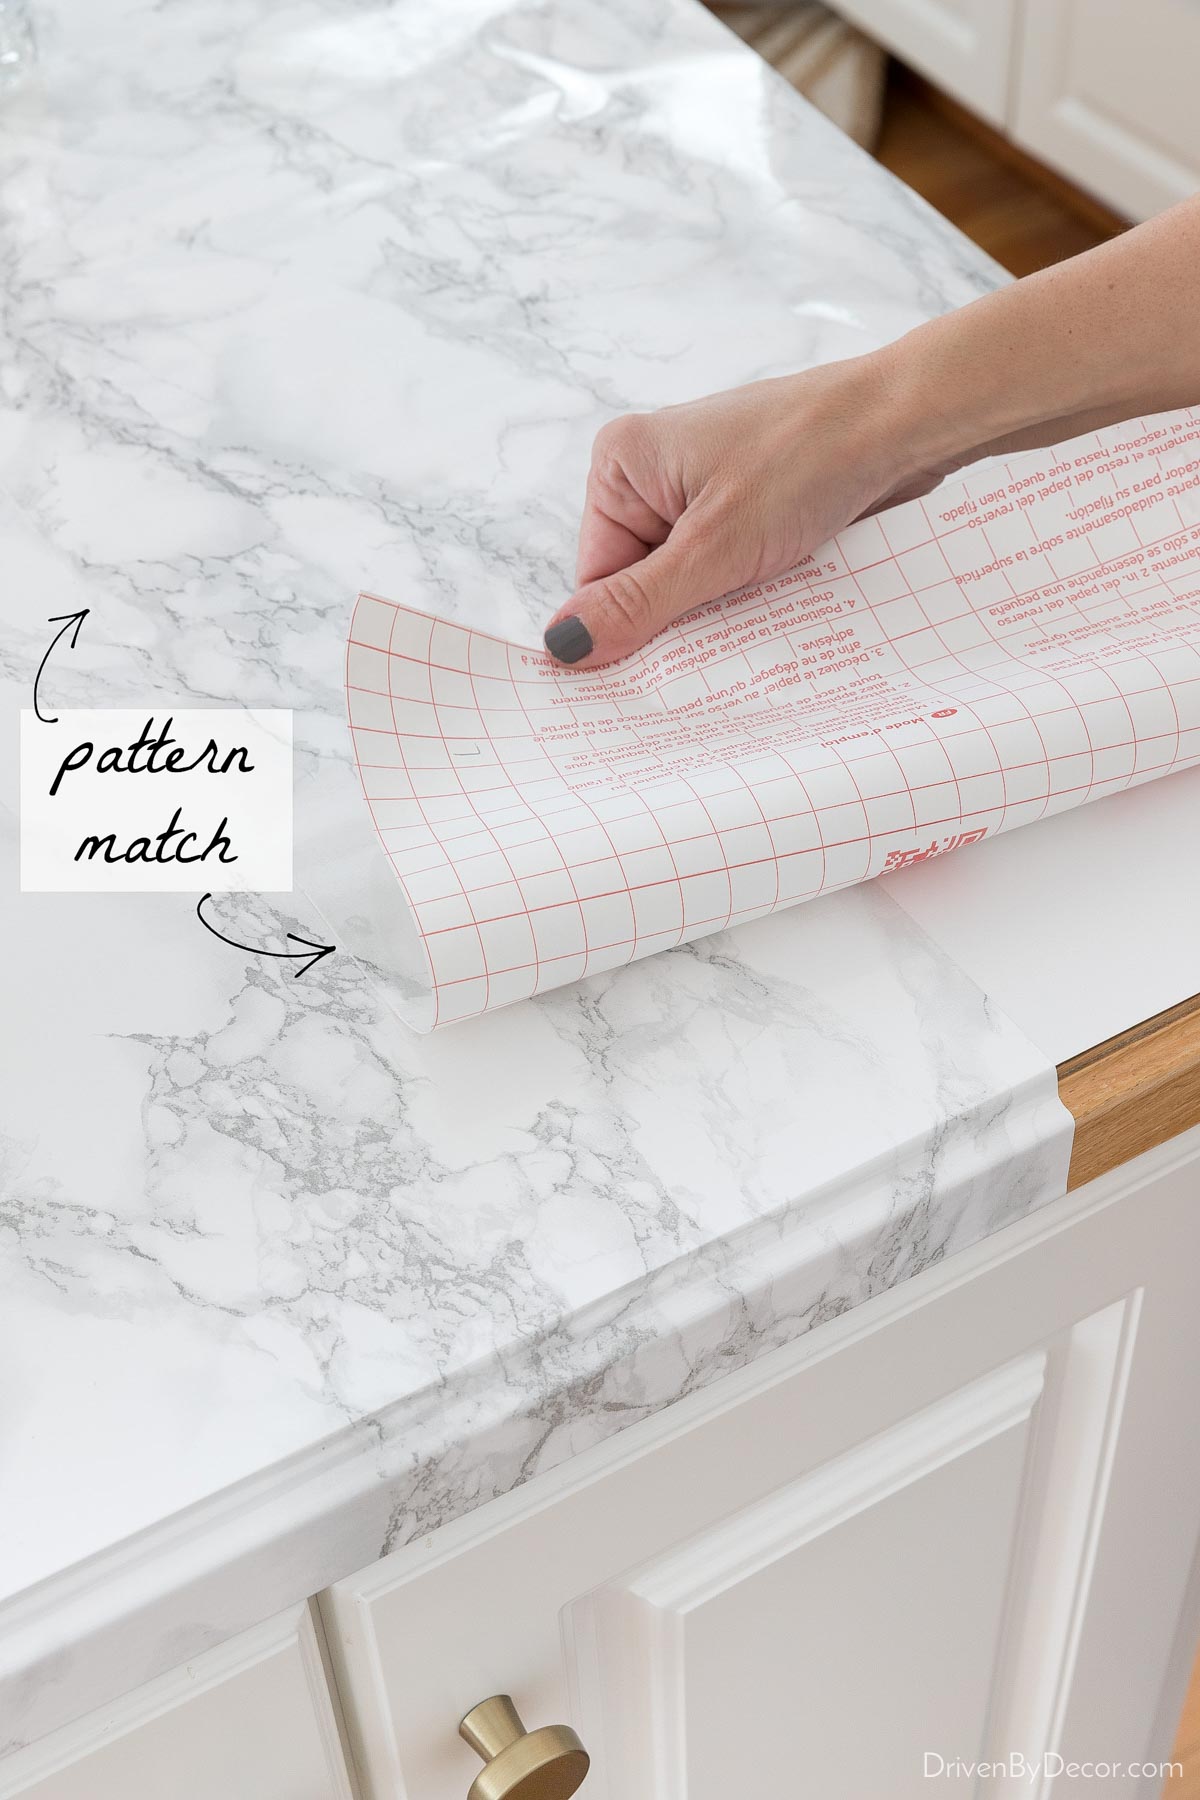
Make a straight line cut along the length of the new sheet so that the overlap of the two strips is only about ¼″:
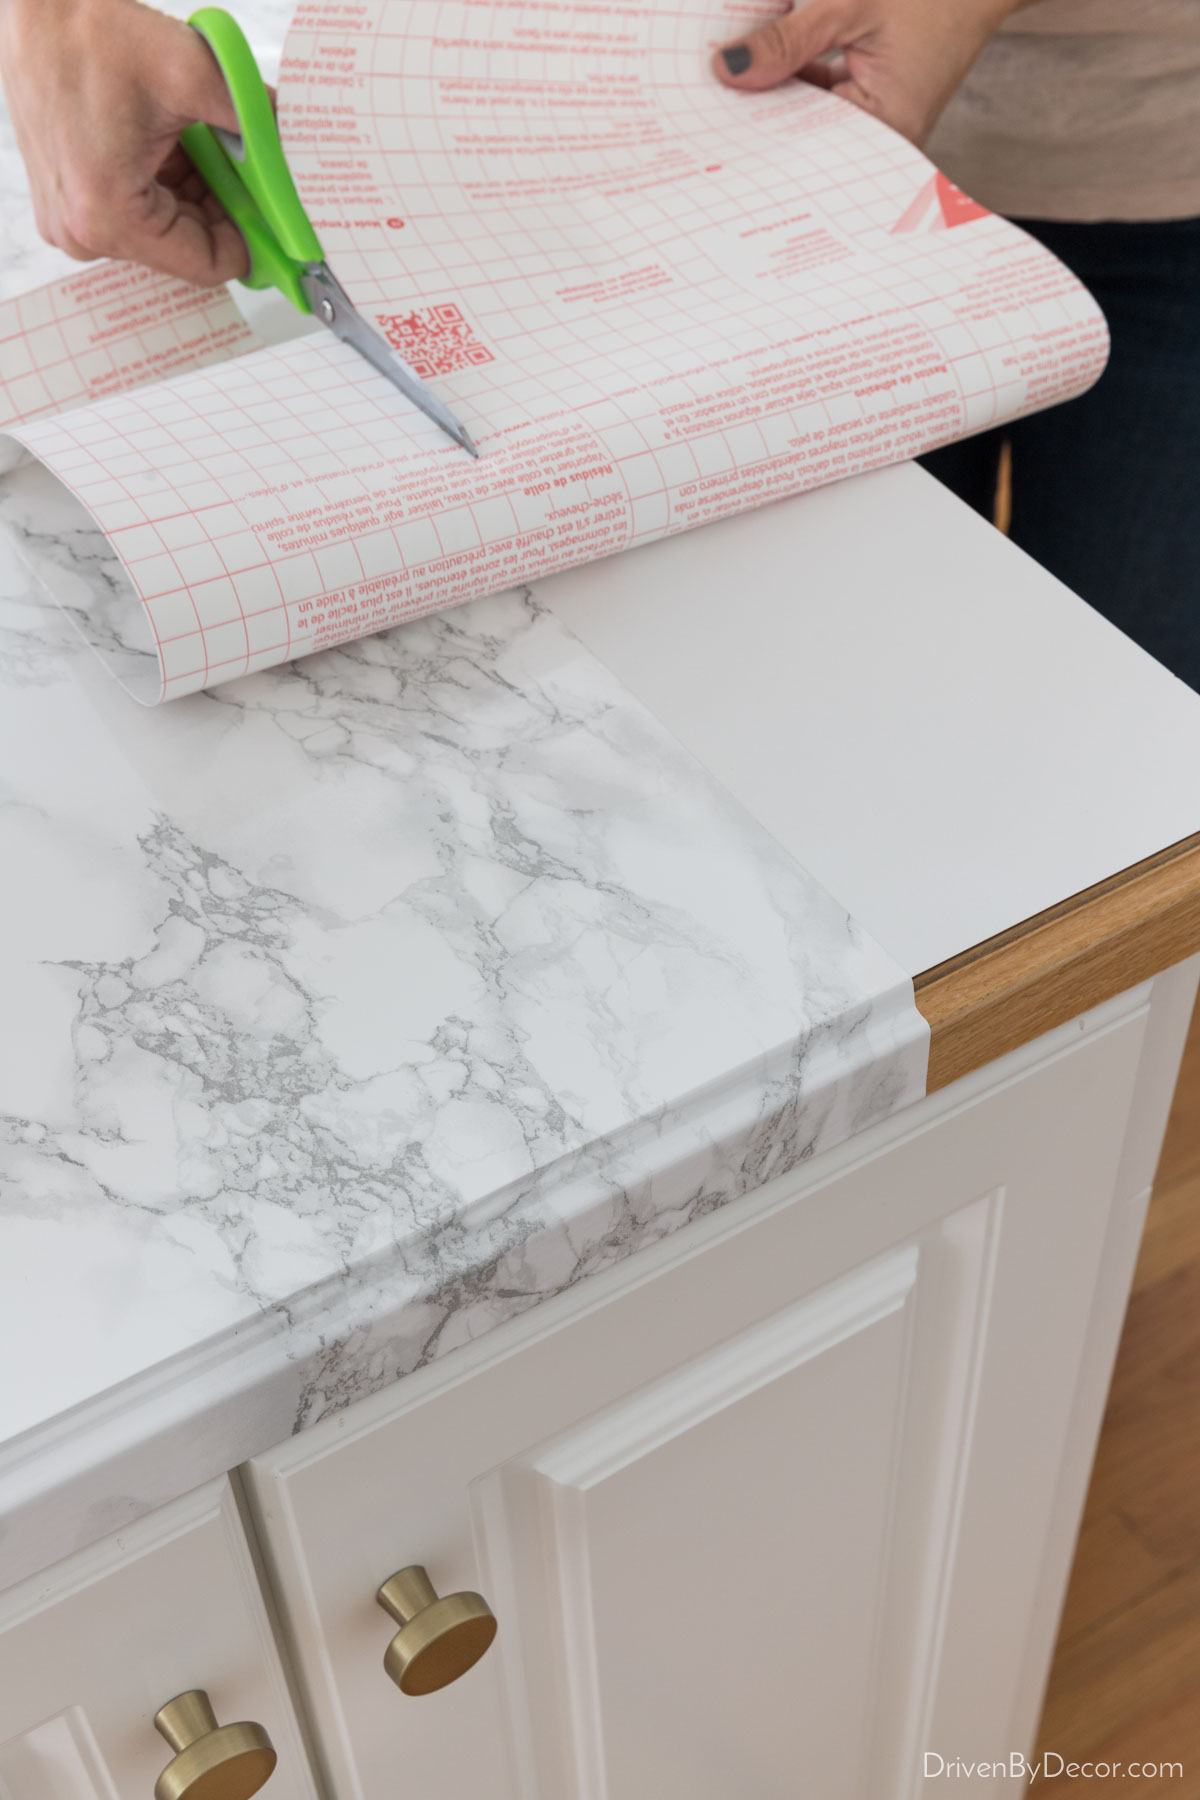
Then to make things easier, remove only a narrow strip of the backing along the entire edge that you’re pattern matching. It allows you to be more precise without your entire sheet sticking down and making it more difficult to reposition:

Once the pattern is matched, smooth down the entire edge with your smoother and then slowly remove the backing from the rest of the paper as you smooth it down:
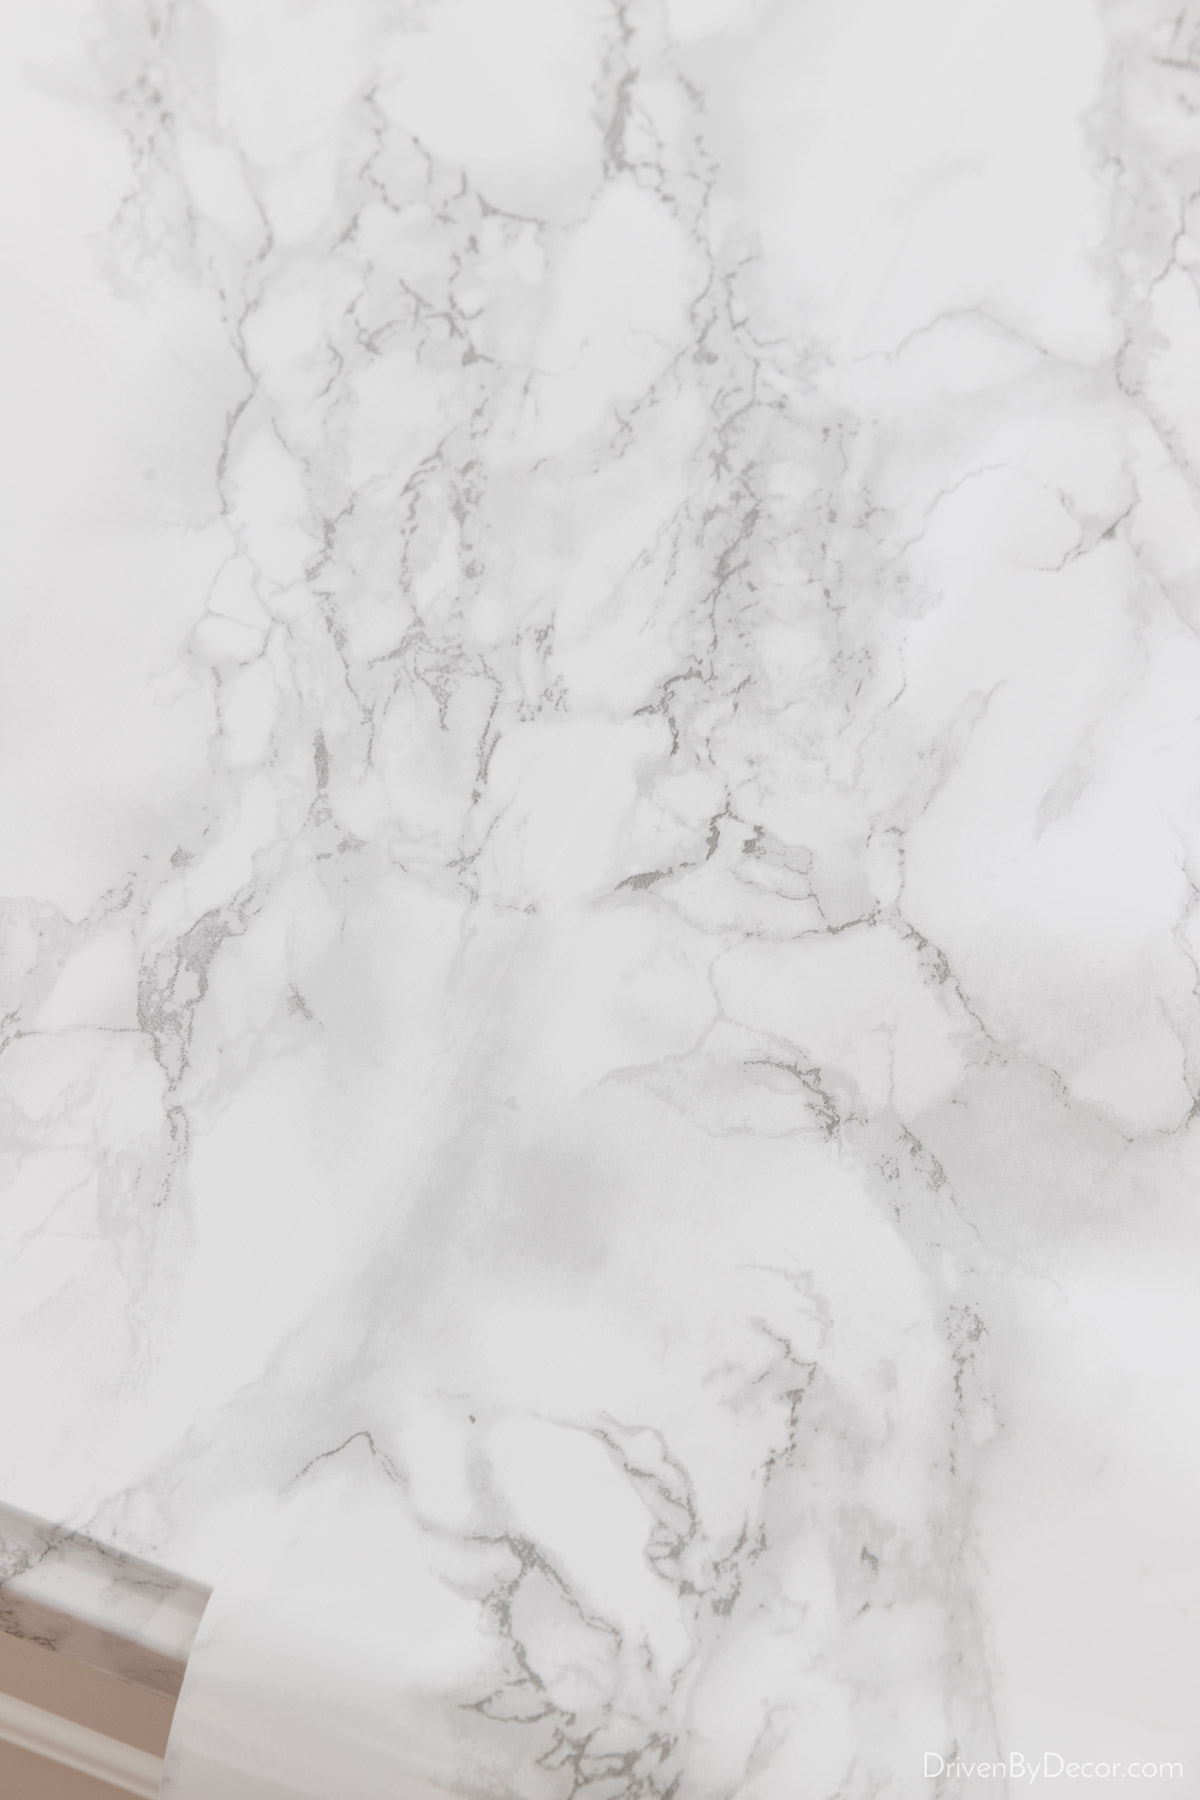
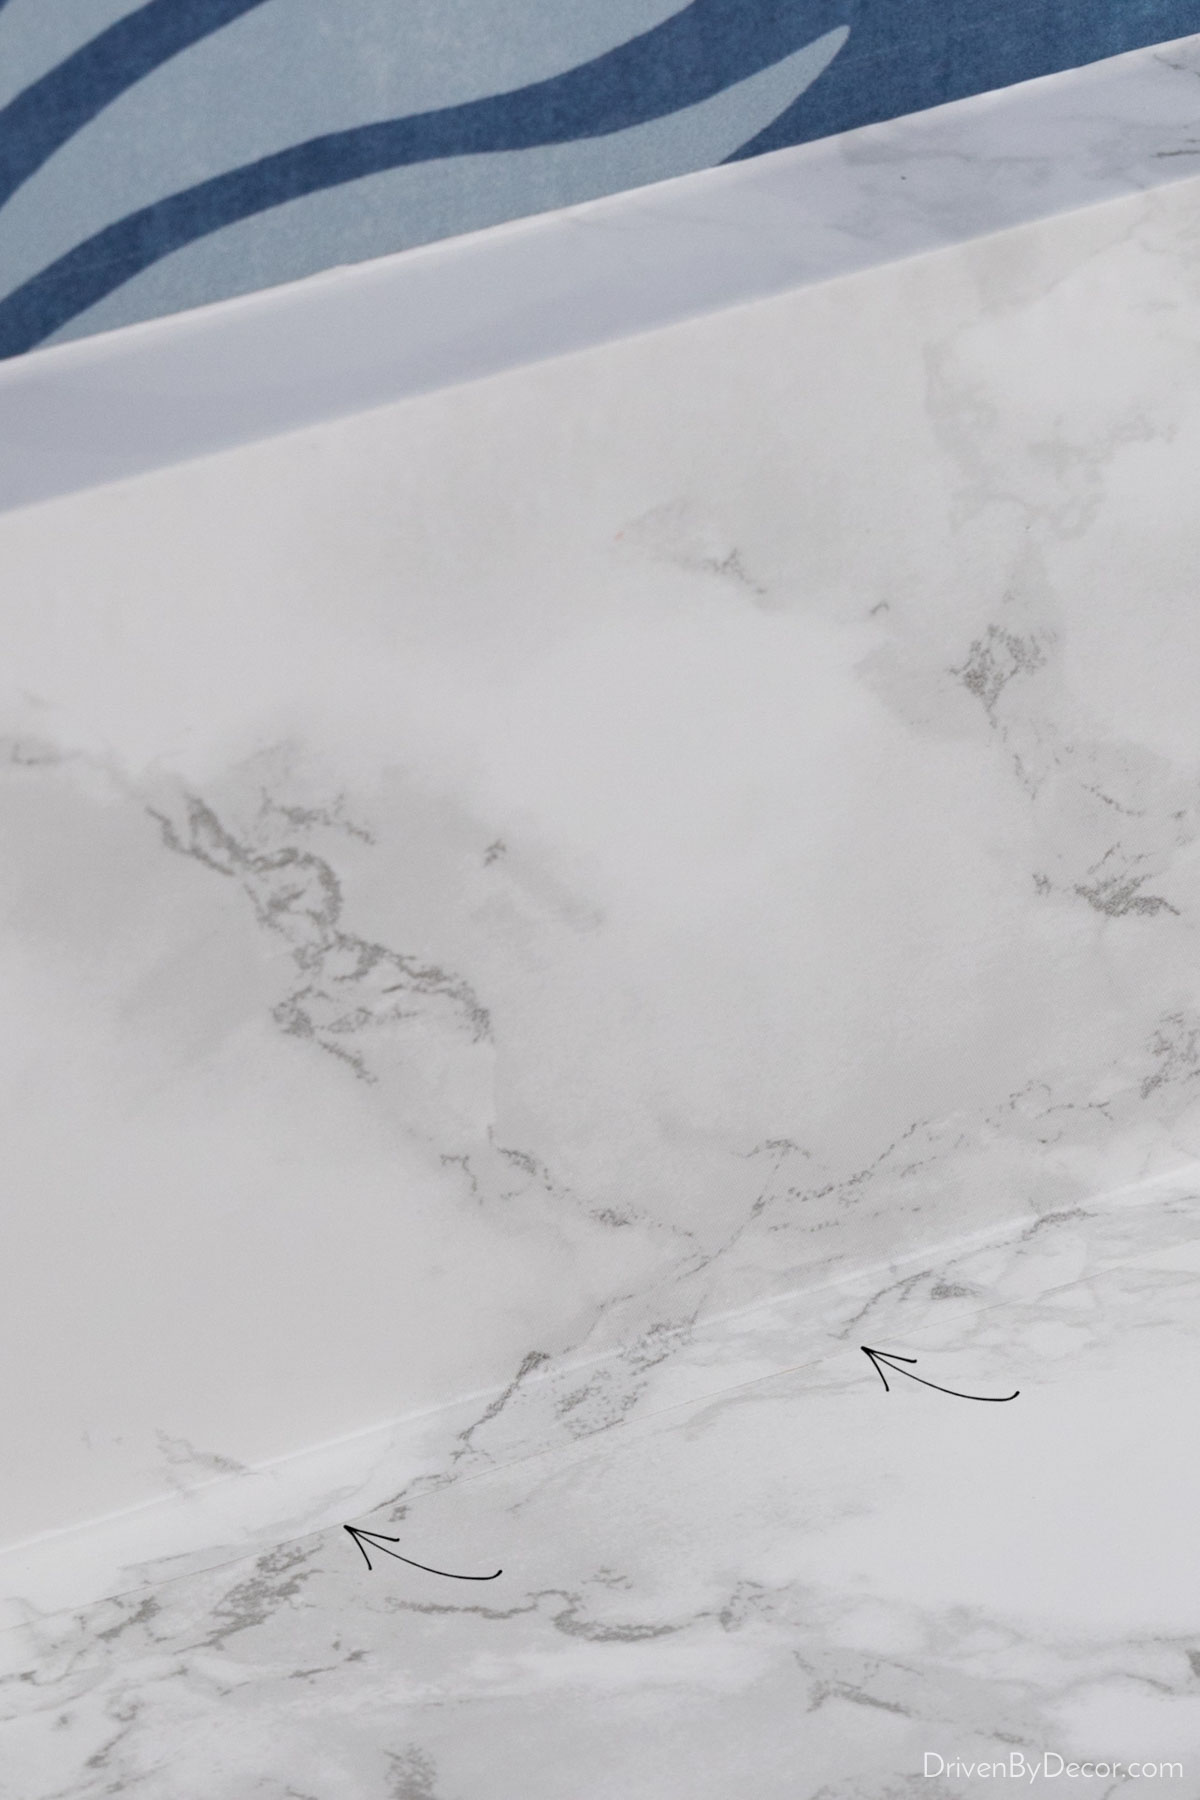
When you’re done, you can see the line of the seam if you’re looking for it (it’s more obvious from certain angles) but it doesn’t jump out at you if you’re not.
If you have a short backsplash made of your countertop material like I do in our kitchen, that’s another spot where you’ll have a seam (I covered the backsplash separately from the countertops). I did it the same way with pattern matching and overlapping the two pieces by about ⅛″ – ¼″. Again, the seam near where the backsplash and countertop meet isn’t obvious:
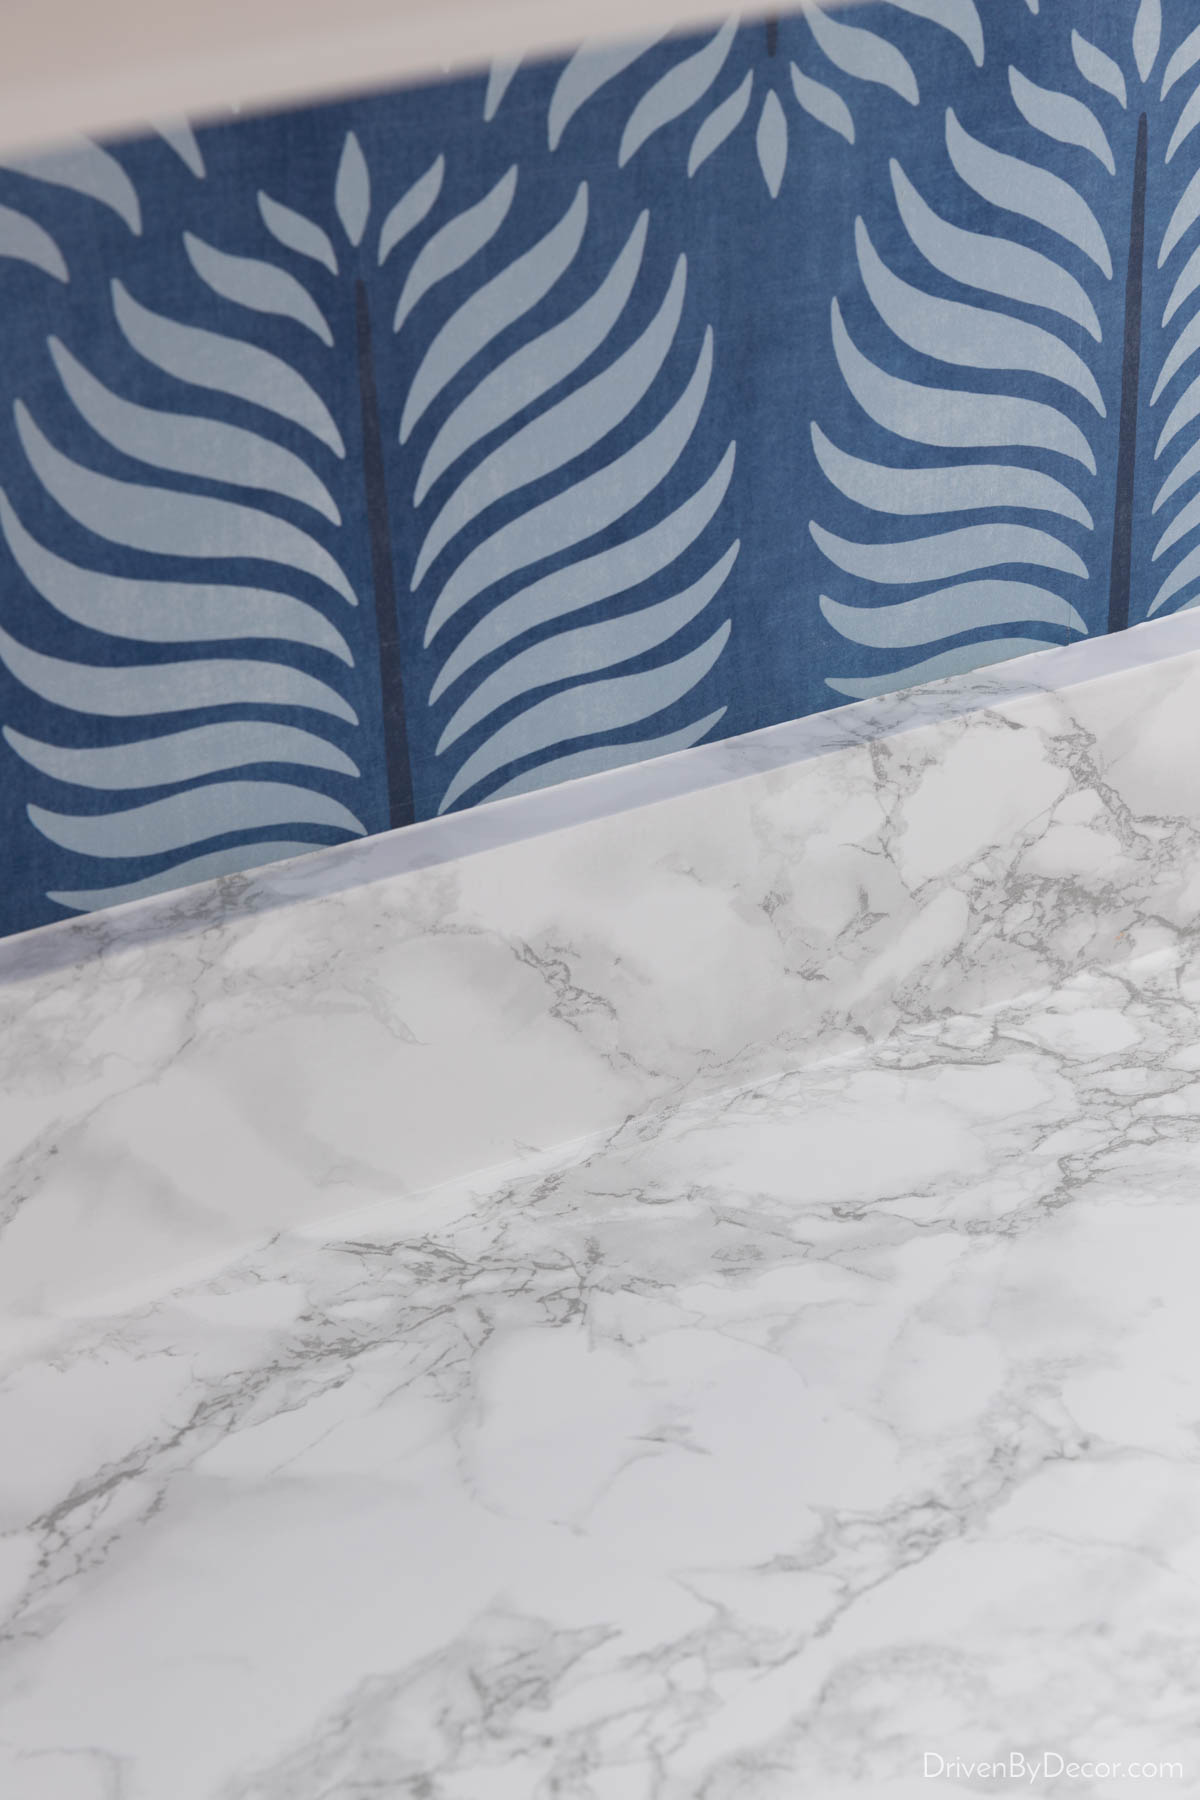
But you can see it when you look up close:
How Did You Handle The Sink?
The best way to apply the contact paper to the area around the sink is to do it with two separate pieces (one coming from the left side of the sink and one from the right) that meet in the middle. In fact, you’ll find that the front of the sink is a very common place to have seams on your existing laminate, granite, etc. countertops.
Just like you use your smoother and razor to follow the outline along the back edge of your countertops, you’ll do the same around the edges of your sink. Start with the side edge, pushing the smoother into the space where the sink meets the countertop and cutting off the excess contact paper. Then continue around the front and back of the sink. Do the same from both sides and create a seam where they meet in the front and back of the sink.
Before & After Pics!
And with that… my marble contact paper countertops are done! With this simple DIY my kitchen desk area went from this:
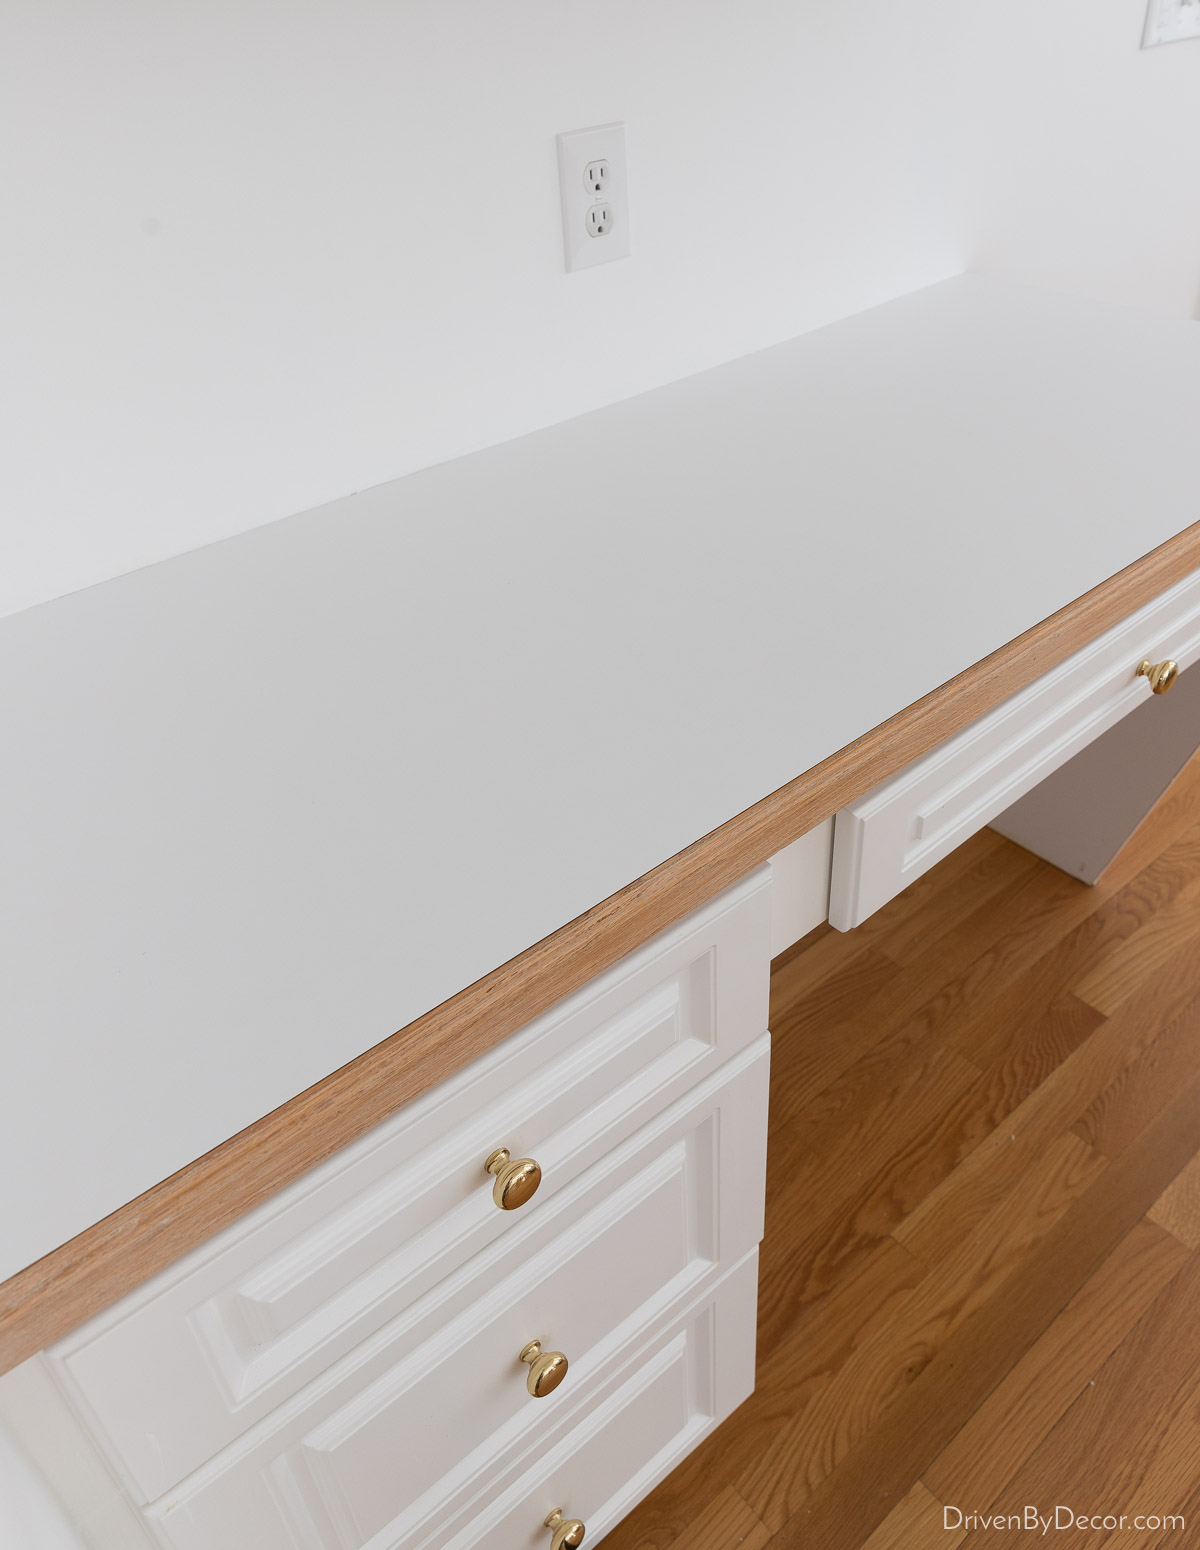
to this with only about an hour of work:
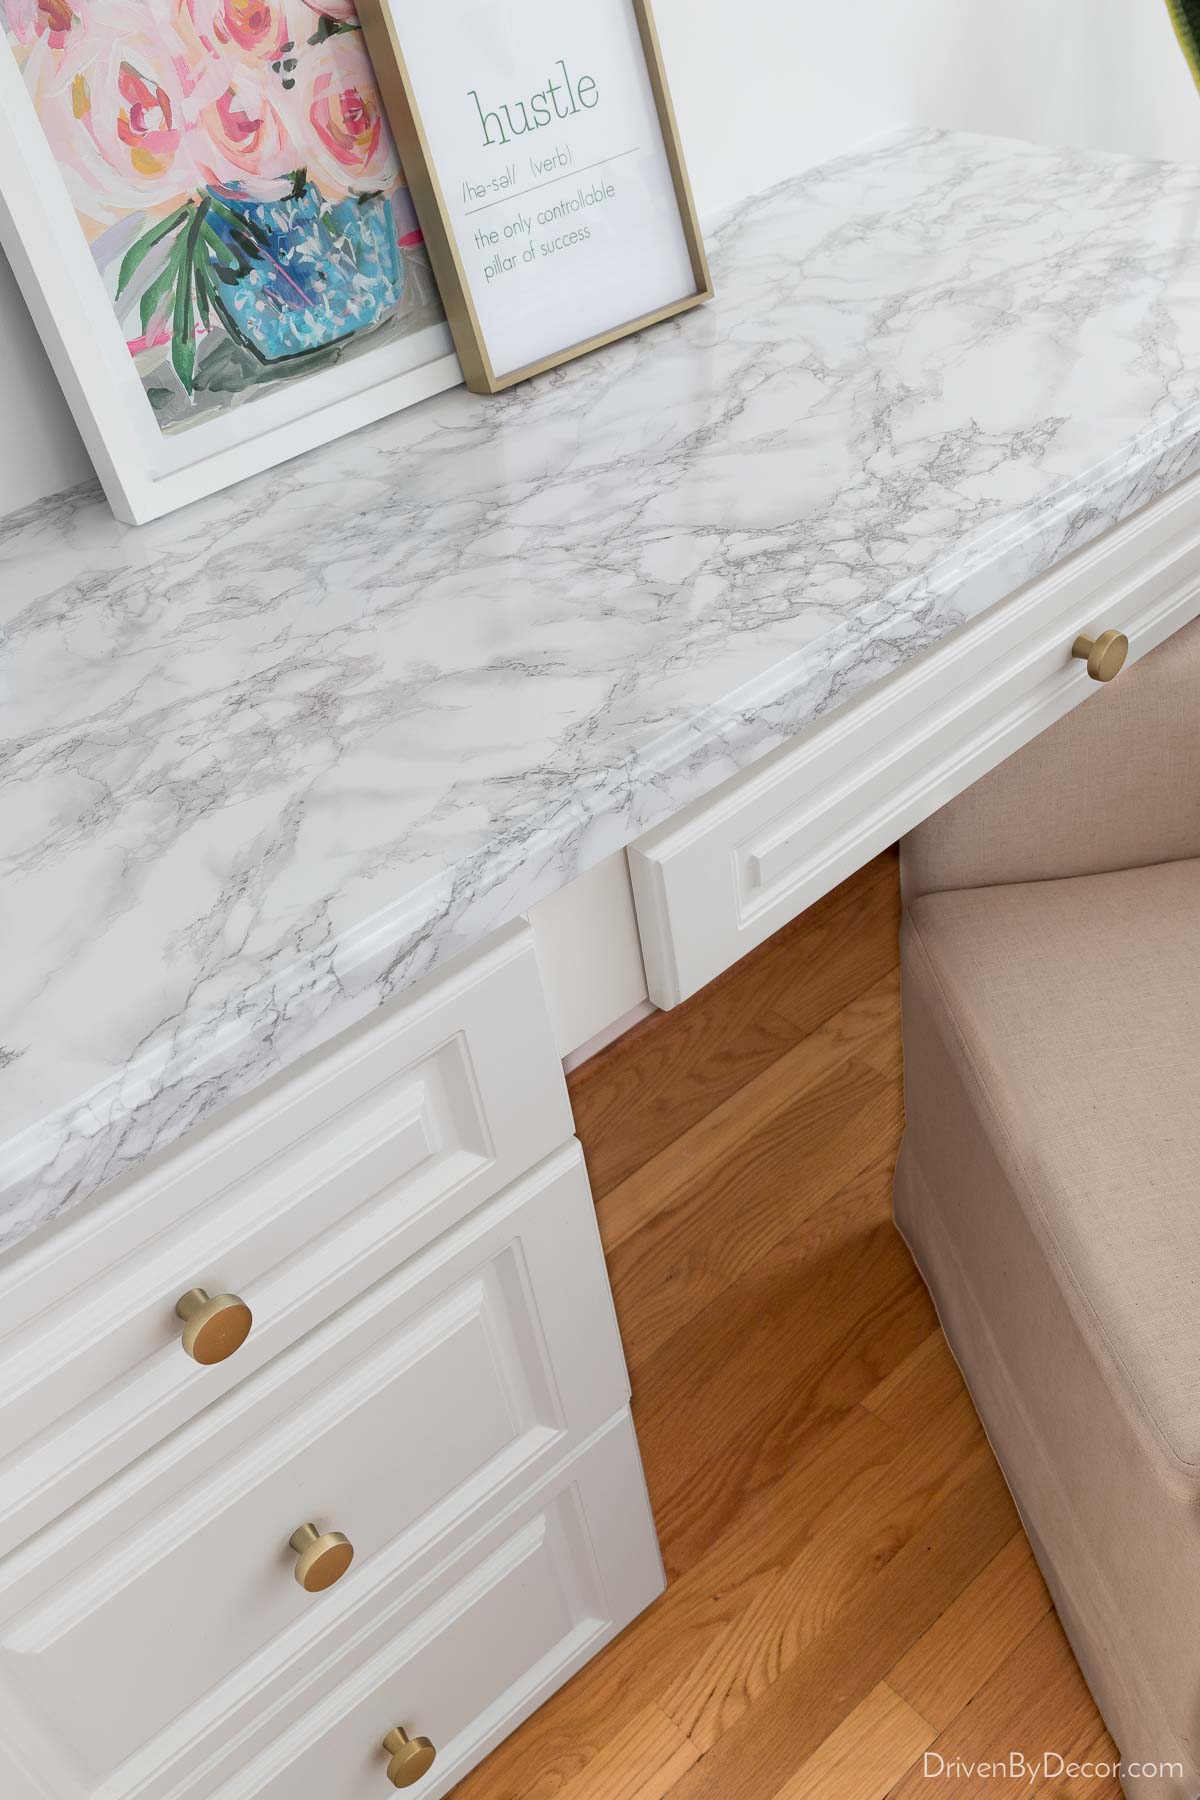
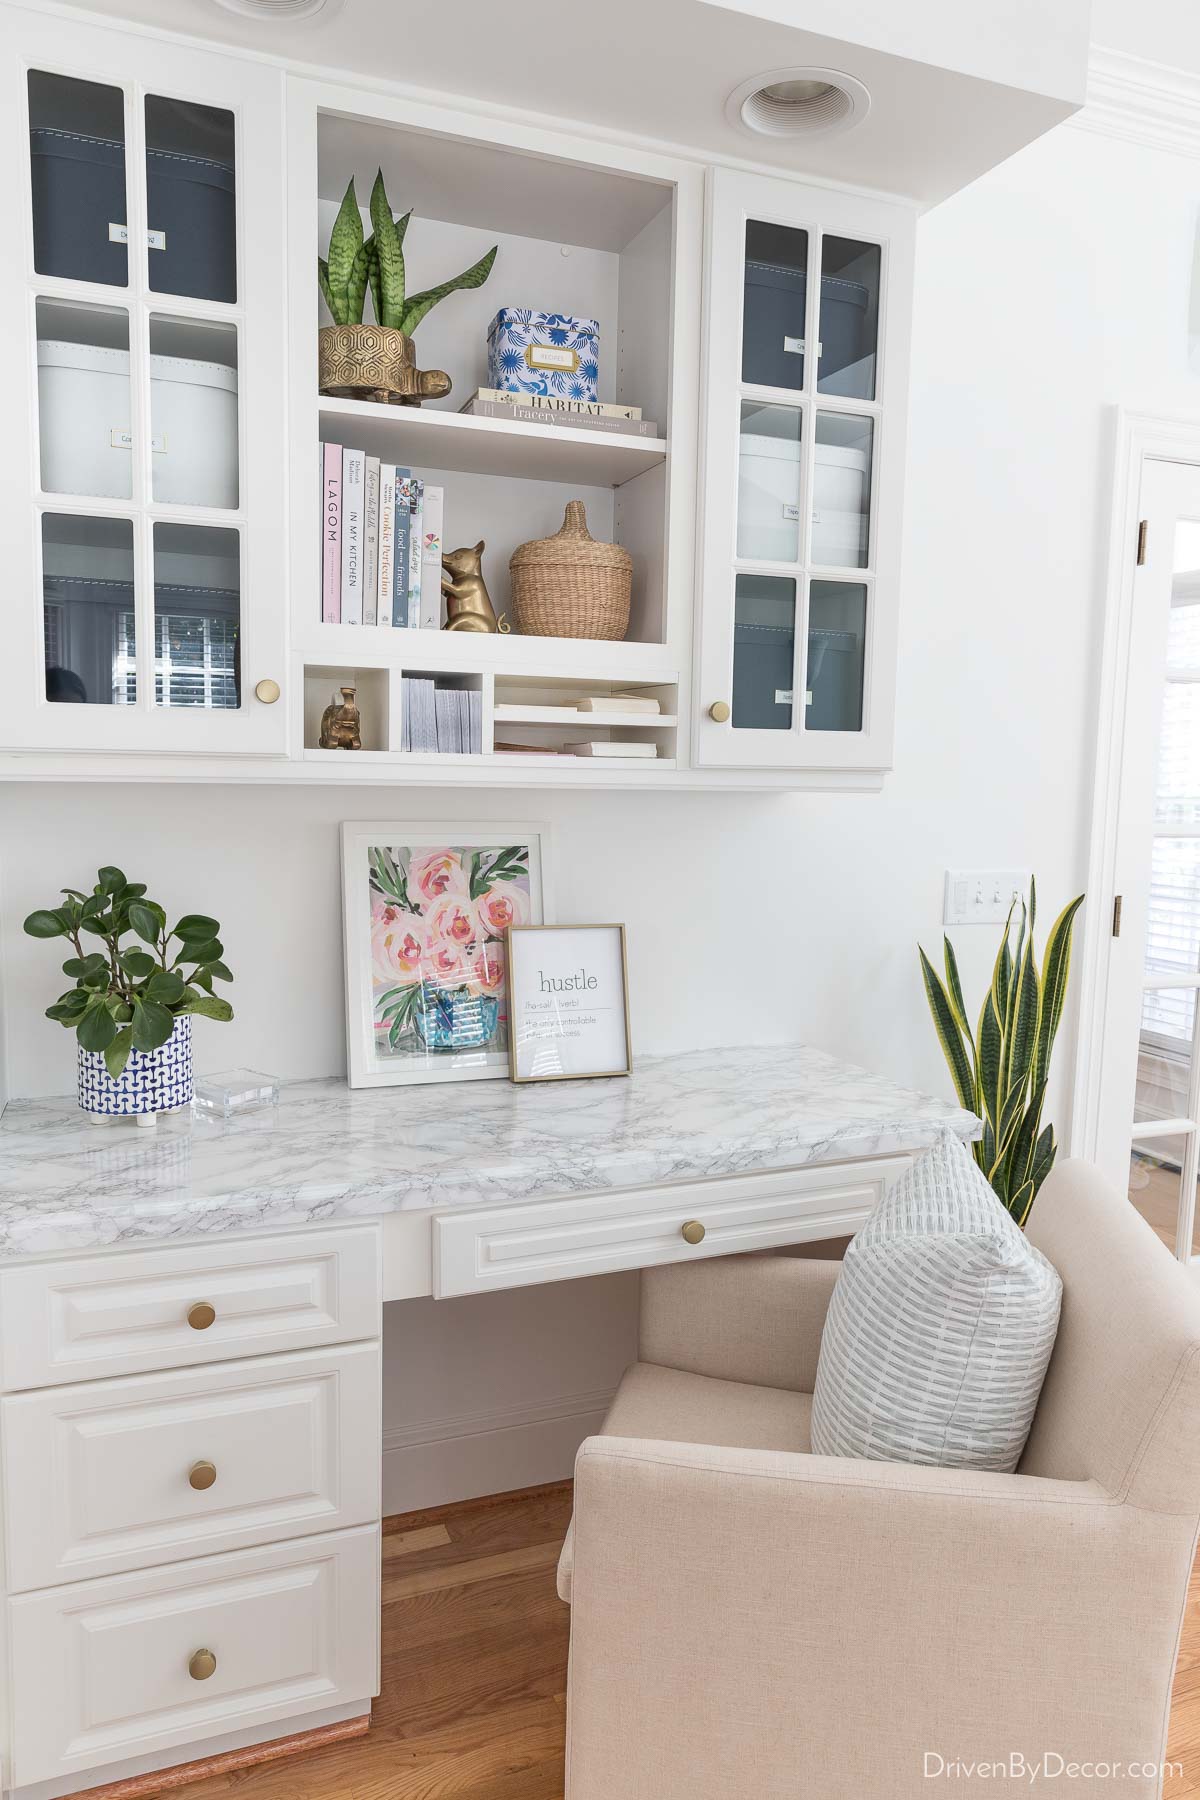
Sources: Brass turtle planter | Recipe tin (similar) | Brass pig bookend | Woven basket set (similar) | Navy storage boxes | White storage boxes | Blue & white planter (similar) | Acrylic post-it holder | Floral art print | Hustle print – self made | Upholstered rolling armchair | Pleated pillow cover | Drawer knobs
And our kitchen went from this:
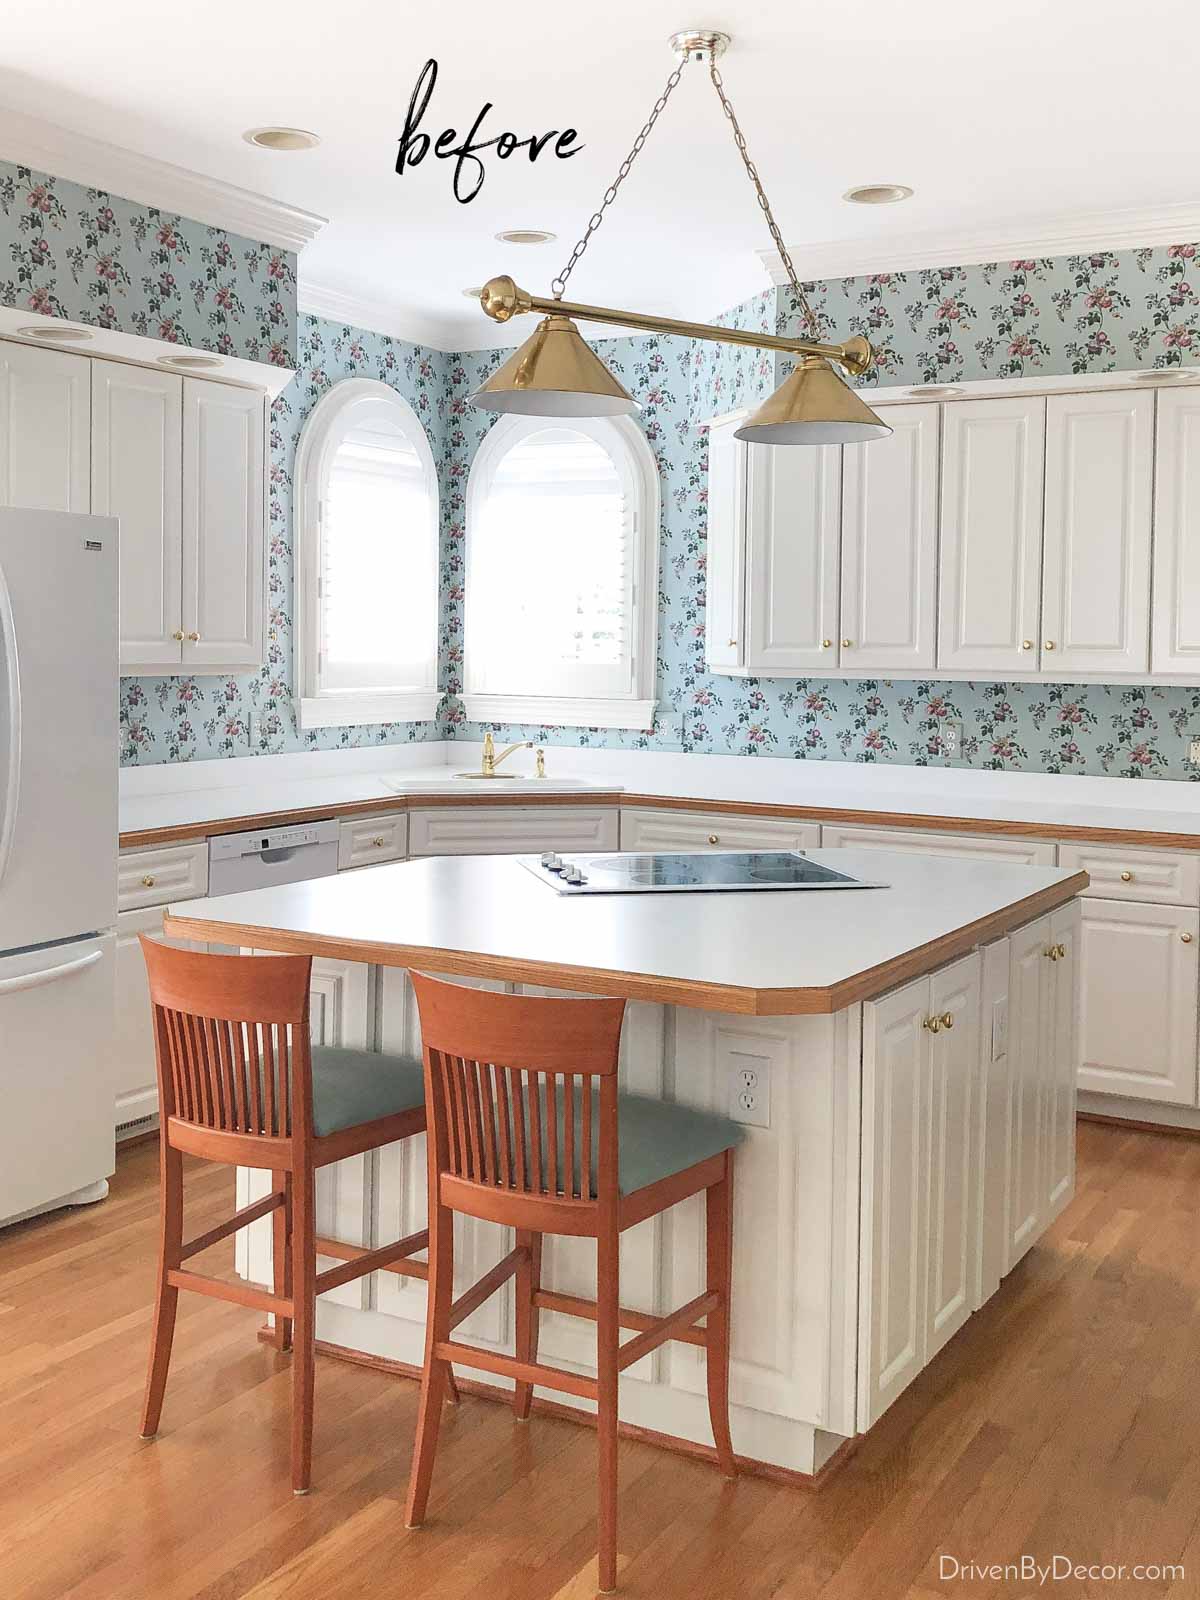
to this with about 7-8 hours of work:
I’m super happy with how both spaces turned out and sure wish I could use it over my ugly bathroom countertops too (unfortunately both bathrooms have integrated sinks made of the same material as the countertops). At least our bathrooms are on the get-done-this-year-to-do-list so I shouldn’t have to be looking at them for too much longer!
Care & Maintenance of Marble Contact Paper Countertops
Update! I’ve had my marble contact paper countertops for about three years now so wanted to share how they have held up!
Overall, they have held up BEAUTIFULLY! I figured that there would be some peeling over time and that after a year or two they’d be looking ratty but there is zero peeling and no tears at all! I’m super impressed and happy with them!
They’ve been quite easy to clean too! My old white laminate countertops had actually been a nightmare to maintain (they stained so easily!) so our contact paper countertops have actually been easier to keep clean. Almost everything I’ve gotten on them has wiped off easily with no problem. The one exception is if you get any red or orangey sauce on them (like spaghetti sauce or once a sauce I made with cumin) – I’ve had some of those that don’t wipe off easily. For these “stains”, I found that some elbow grease with a magic eraser and liquid barkeepers friend worked to remove them.
I knew this before covering my countertops, but as an FYI, you can’t put hot pans directly on them because it would melt the vinyl. You also can’t cut directly on them – you should use a cutting board. This is no different than the laminate countertops that I covered so it didn’t change how I use my kitchen. But if you’re covering a surface like granite, this might be a bit of a change for you.
When Would Using Marble Contact Paper for Countertops NOT Be a Good Solution?
Covering any round areas would not work well so if you have an island that’s rounded on one end or were considering covering a round table, I’d reconsider. Also, if you were thinking about using it for a bathroom countertop, it wouldn’t work for a countertop that has an integrated sink (countertop and sink are continuous and all made of one material). And as mentioned, it’s not resistant to heat like granite or marble is so if you want to be able to take something out of the oven and lay it on your countertop, this is not the solution for you.
Removing Contact Paper from Your Countertops
If at any point you’re ready to remove the contact paper from your countertops, using a hair dryer to heat it up as you peel it off is supposed to loosen the adhesive and make removal easier. Removing it shouldn’t damage the countertops underneath. When the time comes to remodel our kitchen (now just a few weeks away!), I’ll remove a section of the contact paper to see how it goes and report back!
I hope you enjoyed today’s post and always appreciate you stopping by! Be sure to check out my post that has several other kitchen remodel ideas on a budget! Or you might enjoy seeing some of my other past diy projects.
Have a great week!


Susan says
That is crazy and amazing at the same time! I love it! Who would have ever thought you could do that to countertops?
Karolyn says
Hi, Kris! Just found your site and your tutorial for using the marble wallpaper on your kitchen counters was great! You made it very easy to understand. Thank you! I see you have a corner sink as I do and I wonder if you could explain how you tackled that area in particular. I think I can see it in my mind’s eye how to accomplish that, but if you have tips for making that work I’d appreciate it!! I actually feel I can use this technique to improve my countertops until I can afford to do something more permanent. Again, thank you so very much for the great tutorial!!
patricia says
I’m also wondering about handling the sink. Can you explain? Did you create a pattern of the sink first? And how?
As you can tell, I’m very interested.
Pauline says
How did you tackle measuring the sink and cutting that out of the paper?
KJ Miller says
Hi Kris! Just a quick comment on removing this contact paper or those super annoying manufacturer stickers that seem to be placed on, well everything, these days. I received this tip from an appliance repair person so can’t take credit for it. He suggested using a clothes steamer to remove stickers, etc. from anything – even car windows and bumper stickers (we purchased a used car for our teen that had some disagreeable statement stickers on it). Brilliant!
This should work for your contact paper too and is easier to manage and I think more gentle on surrounding surfaces than a hair dryer.