• Skip to primary navigation
  • Skip to main content
  • Skip to primary sidebar
  • Home
  • About
    • Contact
    • Meet Kris
    • FAQs
    • Media
    • Disclosure
    • Privacy Policy
  • Home Tour
    • Master Bathroom
    • Kitchen
    • Kitchen Eat-In Area
    • Family Room
    • Living Room
    • Home Office
    • Laundry Room
    • Master Bedroom
    • Craft Room
    • Dining Room
    • Garage
    • Guest Room
    • Guest Bathroom
    • Patio
    • Powder Room
    • Teen Blue & White Bedroom
    • Teen Boho Chic Bedroom
  • Projects
    • Room Remodels
    • DIY Projects
    • Decorating Tips
    • Cleaning
    • Organizing
  • Subscribe
  • Shop My Favorites
    • Shop My Faves
    • Shop My House

Driven by Decor logo

menu icon
go to homepage
subscribe
search icon
Homepage link
  • Home
  • About
    • Contact
    • Meet Kris
    • FAQs
    • Media
    • Disclosure
    • Privacy Policy
  • Home Tour
    • Master Bathroom
    • Kitchen
    • Kitchen Eat-In Area
    • Family Room
    • Living Room
    • Home Office
    • Laundry Room
    • Master Bedroom
    • Craft Room
    • Dining Room
    • Garage
    • Guest Room
    • Guest Bathroom
    • Patio
    • Powder Room
    • Teen Blue & White Bedroom
    • Teen Boho Chic Bedroom
  • Projects
    • Room Remodels
    • DIY Projects
    • Decorating Tips
    • Cleaning
    • Organizing
  • Subscribe
  • Shop My Favorites
    • Shop My Faves
    • Shop My House
×

Updated: Apr 6, 2022 by Kris Jarrett

How To Replace a Towel Bar With Fixed Ceramic Ends

In this post: Want to know how to replace your ceramic bathroom towel bar (the annoying ones with the fixed ends!) the easy way? I figured out a super simple how-to fix and am sharing how to get the job done! 

post includes affiliate links – see my full disclosure statement {here}

As part of the One Room Challenge makeover of our bathroom that I shared {here}, I found a super simple way to replace our old plastic towel bar that had fixed ceramic ends. I’ve had lots of questions about it which kind of surprised me because I figured there weren’t a ton of you who also have these lovely fixed end brackets glued onto ceramic tile (most of you guys have a typical towel bar screwed into drywall, right?). But in other ways I wasn’t so surprised, since I couldn’t find the answer online myself and how to figure my own towel bar replacement out.

Driven by Decor - Turkish towel

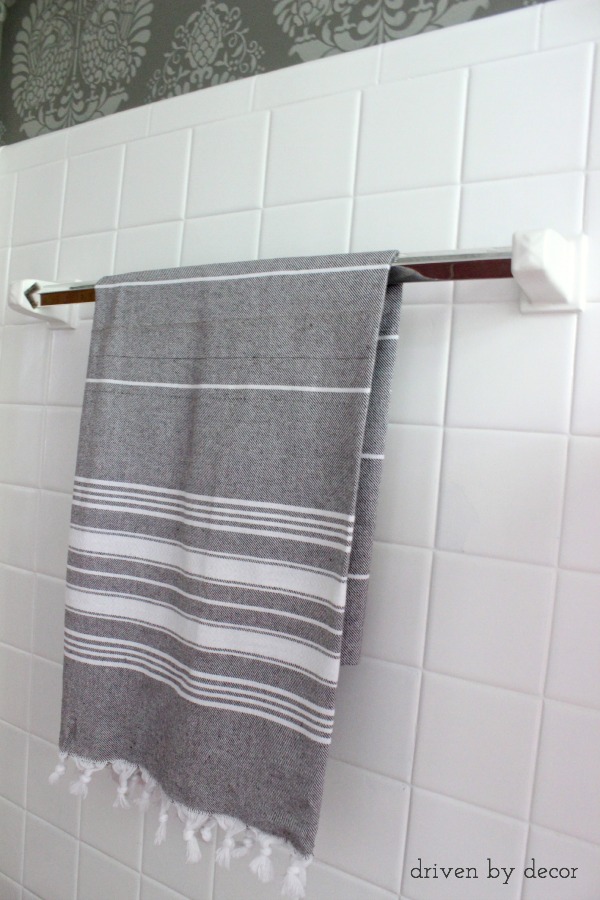
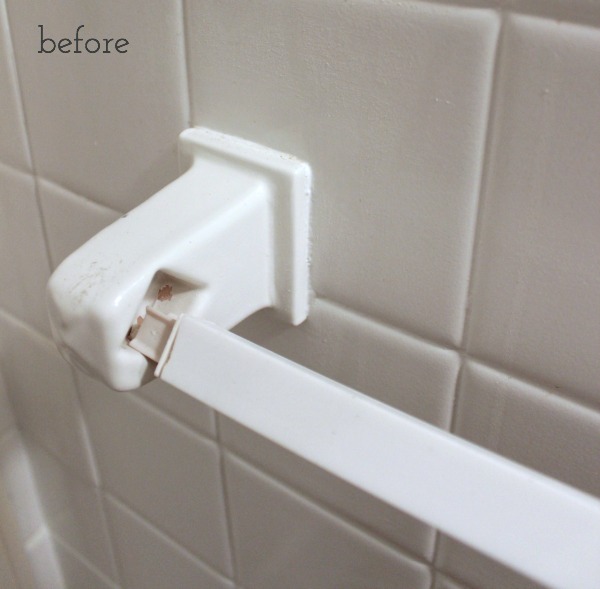
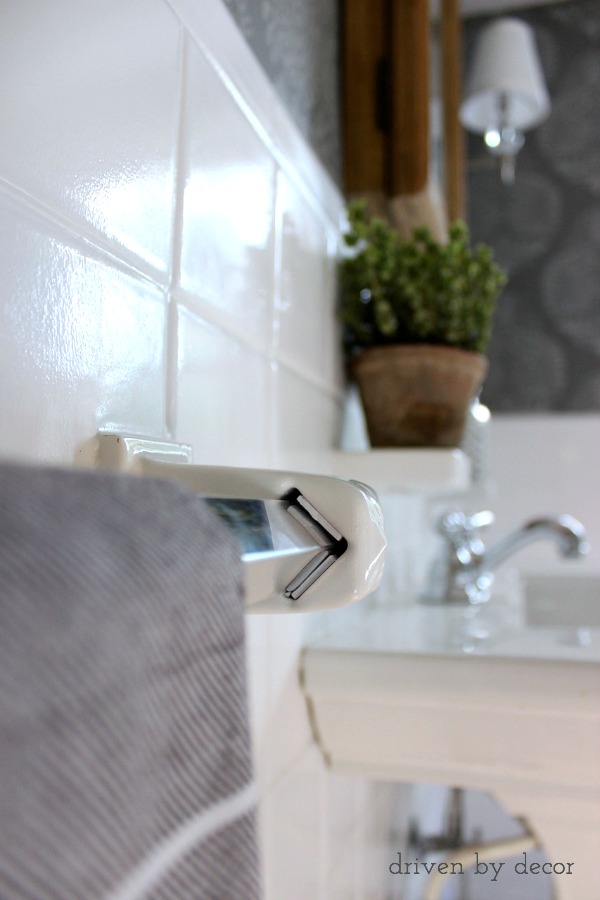
This plastic white towel bar is the lovely one that I started with – it was both too short and small in diameter for my fixed towel bar brackets. The white glazing was also starting to chip away (see that beautiful pink peeking out?!) but luckily that was only in the inside of the holder and was covered up once my new towel bar was in place.

Driven by Decor - Before Image of Old Towel Bar

Here’s what I did to remove & replace it:

1. Measure For & Buy Your Replacement Supplies

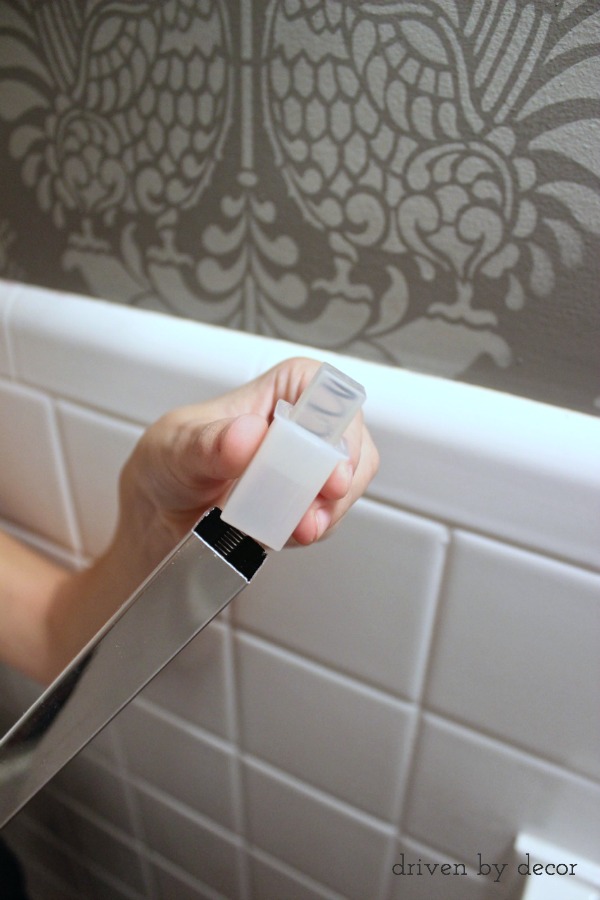
Figuring out the supplies that I needed was the hardest part – once I had them, this was a 10 minute fix. You’ll need two things – a replacement bar and spring-loaded end caps. For the replacement bar, measure to see whether you need a ¾″ or ⅝″ bar and also measure the length that you’ll need and buy a replacement bar that is as long or longer. I needed a ¾″ replacement bar that was at least 22″ long so I ordered {this 24-inch chrome replacement bar}. It’s very lightweight and initially that made me worry that it was cheap and not a good choice but I found that the light weight is necessary to make cutting it to size doable and the bar looks great and is very stable now that it is installed. For spring loaded end caps  I ordered {these adjustable towel bar end caps} that just slip right onto the ends of your replacement towel bar:

Driven by Decor - EZ-Flo Spring loaded towel bar end caps

2. Remove the Old Towel Bar

Now that you’ve got your supplies, it’s time to go to work by removing the old towel bar. I easily pulled my bar out on its own since it was too short to begin with but if yours isn’t, you can remove it by sawing through the middle of it.

3. Cut Your New Replacement Bar to Size

When cutting your replacement towel bar to size, it’s important that you not cut it either too long or too short. Here’s what I did – I put a spring-loaded end cap into one end of my chrome bar and then put that end into one of the fixed wall brackets. I pushed the bar into the bracket as far as it would go and marked the other end of the bar at the spot that it needs to be cut off (just a tad shorter than the inside of the fixed bracket). Use a hacksaw to cut it – it’s actually very easy to saw through.

4. Put the Spring-Loaded End Caps on the Bar Ends & Install It!

After cutting my replacement bar to the correct size, I put the spring-loaded end caps onto both ends of the bar and installed it between the two fixed brackets. Most of you will be done at this point but my bathroom had the extra kicker of having end brackets that were made for a larger than standard towel bar, causing the towel bar to jiggle around in the holder when using the towel. See those lovely gaps between the bar and the inside of the bracket:

Driven by Decor - How to make towel bar fit large endcap brackets

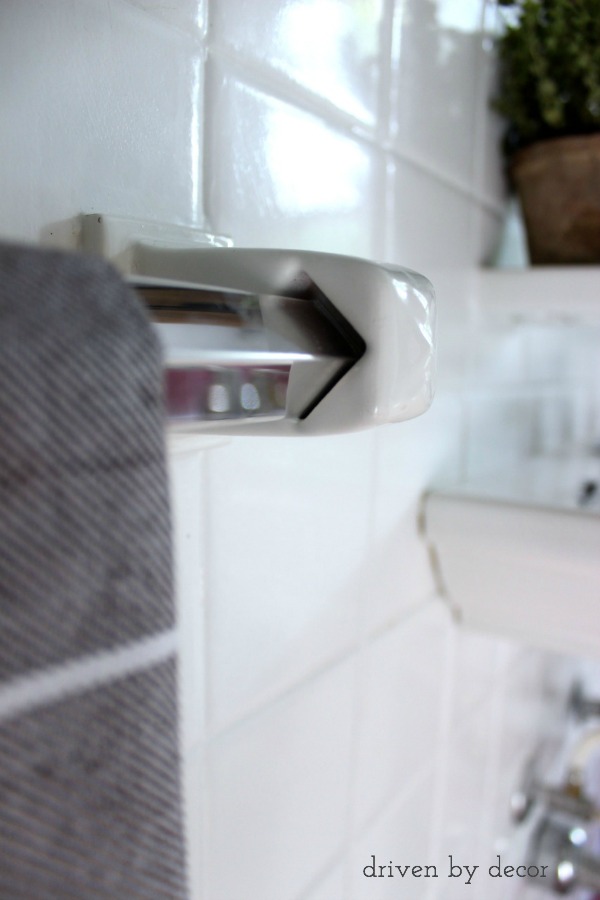
My solution to the jiggling bar was to use a sheet of thin white craft foam that is sticky on one side if you pull off the backing – I got mine at Michaels. I cut out eight ⅝″ squares and put them between the towel bar and the bracket. I didn’t peel off the sticky backing and the foam pieces have stayed in place but if they start shifting I can always stick them down. For now all is good with no more jiggling! And fortunately you can only see my retrofit job if you crouch down low and look into the end of the towel bar. So maybe my dog will roll her eyes at my little hack job but no one else will ever see it.

Driven by Decor - Insert foam pieces to keep towel bar from moving

I hope this was helpful to some of you with the same obscure problem that I had! Since you’re fixing up your towel bar you might need some awesome new towels to go on it! Check out {this post} about the best, softest, most luxurious bath towels out there!

The best towels if you're looking for luxuriously soft, fluffy, and absorbent towels!

Thanks as always for stopping by!

  • Pin
  • Share
  • Email

Categories: Bathrooms

✉️FREE EMAIL SERIES ✉️

5 Secrets to Reinventing Your Home on a Budget

Simple tips to instantly transform five rooms in your home!

Reader Interactions

Comments

  1. Lisa @ Shine Your Light says

    November 12, 2014 at 9:42 am

    Excellent post, I love when useful tips like this are addressed. My mom’s bathroom, that I have been working on for months (longest project ever) had one of those exact same tile mounted towel bars, and toilet paper holder. Who knew the cheap plastic bar was replaceable?? Thanks for sharing this handy tip.

    Reply
    • Kris @ Driven by Decor says

      November 12, 2014 at 10:32 pm

      Thanks Lisa – that’s high praise coming from my QTT friend 🙂

      Reply
  2. Elizabeth @ The Little Black Door says

    November 12, 2014 at 10:07 am

    I had no idea you could do that! Thanks for sharing.

    Reply
  3. classic casual home says

    November 12, 2014 at 10:28 am

    You are so amazing. Where there is a will =there is a way…and YOU will find it.

    Reply
    • Kris @ Driven by Decor says

      November 12, 2014 at 10:36 pm

      I HAD to find a way, right? I mean, did you see how heinous my towel bar was? Kinda embarrassing when guests go to use the hand towel and the bar falls to the floor 🙂

      Reply
  4. VEL says

    November 13, 2014 at 5:23 pm

    You not only have great taste, your also so ingenious! thanks for sharing!

    Reply
  5. Anonymous says

    February 28, 2015 at 9:34 am

    In the close up of the towel bar it appears as though your ceramic wall tile is painted ad the grout lines are exactly the same color and texture as the tile. Is this correct and if so would you address the process by which you painted the tile? Thank you. The entire bath is LOVELY and exceptionally well done!

    Reply
    • Kris @ Driven by Decor says

      February 28, 2015 at 10:55 am

      You have good eyes! Yes, the tile was originally pink and was redone. Unfortunately, I don’t have the details of how it was transformed because it was done before we bought the house but I’m pretty sure that it was simply reglazed. If you google it, you’ll find that there are a ton of companies out there that specialize in reglazing tubs and tile – it holds up pretty well and is so much cheaper than replacing the tile. If you want to do it yourself, Rust-Oleum makes a tub and tile refinishing kit that I know other people have used with success but I haven’t had any experience with it personally. Hope that helps!

      Reply
  6. Bob says

    August 05, 2015 at 10:32 pm

    Thanks. Exactly what I need. Ours has a wooden bar covered in plastic. The plastic has worn, losing color, and shrunk, revealing the wood. The rest of the bath has chrome fixtures so the chrome replacement will look fine. We had the tooth brush and soap things also. I knocked them out and replaced them with relief tiles from Moravian Tile in Doylestown Pa. Knocking them out felt dangerous but it worked out.

    Reply
    • Kris Jarrett says

      August 10, 2015 at 9:38 pm

      Glad you found it helpful and so glad to know that you knocked your toothbrush and soap holders off successfully!

      Reply
  7. Ann Myslinski says

    September 05, 2015 at 8:30 am

    Thank you for the information in this post as I was able to fix my broken towel rack in my shower!

    Reply
    • Kris Jarrett says

      September 09, 2015 at 11:23 pm

      Yay! I’m glad you found it helpful Ann!

      Reply
    • Jill Novosel says

      February 15, 2021 at 4:43 pm

      We just did this following your advice exactly! It worked out perfectly. This was a quick project and gave a polished, updated look. Thank you!

      Reply
  8. Tammy Scott says

    December 07, 2015 at 8:43 pm

    Your bars look beautiful, but I can’t make myself cut my 80 yr old wood bars. They are in perfect shape. Did you look for plastic slip covers or anything along those lines, that have a slit down the back that would fit over the wood bar? someone in some year did that to mine, but they are now worn and I cant find them anywhere.

    Reply
  9. Frank Person says

    March 25, 2016 at 6:11 pm

    Astounding. I have this identical problem. When I googled some derivation of “towel rods”, I never dreamed of finding a completely defined solution with pictures and part #s. MANY THANKS !!!!

    Reply
  10. Mary fillo says

    October 20, 2016 at 5:53 pm

    Can you tell me where I can find replacement bars for the ceramic towel racks?

    Reply
    • Kris Jarrett says

      October 20, 2016 at 8:50 pm

      Hi Mary,
      There’s a link to the replacement bar in my post – just click on the highlighted words where it says {this 24-inch chrome replacement bar}.

      Reply
  11. Deb says

    January 16, 2017 at 4:17 pm

    So happy to find this, with great directions and photos! We have a new to us 1895 Victorian with vintage ceramic towel holders, now I can replace the rods without knocking the vintage holders off the wall. Yay!

    Reply
    • Kris Jarrett says

      January 24, 2017 at 6:24 pm

      So glad it helped – good luck with your reno!
      Keris

      Reply
  12. Anita alexander says

    February 15, 2017 at 9:57 pm

    This looks EXACTLY like our bathroom and exactly the problem we have!! Thank you!

    Reply
    • Kris Jarrett says

      February 20, 2017 at 12:27 pm

      So glad that you found it helpful!

      Reply
  13. Viunce says

    April 24, 2017 at 2:40 pm

    Thank you so much for the post. I see that others are looking for ways to replace worn out towel bars.

    Reply
  14. Mary says

    May 08, 2017 at 8:18 pm

    Great information. My problem is the end of the towel bar is triangle shaped not square. I cant seem to locate anything that is triangle shaped. Any idea would be appreciated. My bathroom tiels were pink. I had them reglazed white, along with the tub came out great.

    Reply
    • Kris Jarrett says

      May 15, 2017 at 10:08 am

      I’ve actually never seen that before Mary so unfortunately I don’t have a solution – sorry!

      Reply
  15. Dit Dragon says

    August 03, 2017 at 11:09 am

    Thank you!, Thank you, Thank you!!!!!!

    My daughter broke the towel rod, and your post enabled me to fix it quickly and painlessly.

    Reply
    • Kris Jarrett says

      August 08, 2017 at 11:31 am

      I’m so glad that your found my post helpful in fixing your daughter’s towel bar!

      Reply
  16. Eliza says

    December 12, 2017 at 8:47 pm

    I can’t believe I waited months to fix my bars! Found this post. Ran to the store. Made magic happen in less than ten minutes. And by magic, I mean I now have a towel rack. Thank you for this – a new homeowner in colorado is very thankful for your post.

    Reply
    • Kris Jarrett says

      December 12, 2017 at 10:34 pm

      I’m so glad you found it helpful! If it makes you feel any better, it was months after we moved in before I fixed mine too!

      Reply
  17. Tracy says

    January 17, 2018 at 10:36 pm

    Thank you for the very helpful information I have a broken towel bar that has been glued together but looks like crap. If I sell the house I would like to do just what you did! I’m Not very handy, but I think I can do it. Thank you?

    Reply
    • Kris Jarrett says

      January 21, 2018 at 4:47 pm

      I’m glad you found it helpful! Good luck!

      Reply
  18. Noelle says

    January 28, 2018 at 3:57 pm

    SO glad I found your post! Thank you…it is just what I need to solve this challenge in 2 of our bathrooms.

    Reply
  19. Robin Smith says

    March 05, 2018 at 5:44 pm

    Thanks for the idea, had the same problem today with the same type of towel bar ends.

    Reply
  20. Rachel says

    March 22, 2018 at 2:13 pm

    This is brilliant, thank you! I’m definitely going to do this as part of my remodel 😀

    Reply
  21. Dave Kendrick says

    April 28, 2018 at 9:23 pm

    Wonderful. Where can you buy the spring loaded ends?

    Reply
    • Kris Jarrett says

      May 02, 2018 at 11:46 am

      The parts are linked in the blog post!

      Reply
  22. Guy Hohenstein says

    July 29, 2018 at 8:55 pm

    I too have these permanent ceramic towel bar holders. I would like to utilize them for grab bars for my wife who needs help getting up from the john. Any suggestions for replacing them with a 1 ” diameter bar, spring loaded. The holder ends are very secure and in exactly the space I want to install the grab bar.

    Reply
    • Kris Jarrett says

      September 09, 2018 at 11:16 pm

      Unfortunately I’ve never had to do that myself so don’t have any advice to share. Hope you were able to figure it out!

      Reply
  23. Regina says

    August 09, 2018 at 5:27 pm

    What I need is the bar itself…can’t find one

    Reply
    • Kris Jarrett says

      September 09, 2018 at 11:41 pm

      There’s a link to the replacement bar in the blog post!

      Reply
  24. Anonymous says

    October 15, 2018 at 8:52 am

    I’ve been looking for an easy solution to this exact problem! Thank you.

    Reply
  25. Kate says

    April 04, 2019 at 12:46 pm

    Thank you so much!

    Had the same gap problem and you have provided a clever solution!

    Reply
  26. SHIRLEY O'CARROLL says

    May 22, 2019 at 6:36 pm

    That was excellent information . Thank you

    Reply
  27. Judith says

    June 09, 2019 at 9:34 am

    Thanks. I have 2 such towel rods and thought I could buy covers. No such luck. I will try your fix and see what happens.

    Thanks

    Reply
  28. Tracy says

    September 12, 2019 at 11:09 pm

    Thank you! This is awesome!

    Reply
  29. Alice E HAMPTON says

    October 26, 2019 at 10:20 am

    What tool did you use to cut the towel bar?

    Reply
  30. Vintage Chris says

    October 27, 2019 at 2:09 pm

    Many thanks for explaining about how to replace this 24″ towel bar – our home was built in 1953 and has undergone many improvements over the years, including this bathroom, but we never replaced the towel bar which finally broke the other day while I was cleaning it. We were able to find a new one at a big box hardware store for about $5.00 and we used a hacksaw to trim it just a little (whoever installed the brackets decades ago cemented them too close together). I thought your method of measuring before cutting was quite clever – bravo! [ By the way, I see from the comments of others that your tiles were originally pink – about 20 years ago I had a company reglaze all the tiles in this bathroom – originally they were Easter basket colors (pale blue, dark blue, yellow, violet! Eeek!) – the white glazing has held up well but the tub has had a 2d glazing and is due for #3.]

    Reply
  31. Jason says

    June 30, 2020 at 10:18 pm

    Thank you so much! I was so happy to find this easy solution. Supplies are ordered and can’t wait to install! If you have any similarly clever and simple ideas for repurposing the toothbrush and soap dish holders, do tell! I’m in a rental and can’t knock them out of the wall.

    Reply
  32. Anonymous says

    March 21, 2021 at 9:17 am

    Why don’t they make replacement towel bars like they do replacement toilet paper bars?? I thought for sure I would be able to find one online, but no luck!I don’t have a hacksaw, and as a renter, my options are limited.

    Reply
  33. Marcus says

    April 27, 2021 at 4:51 pm

    Was planning on painting over the end caps and the towel bar but this tutorial makes it seem pretty easy to just replace the bar. Thank you!

    Reply
  34. Anonymous says

    May 01, 2021 at 4:19 pm

    Thank you, thank you, thank you!

    Reply

Leave a Reply Cancel reply

Your email address will not be published. Required fields are marked *

This site uses Akismet to reduce spam. Learn how your comment data is processed.

Primary Sidebar

✉️FREE EMAIL SERIES ✉️

5 Secrets to Reinventing Your Home on a Budget

Simple tips to instantly transform five rooms in your home!

Meet Kris

Kris of Driven by Decor

Popular Posts

All images on DBD are copyrighted and taken by me unless otherwise noted. If you'd like to use any of my images, please request their use via my Contact page.

I am a participant in several affiliate advertising programs (including the Amazon Associates program) and earn fees from qualifying purchases. For more information, see my full disclosure statement {here}.

To view my privacy policy, go {here}.

Copyright © 2022 · Driven by Decor