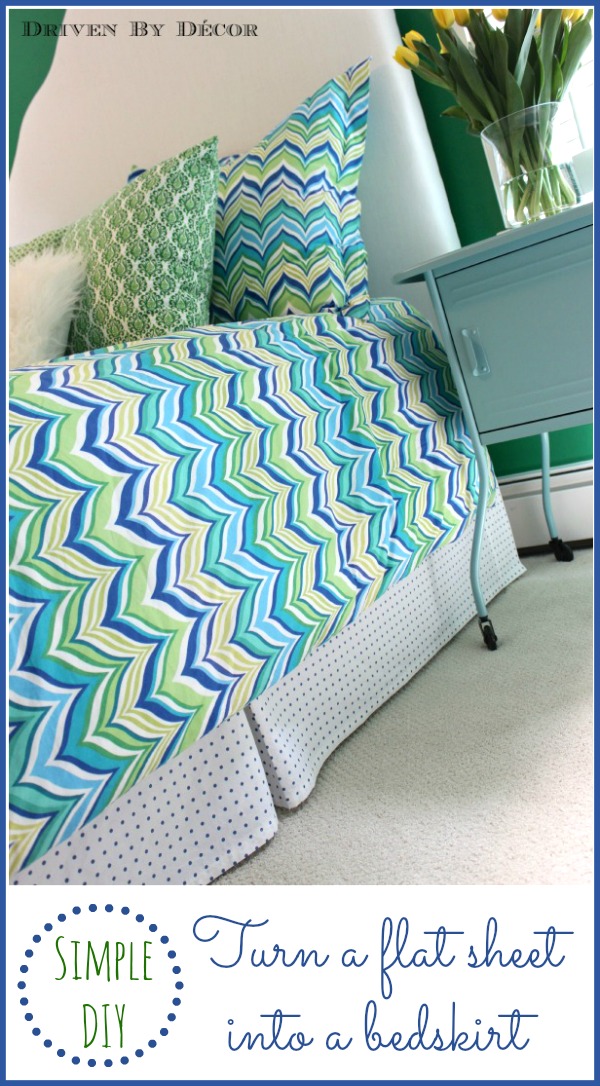
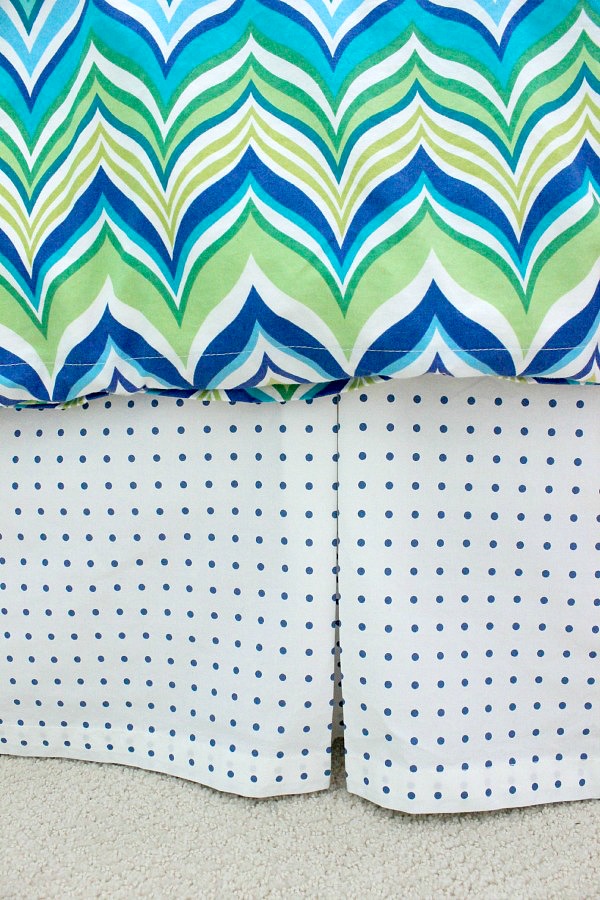
Want to know how to make a bed skirt with little to no sewing? This easy DIY bed skirt is made using a simple sheet! It looks amazing and will be a perfect fit!
While I love to DIY, you may have noticed that my DIY projects rarely involve a sewing machine. That would be because my sewing abilities are limited to sewing a simple stitch in a kinda straight line. So when I couldn’t find a bedskirt that I liked for my daughter’s room, sewing one was definitely not plan A. But after striking out on finding one I liked and realizing that the cute polka dot sheet set I just bought from HomeGoods would make the cutest bed skirt, plan B (aka turning my polka dot flat sheet into a bedskirt) was born!
 What convinced me to take the plunge is realizing that the finished edges around the flat sheet would work perfectly for the bottom edge of a bedskirt so there actually wasn’t going to be that much sewing involved. I’ve seen some great DIY sewn bedskirts but when push comes to shove, I get too intimidated when too much sewing is involved. Also, using a flat sheet was cheap and I loved that I would be able to throw it in the wash when needed.
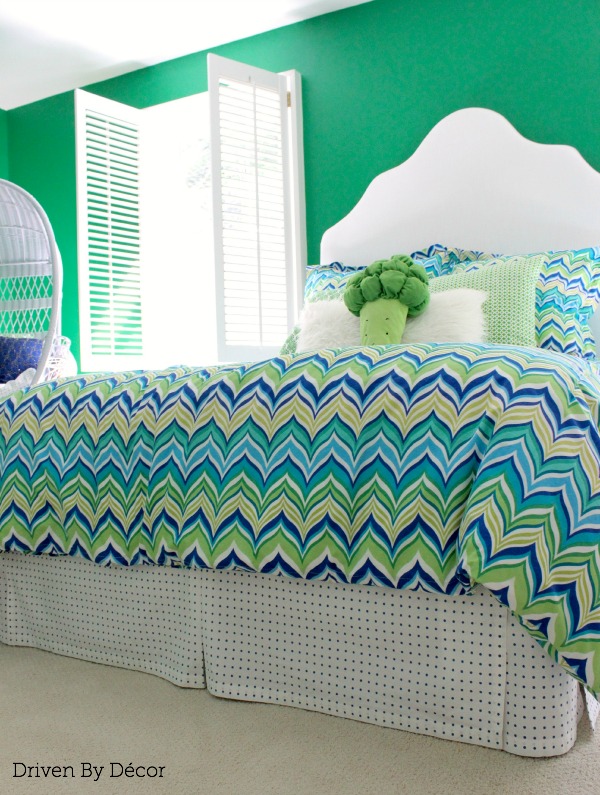
It turned out to be a much simpler project than I ever would have expected and I LOVE that the bedskirt fits the bed perfectly and looks custom-made (because, well…it is!). (post includes affiliate links – see my full disclosure statement {here})
 Here’s the how-to for this simple DIY:
1. Wash, Dry, & Iron the Sheet You’re Going to Use
If your sheet is new, wash it first because if it’s going to shrink, you want it to shrink before you size it perfectly for your bed skirt. One of the perks of having a sheet-turned-bedskirt is that if something gets on one of the bedskirt panels, you can just spot treat it and throw it in the washer! And you want to iron your sheet too so you have accurate measurements before you do any cutting.
2. Figure Our the Sizes for Your Bed Skirt Panels
Knowing the size of your flat sheet and the size of your box spring, get your math on to figure out how you’re going to cut the panel sizes that you need out of your sheet. I was able to use an oversized full sheet to make a bedskirt for my full bed but sheets are not consistently sized so check your measurements before buying your sheet to make sure you don’t have to go up a sheet size. You will need the following (these are finished sizes):
- Two side panels that each measure the length of the box spring (from the head to the foot of the bed) minus 3 ½″ (because it will stop 3 ½″ from the bottom corner of the bed), plus 5″ for the pleat, plus any additional inches that you want the side panel to extend beyond the top end of the boxspring. I extended my bed skirt about 3 ½″ beyond the top end of the boxspring so my final, finished panel length was simply the length of the box spring +5″ . If you cut yours out in the same way that I did below, you’ll have one unfinished end that will need to be sewn or taped so add about ½″ or so to that measurement when cutting out your piece.
- One end panel that measures the width of the box spring minus 7″ (because it will stop 3 ½″ from each side) plus 5″ for the pleat. In other words, your final, finished length will be the width of the box spring minus 2″. Again, if you cut yours out like I did, you’ll have one unfinished end that will need to be sewn or taped so add about ½″ or so to that measurement when cutting.
- Two corner panels that are each about 16″ in length.
- If you have a standard height bed, make each of your panels about 16-18″ tall. For taller beds, make the panels a few inches taller (the height doesn’t need to be exact).Here’s the plan that I went with for cutting out the panels for my bedskirt:
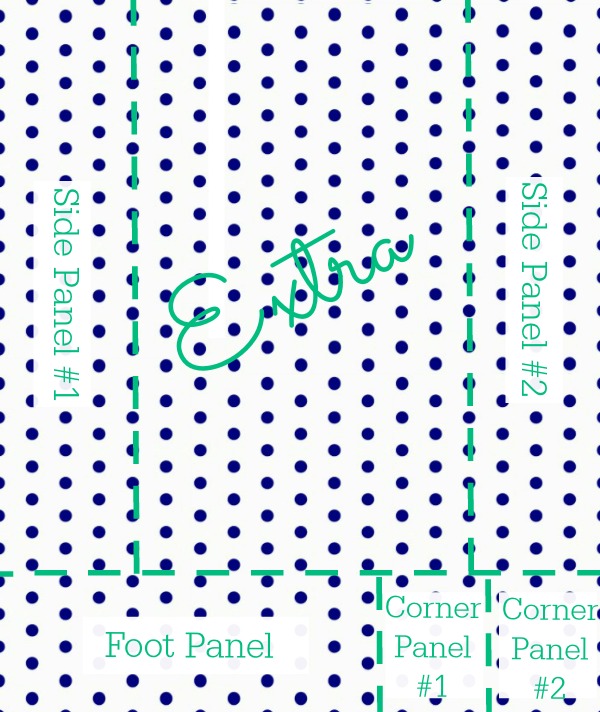 When you’re planning the cutting of your panels, keep in mind that most flat sheets have a wider folded edge at the top of the sheet. If you want to avoid using the wider folded edge as as one of the pre-finished edges on your two side panels, take that into account. I used the wider folded edge as the edge of each side panel that is closest to the head of the bed and actually like the look of it:
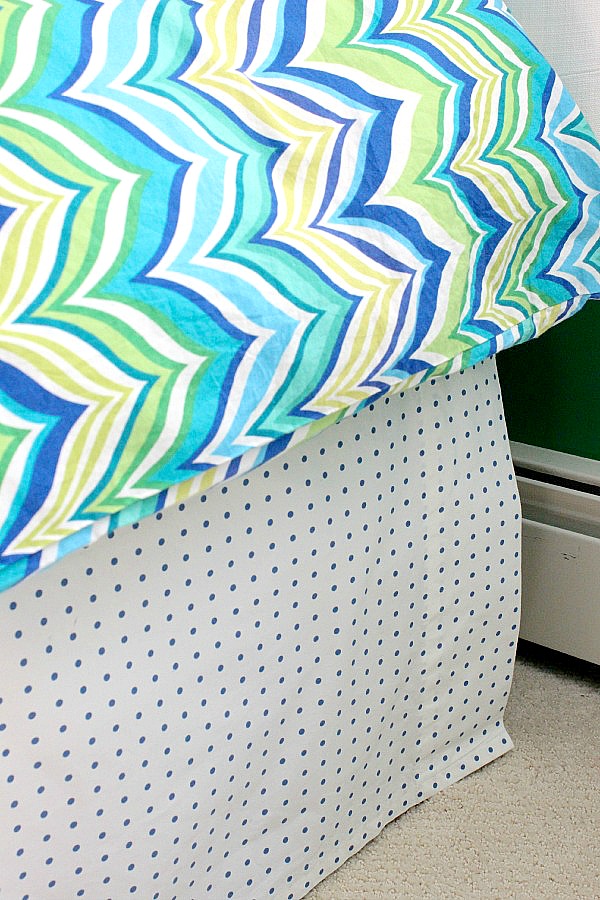
So that you have the least amount of sewing to do, plan the cutting of your panels in a way that most of the edges that will show are pre-finished edges. With my layout, all I ended up having to sew was a few short stitches to make each of the three pleats (more on that in a minute) and three short straight lines (in pink). All of the other cuts (in green) won’t show on the finished bedskirt so can remain unfinished:

Want to save this post?
3. Sew Any Unfinished Edges (Or Use Stitch Witchery!)
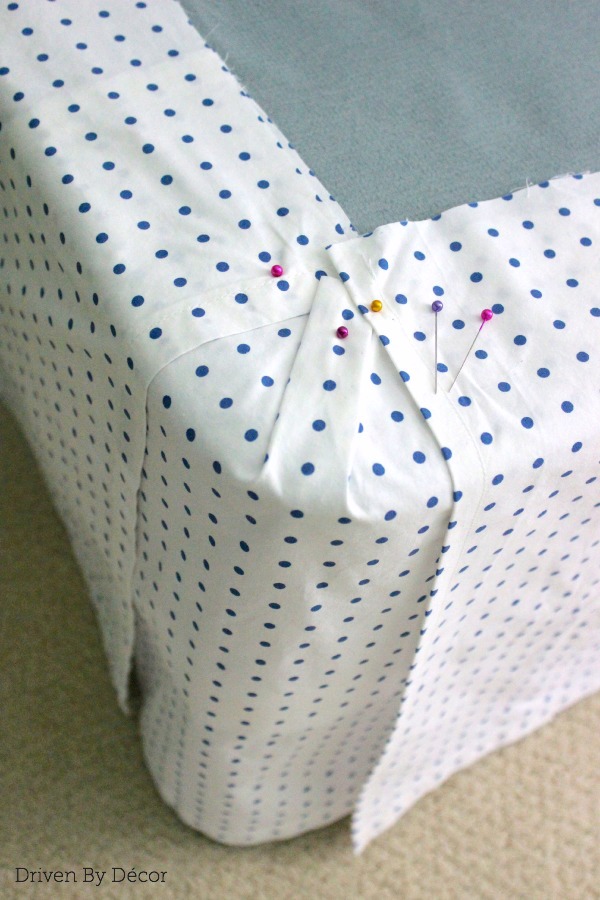
It’s time to get the sewing machine out and sew the few edges that need sewing (or you can cheat and use Stitch Witchery available {here} – I won’t tell!) along with a box pleat in the center of each of the two side panels and the end panel. Did I just lose you there with the mention of box pleats? No worries – I used my friend Jennifer’s tutorial of how to make them {here} and it was super easy! Each pleat will end up looking like this:
4. Attach Your New Bed Skirt Panels
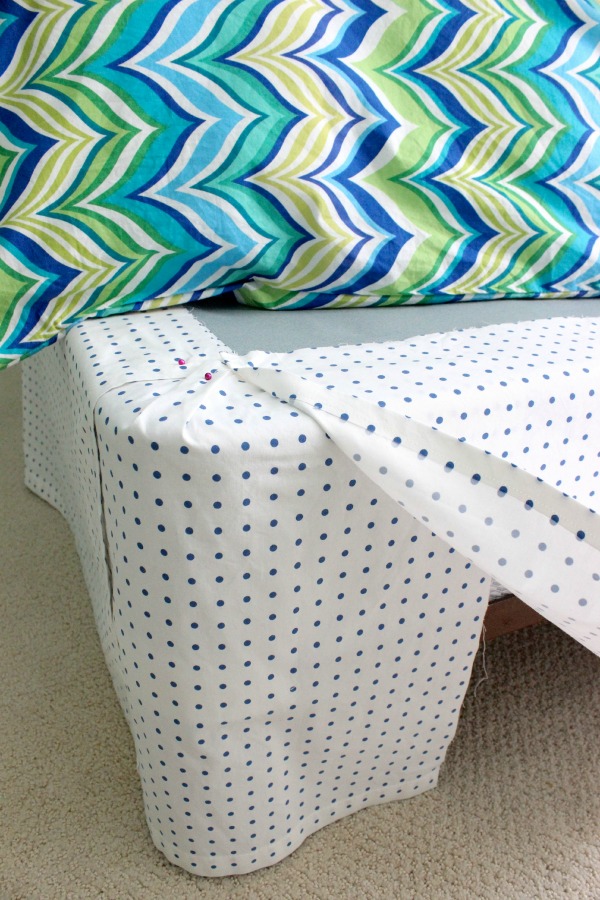
Put the two corner pieces on the bed first, centering them on the corner, wrapping them around both sides, and then pinning them in place at the top of the box spring. I used simple straight pins with large heads to do my pinning but you can buy bedskirt pins available {here} if you want to hold the panels on even more securely. After your corner pieces are pinned in place, you can pin your foot and side panels in place, overlapping the corner piece.
No one will ever know if the edges of those corner pieces are left all ratty since they’ll be covered up:
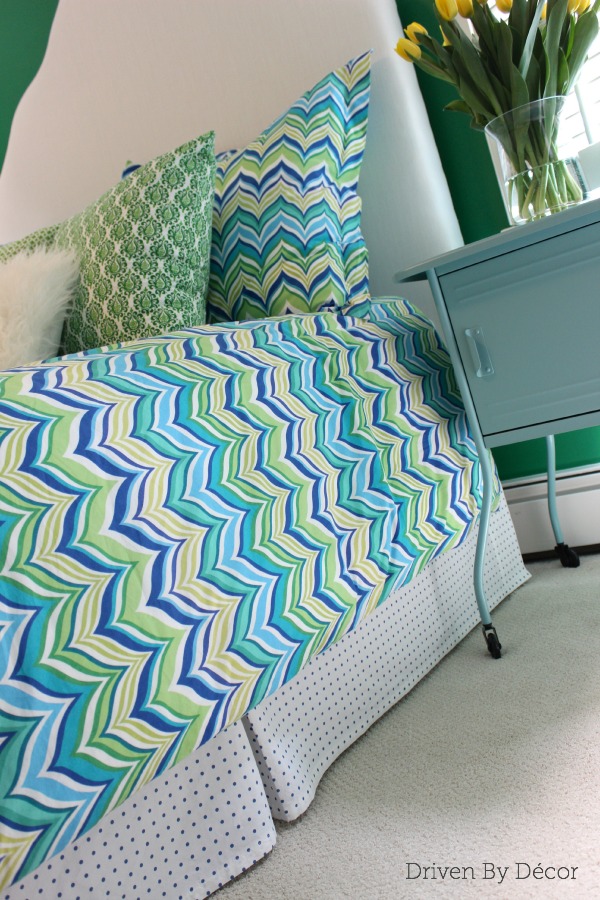
 And….we’re done! The whole project was finished in less than two hours (with a big chunk of that time spent on the measuring, layout, and ironing):
Thanks for stopping by!


Mira says
Finish the job and sew the panels together a piece of fabric in the middle. Then you have a bed skirt that won’t shift and pins that won’t work tears into the foundation.
Vicki says
Great idea. I have one suggestion – save the wide hemmed top and use it to make or add to a coordinating pillow case.
Janie says
Great idea. I made one with stick on Velcro which tended to come loose. I’ll do your idea next. Thanks!
donald robbin says
We read your blog and it is very beautiful and the content is also good, you have well described the fabric well and I liked it so thank you,The 18 inch bed skirt stable bliss is a delightful, simplistic trimmed valance that without difficulty suits into any bedroom way to its minimalist style. It is made with four hundred threads remembered due to the fact it’s far from natural cotton. But no matter its comfortable and low-key design.
Anonymous says
I tripped into your diy bed skirt and glad I did.
I bought a king size flat sheet to make my own bed skirt and had no idea how to get started. They don’t sell bed skirts in the little town I live in, I live in Turkey.
Thank you..
the trip was worth it.
Lillian
Wendy says
I checked your headboard diy and I can see using curtain panels for this project too.
Anonymous says
Going to do the bed skirt soon as I get my sheet .that will match my spread.
donnie loy says
I like the idea about the bed skirt. Looks easily , and a lot more expensive looking. Thanks for the idea.
Beth H says
I see that this is an old post, but your instructions still work great! Yesterday I made one for my king sized bed from a queen sheet. Though I had to hem the bottom panel on all sides, it saved some money. Thank you!
Ana walker says
Tha nk u so much. I use old good sheets also and have one whole piece to go the 3 ways n just pleat in the 2 corners. I also dont repeat making them lol. How do u connect it to the bed? Staple it or join onto a top flat piece…thank u