In this post: How to organize a storage closet from start to finish!
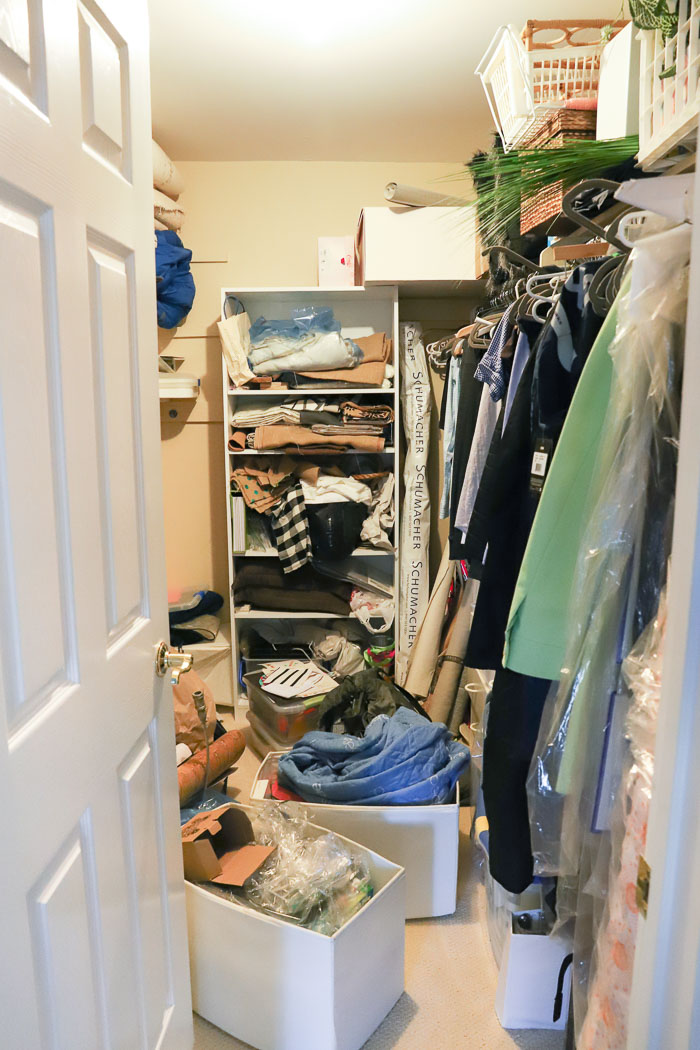
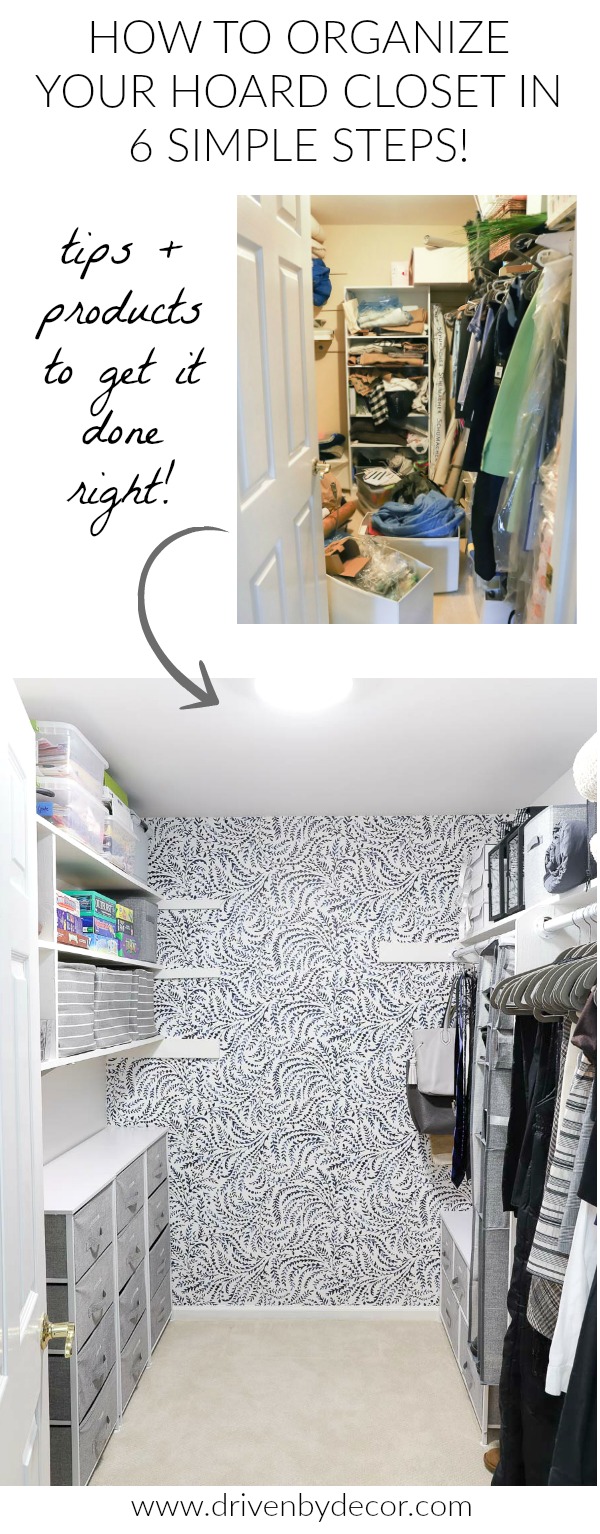
Almost all of us have one. A closet that it is jam packed with so much stuff in such a disorganized fashion that when you realize something you need is in it, you dread opening that door because finding it isn’t going to be easy! In our house, it’s a walk-in closet upstairs that we nicknamed “The Hoard Closet” a few years back because… well, you’ll see why in just a minute! It’s the only storage closet in our house so it’s become the dumping grounds for everything from fabrics (oh my gosh, so many fabrics!) to paint swatches to purses and extra pillows along with being the place that we store some of our off-season clothes and winter gear. There was some semblance of organization when we first moved in four years ago but over time, the shelves filled up and then we started to just put things on the floor. From there it was a downward spiral to this:

Yikes! You would think that I would have cleaned it up just a little before taking some “before” pics so it looked more “untidy” than a “complete and utter train wreck” but real is real so I’m sharing my full, unadulterated hoard closet in its glory (sorry mom! 🙂 ). I’m sooooo happy to share its new, prettier, and way more organized look. It used to look like this when you walked in (the closet door is the furthest back that it would go because there was so much stuff behind it!):
and now it looks like this:
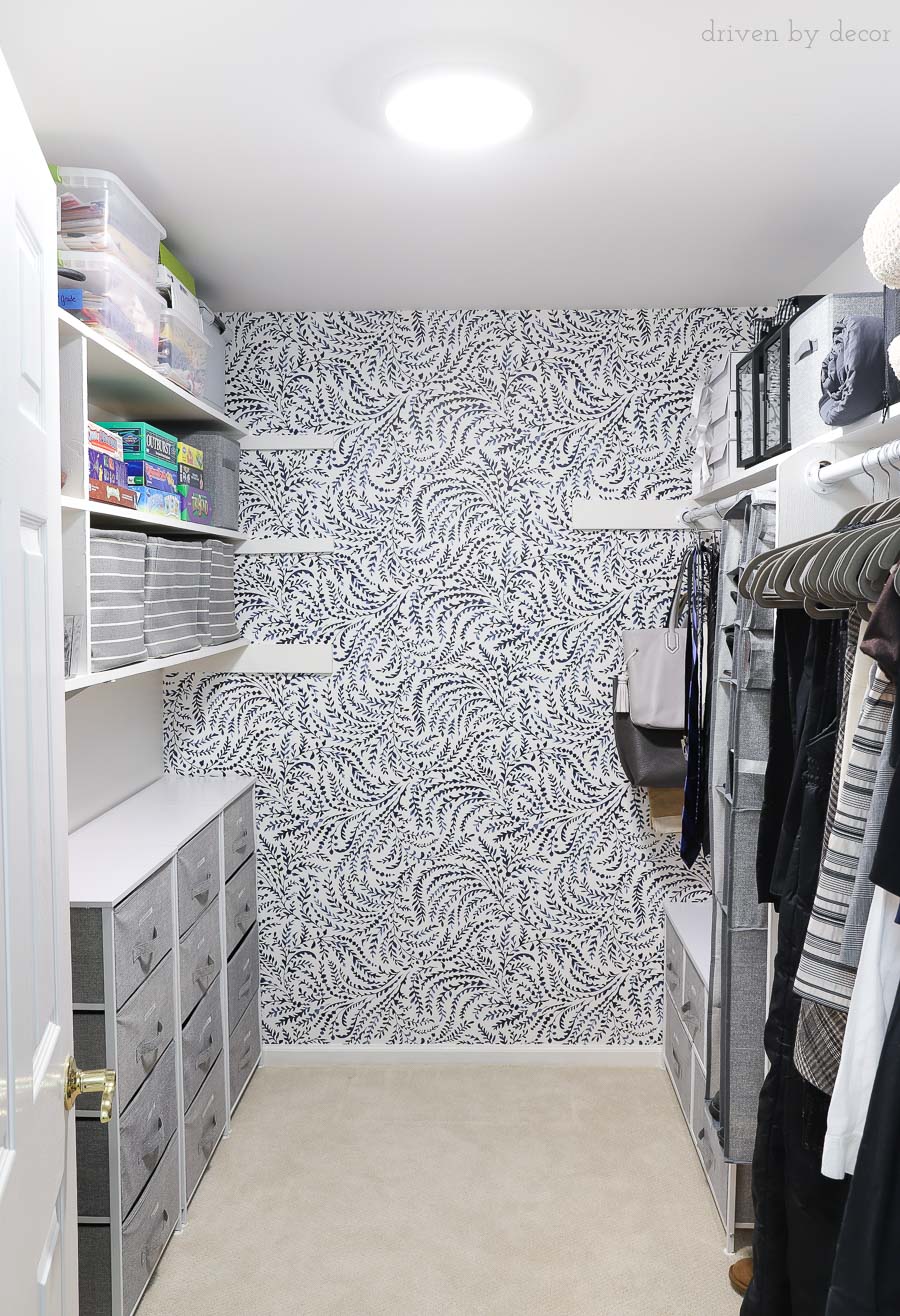
My husband’s jaw just about dropped open when he saw the “after”! His first reaction was “Where is everything?” (which also came with a bit of a look of terror because I think he got worried that I purged his stuff – I’ve been threatening to get rid of a few things of his in here for years!). And while I did get rid of probably about ¼ of what was in here (all my own stuff – my husband was spared!), it was the smart, efficient organization products that makes this look like a new space.
There were several steps in getting from that it’s-so-embarrassing hoard closet to this organized and functional “after” – here’s how it all went down with a step by step of how to organize a closet! (affiliate links included in post – see my full disclosure statement {here}):
Step 1: Take Everything Out. Yes, Everything! And Then Purge..
If your closet has gotten to hoard status like mine, you need to start by taking everything out so you can actually see all that you have and decide on what’s going back in and what can be donated, sold, or trashed. If you leave everything in your closet and start organizing from there, you’ll err more towards keeping things than purging them and the whole process will take you longer in the end than if you had just taken the time to get everything out in the first place. I’ll admit, it totally pained me to clutter up our newly madeover bonus room that my hoard closet is off of and I was horrified to see just how much stuff was actually packed in that closet (pardon the shoddy iPhone pic):

There ended up being a lot of things that I realized we either didn’t need anymore and could get rid of or could be moved into our unfinished basement to be stored long-term (the things we rarely, if ever use but still want to keep).
Step 2: Take Stock of What You Have & Buy The Organizing Products You Need
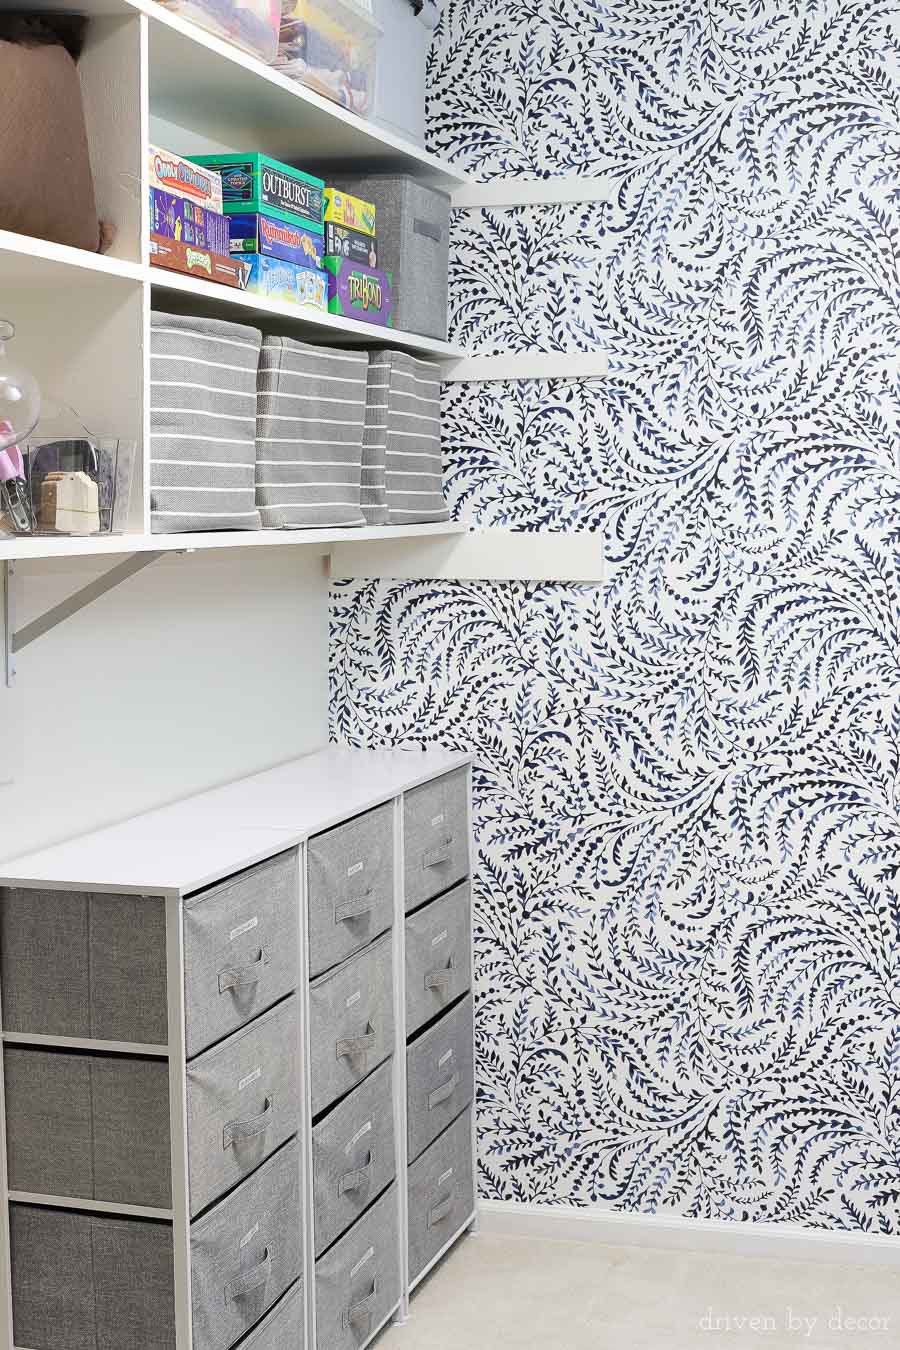
Everyone is going to have different needs for their closets – for example, there’s no way that most people have as big of a hoard stash of pillows and fabrics to organize as I do! Now that everything is out of your closet and you’ve done your purging, it’s time to take a close look at what you have and figure out the best solutions for organizing it. Since I have so many fabrics, drapes, and pillow covers to store, I wanted a storage solution that protected them from getting dust-covered, yet was easy to access (I didn’t want to have stacked plastic containers that I’d have to rearrange every time I needed to get something out). I chose several of fabric dressers and truly LOVE them! On the left hand side of my closet, I lined up three of {these four-drawer dressers like {these} side by side:
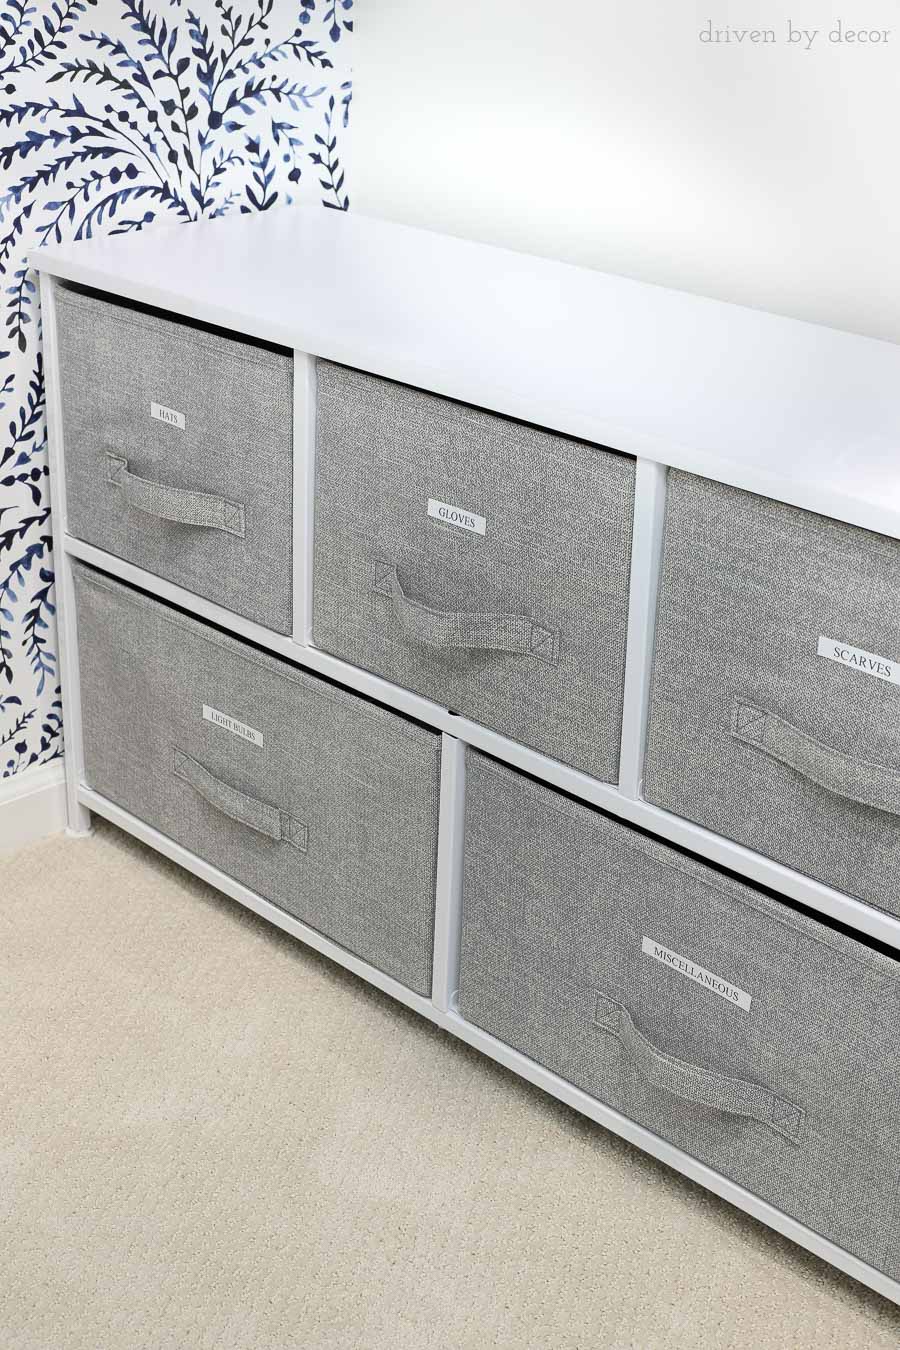
And on the right hand side of my closet, I have {this lower 5-drawer dresser} which gives me space to hang some things above it:
They must have been easy to put together because my daughter did it for me and didn’t ask for a single tool or bit of help and it’s crazy just how much stuff I was able to fit in them! All of the overflowing piles of fabric and pillow covers, our winter gear (hats, gloves, scarves), lightbulbs, crafts supplies, and everything that was previously scattered about the closet is now neatly organized inside of these. And I love that that they pull all of the way out so if you’re looking for something in a bin, you can just pull it right out, place it on top of the dresser (that’s why I didn’t put anything on top of mine!), and easily look through to find what you need. I also needed some larger bins for bigger items and products to organize shoes, totes, wristlets, and a few other things – I’ll show you what I chose for those too!
Step 3: Pretty Up Your Closet & Light It Right!
Not all of you are wired like I am, but having a space that’s pretty motivates me to keep it clean and organized. I think part of the reason that my closet got to hoard status is that it was a poorly lit space with a dingy beige paint color and I just didn’t like or care about it. Once everything was out of my closet, I freshened it up by painting everything white – it was quick and inexpensive to do but made a world of difference. I was just about to start working on putting everything back in when I realized that I had some of {this wallpaper} left over from my recent craft room makeover, so I decided to wallpaper the far wall of the closet with it. Some of you might think a wallpapering the closet is ridiculous and that’s ok but as a quick little extra that cost me nothing, it makes me love my newly organized space that much more:
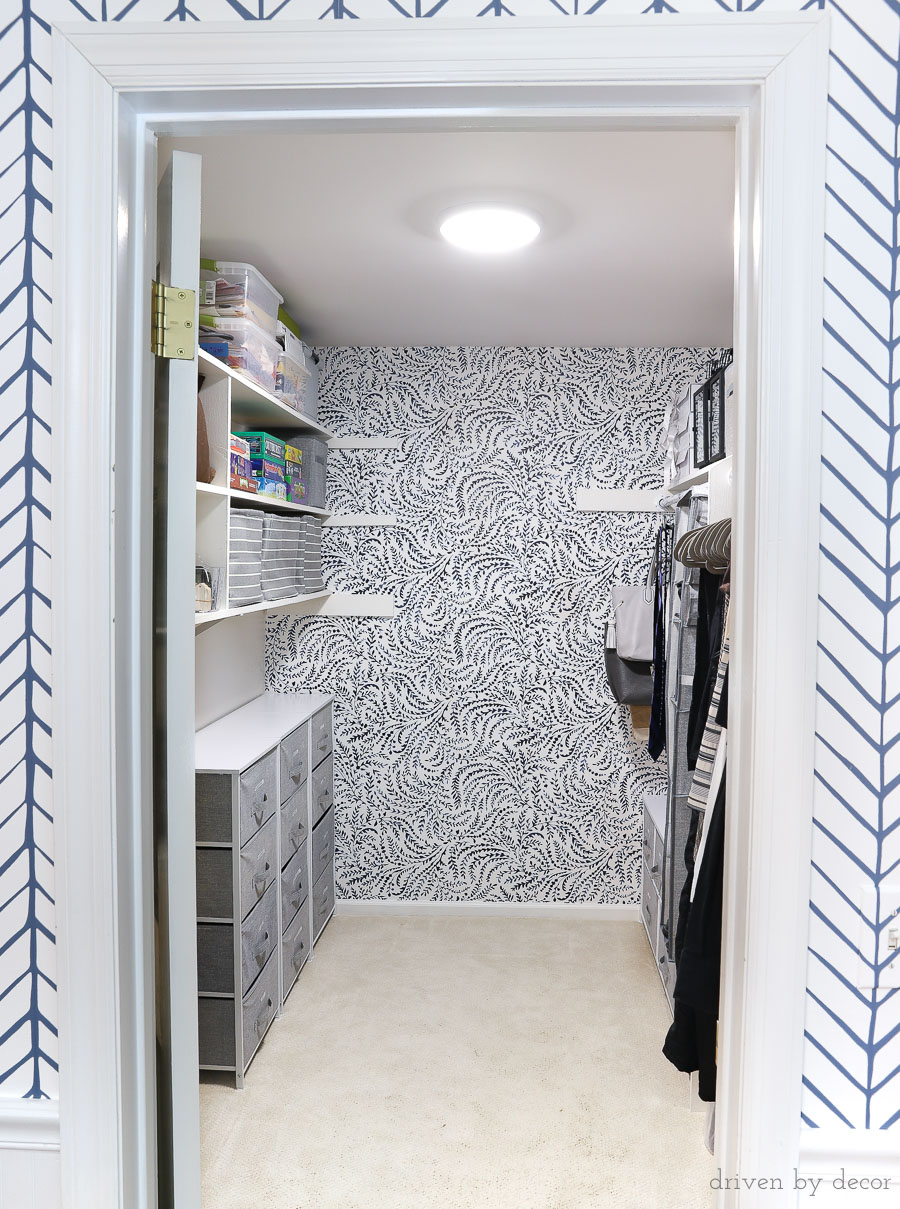
Now’s also the time to change up your lighting if that’s needed. The light in our closet was previously just a single bare lightbulb on the ceiling that didn’t light the whole space and cast a very yellowy glow. Plus, in most (if not all) states, it’s against code to have a bare lightbulb in a closet since it’s a fire hazard. I swapped it out myself in about 20 minutes for {this simple 4000K low profile LED flush mount} that was under $50 and has a ten year lifespan. Now I’m up to code and my space is well lit with a much “whiter” light!
Step 4: Put Back in The “Major Players”
This is my favorite part – time to start putting your closet back together! Start by putting your major players back in place first – this includes any furniture pieces and larger pieces that can only fit well in certain spots. In addition to the fabric dressers, I had a specific spot that I wanted to put {these new rope handled striped storage bins} (mine are the medium size):
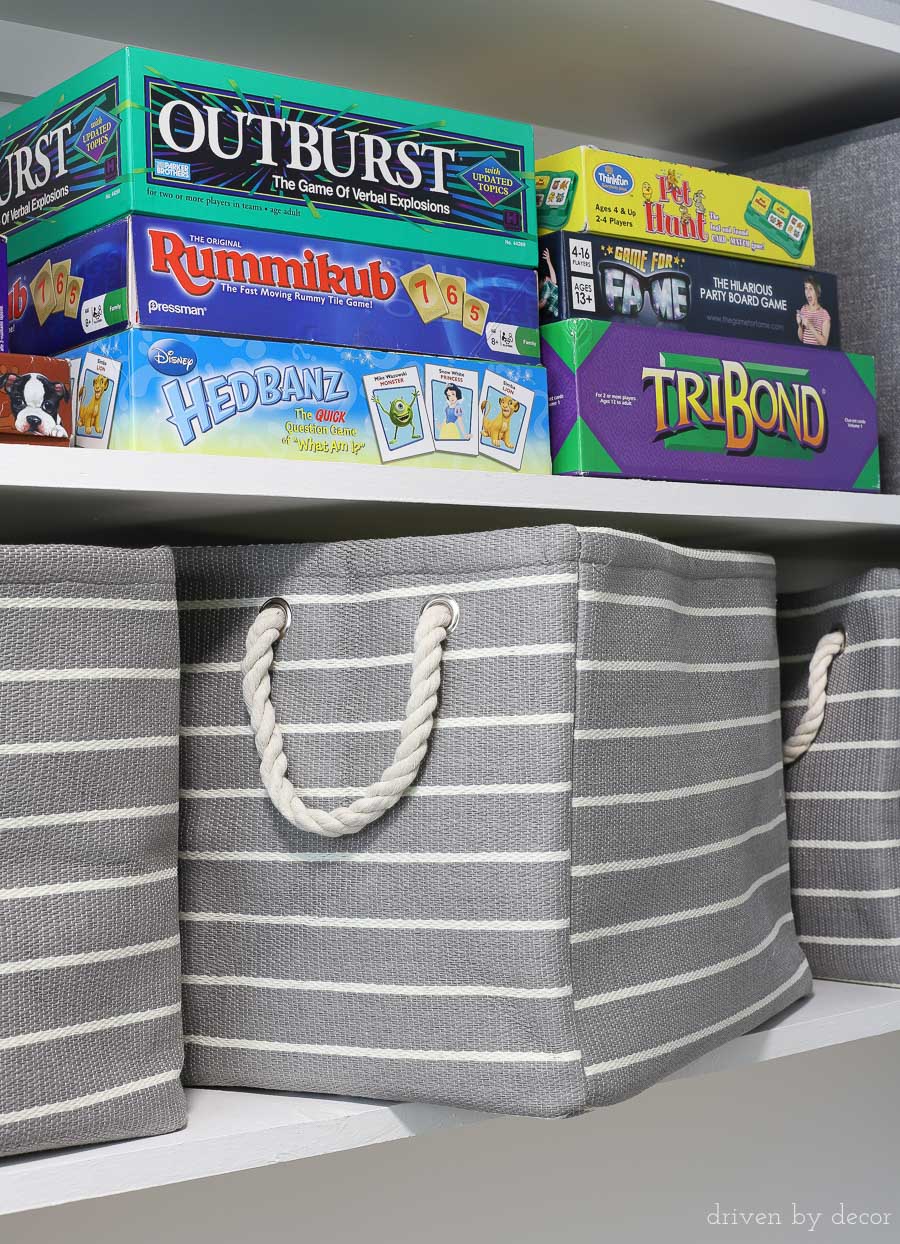
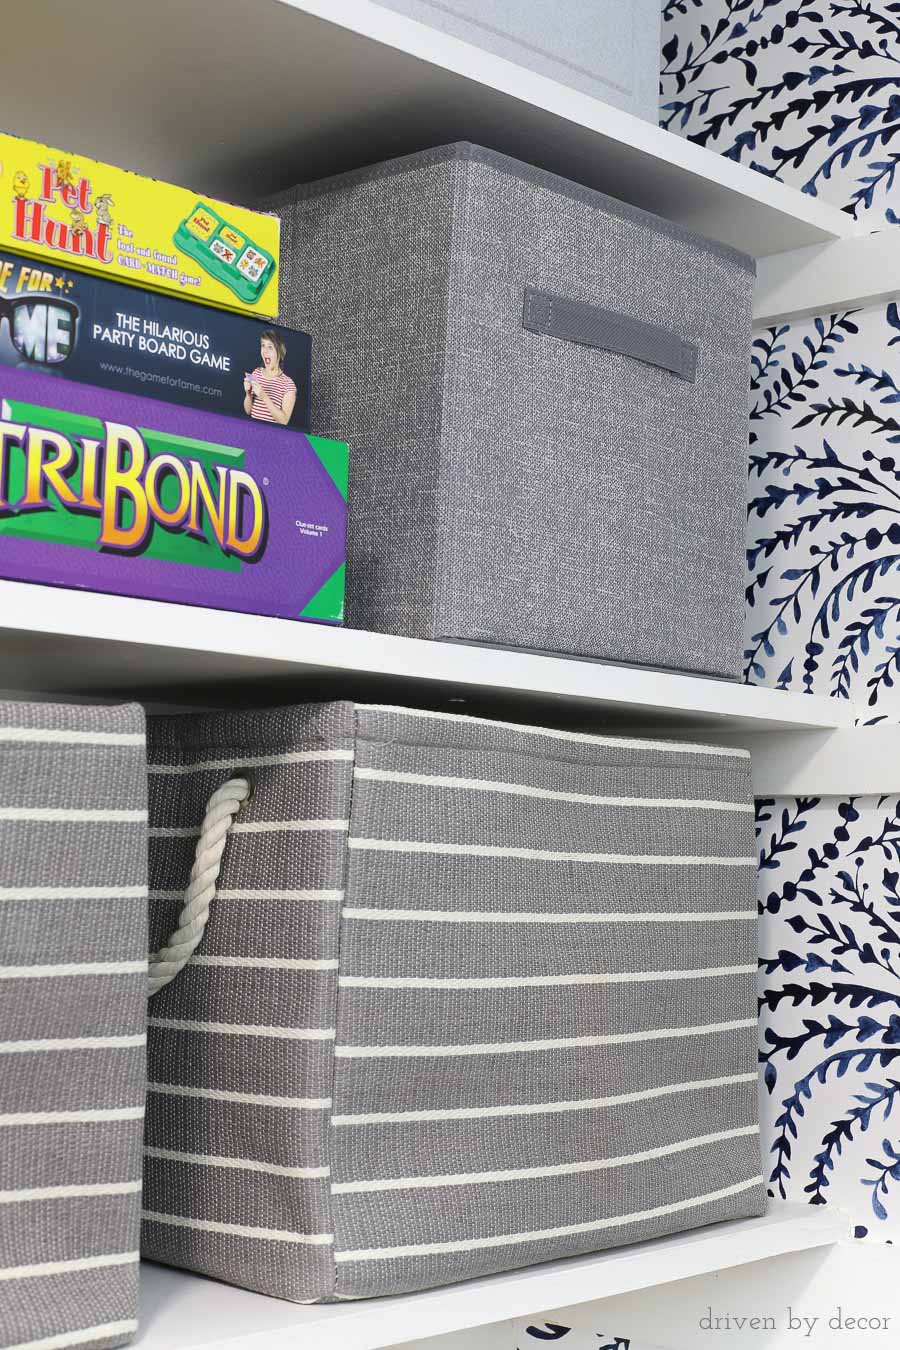
They fit perfectly lengthwise on a standard 12″ shelf and I love that they have rope handles on both sides so they’re easy to pull out and tote around. One of them has all of the bedding for our AeroBed and it will be so easy to grab and take to the room where we’re setting the inflatable bed up. I also ordered a couple of {these gray fabric storage cubes} (medium) which are also perfectly sized for 12″ shelves. I have one above my rope basket holding small games:
and one holding flip flops on the shelf over my {new fabric shoe & boot organizer} which I put into place too:
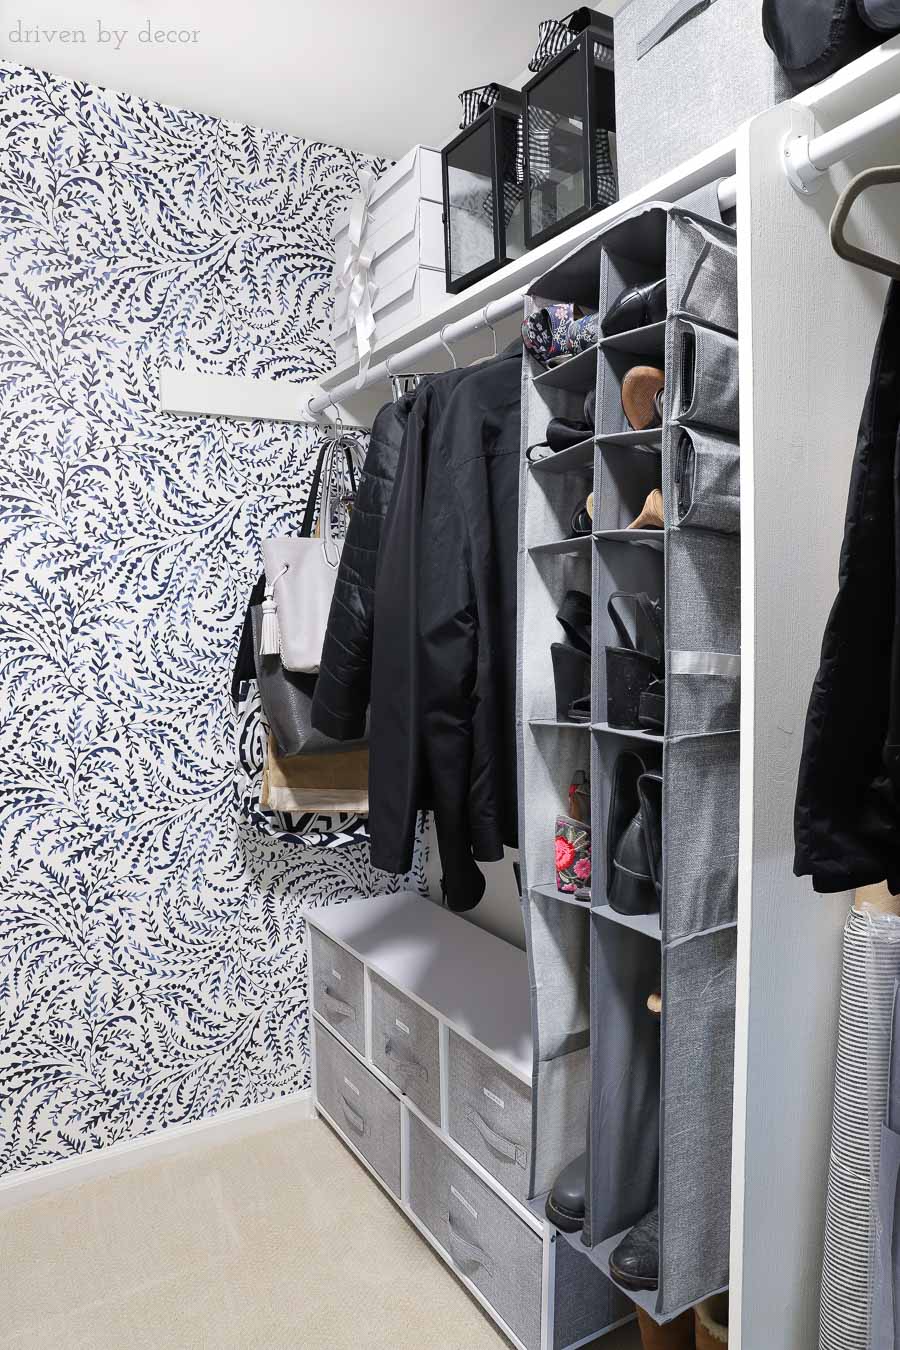
One of the features that I love about the {this} hanging shoe/boot organizer is that it has pockets on each side including a large pocket on the left side that I threw a couple of clutches into:
Want to save this post?
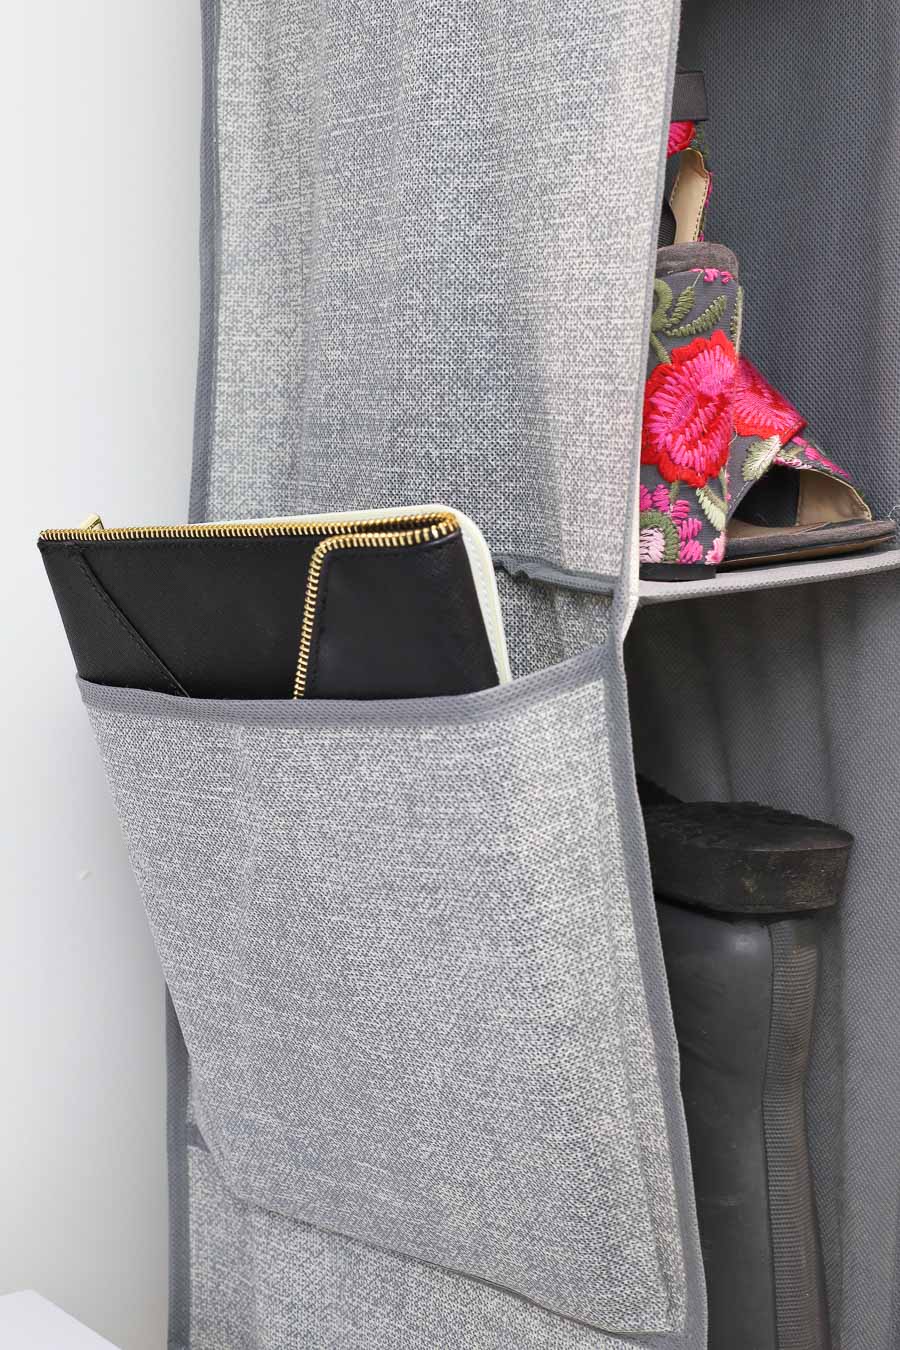
and three smaller pockets on the right side that I filled with some wallets that I’m not ready to part with yet. Now that we’ve got all of our major players in place it’s on to…
Step 5: Label!
The organizer in me LOVES to label things (and my youngest daughter inherited this love too so she was my label maker!). It only takes about 15 minutes if you have a labeler and will end up saving you tons of time looking for things down the road. I’ll easily remember what’s in each of my larger bins, but there’s no way that I’ll remember where everything is in the drawers of the dressers so we labeled each and every one of them:
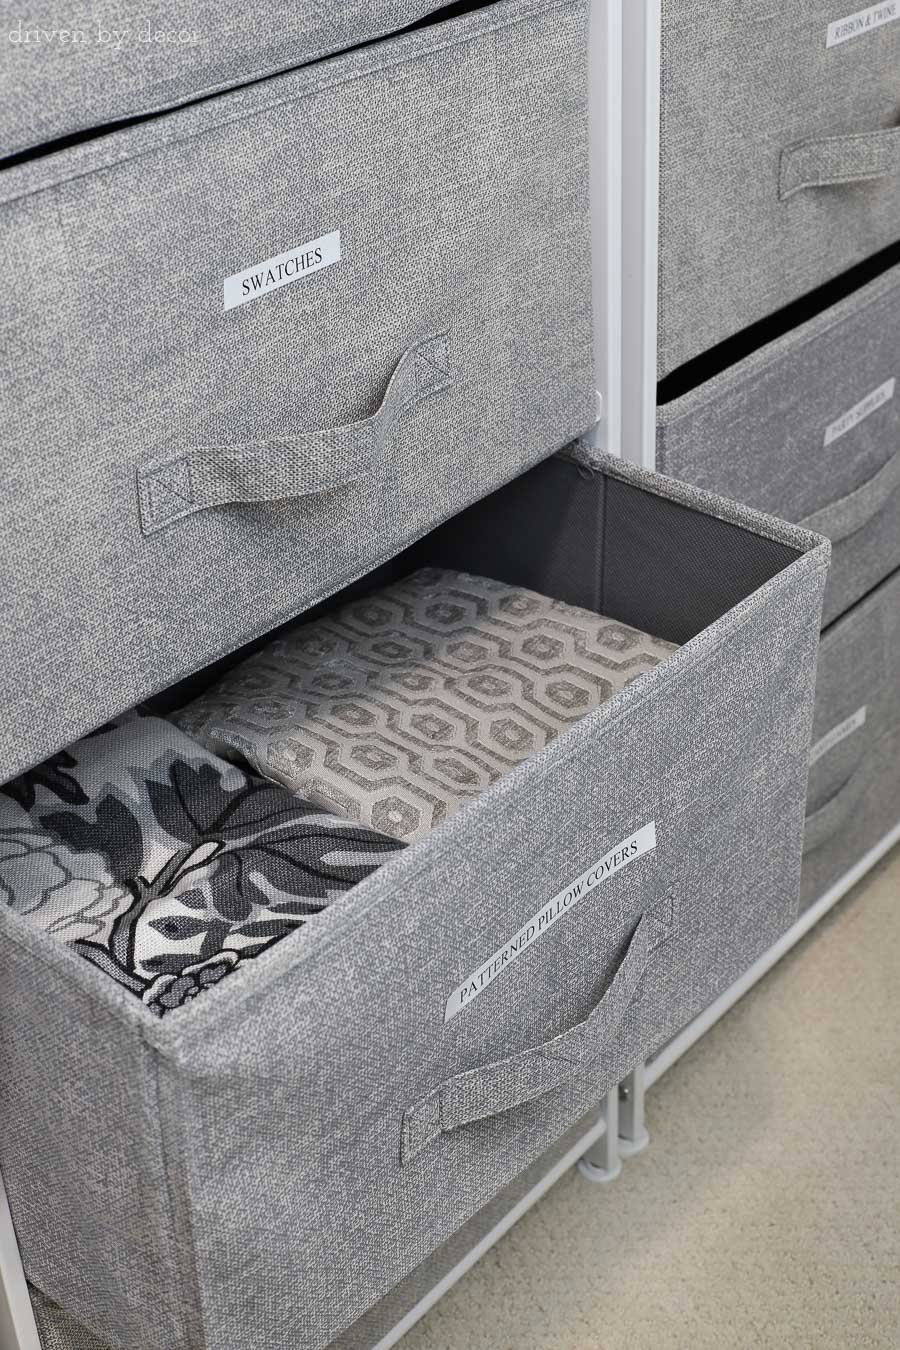
I have {this labeler – the LM280} that I bought because it has a feature where you can use any font that’s on your computer. As it turns out, I ended up liking one of their standard preloaded fonts so have always just used that. It’s super simple to set up and use. I love that the drawer pulls on the fabric dressers are south of middle since it leaves a nice space to place a label. Update: some of the labels started peeling away from the fabric bins after a few months so I covered them with clear packing tape which has done the trick to keep them on!
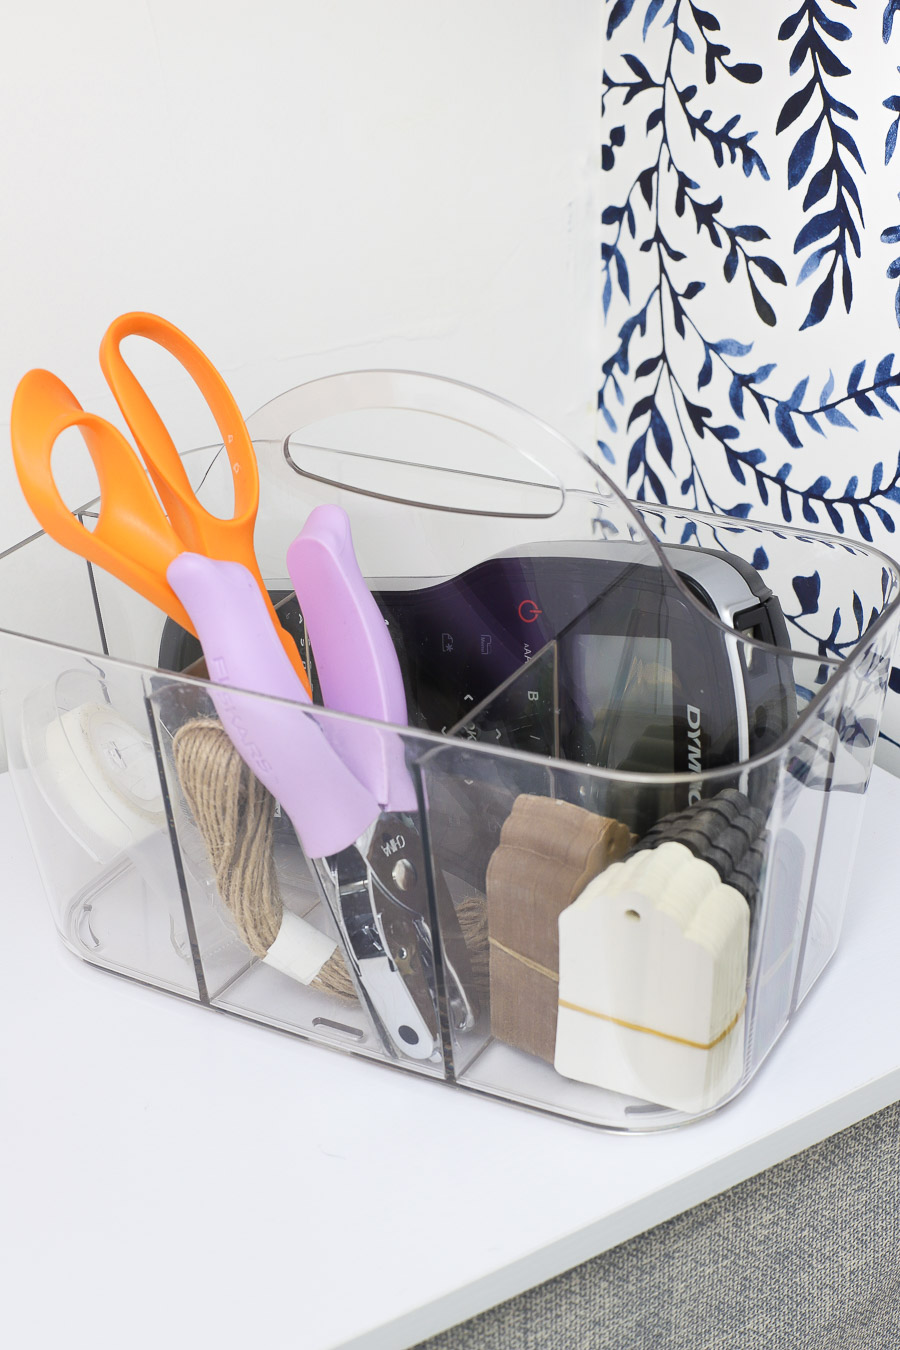
Since I knew I was more likely to keep things labeled by having everything I need easily accessible, I put my labeler and a few other things I sometimes need in my closet into {this acrylic tote} and placed it on a low shelf where it’s easy to grab and use.
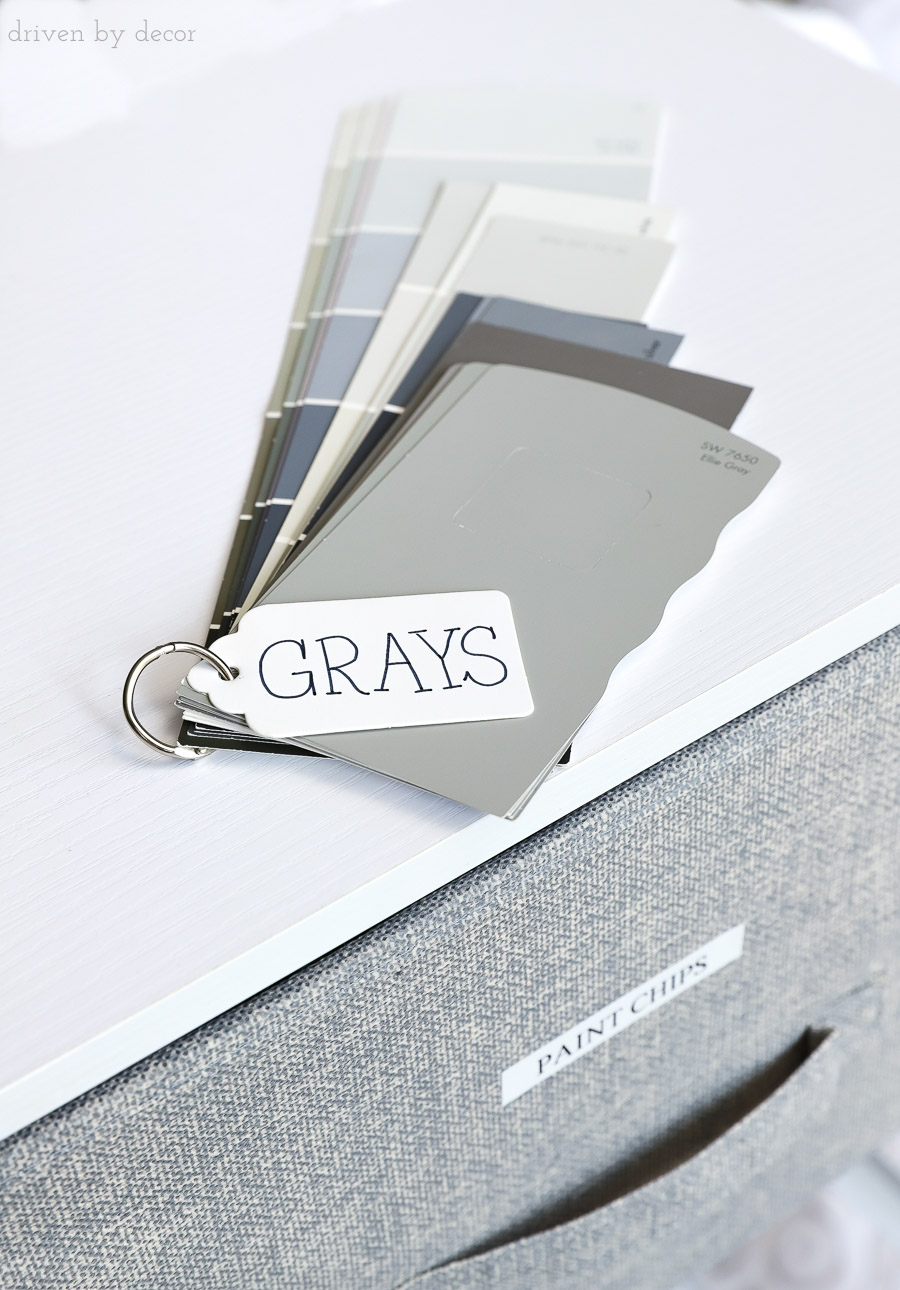
I also went to town on my paint chips because even though I think I have like three duplicates of every paint strip out there, I can never find the ones I want when I need them. Instead of organizing them by brand, I organized them by color because that’s how I’m most likely to use them. For example, I took my favorite gray paint chips and strips, punched holes in the corner and then added a small loose-leaf ring and a labeled white tag so the next time I’m looking for a gray paint color, I’ve got all of my favorite grays from various brands in one easy to grab place!
Step 6: Put Your Smaller Organizers in Place & Bring Everything Else Back In!
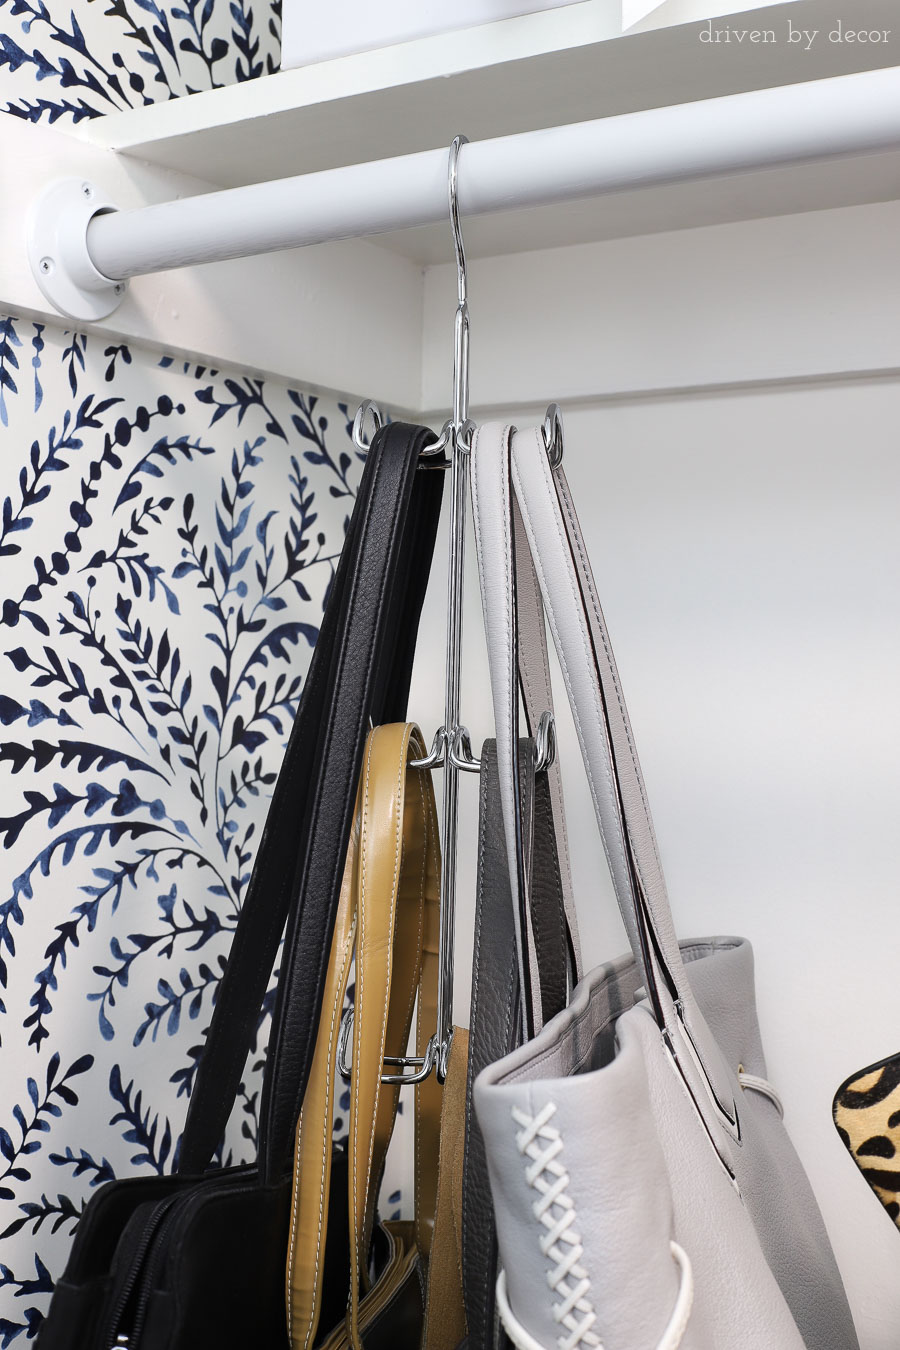
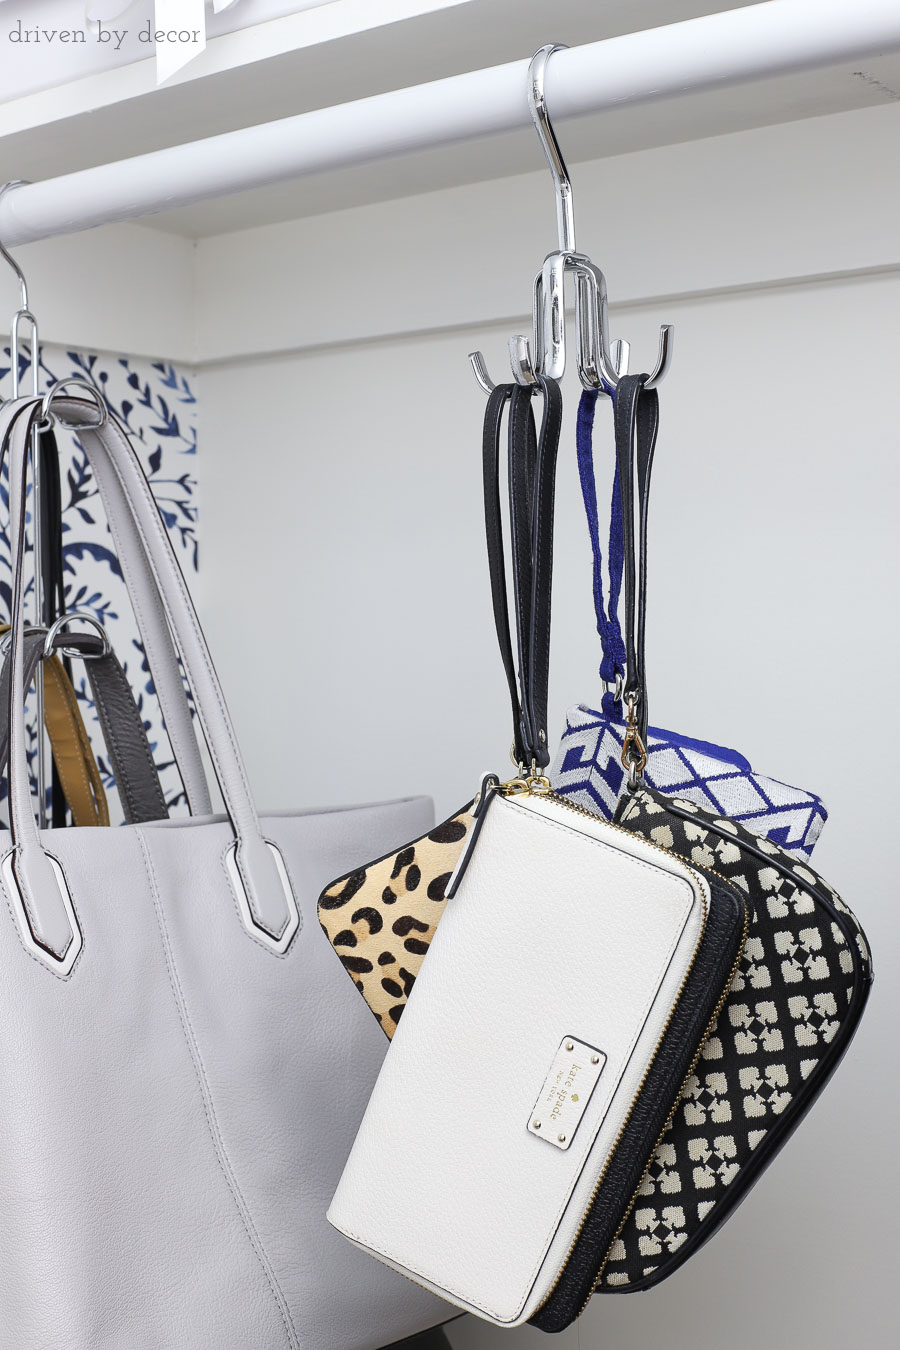
Now it’s time to haul everything else back in! I brought back my smaller organizers first, including {this purse organizer} and {this organizer hook} that I have hanging over my 5-drawer fabric dresser:
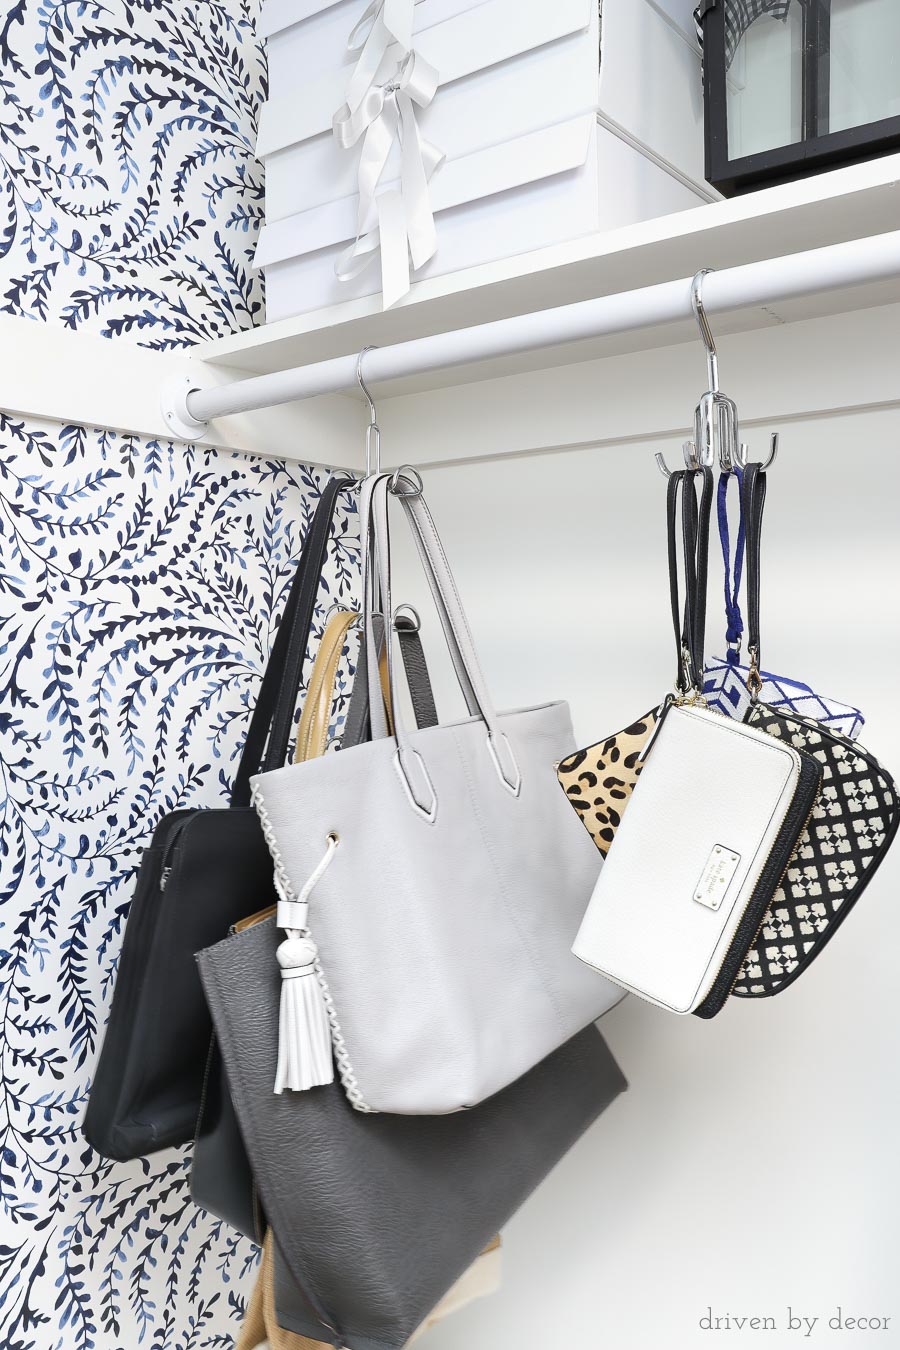
It seems like when I need one of my totes or wristlets, I’m always in a rush about to head out the door and having them stored this way will allow me to grab them quickly and go. {InterDesign’s purse organizer} works great for my totes and would also work well for lots of other things like scarves or baseball caps:
For my wristlets, {this all-purpose organizer hook} does the job well and could be used for an endless number of things. Based on the reviews, a lot of people keep it in their closet as a quick hanger for clothes that they would normally throw on a chair or even the floor at the end of the day. Others use it for bras, umbrellas, belts, and all sorts of other things.
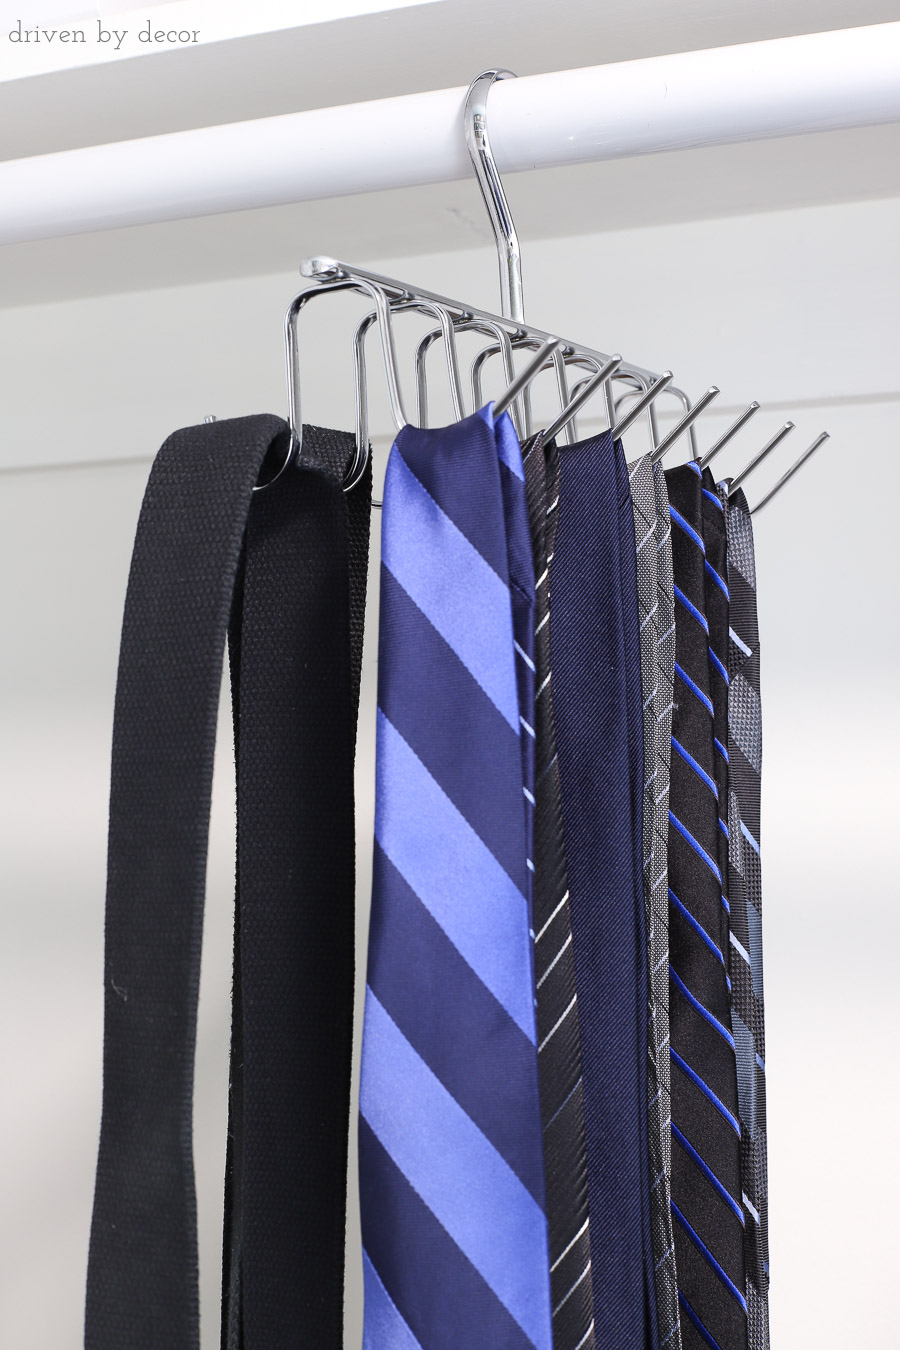
And next to both of these I have {this belt & tie rack} – normally you’d hang your belts by the buckle so that they’d hang all of the way down but since I have my storage dresser under mine, I just looped the whole belt over the hooks which worked great too:
Once my organizers were all in place, I hauled everything else back into my closet and found a home for it. I was truly amazed at how much fit in my fabric dresser drawers and how much more spacious my closet looks – while I only got rid of about ¼ of what was in it, I think it looks more like ¾ of it is gone! Instead of the agony of having to find something in my previously unorganized hoard closet, grabbing a tote, game, or a pair of winter gloves is now a breeze!
I’ve linked all of the great closet organization products that I used for my makeover throughout the post but I’ll also include them in a complete source list below! I know that now is a busy time for many of us with the holidays approaching but before you know it, the January urge to clean and organize everything will be kicking in! I created a Pinnable image below so that if now isn’t the best time for you to jump into a closet makeover, you’ll be able to easily find this post when your organizational fever hits:
I hope you all enjoyed this post – makeovers are my favorite! Thanks as always for stopping by! If you want to keep organizing, I think you’d love my post on 20 of my favorite home organization ideas!


Organizational Elements: 5-Drawer Low Fabric Dresser | 4-Drawer Tall Fabric Dresser (similar item) | Rope Handled Striped Storage Bins | Fabric Storage Cubes | Shoe & Boot Organizer | Acrylic Tote | Hanging Purse Organizer | Hanging Organizer Hooks | Belt & Tie Rack
Other: Paint: Benjamin Moore’s Simply White | Wallpaper | LED Flush Mount Ceiling Light | Labeler (LM280) | Small Metal Rings | White Tags


Anonymous says
Love what you did it’s beautiful and I am moving soon and I hope to Incorporate A few of your ideas .
Anonymous says
Your article on storage closets was one of the best I read leadly. Thank you for info.
Linda mccormack says
Iv no drawers underneath my bed, u find it hard for space in my bedroom, and suggestions please would be appreciated 👍😊
Melissa says
I’m very jealous of your lovely closet! Wish I had a walk in I could do that to—just recently saw that wallpaper on another site and loved it. May I ask where you got your beautiful wood-framed daybed/couch in the room you used to hold your things while you did your redo? I have been looking for one like that and been unable to find it.
Dale Walker says
Nice try, but your method will not work for me. If i take EVERYTHING out of the closet I don’t have anywhere to put it. That’s why it’s on the closet.
Pilialoha says
Hi we’ve bought this 5 drawer lower fabric dresser and the handles are tearing off, is there any way we can order the drawers? Love this item
RW says
Love the look. I was hoping to see what you did with the decorating stuff. Where are the bolts and rolls of fabric and wallpaper? ( Under the bed like the pillows? )
Kris Jarrett says
I never realized I didn’t get a good pic showing those! I consolidated some of the rolls (wrapping a few fabrics on one wall and simply kept then standing up together in the closet by my hanging clothes. One of the pics in the post shows one of my rolls with a striped fabric – the rest of the rolls are standing up next to it!
Shirley Rustin says
I could live in your home so comfortably, I love everything you have done. I have closet issues but you gave me some ideas. I have gone from a whole house to one room at my daughter’s because of health challenges(I am 75) but I loved it when I had my own place and family to care for. I see the joy you take from a job well done. It’s great you share it with others.
Kris Jarrett says
What a sweet comment – thank you so much!!
Karen B. says
Kris,
I’m late to visit this post…so glad I saved it for available time to read it! We moved in July and while we’re completely organized in some rooms, our closets are an ongoing project. I saw several items I know would make my closet work better for me. My husband lost his tie hanger in the move and we’ll both be shopping the links you gave us.
The closet looks so pretty, I’d be tempted to leave the door open! 🙂
xo,
Karen
Kris Jarrett says
Karen, thank you so much! I wish I had put the organizational stuff into place soon after moving in so that it never got to this point! Good luck whipping your closets into shape!
Molly Staggs says
Whoa, that’s so amazing! The purse & shoe hangers caught my eye. Thank you for your inspiration.
Kris Jarrett says
Thank you Molly! The purse hanger is probably my favorite thing about my new closet! 🙂
Kathy says
I am new coming from Melaine’s blog and LOVE your site. This is amazing…I got so many good ideas ~ is that kate wristlet in brown, I can’t believe it I just got a crossover purse in that same material and was looking for a wallet for it…too funny!!
Kris Jarrett says
Thank you so much! The Kate wristlet is actually white and black – I love it and use it all the time!
Amy says
Wow, this is so timely! My closet is about this same shape, size and length and looks worse than this. Thank you for linking these products. This can be January’s project!!
Kris Jarrett says
Amy, January is the perfect time to take it on! Good luck with yours – it’s so worthwhile to do!