Sharing 20 home organization ideas for a more clutter-free home (and mind!)
I love having an organized home because when my home is full of clutter, I feel like my brain is too. My home is by no means perfectly organized – it will always be a work in progress. But I wanted to share some of the home organization ideas that have had the most impact in our past and current homes.
They range from super quick 5 minute fixes to more involved “rainy day” projects. I’ve divided them up by room as a way to organize my organizing ideas – ha! Let’s start with the kitchen… (post includes affiliate links; full disclosure statement available {here})
Quick Links To My Faves Shared on Instagram
Pantry/Closet: Adding {this pair of tension rods} allows me to stack paper towel rolls vertically
Bathroom: I love {this behind-the-door storage cabinet}
Bedroom: I love {these rolling under-bed storage containers}
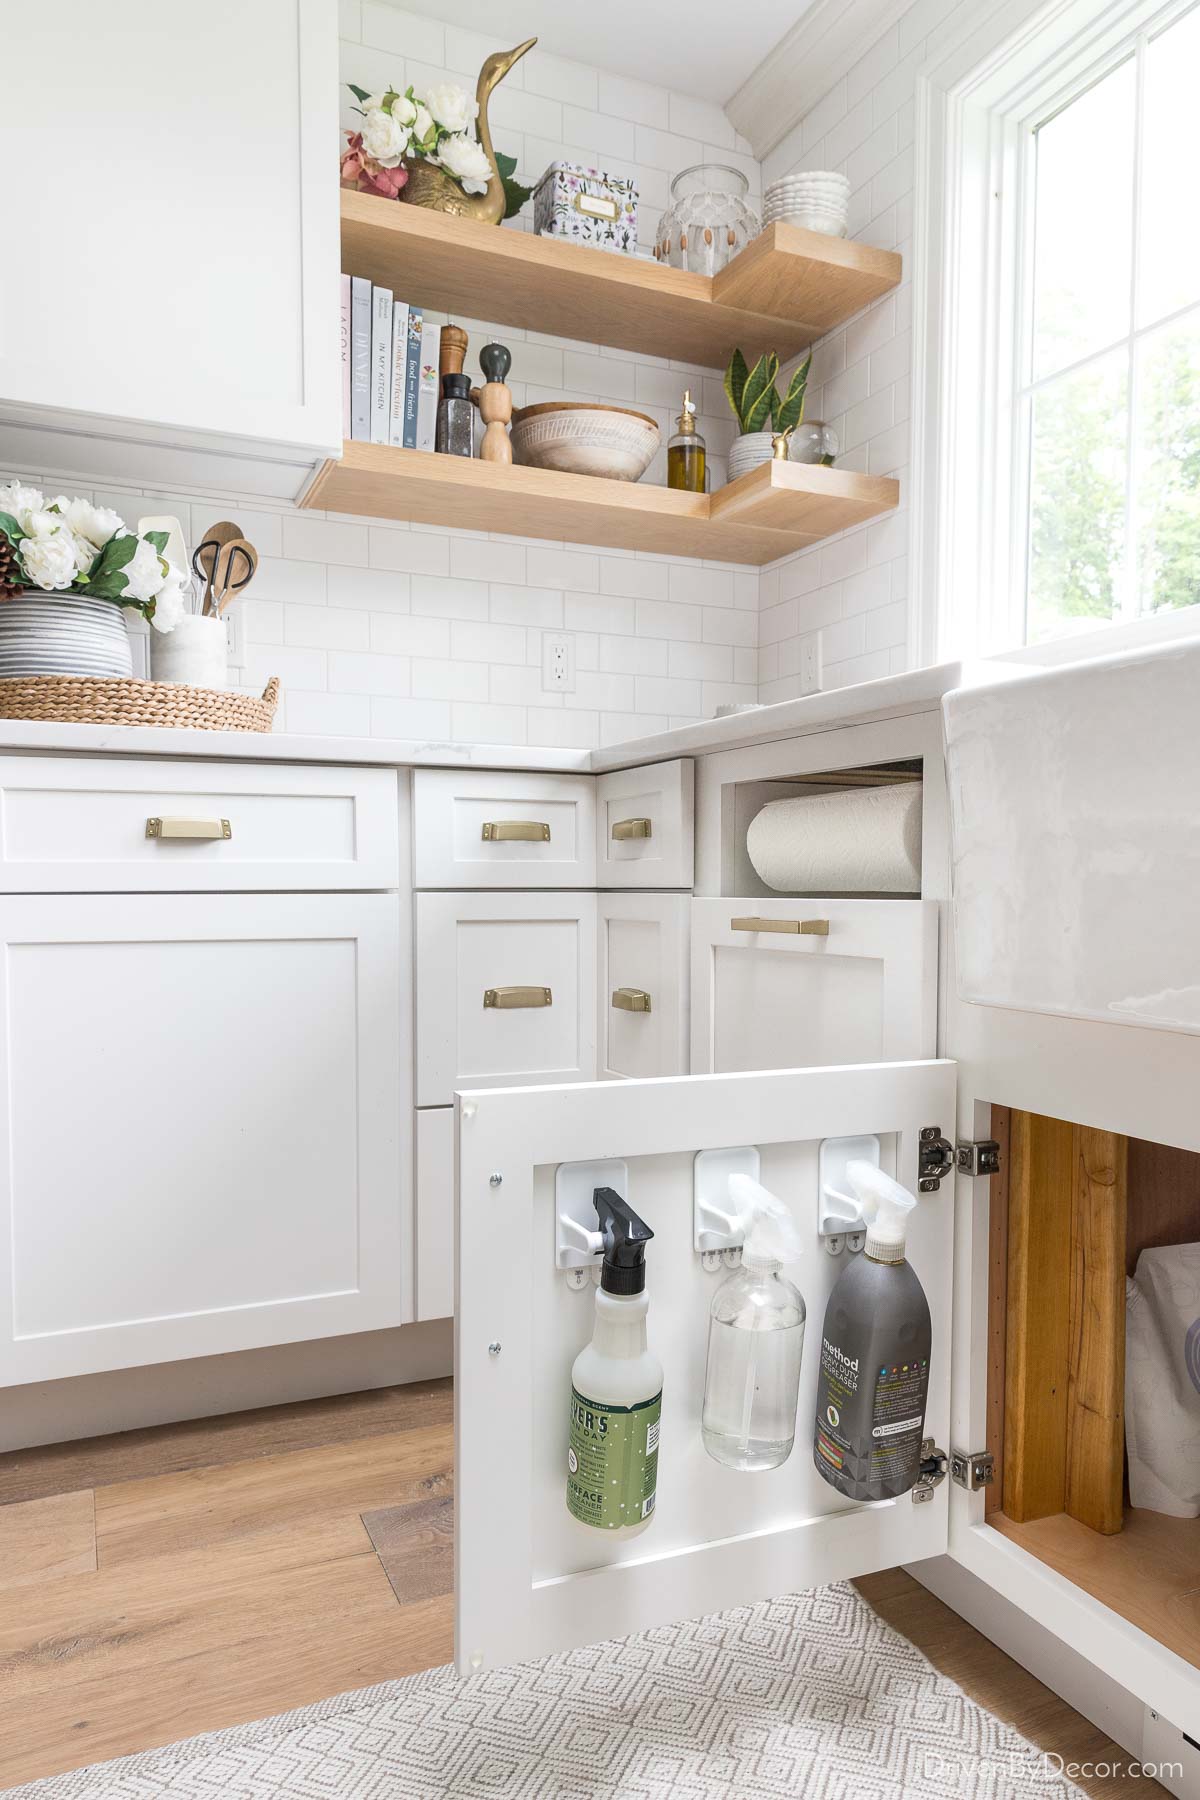
Kitchen: I love {these spray bottle hangers} for the back of my cabinet door and {this roll-out caddy under our kitchen sink}
Family room: I love {this photo scanner} for digitally copying and organizing photos
Linen closet: I love {these labeled bedding bands} for around our sheets
Every room: I have and love {this labeler} that I’ve used to label light switches, file folders, paint cans, and more.
Read on for more many of my favorite home organization ideas room by room…
Home Organization Ideas For Your Kitchen
1. Reduce Countertop Clutter By Hanging Your Most-Used Spray Bottles
I hate countertop clutter, but in a busy house with kids, some clutter is inevitable. That doesn’t mean I’m not going to fight the good fight to keep as much crap as I can off of the counter though! 🙂
One of my favorite solutions is attaching {these spray bottle hangers} to the back of a kitchen cabinet door. I hooked my three most-used spray bottles on the back of one of my under-sink cabinet doors and love that instead of littering my countertops, they’re hidden away:
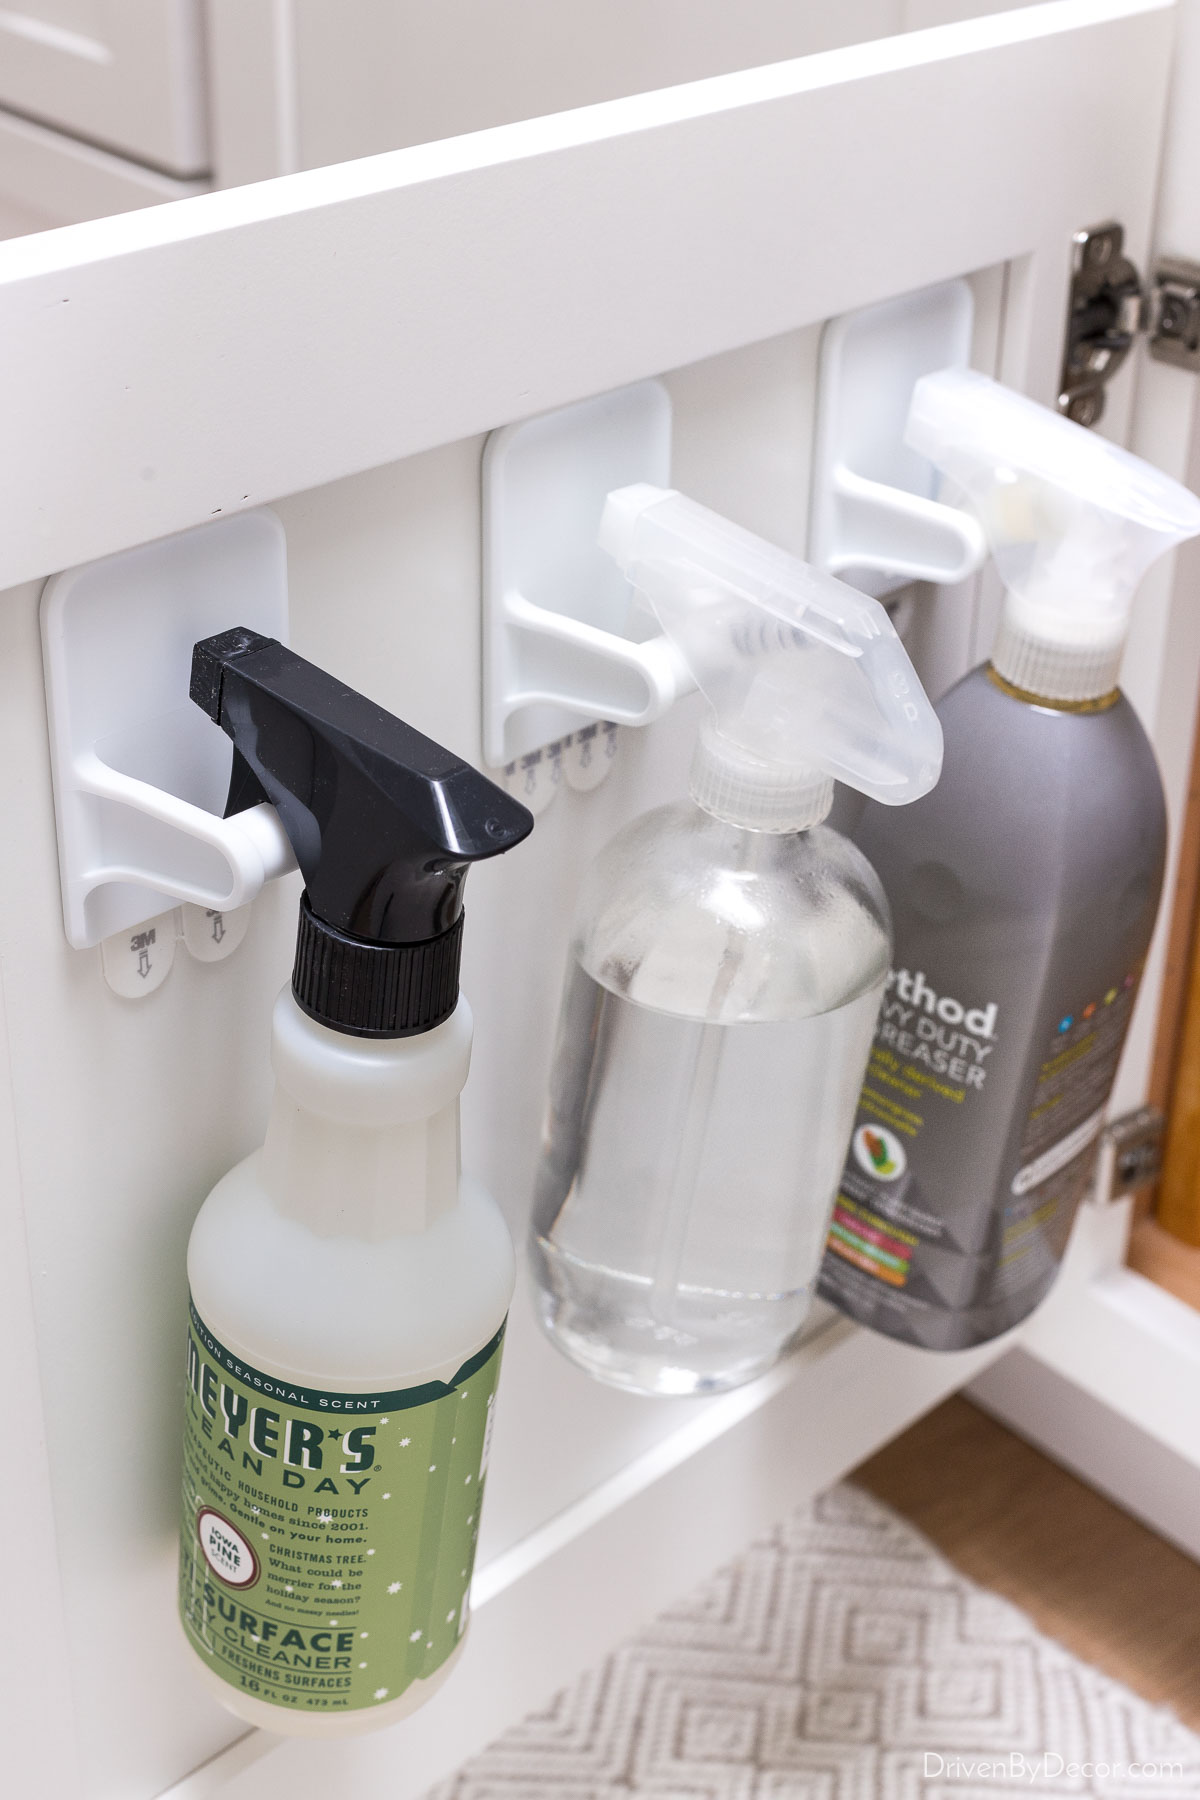
yet they’re still SUPER easy to grab when needed:
And the best part is that they’re a under five-minute fix! You simply clean the spots where you’re going to place the hangers, attach the Command strips to the back of the hooks, remove the sticky backing on the other side of the Command strips, and press them onto your cabinet door.
I’ve used these for years now and never had an issue with a hook falling, even with my heavier glass spray bottles. And I love that if I ever want to remove them, they come off damage-free.
2. Take Advantage of the Space on Upper Shelves
Do you have a pantry like mine where there’s a lot of wasted space above the top shelf (but you can’t add another shelf because it would be inaccessible)? To take advantage of that extra space, create vertical storage. For example, by adding {this pair of inexpensive tension rods}, I was able to stack my paper towel rolls vertically, freeing up a ton of additional storage space on our top shelf:
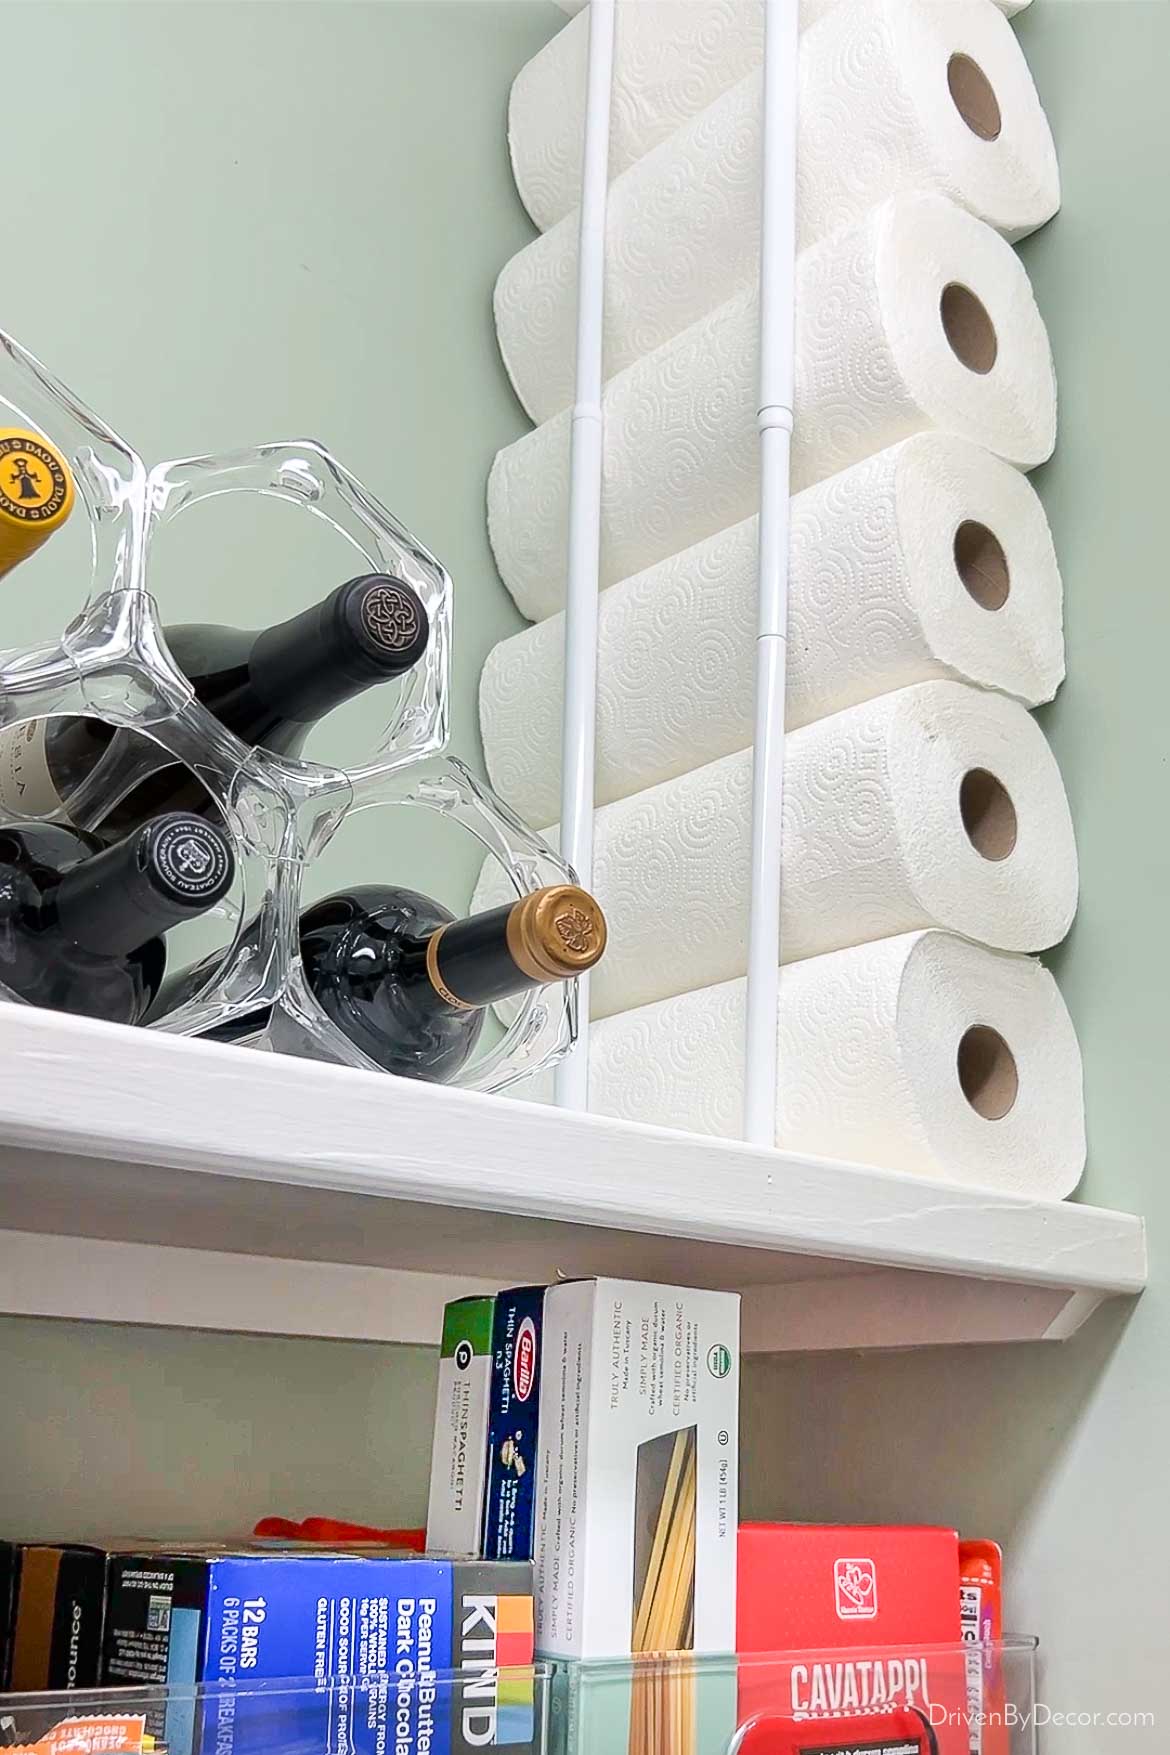
When I need a new roll of paper towels, I can simply pull out the roll on the bottom that’s easily reachable.
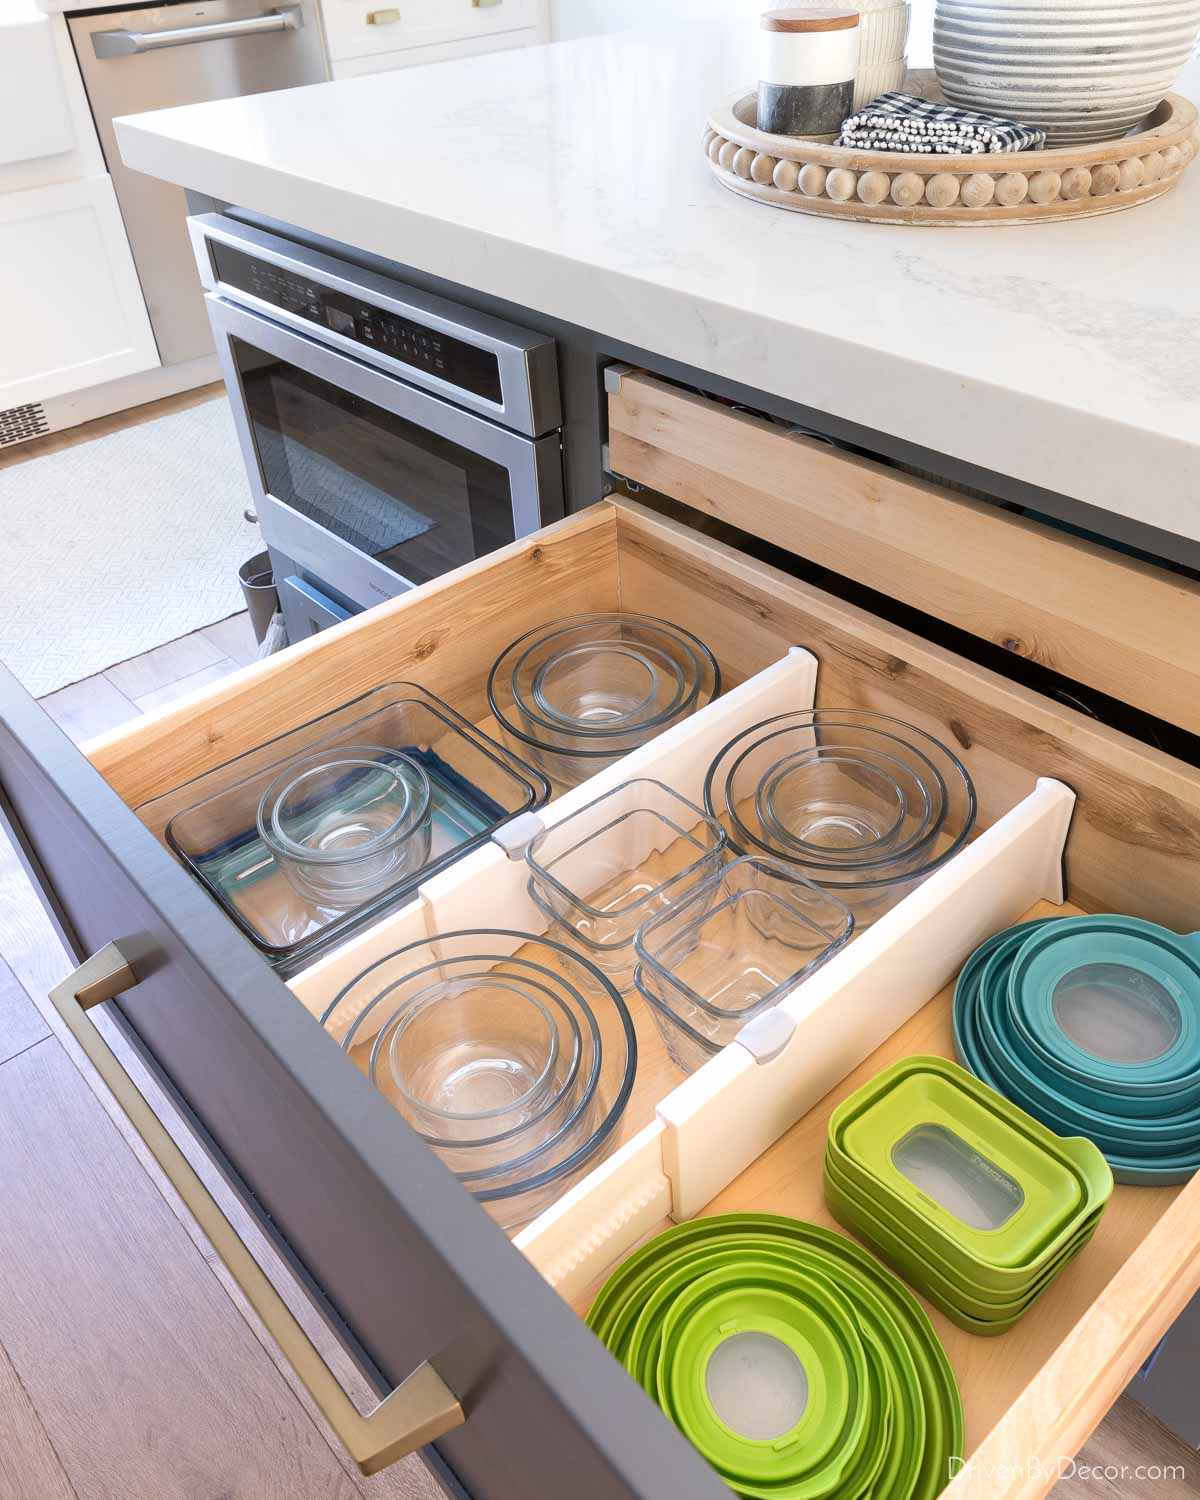
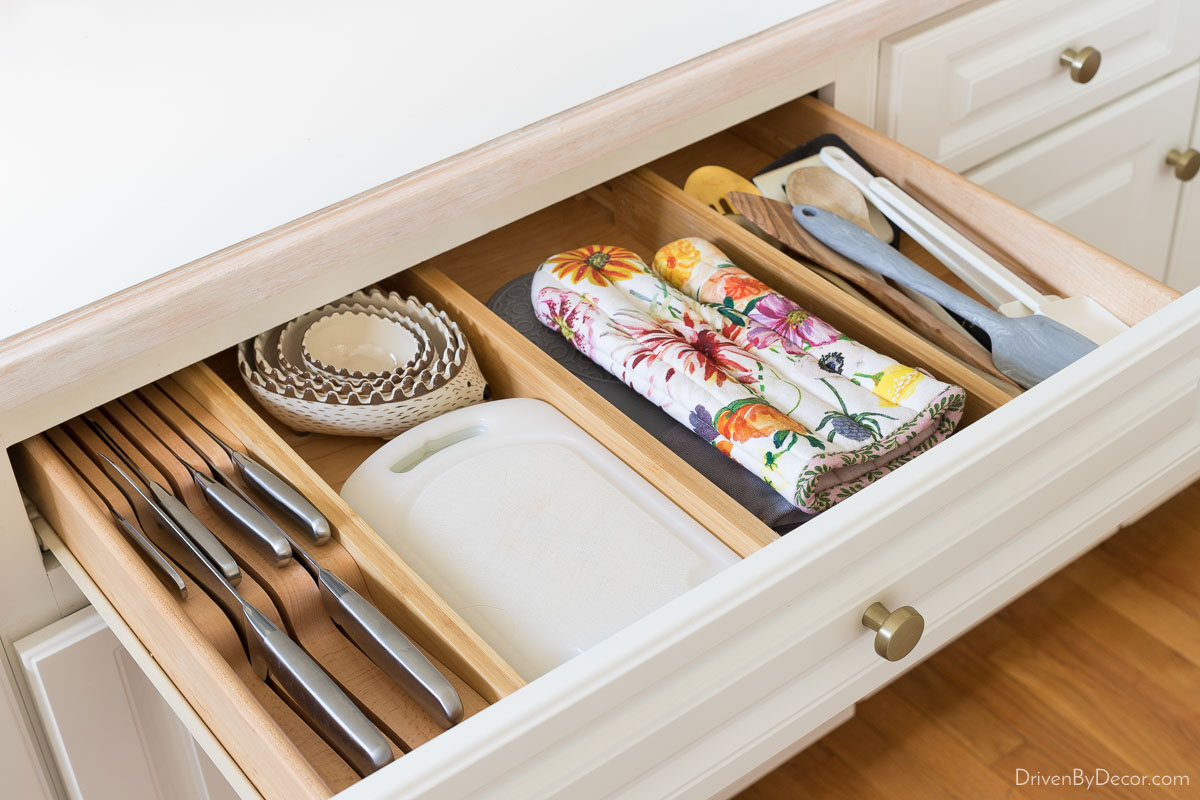
3. Divide & Conquer Your Drawers
One of my go-to strategies for organizing our kitchen drawers is to use drawer dividers that keep everything organized and in place. For our deeper kitchen island drawers, I love 4″ tall adjustable dividers such as {these} that I’ve used to organize pots and pans, serving pieces, and our food storage containers:
For more shallow drawers, I love {these low-profile expandable bamboo dividers}. I hang the spring-loaded end at the back of the drawer, making it appear as if you have custom dividers:
4. Rack Up Your Pans
If you have a lot more cabinets than you do drawers, you might be keeping your pans in an unorganized, teetering tower in your cabinet. One of my favorite, simple home organization ideas is to use a pan organizer like {this one} to rack them up! Not only does it keep your pans much neater in your cabinet,
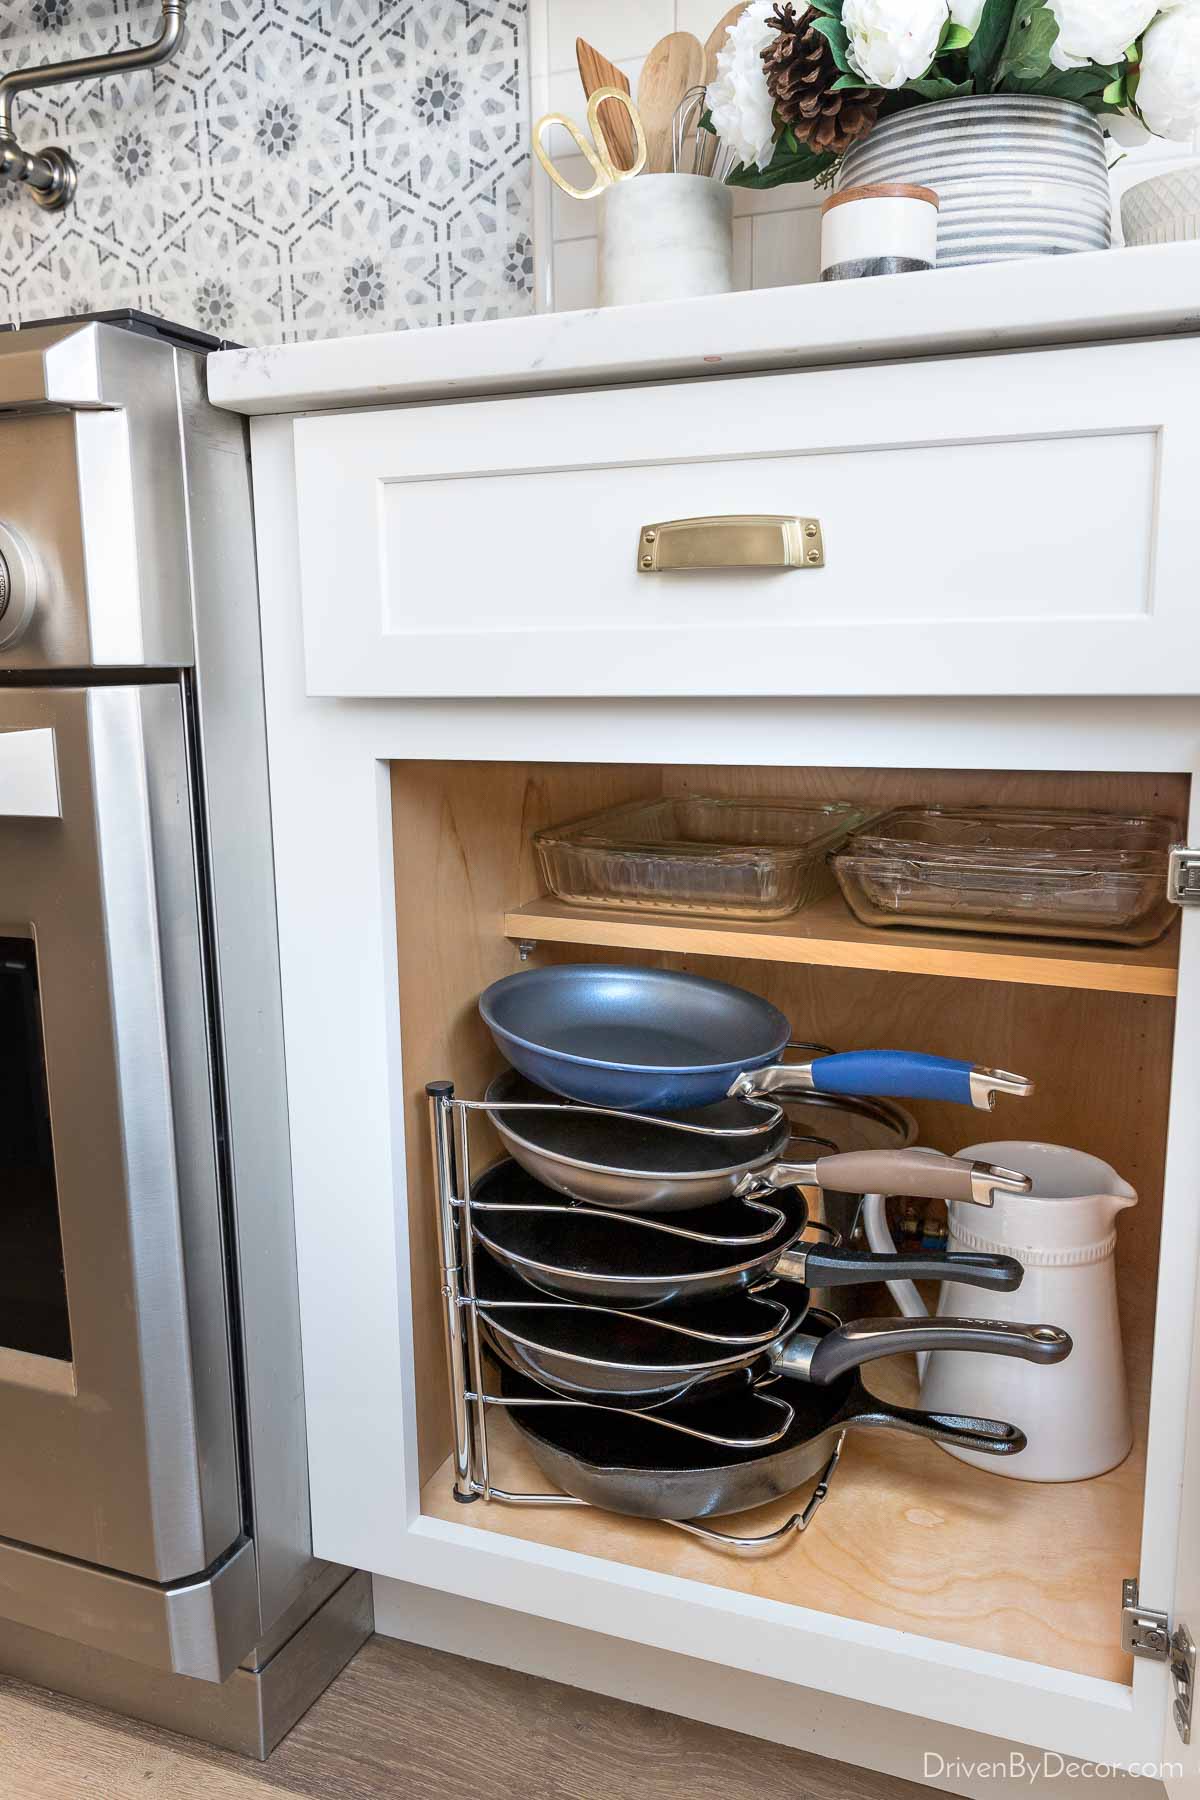
but it makes it much easier and quicker to grab a pan without causing an avalanche. You can also flip this pan organizer on its side to store your pans horizontally if that works best for your cabinet space. I also swear by {this simple rack} for keeping your cookie sheets and shallow baking pans organized and easy to grab.
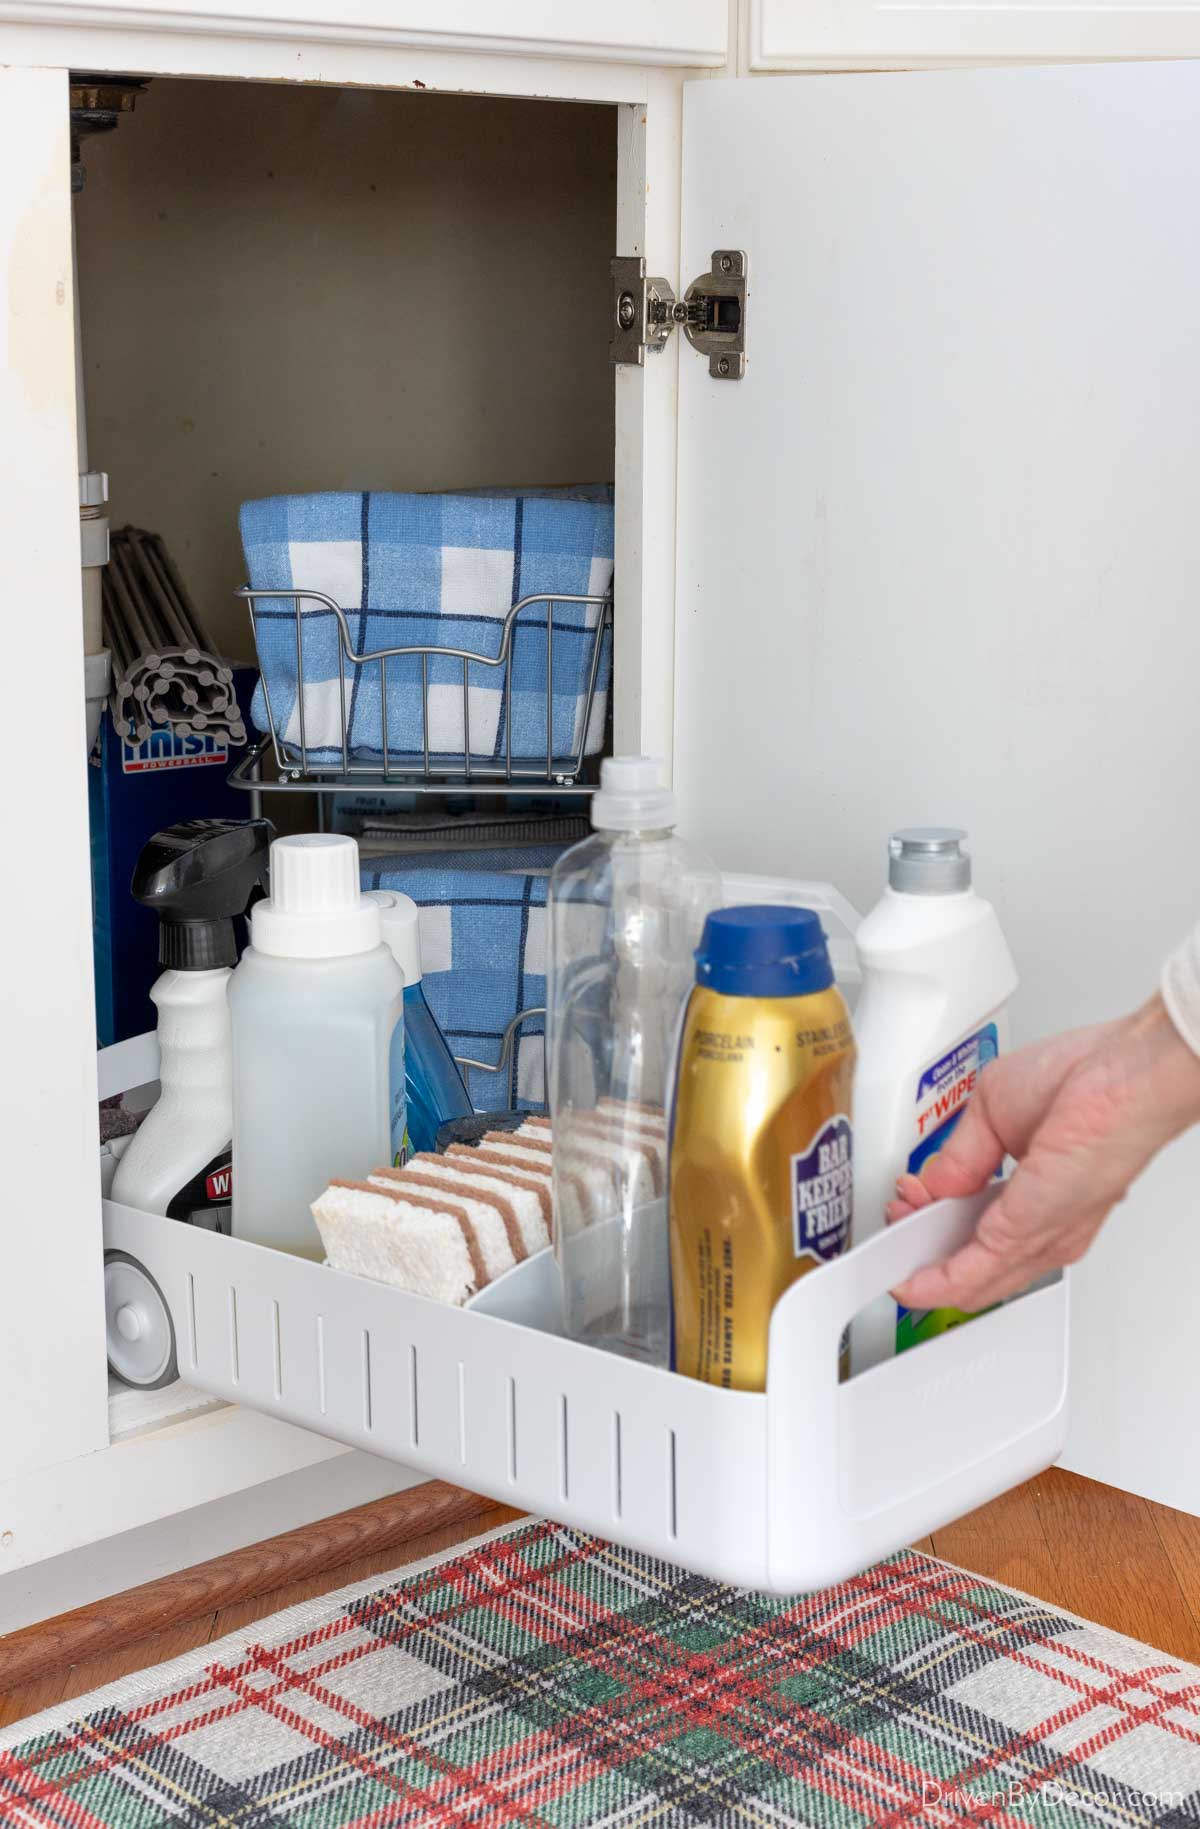
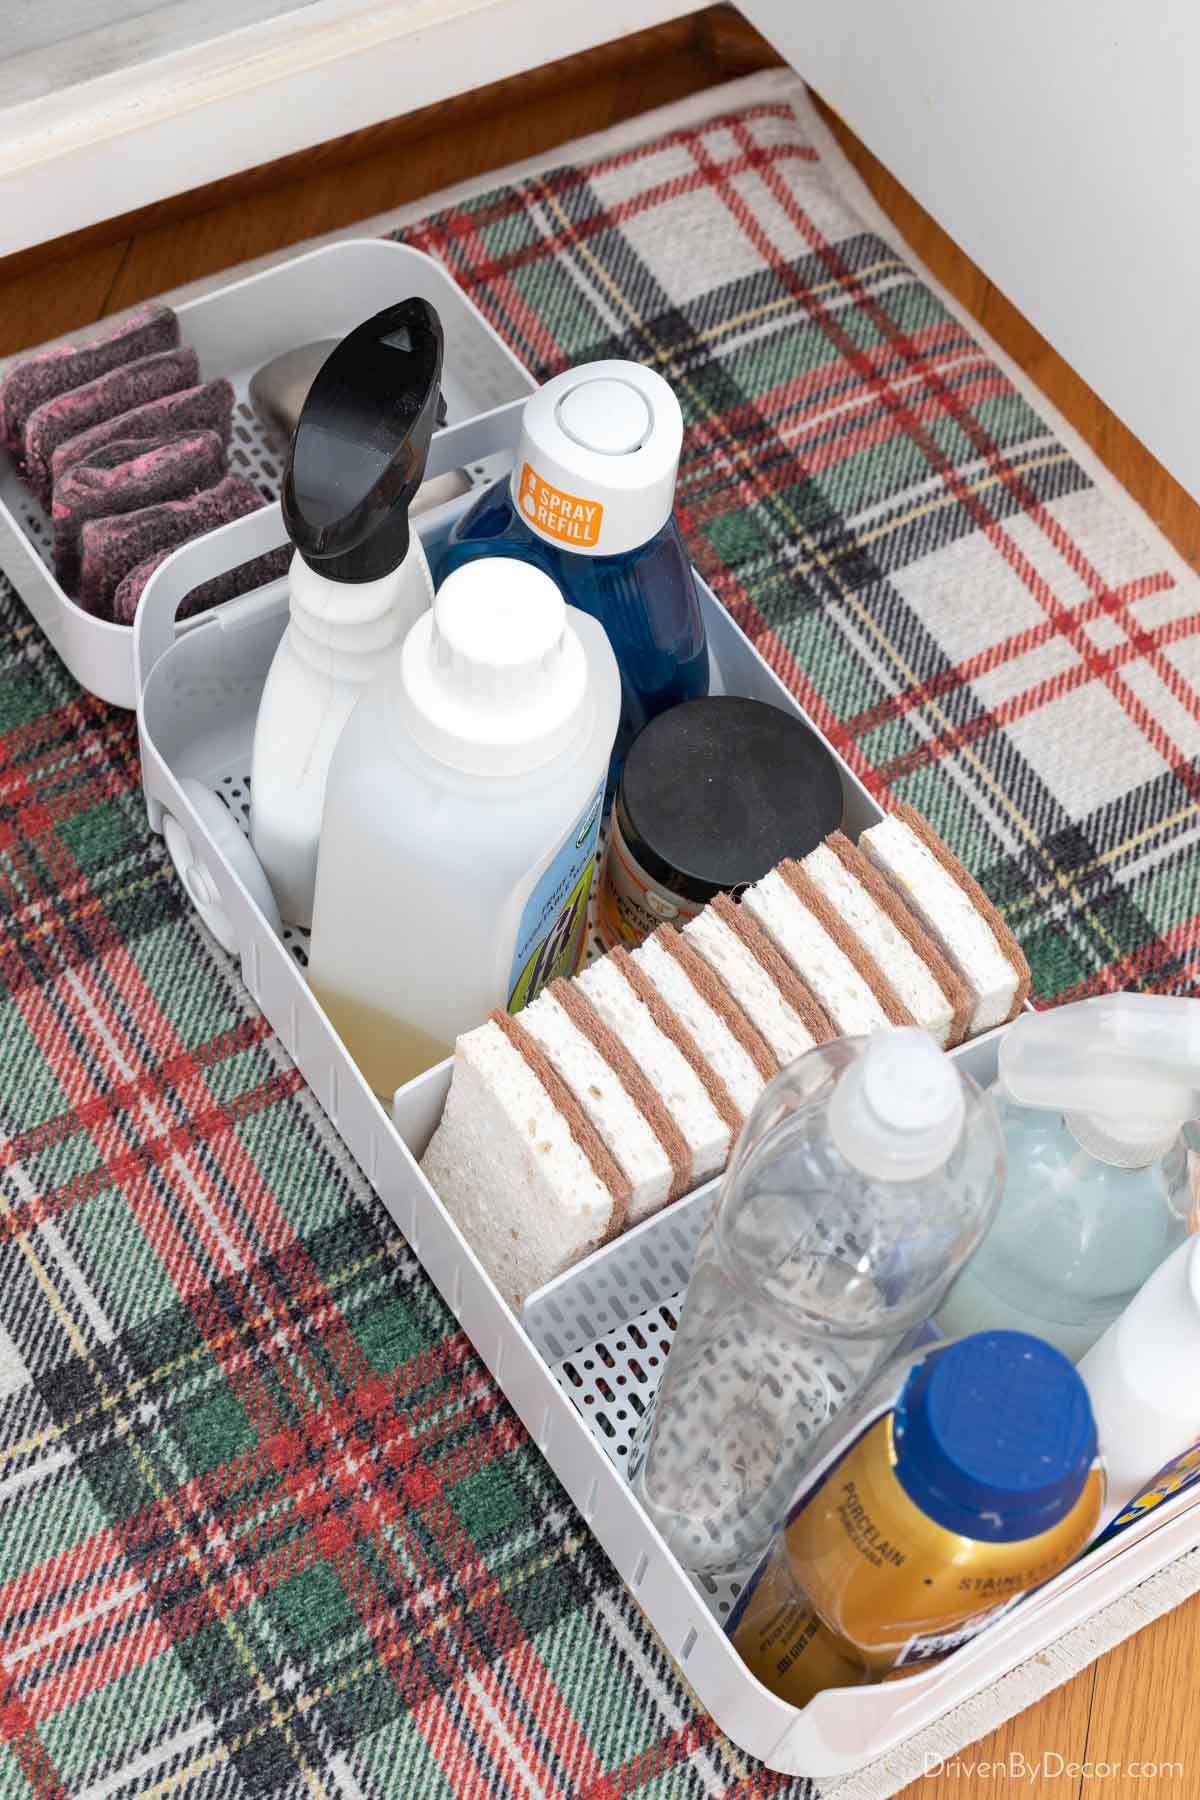
5. Make It Accessible With Rolling Organizers
There’s typically a lot of storage space in the cabinet under your kitchen sink but the area in the back can be a bit of a black hole since it’s hard to access (especially if you have a corner sink like me!). Getting rolling organizers can make a huge difference in not only keeping things organized but also making them easy to access!
I specifically love {this roll-out caddy} because it has adjustable dividers, holds a ton, and rolls in and out with ease:
6. Make the Most of Your Pantry With Tiered & Rotating Organizers
If you have a small pantry, using the right organizers can make a night and day difference in how organized your pantry stays and how much usable storage space you have. Tiered organizers like {these 3-tier risers} and lazy Susans like {this 11″ turntable} are favorites because they allow you to see all of your canned items and bottles clearly instead of having a bunch of them buried in the back:
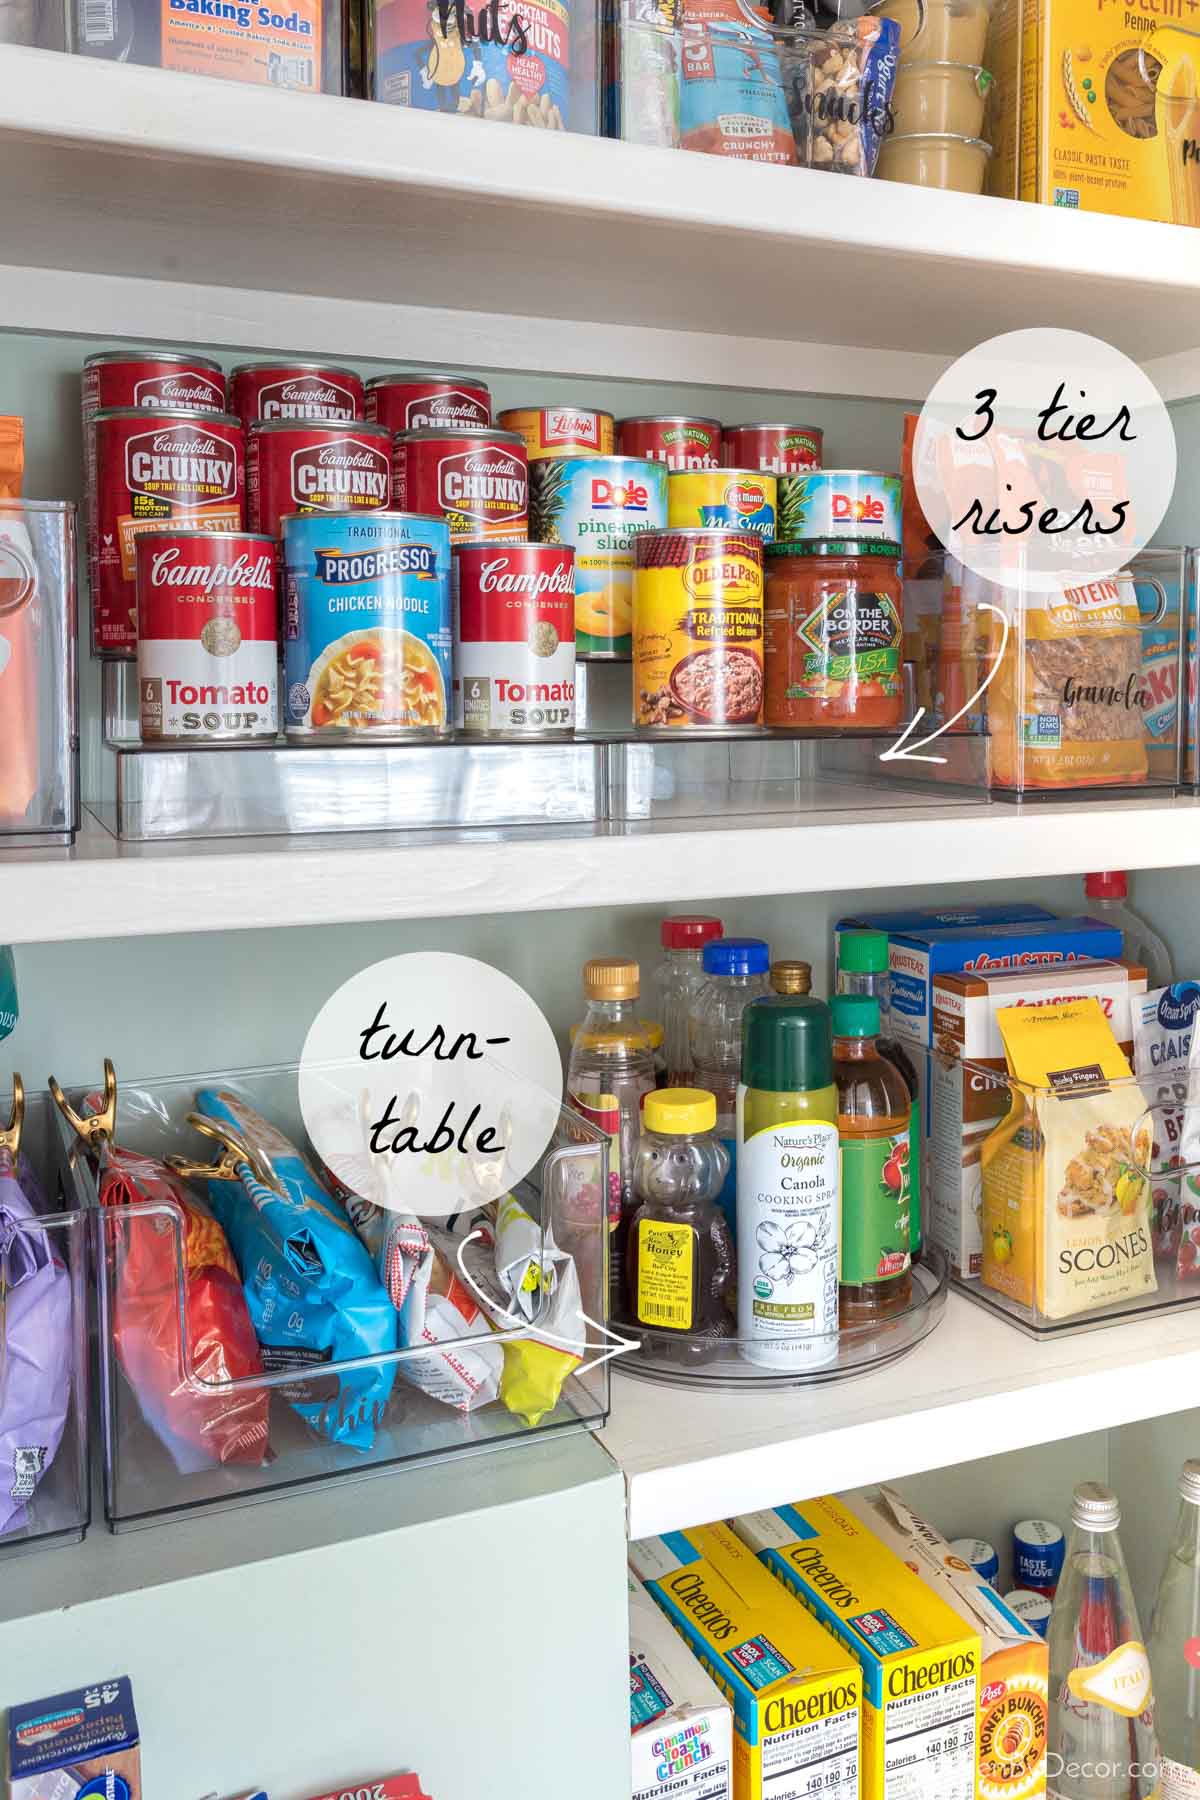
Turntables are also great for storage in bathroom cabinets and in the refrigerator.
The pantry in our previous home was completely different from this one, with several large roll-out trays. If yours is the same, see my post on pantry organization ideas for organizing tips!
7. Store Items Close to Where You Use Them
Just as you wouldn’t store your toothpaste across the bathroom from the sink where you use it, you shouldn’t store frequently used kitchen items far from where you use them either. For example, where do you store your kitchen garbage bags? If you have to cross the kitchen to get them, find a spot to move your bags so they’re closer to your trash can.
I added this cabinet caddy to store them in the same cabinet that my trash can is in:
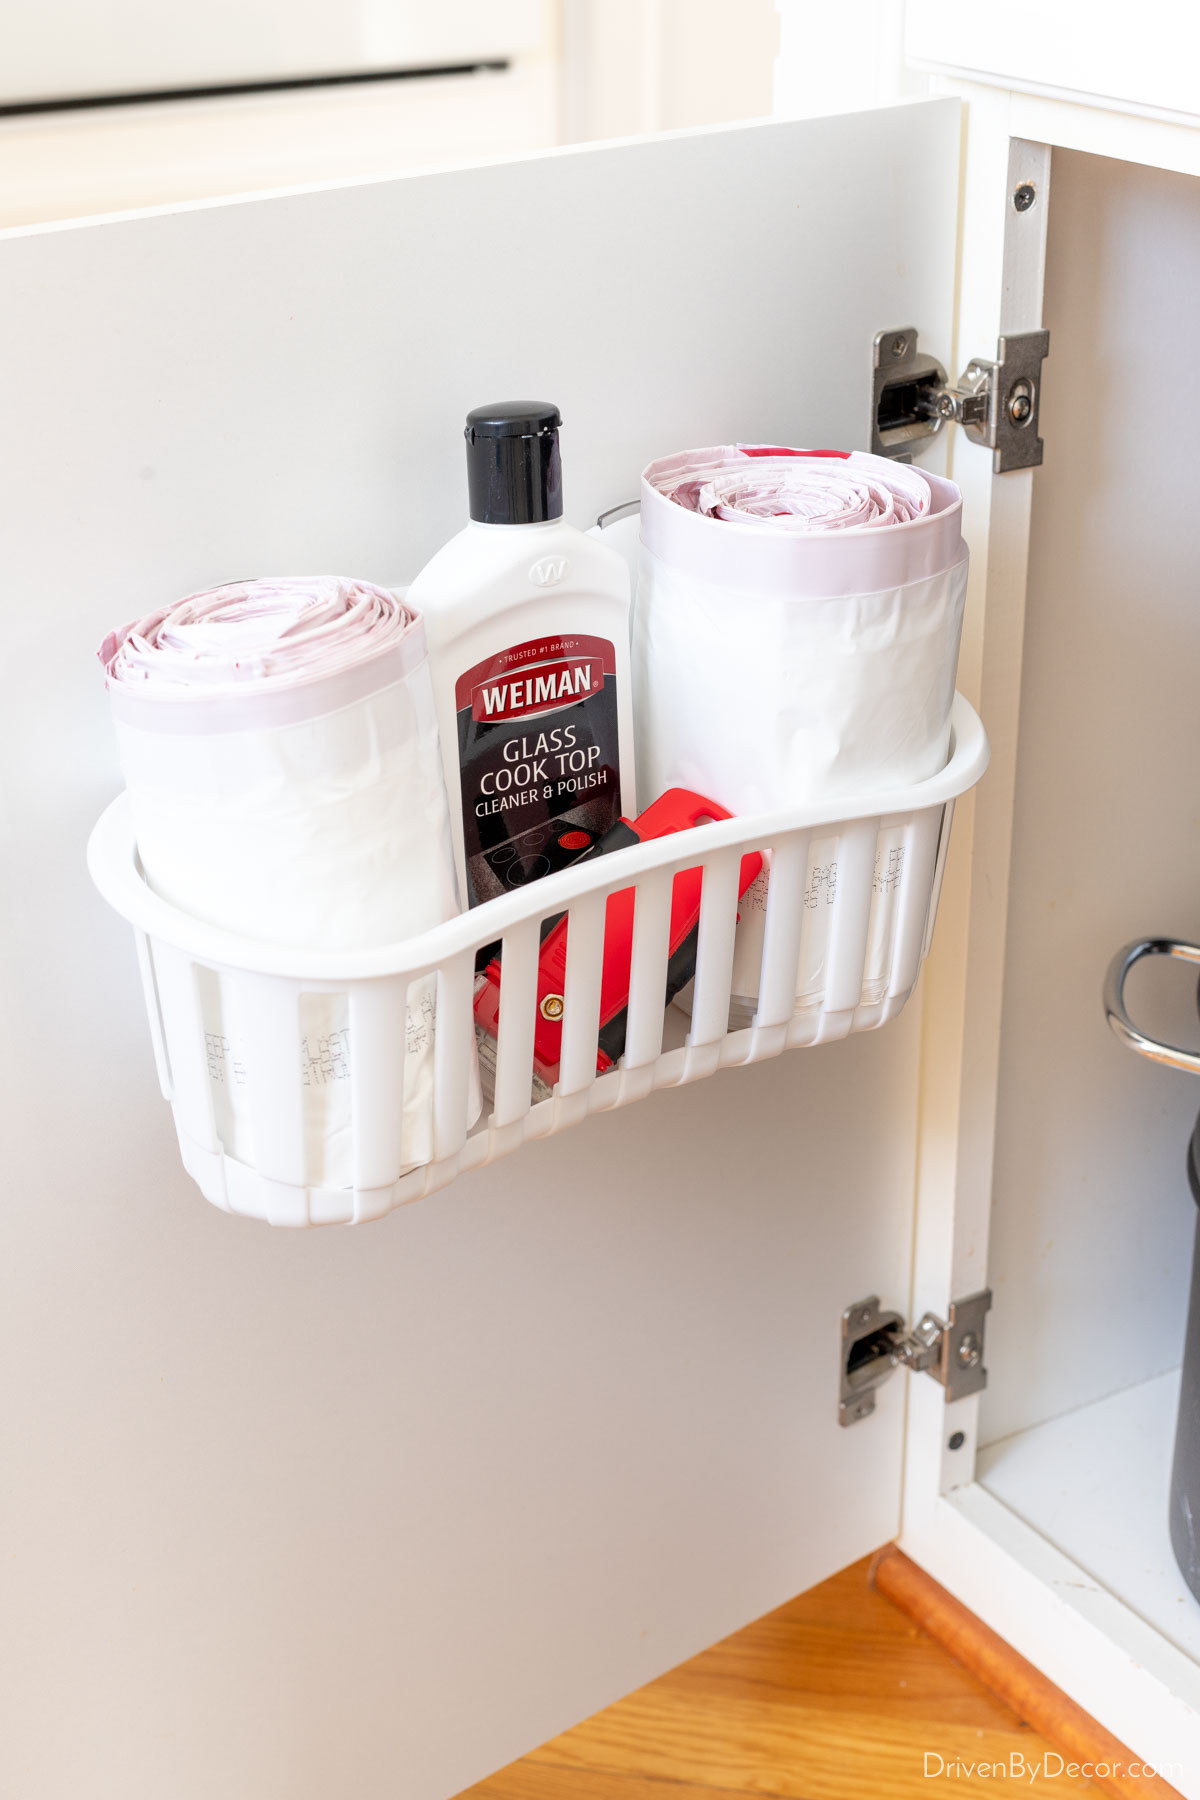
The lazier members of my family (you know who you are 😂) are now more likely to change out the trash when needed and not leave the box of extra bags laying out on the countertop when they’re done because it’s so convenient. It’s a super small change, but when putting something away is easier, it will get done more often and result in a neater, more organized home. The exact caddy I have is no longer available but {this caddy} is similar.
I have lots of other home organization ideas to share, so let’s move on to organizing other rooms, but if you want more ideas for your kitchen, check out my posts on…
Kitchen drawer organizers (tips for organizing your spices, silverware, baggies, & more)
Kitchen cabinet organization ideas (tips for organizing your canned goods, water bottles, dish towels, & more)
Home Organization Ideas For Your Living Room
8. Organize, Digitally Copy, & Store Your Old Photos
Traditional photo albums with printed photos take up a LOT of space. And if you have albums with the old type of pages that have a sticky back and plastic covering, over time the adhesive can stain your photos and also make them very difficult to remove. I decided it was time to remove my photos from these old albums, scan them so that I have digital copies to keep those precious memories intact, and store them in a way that they take up less space.
This is the pile of photo albums that I tackled (there are some stacked behind this front row too!):
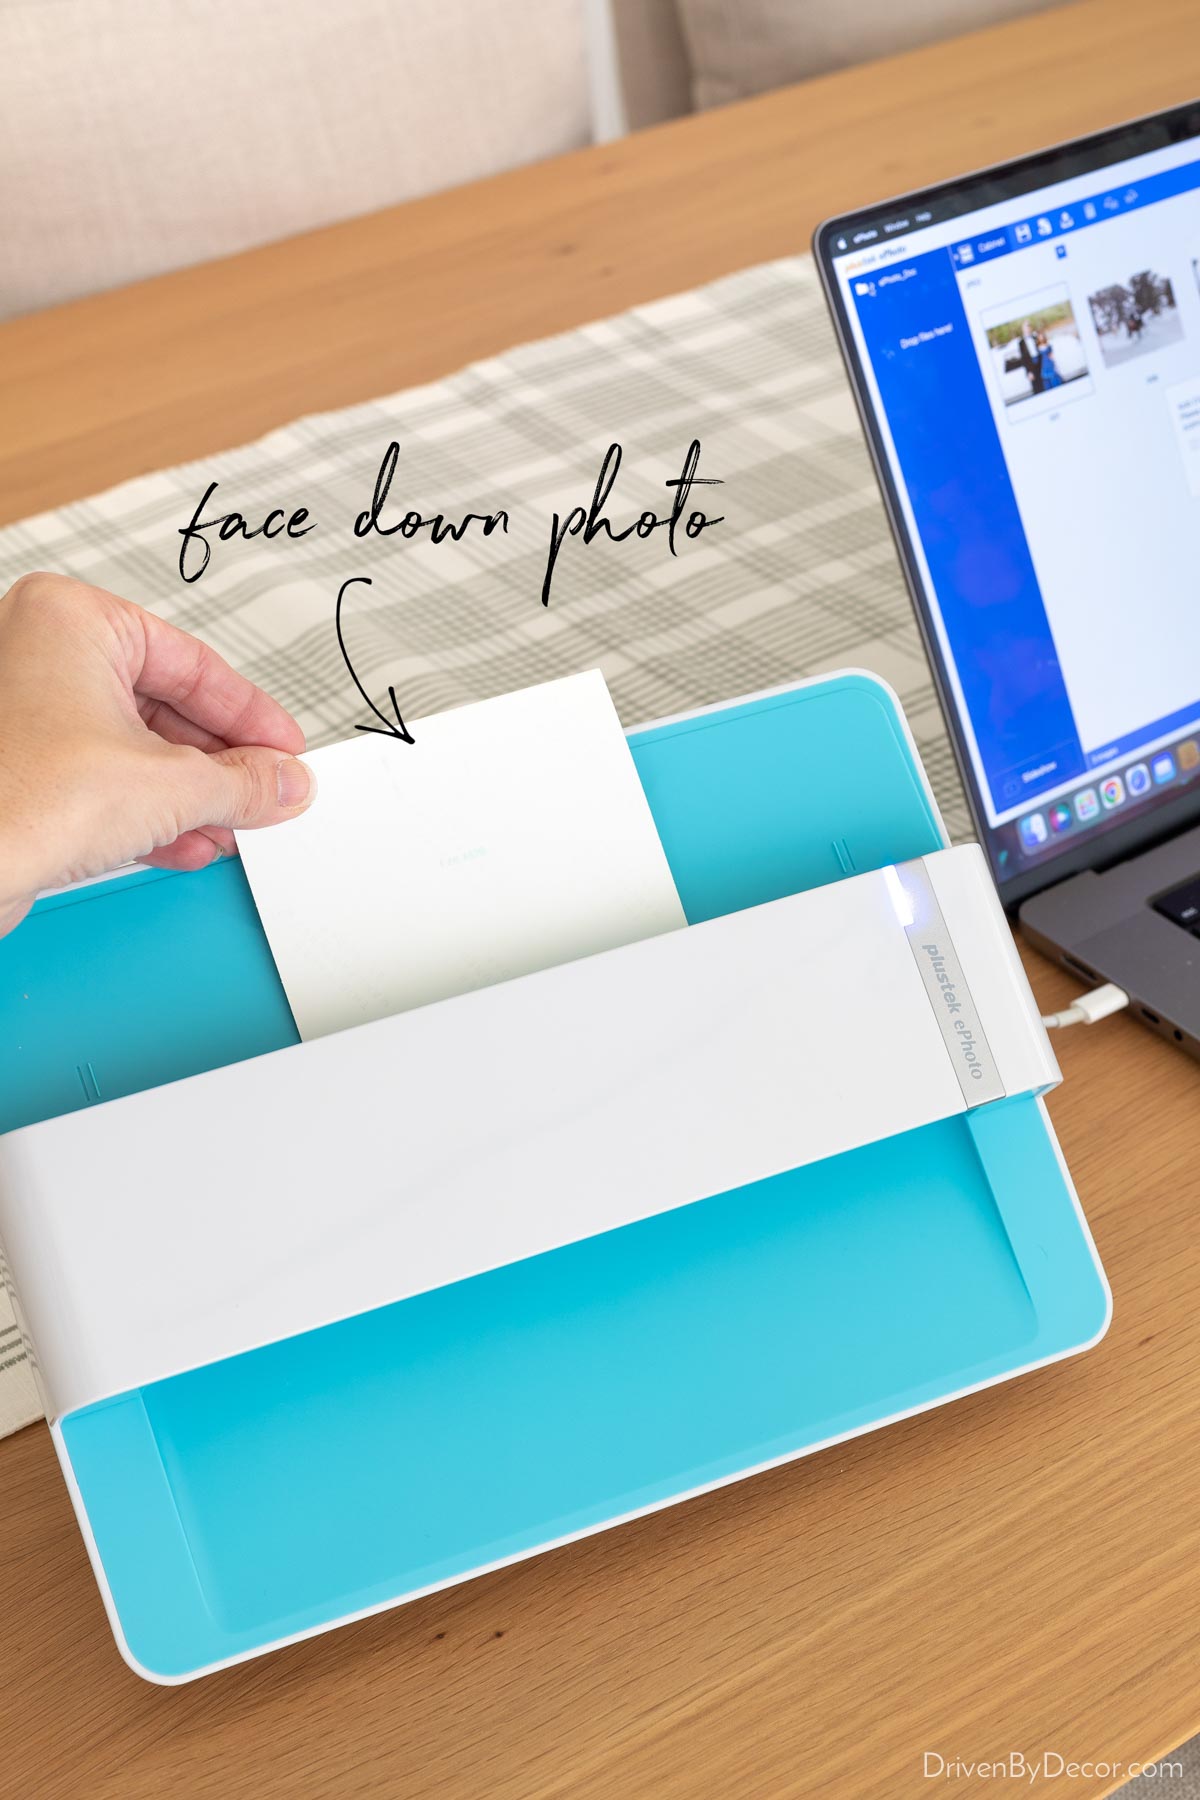
I enlisted my oldest daughter, and we each took one album at a time, removing all of the photos from the album, throwing out any not worth keeping (I had so many photos that were five different angles of the same thing), and scanning them with {this photo scanner},
You can have your photos professionally scanned instead of scanning them yourself, but (1) I had SO many photos that getting my own photo scanner was cheaper (you could probably even re-coup half the cost by selling it on Facebook Marketplace once you’re done with it!) and (2) I was really nervous about putting my un-scanned photos in someone else’s hands in the off chance something happened to them.
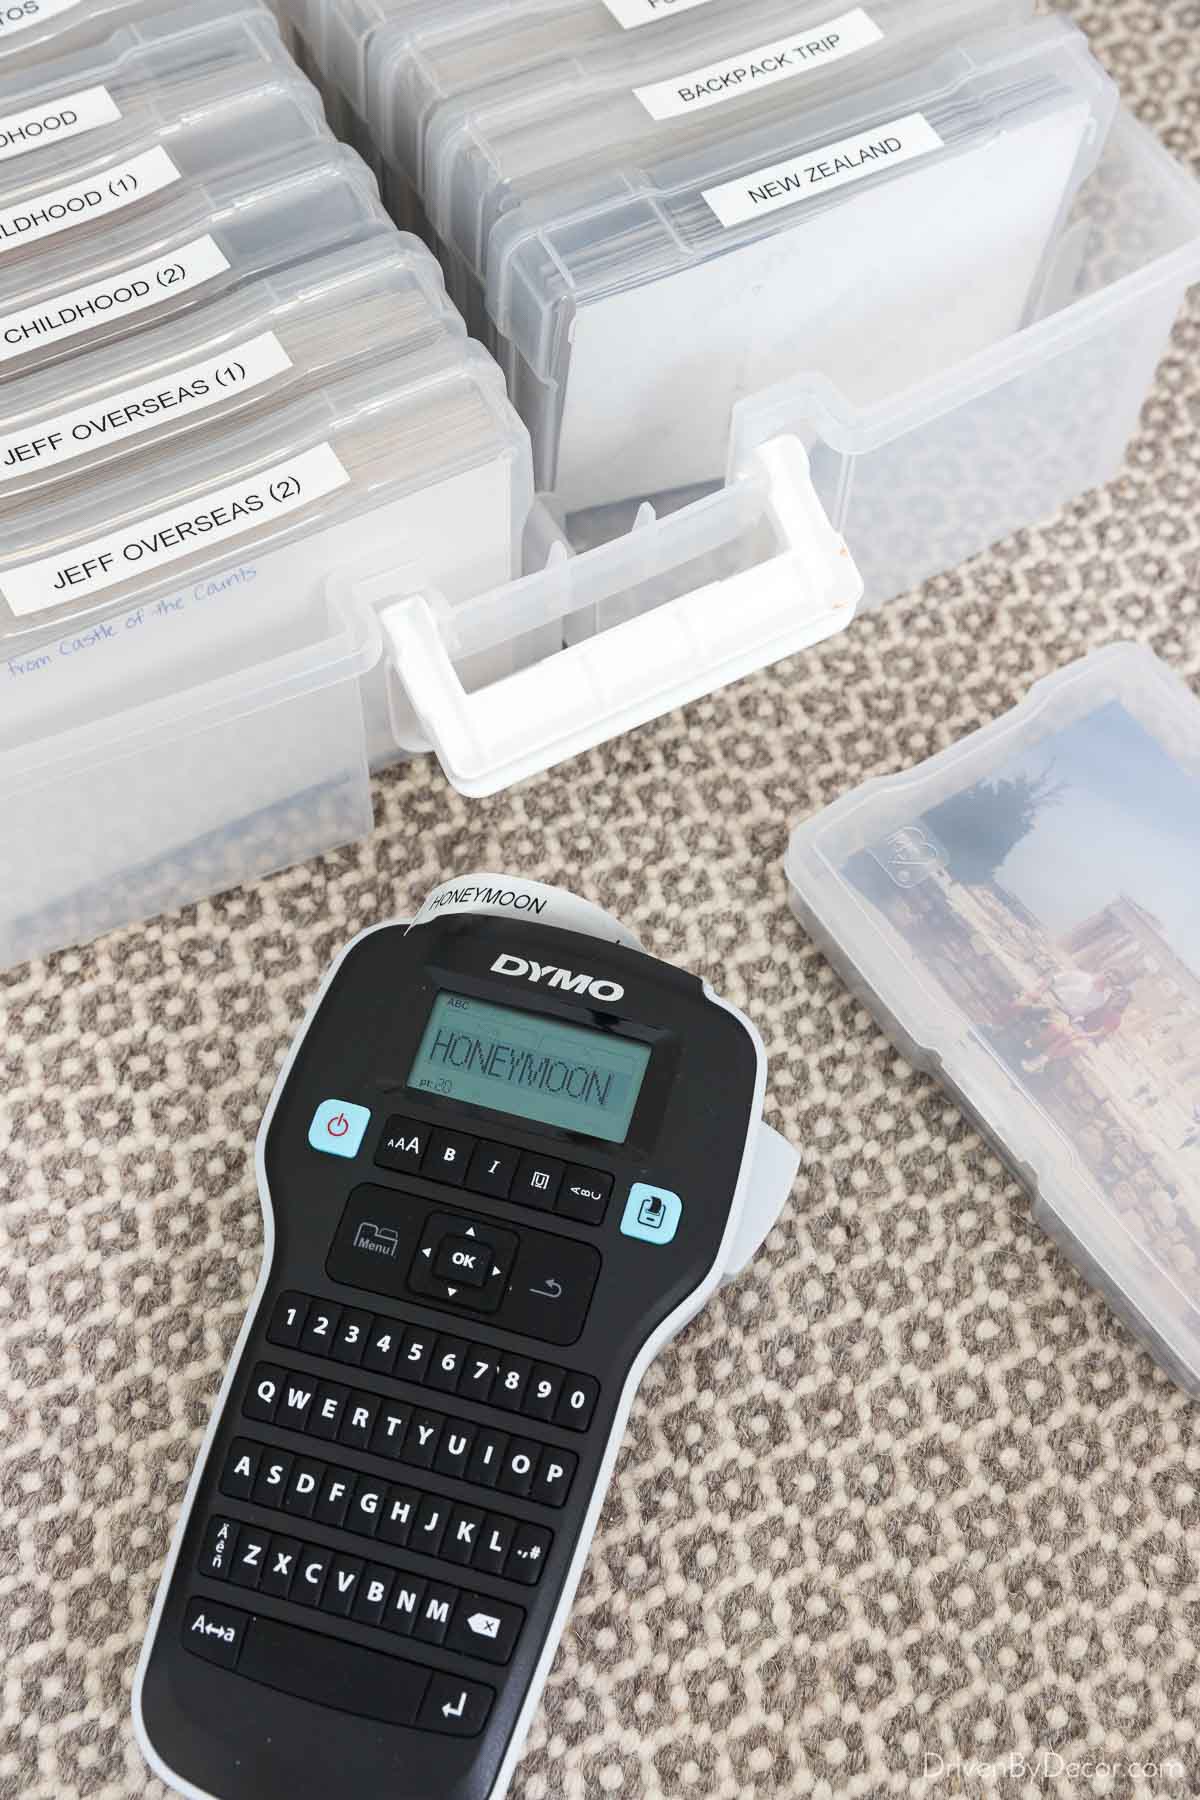
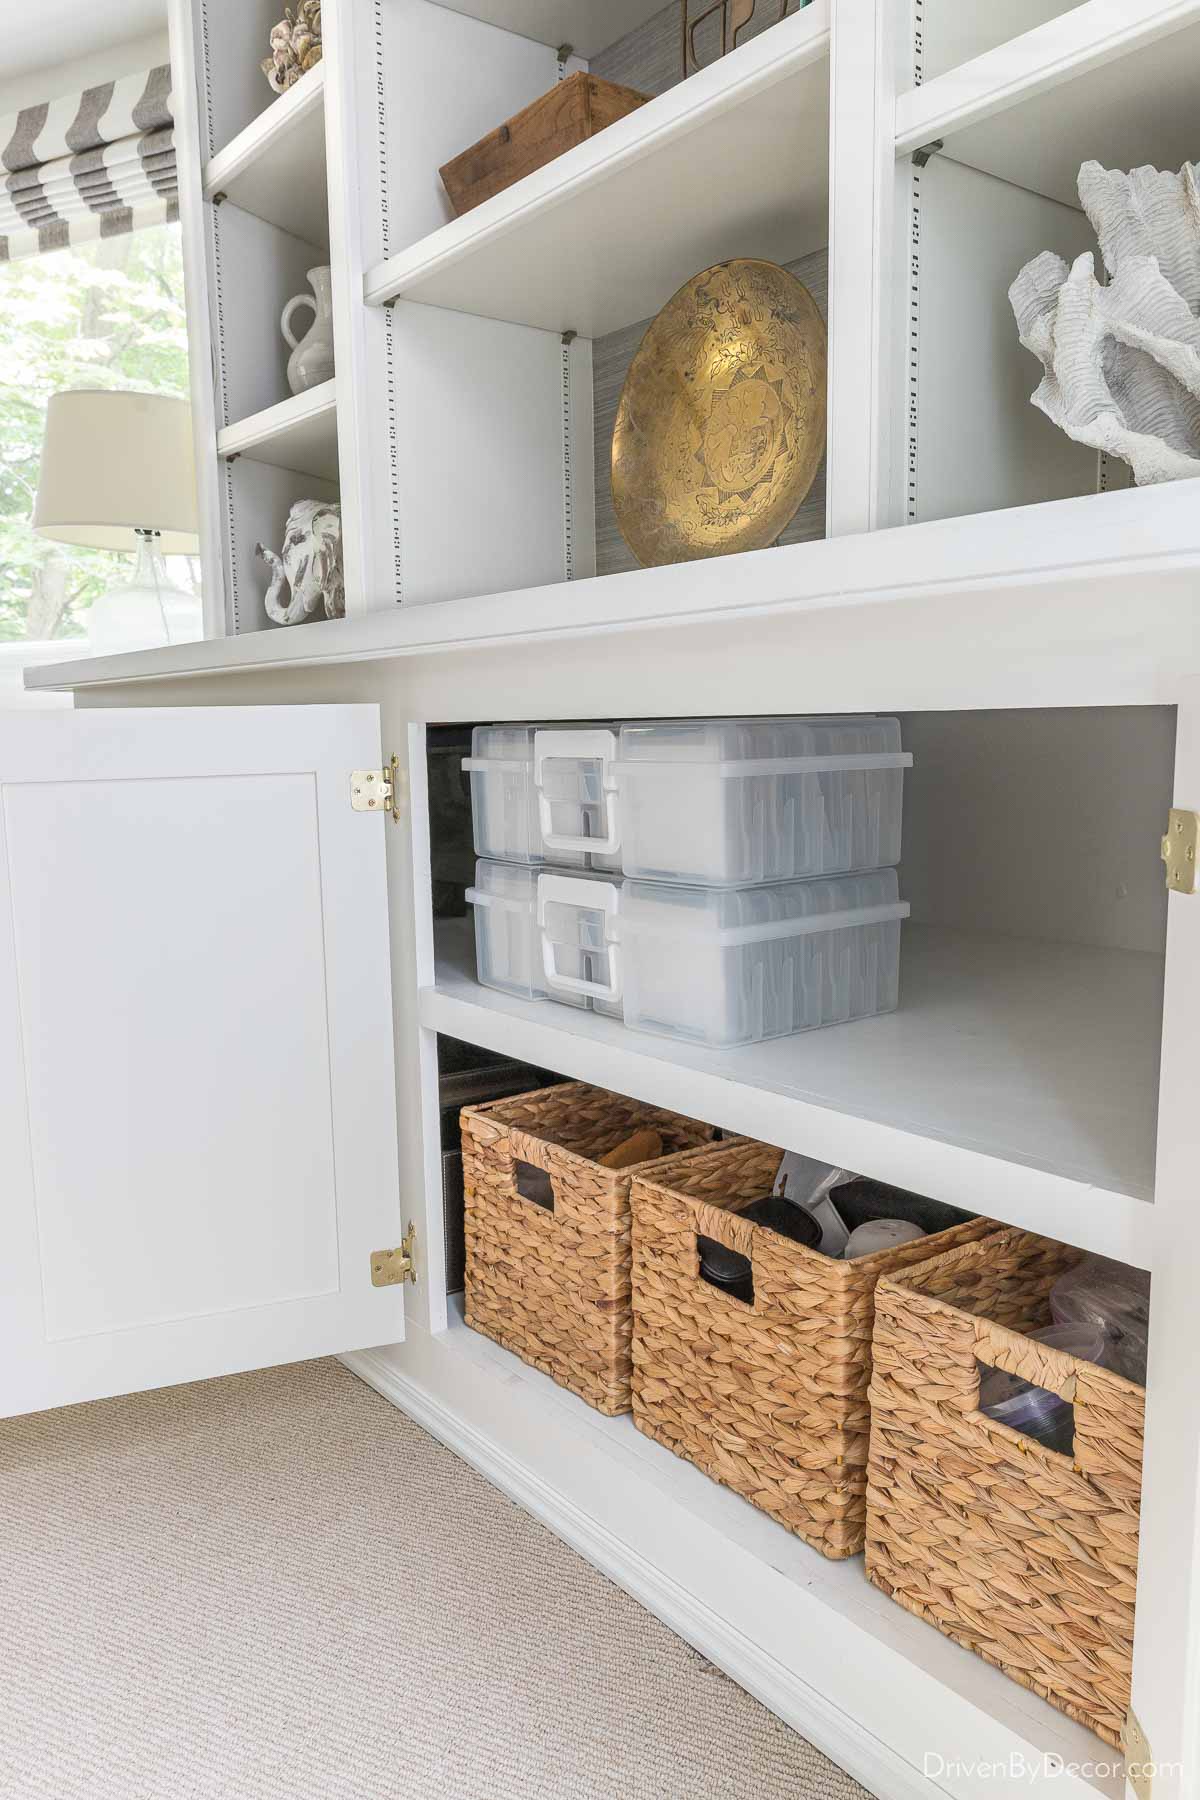
You can either throw your original photos away once they’re scanned, place them in archival photo albums that won’t damage them, or put them in photo storage cases. I kept our wedding album (we were married in the pre-digital age!) as-is but placed the rest of our photos into {these photo storage cases} where they’re easy to pull out and look at whenever I want:
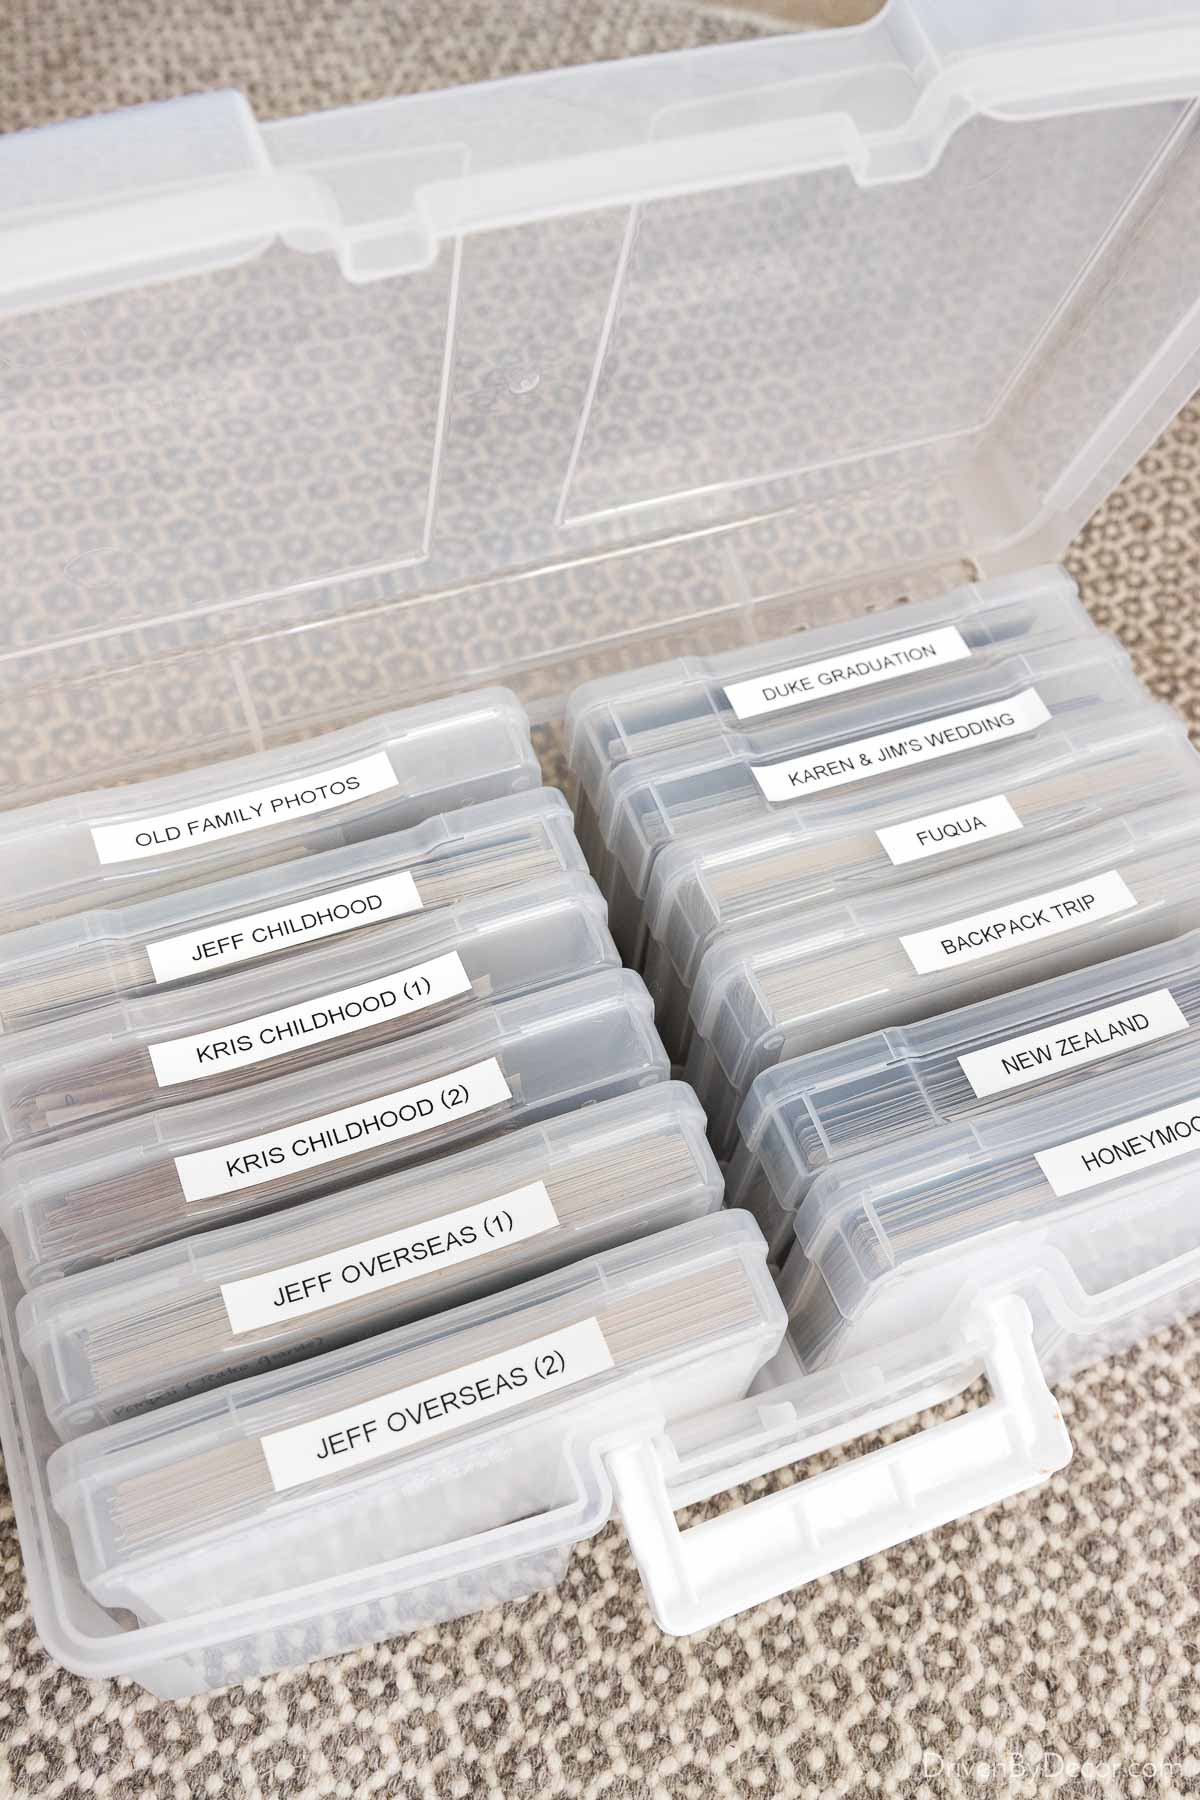
I have one photo keeper with cases sorted by theme (albums from trips, etc.) and a second keeper with cases organized by year. I labeled them using {this DYMO labeler} which is perfect for this task plus so many other organizing tasks throughout your home:
What used to take up the ENTIRE top shelf now only takes up about ¼ of the space – that’s some pretty precious real estate that got freed up:
Plus, I have peace of mind knowing that my photos are digitally preserved in case something happens to my physical copies.
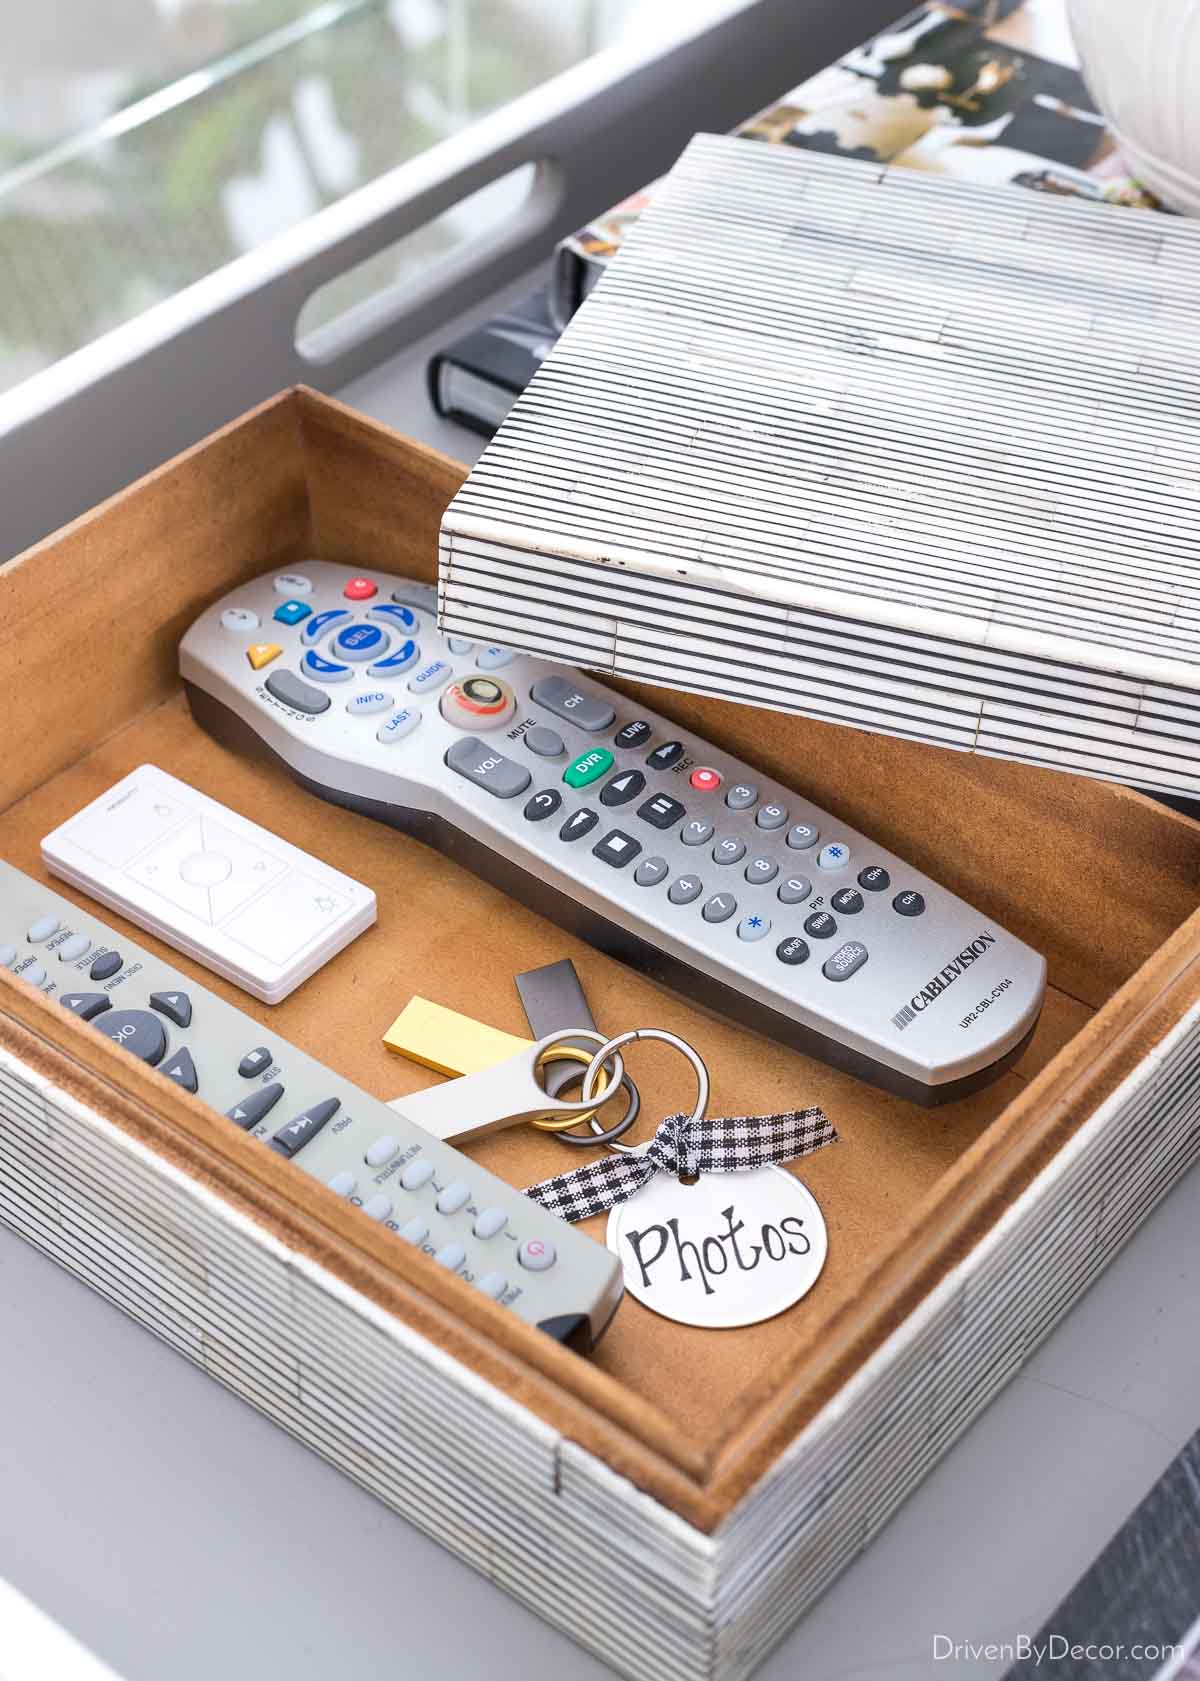
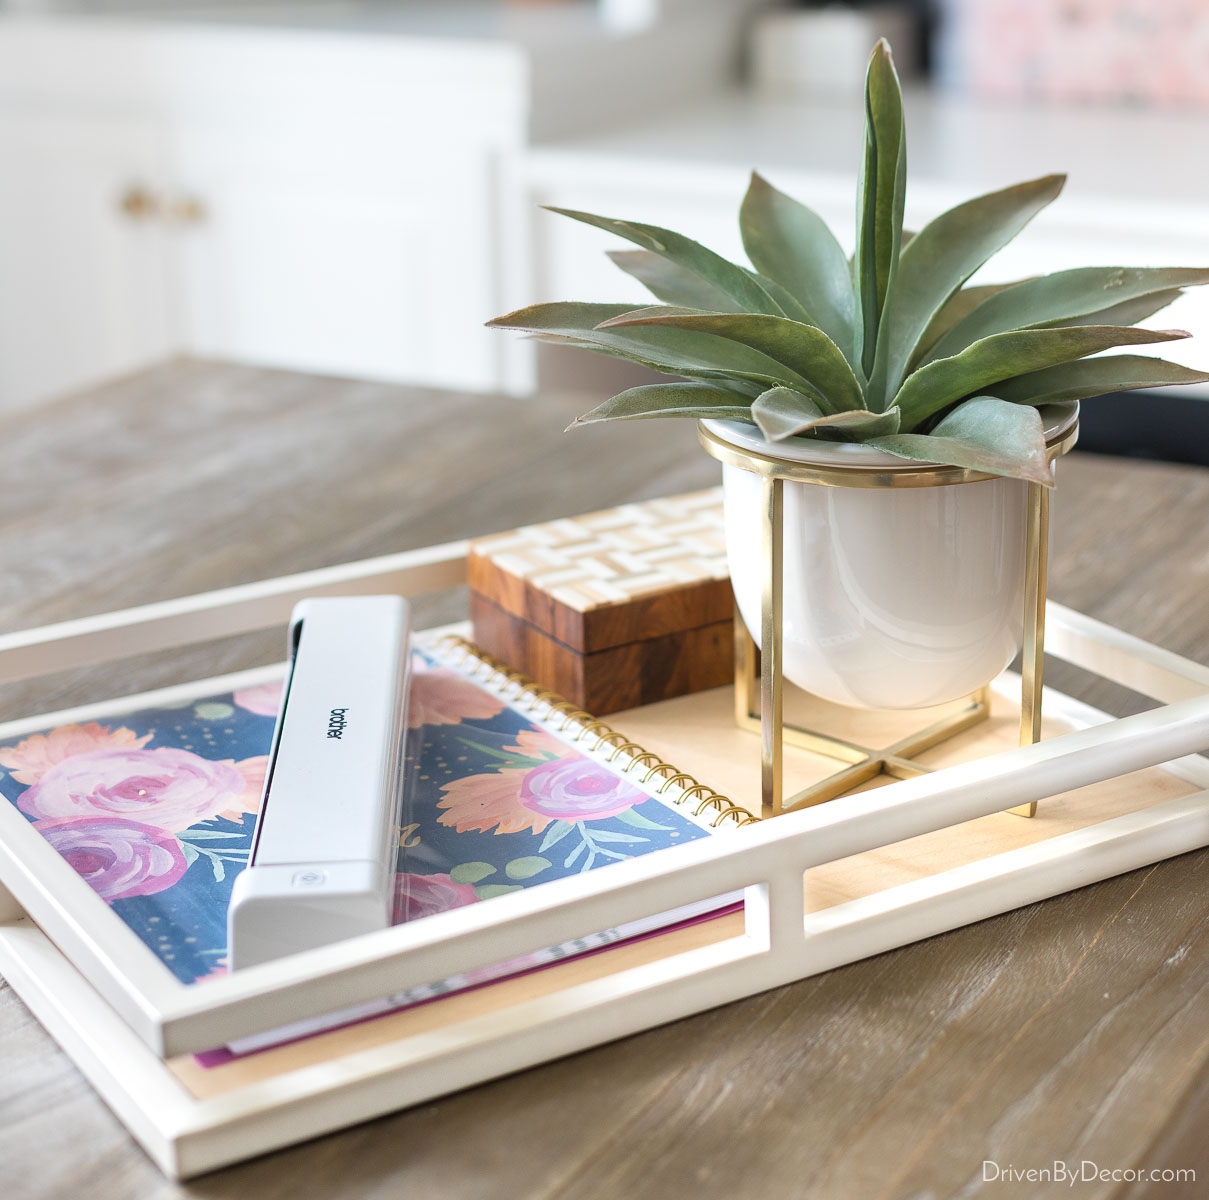
9. Corral Clutter With Decorative Trays & Boxes
The coffee table tends to be the clutter-collector of living and family rooms. Using a large tray on your coffee table helps keep the chaos in check:
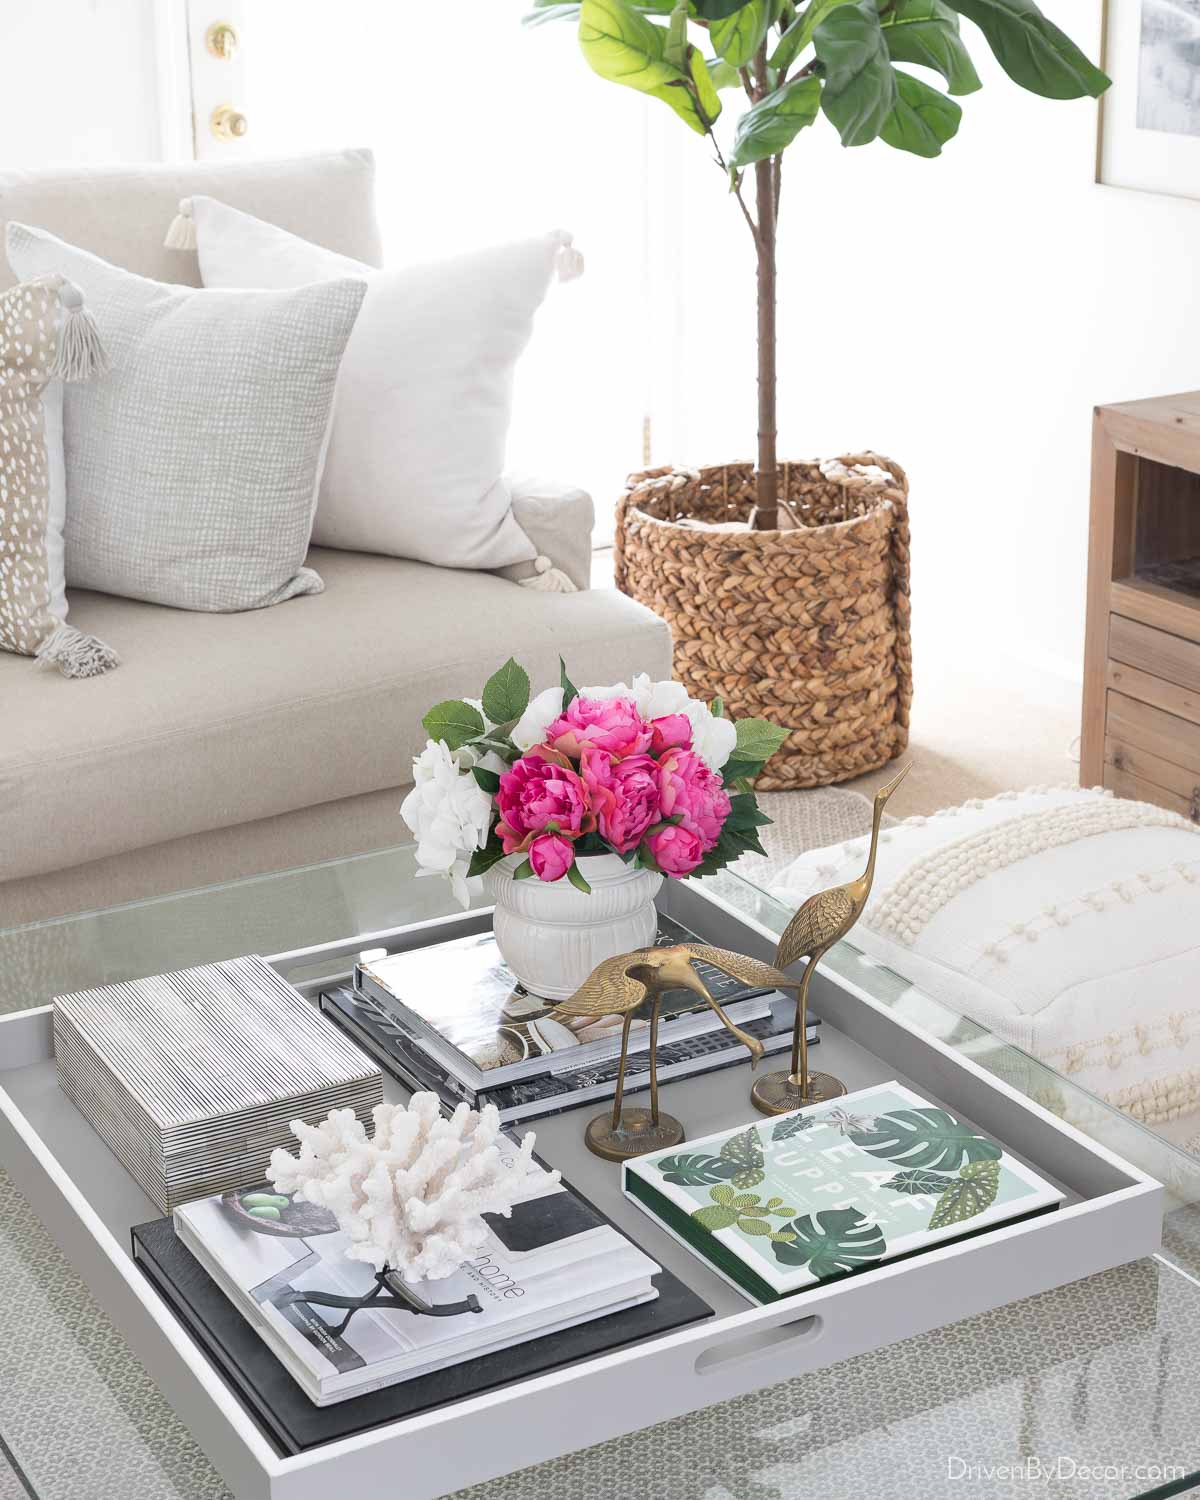
Add a decorative box like {this pinstripe bone box} to store coasters, extra remotes, computer cords, and other things normally cluttering up that space:
Decorative boxes like {these rattan boxes} are also great for stylish storage on living room shelves:
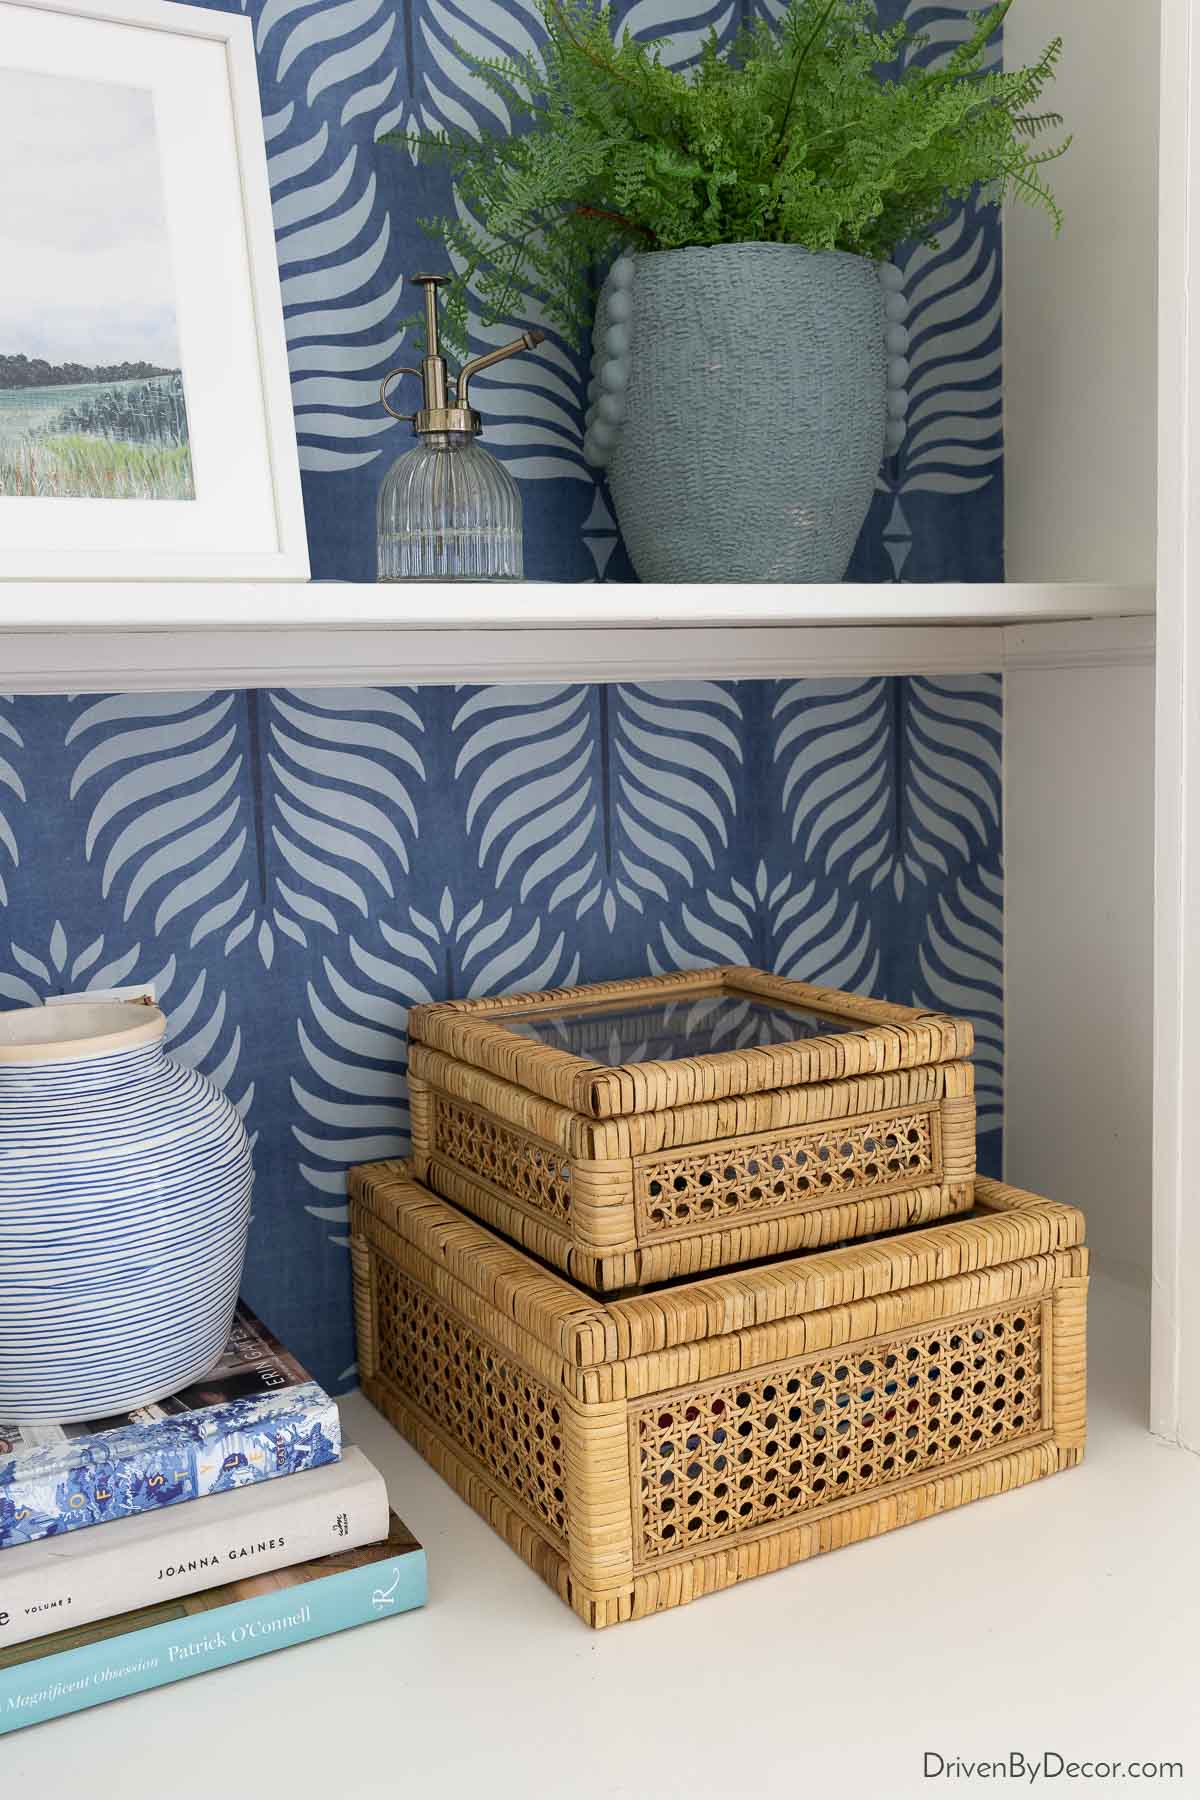
Check out my post on coffee table decor for tips on styling your coffee table and links to my favorite coffee table trays & accessories.
10. Save Your Inserts, Swap Your Pillow Covers
If you like to change up your decorative pillows seasonally, you can accumulate a hefty pillow stash pretty fast. And those extra pillows take up a lot of storage space. The solution? Have one set of quality pillow inserts ({these ComfyDown inserts} are a favorite) and store only the covers of any extra pillows. When it’s time to swap a pillow out, keep the insert the same and just swap the pillow cover.
I use {these fabric storage bins} and fold my extra pillow covers to fit neatly inside:
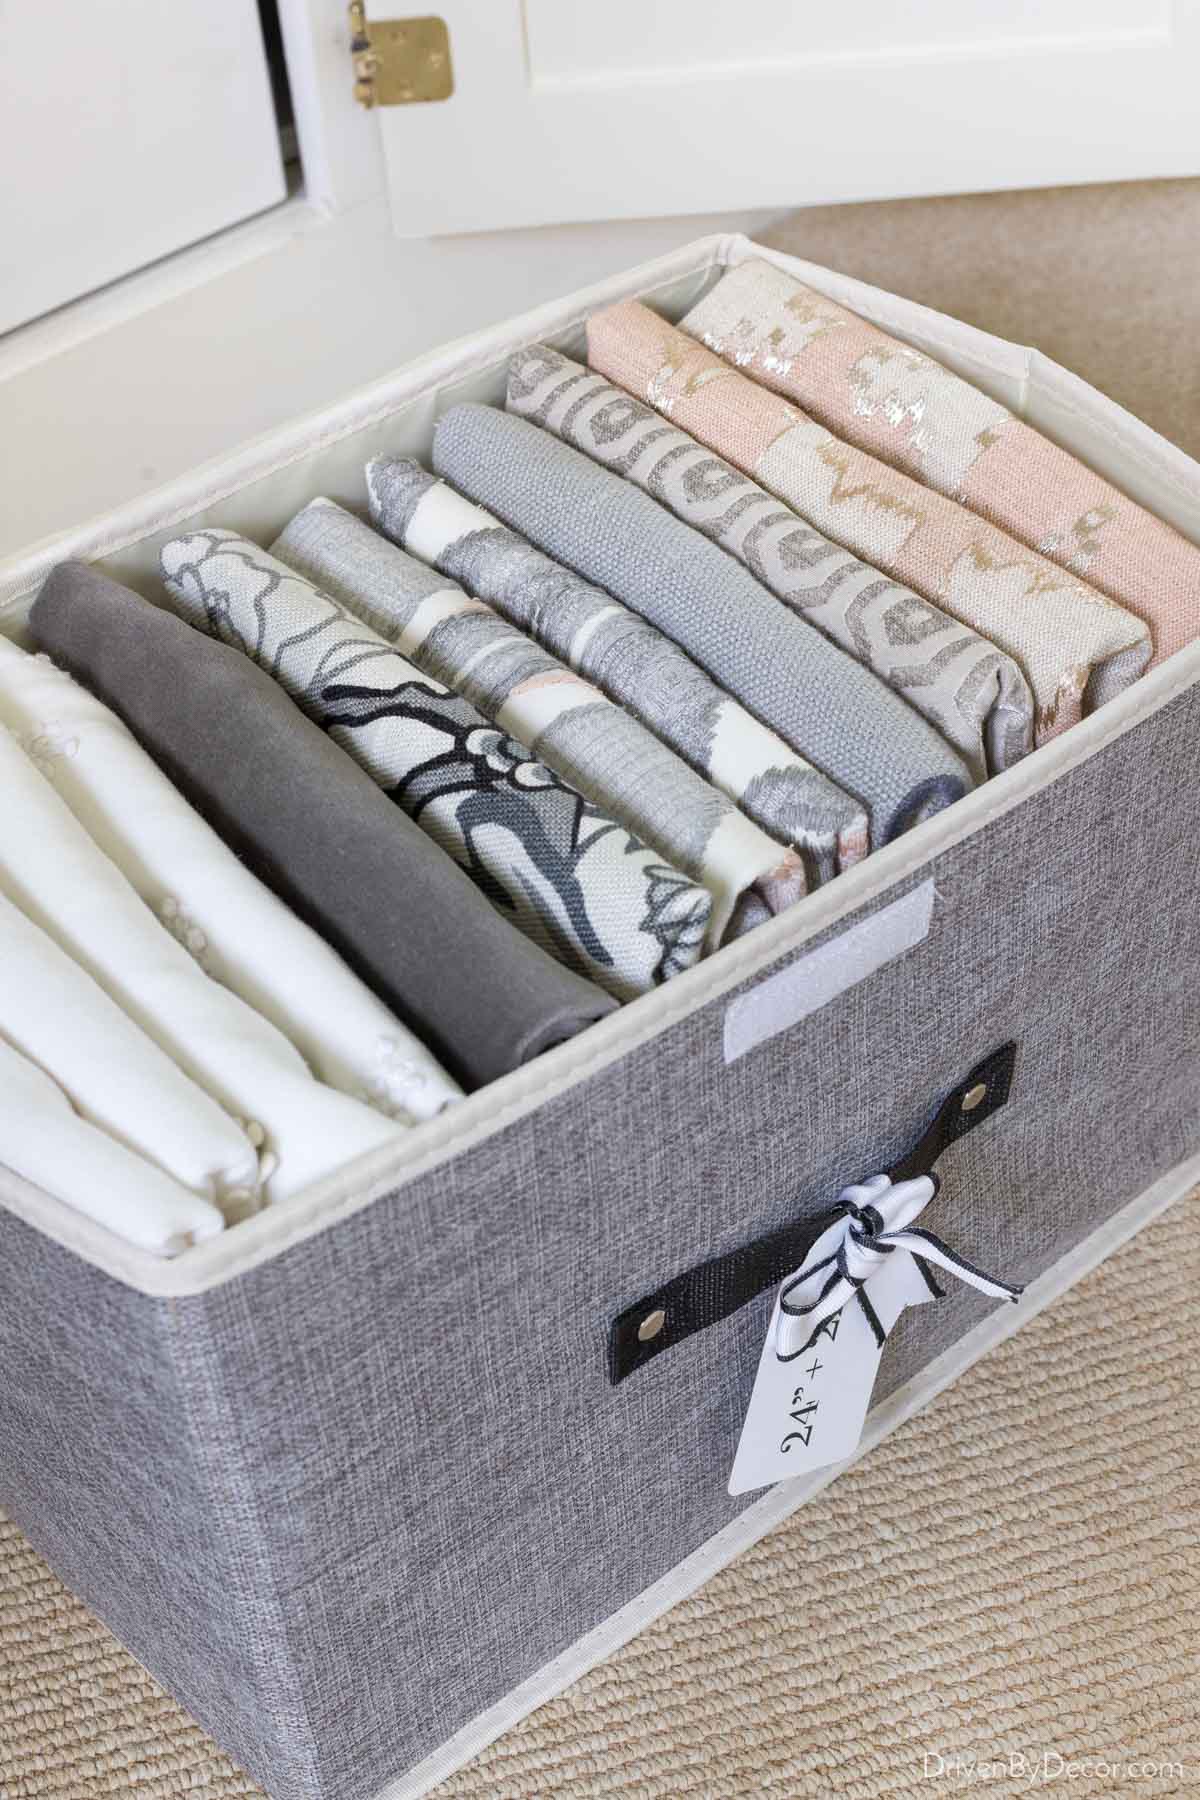
I can fit 12 decorative pillow covers in one compact fabric storage bin, which takes up SO much less space than 12 pillows would. Donate any extra inserts you currently have, and from this point on, buy only pillow covers instead of full pillows whenever possible.
Home Organization Ideas For Your Bathroom
11. Add Storage Space Behind The Bathroom Door
To keep your bathroom well organized, your towels, bathroom products, etc. all need to have a designated home. But… a lot of bathrooms are short on storage space, including my girls’ bathroom. It has no closet, so the only space to store everything is in the cabinets of their small vanity. And they’re teens so yes, they have a LOT of beauty products. I wrote a whole post that’s full of bathroom storage ideas, but if I had to pick a favorite, it would be adding {this behind-the-door-cabinet}:

It attaches to the hinges of the doors and stays closed against the door with a magnet when not in use, but opens up to reveal a TON of storage space! Given that I have two daughters who love to try different beauty products, it’s been key to have a spot to store everything and keep their bathroom neat and organized.
They also make one with a full length mirror on the back that you can see {here}. Visit my post on bathroom storage ideas for several more tips about making the most of your space.
12. Organize Hair Bands With A Simple Binder Ring
If you have girls in your home, you also probably have hair bands everywhere, including littering their bathroom drawers. This home organization idea couldn’t be simpler or cheaper – use a round binder clip like {this 2″ ring} to corral them:
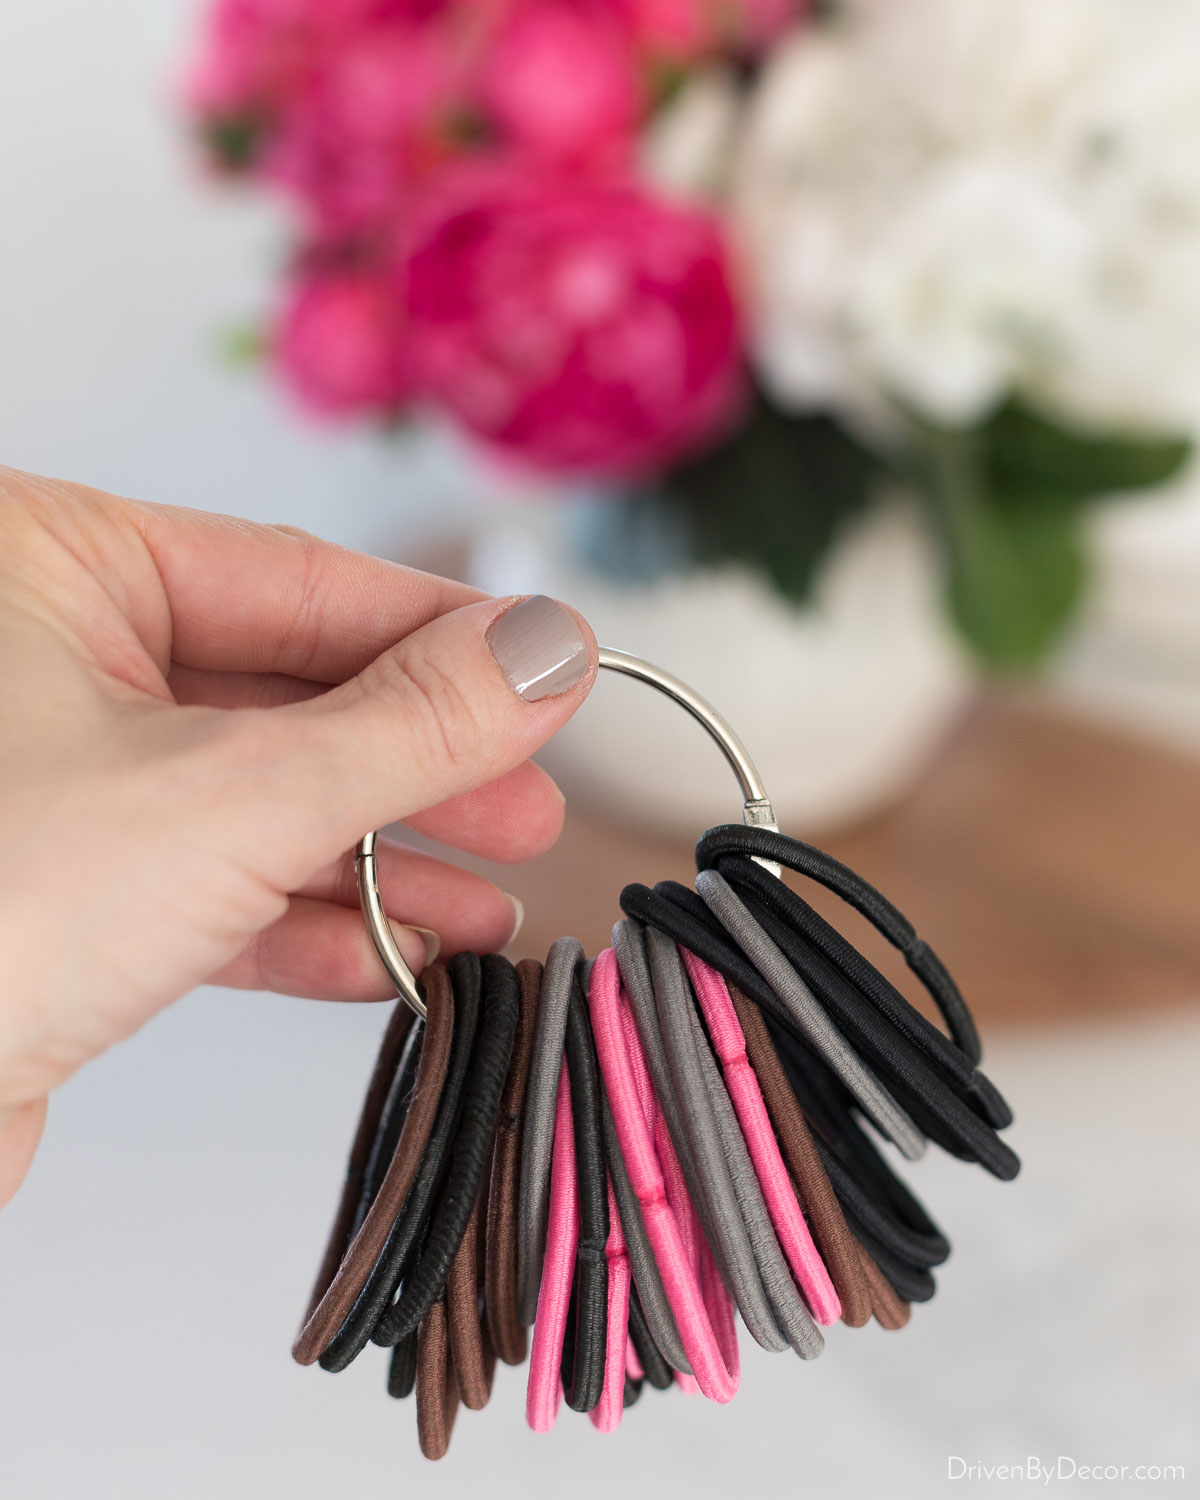
Your bathroom drawers will be neater and more organized, and you’ll never have to go digging around to find a hair band.
Home Organization Ideas For Your Laundry Room
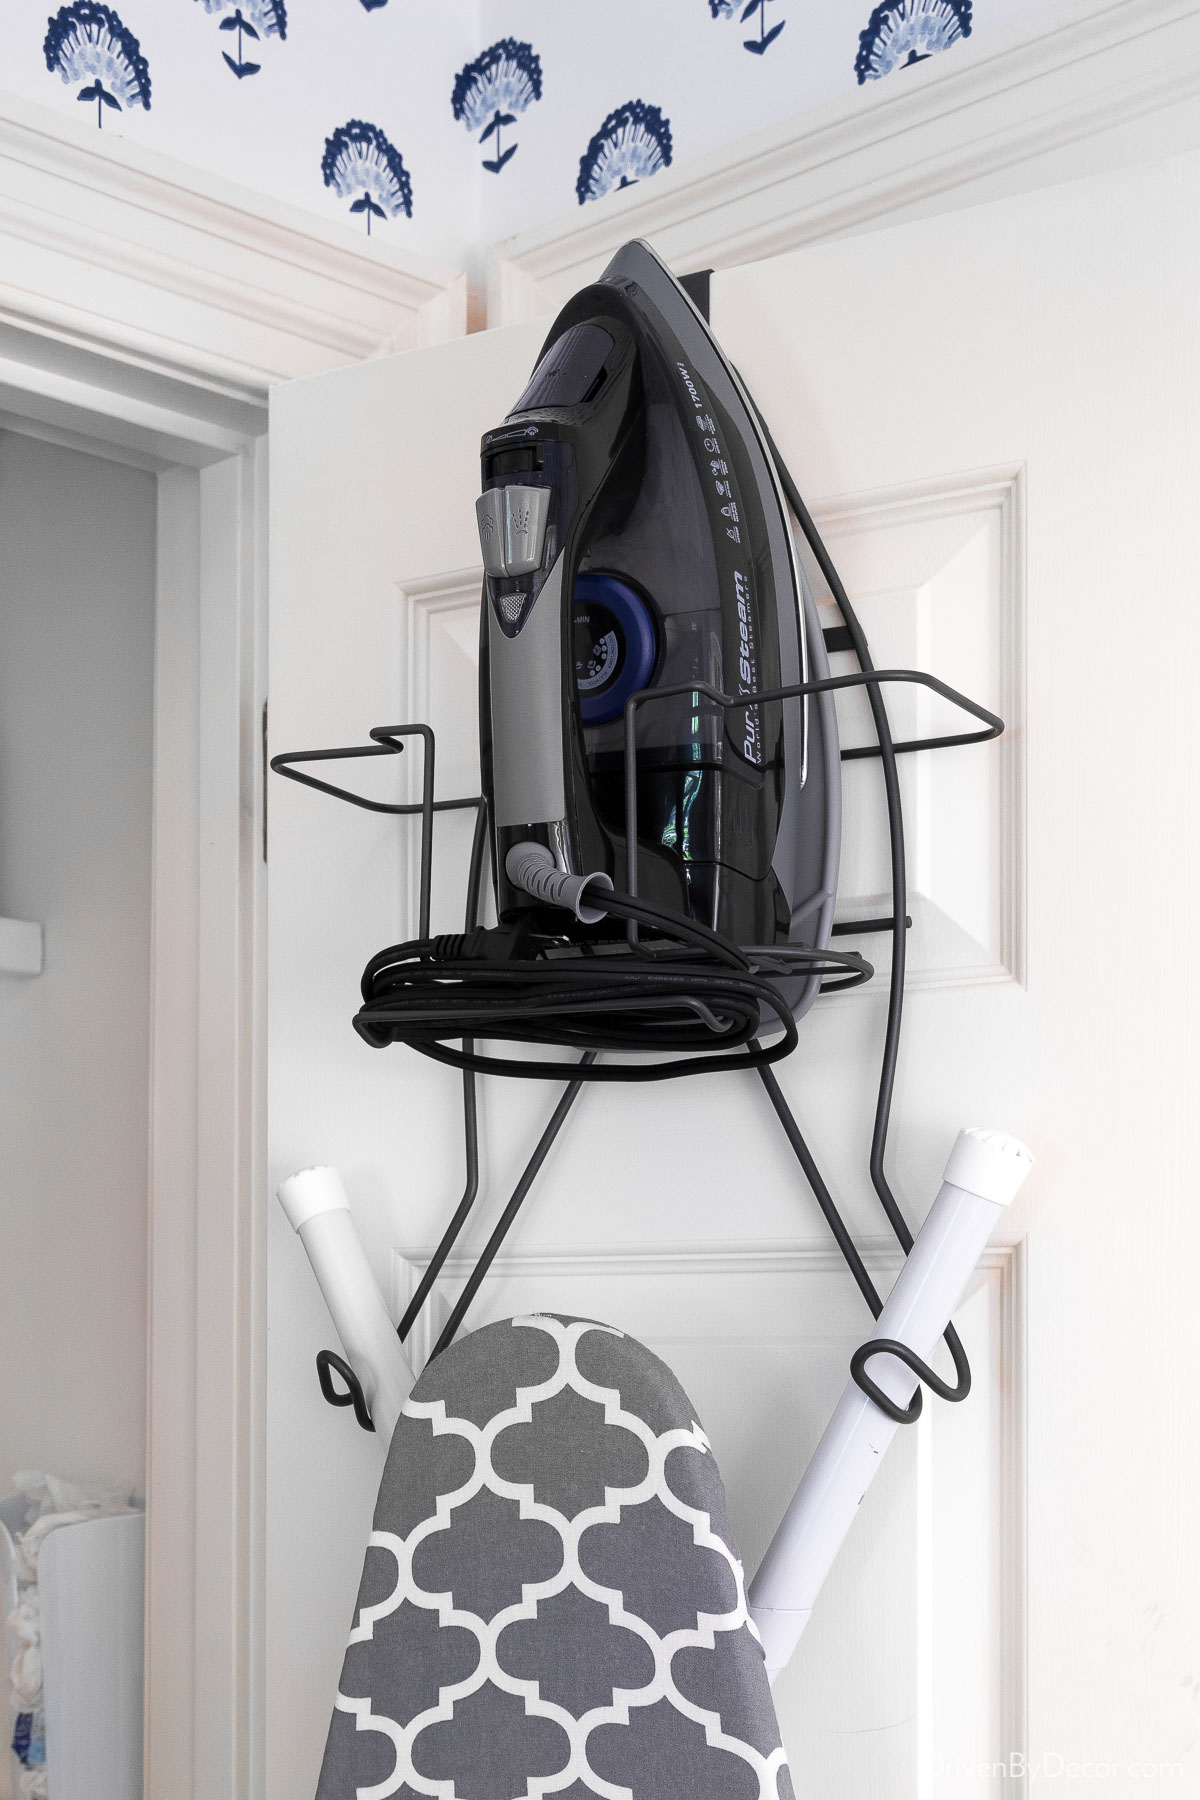
13. Hang Your Ironing Board on the Back of the Door
It can be hard to find a good storage spot for your ironing board, but you don’t want to leave it sitting out, cluttering up your laundry room. A simple solution is to hang it on the back of a laundry room door. I used {this ironing board hanger} on the door of our laundry room in our previous home:
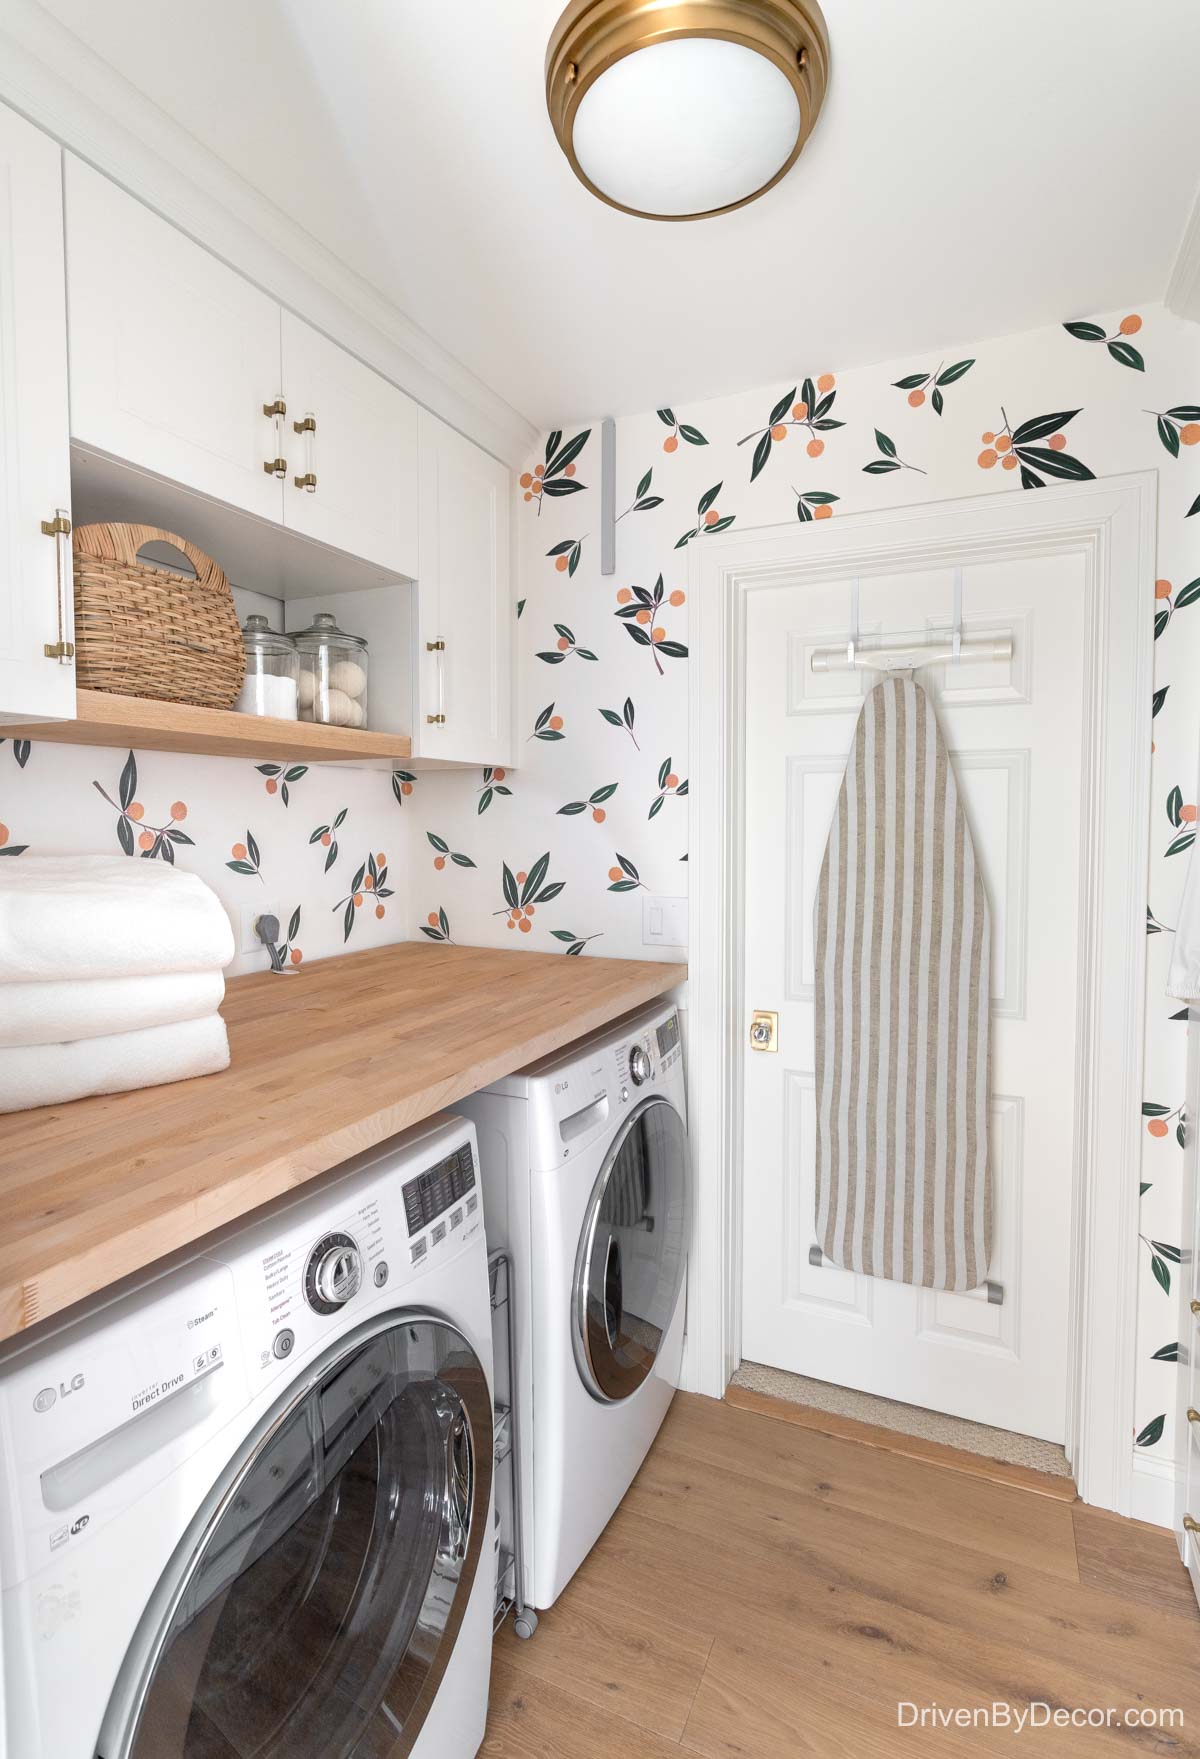
and an ironing board hanger similar to {this one} (that also holds my iron) on the door of the laundry room closet in our current home (I know it looks like the iron is too tall for the closet door to close, but trust me, it does!):
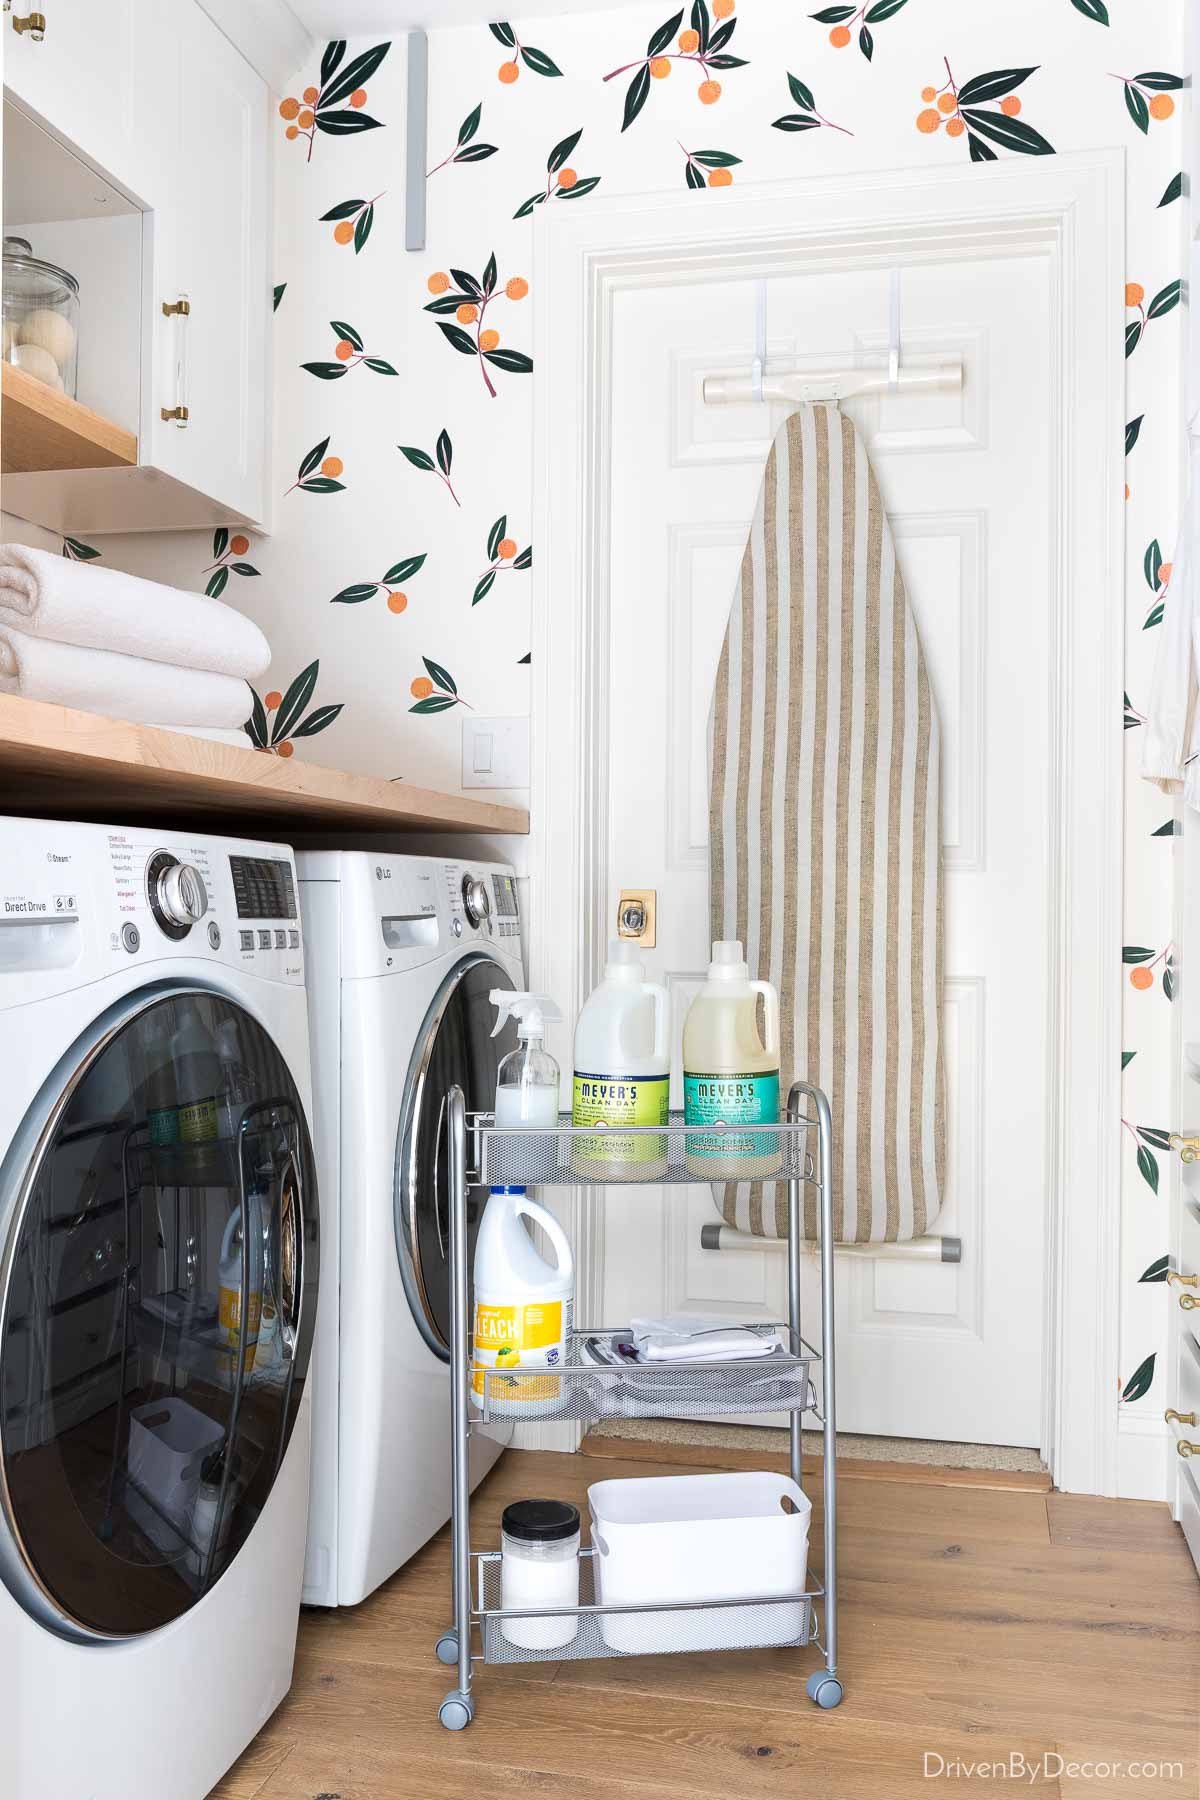
14. Store Laundry Supplies in a Rolling Cart
A simple way to keep your laundry supplies neat, organized, and also tucked away is to put them in a rolling cart between your washer and dryer. You might think that you don’t have the space, but it doesn’t take much! I have {this rolling cart} that’s less than 7″ wide and holds my detergents, laundry bags, a small bin that I use as a trash bin for lint, and more:
Home Organization Ideas for Your Bedroom
15. Tame Cord Clutter With Wireless Phone Chargers
Want a simple way to tame cord clutter? Instead of having cords and chargers all over your bedroom, use bedside wireless chargers. I have this patterned wireless charger on my nightstand:
and not only do I love that it keeps my bedside free of draped cords, but that I no longer get in bed and realize that I can’t charge my phone because someone snagged my cord 🙂 My exact charger is no longer available but you can find chargers in a variety of simple metal finishes {here}.
16. Revamp Your Closet
Revamping your closet starts with purging what you no longer wear. For any clothes you’re unsure of, hang them up with the hangers turned backwards. Rehang anything you wear with the hanger facing the normal direction. After several months, see which hangers are still backwards and purge those pieces.
Another simple tip is to use space-saving hangers like {these velvet hangers} that I have and love:
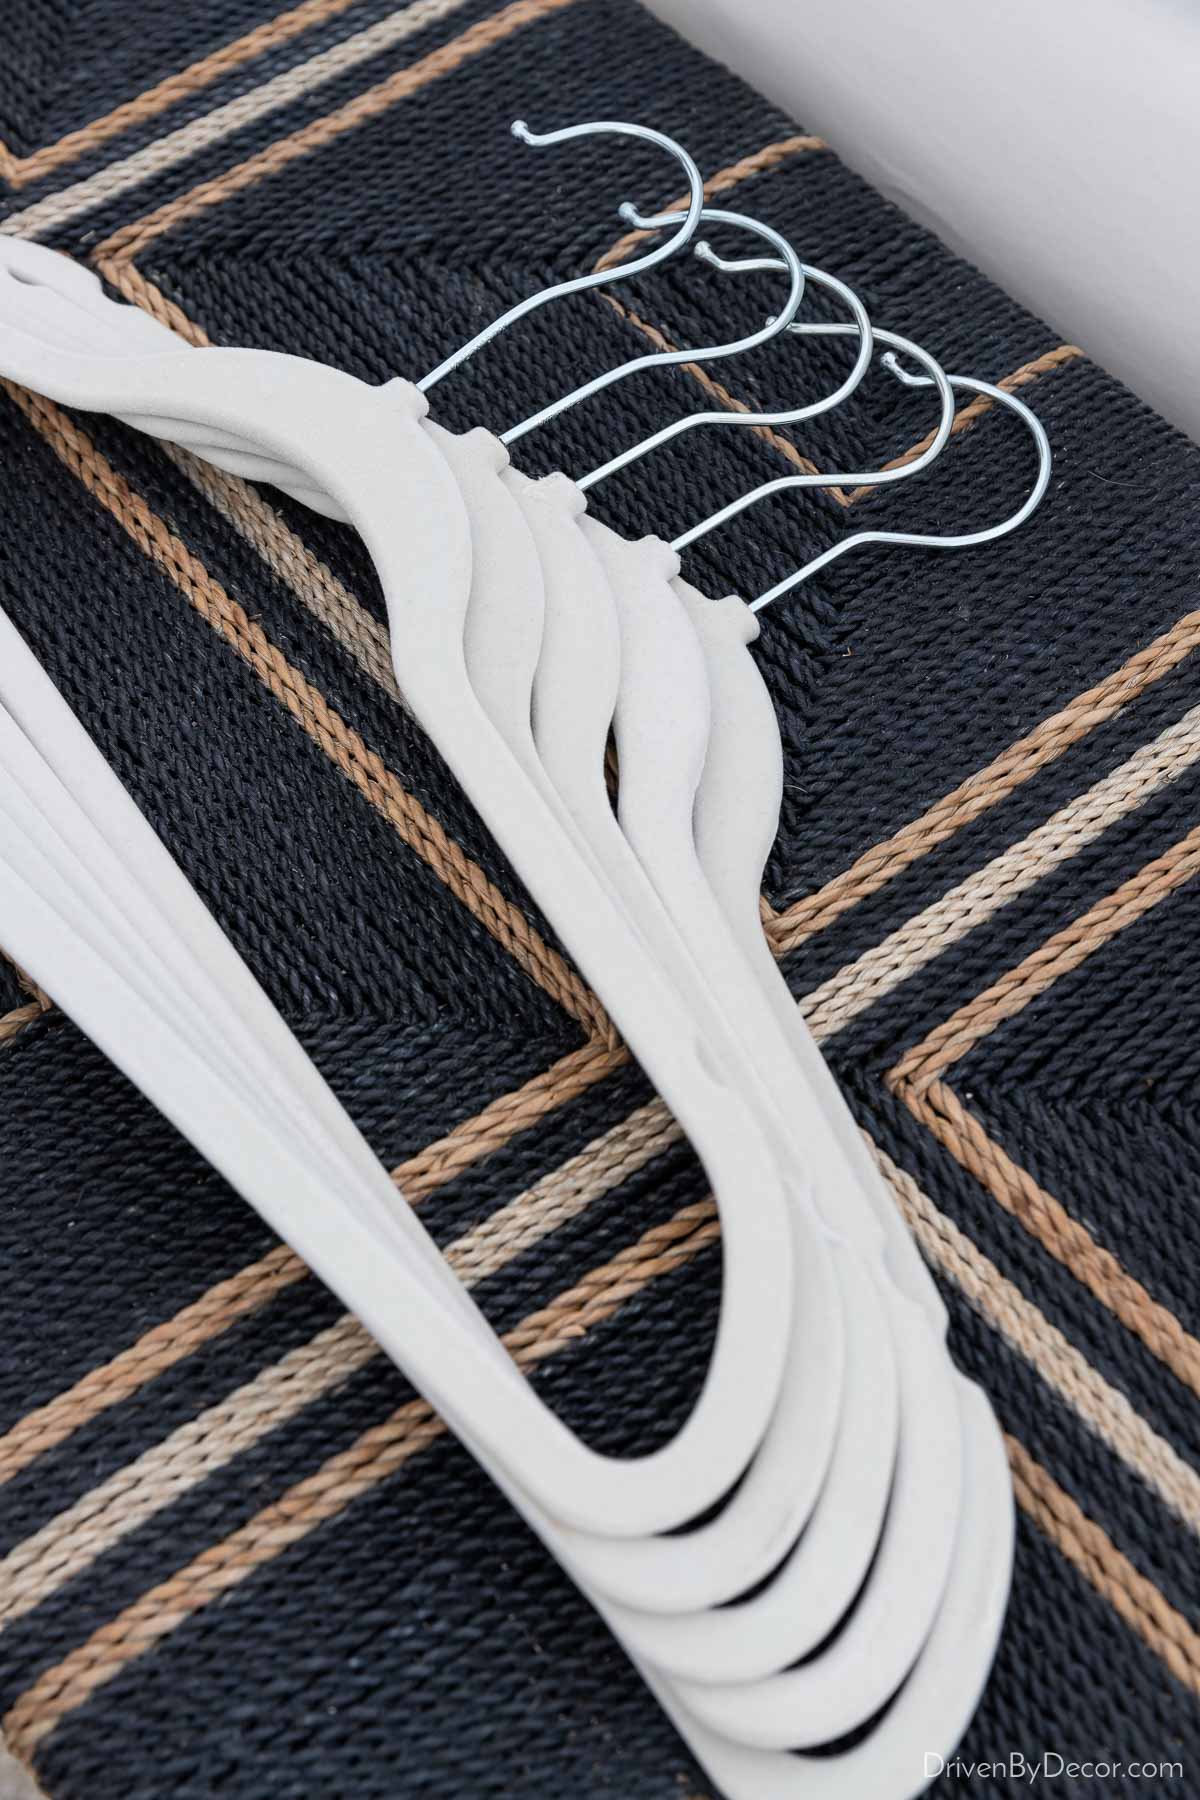
It’s surprising just how much space they free up in your closet compared to typical hangers, making it easier to organize everything. I also love that clothes never slip off of them.
Want to go BIG with revamping your closet? Install a new closet system! Check out the IKEA PAX Closet System in our previous home and the Elfa Closet System in our current home. Both are great systems that you can save big on by installing yourself.
Check out my post on bedroom organization ideas for more helpful tips on organizing your bedroom
Home Organization Ideas for Your Entryway
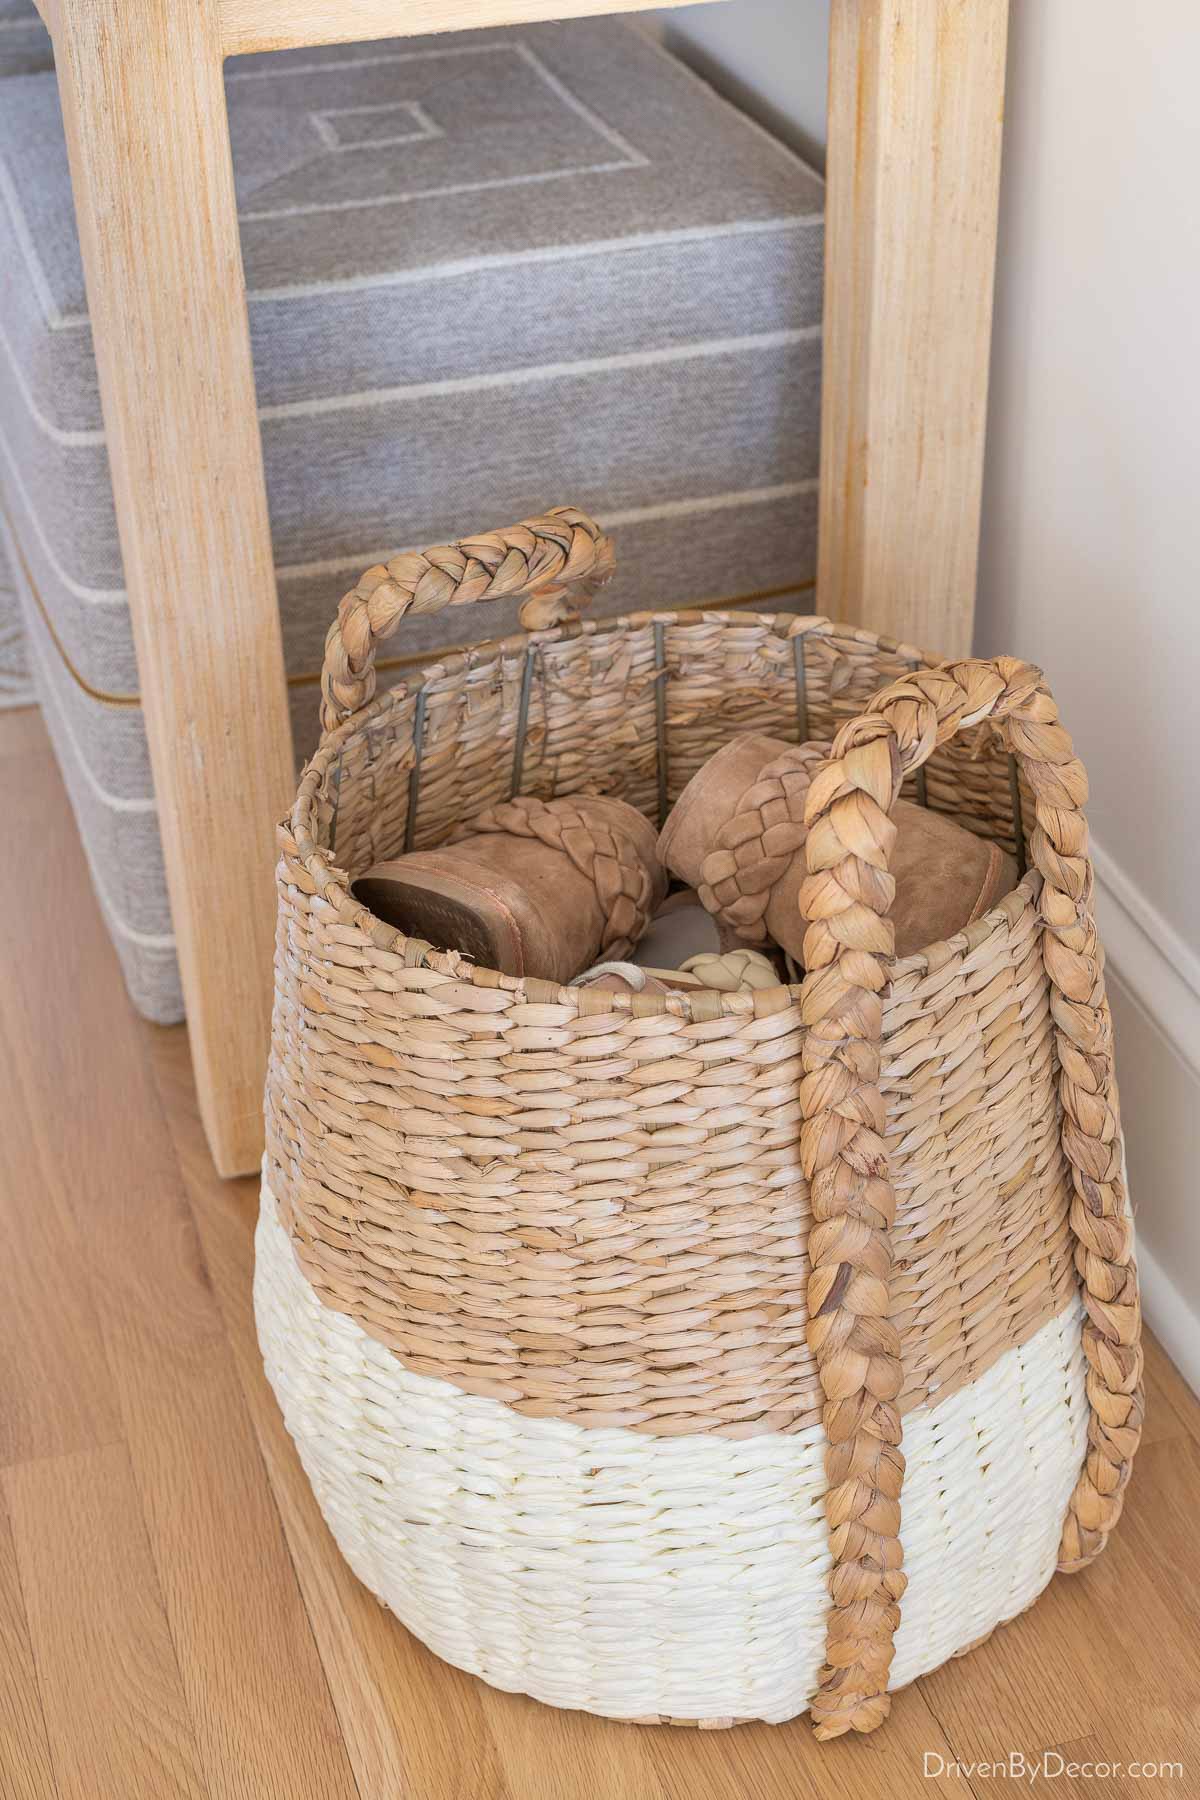
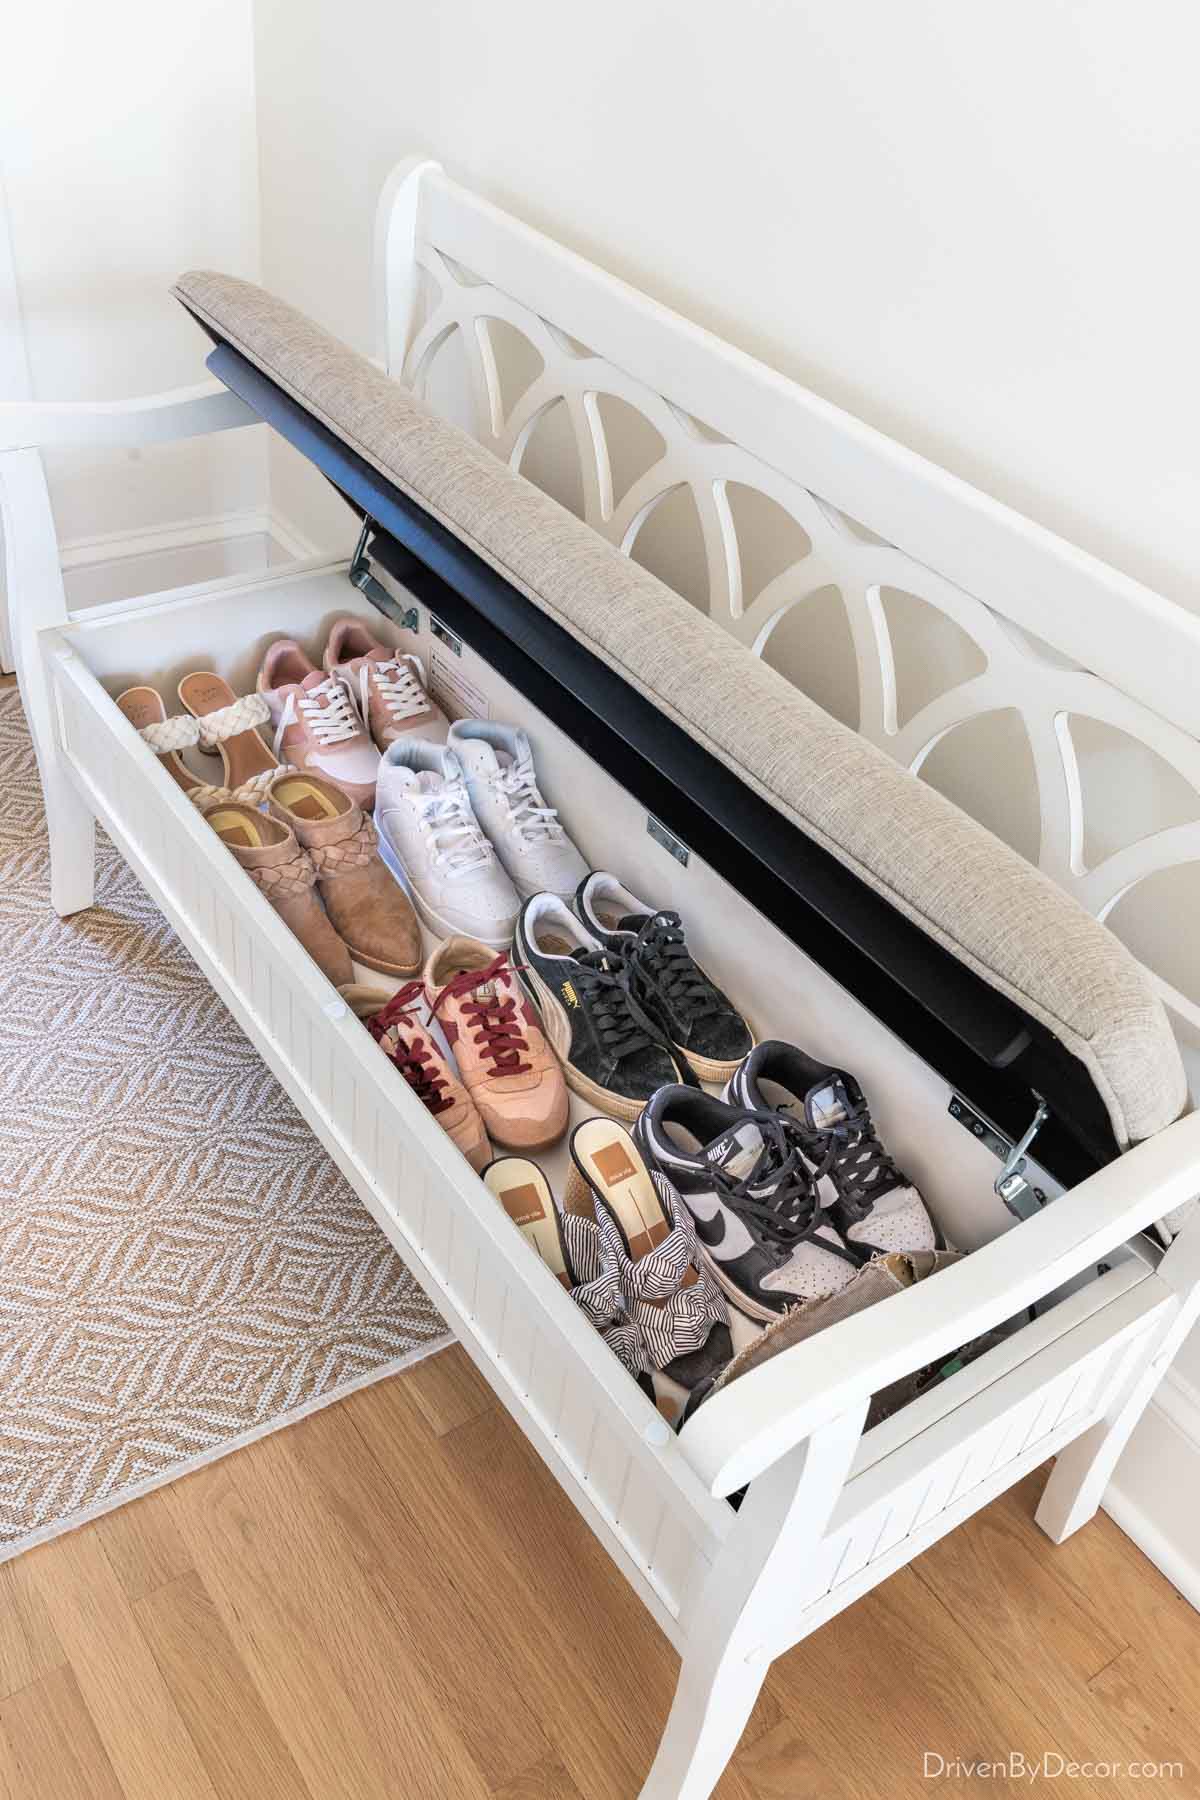
17. Banish Shoe Piles
If you’re a shoe-free home, you probably end up with shoe piles in your entryway, mudroom, or whatever other room you enter your house through. If you missed it, in my recent post on entryway shoe storage ideas, I shared several solutions for banishing those shoe piles! It can be as simple as having a designated shoe basket like {this one}:
or adding an entryway bench like {this flip top bench} that’s packed with storage space inside:
Other Home Organization Ideas
18. Switch from Filing to Scanning
One of the best resolutions you can make if you want a more organized home is to eliminate as much paper clutter as possible. Start by getting off unnecessary mailing lists & reducing your junk mail (the how-to details are in my post on my simple mail organizer), switching to electronic bill pay instead of paper bills, and scanning important paperwork to create a digital copy instead of keeping the paper and filing it away.
Most home printers have a scan feature that you can use, but I prefer a handheld scanner like {this mobile scanner} that you don’t need to leave your desk chair to use:
You simply hook it up to your computer, scan your paper through, save your digital copy to the designated folder on your computer,
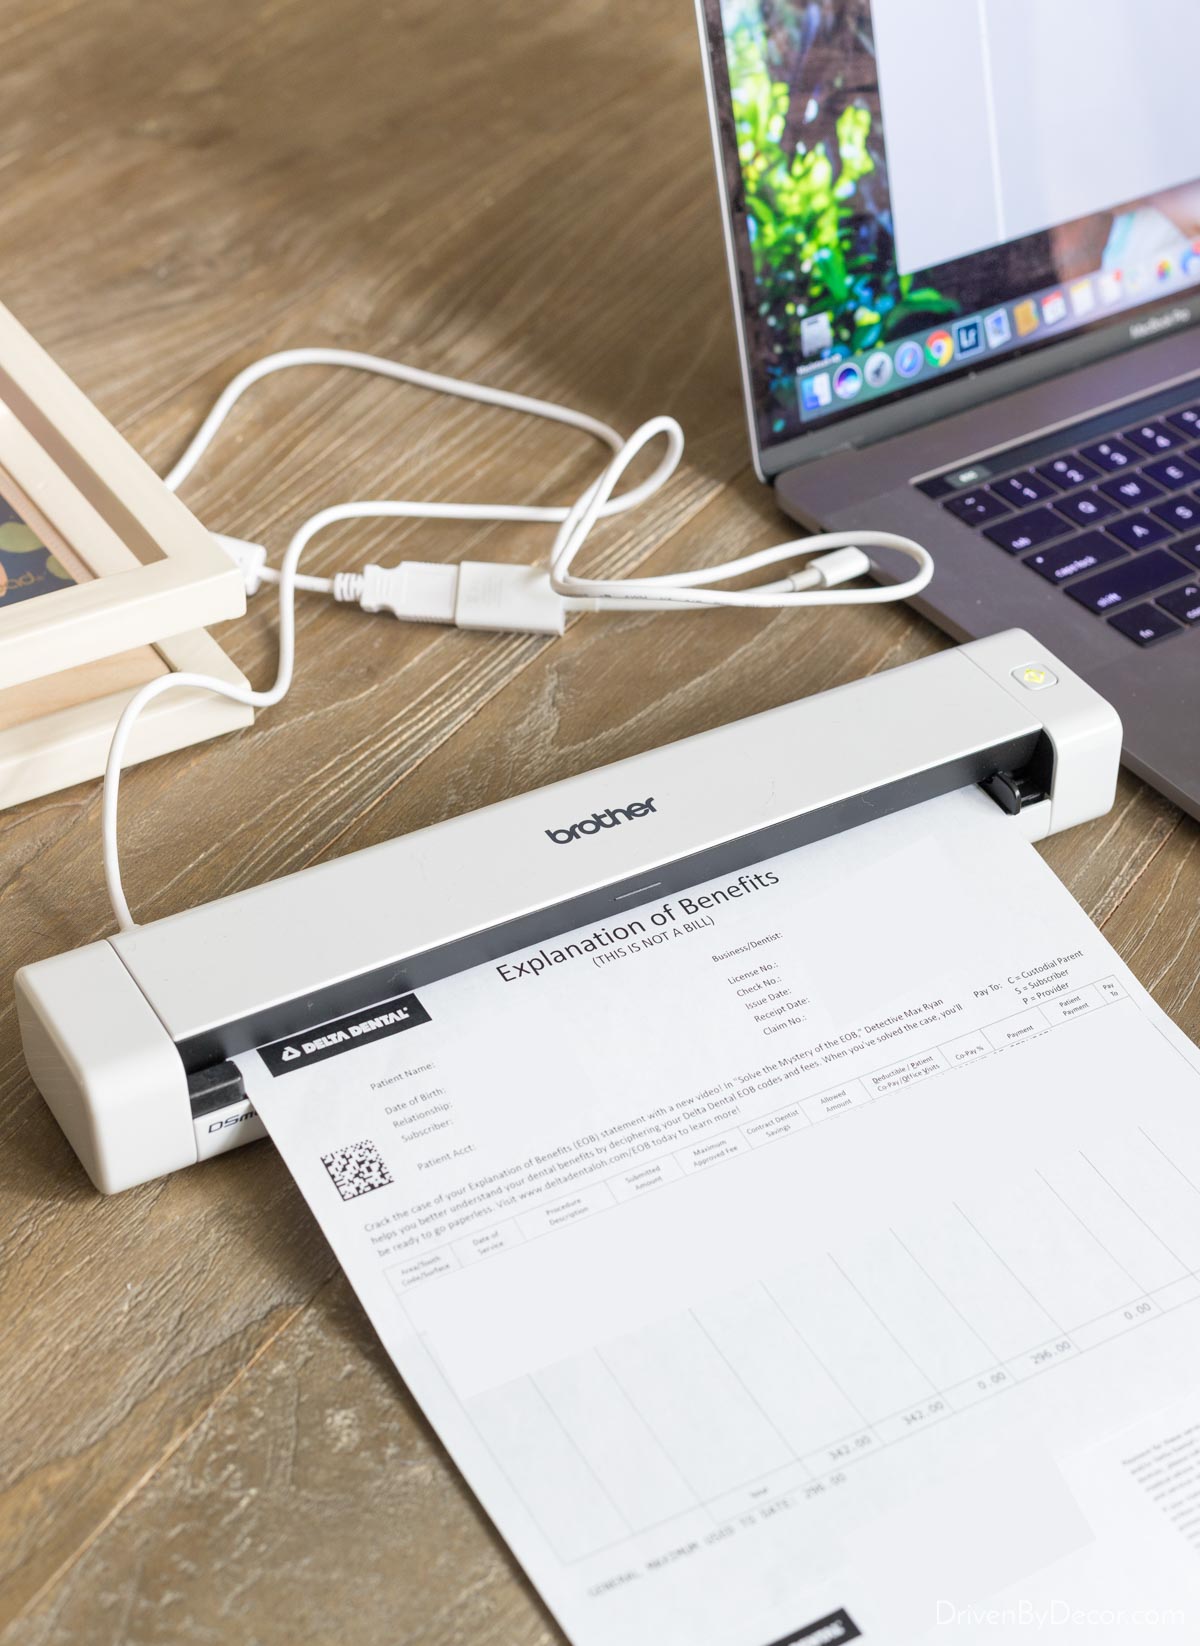
and shred your paper copy. Not only does it reduce paper clutter, but it also makes finding saved documents so much easier since you can use the search feature on your computer instead of sorting through physical file folders. Just make sure to back up your computer’s data on a daily basis so you don’t lose anything important if your computer fails.
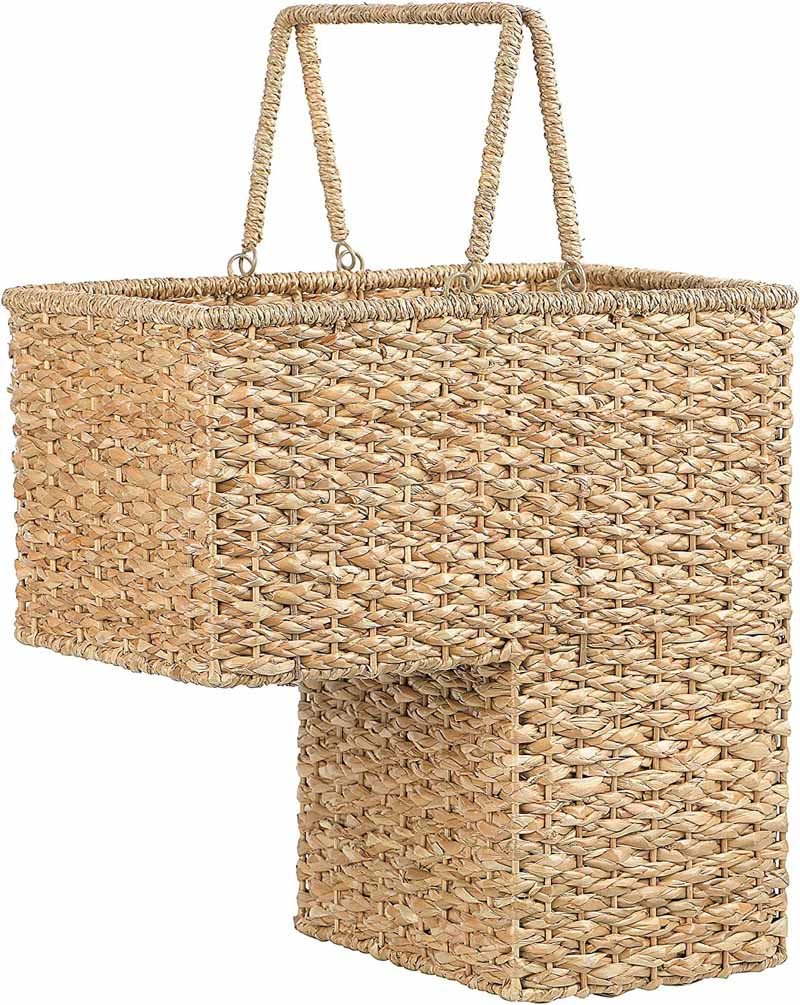
19. Keep a Basket at the Bottom of Your Stairs
Are you constantly running up and down the stairs, putting things away? Keep a basket at the bottom of the stairs and use it for placing anything that needs to be put away upstairs. Any time you’re heading upstairs, grab what’s in the basket and put everything where it belongs. If you have kids at home, make checking the basket for their own things to put away part of their daily routine.
Use a basket you already have or try a stair basket like {this one} or {this one} that’s shaped to fit your stairs and has handles for easily carrying it up and down the stairs with you:
20. Transform Your Junk Drawer Into a Hidden Command Center
Do you have a junk drawer that’s full of pens, pencils, miscellaneous papers, and tons of other junk? Let’s get it organized! It doesn’t take long to do, and once it’s organized, you’ll be able to find things so much faster than when you were digging through the piles of junk.
For our junk drawer, I used {these Poppin desk accessories} which come in all sizes & configurations and can be mixed and matched to fit the size of your drawer:
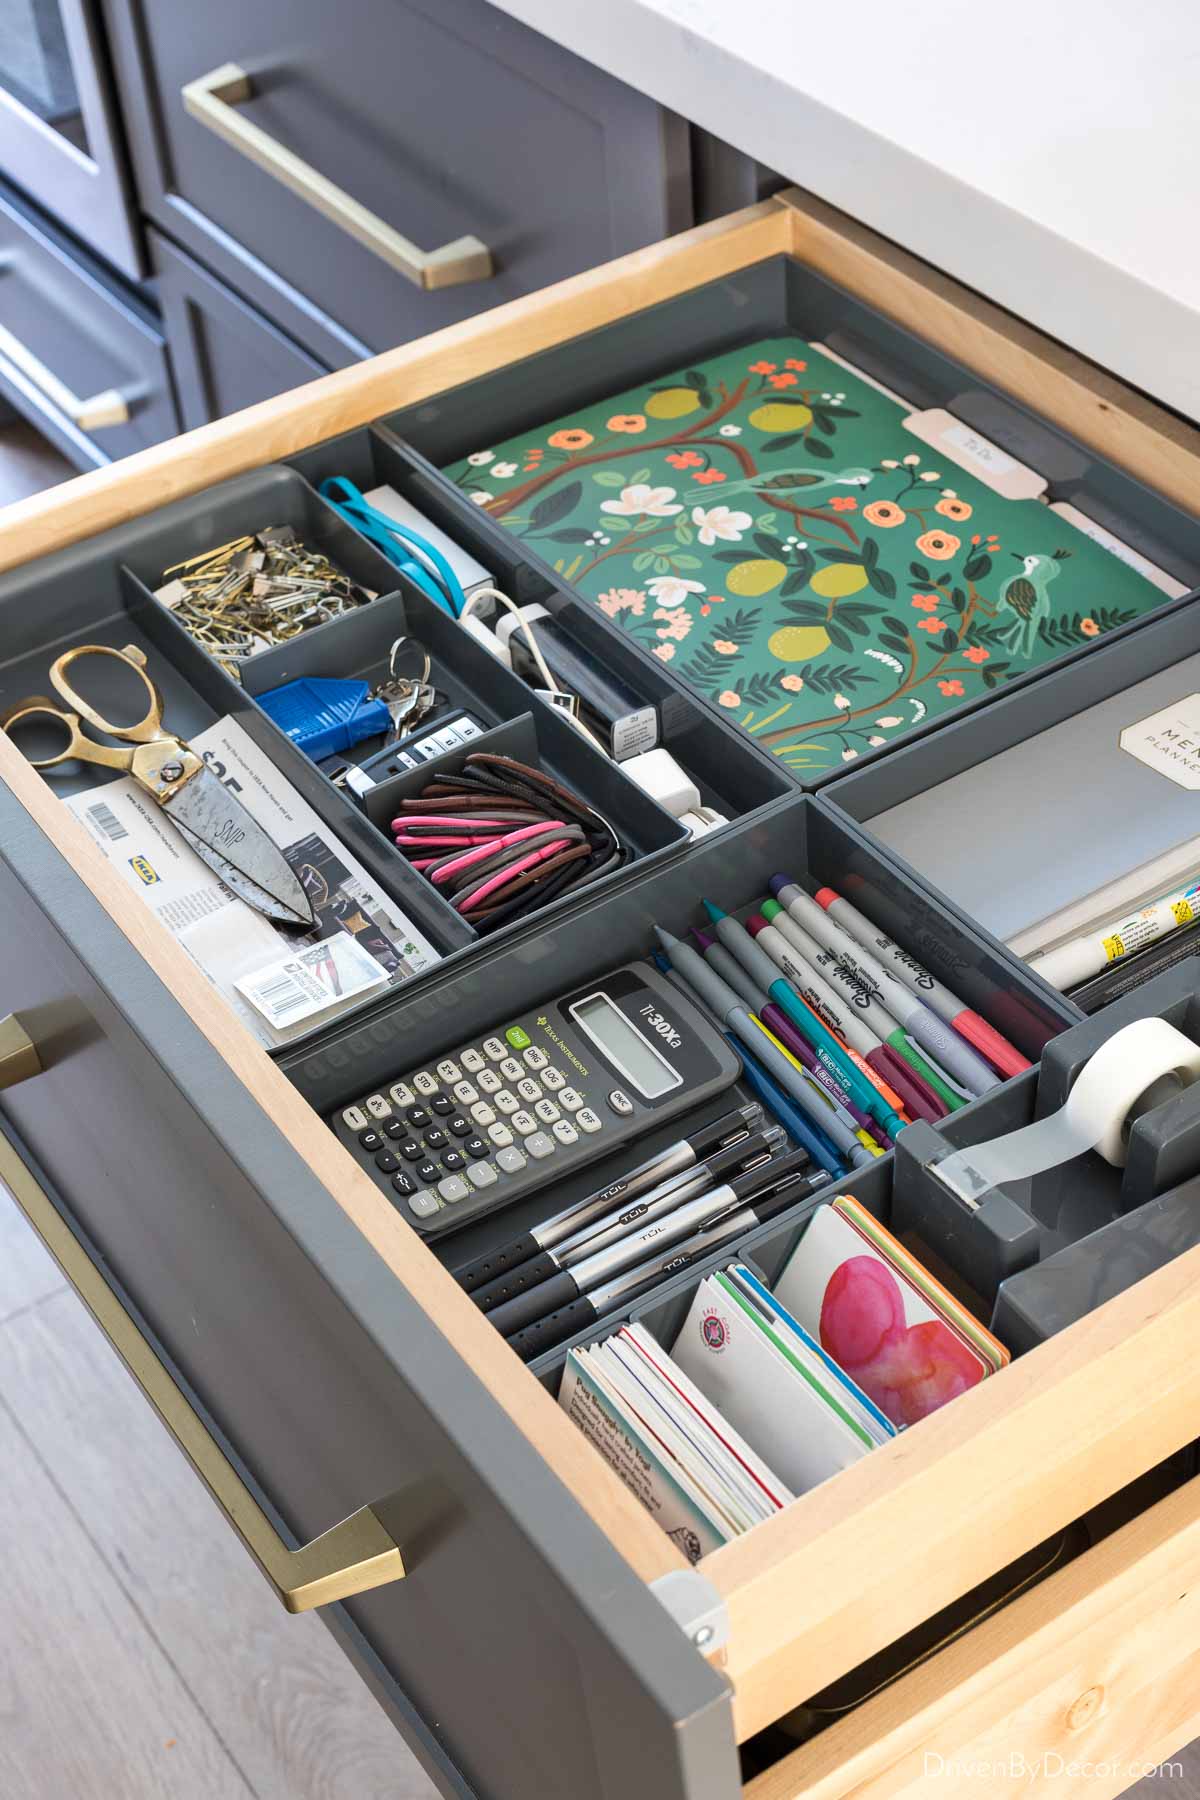
You can also do it on the cheap by using variously sized gift boxes to divide up your drawer space. For the batteries that were stashed in our junk drawer, I organized them plus and our packs of new batteries using {this battery organizer}. For more details on our junk drawer organization, see my full post on our hidden kitchen command center.
21. Install a Track System to Hang Your Tools
Let’s wrap things up with a simple home organization idea for your garage. Get your tools and other hangable items off the garage floor by hanging them on a track system. For storing shorter items, you can even stack two tracks to double your storage space:
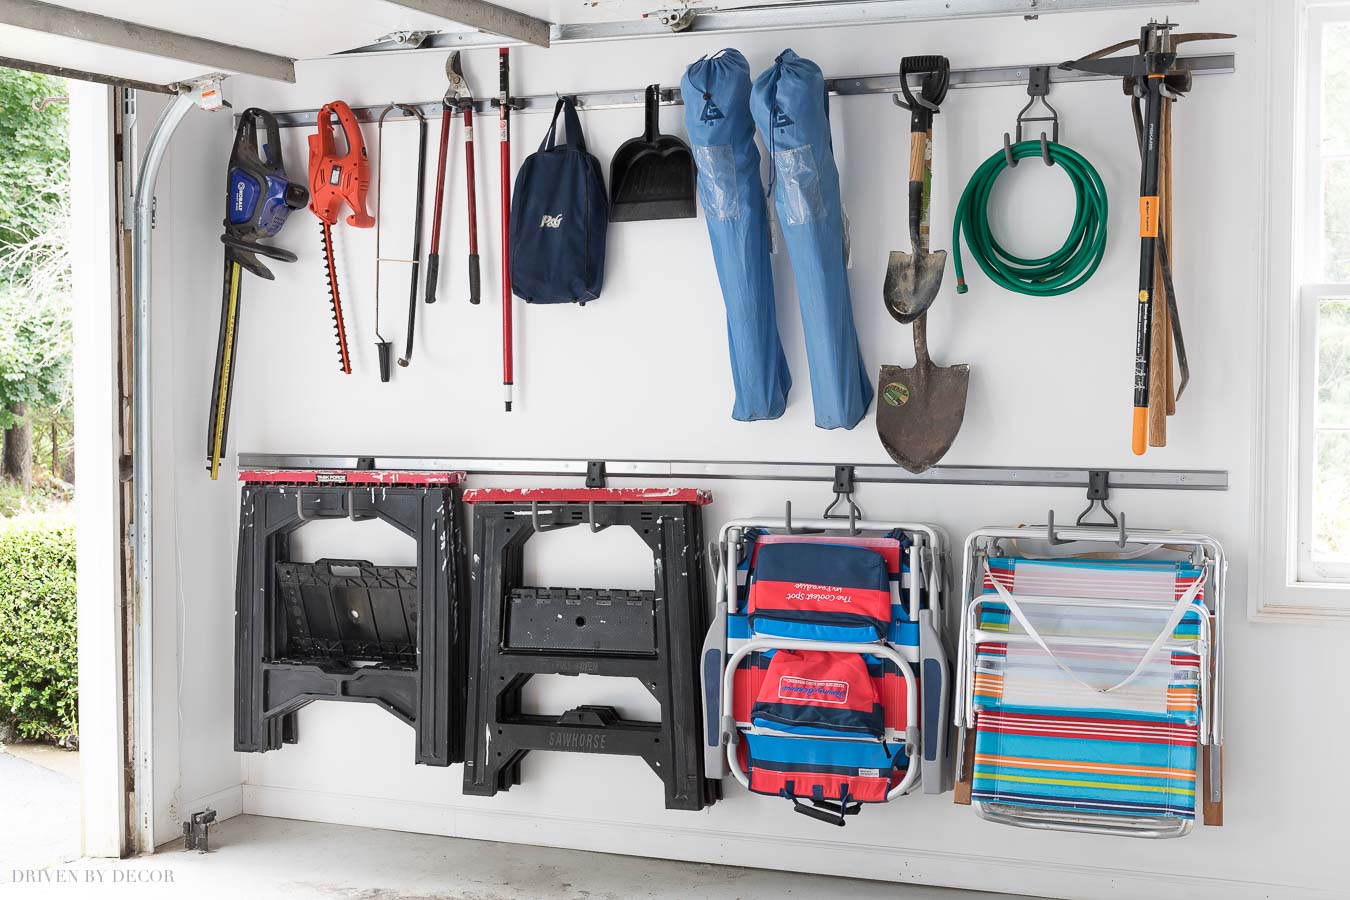
A track system is so much better than wall mounted hooks because you can move the hangers back and forth along the track to readjust spacing as you reorganize. You can also use a variety of different hangers on the same track. Check out my post on garage organization for more details about the track system and other organizational features we added to our garage.
Also check out my post on linen closet organization ideas to get some tips on organizing your sheets, towels, and other linen closet essentials.
So what do you think – did you find an organizing project that you might like to tackle? If whipping your home into organized shape is something you never seem to get around to, start small. Once you get that sense of accomplishment after tackling a quick project, you might surprise yourself and realize that you’re itching to knock out something bigger!
Thanks as always for stopping by, and enjoy the rest of your weekend! If you haven’t already stopped by my Shop page, check it out {HERE} for all of my latest finds!
XO,


Sarah says
Really loved reading through this—there are so many practical, realistic ideas here instead of overly complicated “perfect home” systems. The small changes like using vertical space, drawer dividers, and under-sink pull-outs are exactly the kind of things that actually make day-to-day life easier and more manageable.
What I appreciate most is that nothing feels unrealistic—it’s all about working with the space you already have and slowly improving it over time. That approach really makes organization feel achievable instead of overwhelming.
I’ve also had a good personal experience with storage products from HDX Totes—simple, durable solutions that fit well with this kind of practical home organization mindset.
Thanks for sharing these ideas—definitely bookmarking this for future reference.
Raicy Yang says
Thanks for sharing, it’s very helpful to me