Want to create a mudroom on a budget? Check out our IKEA PAX mudroom that gave us a high-end look without the high price tag!
There are so many things to love about having an older home but ample storage space is unfortunately not one of them! Our previous home had no mudroom or even a coat closet so we relied on just a few hooks by the door which definitely wasn’t ideal.
I was determined to find a way to turn our laundry room into a mudroom without spending thousands of dollars. When I think of budget-friendly, I think of IKEA so my idea to create an IKEA PAX mudroom was born! (post includes commissionable links; for more information, see my full disclosure statement {here})
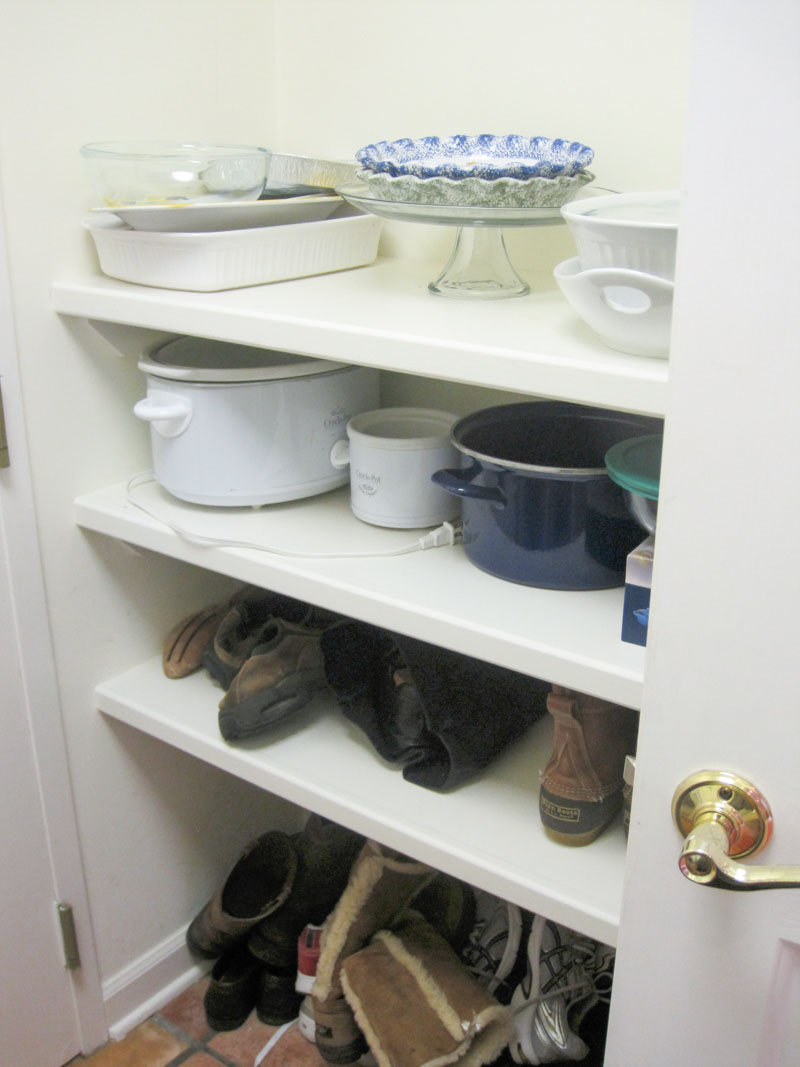
The only “before” pic I have of the available space in our laundry room is one that I took when we first looked at our house. The previous owners used these open shelves to store extra kitchen items on the top and shoes on the bottom. The shelves only went half way up the wall so it definitely wasn’t the most efficient use of space:
It was only about 16″ deep so I couldn’t simply add a hanging rod like a traditional closet because there wasn’t enough depth for it. I wanted something more functional than simple hooks, and decided to create an IKEA mudroom using their PAX wardrobes. I’m so, so happy with how it turned out:
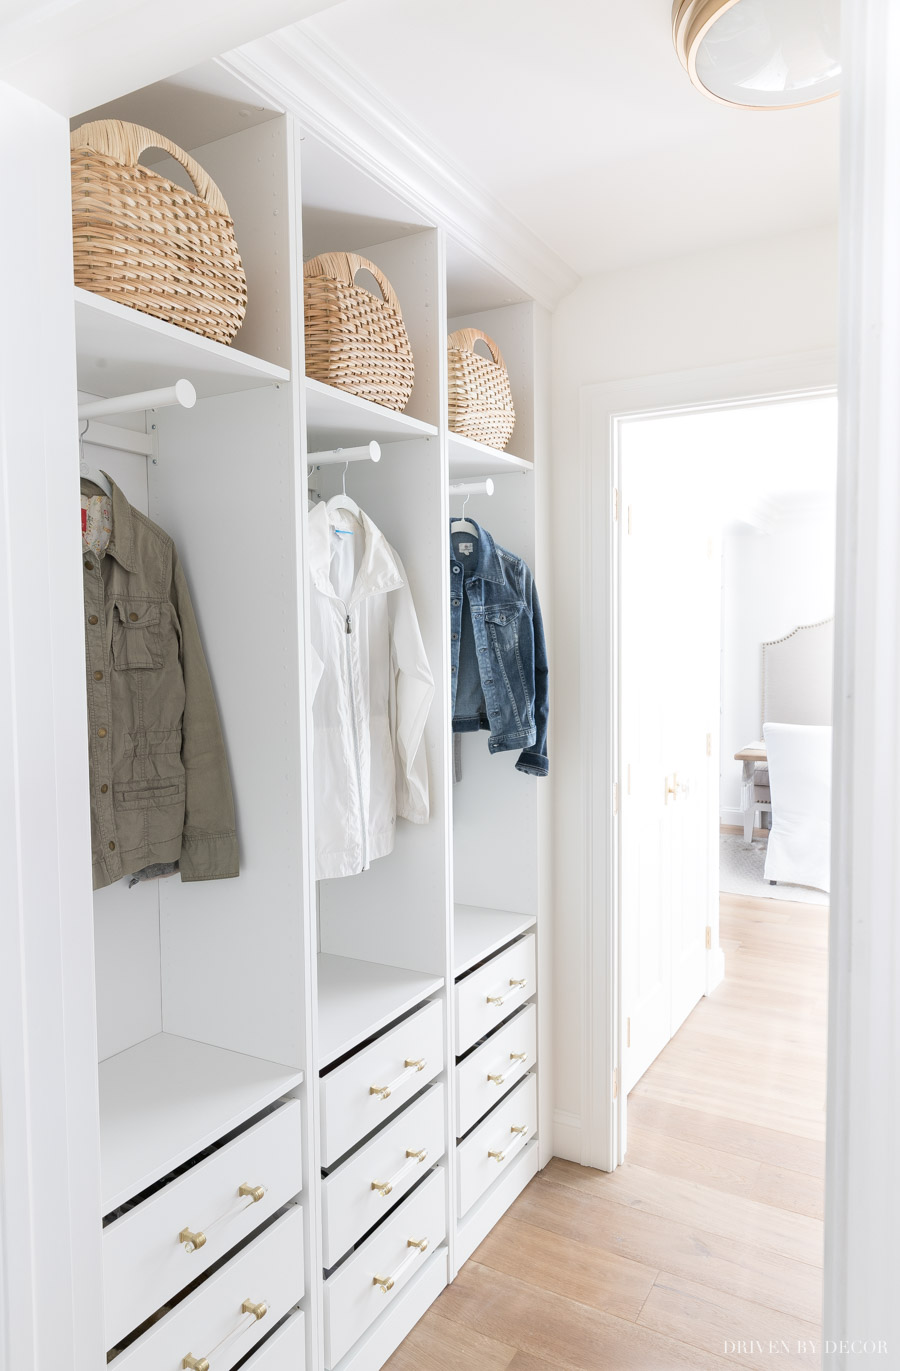
It’s a SUPER challenging space to photograph since there’s hardly any natural light and I have to jam myself in the doorway to photograph it but hopefully you can still see what a huge change it is! Who knew that you could create such a great IKEA PAX mudroom with only 16″ of depth to work with!
This new mudroom area for storing coats, shoes, and winter gear is is directly across from our washer and dryer (note that this pic was taken a few months later, after I added some cute wall decals to the entire space!):
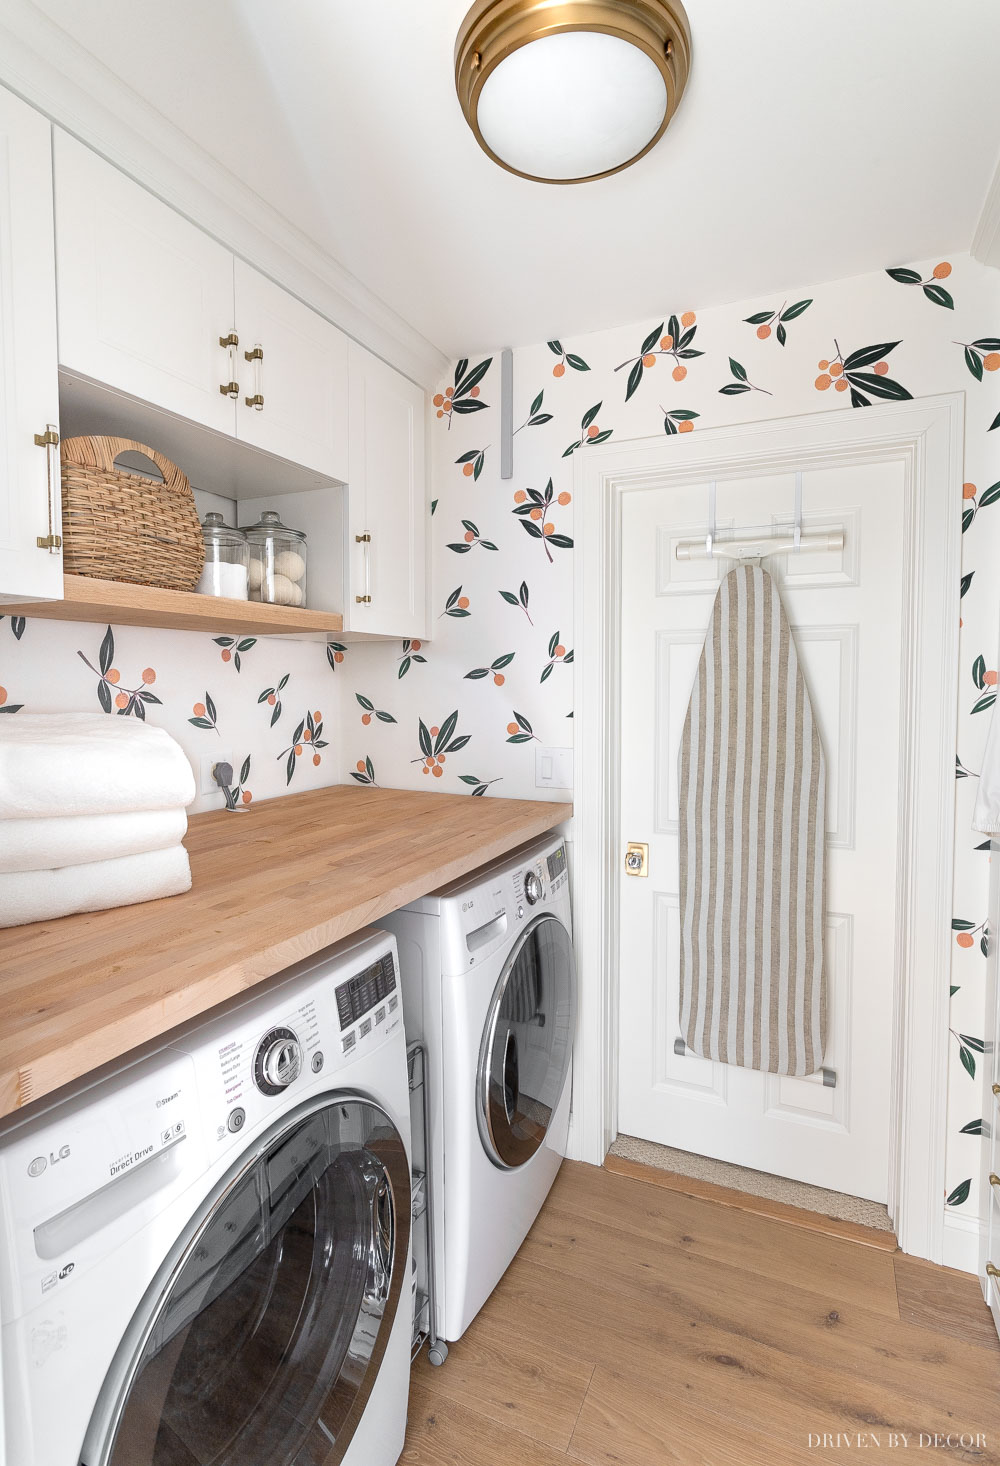
I also went with IKEA for the cabinetry above my washer and dryer! For all the details, see my post on our IKEA laundry room cabinets.
And here’s a look at my new IKEA mudroom from the other direction (the light fixture is {this simple flush mount fixture} in warm brass:
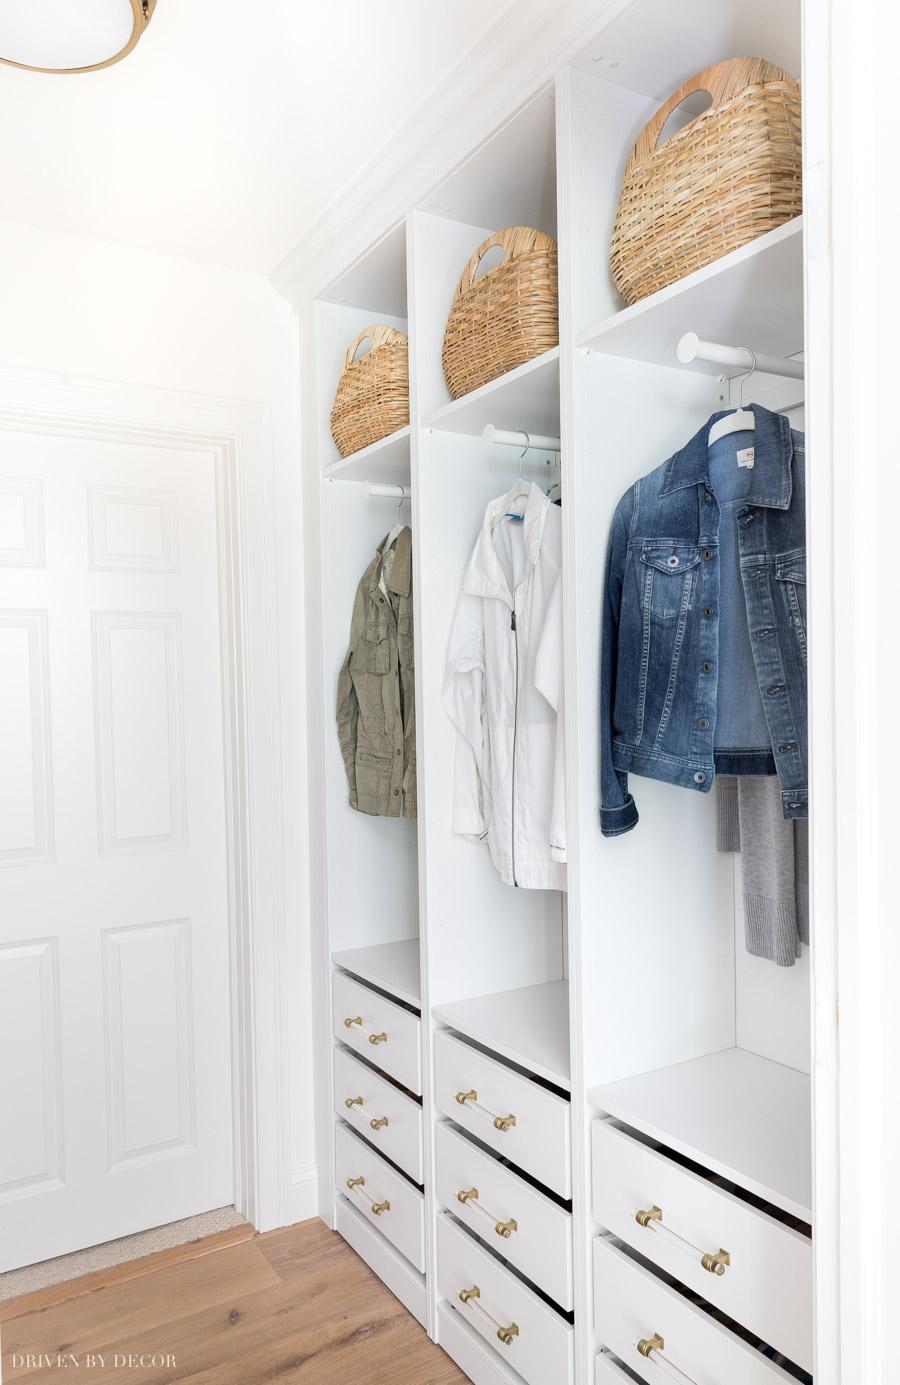
I designed our new coat closet using three of {these IKEA wardrobe frames} that are 19 ⅝″ wide and only 14″ deep. The three frames are freestanding but are anchored to the wall in the back and bolted to each other. I was lucky with their size – they filled almost the entire nook, leaving only a few inches on each end between the wardrobe frame and the wall.
To make it look more built in, we added filler strips to fill that gap and also added a piece of crown molding at the top. I then caulked and painted the fillers and crown molding to match the white paint of the IKEA PAX drawers and frames (more on that at the end of the post).
I was originally planning to add doors to each of the three wardrobes but then decided it would be so much more functional as an open closet so I left off the doors and prettied everything up with some gorgeous pulls and baskets.
Here are the details on those and some of the other customized elements we added to our IKEA mudroom…
How to Customize IKEA Wardrobes for a Mudroom
IKEA offers quite a few options for accessories to put in their PAX wardrobe frames including the KOMPLEMENT pull-out clothes rails that I put in each one of mine. The genius behind them is that you can hang coats in the opposite direction from the way that a typical rod would run which is exactly what I needed for this shallow space! And the rods can be telescoped out which is really nice since we can use that extra space to hang items for air drying that are coming out of the washer:
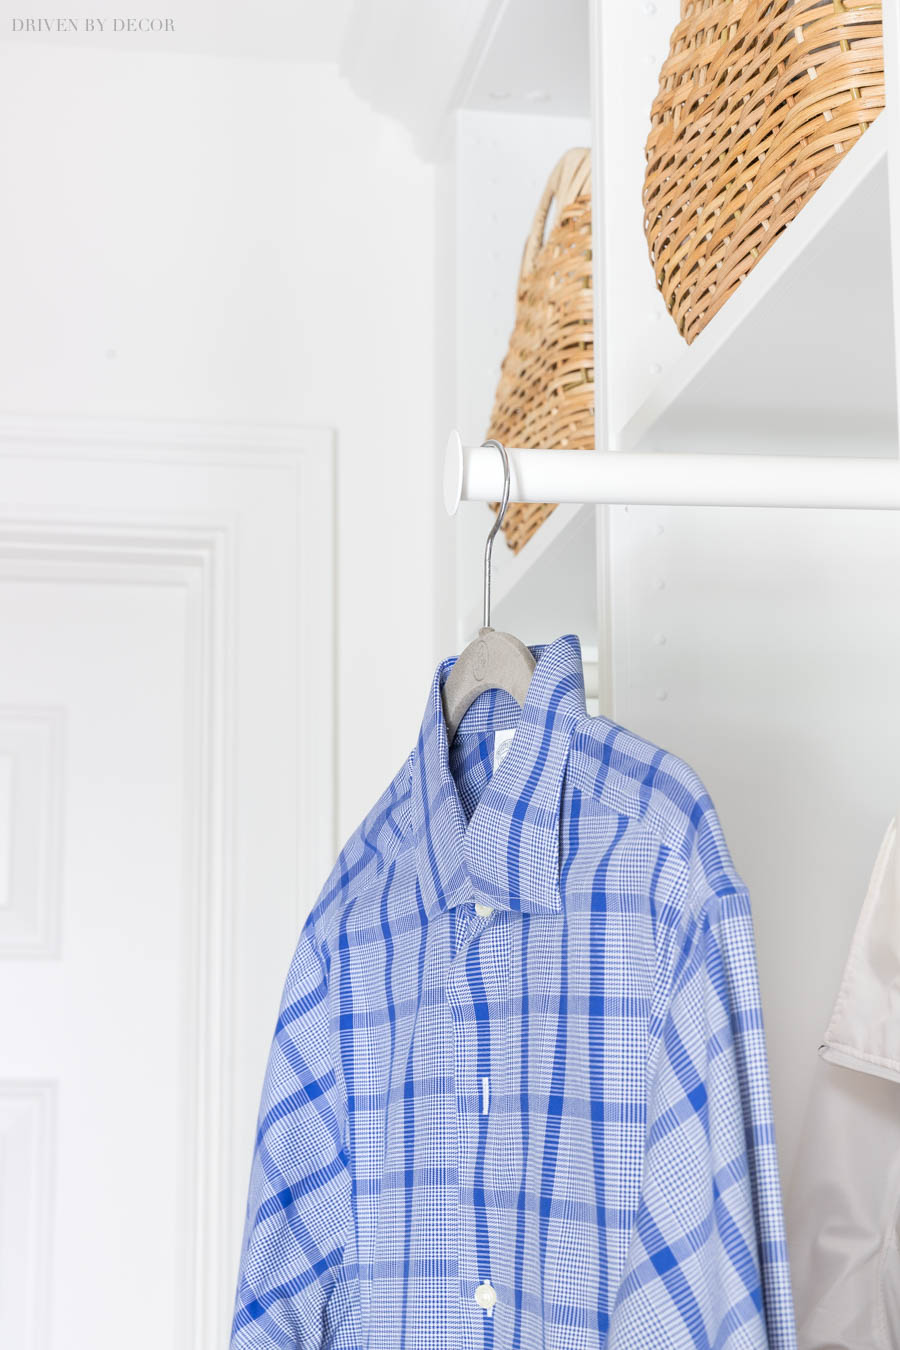
I installed the clothes rails high enough that our long winter jackets will fit and then I put a pair of {these KOMPLEMENT shelves} in each wardrobe frame – one above and one below the space for coats.
Update: IKEA has sadly discontinued the KOMPLEMENT pull-out clothes rail that I used. A pull-out rail that attaches to the shelf above it such as {this one} or possibly {this one} would be a good substitute. Note that you don’t want a rail that attaches to the BACK of your PAX unit because it’s too flimsy to support the weight.
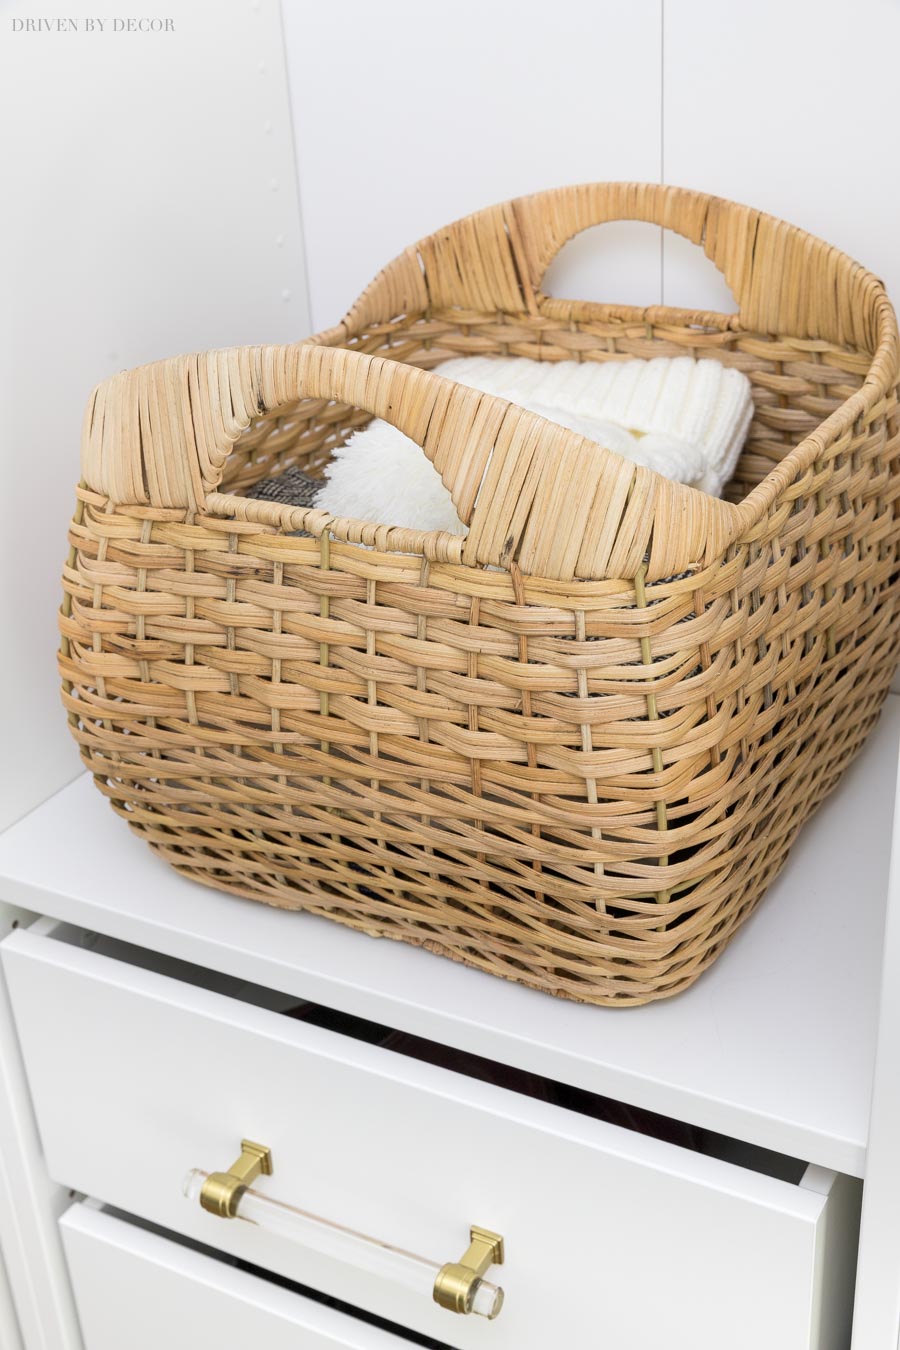
On each top shelf, I added a woven basket where I put gloves, scarves, and hats (I placed one on the lower shelf in the pic below just to photograph it so you could see it better):
Then at the bottom of each wardrobe unit, I added three of {these KOMPLEMENT drawers} with {these acrylic pulls} in the Golden Champagne finish in the 5 1/16″ size (they’re also available {here}):
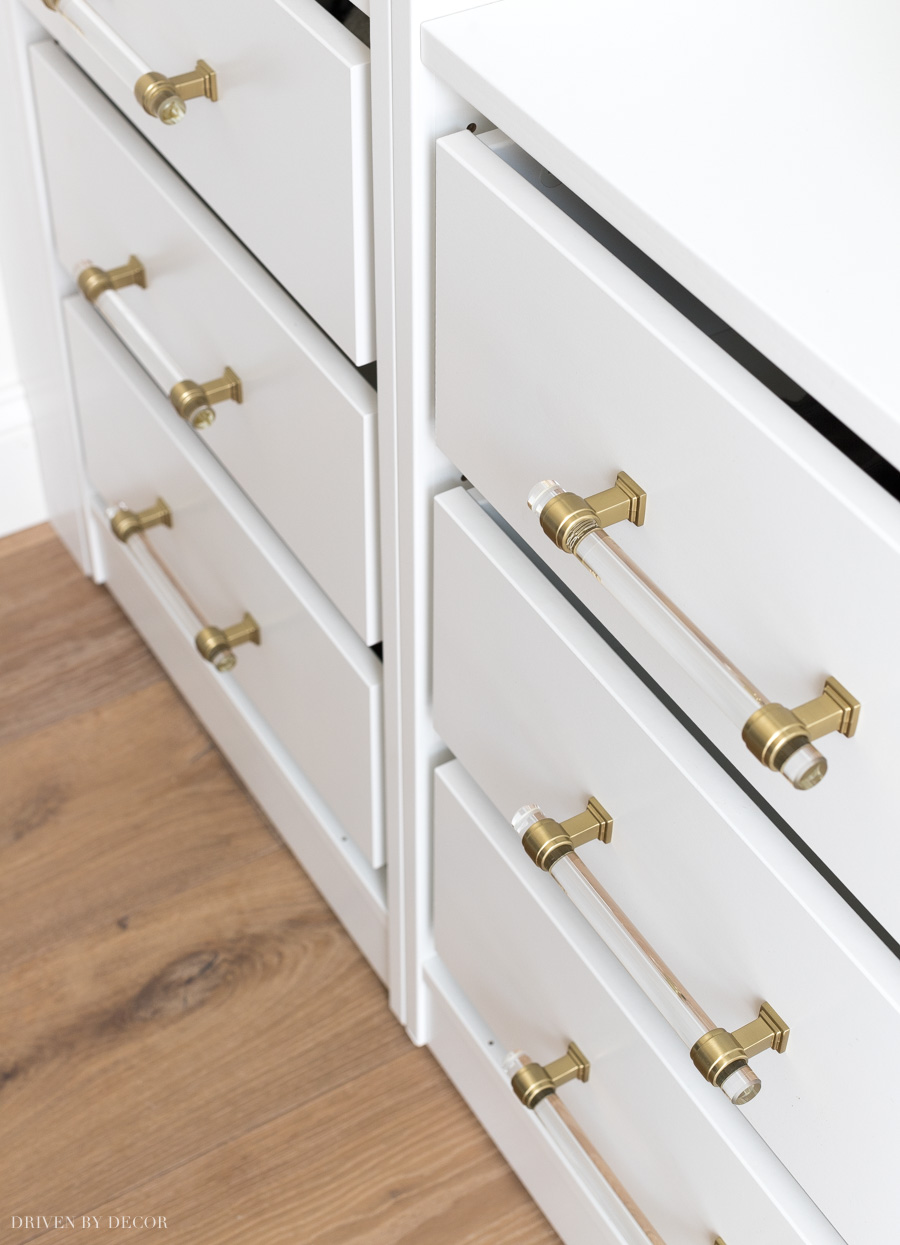
The pulls aren’t cheap but they sure make these inexpensive IKEA drawers look like a million bucks! If you’ve been following my projects for a while you might remember that I was thinking about using them on our kitchen island drawers for our kitchen remodel last year but I ultimately decided that one long pull would be better than two shorter ones so I’m thrilled that I found a place to finally use these beauties!
Update! If you want drawer pulls with a similar look at a lower price tag, check out {these acrylic bar pulls} that come in a pack of 10.
We use all of our drawers for shoe storage – they’re small but the girls and I can fit several pairs in each of them. If you don’t want to stack or nest your shoes, you can comfortably fit two pairs of women’s shoes:

If you want to nest or overlap shoes you can fit several more pairs:
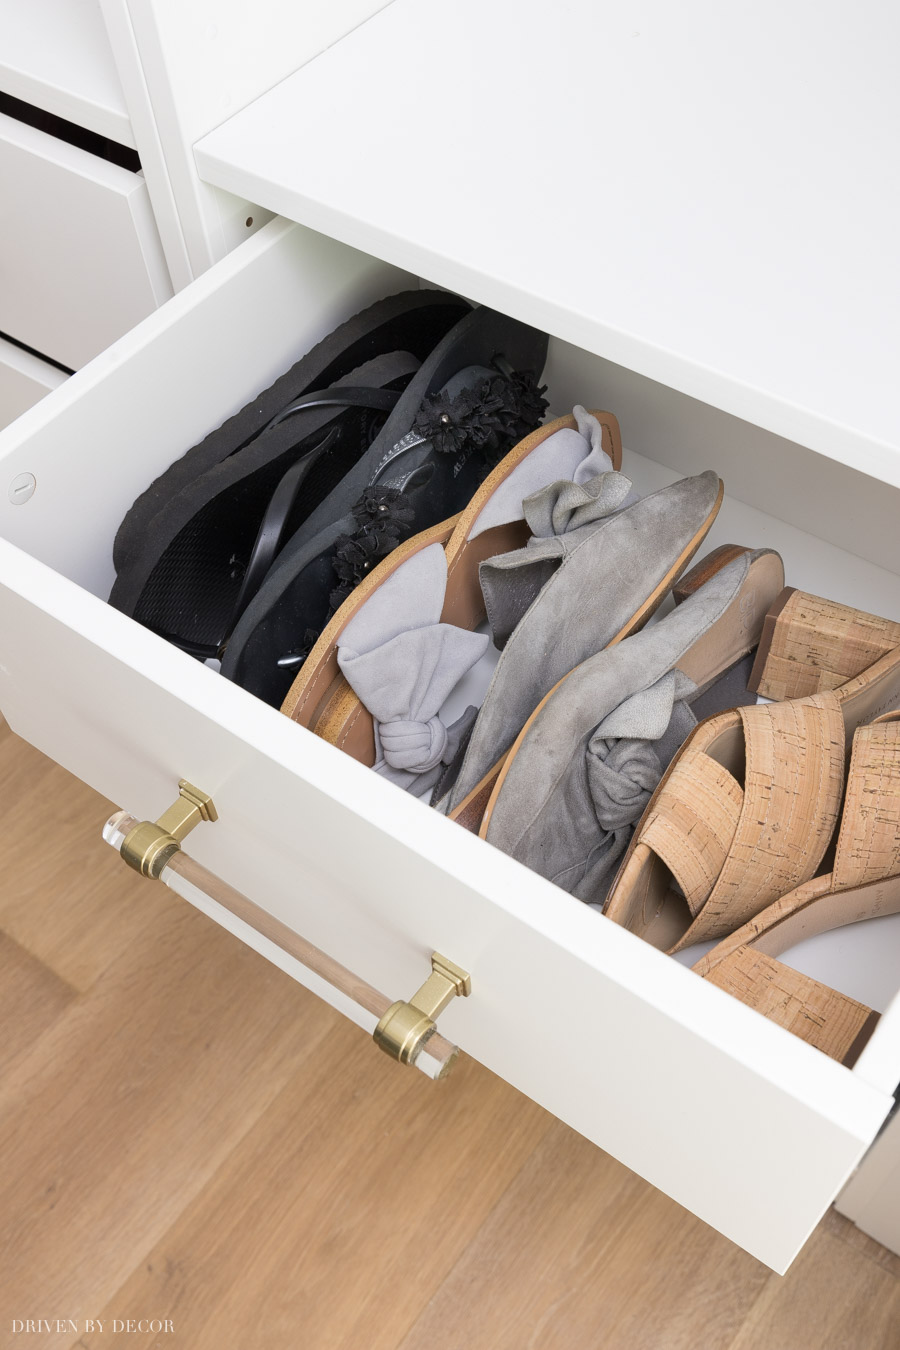
Men’s shoes are obviously a tighter fit – I can fit two pairs of Jeff’s shoes in a drawer when nesting them on their sides.
Covers & Plugs for IKEA PAX Holes
One of my tips for making IKEA PAX frames look more like custom cabinetry is to cover all of the holes. It’s amazing what a difference it makes!
I used several different things as hole fillers. There were two tiny holes at the bottom of each frame that I simply filled with caulk. Then, for all of the holes that run along the edges of the PAX frames, I used IKEA’s VARIERA cover plates that you can find at IKEA {here} or for a few bucks more on Amazon {here}. It’s tedious work to cover each hole with a plug but it’s worth it.
I took a pic midway through filling the holes so you can see the difference it makes:

There were holes at the top of the IKEA units that I filled too – I covered the IKEA cam lock holes with {these adhesive cover caps} and I covered the ⅜″ open holes at the top with {these hole plugs} – both were a perfect fit:
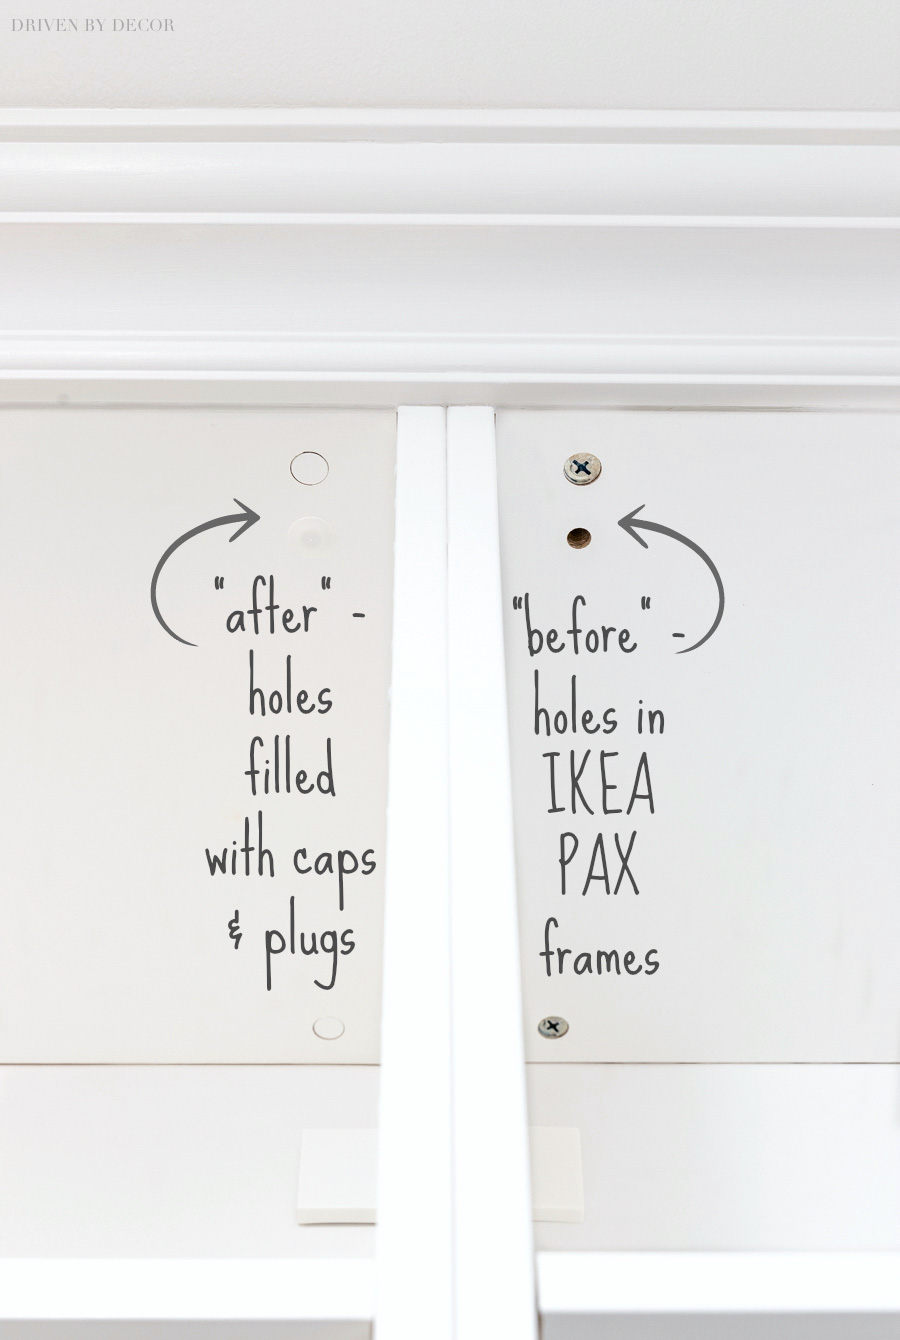
You could also simply fill all of the holes with wood filler and sand and paint to match. I chose not to because… 1. that is a LOT of work and 2. I prefer to use removable covers to keep my options open for future customization.
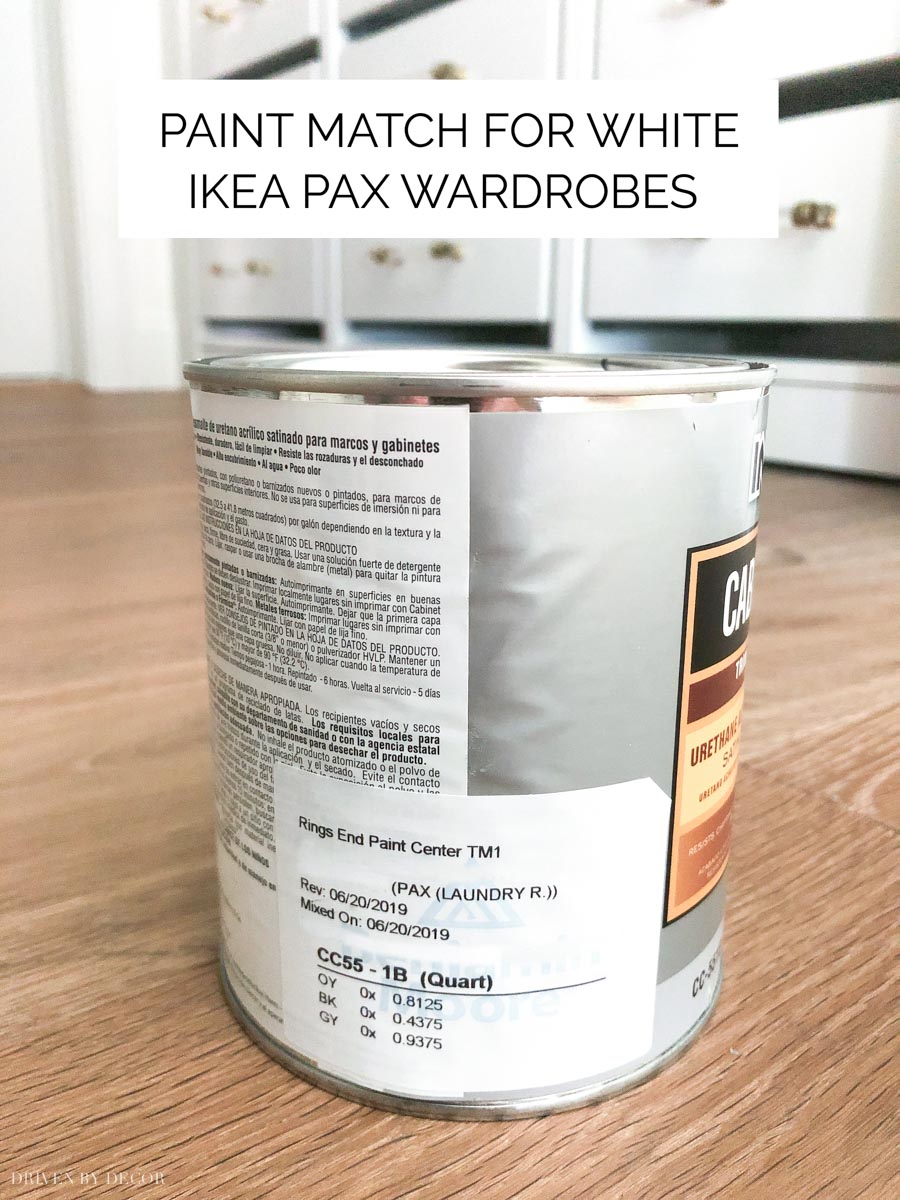
Paint Color to Match IKEA PAX in White
As I mentioned earlier, we added filler pieces between the wall and the two end PAX wardrobes and also added crown above the PAX wardrobes that I painted white to match. I looked at LOTS of white color swatches to find a good match for the IKEA PAX frames and drawers but couldn’t find one that I thought would work well so the talented guys in the paint department at our local Ring’s End came to the rescue.
They did a great job coming up with a close match! It’s mixed in INSL-X Cabinet Coat in Satin (it’s important to use this same exact base) – here’s the exact formula:
I think that covers all of the little details about my new IKEA PAX mudroom, but if I missed anything you have questions about, don’t hesitate to ask! I also used the PAX system for the walk-in closet we added as part of our bathroom addition – be sure to check out my post on our IKEA PAX closet system to see it.
And if you want to see the rest of what we did to our laundry room including adding IKEA cabinets above our washer and dryer, check out our finished laundry room with details on our IKEA laundry room cabinets.
XO,


Julie says
Just wondering if the water and dirt from shoes damaged the pax over time? Trying to decide if I need to buy the metal shoe shelves or if I can do regular drawers or shelves instead. Id love your insight!!
Kris Jarrett says
Hi! We didn’t put anything wet inside the PAX drawers because it would definitely damage them based on the materials they’re made from. If you use drawers like I did and plan to put anything damp inside, I’d recommend using a plastic or metal liner on the drawer bottom. Hope that helps!
Keith Herrman says
Great solution if you can actually get all of the pieces you need from Ikea.
Anonymous says
May I ask where you found the woven baskets? Super job, thanks for sharing.
Michelle says
Beautiful! Do you have ideas on small entryway drop zones? I currently have 5 hooks and a shelf but it doesn’t look put together at all. I found ideas for board and batten with hooks but curious if you have any suggestions? Our space is about 5 feet wide x 9 ft tall with a chair rail in the middle.
MK says
Where are the baskets from? What are their dimensions?
Jessica says
Love this! Looking forward to using your pics as inspiration in my laundry room! Did you use the 79″ Pax frames? Or the 94″? Thanks so much!
Danielle Krawiec says
When did you buy the komoplement pull out clothes rail? I can’t seem to find it on the IKEA website and it is exactly what I am looking for.
Kris Jarrett says
I just bought these for another closet we redid less than a year ago but I don’t see them on their website anymore either – can’t believe they would discontinue those! I would give eBay a shot to see if someone is selling them there!
Jenn says
Which cabinets did you use on the opposite side above the washer and dryer?
Kris Jarrett says
You can find those details in this post: https://www.drivenbydecor.com/ikea-laundry-room/
Lisa says
Incredible! You have absolutely inspired me to finally add a “closet” to our entryway, currently a mess with shoes on the floor and jackets hanging on wall hooks. Definitely something I want to change before the heavy coats come back out this fall/winter! Based on the funny width of 53 inches, I am going to have extra wide filler pieces between the wall and the PAX system (along with adding crown above). Any tips on how to make this filler magic happen? Materials, etc? Thank you!!
Stacey says
How did you bolt them together?
Kris Jarrett says
We connected them with screws and small nuts that went through the predrilled holes – we added one at the top and one at the bottom. Be sure and plan out where you are putting shelves, etc. in your wardrobes first though so that you know which holes aren’t going to be in use.
Nippon says
Amazing work!! Looking for more from you.
Laura Killion says
Hi Kris,
I love everything you do!! I’ve been looking for an older post about your daughter’s closet makeover. My daughters closet is very similar. Hopefully, after reading the post I will have the motivation and inspiration to get my daughter’s closet looking better.
Thank you,
Laura
Kris Jarrett says
Thank you so much Laura! This post has details and links to the makeovers I did on the closets in both of my girls’ rooms: https://www.drivenbydecor.com/closet-door-ideas/