• Skip to primary navigation
  • Skip to main content
  • Skip to primary sidebar
  • Home
  • Home Tour
    • Master Bathroom
    • Kitchen
    • Kitchen Eat-In Area
    • Family Room
    • Living Room
    • Home Office
    • Laundry Room
    • Master Bedroom
    • Craft Room
    • Dining Room
    • Garage
    • Guest Room
    • Guest Bathroom
    • Patio
    • Powder Room
    • Teen Blue & White Bedroom
    • Teen Boho Chic Bedroom
  • Projects
    • Room Remodels
    • DIY Projects
    • Decorating Tips
    • Cleaning
    • Organizing
  • Subscribe
  • Shop My Faves
  • Instagram
  • About
    • Contact
    • Meet Kris
    • FAQs
    • Media
    • Disclosure
    • Privacy Policy

Driven by Decor logo

menu icon
go to homepage
subscribe
search icon
Homepage link
  • Home
  • Home Tour
    • Master Bathroom
    • Kitchen
    • Kitchen Eat-In Area
    • Family Room
    • Living Room
    • Home Office
    • Laundry Room
    • Master Bedroom
    • Craft Room
    • Dining Room
    • Garage
    • Guest Room
    • Guest Bathroom
    • Patio
    • Powder Room
    • Teen Blue & White Bedroom
    • Teen Boho Chic Bedroom
  • Projects
    • Room Remodels
    • DIY Projects
    • Decorating Tips
    • Cleaning
    • Organizing
  • Subscribe
  • Shop My Faves
  • Instagram
  • About
    • Contact
    • Meet Kris
    • FAQs
    • Media
    • Disclosure
    • Privacy Policy
    • Facebook
    • Instagram
    • Pinterest
  • ×

    Updated: Jul 21, 2025 by Kris Jarrett

    Our IKEA Laundry Room Cabinets

    New IKEA laundry room cabinets plus new lighting & storage solutions completely transformed our laundry room!

    After knocking out our kitchen remodel “before” and “after” a few years back, I decided it was time to give our sad looking laundry room a much-needed makeover. We added a ton of extra storage to it using IKEA cabinets & wardrobes and it made SUCH a difference!

    Today I’m sharing all the details of the IKEA additions to our laundry room plus all the other little extras we added to it as well. Hopefully you’ll find an idea or two you can use for dressing up your own laundry room! (post includes commissionable links; for more information, see my full disclosure statement {here})

    Our Before and After

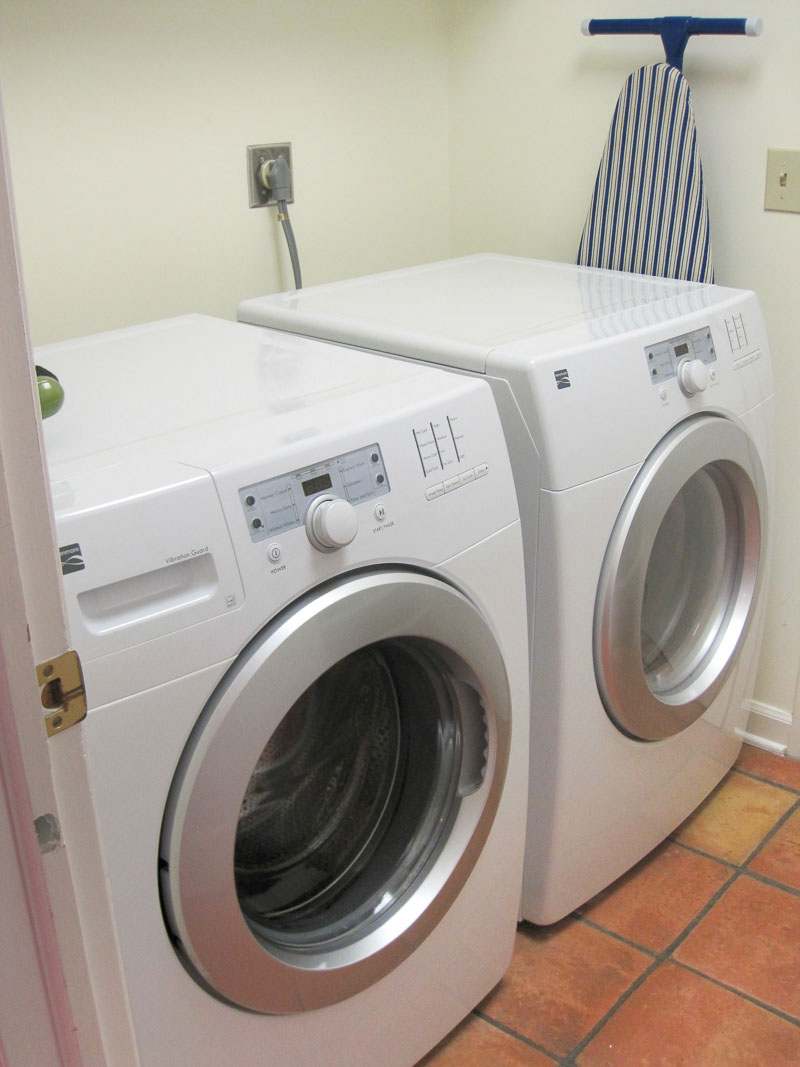
    Our laundry room wasn’t very big (7’5″ x 5’6″) and when we bought our house there was some prime real estate that was going unused including the wall above the washer and dryer that was entirely bare with no cabinetry or shelving. Here’s the “before” of how it looked:

    Our laundry room before its makeover!

    And here’s that same space after our makeover:

    Love the IKEA cabinets above the washer and dryer in our laundry room!
    We transformed the look of our laundry room with Ikea cabinets and wardrobes!

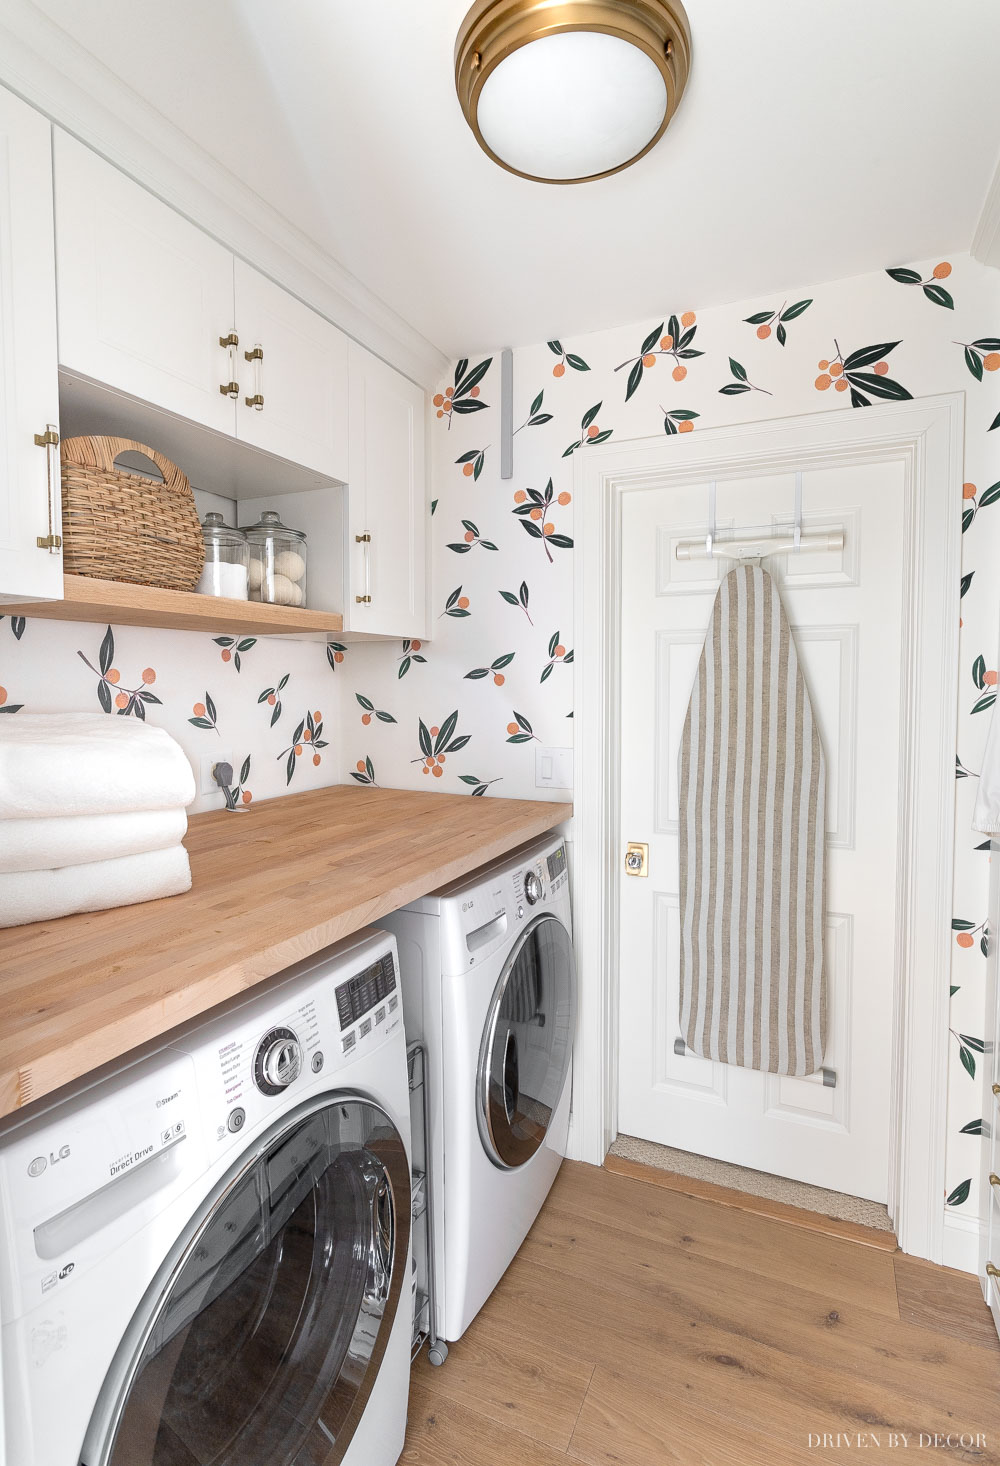
    Not only is it a much prettier place to do laundry but it’s so much more functional and full of storage space too! I wanted to keep the cost of this mini makeover low so used IKEA products for all of our new laundry room storage.

    The IKEA Laundry Room Cabinets We Used

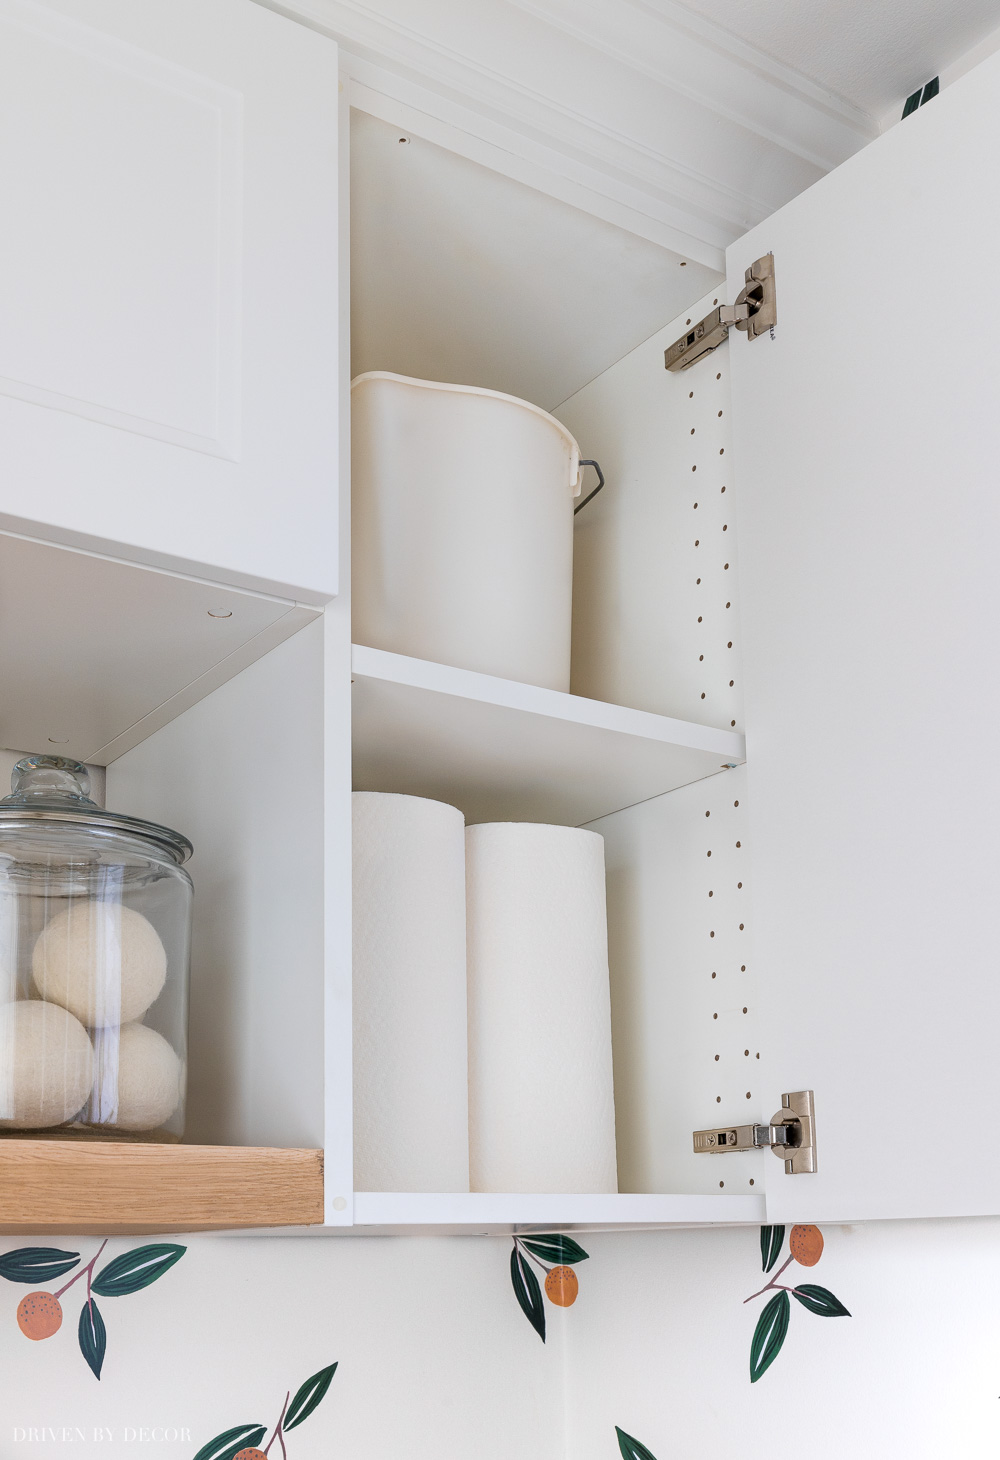
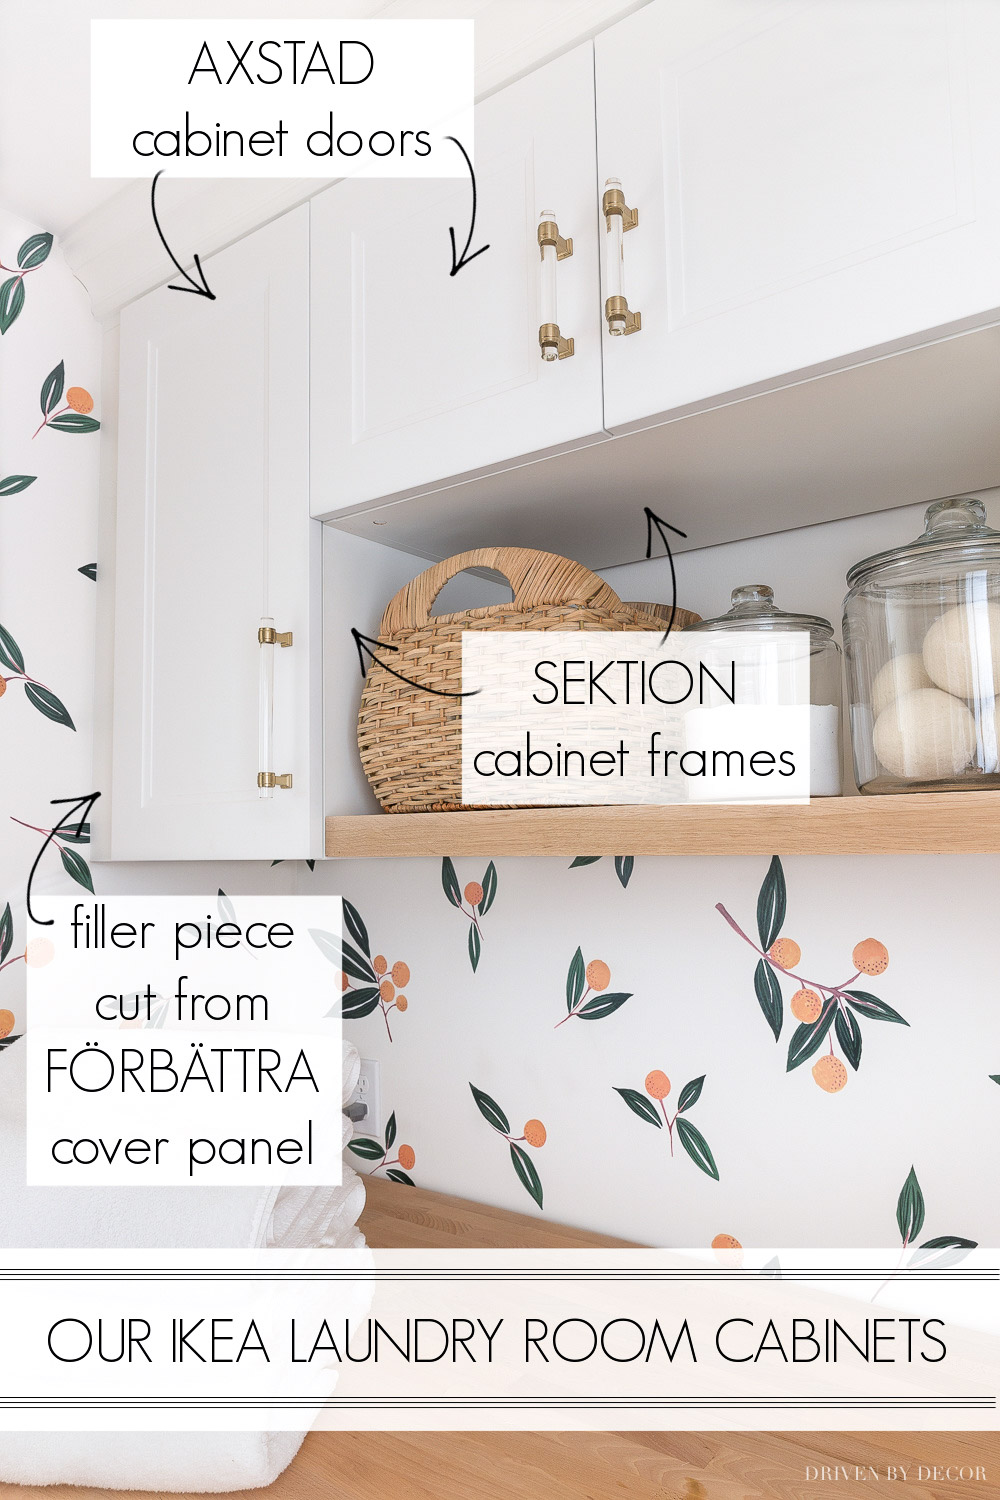
    Above the washer and dryer we added IKEA SEKTION wall cabinet frames with AXSTAD doors. Specifically we used {this 30″ SEKTION frame} in the middle with two of {these AXSTAD doors} and one of {these 15″ SEKTION frames} on each end with {these AXSTAD doors}:

    We used Ikea Sektion cabinet frames and Axstad doors to create storage over our laundry room washer and dryer!

    When you get cabinets from Ikea, everything is ordered separately so you also need to buy interior shelves and hinges for the cabinet doors. I used {these Utrusta hinges} and {these Utrusta shelves}):

    Inside our Ikea Axstad & Sektion laundry room cabinets

    Cabinet Installation

    The IKEA cabinets come disassembled but are relatively quick and easy to put together (under 30 minutes per cabinet). Once assembled, cabinet frames are hung on {this SEKTION metal suspension rail} which actually makes hanging them pretty simple. First you mount the suspension rail to the wall, ensuring it’s level. Then you hang the cabinet frames on the rail and lock them in place.

    To give our cabinets a more finished, built-in look, we added small filler pieces on each end of the cabinet (cut from {this FORBATTRA cover panel}) and a strip of crown molding at the top:

    The Ikea products we used for laundry room storage! A great inexpensive solution!

    Adding Open Shelving to IKEA Laundry Room Cabinets

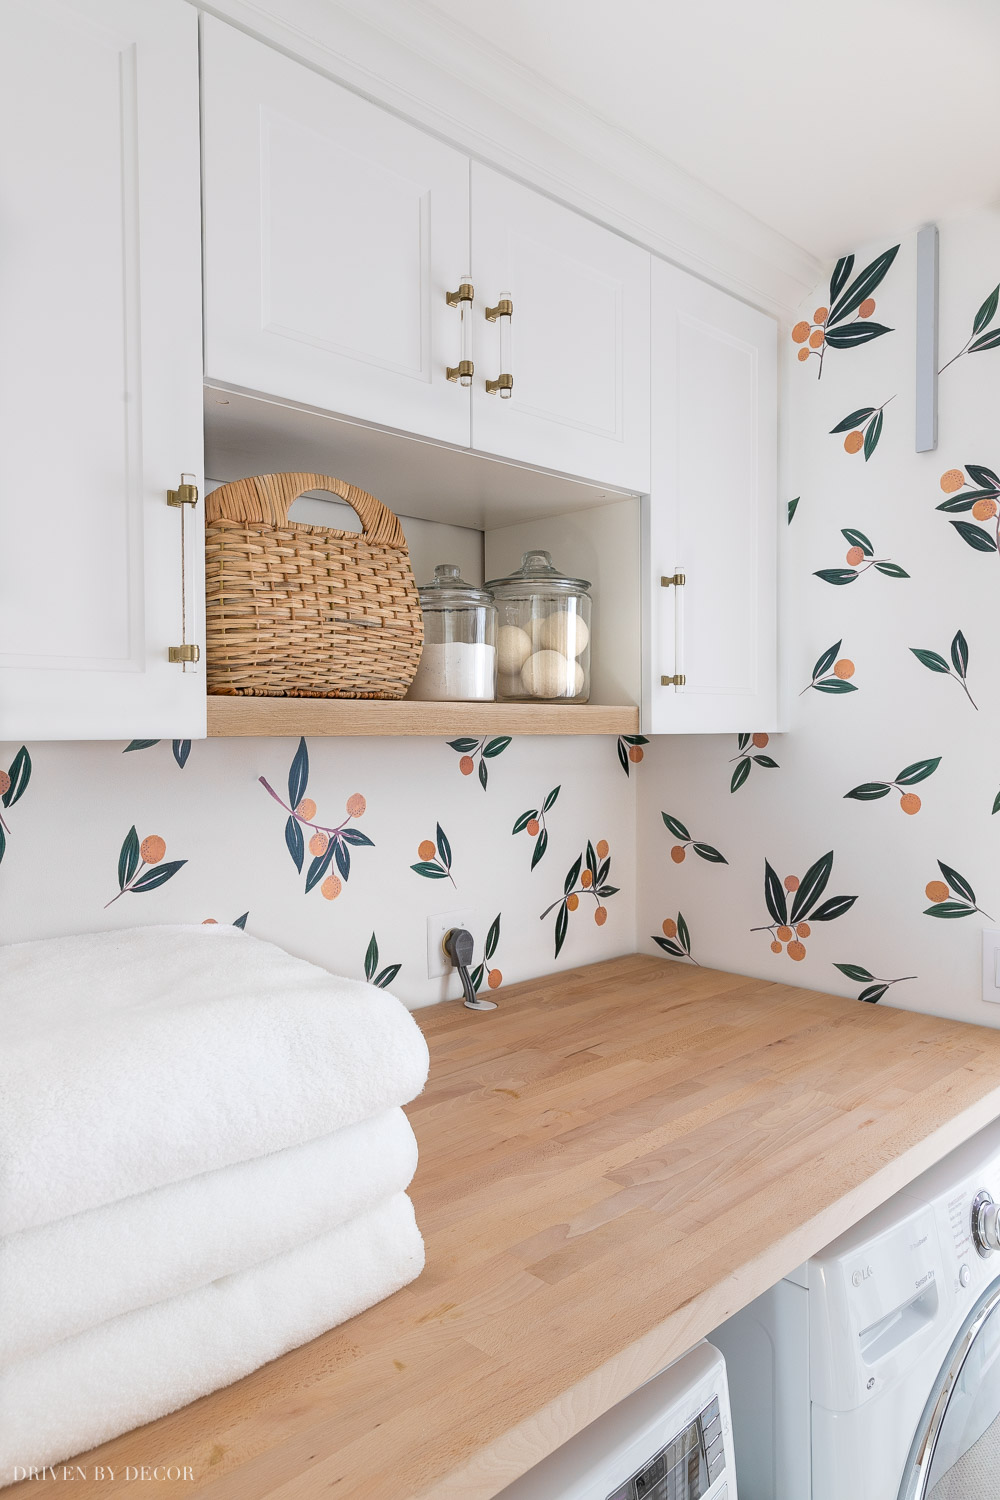
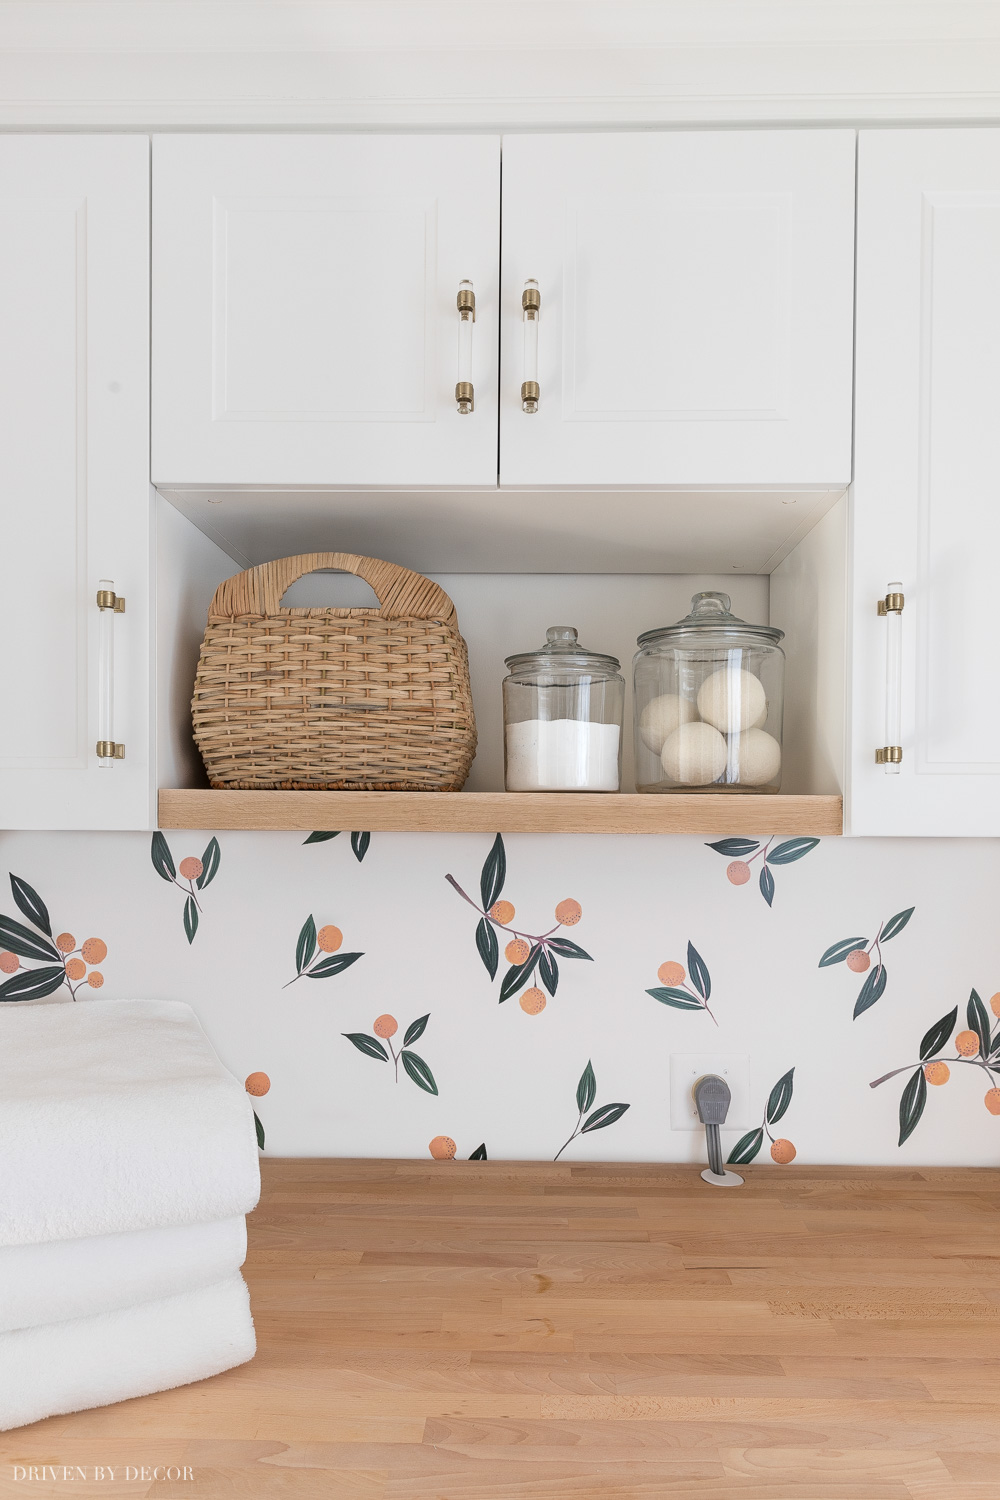
    I wanted open shelving between the two end cabinets and while Ikea has several wood shelf options, I luckily had a leftover piece of the white oak boards from creating these floating corner shelves in our kitchen:

    Faux hydrangeas that look real! Love them in a pitcher on this open kitchen shelving!

    So that’s what I used! The oak board was cut to size to fit between the two end cabinets and then secured with screws going through the inside of the cabinets into the ends of the board. It holds a woven basket (with socks that have lost their mate 😊) and a pair of {these glass jars} holding powder detergent and my wool dryer balls:

    I added a wood shelf between the Ikea cabinets in our laundry room for open storage!

    Cabinet Hardware

    The finishing touch to my new IKEA laundry room cabinets was adding {these acrylic pulls} in the Golden Champagne finish – love them!

    LOVE these acrylic cabinet pulls that totally dress up my Ikea laundry room cabinets!

    Butcher Block Countertop

    The last major addition to this side of the laundry room was a large piece of butcher block above the washer and dryer. It sits on simple wood cleats (horizontally mounted wood strips) installed on the back and side walls. Having this flat surface for sorting and folding laundry has been a game changer:

    This Ikea wood countertop (butcher block) added a great space to fold and sort clothes in our laundry room!

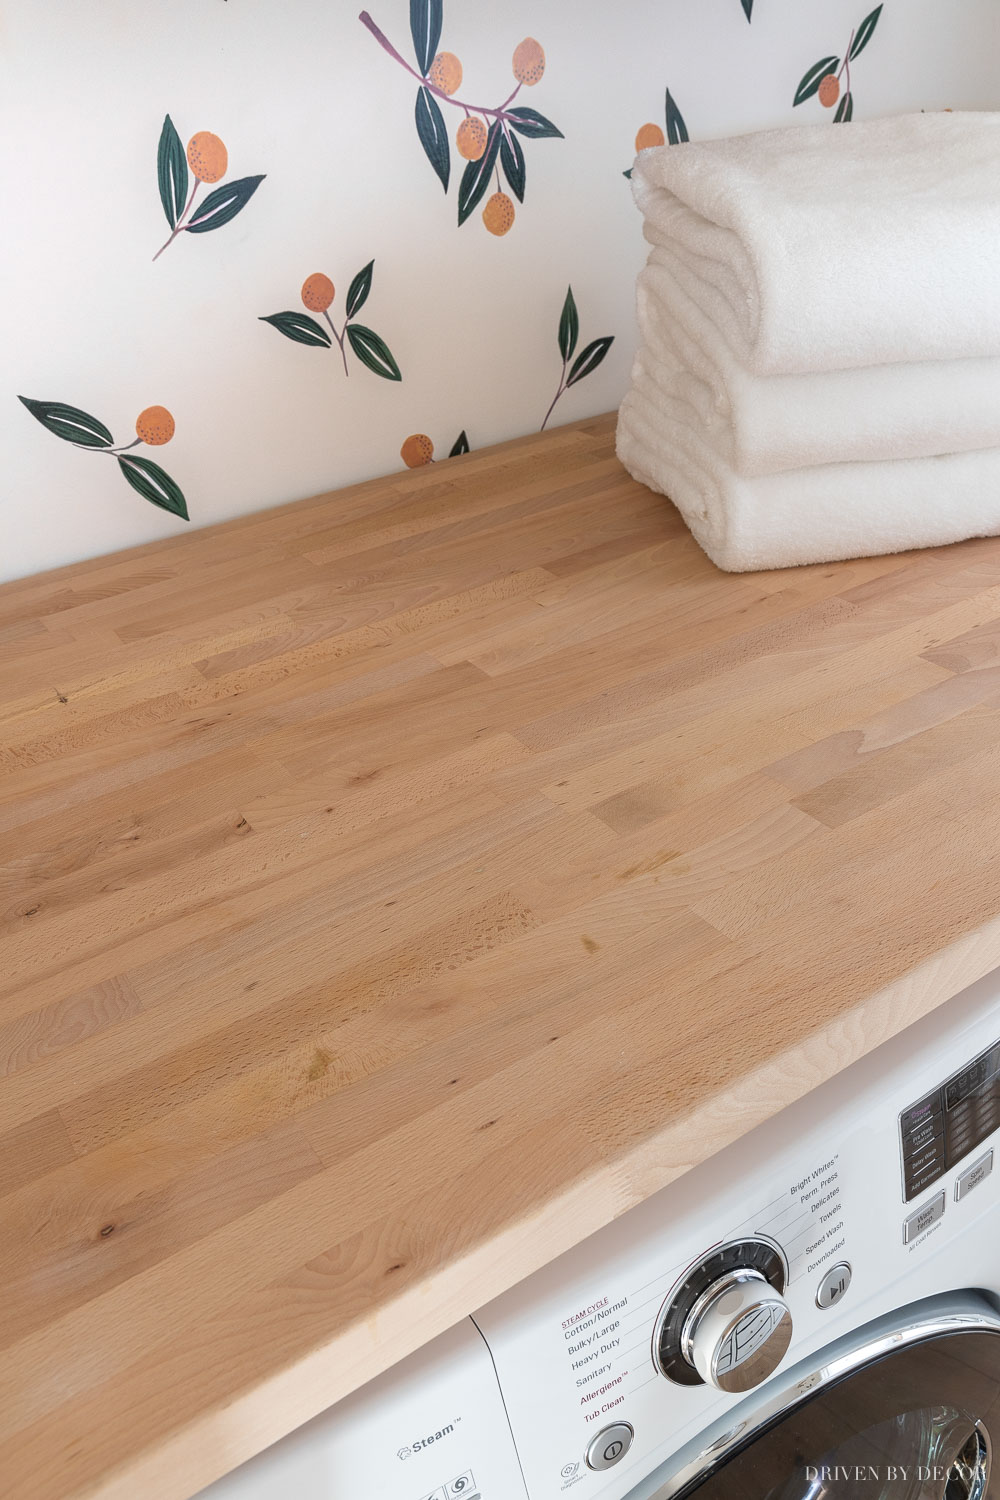
    I bought the butcher block from IKEA and unfortunately they no longer carry it, but {this countertop} is similar.

    Other Additions to Our Laundry Room

    Some other smaller additions to our laundry room include an over the door ironing board holder similar to {this one} and {this retractable clothes rack} we mounted on the wall. It’s great for air drying Jeff’s shirts – you simply pull up on it from the bottom and it opens up to give 10″ of hanging space:

    Love this retractable clothes rack for hanging clothes to dry in our laundry room!

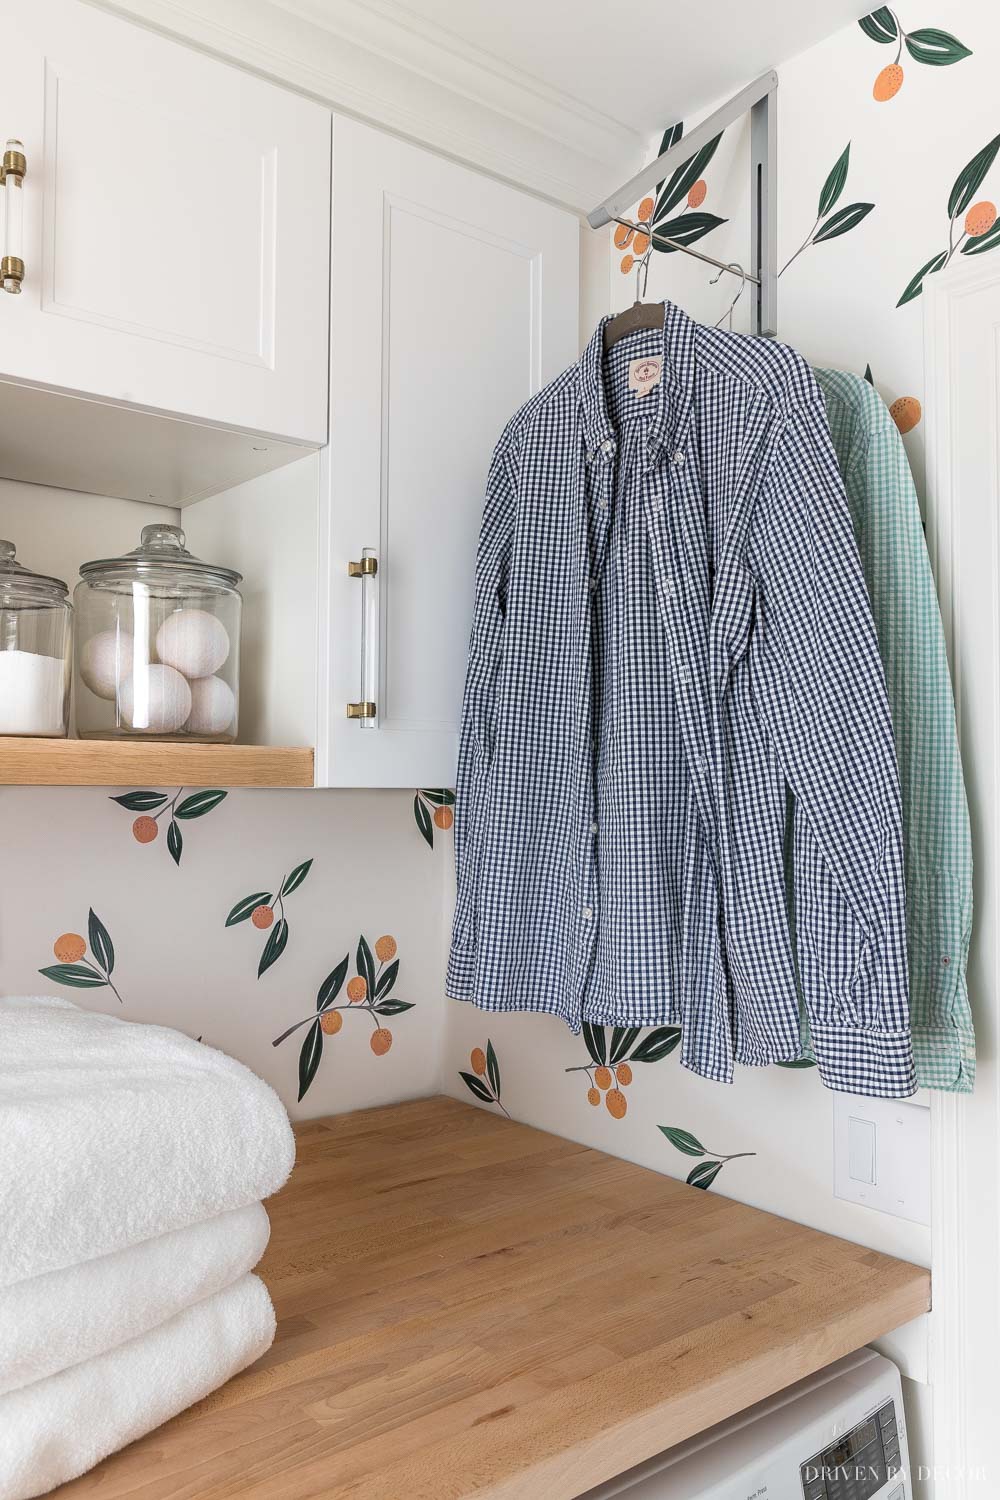
    When I bought mine it only came in silver but it’s now available in white too (which is the color I wish I had!).

    We also added {this skinny rolling cart} which fits perfectly in the gap between our washer and dryer:

    This slim rolling cart between our washer and dryer is the perfect storage solution for my most used laundry products!

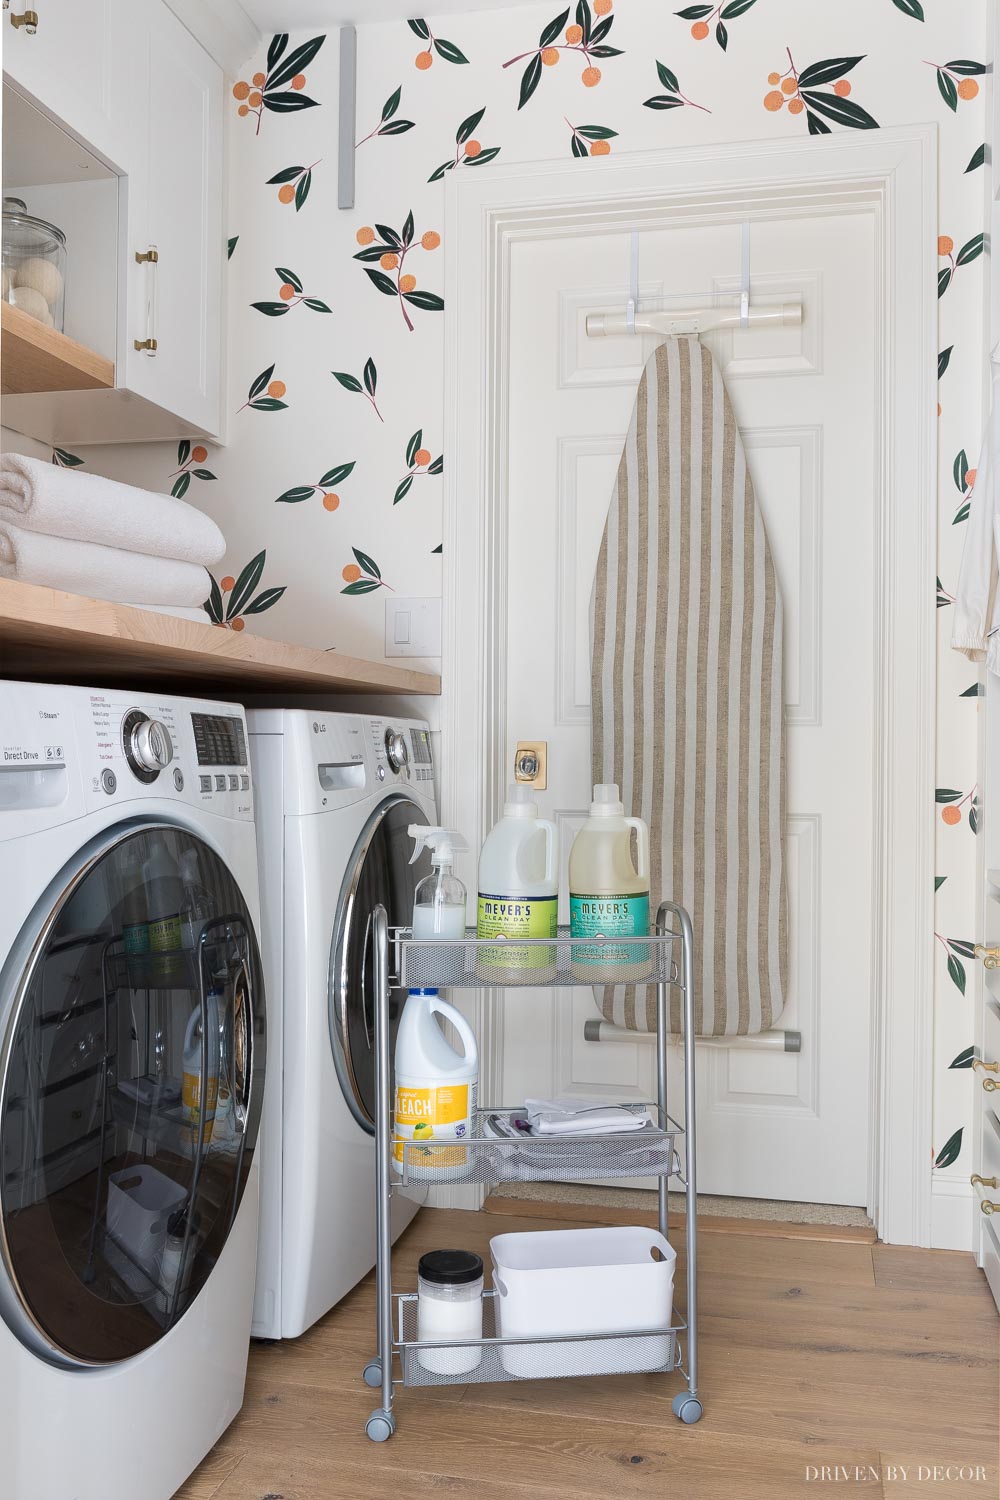
    Having the rolling cart makes it easy to grab my laundry essentials including detergent, bleach, stain spray, and {these delicates bags}. I also have one of {these small bins} on the bottom shelf for dryer lint:

    A rolling rack between your washer and dryer is a simple way to add extra storage in a small space!

    Check out my post on laundry room storage ideas for more details on how I organized this space.

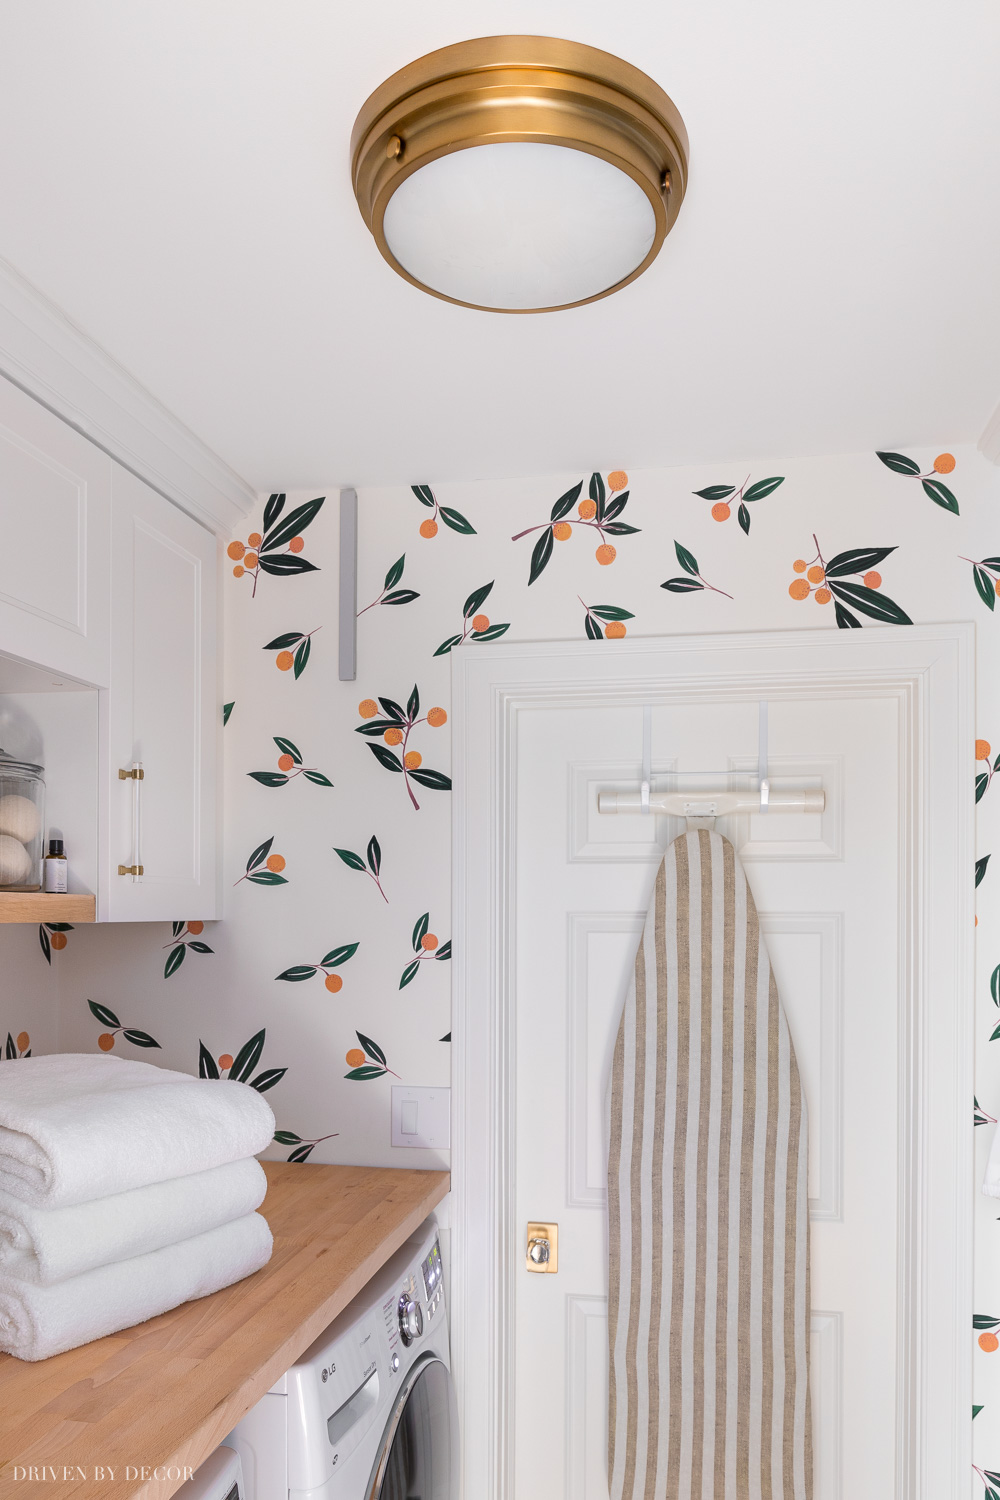
    I’m sure you’ve noticed the cute tangerines on the wall too – those are simple peel and stick decals that I bought {here}! They’re so easy to put on and they come off without damaging your walls whenever you’re ready for a change. I share the step by step details of installing them in my post on vinyl wall decals.

    The cutest vinyl wall decals that I used to dress up our Ikea laundry room

    I also swapped out our ceiling light for {this simple but stylish flush mount}:

    Love this simple but stylish flush mount ceiling light in our laundry room!

    The other side of our laundry room underwent some major changes too – the previous homeowner had open shelves that went halfway up the wall holding their kitchenware and shoes:

    The "before" of the space that became our coat closet

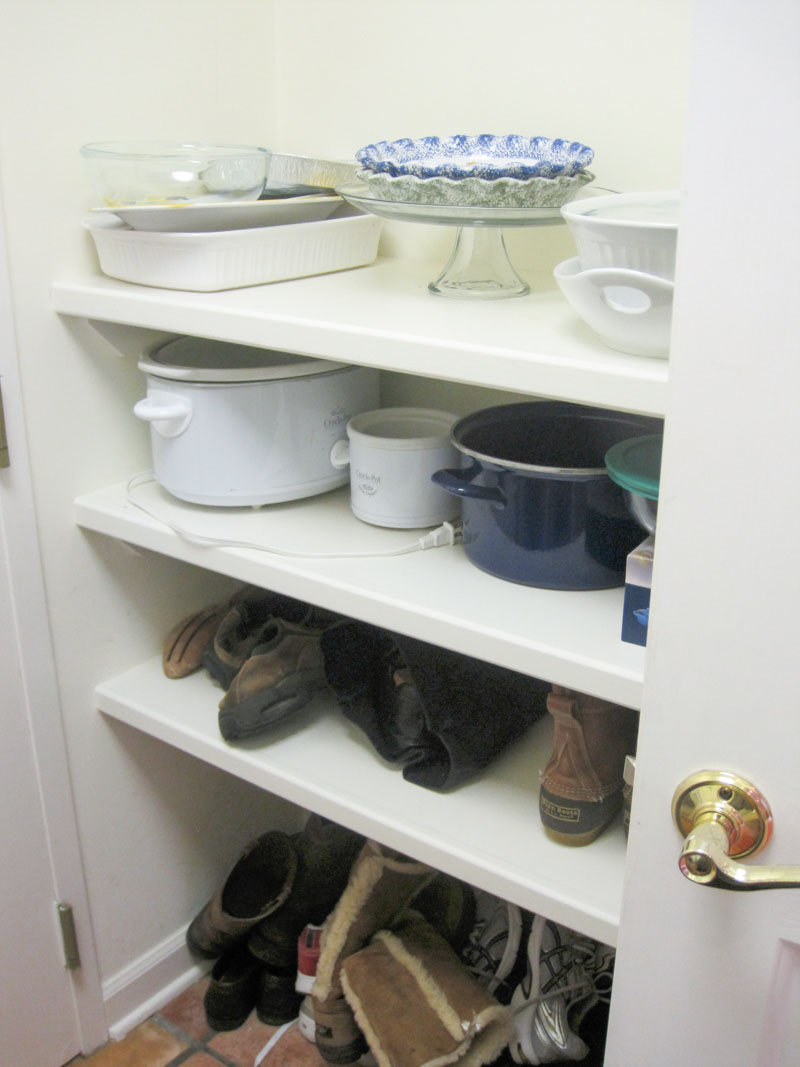
    We removed the shelving and installed IKEA PAX wardrobes to create a cubbies for coats and drawers for shoes (we have no coat closet so space for coats was much needed!). Here’s what that side of the laundry room looks like today:

    Ikea Pax wardrobes installed in our laundry room to create storage for shoes and coats!

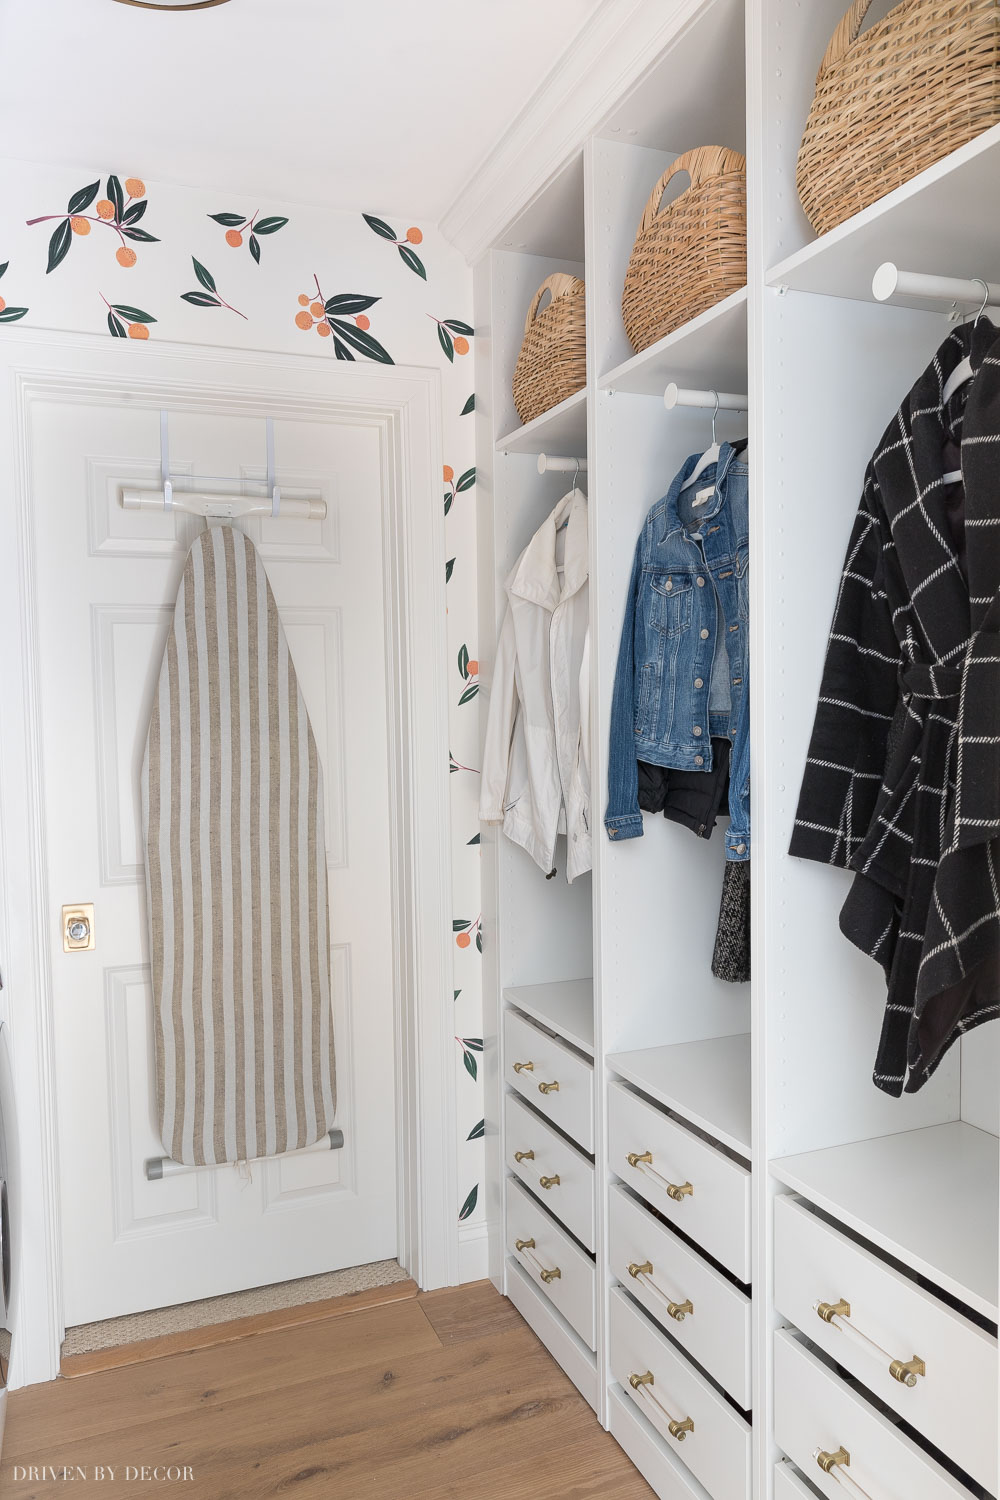
    I shared all of the details of how we used PAX wardrobes to build a coat & shoe storage space in my post on creating IKEA mudroom.

    And if you’re wondering about the change in flooring from Saltillo tile to wood, we made this change as part of our kitchen renovation since our kitchen and laundry room floors connect to one another. Check out my post on our Hallmark wood floors if you want more details on my engineered hardwoods and how they’ve held up since we installed them.

    Thanks for taking a minute to stop by today and take a peek around our laundry room! If you want to see another big makeover project I did using Ikea products, check out our master closet makeover and Ikea PAX closet system review}.

    A tour of our IKEA PAX closet + my honest review!

    XO,

    Want to save this post?

    We'll email this post to you, so you can come back to it later!

    • Share
    • Email

    ✉️FREE EMAIL SERIES ✉️

    5 Secrets to Reinventing Your Home on a Budget

    Simple tips to instantly transform five rooms in your home!

    Reader Interactions

    Comments

      Leave a Reply Cancel reply

      Your email address will not be published. Required fields are marked *

      This site uses Akismet to reduce spam. Learn how your comment data is processed.

    1. Lynn says

      February 07, 2021 at 2:56 pm

      Very helpful post. Thanks for all the information.

      Reply
    2. Vina Galetto says

      February 07, 2021 at 3:00 pm

      Wow! Great job!!! Really looks professional, practical and pictorial.
      I am in the process of planning a kitchen and laundry room remodel and am delaying because of sticker shock. What did this cost? Materials and labor? How much did you do yourself? How much did a contractor do?
      Thank you.

      Reply
      • Kris Jarrett says

        February 08, 2021 at 12:01 pm

        Hi Vina – honestly I don’t have a total cost because I did the room in pieces at various times over the course of a few years. I did link the exact cabinets and other Ikea supplies I used so you should be able to get an idea about materials cost that way. I bought everything, put all of the Ikea cabinets, wardrobes, drawers, etc. together, did the painting, and added the decals. My contractor hung the cabinets, installed the cleat for my butcher block, and cut it to size. My contractor labor costs were pretty minimal since the time consuming part is the planning and assembling.

        Reply
    3. Jennifer Corea says

      February 07, 2021 at 3:06 pm

      Chris
      I love everything you do!!
      Sometime can you repost your favorite chandeliers. I am looking for one for a master bedroom
      (Vaulted one side ceiling )
      Thank you and Have a Happy Valentines Day!!

      Jennifer

      Reply
      • Kris Jarrett says

        February 08, 2021 at 12:03 pm

        Thanks Jennifer! Here’s a link to my chandelier post (it’s for dining rooms but several could work in master bedrooms too): https://www.drivenbydecor.com/dining-room-chandeliers/ Also check out this post on wood bead chandeliers which can be a great choice for a bedroom: https://www.drivenbydecor.com/wood-bead-chandelier/

        Reply
    4. Tara says

      February 07, 2021 at 3:09 pm

      As always, it looks stunning! I especially like the shelving above the machines.
      I wish I could do a wood block over the machines, but I’m dead set against a front loading washing machine and will only use a top loader. I wish there were a way to incorporate that element with a top loader.

      Reply
      • Kris Jarrett says

        February 08, 2021 at 12:04 pm

        I hear you! There are definitely some things I don’t love about a front loader but it’s so nice to be able to have the countertop space above them!

        Reply
    5. Gabrielle says

      February 07, 2021 at 3:18 pm

      Looks beautiful.I also used Ikea for my laundry room. It ‘s part of the basement need to finish it.

      Reply
    6. Michele M. says

      February 07, 2021 at 3:52 pm

      Your laundry room is so refreshed and stylist and smartly done!

      I think it takes the “chore” out of doing a tedius task often going into a refreshed space.

      We just painted our laundry room from an awesome fun kelly green to a greige for a change – while not as fun it looks so much larger and brighter now. These kinds of changes – whether large or small, as mine, is a nice way to refresh a fairly mundane area of a home. Yours has been taken to a fabulous new level. Well done!

      Reply
      • Kris Jarrett says

        March 08, 2021 at 9:59 pm

        I totally agree – it’s so nice to have a refresh on even the smallest spaces in your home!

        Reply
    7. Stacy says

      February 07, 2021 at 4:06 pm

      This is so great! Love the makeover. You do an awesome job! Do you happen to have a post about you attached your open shelves over your tile wall in the kitchen? Thank you for all you share!

      Reply
      • Kris Jarrett says

        March 08, 2021 at 9:56 pm

        Sure Stacy – this post has those details for you: https://www.drivenbydecor.com/diy-floating-corner-shelves/

        Reply
    8. Robin Warzywak says

      February 07, 2021 at 6:38 pm

      Thanks for sharing your awesome laundry room with us! Do you recall how many sets of decals that you used?

      Cheers!
      Robin

      Reply
      • Kris Jarrett says

        February 08, 2021 at 11:51 am

        Hi Robin – I ended up needing 3 rolls of the decals (but only used about 1/4 of the 3rd roll).

        Reply
    9. Anne says

      February 07, 2021 at 9:12 pm

      You did a fantastic job! Thanks for sharing it.

      Reply
    10. Kristal R. says

      February 08, 2021 at 11:24 am

      I just love the laundry room makeover! It’s cute and simple. I somehow missed your closet post, gotta look at that!

      Reply
    11. Margot says

      February 08, 2021 at 11:30 am

      Love how this turned out! It looks so much like the laundry area in my son’s new home – except theirs is also the entry to the home from the garage! I’ll be forwarding this to him for inspiration!

      Reply
    12. Ann-Marie says

      February 08, 2021 at 12:11 pm

      This was so fun to read through!!! What an inspiring end product. Well done. (IE: I never leave comments on posts (of anyone’s)….but this one demanded a moment of ‘Ahhh!’

      Reply
    13. Karen B. says

      February 08, 2021 at 9:38 pm

      Kris,
      You are amazing. I love the laundry room makeover and you are very clever to figure out all of these details. It looks amazing.
      I always enjoy seeing the creative use you employ to redo a space for the better.
      xo,
      Karen

      Reply
    14. Holly O’Keeffe says

      February 18, 2021 at 3:45 am

      This is gorgeous! I love everything about it! Did you purchase the crown molding to finish the top of the cabinets from a hardware store?

      Reply
      • Kris Jarrett says

        February 19, 2021 at 3:32 pm

        Yes I just got it from our local hardware store that sells all types of moldings.

        Reply
    15. Valerie says

      July 14, 2021 at 12:40 am

      Most of the countertops i’m finding are not deep enough to sit flush with washer and dryer, did you have that problem or can you suggest where to find one that is deep enough.

      Reply
      • Kris Jarrett says

        July 20, 2021 at 12:59 pm

        I knew I wanted butcher block so really didn’t look around at too much else but my IKEA butcher block was plenty deep!

        Reply
        • Marie says

          February 22, 2022 at 12:38 pm

          Hi! Just wondering how deep is your butcher block countertop?

          Thanks!

          Reply
          • Kris Jarrett says

            February 22, 2022 at 4:48 pm

            Unfortunately I don’t recall the exact measurement and we’ve since moved from that house 🙂

            Reply
    16. Kiera says

      August 03, 2021 at 11:01 pm

      Love your laundry room! Would love to do the same cabinets and pulls. What size pulls did you purchase for the four above the washer and dryer?

      Reply
    17. Kim Dockman says

      September 08, 2021 at 9:18 am

      Love this laundry room! What color paint did you use?

      Reply
    18. kate says

      October 07, 2021 at 1:39 pm

      Hi there, love this! I was hoping you can help with the cord? You’re laundry cord goes through the butcher block, but you have something that protects it in the hole? do you know where I could get that? or what it’s called? THANK YOU

      Reply
    19. Samantha tali says

      January 31, 2022 at 12:27 am

      I love reading your blogs. I’m going to try to duplicate most of what you did for your laundry cabinets. Would I need one or two of forbattra cabinet fillers? I’m not really sure how you used them for fillers, but hoping my guy doing it can figure it out. Thanks!

      Reply
      • Kris Jarrett says

        January 31, 2022 at 5:24 pm

        Thank you! Everything depends on the width of your space but we only needed one piece of Forbattra to do ours!

        Reply
    20. Jennifer says

      February 03, 2022 at 3:51 pm

      Beautiful! What kind of flooring did you use?

      Reply
      • Kris Jarrett says

        February 04, 2022 at 9:50 am

        They are engineered oak hardwoods – the flooring in our laundry room is continuous with what we have in our kitchen and kitchen eat-in so that go changed when we did our kitchen remodel. There are more details on the exact flooring we chose here: https://www.drivenbydecor.com/hallmark-wood-floors-review/

        Reply
    21. Christina says

      February 12, 2022 at 3:56 pm

      This looks amazing! I am trying to do something similar in my laundry room. Would you be able to tell me the dimensions of the open oak shelf between the two cabinets?

      Thank you!

      Reply
      • Kris Jarrett says

        February 17, 2022 at 11:43 am

        Thank you! It’s about 30″ long.

        Reply
    22. Claudia says

      March 11, 2022 at 8:26 am

      Wonderfully done, I will take some of your ideas to integrate in my project !

      Reply
    23. Michelle Hill says

      June 08, 2022 at 6:49 pm

      I have searched high and low for those baskets ever since I saw this beautiful post! Do you recall where you bought them from or have recommendations for similar ones? Thank you!

      Reply
    24. Dwayne Johnson says

      July 05, 2022 at 4:22 pm

      Hello,

      I truly appreciate the time you have taken to share your make over and all the resources you sourced. I am in Canada and I was able to find the same stuff at my local Ikea.
      My wife and I are doing our best to replicate your make over in our tiny laundry room.
      I have been looking for dimensions particularly when it come to selecting the right width for the Sektion frames.
      The width (going across) of our room is 66.25″ and I’m not sure what width you were working with in your laundry room, but it seems if we went with the same frames you used 30″ center and 2x 15″ right and left frames that is 60″ in total leaving us with an extra 6″…I am thinking to go with a 36″ x14 3/4×15″ center frame, which would leave us with just 1/4″ .
      I am definitely a novice at this…not handy at all. Any help with understanding dimension would be greatly appreciated. Thank you.

      Dwayne J

      Reply
    25. Giuliana says

      July 20, 2022 at 6:09 pm

      Hello there – beautiful laundry!! we are renovating our garage as I type, and had already purchased the same cabinets for the laundry area. Do you have any guidance on installing the crown molding above? the doors are flush to the top of the cabinet, so not sure how exactly to install.

      Thank you for your time!

      Reply
    26. Manish says

      August 21, 2022 at 1:48 pm

      Hello- we have the same laundry machines and a butcher block would need to be at least 34 inches width to cover the machines. Ikea’s is 18 inches. Did you attach two blocks together?

      Reply
    27. Paul Freeman says

      March 03, 2025 at 10:20 am

      Beautifully done work in your laundry room! An excellent use of all the extra real estate available to you.

      It has inspired my wife and I to do something similar as our dimensions above the appliances are the same as yours: 5’6”.

      I’d like your expert input. The cabinets and the filler pieces you used amount to maybe 5’2”. What did you do with the extra 3-4” of space?

      Thank you so much!

      Reply
      • Kris Jarrett says

        March 15, 2025 at 11:31 am

        Hi! I used one 30″ cabinet and two 15″ cabinets (total of 5 feet of cabinetry) that we centered on the wall and then we added 3″ fillers on both ends to get to the 5’6″ width.

        Reply

    Primary Sidebar

    ✉️FREE EMAIL SERIES ✉️

    5 Secrets to Reinventing Your Home on a Budget

    Simple tips to instantly transform five rooms in your home!

    Meet Kris

    Photo of Kris Jarrett

    Follow Me

    • Facebook
    • Instagram
    • Pinterest
    All images on DBD are copyrighted and taken by me unless otherwise noted. If you'd like to use any of my images, please request their use via my Contact page.

    I am a participant in several affiliate advertising programs (including the Amazon Associates program) and earn fees from qualifying purchases. For more information, see my full disclosure statement {here}.

    To view my privacy policy, go {here}.

    Copyright © 2025 · Driven by Decor | Privacy Policy