

I’m sharing all the details about glass shower enclosures including cost and which options might be worth it and which aren’t!
After sharing our bathroom remodel before and after, something many of you wanted more info about is our glass shower enclosure. Today I’m dishing all of those details including the extra options I chose, why I chose them, and the full cost breakdown too. (post includes commissionable links; for more information, see my full disclosure statement {here})
Before jumping in, here’s a reminder of what our glass shower enclosure looks like:
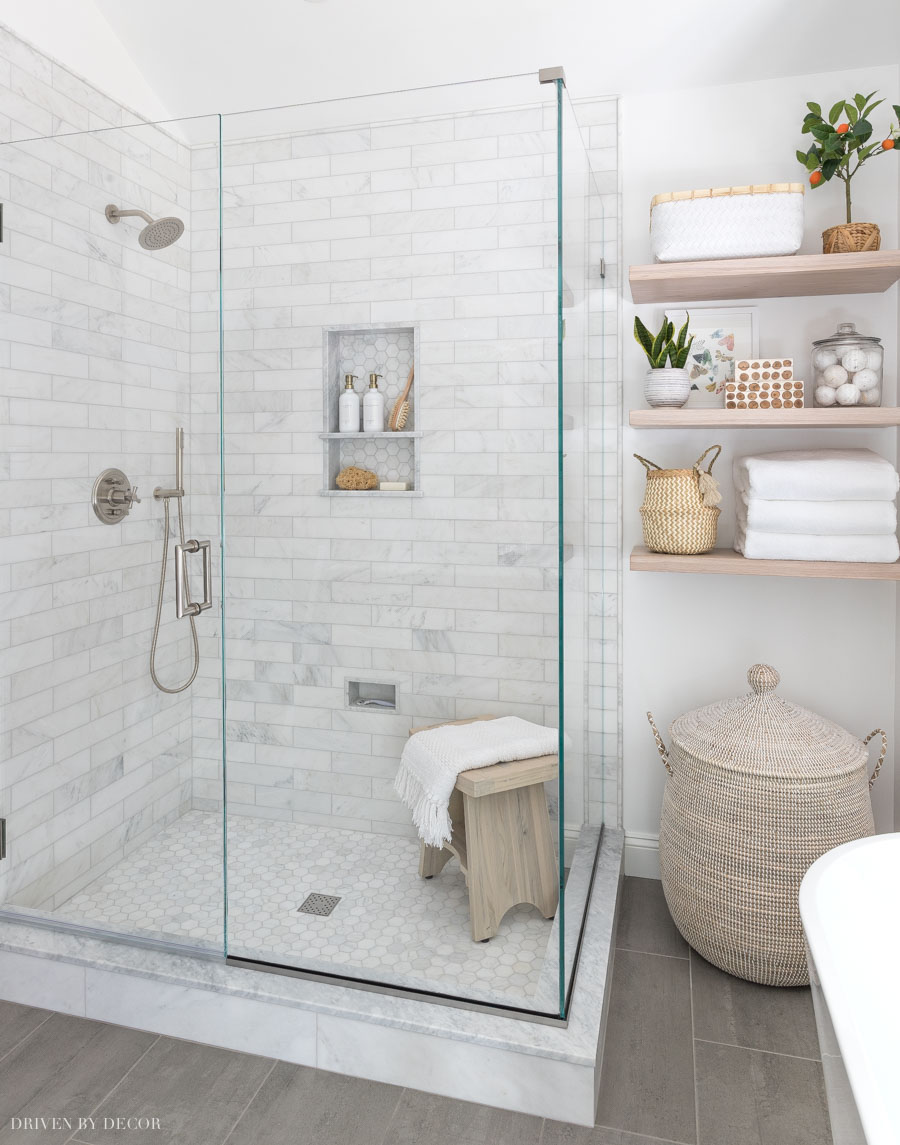
Sources links: Pump bottles (16 oz white/gold) | Body brush | Sea sponge | Shower bench | Large lidded basket for hamper | See my post on our bathroom floating shelves for those details & sources
I chose a simple shower design without a built-in shower bench (I never sat on the bench in our old shower and like the clean-lined look without it!). Our frameless glass shower enclosure is 60″ long x 37″ wide with a 28″ door. The price was definitely higher than I expected! The base price I was quoted for the shower enclosure + installation was $2400 (note that I got multiple bids and they were all quite close to each other but prices in Connecticut are higher than most other areas of the country).
My quote was for a frameless unit with standard ⅜″ tempered glass, brushed nickel wall hinges, non-mitered door, and standard 6″ pull. But where they really get you is with all of the extras – there were a ton of options and choices to make. I’ll share each of them along with the additional cost and what I chose to add on (and what I decided wasn’t worth it).
Frameless Shower Clips vs. U-Channel
One of the biggest design decisions I made was whether to go with frameless shower clips at all points where the glass meets the tile or to use U-channels as supports for the glass panels. Here’s an example of your typical shower clip:
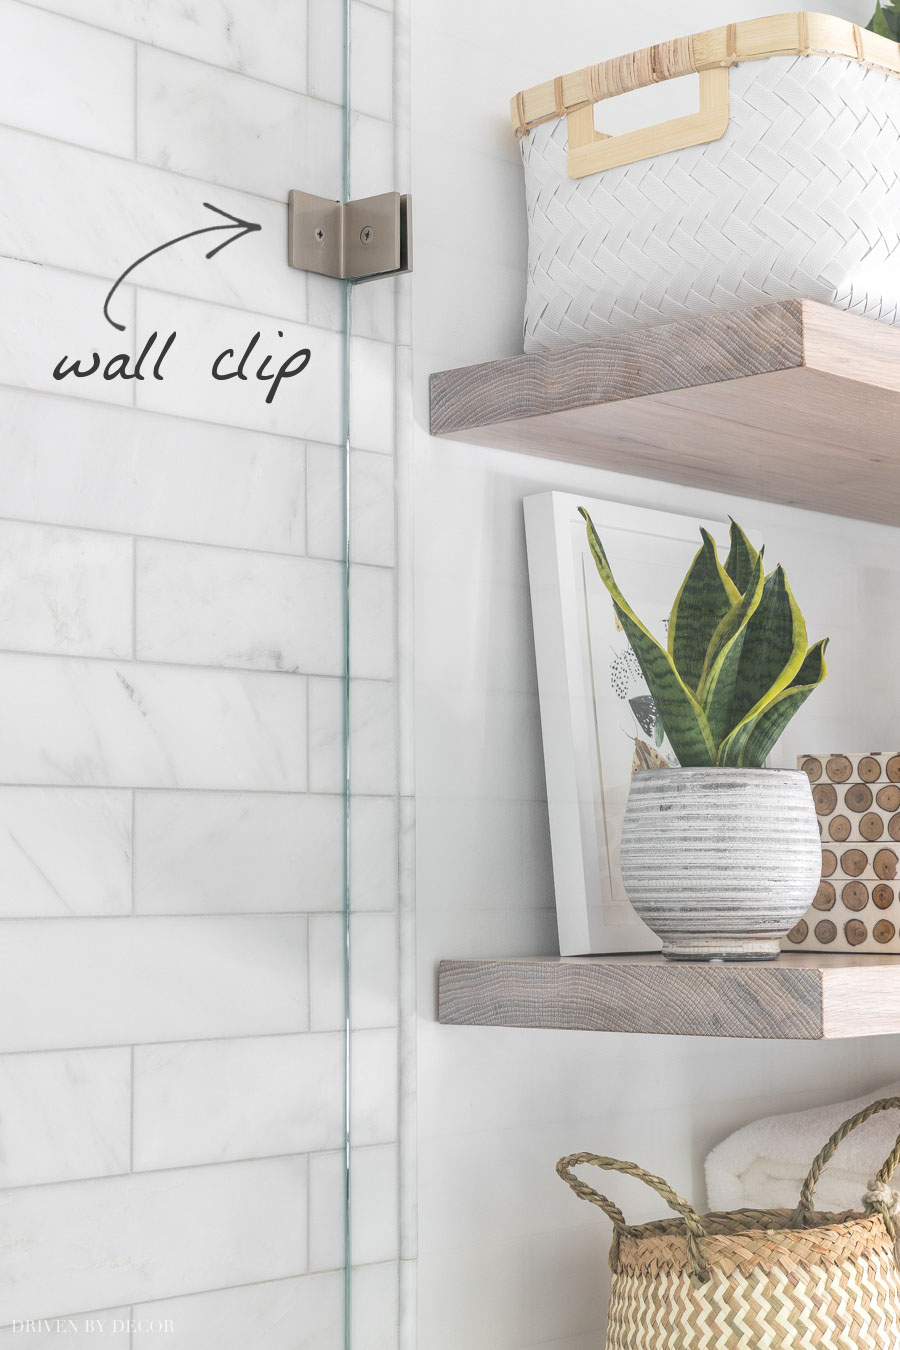
Most people choose to go with all clips on both the sides and bottom of the glass because technically “frameless” shower enclosures don’t have any type of framing or channels – they are supported entirely with clips. But I went against the grain on this one and chose to go with wall clips along the side and U-channels along the base of the glass.
If you don’t know what a U-channel is, it’s basically a short U-shaped metal strip that the glass rests in:
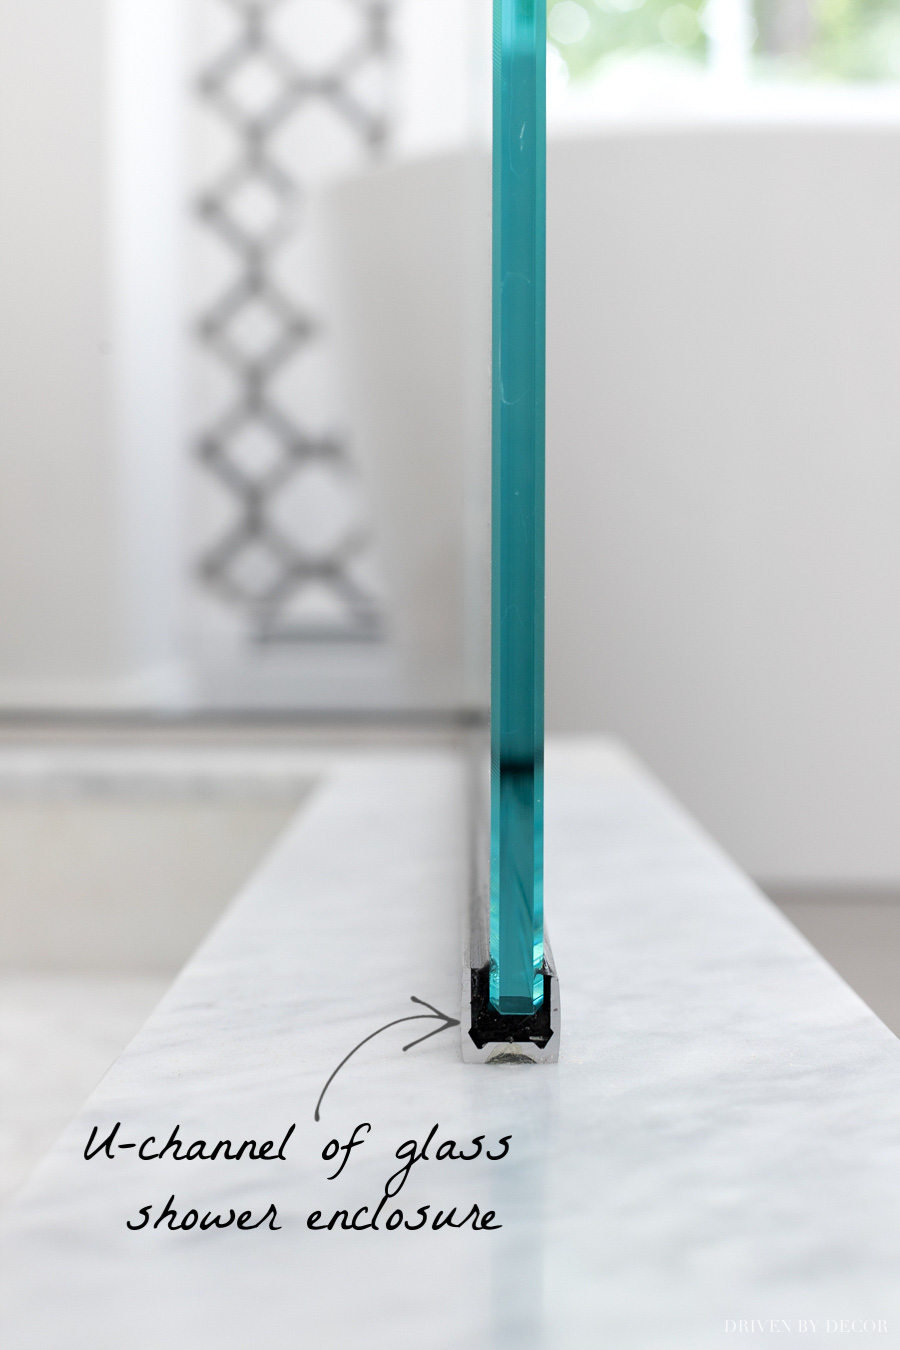
The two reasons I chose to use them are: (1) when the glass shower enclosure is resting directly on tile and sealed with clear caulk like it is with clips, over time mold/mildew often develops under the clear caulk where it’s impossible to reach and clean. Because of this, many people find that they have to frequently cut the mildewed caulk out and re-caulk. This is more common with natural stone like I have than porcelain tile because of the porous nature of natural stone (see my post on using marble tile in a bathroom for details). When you use a U-channel you don’t have this issue.
Reason (2) is that I actually like the streamlined look of the U-channel on the bottom instead of the clips:
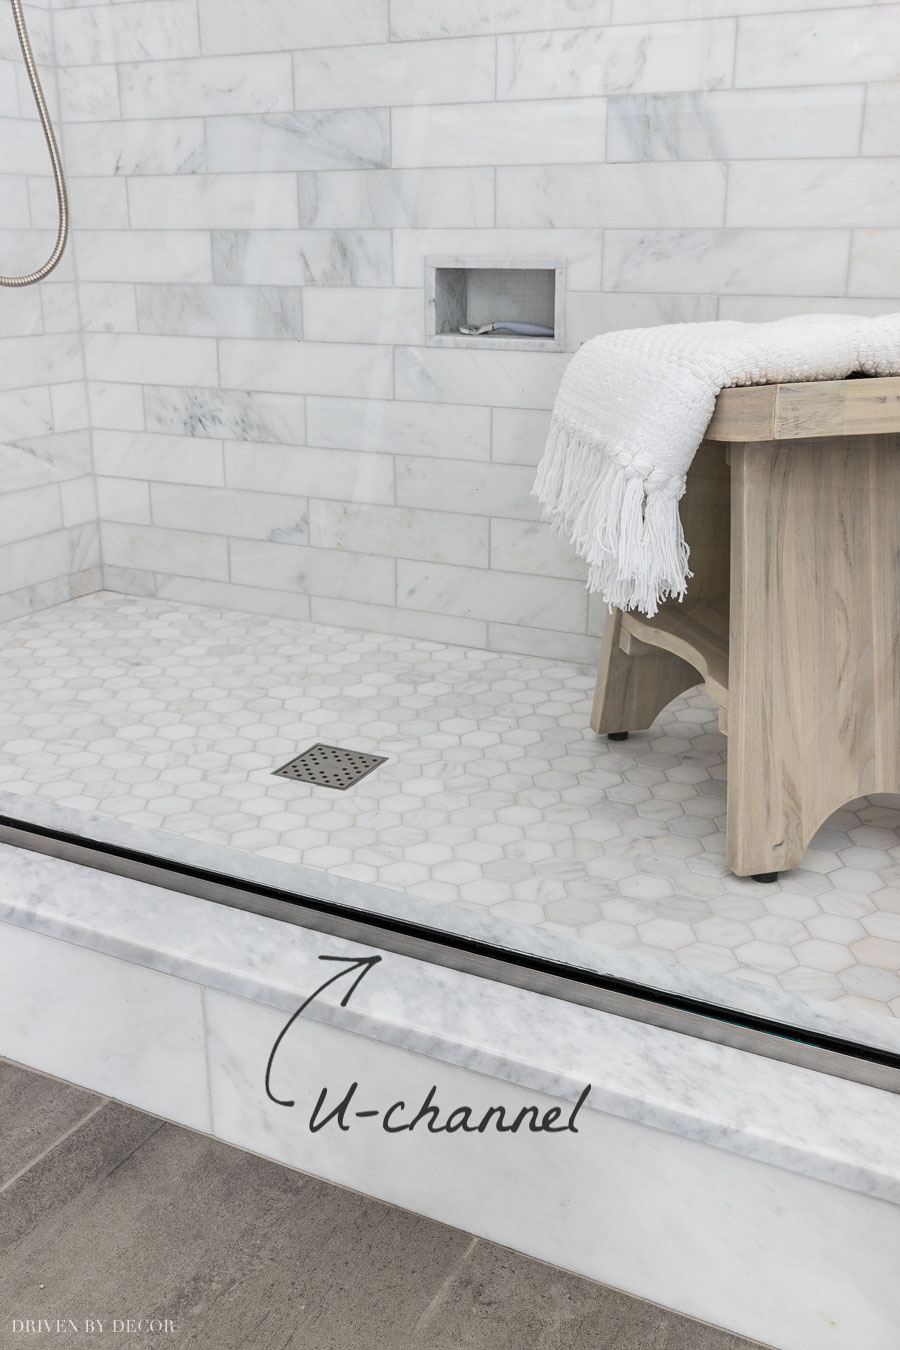
Our overall bathroom design has more of an updated classic feel than an extremely modern one and I felt like the design of the U-channel fit that aesthetic best. In terms of pricing, some companies charge about $100-$200 less for using U-channels than clips because the cut of the bottom of the glass doesn’t have to be quite as precise with a U-channel – my proposal was the same price regardless of which I chose.
Glass Treatment to Prevent Water Spots
Another add-on option is a glass treatment that seals pores in the glass to make it resistant to water spots and stains. In some cases this is done during the fabrication of the glass and in others it is sprayed on as a sealant after production of the glass. It helps keep your glass clean and from becoming cloudy over time. This is a great option to consider if (1) you have hard water and (2) you don’t have the best track record for regularly cleaning your shower glass.
I was quoted an extra $540 to add-on this glass treatment – yikes! I decided to pass on this option and instead try and be a more diligent cleaner to keep our glass enclosure cost closer to what we had budgeted for it. I also might try out {this spray glass treatment} that works similarly (but has to be re-applied frequently). I do know several people who swear by how much easier the factory applied glass treatment has made it to maintain their shower so it could be a decision I regret with time.
Regular Glass vs. Low Iron Glass
Shower glass is fairly thick which gives it a subtle green hue. One add-on option is to choose low iron glass that is completely clear, without the greenish hue. It’s called ultra-clear glass, opti-white, Starphire glass, and various other names. Along with the glass being completely clear, when you look directly at the edge of the glass, instead of it appearing green like it normally would, it has more of a bluish tint:
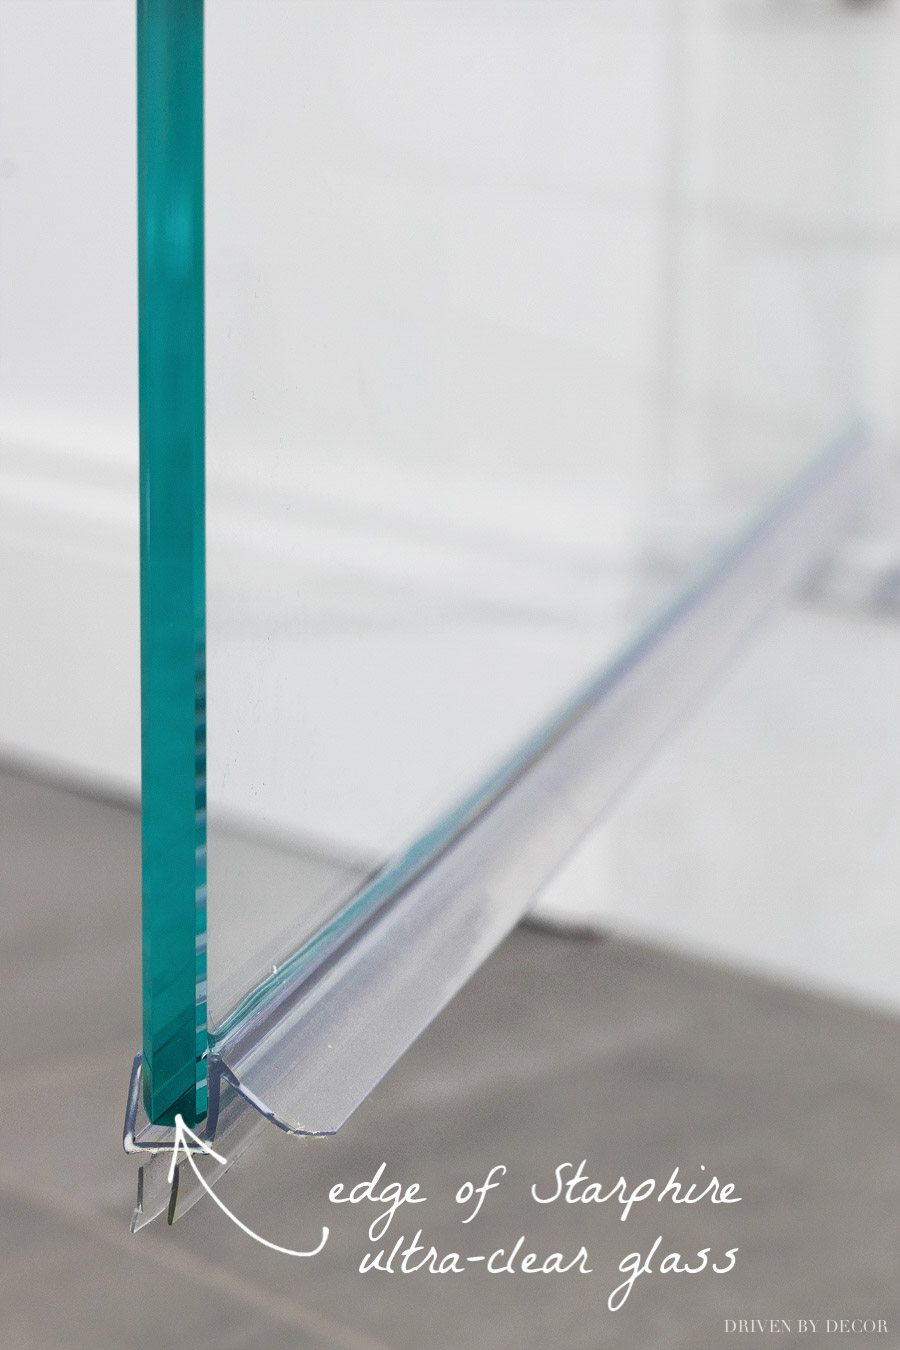
I debated this decision a LOT mainly because it’s a super pricey option – I was quoted an additional $648. After researching and getting LOTS of opinions, what I found is that if you don’t have white tile the difference probably isn’t noticeable enough to warrant spending the extra money. But if you have white tile like I do, it might be because you can definitely tell the difference.
As much as it pained me, this was the one costly add-on we went with – I LOVE my shower tile and didn’t want one of my final decisions on our bathroom one that made me unhappy with the overall result.
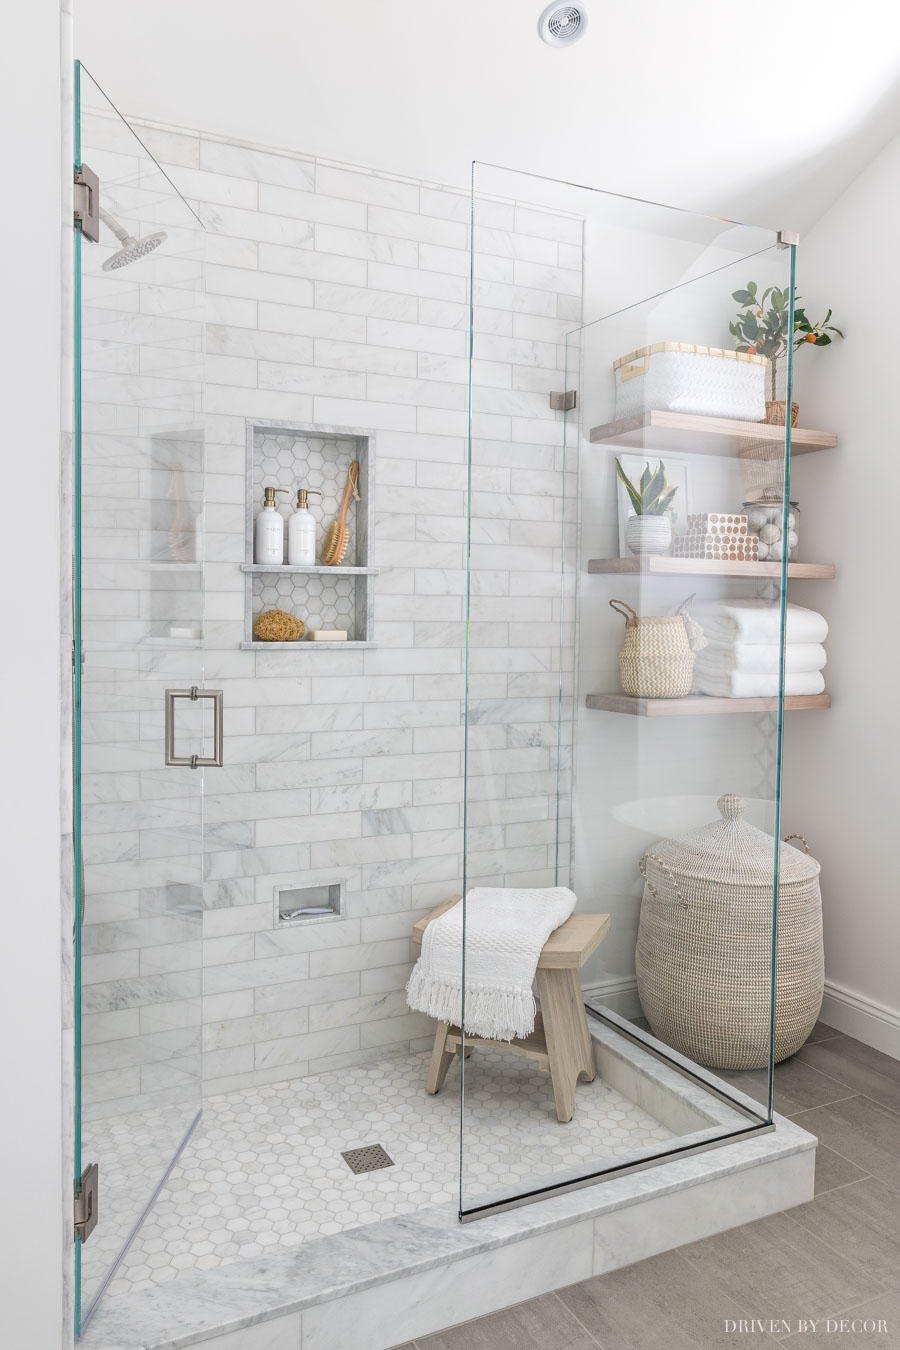
It definitely lived up to the hype! You can see as you look at my bathroom tile through the glass of the shower enclosure and through the open door, there’s no change in color:
Shower Glass Thickness: ⅜″ vs ½″
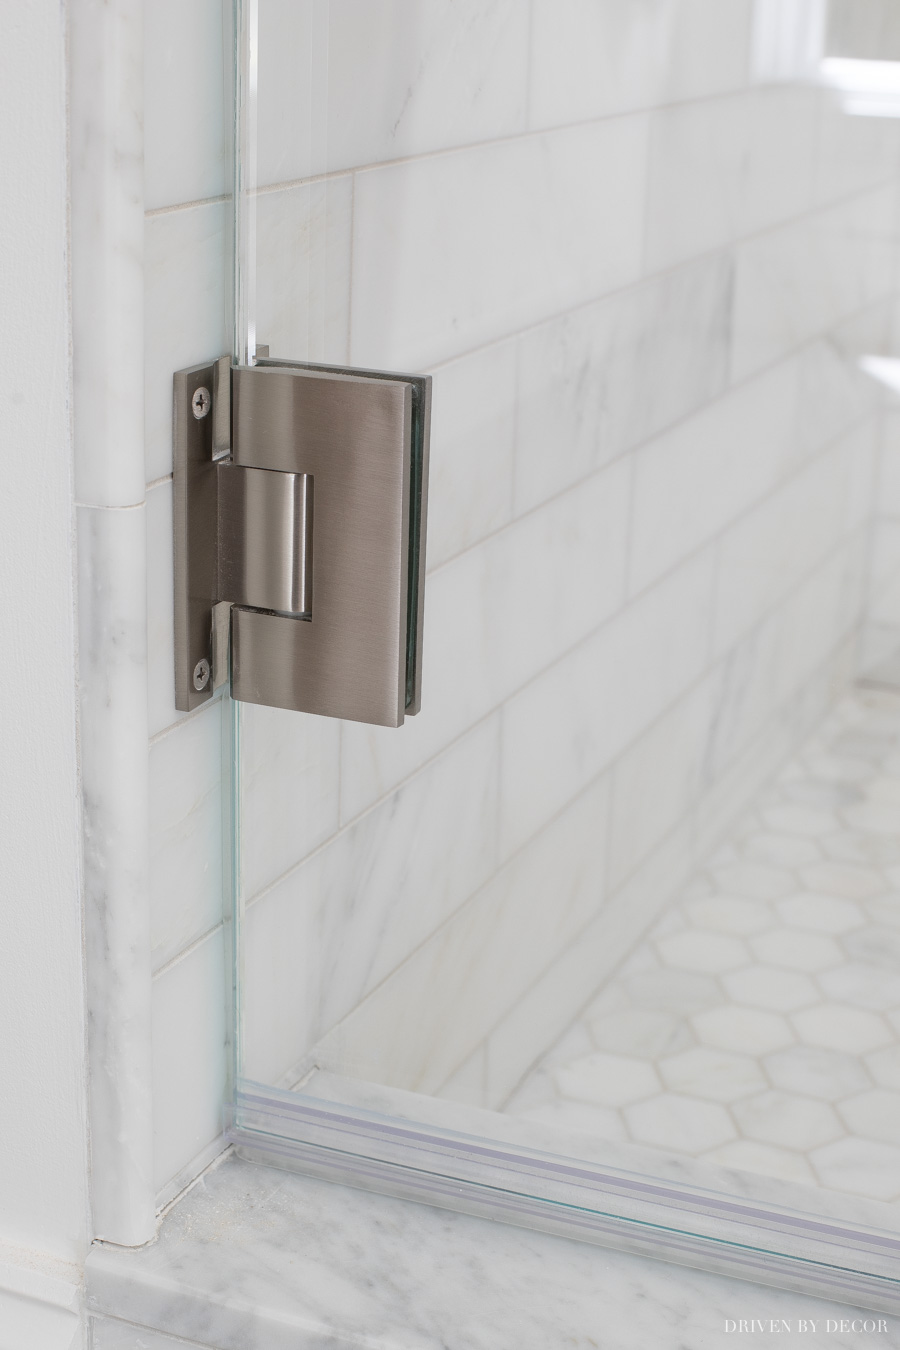
The most commonly used glass thickness for shower enclosures is ⅜″ but an upgrade to ½″ was another add-on option (my quote for this upgrade was $648). The benefit of ½″ glass is that the extra thickness provides additional stability. Also, some people simply like the thicker look. Unless you’re one of those people (personally I like the look of the thinner glass), the main reasons you’d want to choose ½″ glass is if you have glass panels that are taller than typical (like 80″+) or if your shower door is hinged off one of your glass panels instead of being hinged off the wall like mine:
This decision was an easy one for me – we stuck with the less expensive ⅜″ glass.
Decorative Handles
Most shower door companies include a standard curved handle on both sides of the glass door in their basic price. Different styles are an upgrade with the price depending on the style. I wasn’t a big fan of the standard handle and went for an upgraded handle that I thought tied in the design of the tile on our tub wall really well:
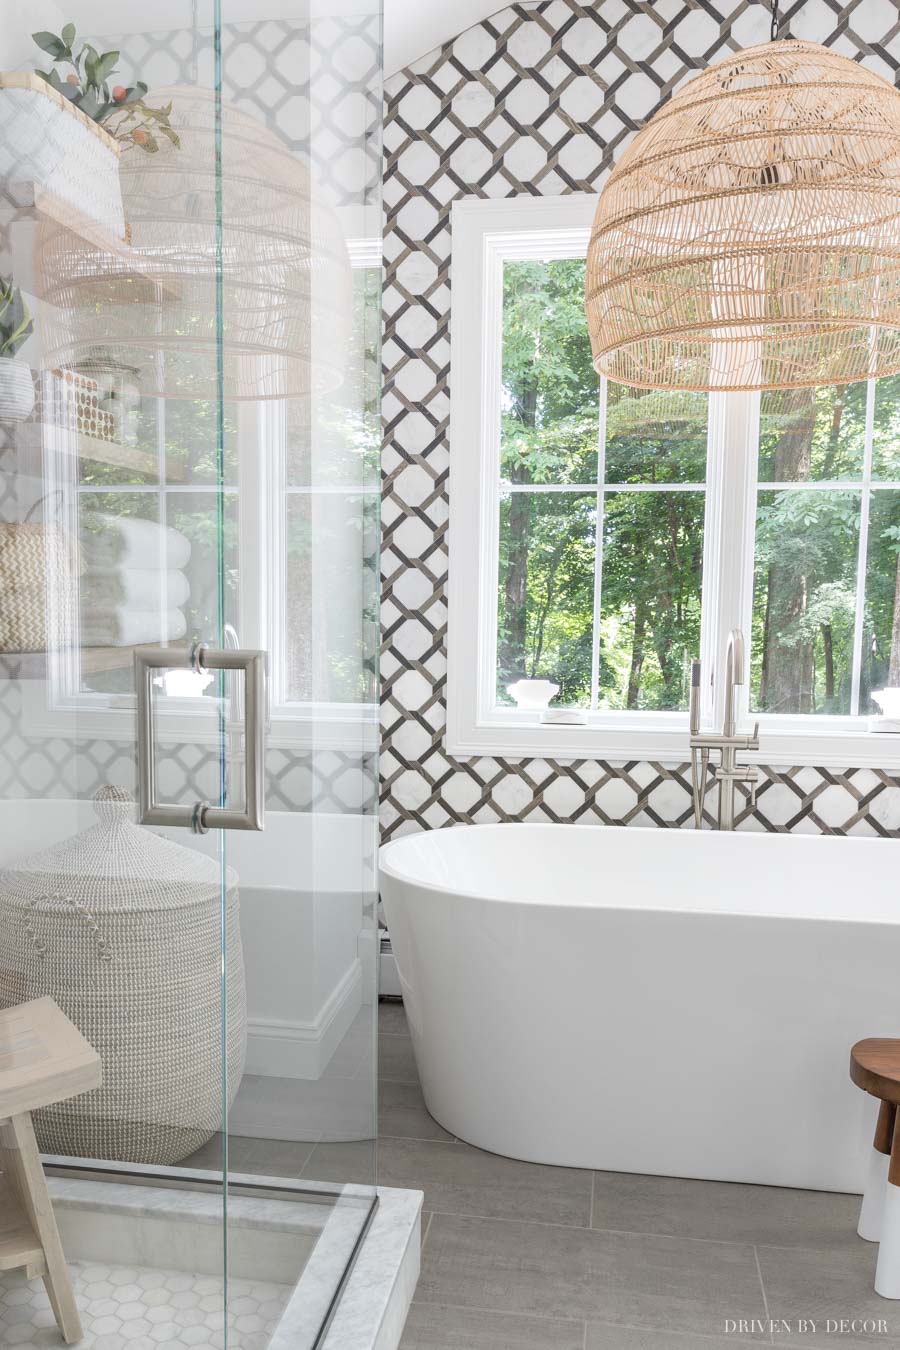
The cost for this upgrade? $200
Robe Hooks or Towel Bar
There are also several options that allow you to hang your towel on the shower enclosure if that’s something you’d be like to be able to do. One options is a robe hook (I was quoted an additional $125 for per hook) that’s on both sides of the glass – on the inside of the glass you can hang the towel you’re going to use after showering and then when you’re done using your towel you can hang it on the outside to dry. There is also the option to add a towel bar as an extension of the door handle on one or both sides.
I wanted to keep the clean-lined look of our shower enclosure so I chose not to do either of these and instead installed {these three robe hooks} for towels on the wall by our vanity:
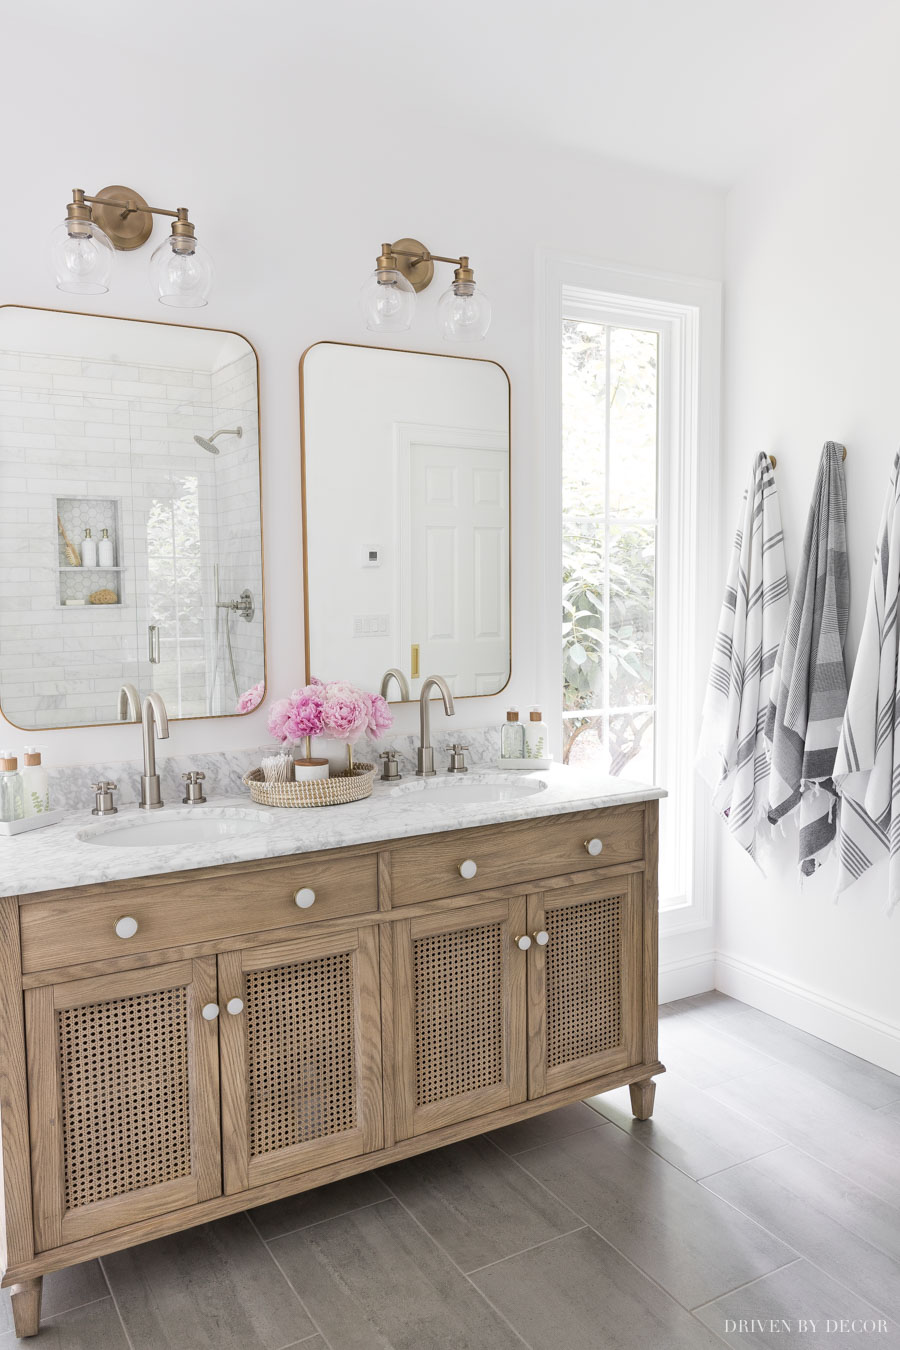
Vanity Area Sources: Wood & rattan double vanity | Vanity knobs | Vanity lights | Vanity mirrors – gold | Soap & lotion sink set with tray | Gray & white striped towels
A Few Last Options
Believe it or there were still a few more options to consider:
- Mitered glass door where the door only opens out (an additional $180) – the benefit of this is that the mitered edge helps create a tighter seal when the door is shut to prevent water from leaking out. I actually like having the door be able to swing both in and out so this was an easy no thanks. And I never had issues with leaking after installation.
- Custom height – I wanted our enclosure to be a little bit higher than standard so it was taller than our shower head – this was an additional $100
- Having the U-channel and framing clips in a brushed nickel finish on real brass framing (an additional $580). This is an upgrade of the standard anodized aluminum finish which is similar in appearance but not identical to the brushed nickel wall hinges and handle. I passed on this one.
Total Cost for Our Glass Shower Enclosure
The total estimate for our shower enclosure with installation ranged from $2420 to $5516 depending upon how many extras we chose. Starting with the base price of $2420 and adding the ultra-clear glass ($648), upgraded handle ($200), and additional height ($100), our total cost was $3368. Crazy expensive right?! I got multiple estimates and they were all within 10% of each other so I feel like this is a good cost estimate for the NYC area. However, as I mentioned at the beginning of the post, prices here are higher than most other areas so something similar in a different area of the country will likely cost less, sometimes MUCH less.
Want to save this post?
Phew… we made it through! Would you ever have guessed that buying a shower enclosure could be so complicated? I hope this post helps any of you who are in the midst of a major bathroom renovation or who have one planned for down the road. Want more details and ideas on renovating a bathroom? You’ll find these posts helpful:
Master Bathroom Remodel Ideas: My Ten Favorites!
Must-Have Bathroom Measurements
XO,



Myrna says
Thank you for this informative article. You’ve answered practically all of my questions regarding installing a shower enclosure. Your master bathroom is lovely. You have impeccable taste. I wish you many years of enjoyment.
Sarah says
Hi Kris, your bathroom renovation turned out beautifully! I’m curious how the marble hex tile is holding up on the shower floor? I heard marble is super high mainentance, needs to be sealed multiple times a year, and absorbs stains from shampoos easily. But I love the look of it. Just need an honest opinion on if you recommend it? Thanks!
Kris Jarrett says
Hi Sarah – mine is holding up great! I have more detailed info on it in this post: https://www.drivenbydecor.com/marble-tile-bathroom/
Alexis DeJong says
Where did you get the tile for the shower wall from?!?!
Kris Jarrett says
Hi Alexis – the tile and everything else in my bathroom is sourced in my reveal post here: https://www.drivenbydecor.com/master-bathroom-reveal/
Kat Browning says
I was literally thinking about this as a show solution in our (much smaller!) Bathroom in Manchester – I knew there was a bit to consider but with you having gone through it step by step it’s really given me food for thought! Thank you for the time and thought that you’ve put into making this post!
Rachel says
This is such a great post! I too am considering getting a new glass shower door that opens in both directions. I am wondering, do you need a vertical silicone strip along the side of the door to create a water tight seal or is it okay without one?
Kris Jarrett says
Yes mine does have a clear vertical strip along that edge – I actually didn’t even know it was there until I went looking so I could answer your question – you really can’t see it!
David says
Amazing project! I hope our bathroom design ends up this nice. What are the dimensions of the shaving niche?
Kris Jarrett says
Thank you! This post has all of my shower measurement details: https://www.drivenbydecor.com/bathroom-measurements-towel-bar-toilet-paper-holder/
Ashley says
I love the bathroom and want to copy it. What paint color did you use?
Kristin says
Your bathroom is absolutely beautiful! Where did you purchase your tile and your flooring? We are in the process of redoing our bathroom and I am using yours as an inspiration!
Kris Jarrett says
Thank you! This post has sources for everything: https://www.drivenbydecor.com/master-bathroom-reveal/
Lori says
Thank you for your post and including pricing. I’m in the middle of deciding to update our shower and I can finally come up with a realistic budget. I had no idea about all this different upgrades and that it would cost so much!
Chris says
Thank you for posting all that info, we are about to remodel our shower here in Michigan, I didn’t realize all those options would be available to me!
Lois Merrill says
An excellent article and comments! Very helpful as I’m just beginning to research a redo using a glass shower surround and soaking tub. Thank you!
Belinda says
In little Corpus Christi, Tx we were quoted $7800 just for the glass alone. that’s crazy and made us change our minds. your’s is beautiful.
Sheath says
Hi Kris! I’m about to order my glass, and your post has convinced me to upgrade to the low iron glass with my white tile. I wasn’t prepared for the shock of the glass cost either! 🙂 Thank you for the info and the inspiration! My shower curb is 4.75″ wide. And I’m trying to decide where the shower wall and door should sit on that curb? Did you center the glass on the curb wall? Or did you take it a little further, so that most of the curb was inside the glass, Kris? It seems to make sense to have more of the curb enclosed in the shower, but I didn’t know if that impacts stability or functionality if not centered right on the curb?
Kris Jarrett says
Mine is centered on the curb 🙂
Noel says
I need the details on these wall shelves! How deep are they?
Kris Jarrett says
Hi Noel – you can find all the details on those here: https://www.drivenbydecor.com/floating-wood-shelves/
Tanya says
Your bathroom is gorgeous! You have inspired me to redecorate mine- which is long is overdue. My only concern with the small tile is cleaning the grout- have you found it to be a problem? Are you able to keep it looking as nice as your pics? I would love any thoughts or feedback. Thanks!
Mairenis says
Thanks so much for this! I just purchased my shower door today.. a whopping $3,000! I’m in NYC. I wished I would’ve found this page and read this before. Like you, I got several quotes that were similar in price. The only thing I’m worried about is that I the glass will have the slight blue hue (didn’t go for the upgrade)! And I have white tile! 😬 crossing my fingers that it turns out ok. How have the glass held up? What do you use to clean it and how often do you clean it?
Tom Guthrie says
I need to start off by saying that I have my own business providing and installing shower doors like yours. I was shocked by the amount you had to pay. You mention that prices in CT are higher, but I am in CA and can’t believe the prices are that much more…
For comparison, my base price for your size shower would be $1,630 (material, labor, and tax included). That is 3/8″ clear glass, brushed nickel hinges and clips (not channel, which I will address in a moment), non-mitred door (I would never do a mitred door, which I will address in another moment), and a standard 8″ handle, not 6″.
I will no go through those add-ons:
Clips are standard in my book, and I only use channel if there is a specific reason or request for it. There is no more risk of mildew with clips than there is with channel as long as you use milder resistant silicone (and clean it on a somewhat regular basis). Having porous stone is not really a problem as long as you seal the stone (which you definitely should do to protect it from discoloration and hard water pitting). Clips provide better support for the glass, since they are actually clamped on and holding it firmly. With channel the glass is just sitting in the channel. And the clips I use are a lot nicer and less obtrusive than those that you pictured. Now, you mention that you prefer the look of the channel, which is perfectly fine, obviously, it is a personal choice. But a serious issue with channel that I should mention is that the metal is more likely to attract and collect hard water and calcium deposits. I do not charge differently for channel or clips.
Glass treatment to help prevent water spots is certainly a choice. However, the price you were quoted seems especially high. My rule of thumb is to add $100 per panel ($300 total for your particular shower). However, using Rain-X ($6) on the glass is a much more cost efficient way of doing it. Yes, it does need to be reapplied ever 3-6 months, but for a small fraction of the price, that is not a big deal. One thing to note with either of these options though, is that you still need to take care of the glass. Spot treatment does not stop spots. You still need to squeegy or wipe down the glass daily if possible. The spot treatment just makes it easier to clean if you miss a spot, or miss a day because you were running late.
Standard glass vs. low-iron glass is entirely a personal preference. Your quote of an additional $648 is a bit high for that shower however, I would have priced that at no more than $350.
3/8″ vs. 1/2″ glass… the additional stability of 1/2″ glass is negligible. However, the added weight of the thicker doors can cause the hinges to wear faster. Plus, nobody can tell if you have 3/8″ or 1/2″ unless you see the edge of the glass, so why spend the extra $? Plus, the thicker the glass, the greener it will appear (if you go with standard cleare glass).
Handles -the handle you got is no more than a $50 upgrade, tops.
Robe hooks are purely a personal choice, but $125 is a bit steep… $75 tops.
Miter glass door – why is this even an option? Do you really want a mitered glass edge to bump up against another mitered glass edge? Edges are the most fragile part of the glass, and mitered edges are even more fragile, what do you imagine would happen if you closed the door hard? If you want a tighter seal, then put a clear plastic strike jamb on the edge of the panel for the door to close against… and it’ll only cost you $10.
You did mention that you like the door to also swing in, but another advantage of that is that you can leave the door opened in after you are done showering for the day to help air circulate in the shower and dry out the grout, which will help prevent milder.
You don’t mention the height of your door, but my prices cover up to 80″ tall.
There is absolutely no reason to get brass hardware for the clips or channel. None at all. That is just a brazen grab at your money. Now, brass hinges is something else. Absolutely get brass hinges. But you shouldn’t pay extra for them.
So, for the unit you got, I would have charge you…. base price of $1,630 + $350 for low iron glass +$50 for the upgraded handle (which if you’ll remember is 2″ larger than what you got) = a grand total of $2,030.
Now, I know that you said prices in CT are higher, but are they really that much more? That is a difference of $1,338! That is almost another shower door base price!
I know you mentioned that you got multiple quotes that all came in within 10% of each other, but still….
Kris Jarrett says
Yes, CT pricing is crazy – I’ve lived in 8 states including CA so have a good bit of knowledge on how it compares to other areas and it’s by far the highest here. I got three bids and ran the estimates by my contractor too so definitely did my due diligence. That’s why I mentioned twice in my post to consider the figures I gave to be at the high end of any estimates. Glad to hear you agree with all of the decisions I made for our enclosure including glass width and declining brass hardware, the mitered door, and the glass treatment. I’m super happy with it!
Kira H says
Wow, thank you for this additional info from a pro! Where in CA are you located? Name of business? These details from you and Kris are SO helpful and appreciated.
Rafaela says
Hello ,the price that you are offering is great…..Im going to purchase my shower door and I have been checking 3-4 places and also Im located in MA and the prices here is very expensive. Based on your prices theres any way for you to ship to MA? I would love to hear about this option that before I make my final Decision.
Thanks,Rafaela
Allison says
I live in South Jersey and was just quoted I thought for the same choices as this bathroom shower because I read her post first and it was so helpful when I went and asked for everything… I was quoted $4,500 not including an extra $650 if I want it treated to help prevent soap scum. This included installation, but not sales tax.