I’m sharing how to DIY shiplap walls to get the look of true shiplap on the cheap! From prep to install to the finishing touches, I’ll walk you through it step by step!
(affiliate links included in post – full disclosure statement available {here})
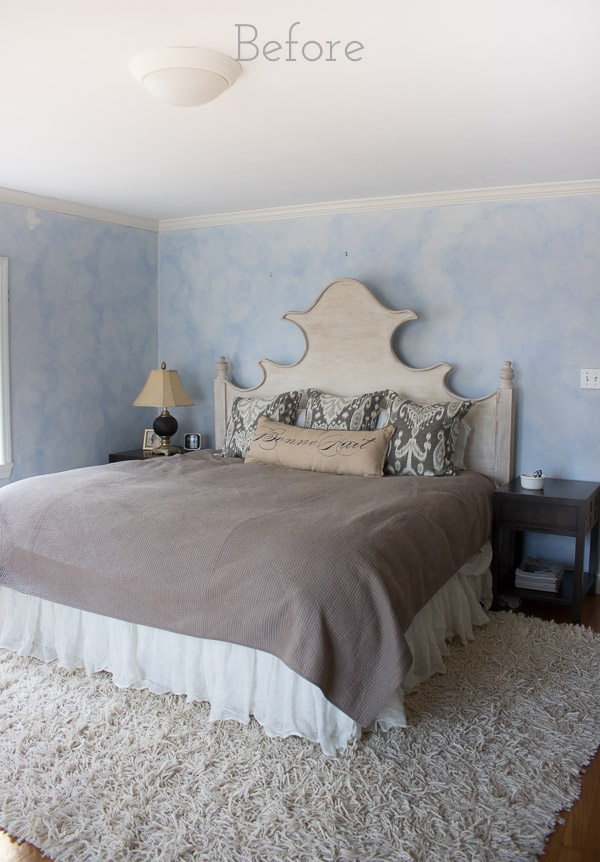
When we first moved into our home, our bedroom had light blue textured faux finished plaster walls with lots of ugly cracks. Instead of skim coating & sanding the walls and fixing all the cracks in the plaster, I decided to cover the walls with shiplap instead. I figured out a way to DIY shiplap walls that was a lot less expensive than installing traditional shiplap and I’m so happy with how it turned out:
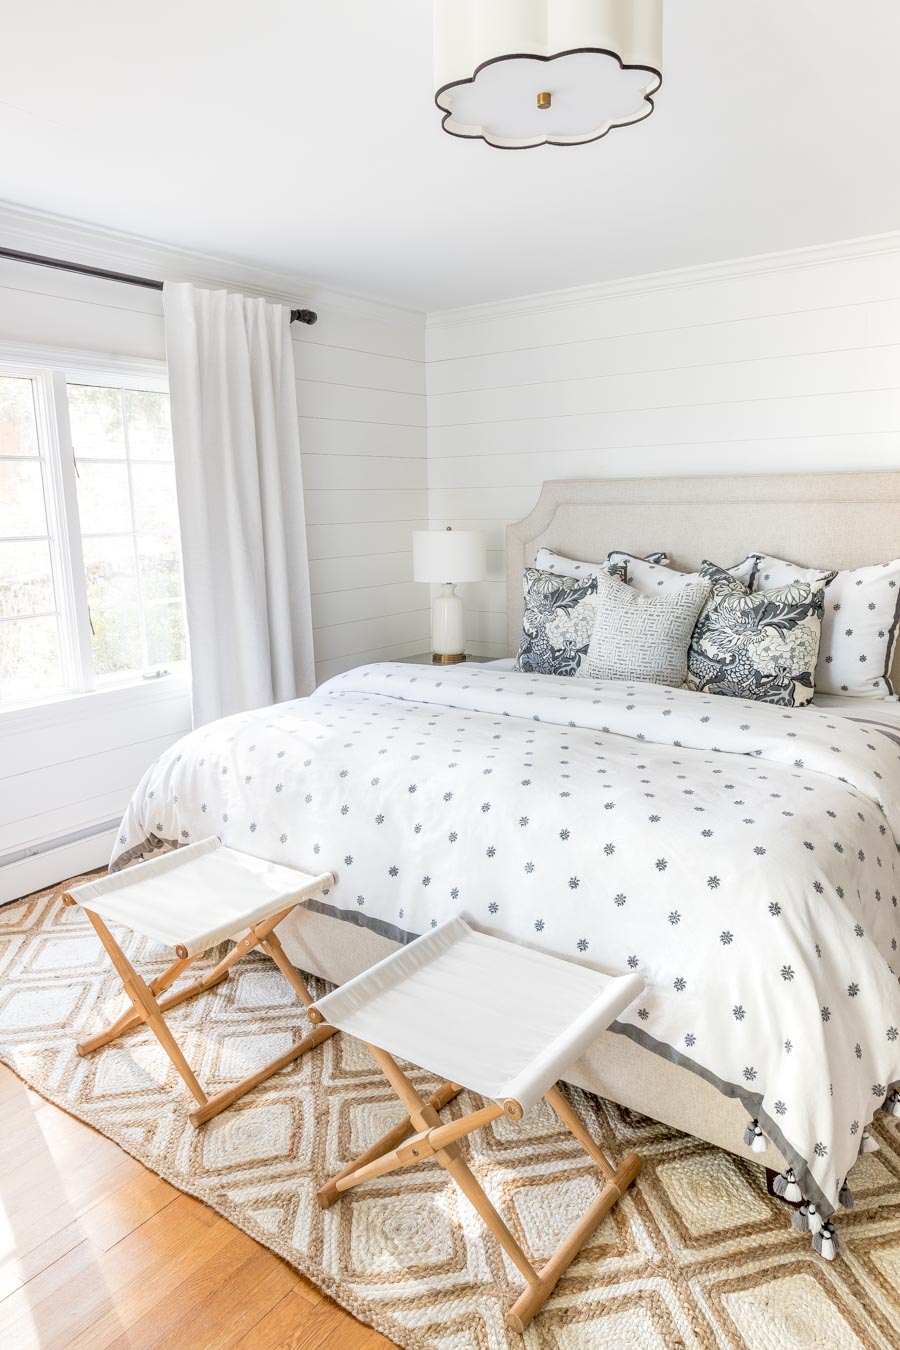
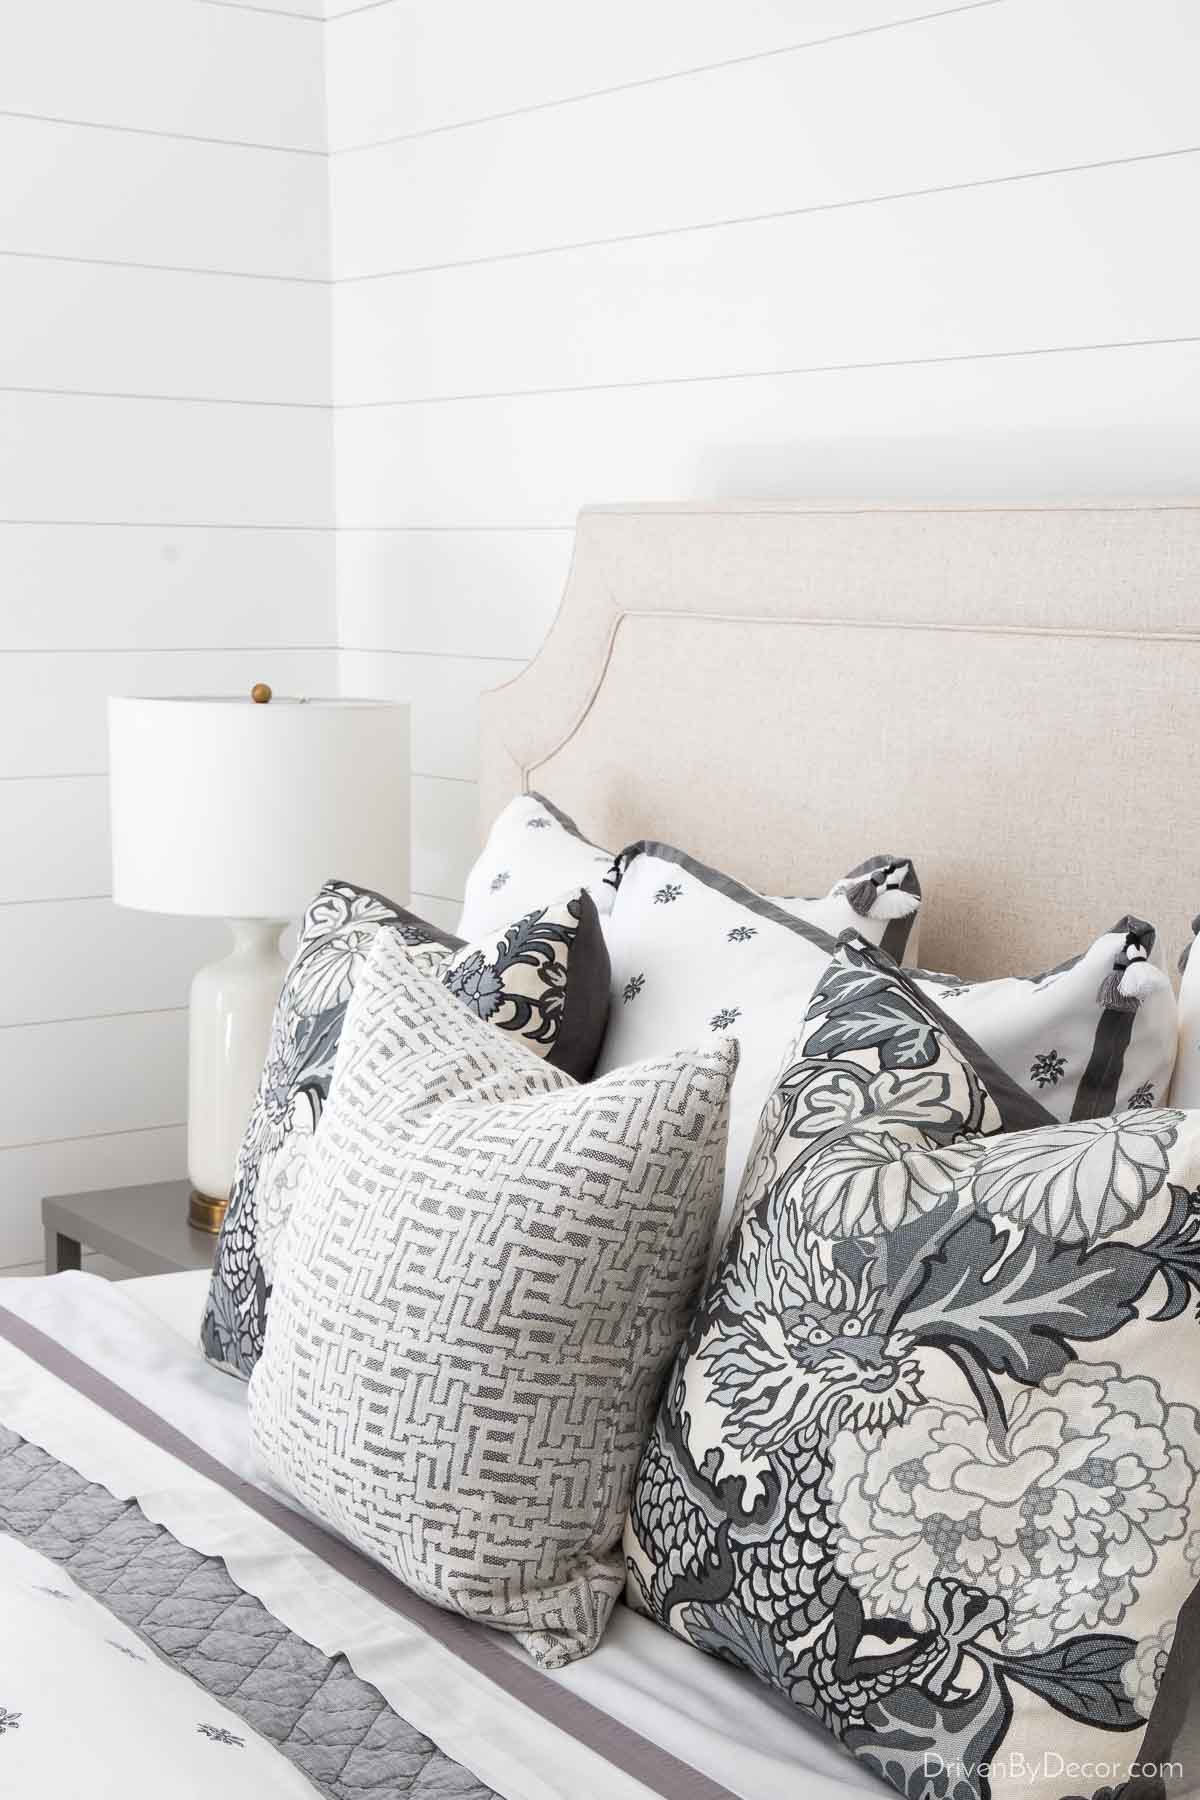
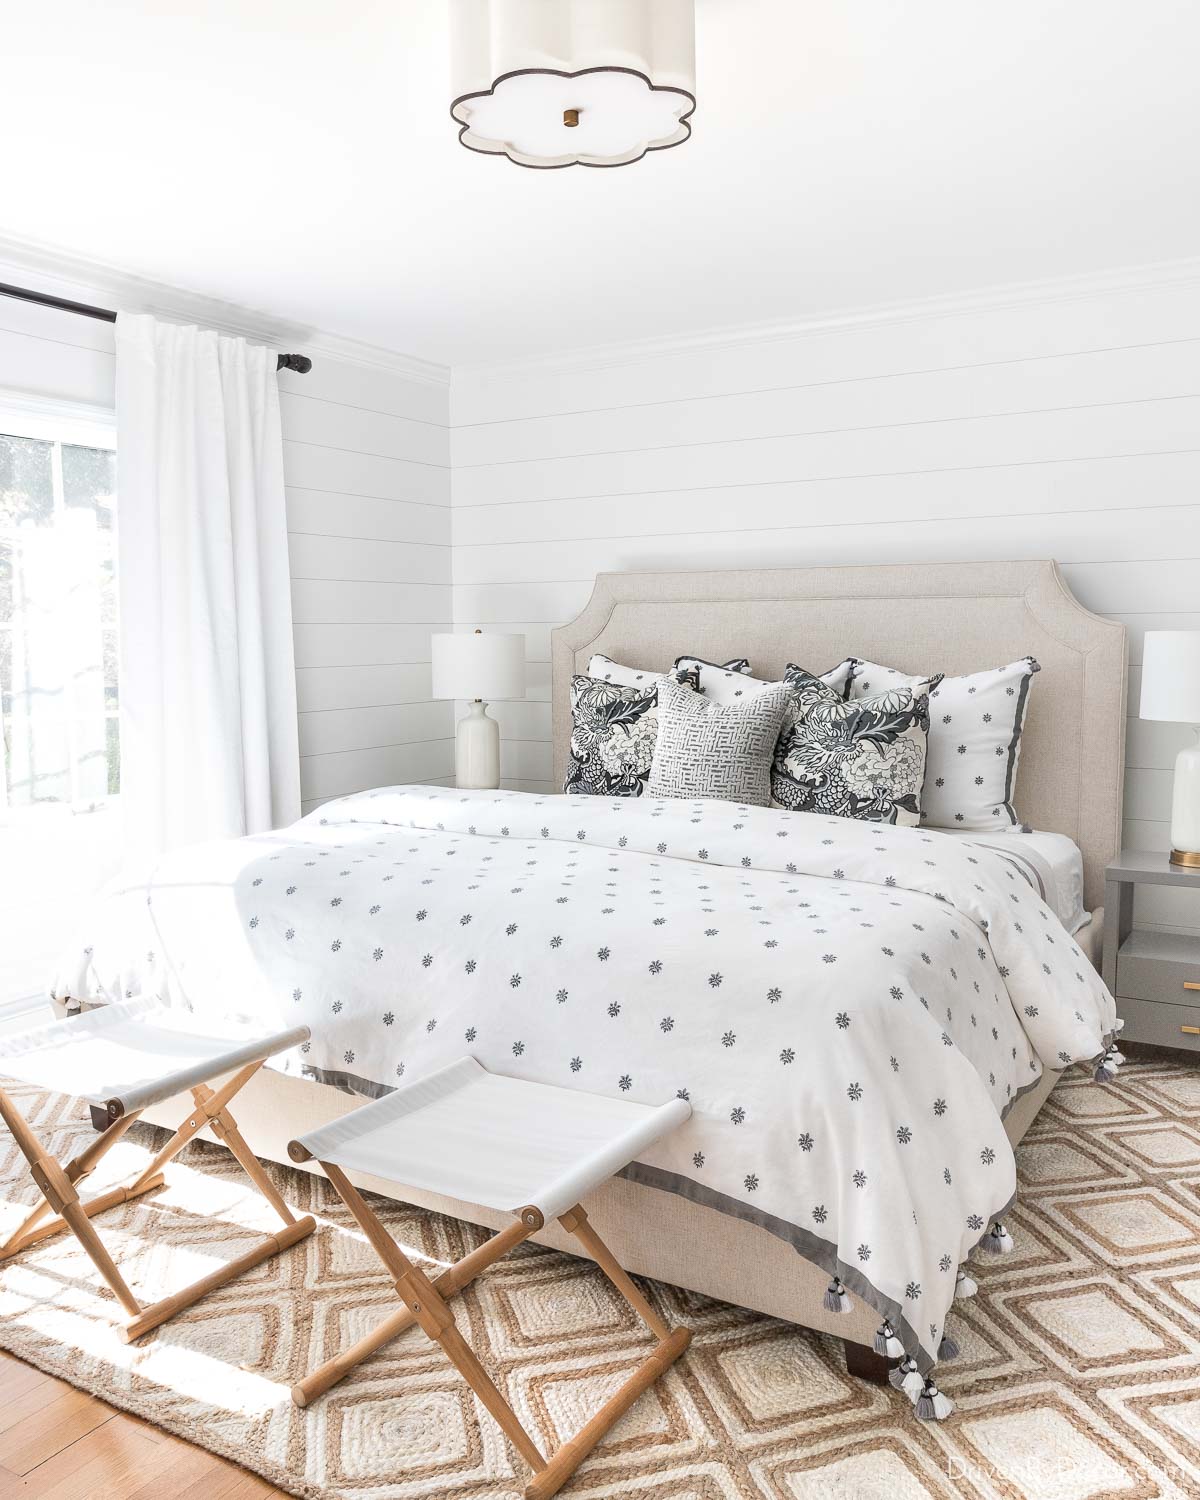
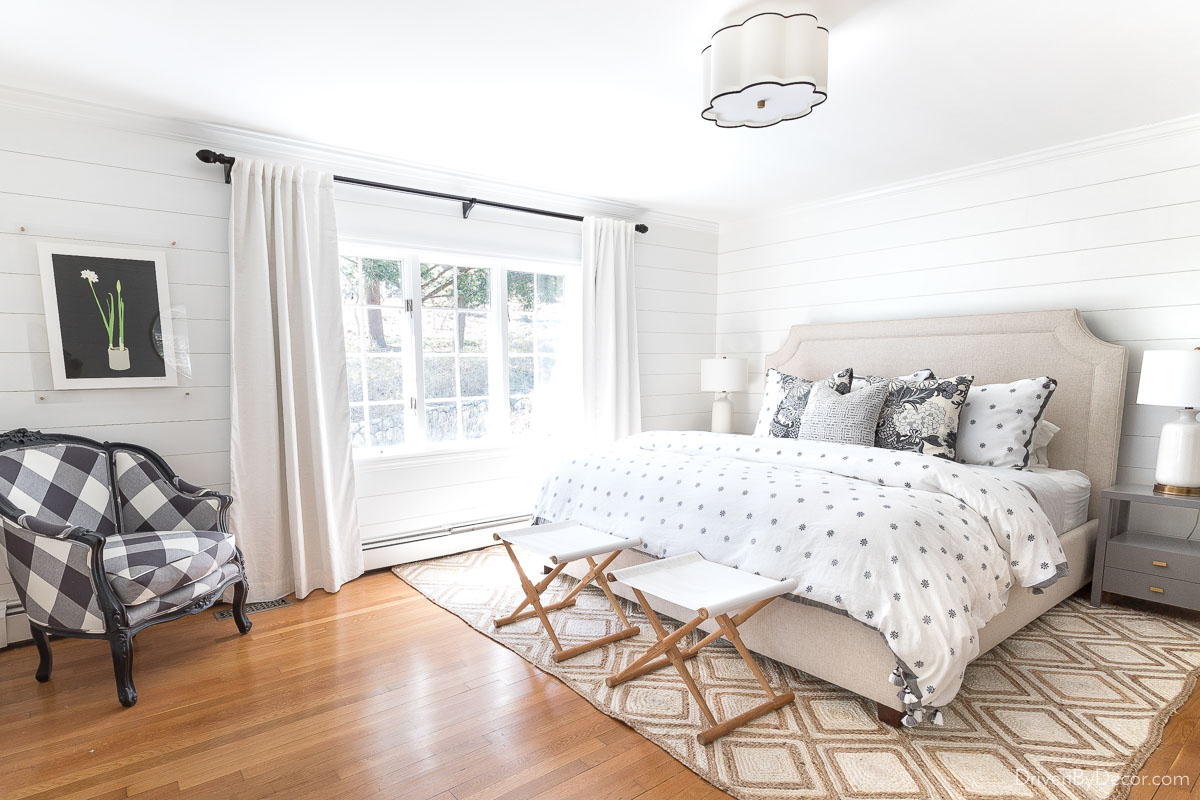
Sources: Upholstered Bed (similar) | Gray nightstands | Camp stools (similar) | White table lamps (similar) | Semi flushmount light (available {here} and {here}) | Gray & white patterned linen duvet – no longer available | Gray & white dragon/floral pillows | Quilt in king (color is Flagstone) | Drapes (mine are single-width blackout lined) | Diamond jute rug
Since I’ve gotten so many emails with questions about how I knocked this project out, I thought I’d write up a quick post to share some what-to-do and what-not-to-do tips that I learned along the way!
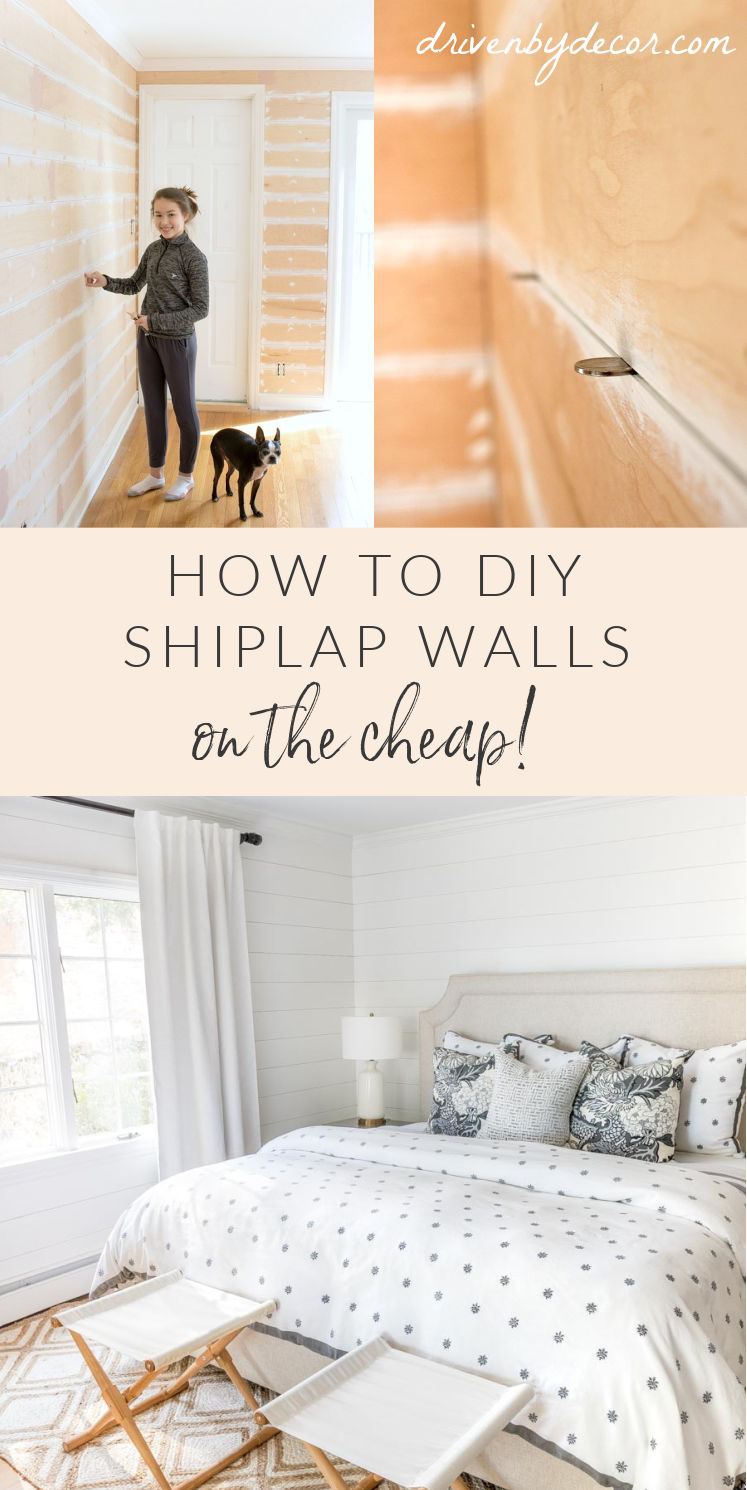
For Cheap Shiplap, Faux is the Way to Go!
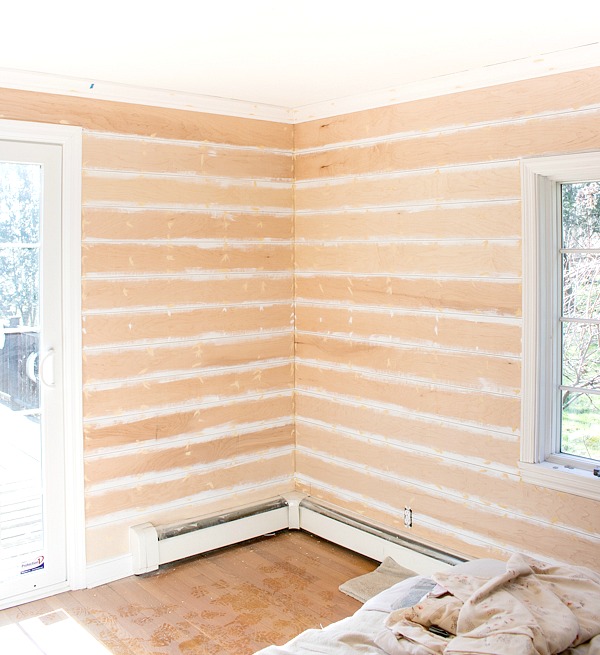
There’s definitely a significant cost savings to creating the look of shiplap with plywood strips instead of using true shiplap boards so that’s one reason that faux is the way to go. But also, since true shiplap boards are about ¾″ deep, it means that you have to remove ALL of your molding (baseboards, crown molding, door trim) to install “real” shiplap and then reinstall the molding back on top of it. Umm… no thank you! We went with plywood strips that are only ¼″ deep so we were able to leave all of the molding in the room in place and simply butt the wood strips up against it. So much easier!
Shiplap Prep: Paint Your Walls & Do Your Math!
Prep work for a shiplap wall project is key! First off, you want to paint the walls in the room the same color that you’re going to paint your shiplap. Why? Because there’s a small gap between the boards where you can see the wall and you definitely don’t want a different color showing through. Seeing this lovely light blue wall color (which is what they looked like before doing this project) between the white boards wouldn’t have been such a great look!
I also painted the top and bottom edges of each shiplap board before it went up on the wall because I knew it would be a little nightmarish to try and paint the edges by sticking a paintbrush through the small space between the boards once they were hung. Truth be told it took me a LONG time to pre-paint them so I’m not sure if this part of my prepwork was a time-saver or not in the end. I used Farrow & Ball White for my shiplap paint – you can read more on it and other great whites in my post on the best white paint colors.
The other prepwork that’s a definite must is a little bit of math – you want all of your boards to be the same height rather than getting to the end and realizing that you’re going to have an awkward thin strip at the bottom. So measure the space between the crown molding and baseboard and figure out a good height to cut the boards so that they fill the space exactly. Just don’t forget to take the spacing in between the boards into account when making your calculations! I ended up going with a height of 6 ¼″ for mine.
Beware of Home Improvement Centers Saws
The cheapest way to get thin wood shiplap strips at an exact height is to cut them out of ¼″ plywood or MDF sheets (I went with maple plywood sheets because they seemed to be the smoothest of the ¼″ plywood options at Lowes). Lowes and Home Depot will cut your plywood sheets into strips for you for a small fee and while I know some people have had this done successfully, I would definitely proceed with caution – their saws are made for doing rough cuts and often leave jagged and/or uneven edges. If you’re going to try having them do it for you, I would try just one sheet first to check that you’re getting a nice clean and even cut. If not, hire this job out to a contractor if you don’t have your own table saw.
Another option that’s become available since doing my shiplap walls is pre-cut mdf boards like {these}. I used them for my bathroom shiplap and they worked great!
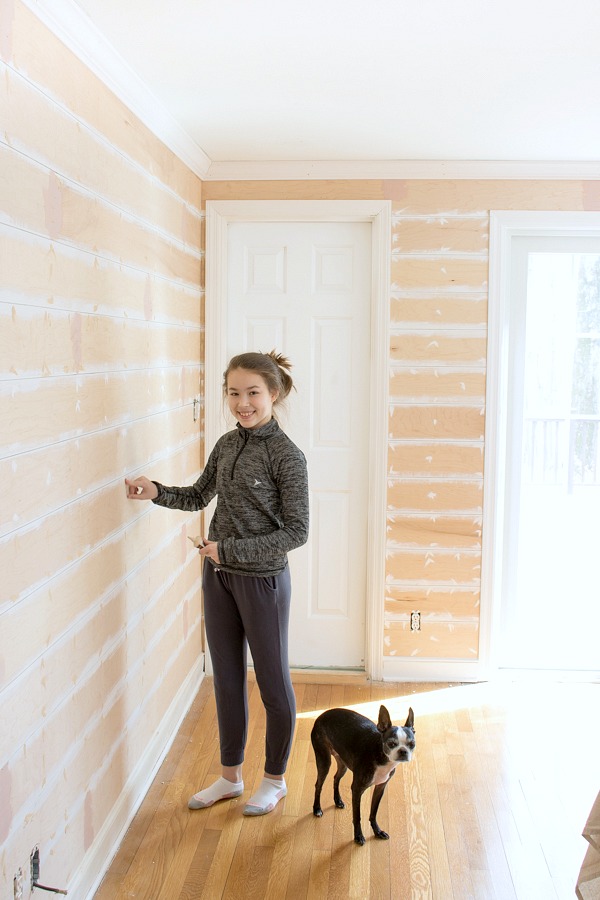
There Is Such a Thing as Too Many Nail Holes (when you’re the one filling them…)
For installation, we nailed each board to the walls using a nail gun (being sure to get some nails into studs) in addition to applying Liquid Nails on the back of each board. Here’s what it was looking like at this point:
Those suckers are definitely going nowhere which is great but here’s the thing… I was the lucky one that got to fill and sand each and every one of those nail holes before I painted and oh my gosh there were soooo many nail holes and it was sooo time consuming. I’m pretty sure we could have cut the number of nails used in half and those boards still would have been super secure. Thank goodness I had a cute assistant to help me knock out the nail filling:
Nickels Make Great Spacers
It’s important to keep the spacing between your wood strips consistent and an easy way to do that is with nickels! The amount of space you leave between boards is totally personal preference – if you want less spacing you can use pennies and if you want more spacing, use tile spacers.

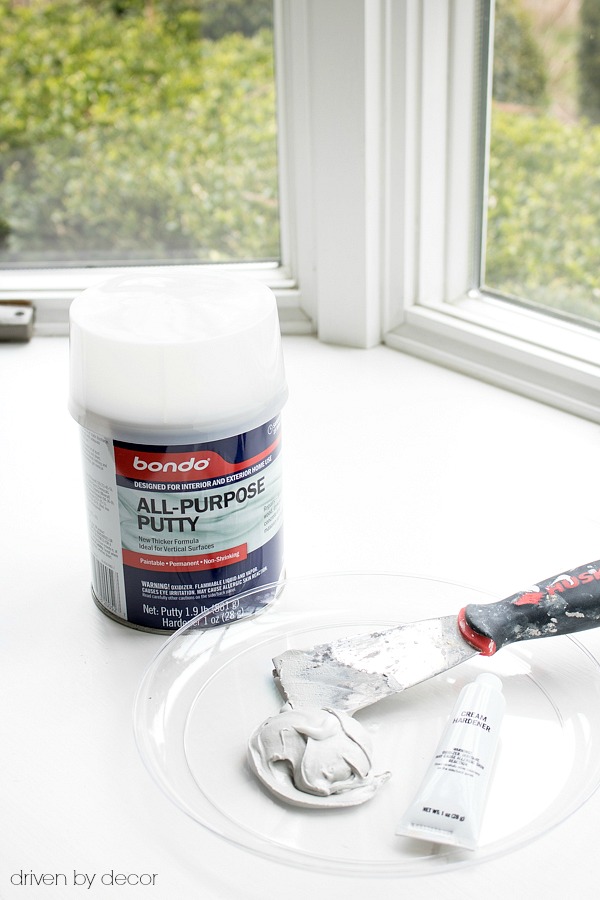
The Key to Seamless Seams is Auto Body Filler
Unless you’re doing faux shiplap in a small room like a bathroom, you’re going to have vertical seams where one board ends and another begins. Some people don’t mind the look of the seams and leave them as-is but I wanted a look of seamless planks along the wall. Normally I would use wood filler for a project like this but my contractor gave me the great tip of using {this Bondo putty} – it sands just like wood filler but leaves a smoother finish and is less likely to crack over time. The auto body fillers come in two parts – you simply mix the putty with a little bit of the activation cream (I did this on a plastic plate),
smooth it over the seam with a putty knife, and then sand smooth once it’s dry:
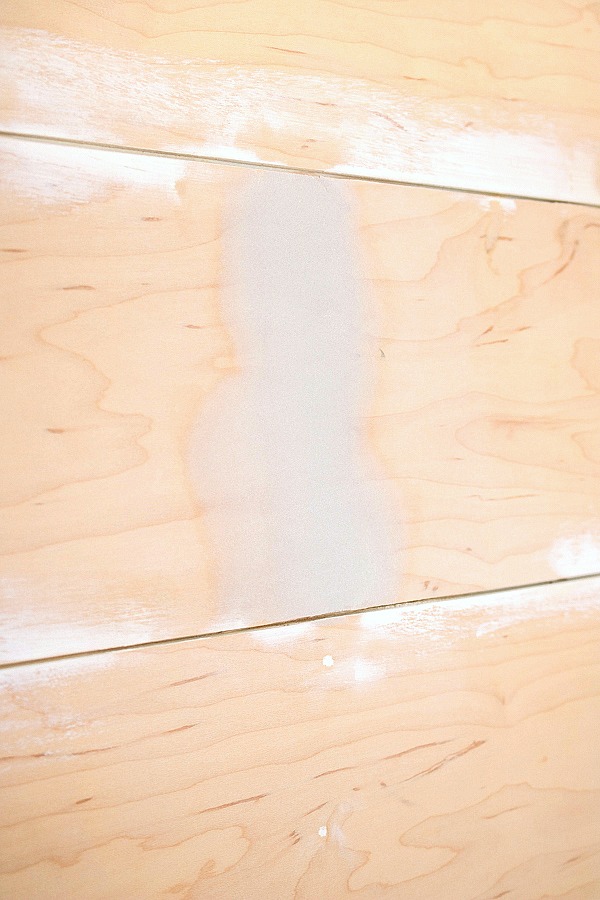
The only negative is that you have to work fast and only mix it in small batches because it hardens quickly.
Want to save this post?
That about covers it! I wrapped up the project by vacuuming the dust off the planks and out of the spaces between them and then I calked the corners and primed and painted the shiplap. It definitely wasn’t a quick project but I feel like I got the true shiplap look for a fraction of the cost and love my room as much today as the day that I finished it:
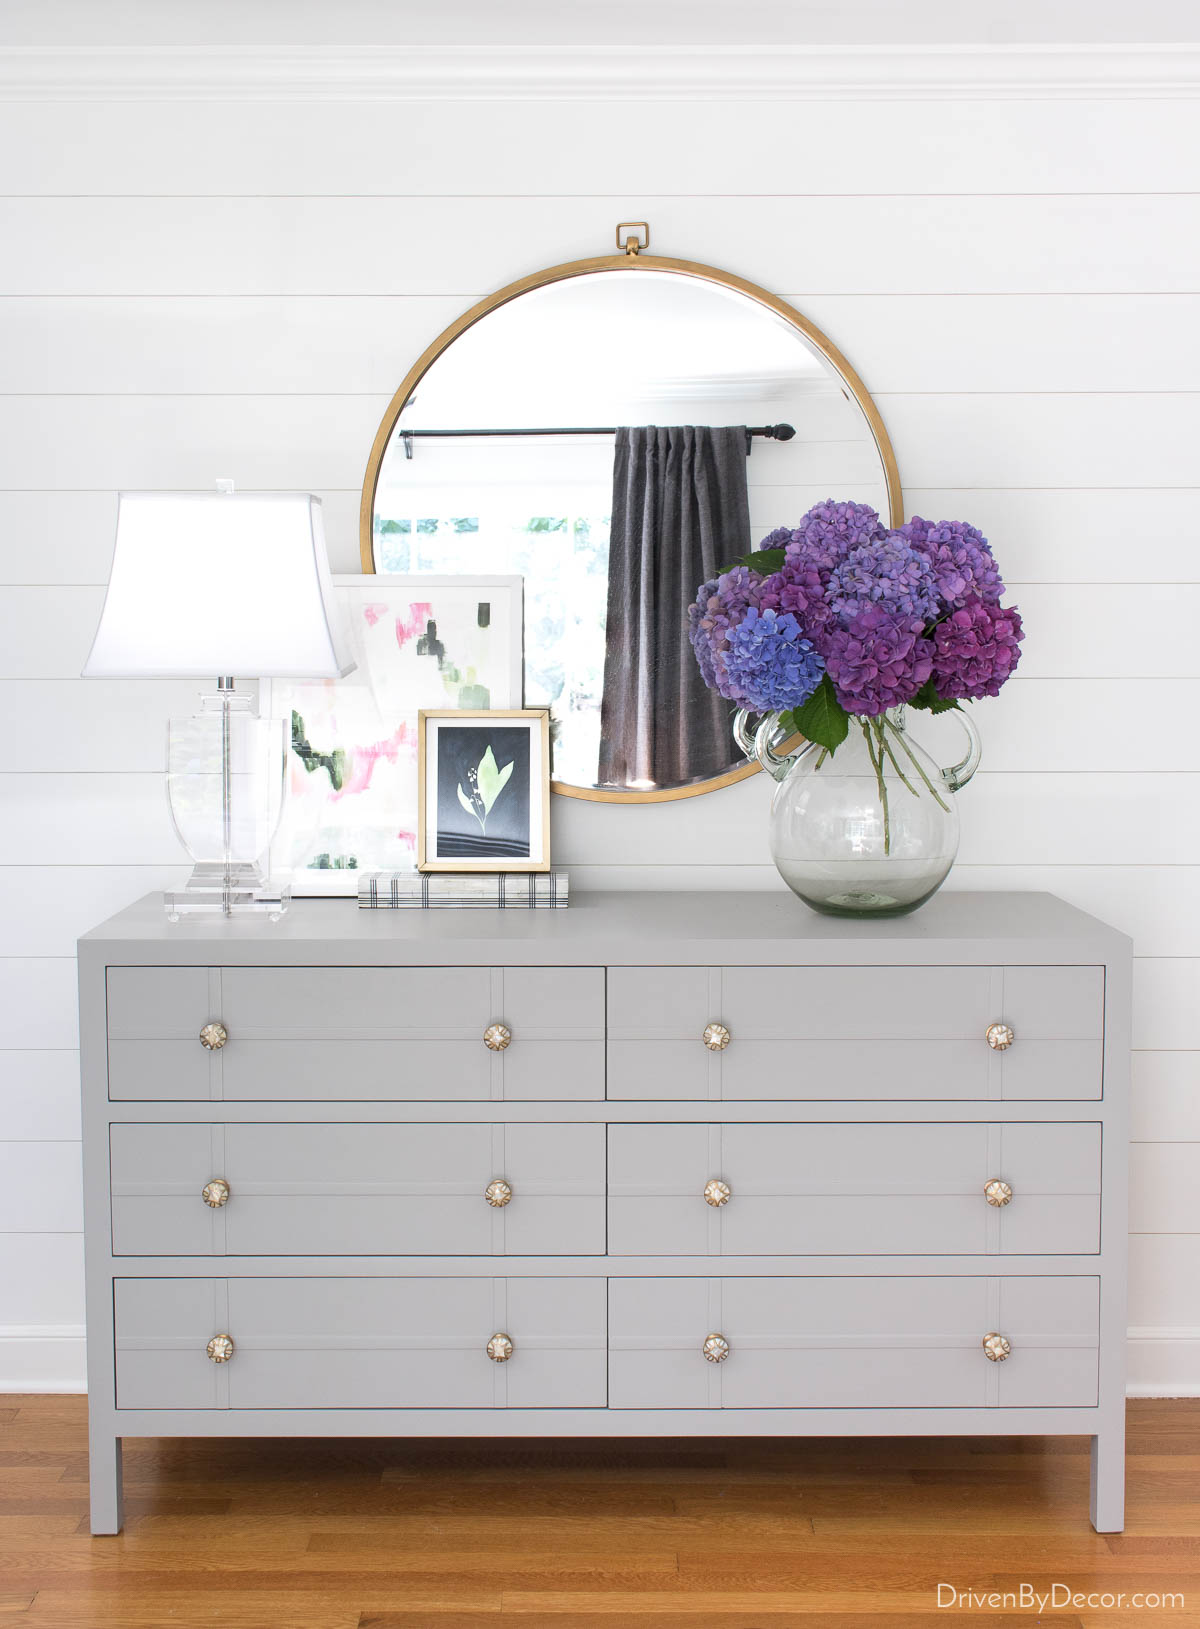
Sources: Dresser (no longer available) with these knobs | Large round mirror | Acrylic lamp | Colorful abstract print | Small lily print
Want to see another option for how to shiplap a room? Check out our bathroom shiplap project using pre-made MDF shiplap. It was slightly more expensive but was quicker to install and easier to paint. Also take a peak at our shiplap ceiling in the room off your kitchen – we’re so excited about how it turned out!
XO,


Tahnee says
what color white is this and what brand.
Kris Jarrett says
The paint color is Farrow & Ball’s All White
Stacy Yeomans says
How did you finish the inside and outside corners?
Erica says
Hey! I was wondering if you would mind sending a close up of your corners? I have a lot of rooms in my house I wanted to do this in and I’m nervous about my outside corners because I’m trying to avoid the corner strips ( I feel like it kinda gives away the whole THESE ARE FAUX SHIPLAP ????) but the inside corners I’ve seen caulked and some with corner trim and I like yours- but just wanted to see up close? Sorry for the essay! I love your room and I love the tutorial! Great tips/details I haven’t seen in all the other ones!!
Paige says
How do you paint in between your ship lap? Horizontally… did you use an angles brush or a small brush? Looks awesome!!!!
Kris Jarrett says
Thanks! I painted the edges of the boards before they went up on the wall!
Sharyn says
Would you recommend using a paint sprayer to paint the raw shiplap after installation? (We are ripping up carpet, and can use plastic to cover doorways and windows)
Kris Jarrett says
Ha! They’re actually real. I bought them at our local grocery store if you can believe that!
Beth C. says
Getting ready to do this in the home we are moving to. What finish was your paint? Satin? Flat? Semi gloss? Thanks so much for your inspiration. It is fab!
Kris Jarrett says
Hi Beth, I used Eggshell for mine just because I don’t personally love paint with high sheen but Satin or Semigloss would work well too! Good luck with your project!
Brittany says
Roughly what was the ending hight of each board after you cut the plywood? It’s about perfect size!
Kris Jarrett says
Hi Brittany! Each board was a little over 6″ high!
JeanaB says
Do you think your entire process would work well on ceilings? I have a textured ceiling that I’ve been wanting to cover. The room is not very big, but does have a tray ceiling. Thanks!
Kris Jarrett says
Jenna I would think that it would work on a ceiling too as long as you were using both the glue and nails but I haven’t personally tried it so can’t say for sure. If you try it, let me know how it goes!
Kris Jarrett says
Patti, thank you so much!
Marty says
The bondo is a great fix, but if you do use it, leave a little space – about the same as your horizontal ones – to let the filler grab a little traction, rather than just a thin surface layer. If you are really into it, cut those ends back in at an angle, open wider to the inside. This will really lock in your bondo, and keep those seams from ever coming back!
Kris Jarrett says
That is super smart! Thanks so much for the tip!
Eve says
Your bedroom is so beautiful! I love your blog!! Thanks for all of the tips & tricks to this amazing project. When we did our bathroom in ship lap, we used a pin nailer, so we didn’t have any of the nail holes to fill! The paint covered it! It is a major time saver, and if you use liquid nails on the boards, they are completely secure.
Kris Jarrett says
You are so sweet – thank you! And smart too – gosh how I wish we had used a pin nailer!!!
Mary says
Wow! That’s a lot of work. Do you think the planks will shrink (in dryer weather) creating bigger gaps between the planks? This happens to my wood floors during the winter.
I’m trying to get my husband on board to do this in our laundry room. But now I’m concerned with how long it will take get it completed. We can’t go too long without our washer/dryer hooked up.
Kris Jarrett says
I sure hope that won’t happen with the wood planks – hopefully since they’re glued down too they won’t really be able to shrink up! It was definitely a pretty time intensive project but I think you could knock out a laundry room in less than a week!
Garden, Home and Party says
Kris,
This room is wonderful. I remember following along when you were in the midst of working on it. It was worth the extra time and labor, it’s great.
Thanks for the tutorial.
Enjoy the long weekend.
xo,
Karen
Kris Jarrett says
Thank you so much Karen – I appreciate that!!
Jessie says
Those gorgeous walls is definitely a labor of love! You did a great job! Love everything about your master bedroom.
Kris Jarrett says
Thank you Jessie!
Rene says
We did the exact same thing a couple of years ago. Your looks great Kris!
Kris Jarrett says
I lot of work but worth it, right?!
Lisa | Shine Your Light says
Oh my gosh woman, you are a DIY hero!!!! That is a crazy amount of work but it sure is gorgeous! That detail adds so much to the design of the room! All those nail holes…..and painting the edges….good thing you had such cute helpers!!!! Can you all come on over here and shiplap my bathroom? I’ll get donuts??? 🙂 🙂 🙂
Kris Jarrett says
I’m insane is what I am!! And yes, we gladly work for donuts 🙂