Our powder room remodel is finished! 🙌🏻 Today, I’m sharing the details on everything that went into it, including answers to all of your questions about the new shiplap in our powder room.
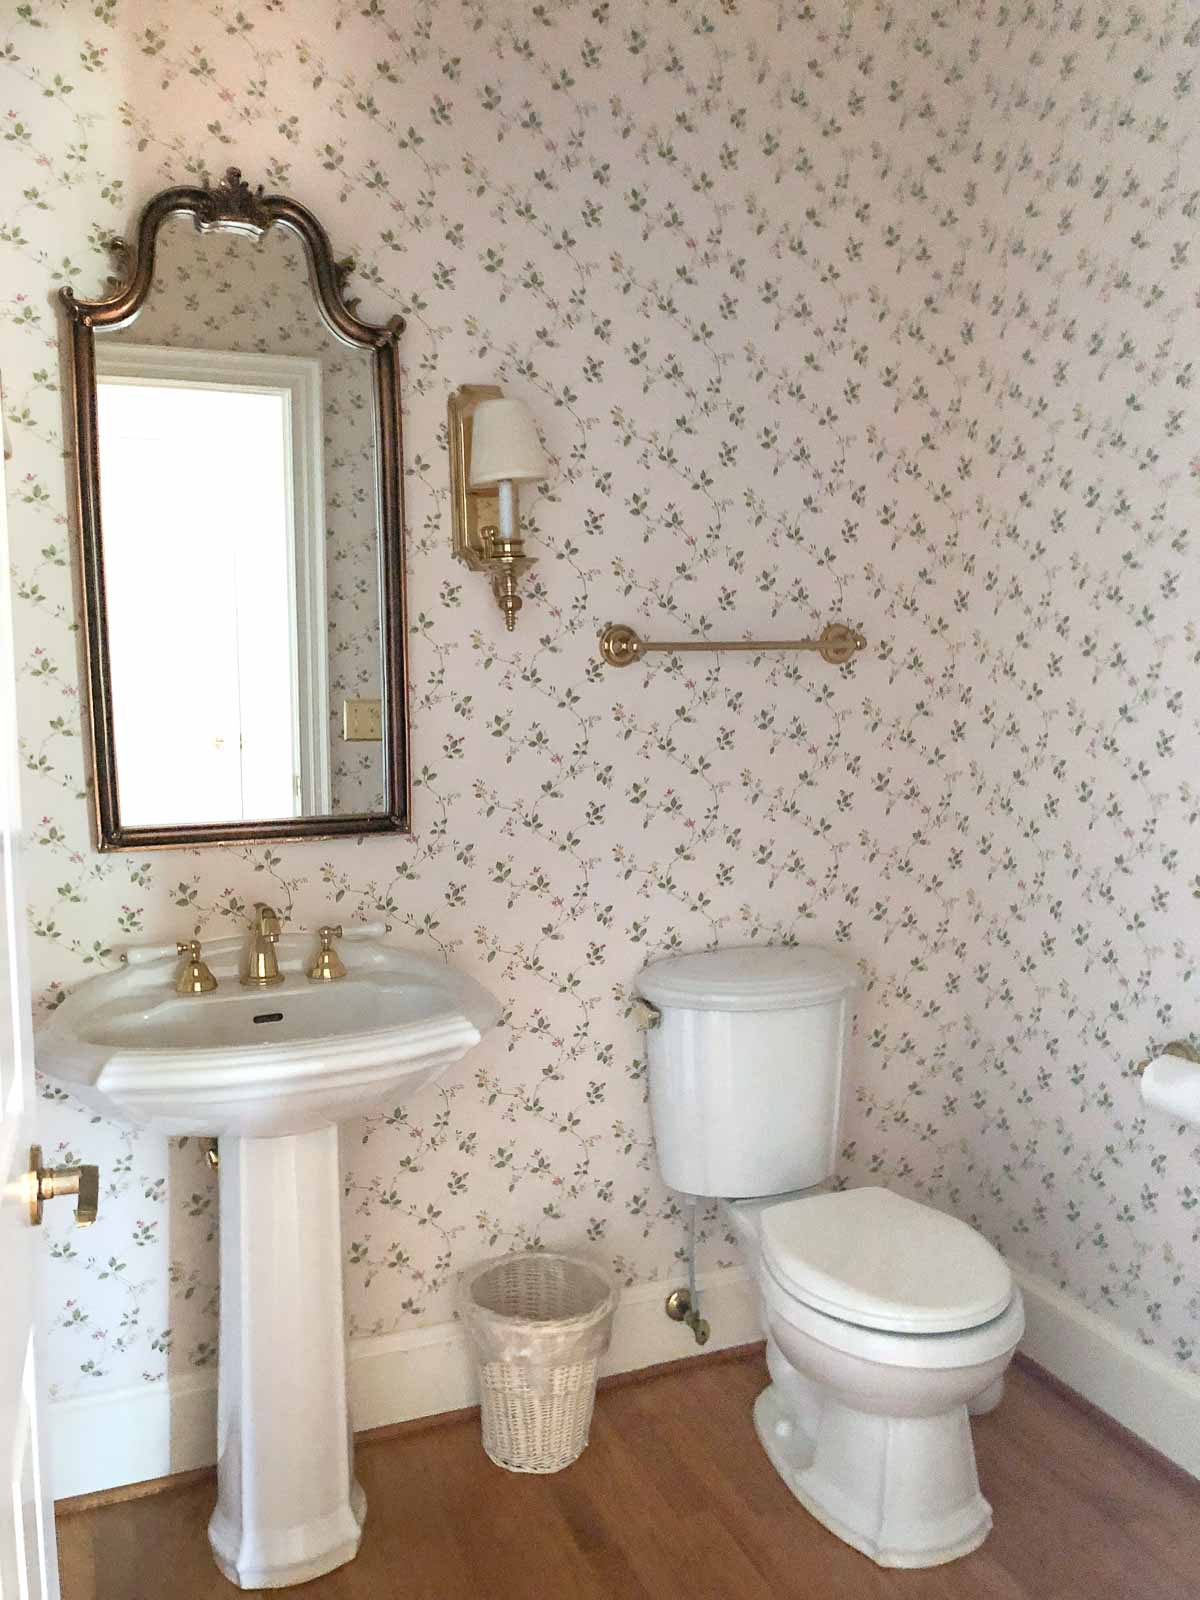
There are a ton of other changes too! With many of my remodels, I keep certain elements of the original design and change up others but in this one there were no survivors! Everything from the floral wallpaper to the pedestal sink, mirror, toilet and lighting are outta there.
We’ve even refinished the floors since moving in (check out my post on hardwood floor refinishing for details). Ready to take a peek inside?! (post includes commissionable links; for more information, see my full disclosure statement {here})
Let’s start with the “before” so you can see where things started when we bought our house:
Here’s that same view today:
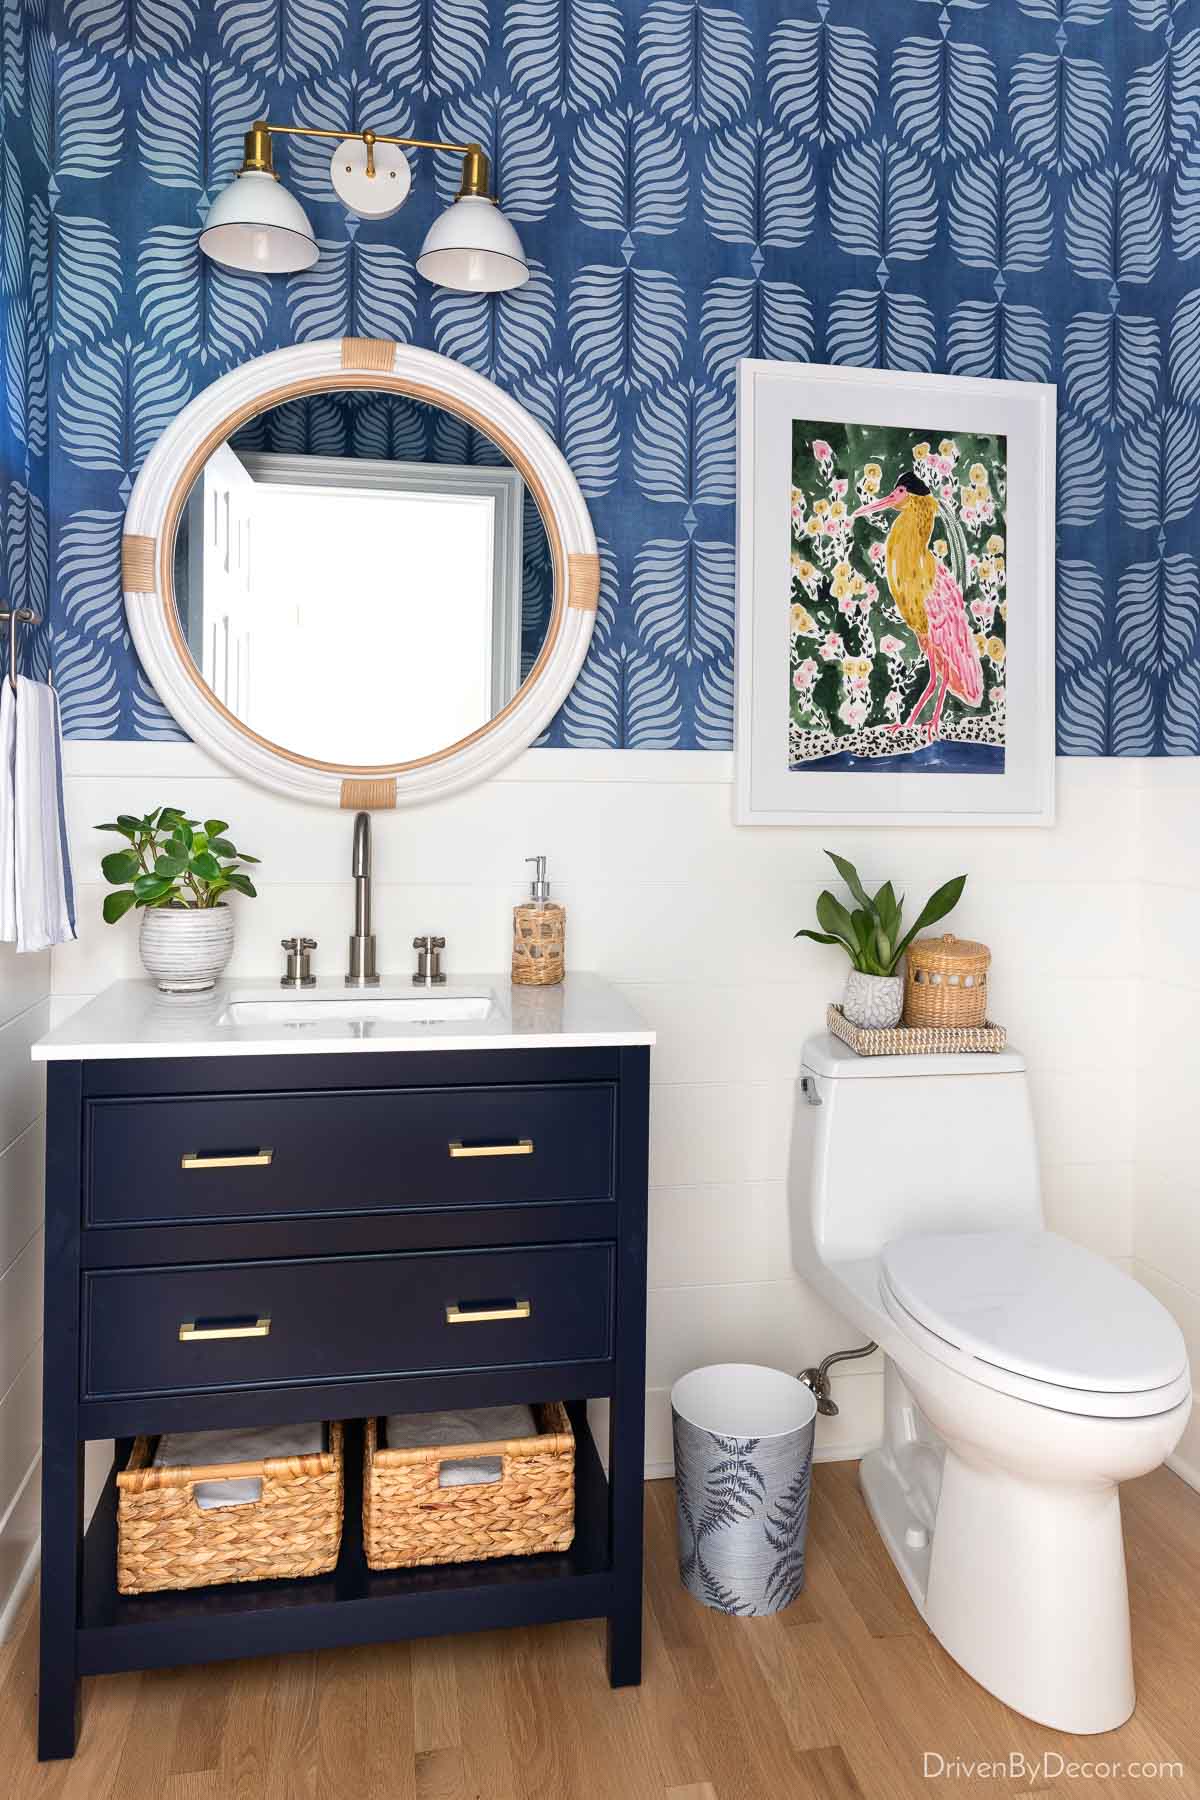
Sources: Wallpaper | 2-Light sconce | Round rattan mirror | Vanity | Faucet (similar) | Woven soap pump | Towel ring (stainless) | Vanity baskets (large) | Toilet | Toilet paper holder (brushed gold) | Woven toilet tray (small) | Bird art print (18 x 24) with White wood frame (similar) | Waste basket covered with grasscloth wallpaper remnant
Let’s jump into the details on everything that went into our new space…
Powder Room Shiplap Installation
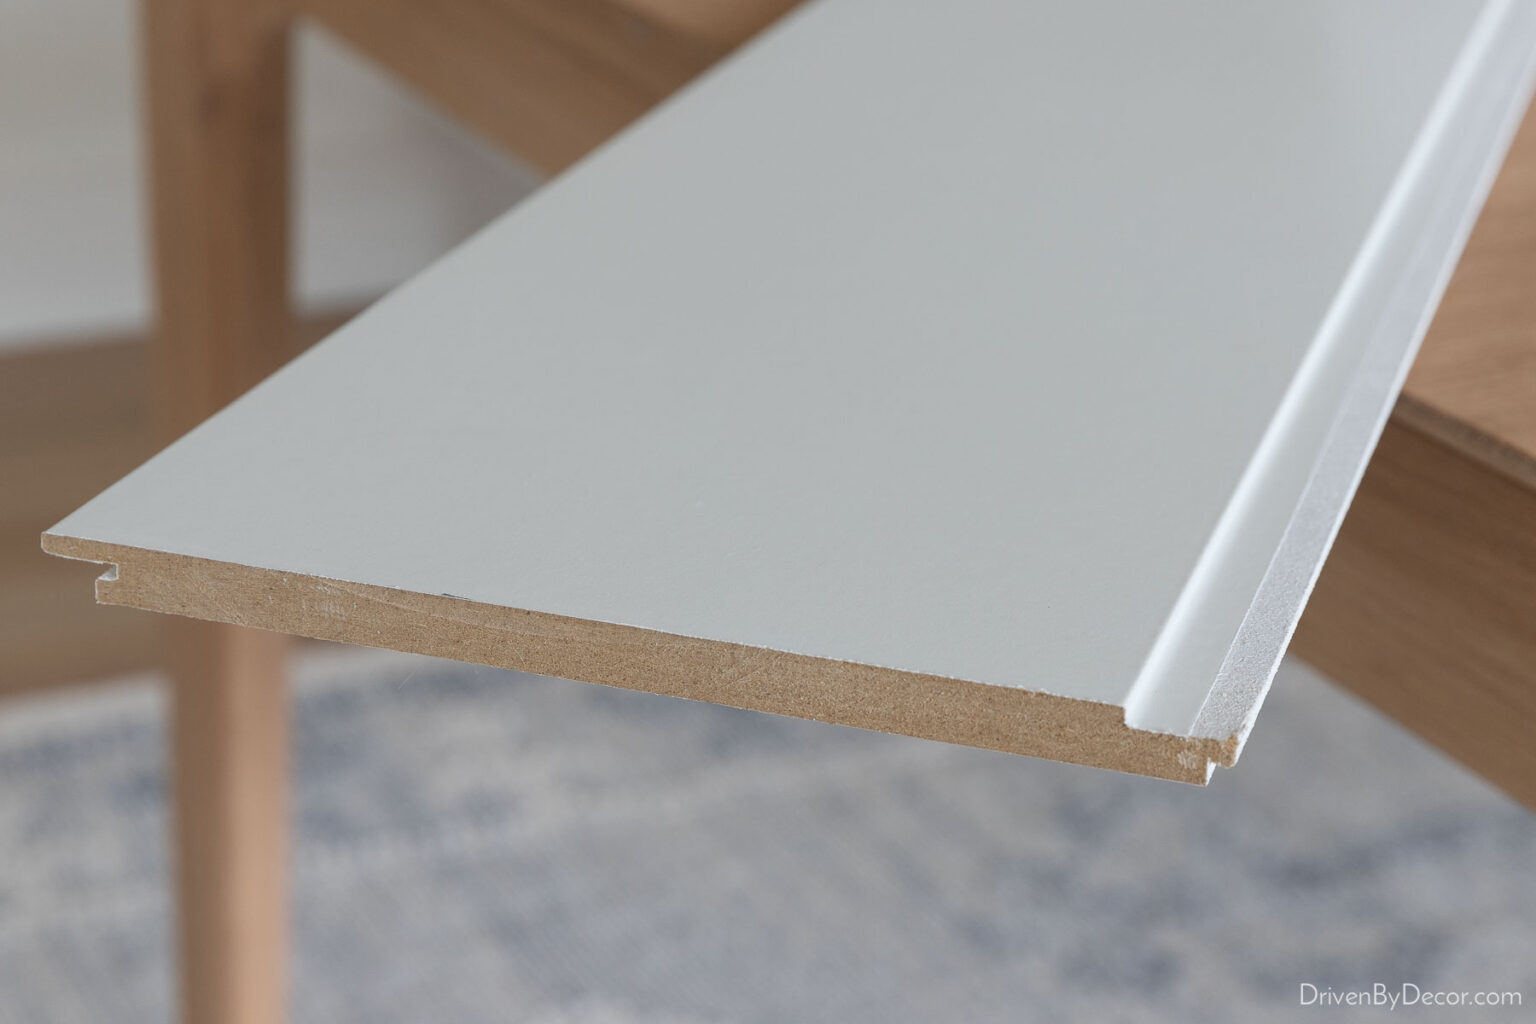
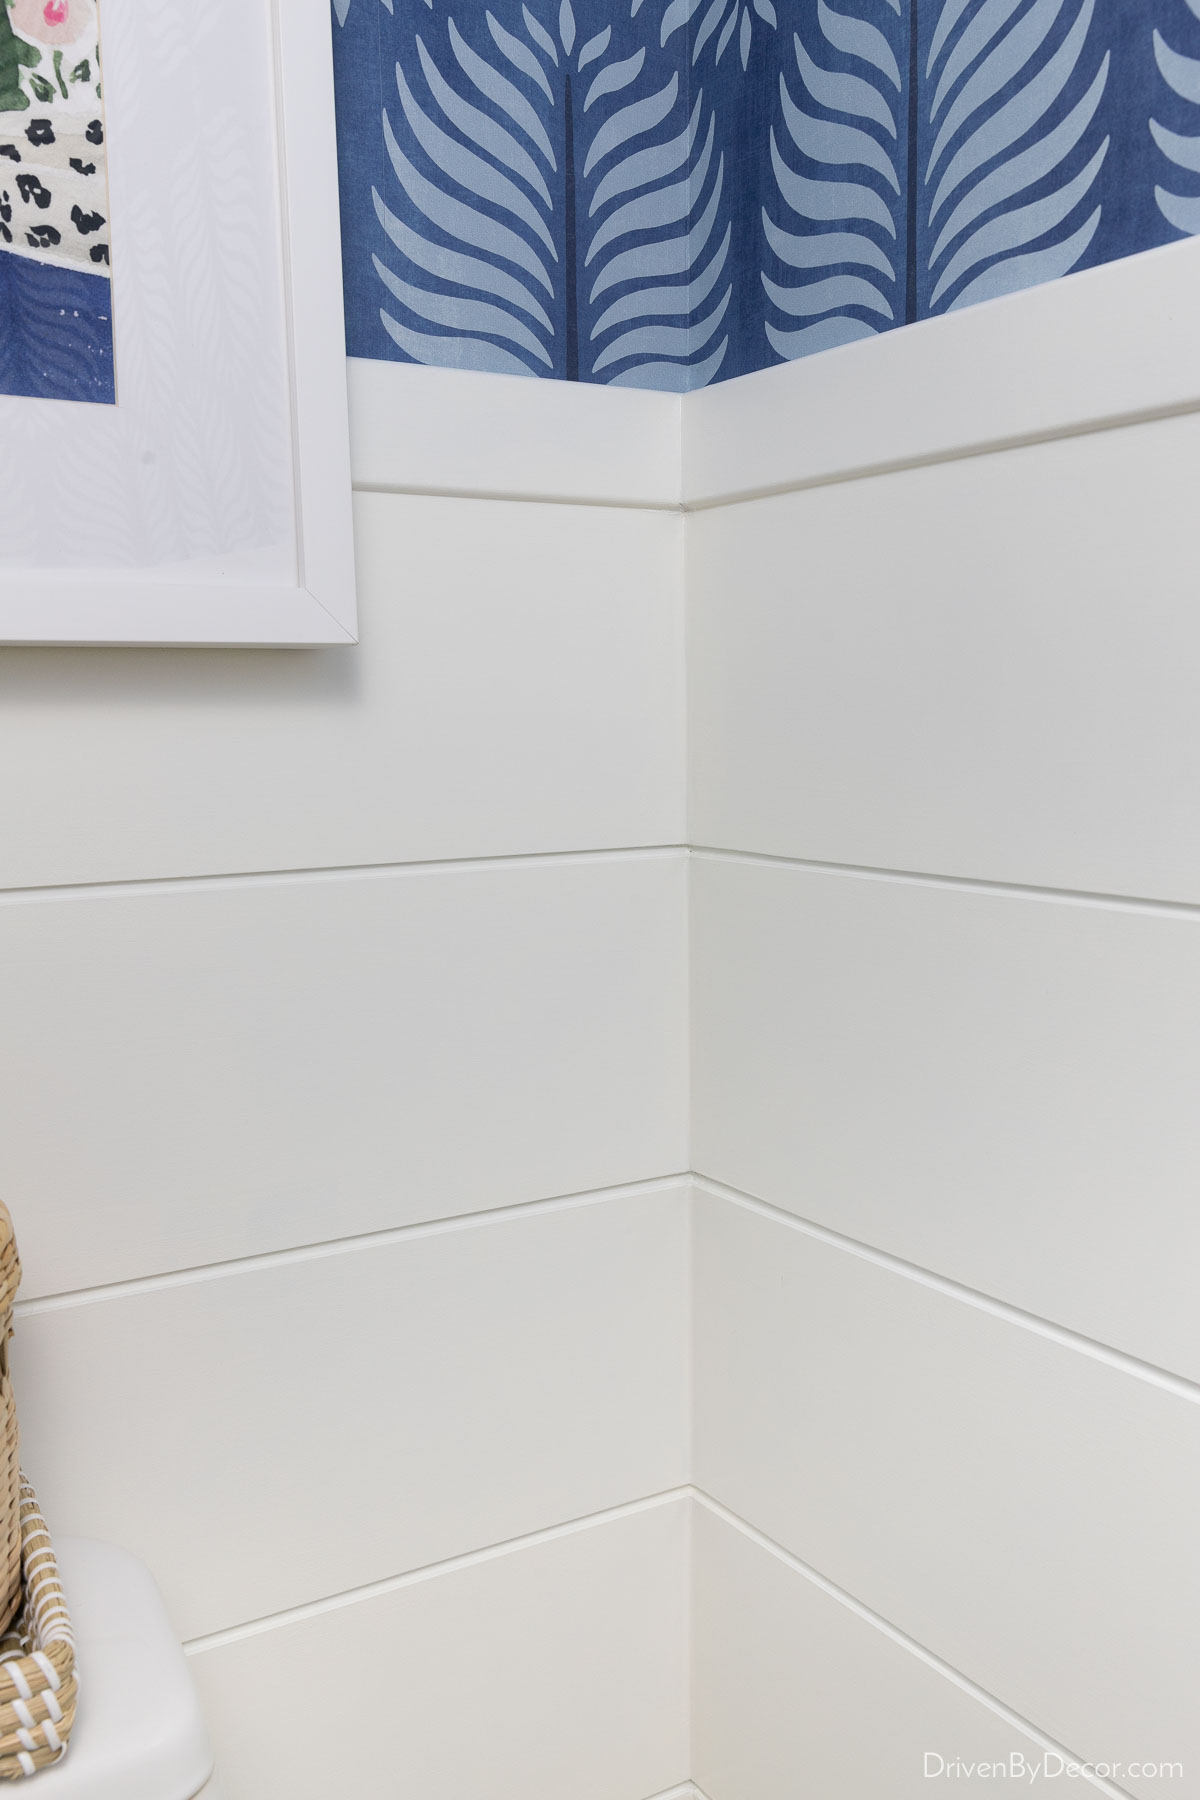
One of the biggest changes we made was removing the wallpaper (detailed in my post on how to remove wallpaper!) and installing shiplap on the bottom ⅓ and new wallpaper on the top ⅔rds of the walls. I wanted shiplap boards that were at least 6″ wide and thinner than my baseboards so I could keep my existing baseboards and door casing in place.
After a lot of searching, I ended up finding thin 7″ MDF shiplap from Lumber Liquidators and it worked beautifully:
Lumbar Liquidators no longer sells it but I found and linked several similar MDF shiplap options below:
- 5 ¼″ x .56″ x 6′ shiplap (Amazon)
- 5 ¼″ or 7 ¼″ x 0.55″ x 8′ or 12‘ (Lowes)
- 7 ¼″ x 9/16″ x 8′ (Home Depot)
Before installing the shiplap, we removed the decorative cap from the top our baseboards:
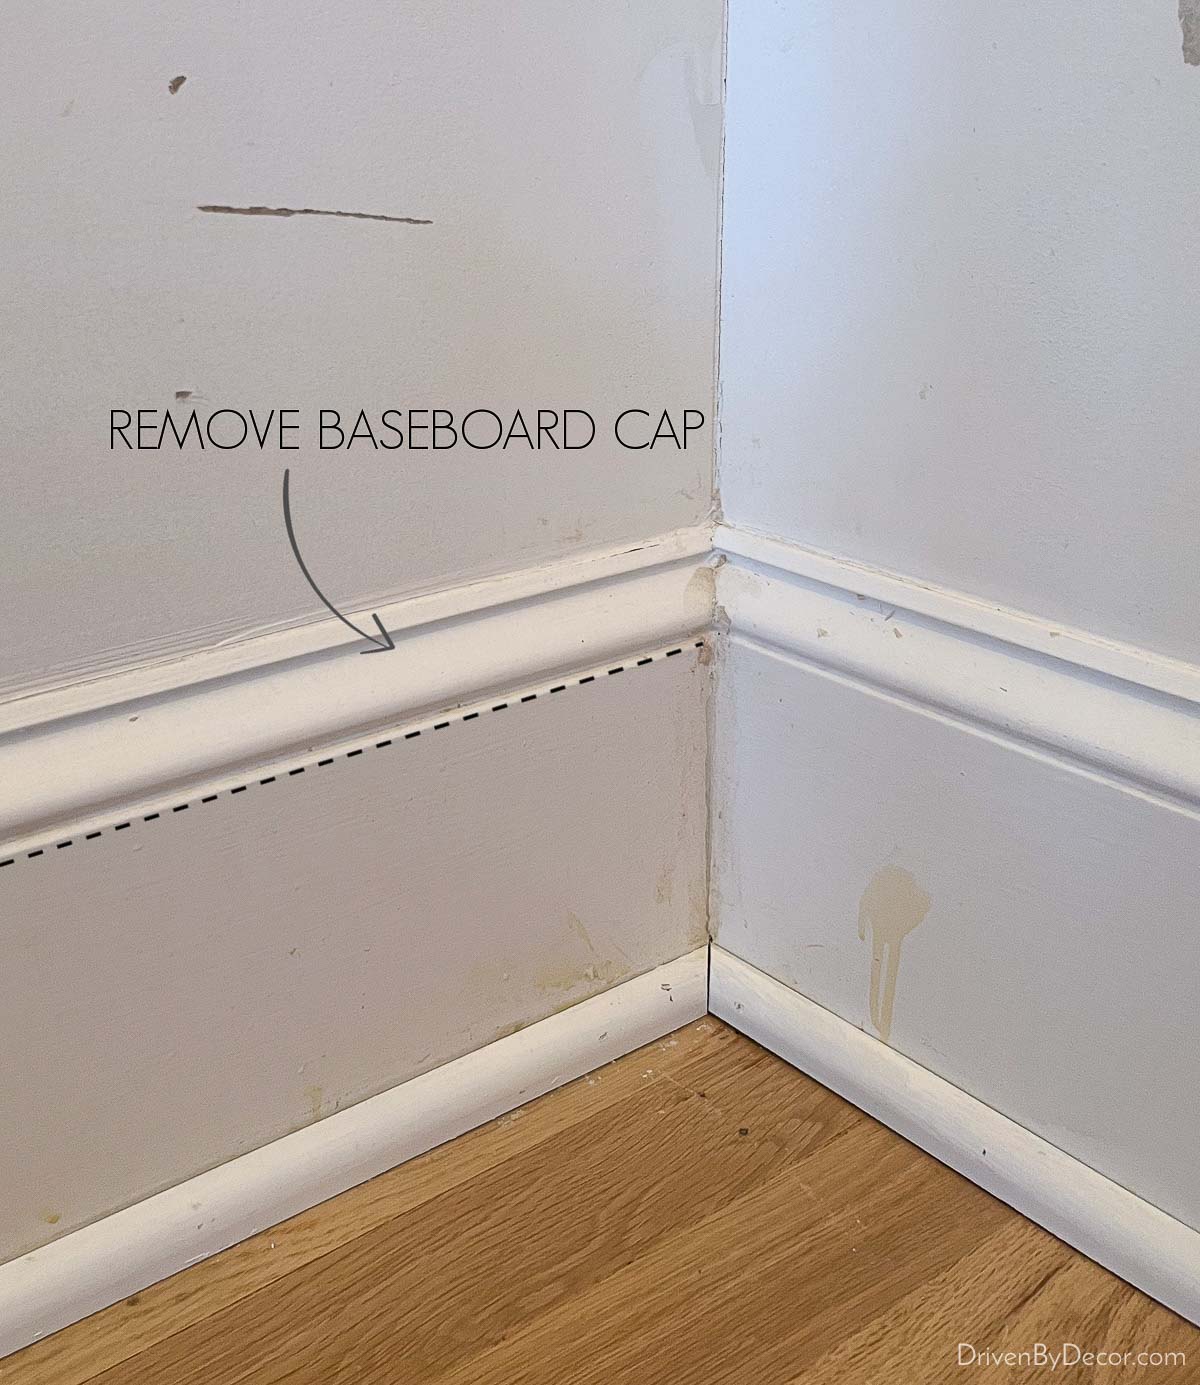
Fortunately any wall damage caused by getting that cap off was going to get covered by the shiplap so that wasn’t a worry:
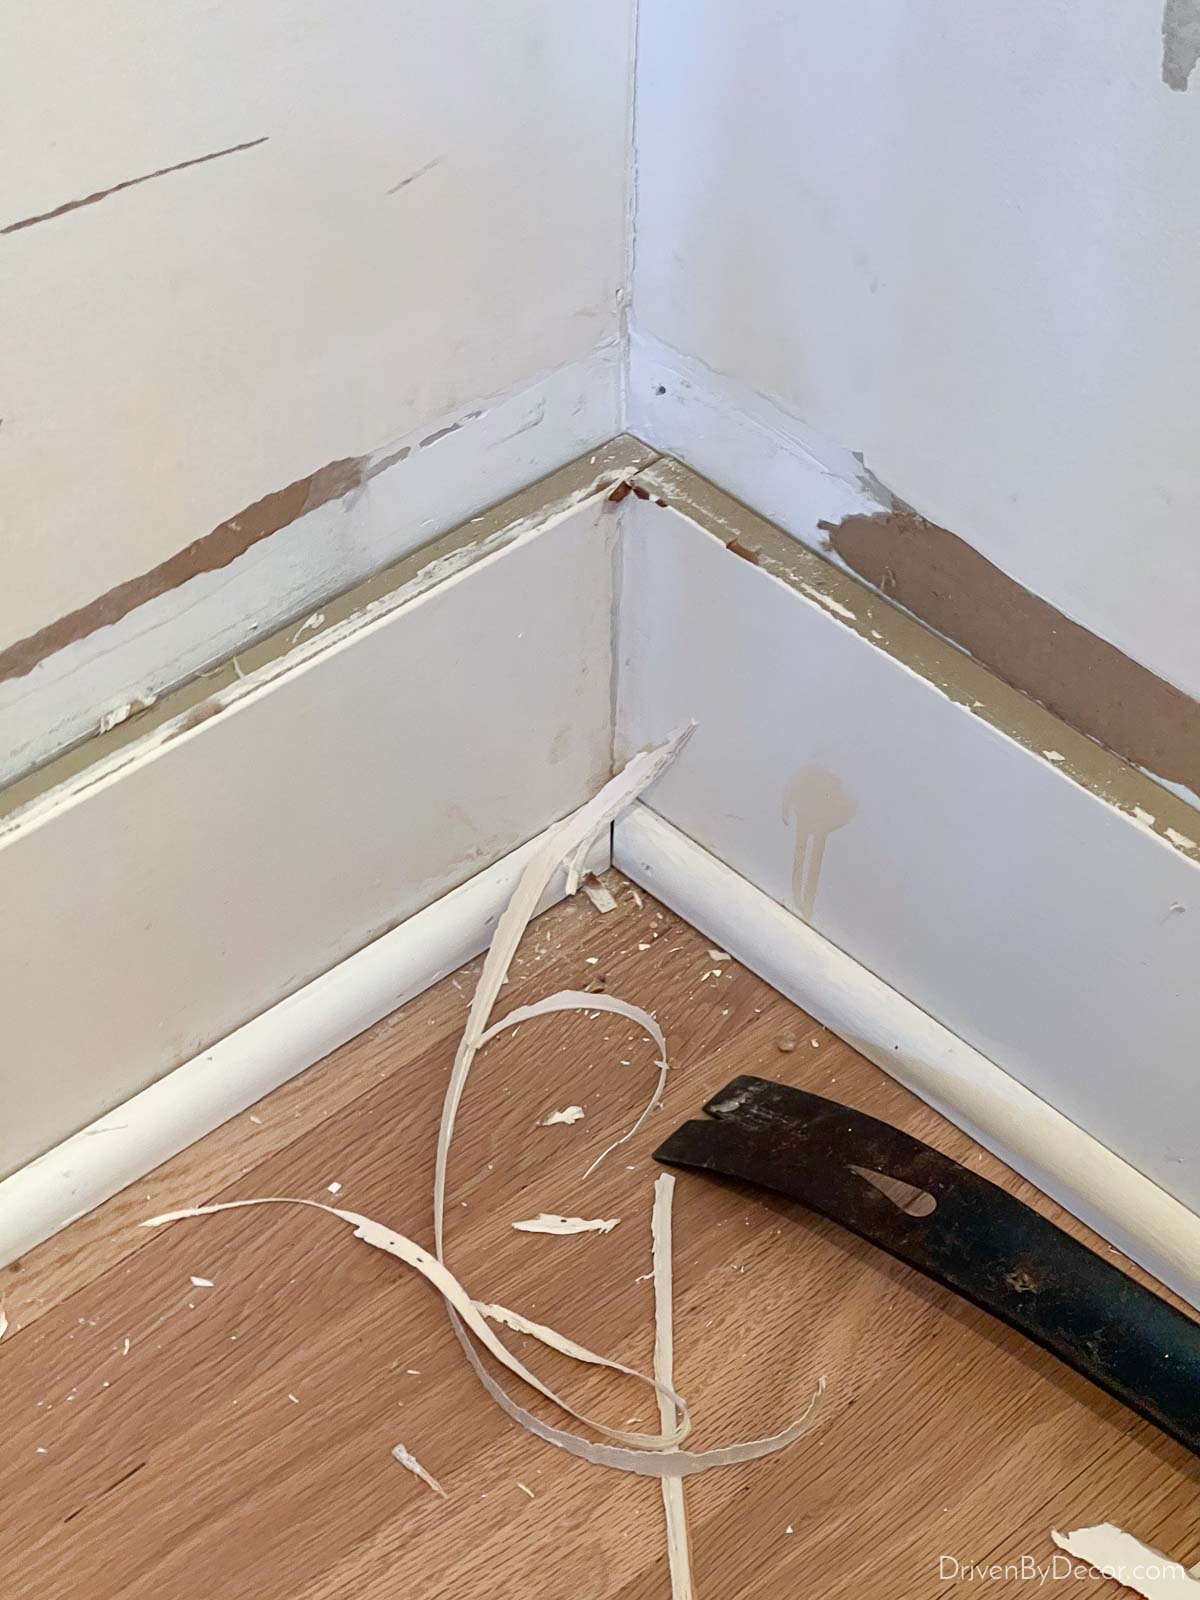
Since the shiplap was thinner than our baseboards, the first row of shiplap simply sits right on top of it. It was nailed into the wall at the location of the studs (marked by the penciled vertical lines) with a nail gun using 15-16 gauge nails:
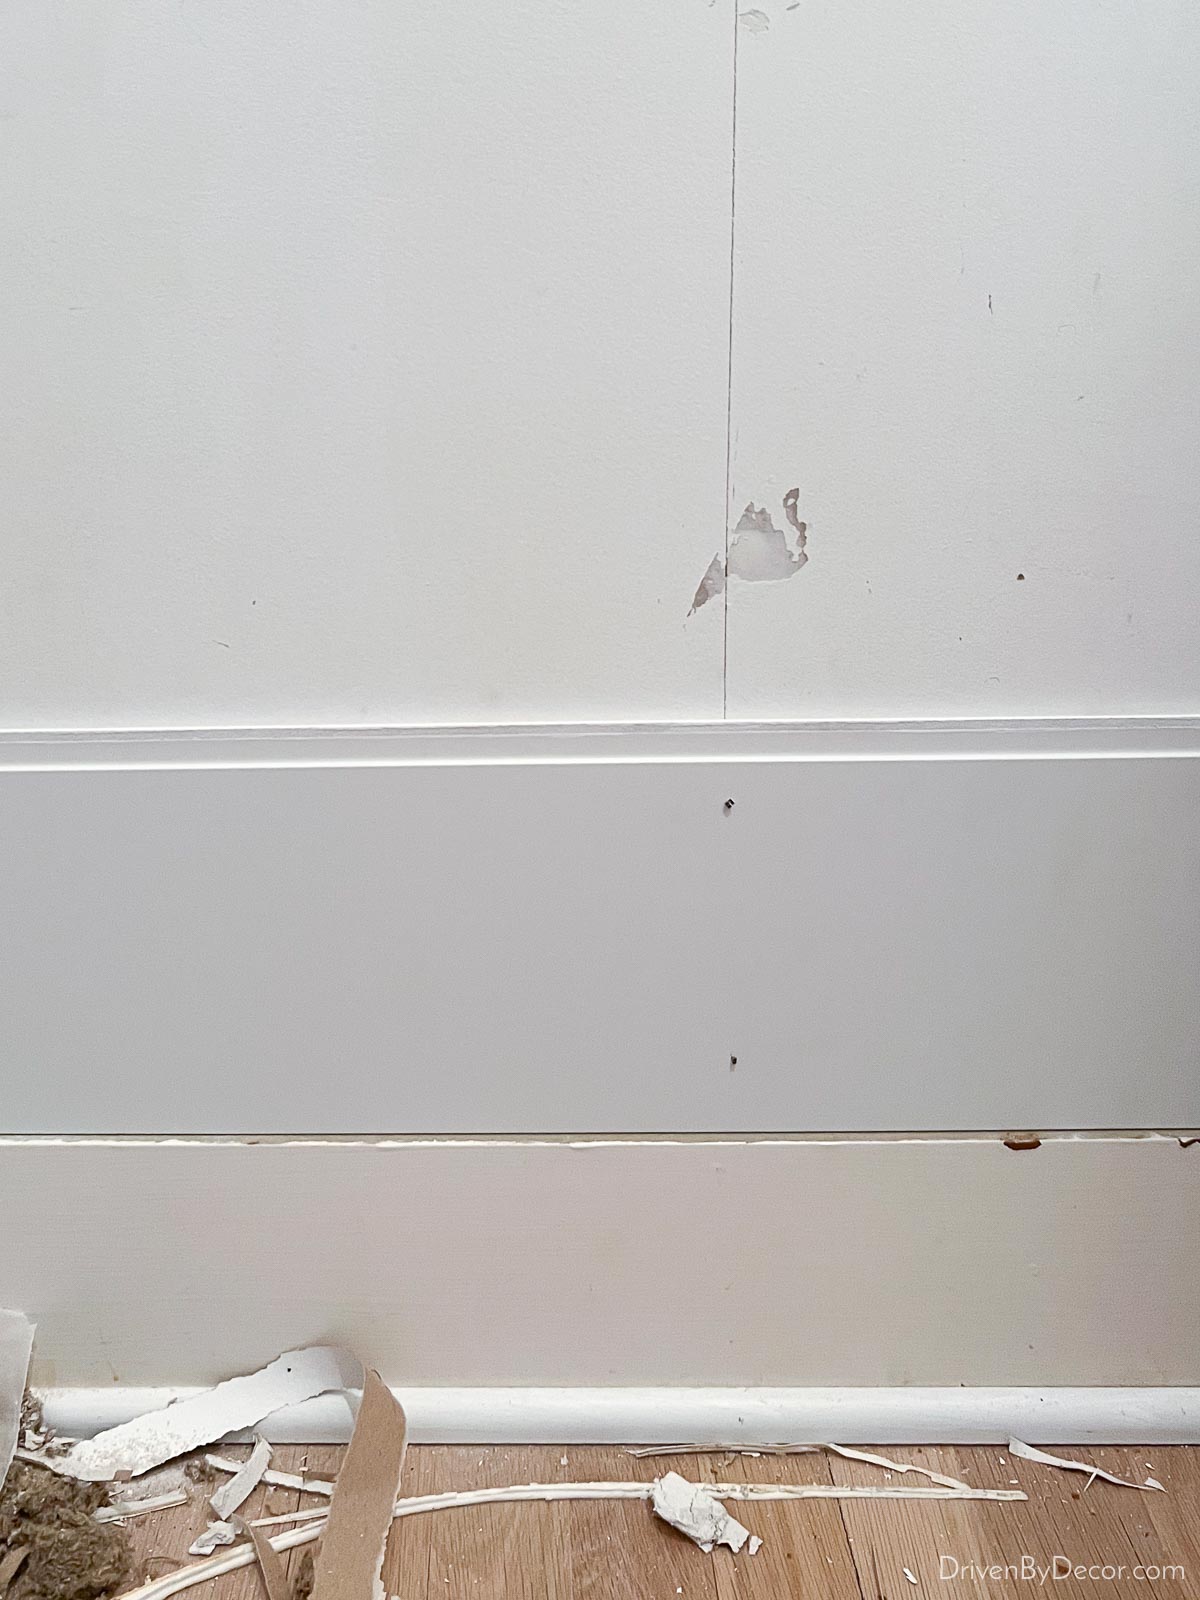
We used a nail setter as needed to recess any nails that protruded above the face of the shiplap boards. You can also choose to apply some Liquid Nails adhesive to the back of each shiplap board for extra security if you feel it’s needed (we did not).
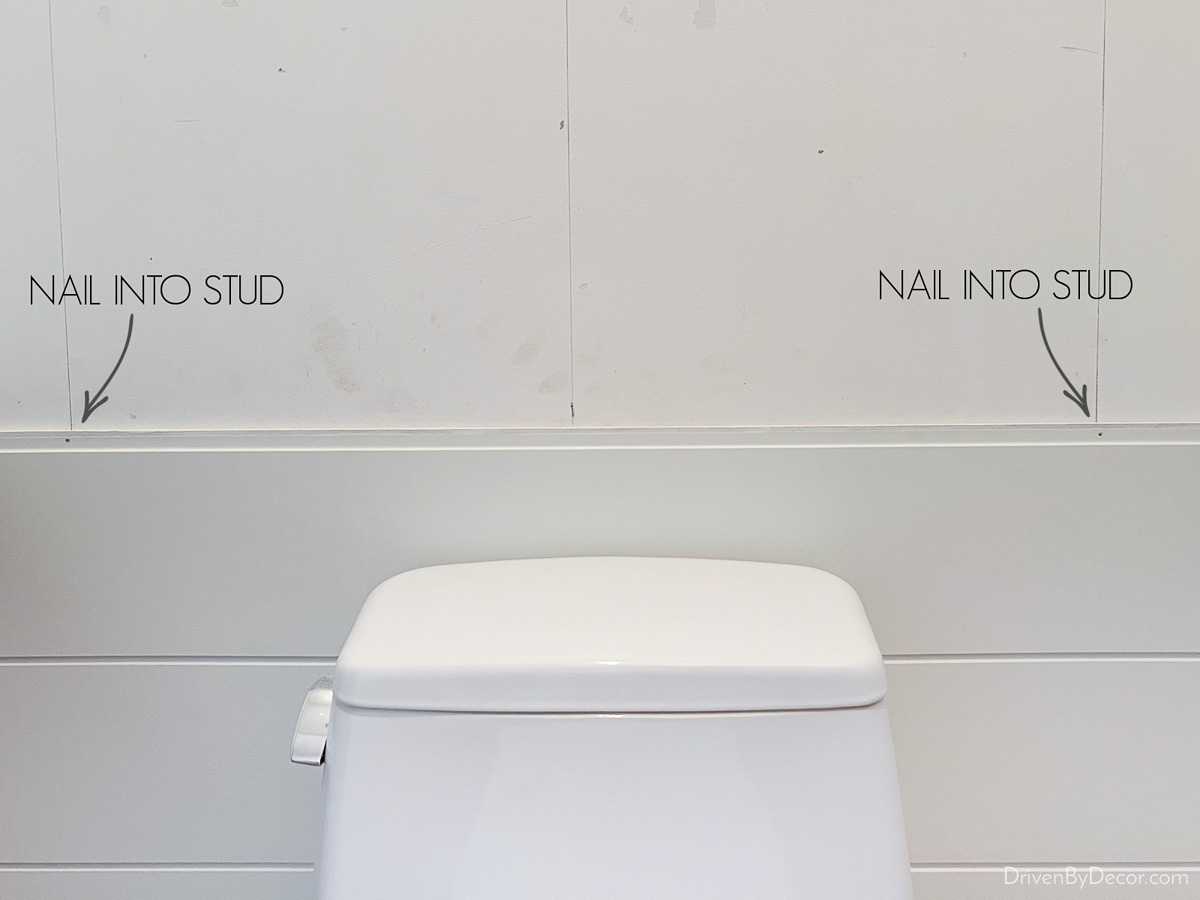
Each row of shiplap interlocks with the next. Beginning with the second row of shiplap, the boards were nailed into the studs through the small strip along the top of each piece of shiplap. Then the interlocking strip on the next piece of shiplap covers the nail so there’s no need for sanding and patching:
In spots where the shiplap overlaps any outlets or light switches, use a jigsaw to cut out a rectangle in the shiplap at the spot of the outlet (my contractor did this for me). If it overlaps any plumbing, use a hole saw (drill bit that drills a perfect hole) to make a hole in the shiplap that the pipe comes through.
Before you nail your top row of shiplap onto the wall, use a saw to “rip” (cut off) the projecting piece along the top of the board that would normally interlock with the next piece. Here I have the final row held up only with tape so I could make sure this is the height I wanted to end it at:
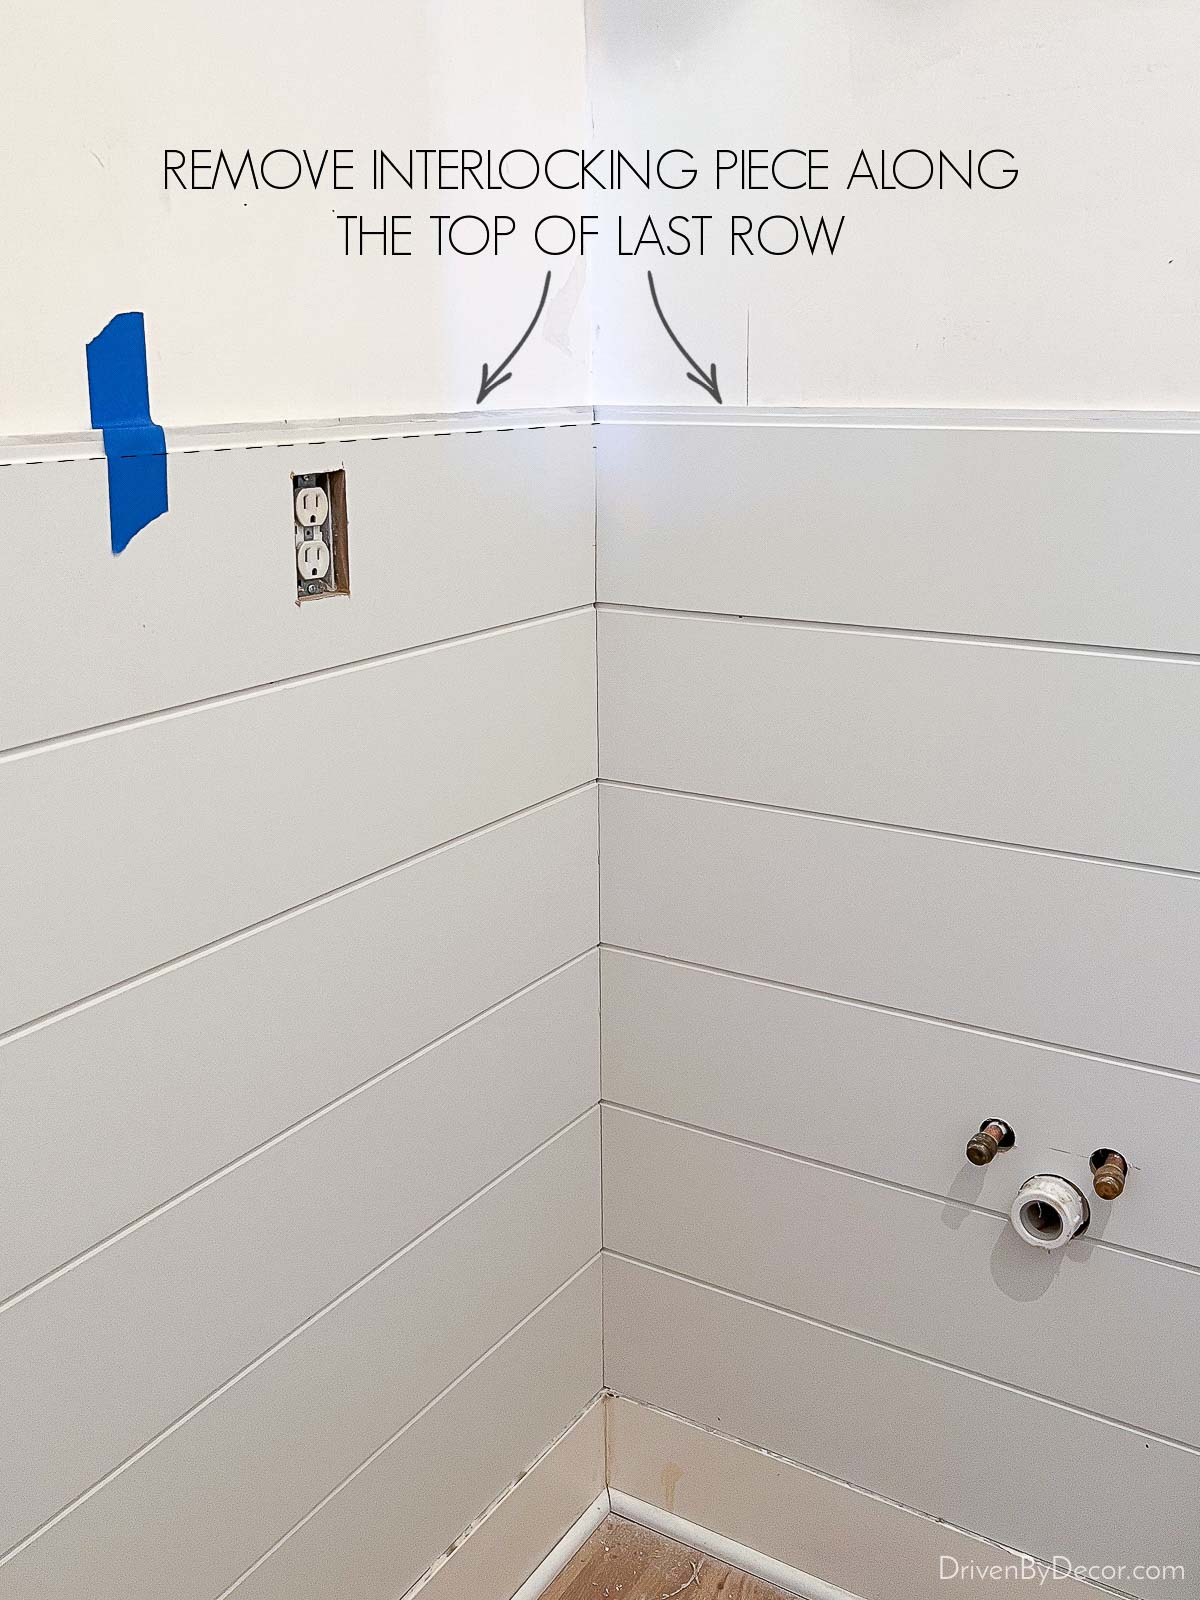
This is what the final board looked like once the projecting piece along the top was removed and the shiplap board was nailed into place:
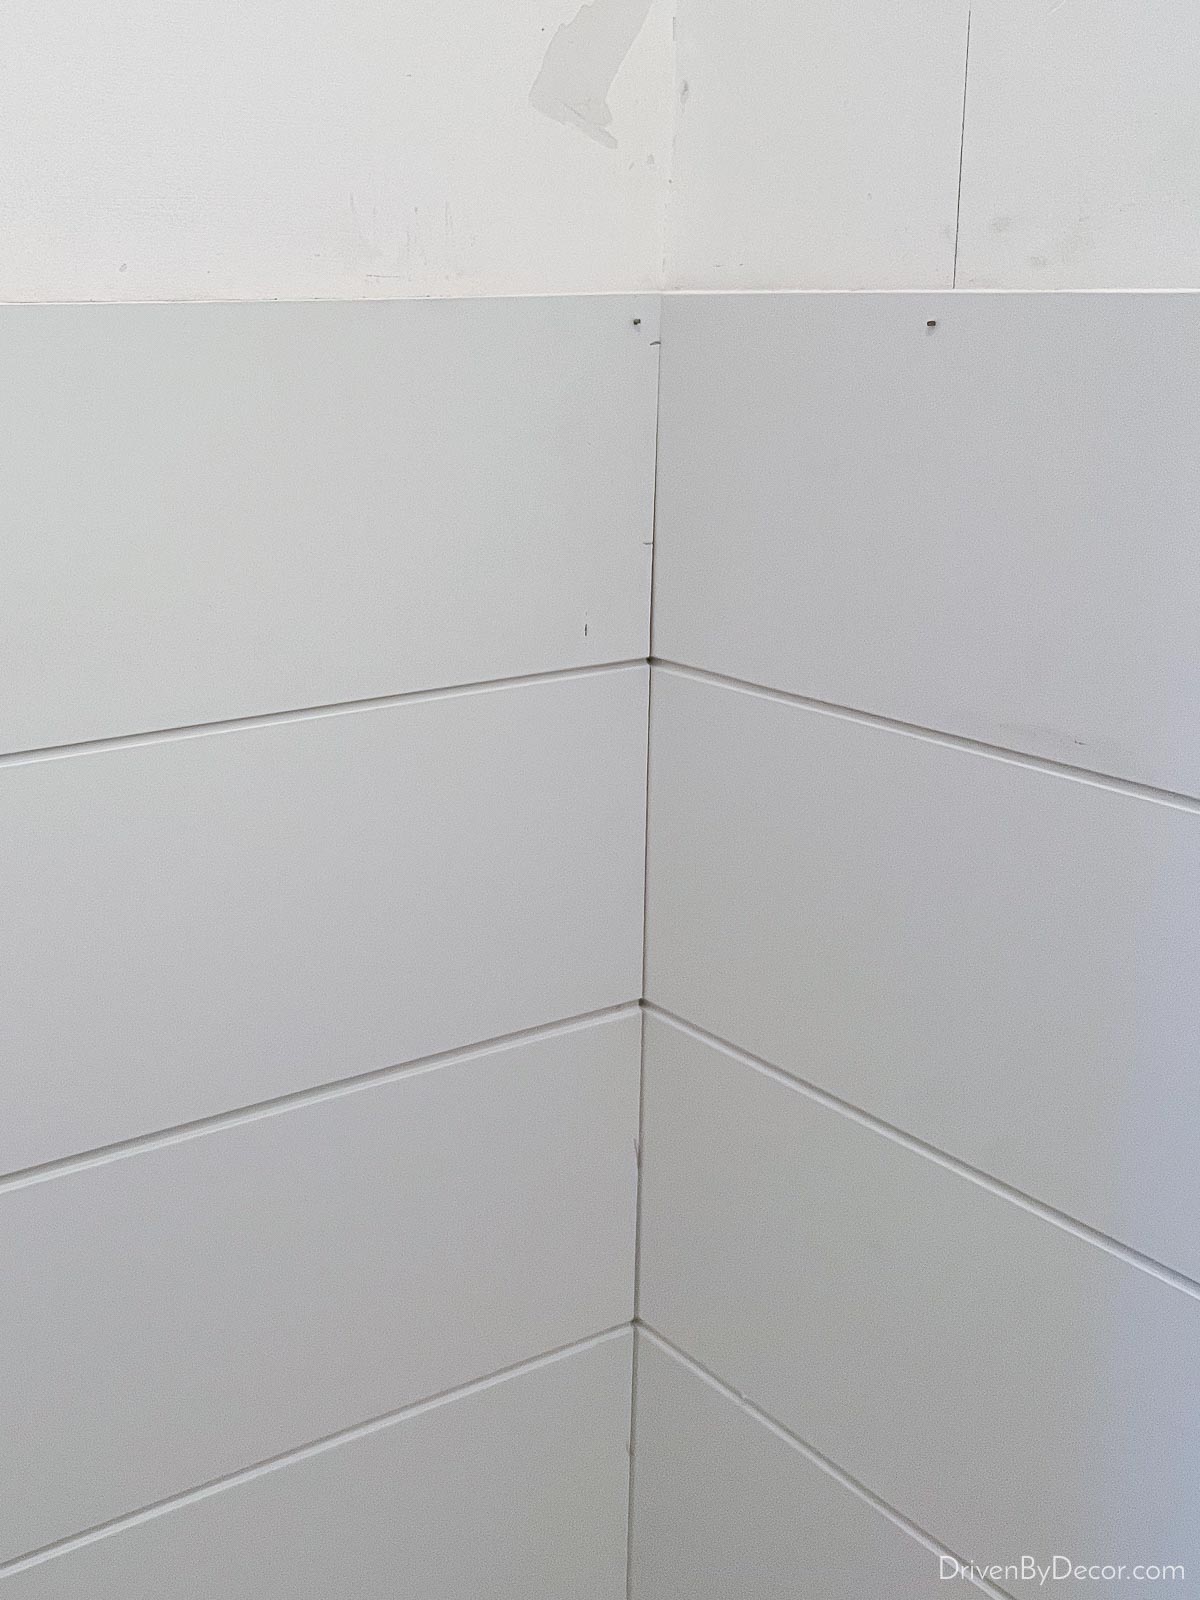
We finished off the top of our powder room shiplap with {this trim piece}. Most shiplap is finished off with a trim piece that projects from the wall more than mine but since I had planned for the mirror and art to overlap it, I wanted something more shallow than typical. I also liked that this trim piece was rounded on the edges, giving it a very finished look:
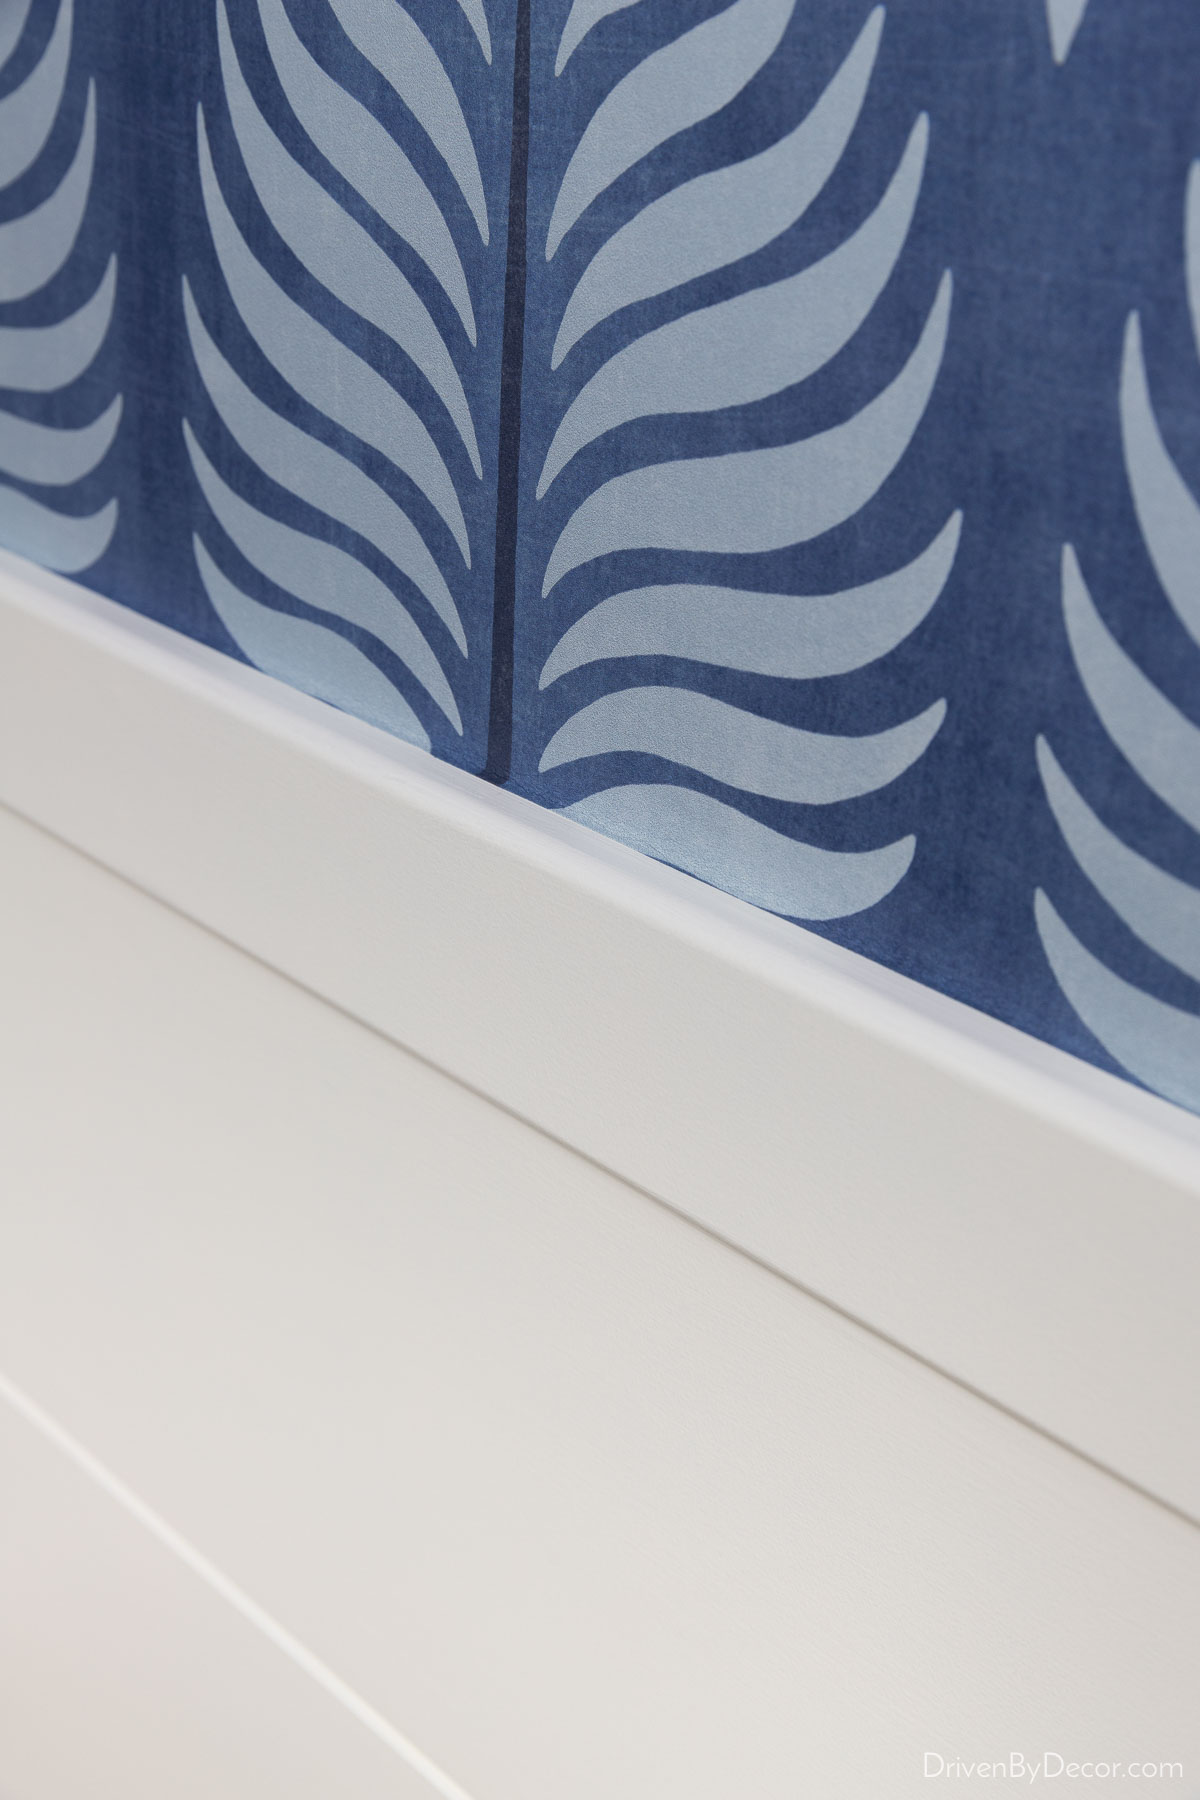
Then I caulked the corners and along the joints where the top shiplap board and trim piece meet and painted everything (along with my baseboards) Benjamin Moore Simply White in a satin finish.
I’ll share a few more details about the shiplap at the end of the post for those interested but for now, let’s move on to the rest of the room!
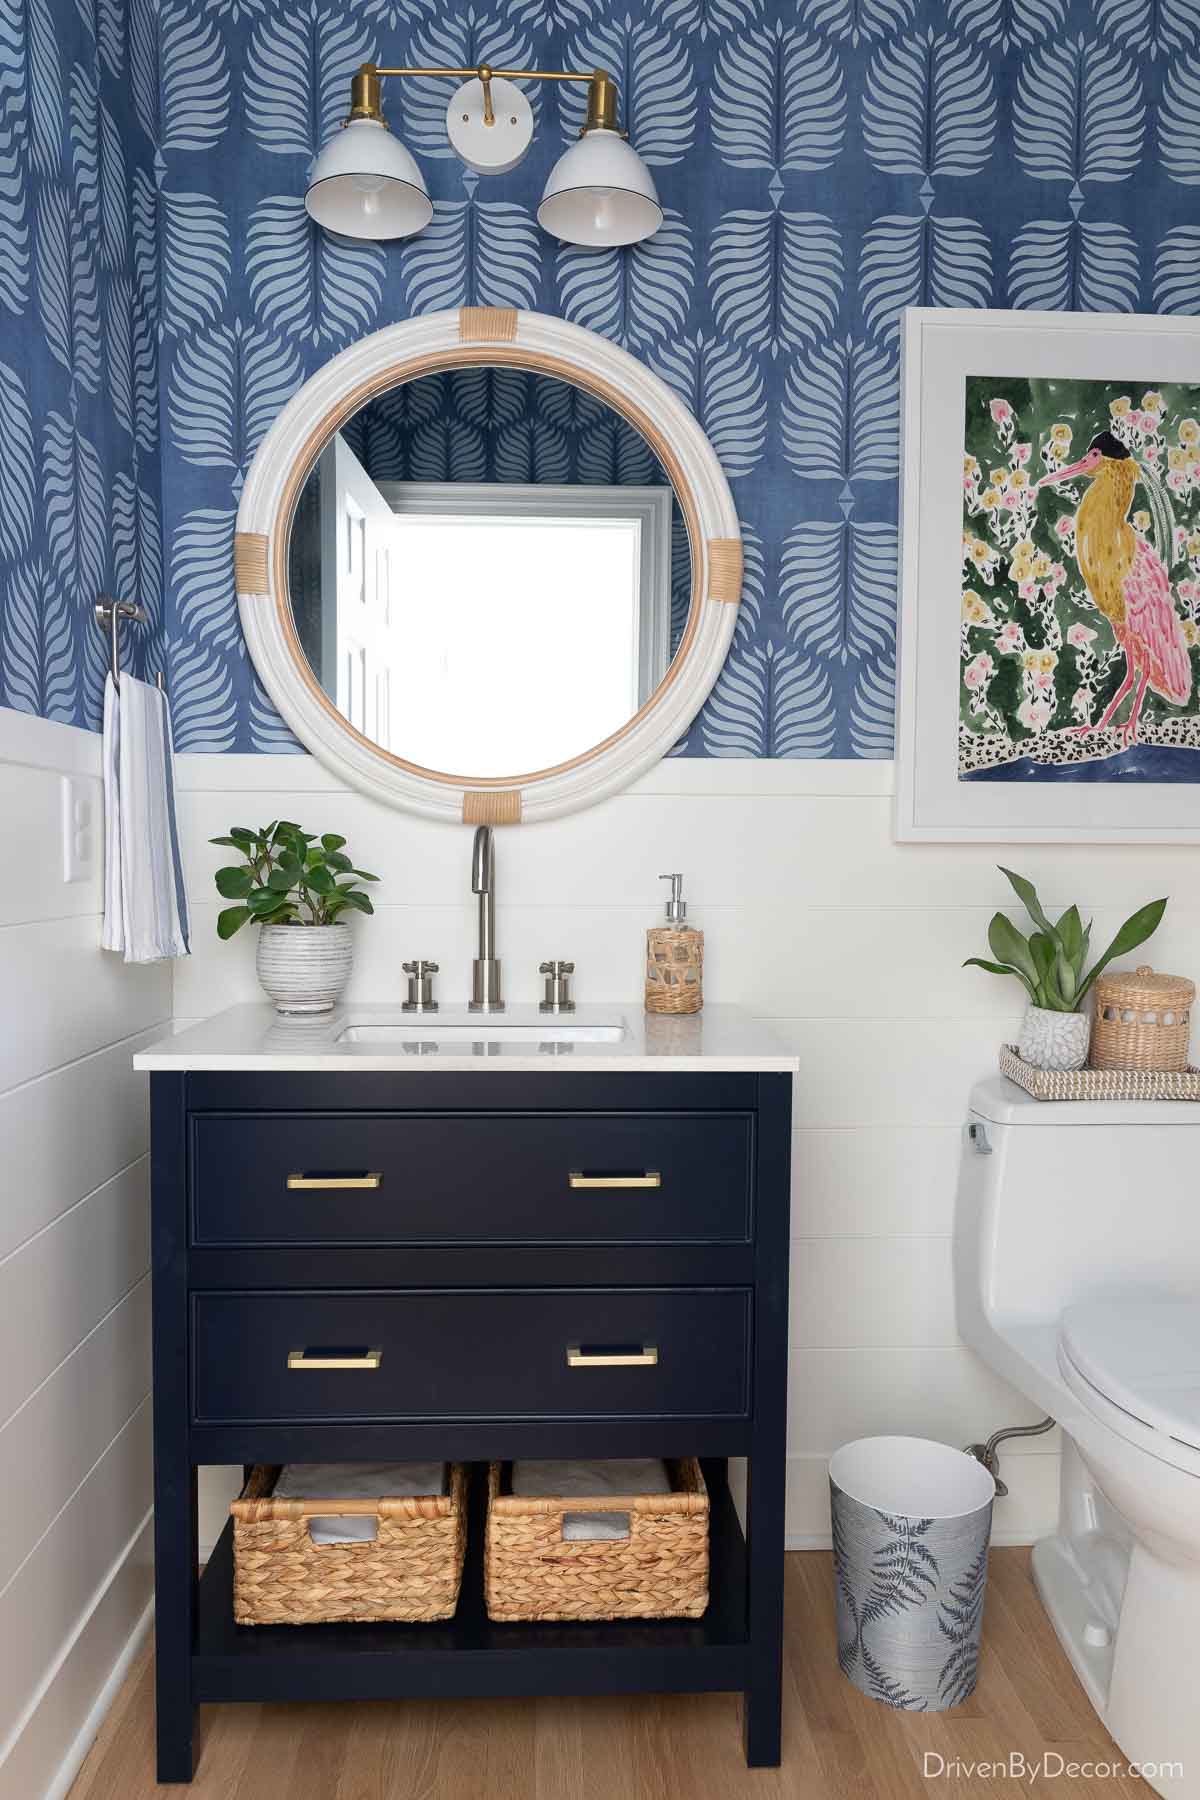
Vanity, Mirror, & Lighting
I’m not a huge fan of pedestal sinks, especially the one we had which didn’t even have a level spot for a soap pump. I chose {this 30″ vanity} to replace it with and even though it’s much wider than the old pedestal sink I actually think it makes the room feel bigger:
I usually replace the hardware that vanities come with, but I actually liked the gold pulls that came on this vanity so I left them as-is.
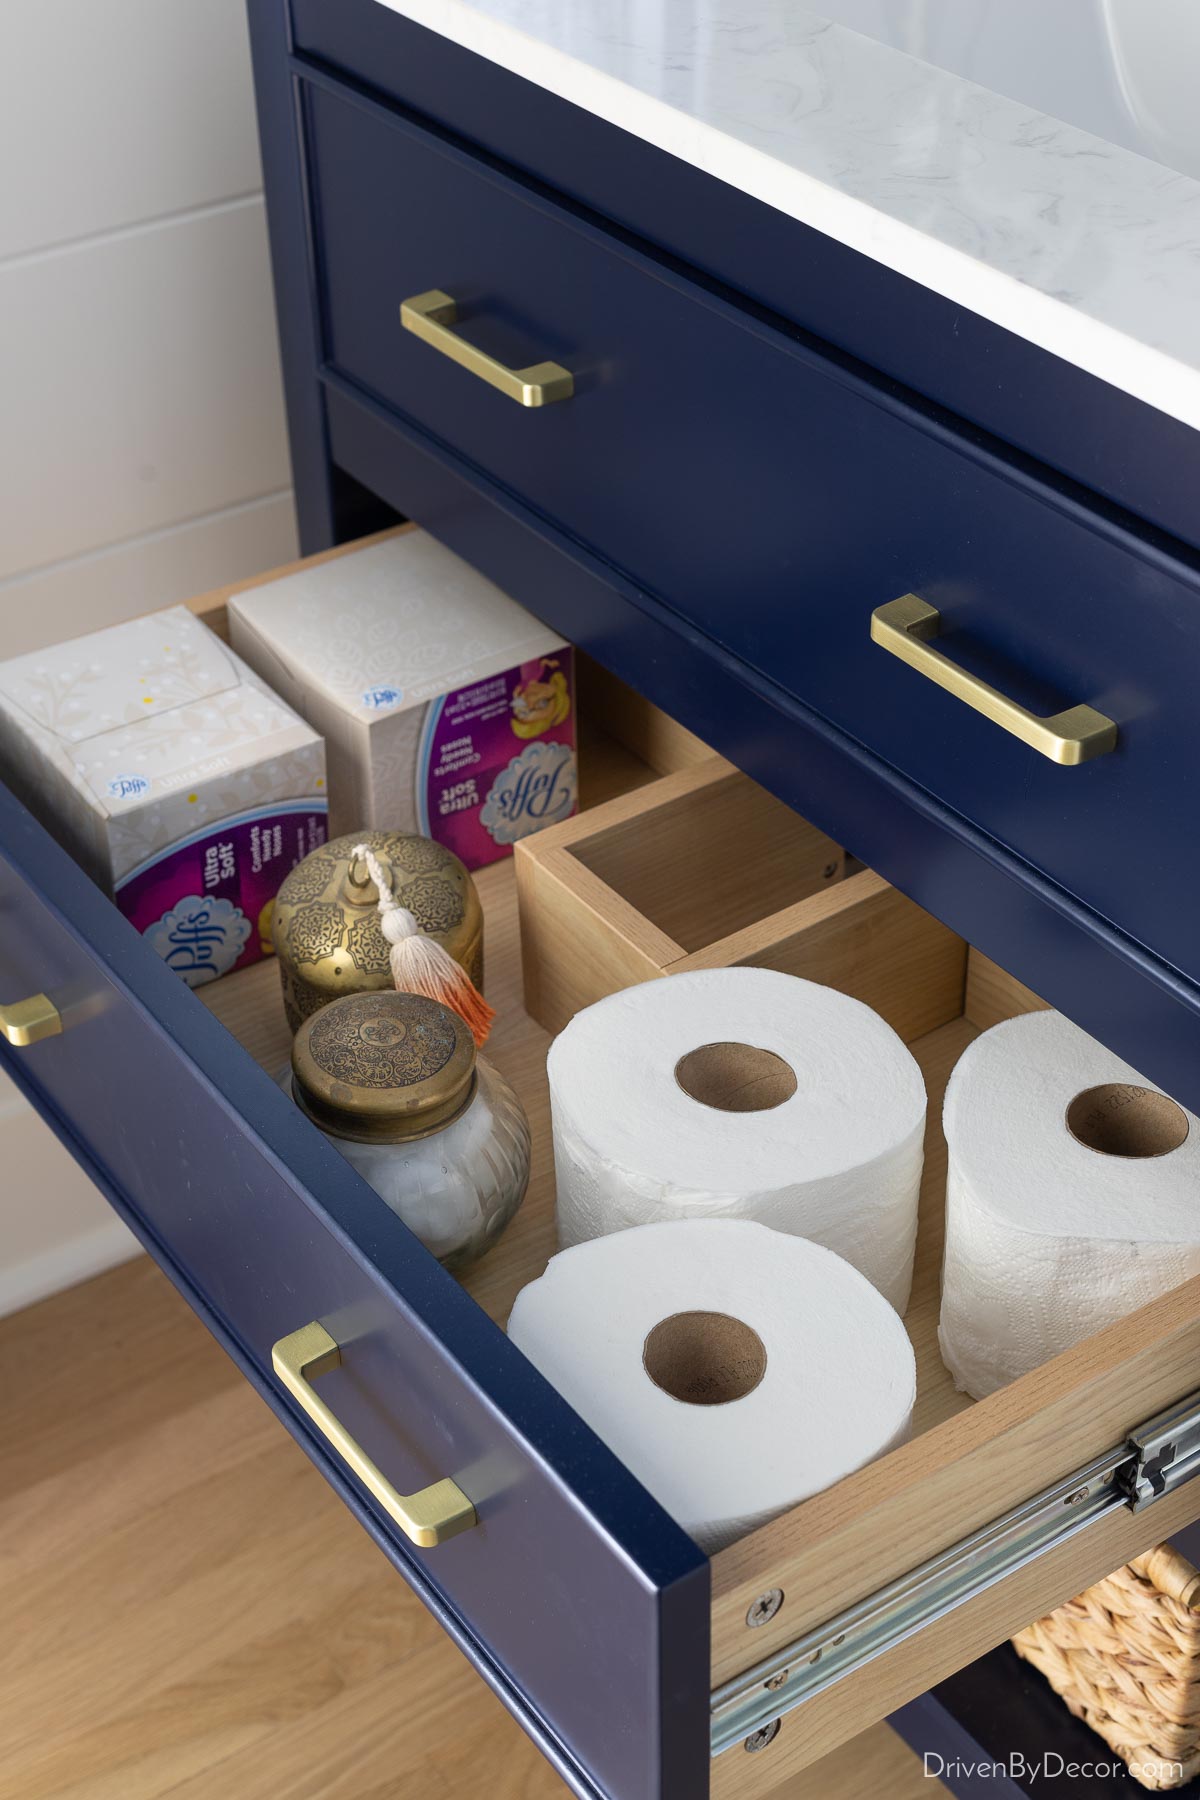
Along with loving how much more counter space the vanity provides, I also love that it has two useable drawers for storage:
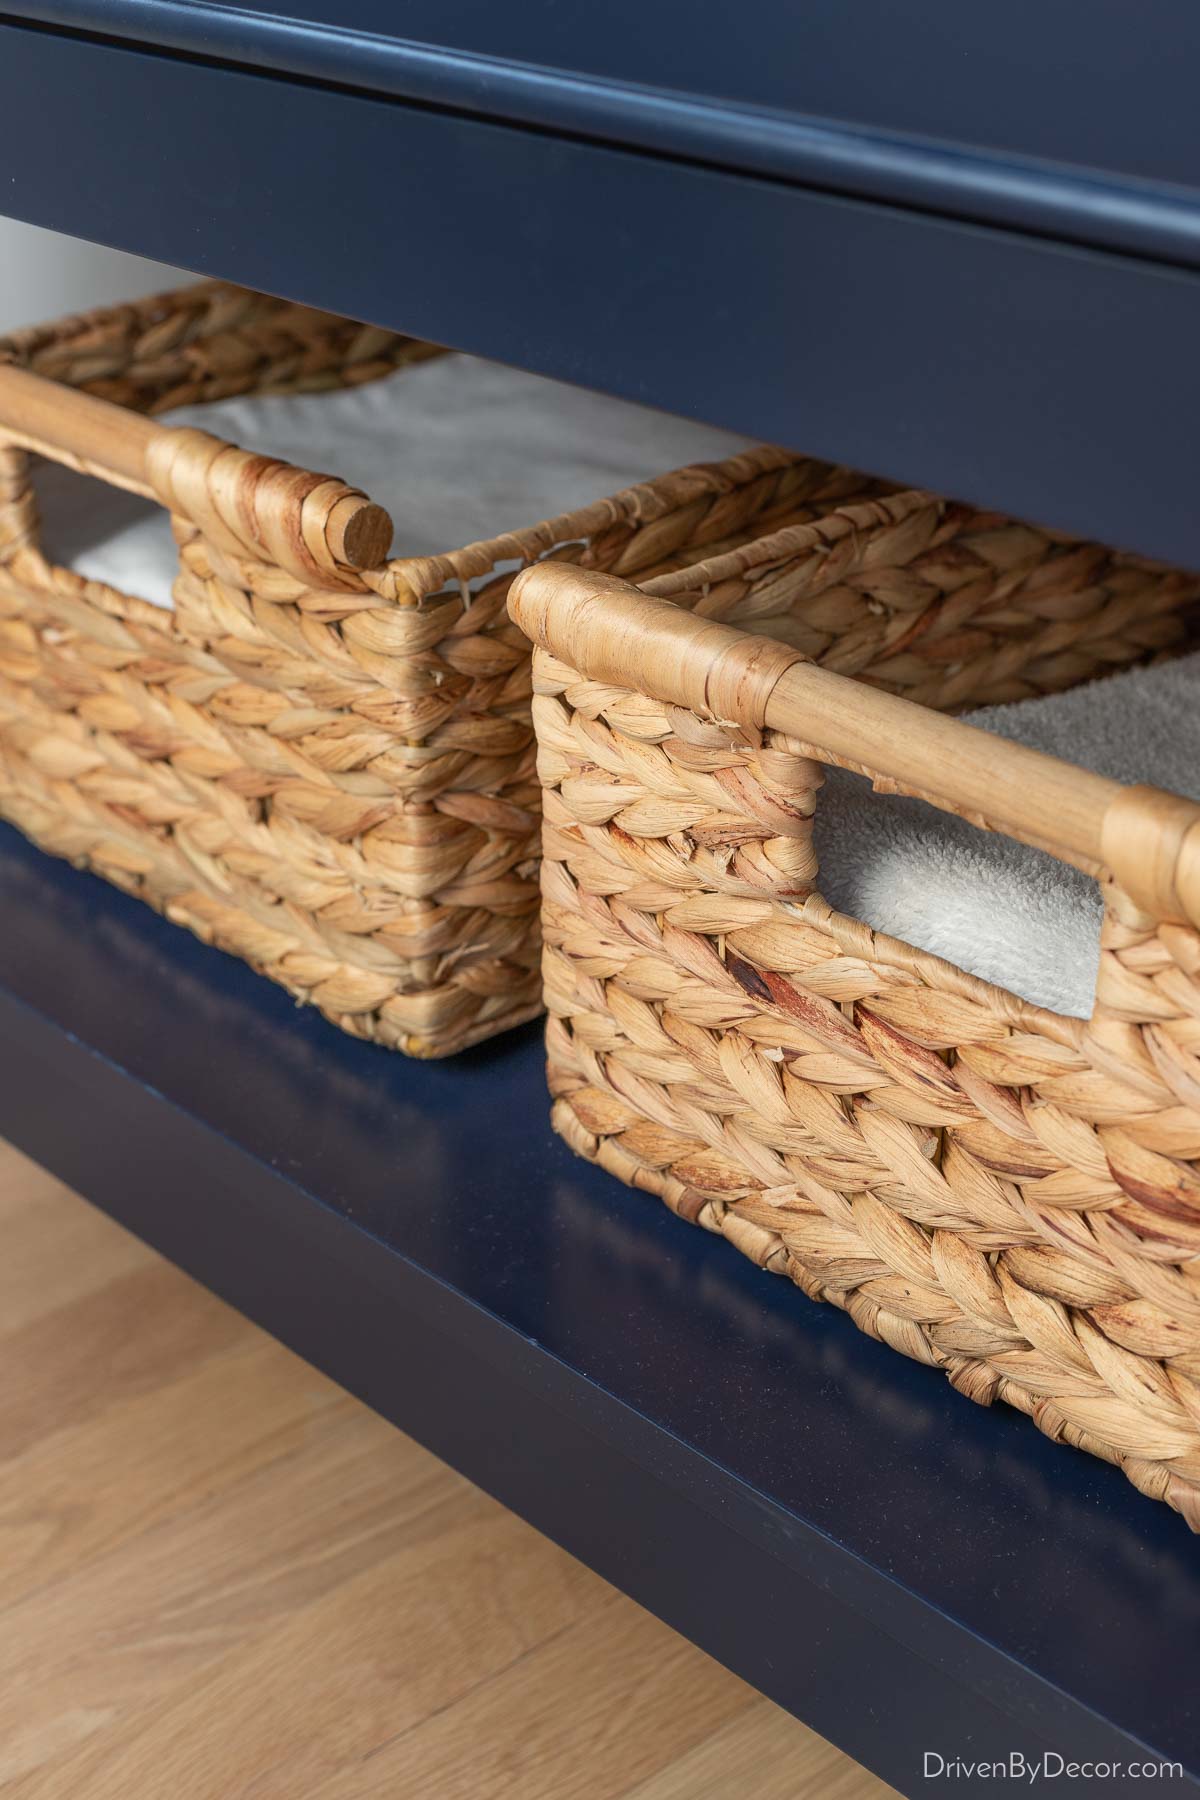
along with space for storage in baskets on the shelf below (I bought a pair of {these woven baskets} for the vanity shelf):
For the faucet, I went with a high arched faucet in the brushed nickel finish (it’s no longer available but {this faucet} is similar):
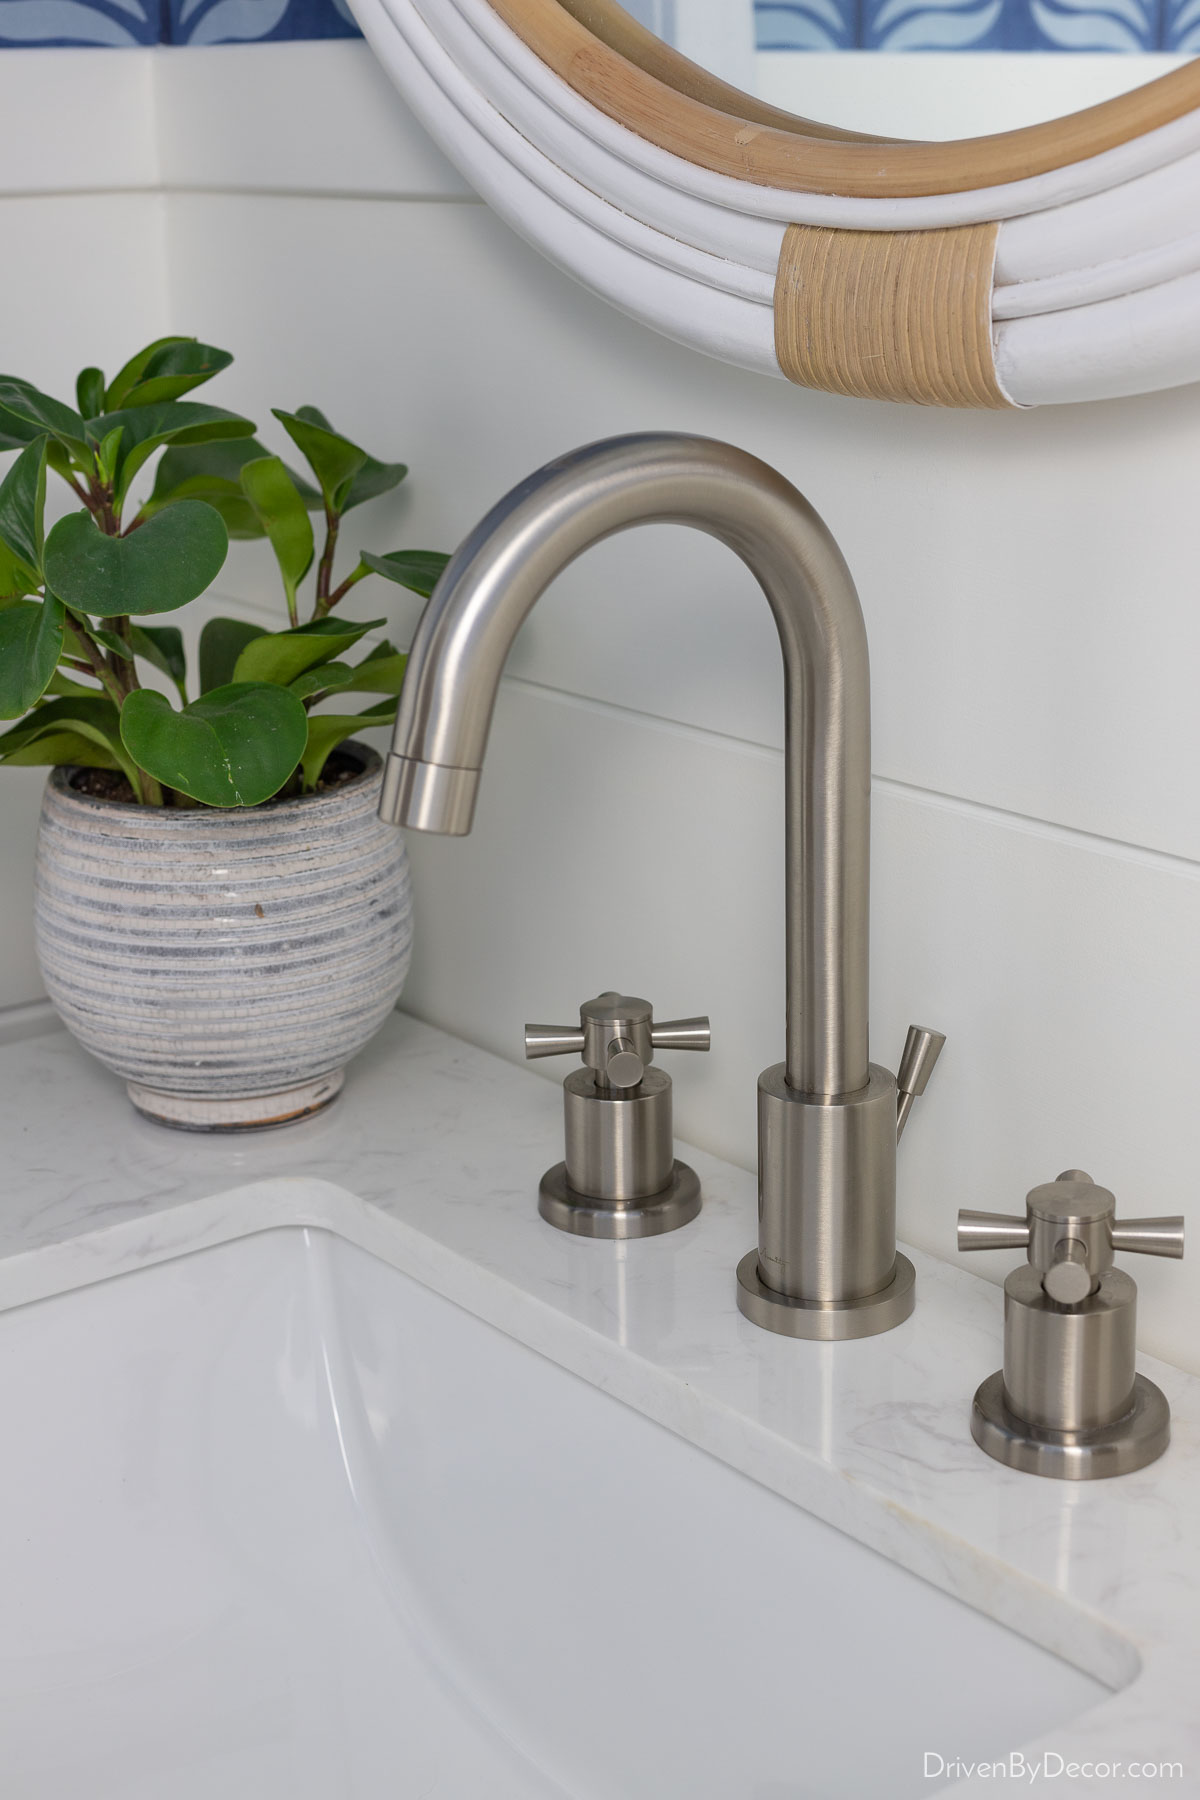
If it looks familiar, it’s because it’s the same faucet I chose (and loved) for our master bathroom remodel. Above the vanity, I hung {this round rattan mirror} that I shared in my recent post on bathroom mirror ideas:
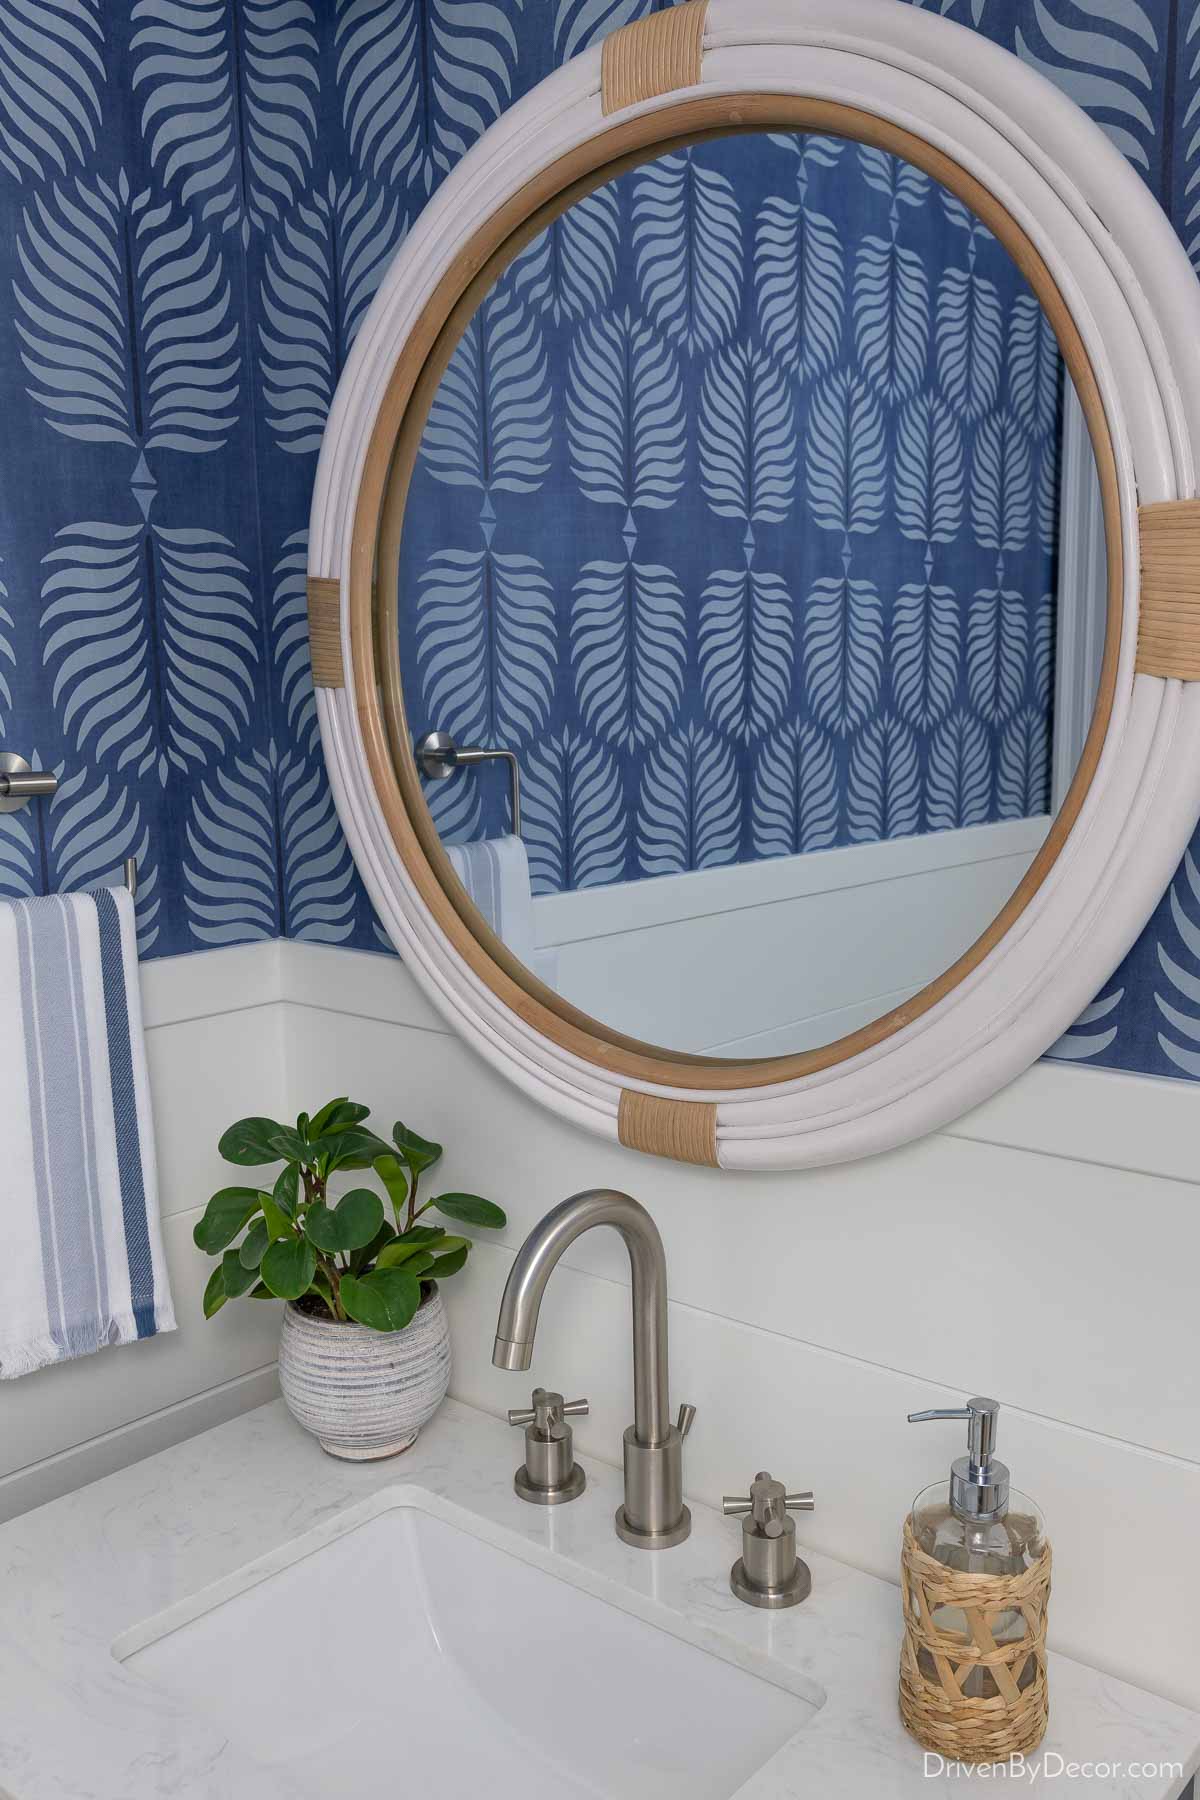
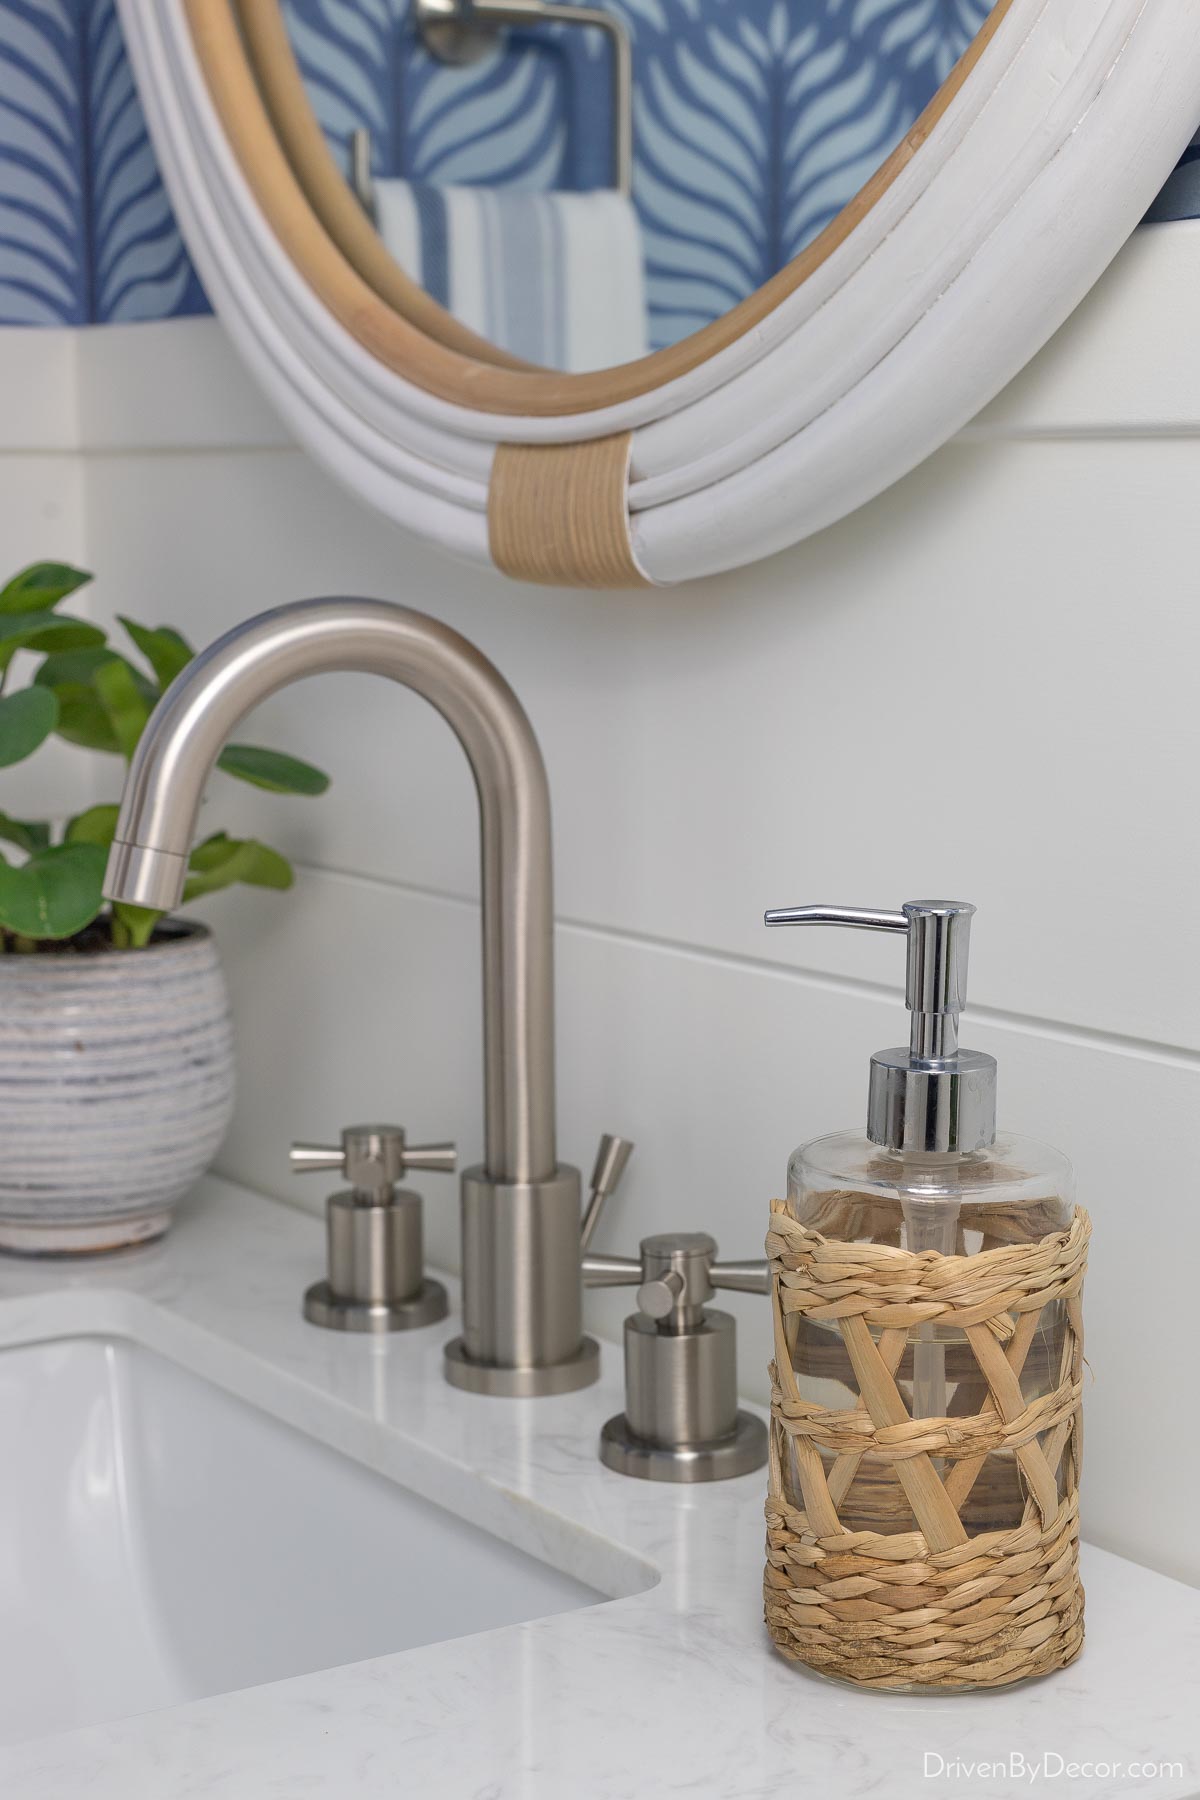
It’s a great lower cost look-alike to {this mirror from Serena & Lily}. I also added in another dose of rattan with {this soap pump}:
I had an electrician reroute the wiring so that instead of having sconces at the sides, I have {this double light sconce} above the mirror:
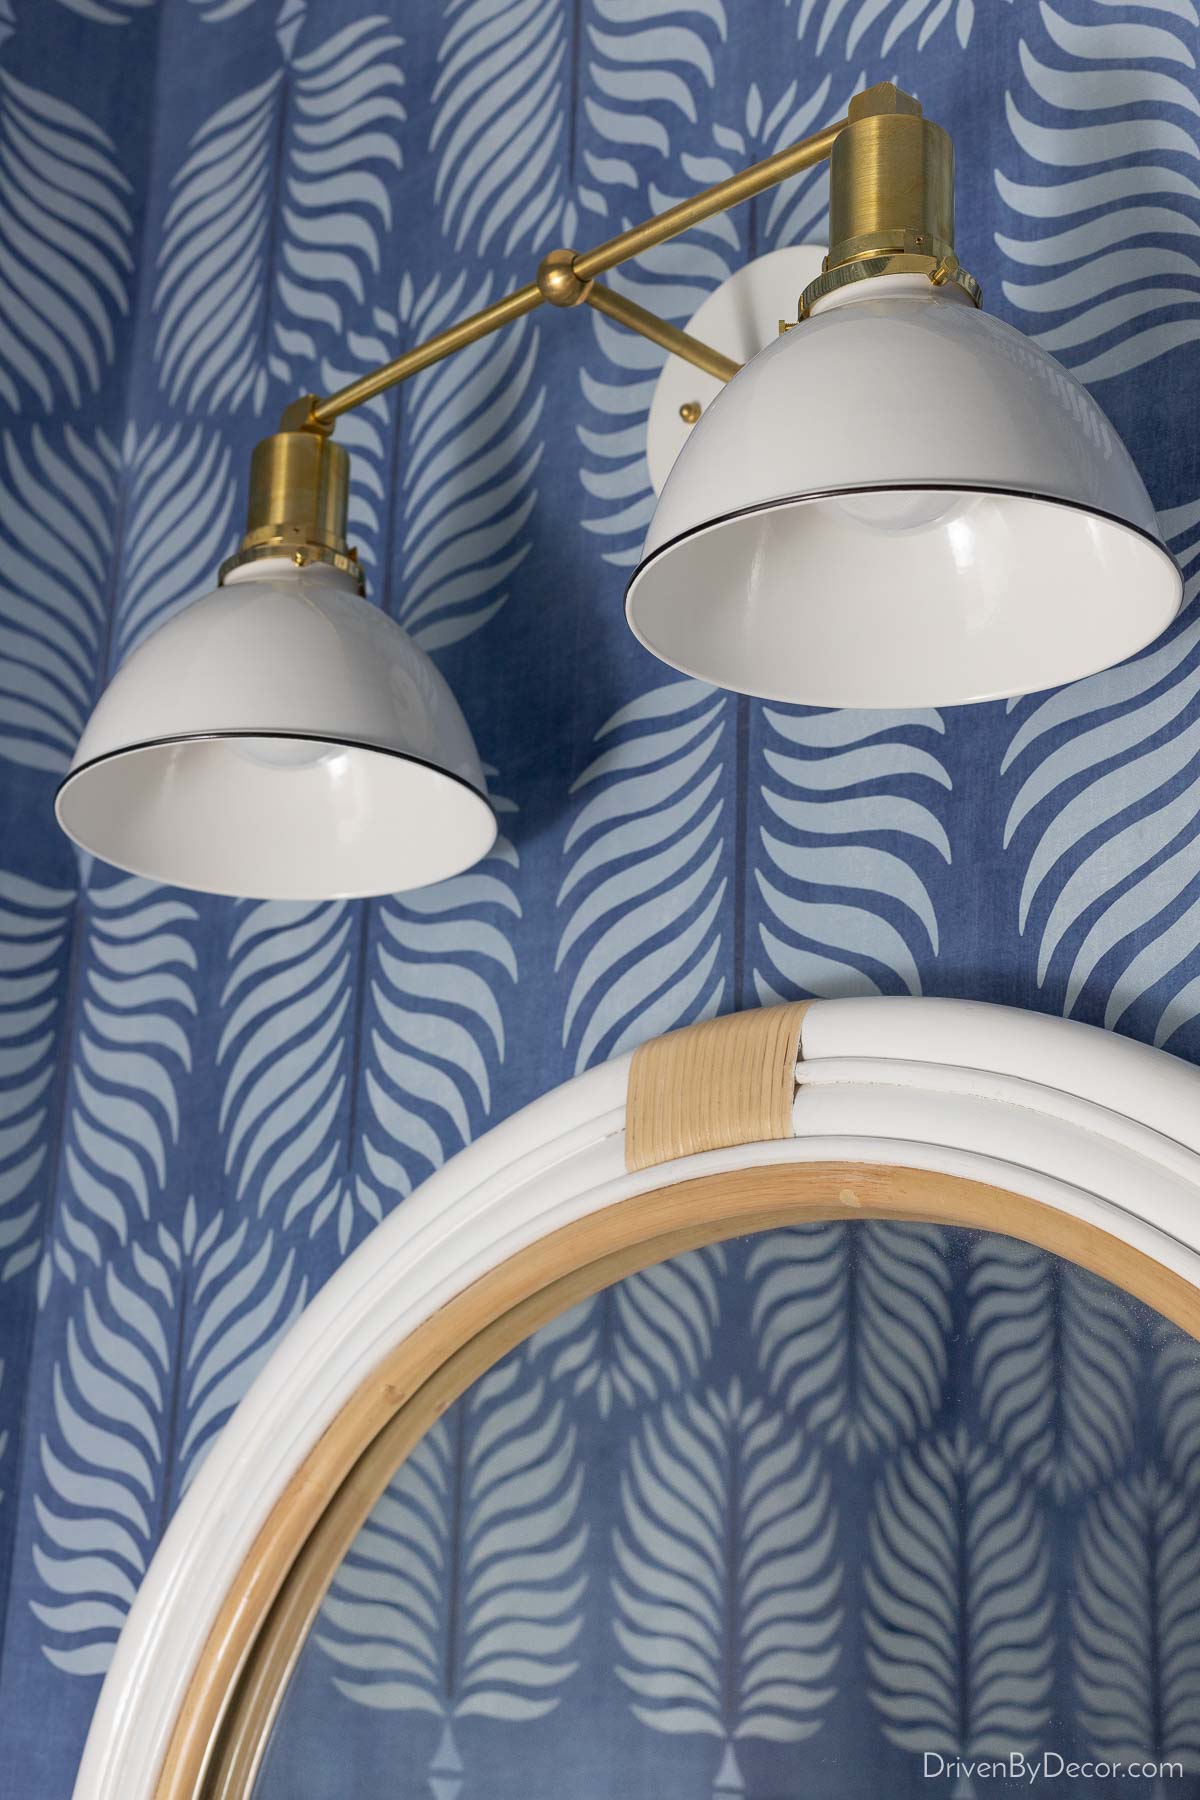
It’s exactly what I had in mind for the space so I was pumped to find it from a small Etsy shop!
We have 10′ ceilings in the powder room so you really don’t notice it unless you’re looking for it, but I also added {this simple flush mount light} to the ceiling. It’s perfect for overall lighting in a small space like this and I love the look of it too!
Wallpaper
I went back and forth on which wallpaper to use for this space and ultimately decided on {this indigo wallpaper} for the upper ⅔ of the wall.
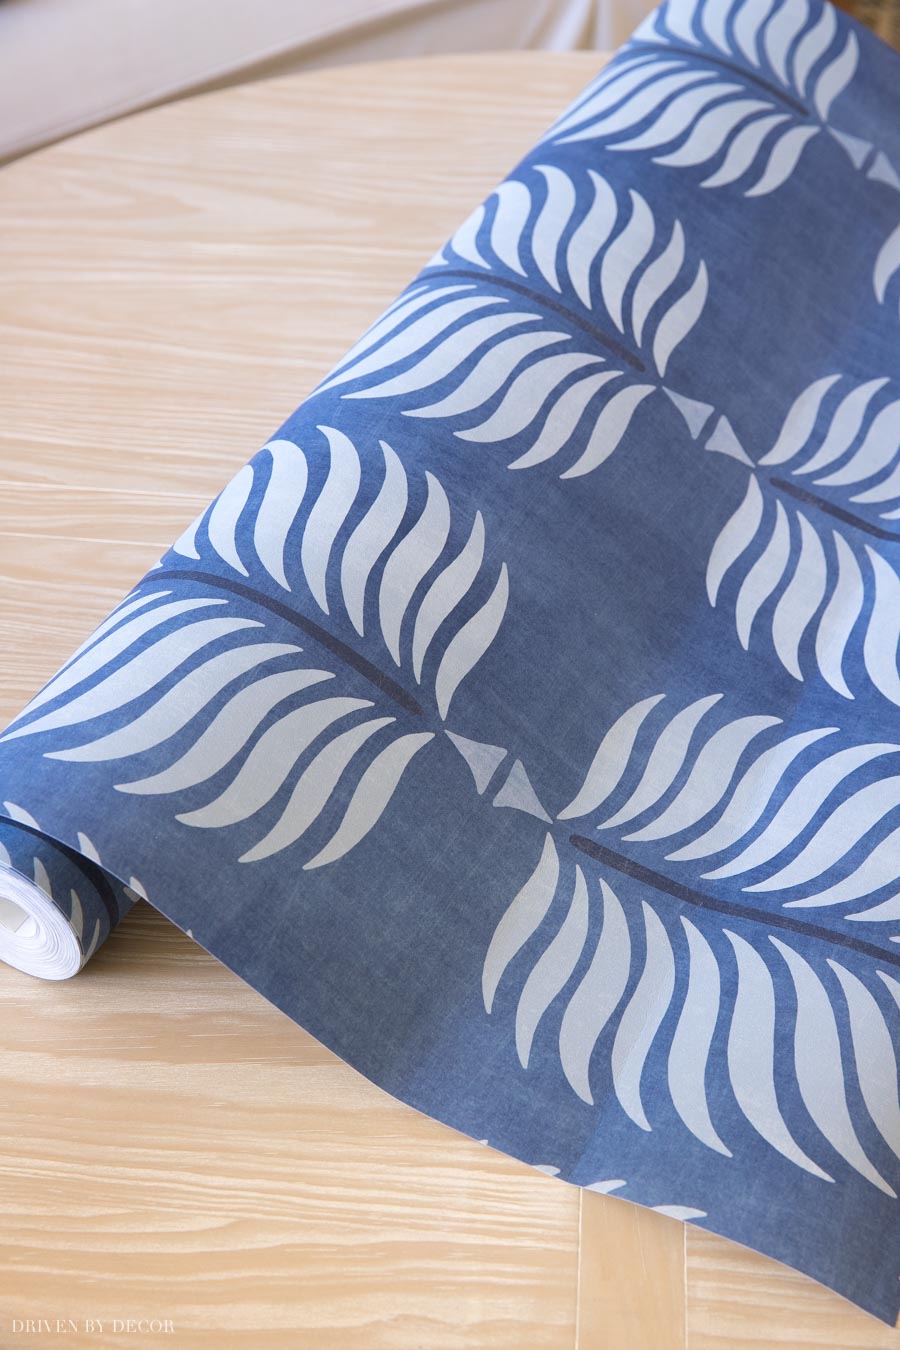
You might feel like you’ve seen me use this wallpaper before and you’re right! I used it as a wallpaper backsplash in our kitchen before we remodeled it.
If you’ve been following along since this project started, you may remember that I originally wanted to use {this grasscloth wallpaper} but decided it was just too expensive and not the most practical choice for a bathroom. So I found a way to bring a little remnant of it into our powder room by covering {this inexpensive waste basket} with it:
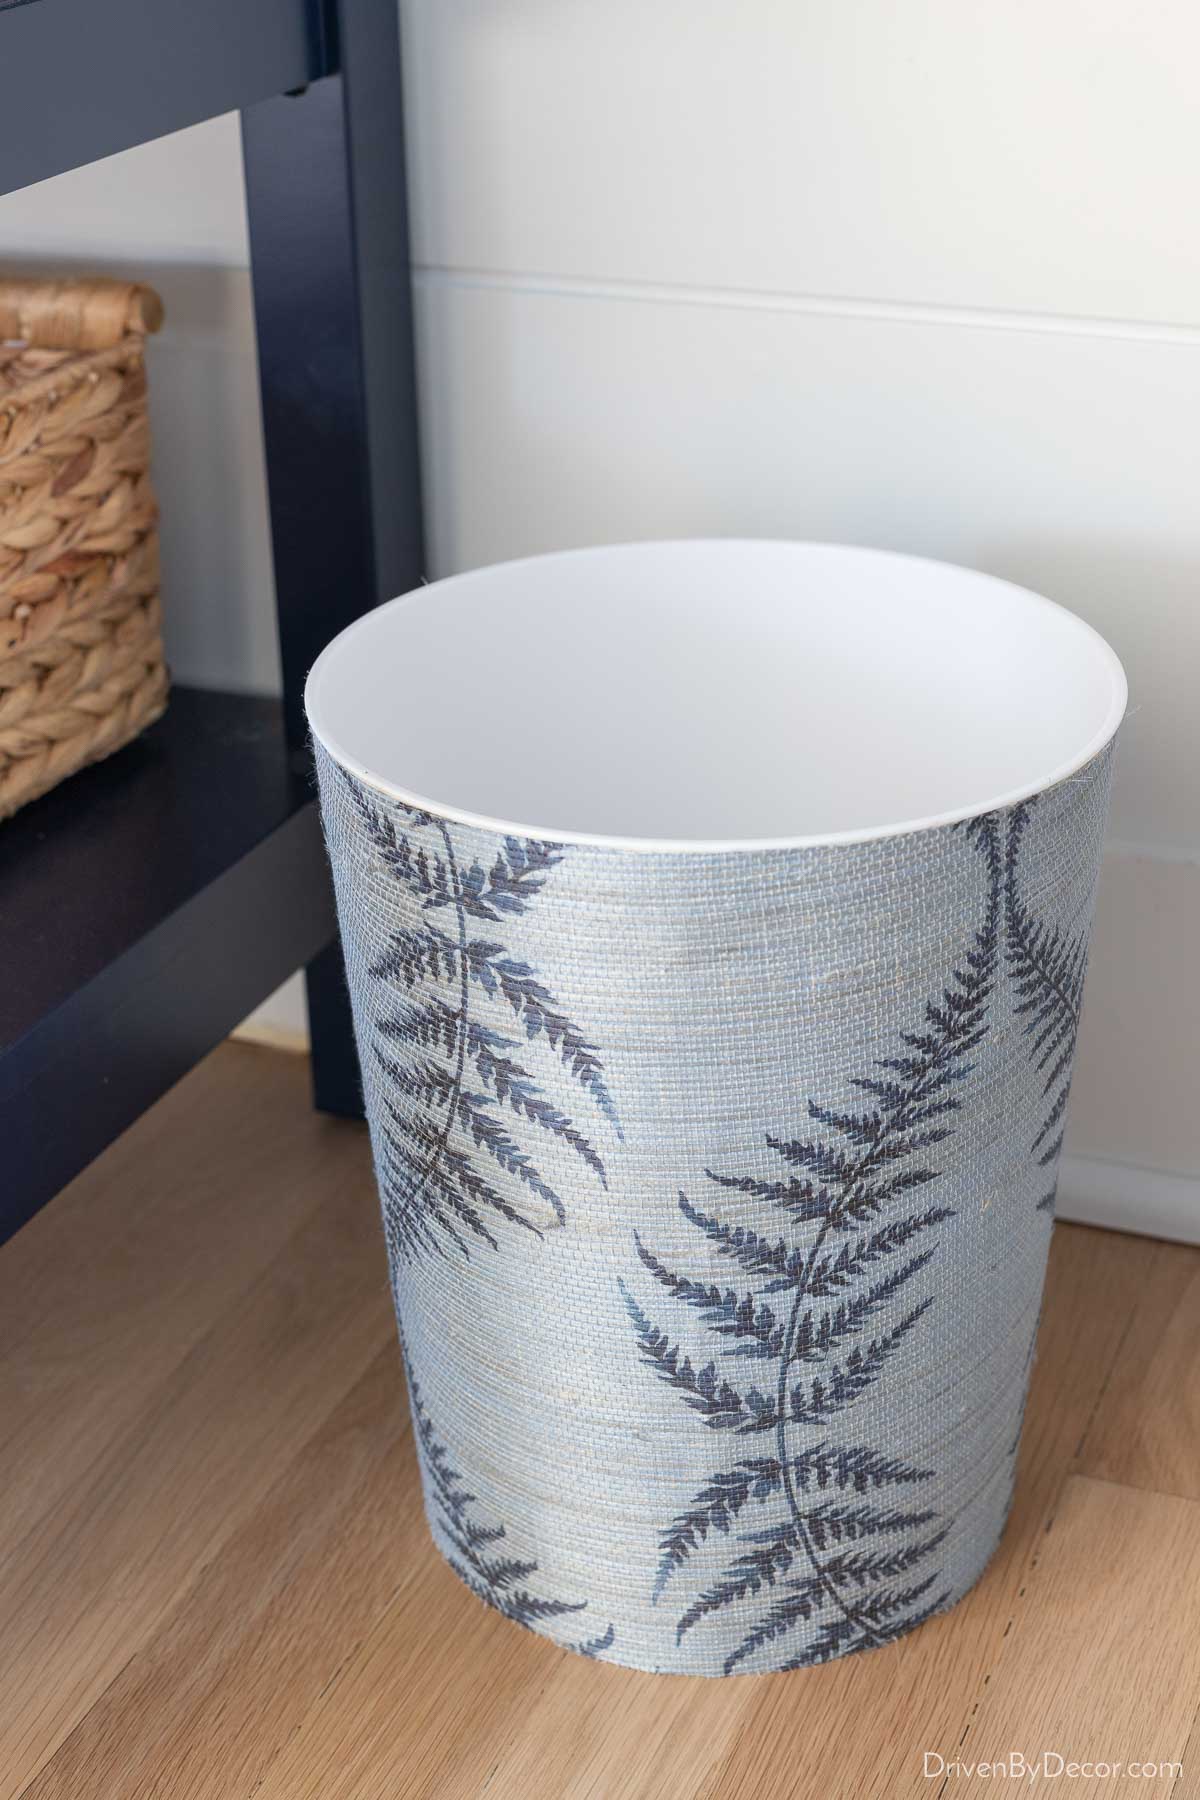
It was a simple 20 minute project! I just wrapped the wallpaper remnant around my waste basket, traced it along the top,
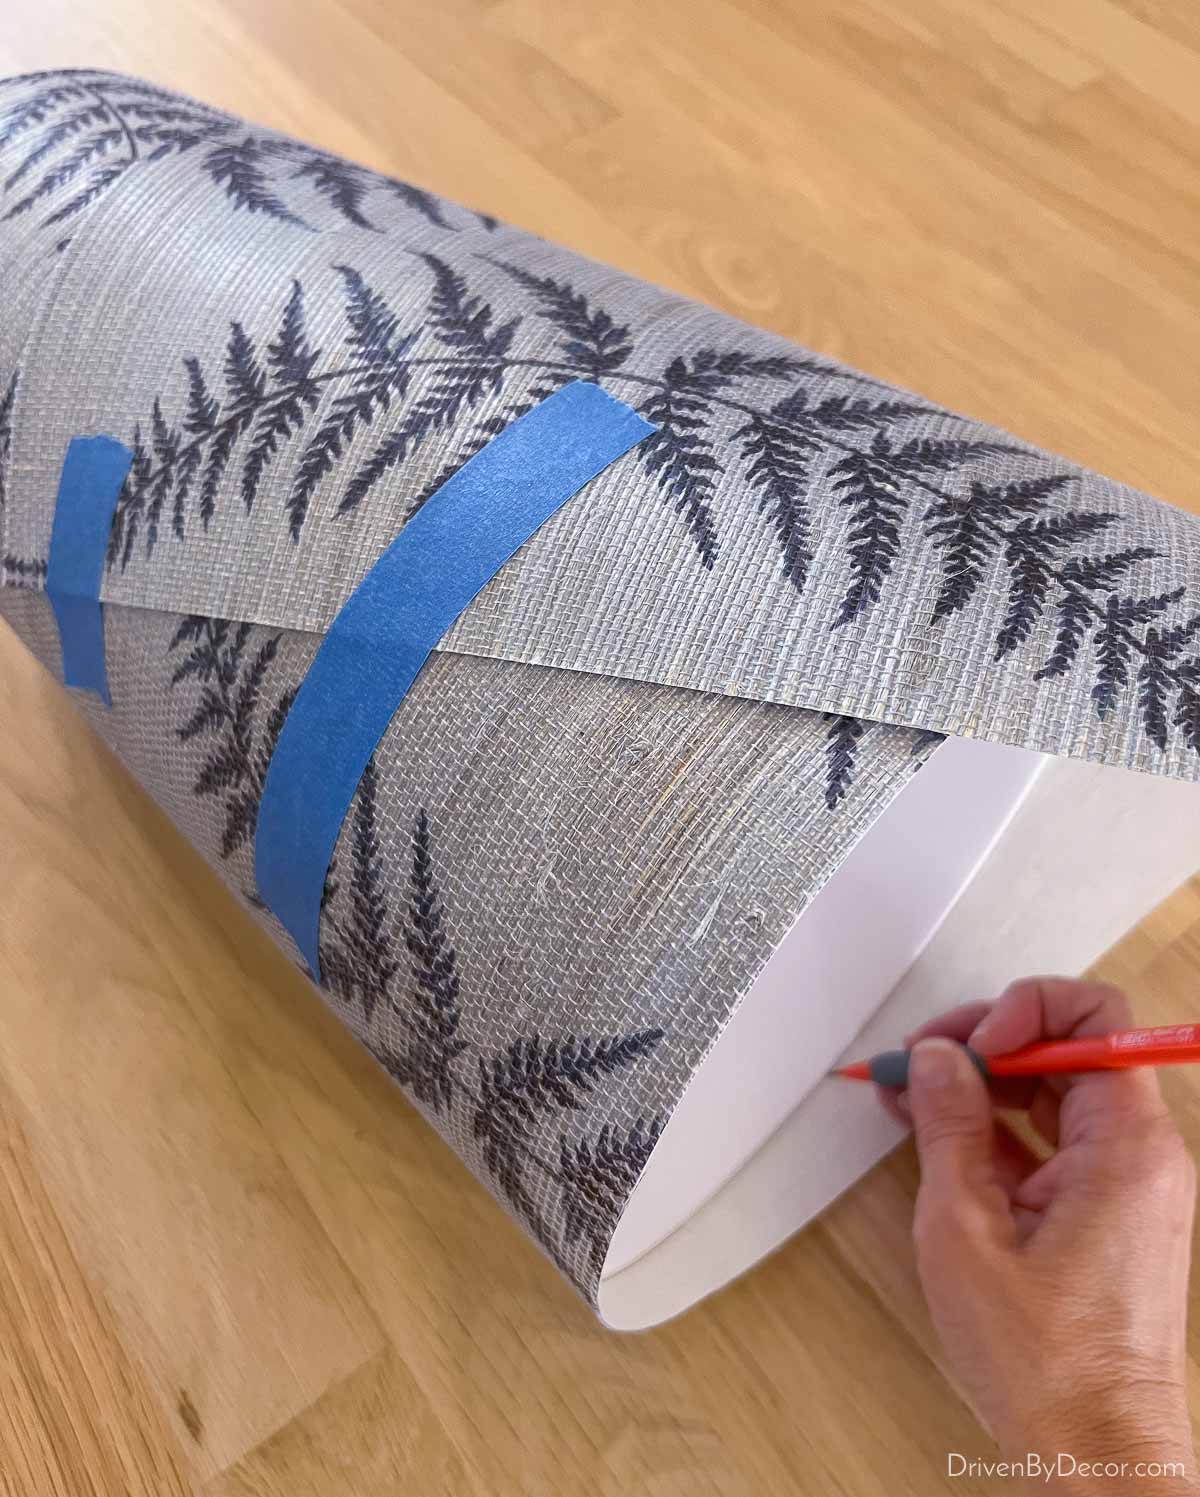
unwrapped it and cut along the traced line. Then I rewrapped the wallpaper around the waste basket so that the top edge of the paper sat just below the top lip of the waste basket. Next, I traced along the bottom edge, unwrapped it, and cut along that traced line.
Finally I gave the waste basket a light sanding to degloss it a bit and used wallpaper paste to paste my remnant around the waste basket. At some point, I’ll probably coat it with a flat varnish like the one I used for the wallpaper backsplash in our kitchen in order to protect it from stains.
The Rest!
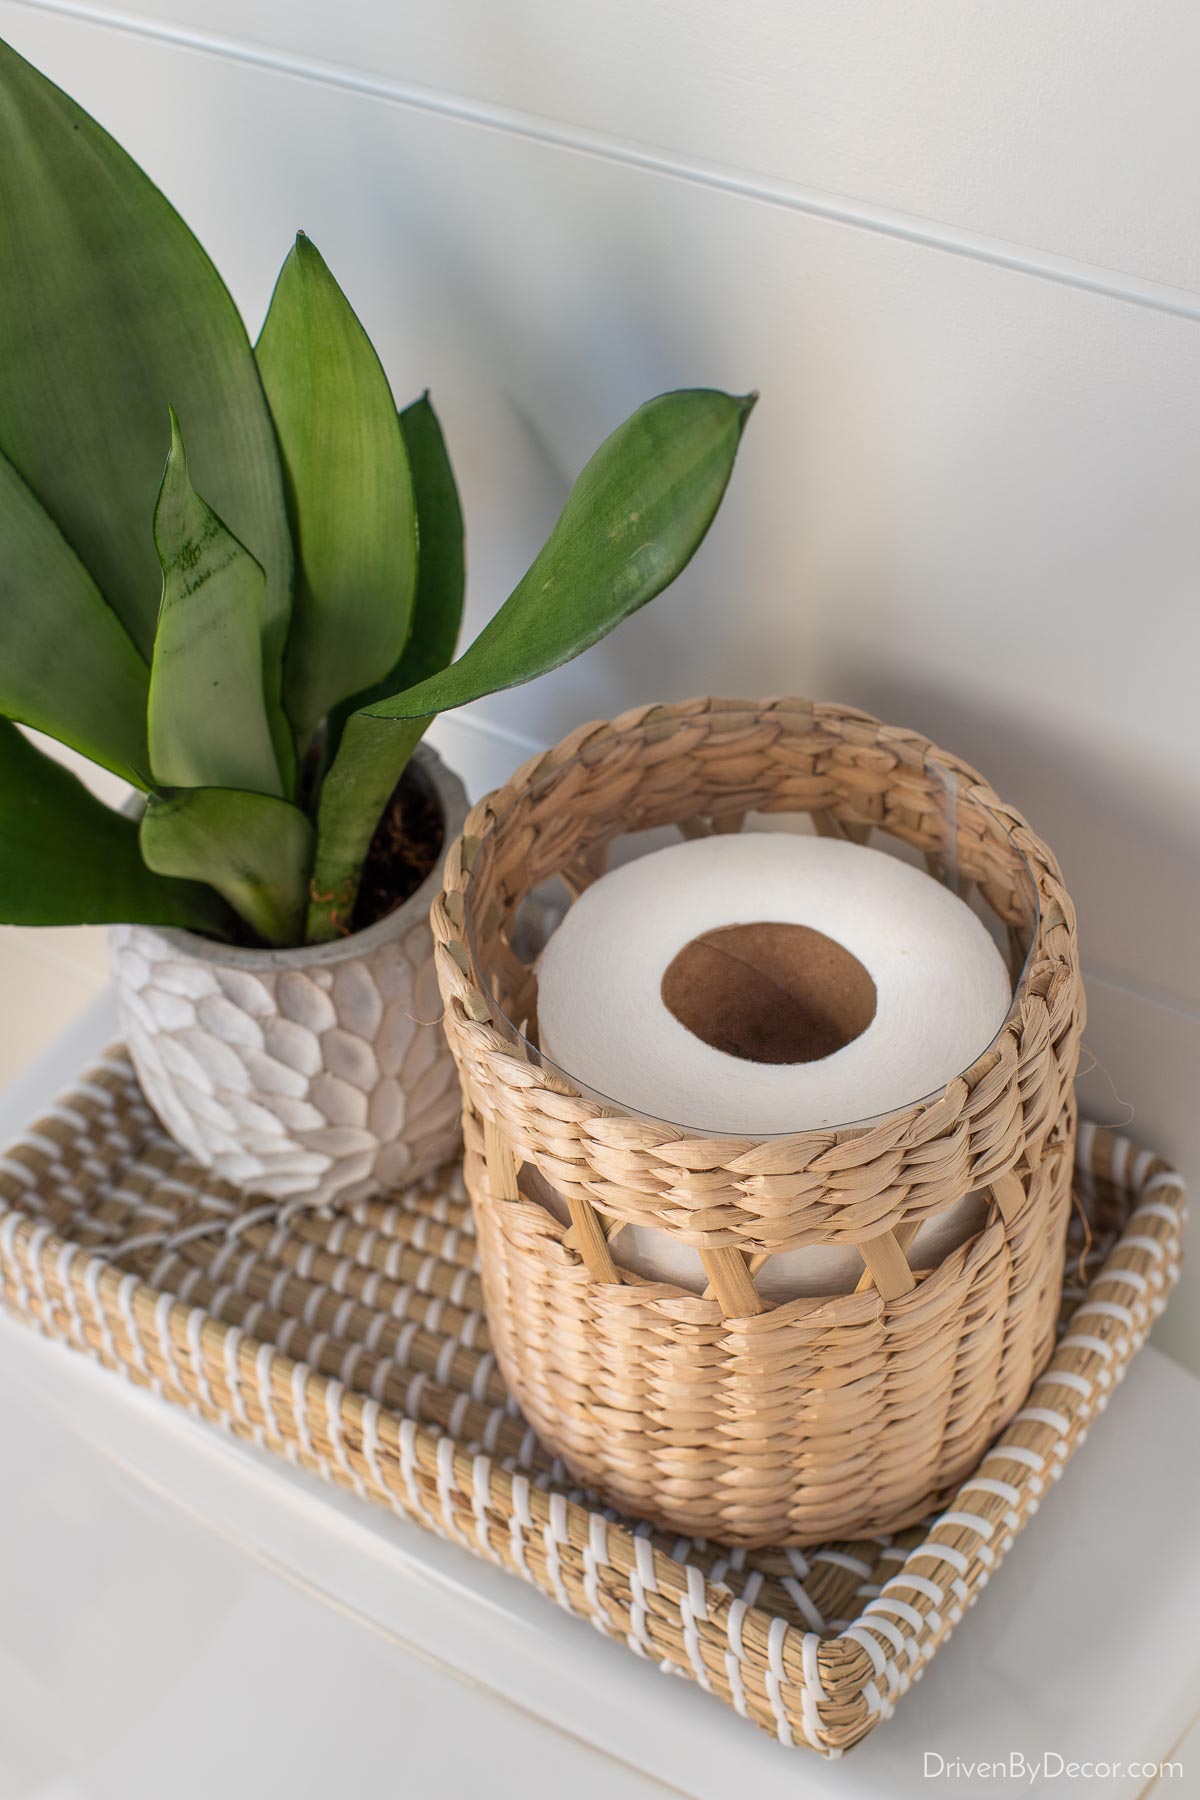
There are a lot of small, little pretties that went into the space too! We replaced the toilet that was there with {this one-piece toilet} and it’s been nice to not have to stand around holding the handle down for the entire flush like I did with the old toilet 😂. It has a small tank that’s the perfect size for {this small woven tray} holding a potted plant and woven canister:
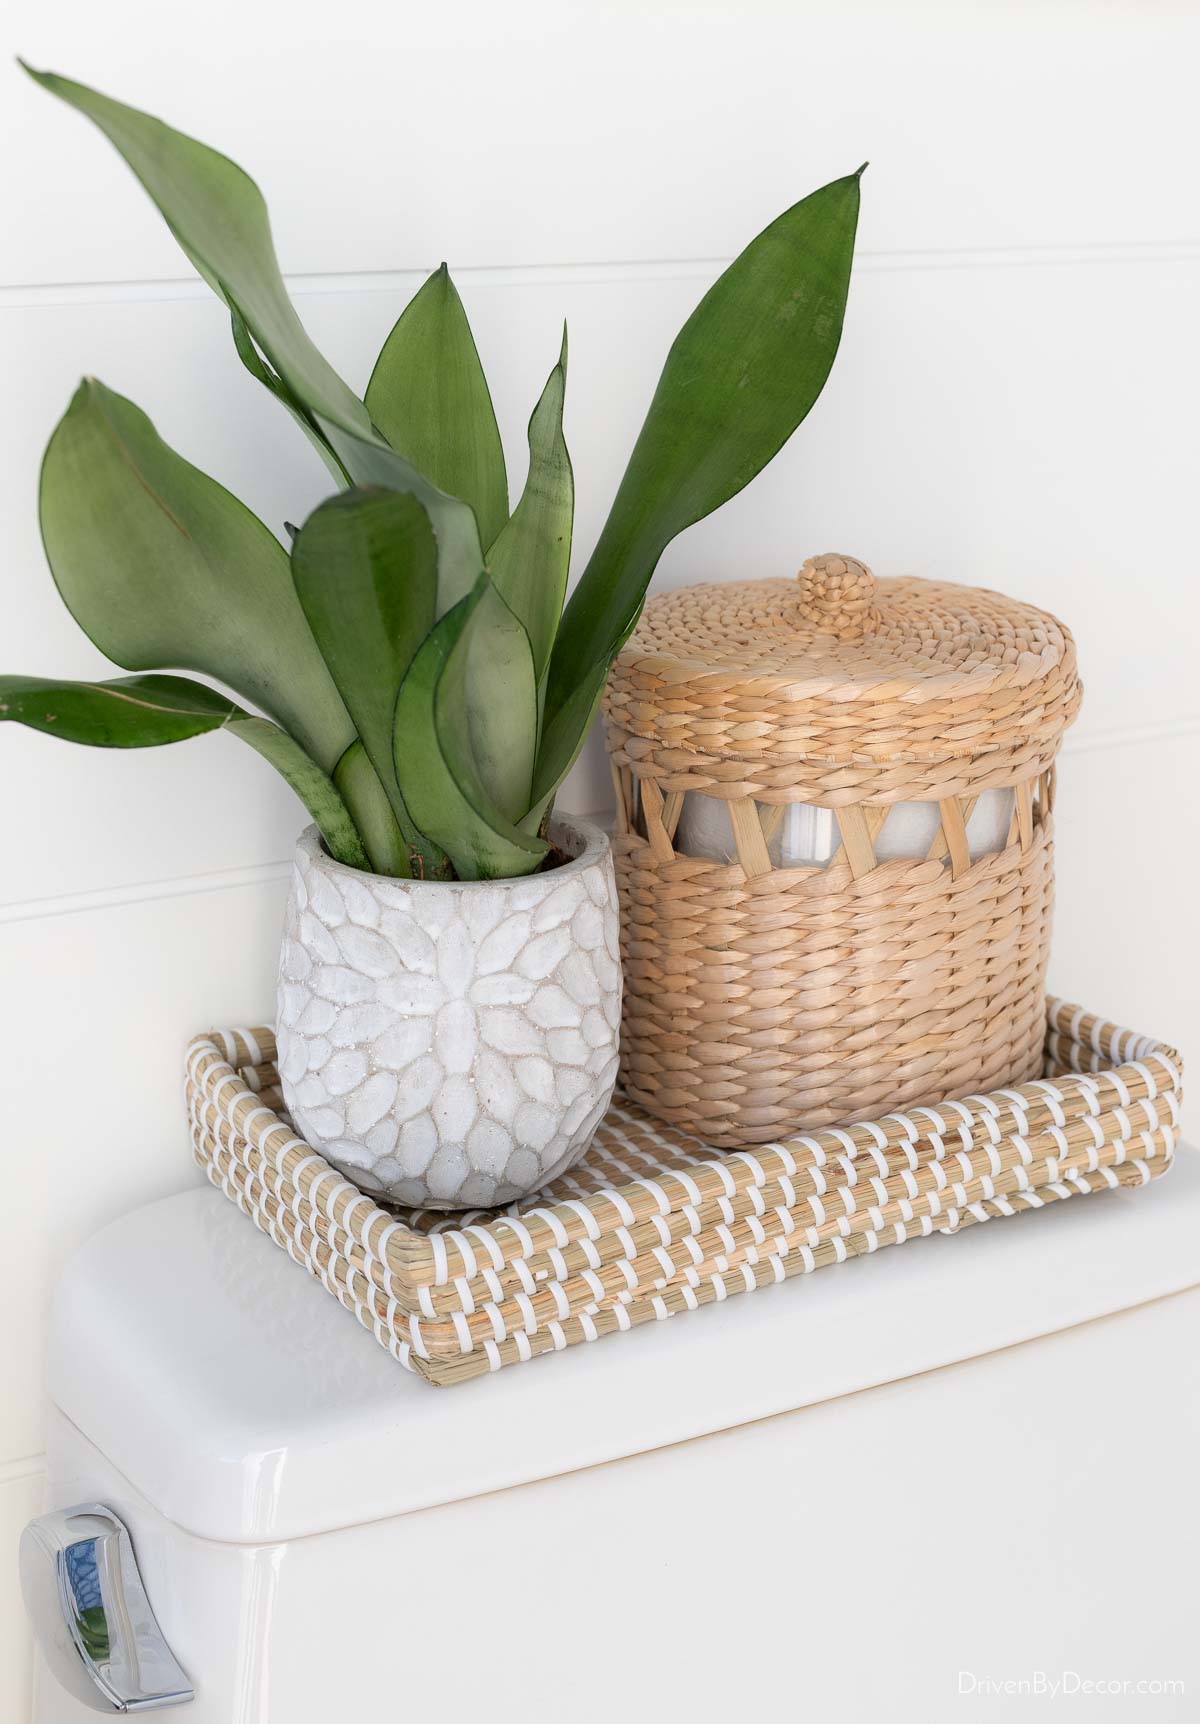
The woven canister holds an extra “in case of emergency” roll of toilet paper inside of it:
Over the toilet I hung {this art print} in the 18″ x 24″ size with a white mat and wood frame (I already owned the frame but the look & size of {this frame} is similar).
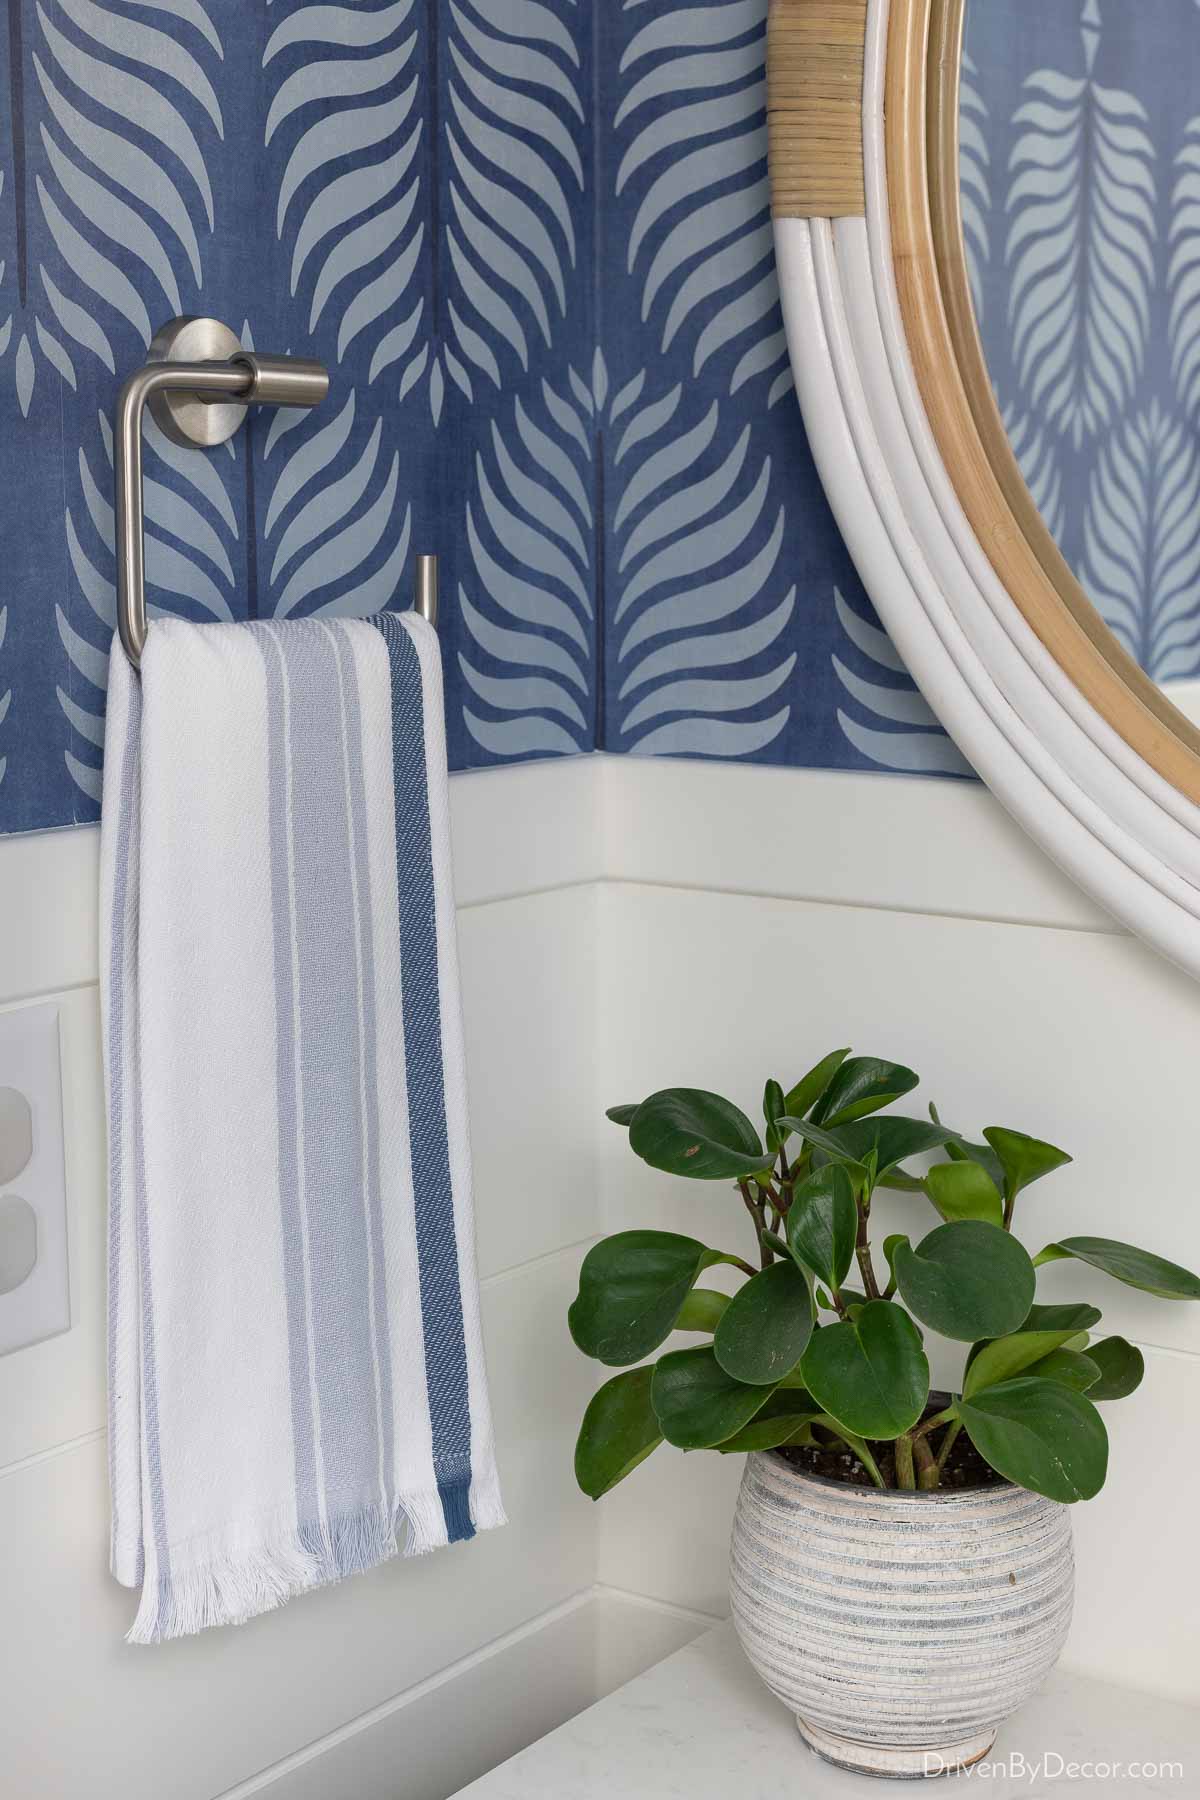
For hardware, I chose {this towel ring} in stainless steel that holds a blue striped hand towel:
And I mixed things up by using {this toilet paper holder} in brushed gold:
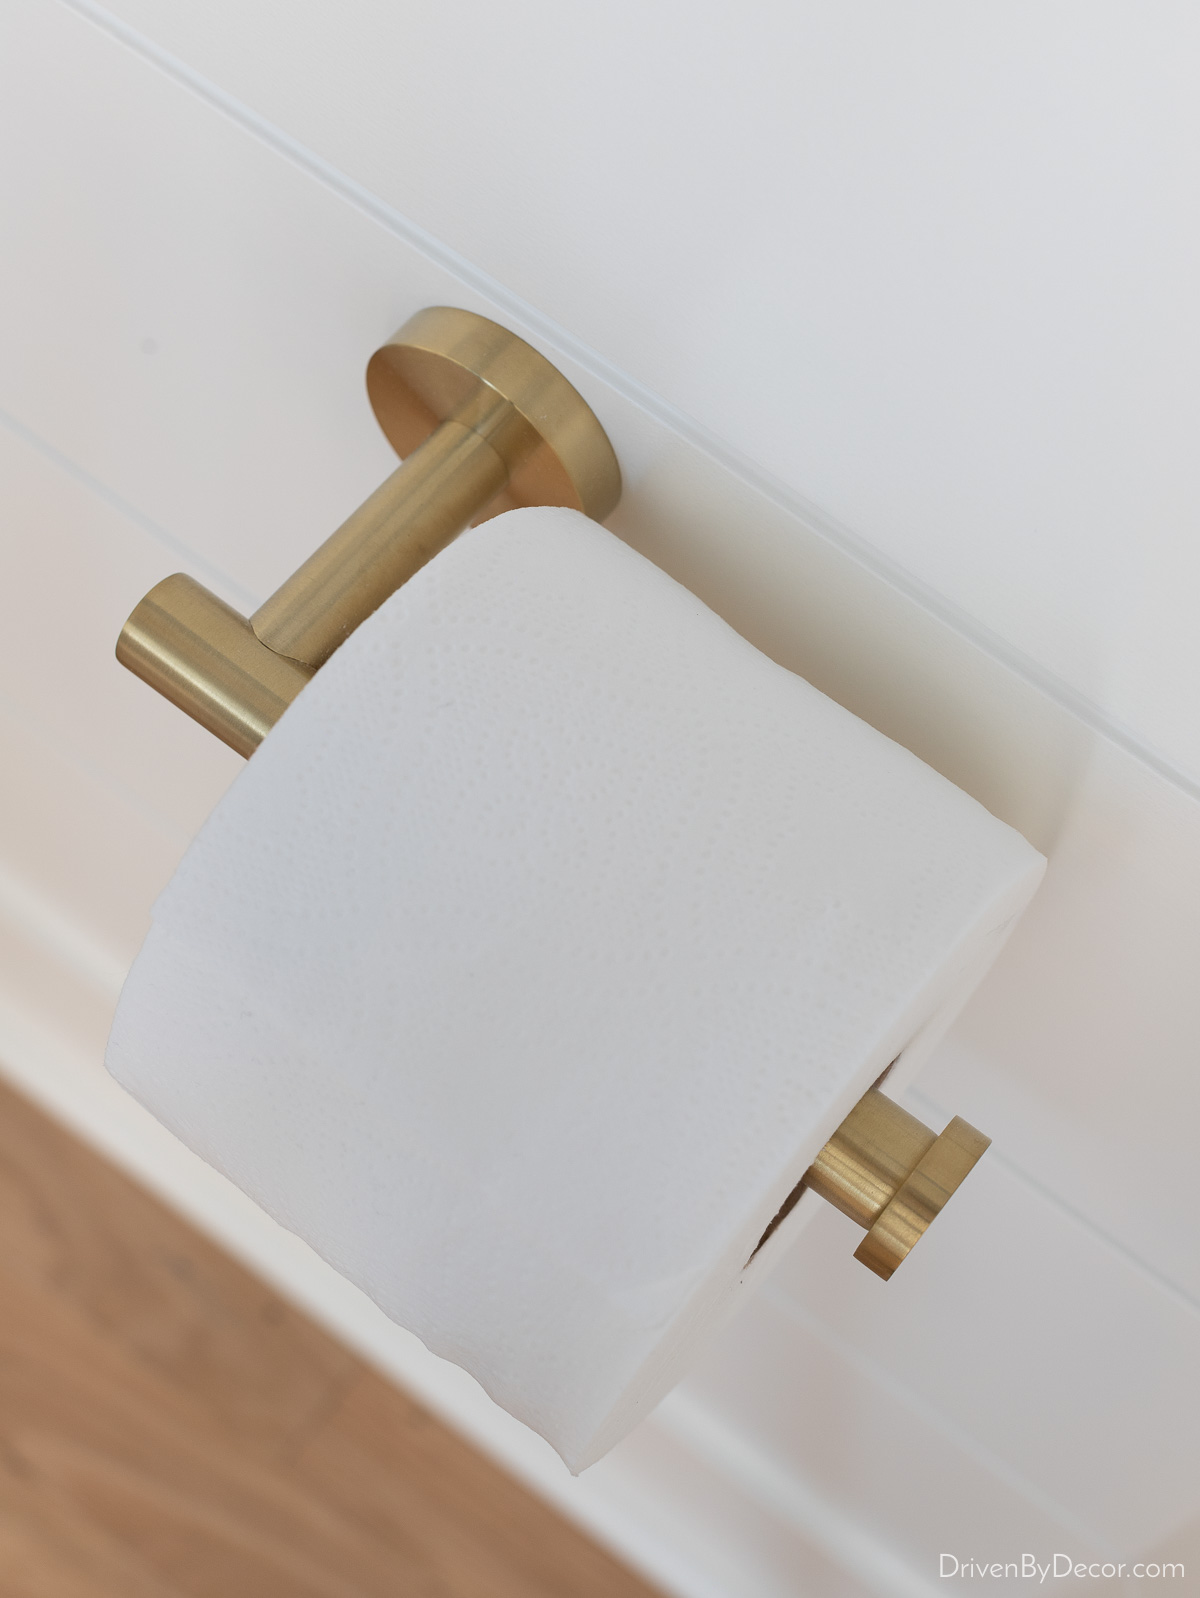
I normally choose the same finish for all of my powder room hardware but for whatever reason it felt right to change it up this time. If you like the mixed metal look, I have a full post with tips on mixing metals in your bathroom to check out.
Phew… that was a lot for a little bathroom! What do you think? Before we wrap this post up, I’m circling back to answer two questions I got about the powder room shiplap so read on if you want all the little details.
Are You Sure It’s OK To Use Shiplap In a Bathroom?
YES, you can definitely use shiplap in a bathroom or powder room! The key is to choose the right shiplap material based upon the moisture level in the bathroom you’re installing it in. If you’re adding shiplap to a powder room like mine, you don’t have the same humidity/moisture concerns as full bathrooms with a shower. Because of this, any type of shiplap should work in a powder room as long as it’s painted, sealed, or made of a moisture resistant material.
If you’re using shiplap in a full bathroom with occasional high humidity (due to a shower), you need to be careful about what shiplap you choose. You should NOT use MDF shiplap like I did in our powder room since it can swell and expand with exposure to water and moisture. Instead, use shiplap made of PVC such as {this PVC shiplap} or AZEK such as {this AZEK tongue and groove shiplap} that are moisture and rot resistant. You could also choose to buy a PVC sheet such as {this one} and cut it into strips, installing it in the same way as I did with the DIY shiplap walls in our bedroom.
The MDF shiplap we used is also not recommended for ceilings. See my post on the shiplap ceiling in our “circus room” for more details on what’ we used to get the shiplap look on a ceiling.’s best to use for that application.
What Did You Use to Paint Your MDF Powder Room Shiplap?
Since the surface of the MDF shiplap I used had a little sheen to it, I lightly sanded it with very fine (400 grit) sandpaper to prep it for painting. I also caulked where the the shiplap boards meet in the corners and between the top piece of shiplap and the piece of finishing trim.
After removing all sanding dust with a microfiber cloth, I used Benjamin Moore Advance paint in the Satin finish to paint it (color is Simply White). I wanted it to have a smooth finish so I used a paint brush to get into the grooves between boards, followed immediately by rolling paint onto the boards with {this small ¼″ nap roller} with {this roller frame}. Here’s a close-up of what it looked like when I was done:
And with that, our powder room makeover is a wrap! Thanks for stopping by the blog today!
XO,


Alex says
I love this! Putting up shiplap in my bathroom is on my new years resolution list. Yours looks so good next to the wallpaper, so I might need to consider adding some. Thanks so much for sharing!
Kelly Bott says
I went to the Etsy sight to order the vanity light and not sure if you used raw brass or sealed brass. Do you remember which one you ordered? Thank you!
Kris Jarrett says
Hi! When I ordered there was only one brass option and it was the raw brass. I’ve had zero issues with it but if given the option between raw and sealed, I’d probably choose sealed. They should look similar but the sealed would be protected from possibly tarnishing.
Barbara says
Hi Kris – Beautiful project! How high does the top of your shiplap go? Thank You!
Michelle says
Beautiful! I would love to do this and add wallpaper to our guest bathroom, but I’ve never done wallpaper before. Two questions- Will wallpaper hold up to the humidity from the shower (it’s typically only used twice a year for 2 weeks at a time, but we are using it daily due to repairs in our master shower)? And do I need to sand down my walls to be smooth since we have orange peel texture (big in Florida) or can I wallpaper over the texture?
Deborah Hoover says
Love the room!! How did you re
Move the baseboard cap?
Kris Jarrett says
Thanks Deborah! Fortunately ours were baseboards are two parts put together – a rectangular base plus a curved cap on top. So we could get the cap off by cutting the caulk line between the cap and wall and then using a small pry bar to loosen it from the wall and remove it.
Michelle says
It’s beautiful! We are remodeling and can’t decide between a 30” or 24” vanity. How much room is between your toilet seat and vanity (we are trying to figure out how much “elbow room” is comfortable enough). Thank you for sharing your gorgeous home and tips!
Kris Jarrett says
Thank you! I’ve got about 14″ between the vanity and the widest part of the toilet toward the rear.
Anonymous says
Thank you, very helpful!
debra@5th and state says
YOU ARE AMAZING KRIS!
killer post, so informative, fabulous powder room….every single aspect
xoxo
Debra
Angie Holmes says
Such a beautiful transformation! Love all the details, especially the covered waste basket! Such a genius idea to elevate the space.
Renae says
Such a beautiful transformation. It’s gorgeous.
Karen B. says
How pretty your powder room turned out. You find such pretty details to make your new home even better. Great job.
Karen B.
Lizzy says
You did a great job! It’s really fresh and pretty. Are you pleased with the quality of the vanity? I need a new one.
Kris Jarrett says
Yes I’ve been extremely happy with it! The top is pretty, hardware is nice, and the back had a large cut-out for plumbing which made install easier than with some other vanities I’ve had.
Martha McNeil says
Kris…Your project are amazing. You are so talented!
Judy says
It really is a great remodel. I especially love that you replaced the pedestal sink with a vanity. I know pedestals had their day, but when there’s room, a vanity makes so much more sense…with the storage they offer. I also love the different elements of a vanity.