Want to know how to remove wallpaper? I’ve tried lots of different ways and am sharing what I’ve found works best!
Just as in our previous home, there’s a LOT of wallpaper to remove at our home in NC! Over the years I’ve tried every trick in the book for taking old wallpaper down (we have a knack for buying houses absolutely loaded with it) and today I’m sharing the removal method that works best for me.
I’m also sharing the “before” and “after” makeover of the most recent room I removed wallpaper in – our laundry room. Ready to see?? (post includes commissionable links; for more information, see my full disclosure statement {here})
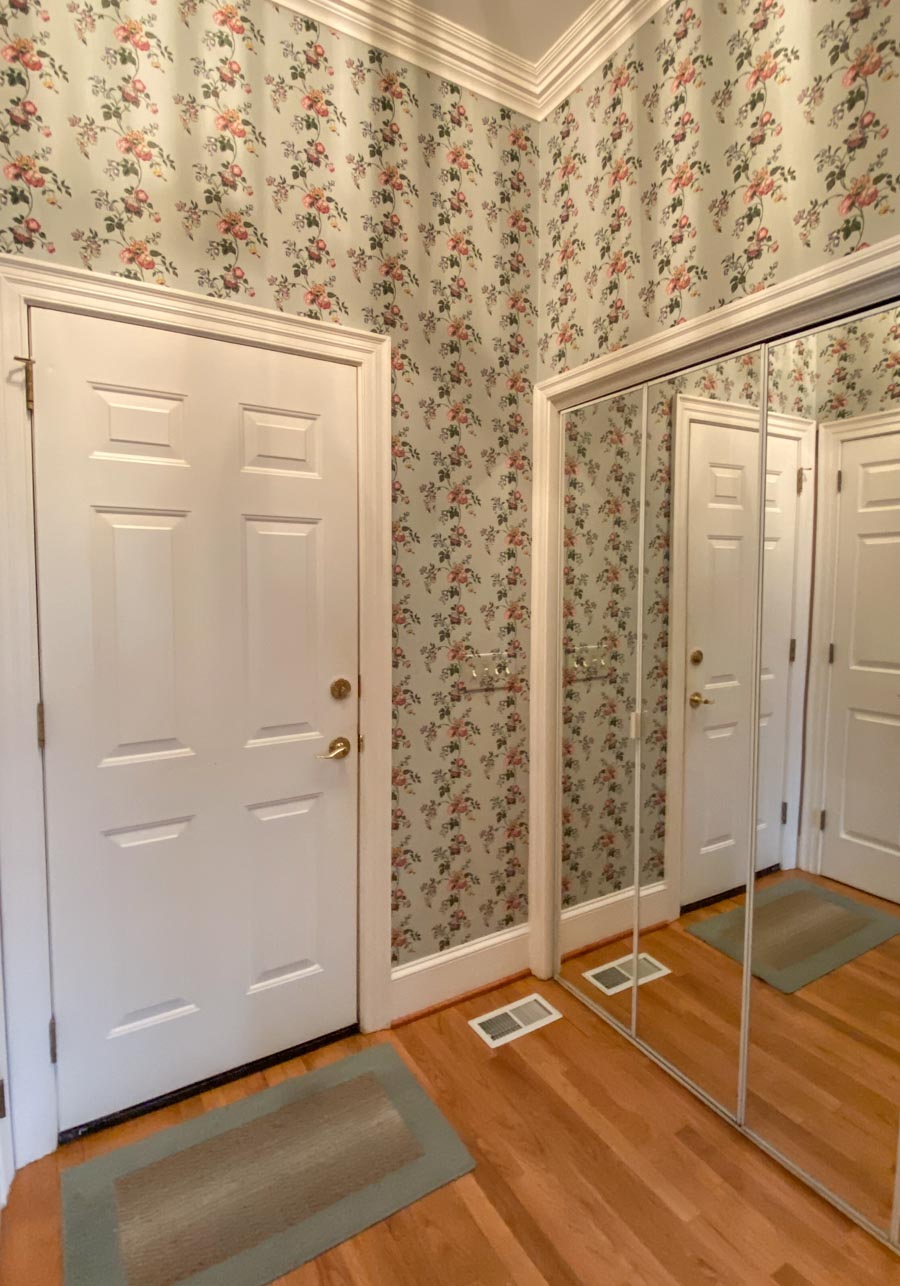
Here’s the “before” of what our laundry room looked like when we bought our house:
I was able to get all of the wallpaper in the entire room down in under two hours which is pretty amazing! The key to my wallpaper removing technique is to use an inexpensive handheld steamer like you steam clothes with. I have {this steamer} and it works great (remember to use all of the precautions on the steamer instructions to avoid getting burned by the steam and don’t use it near any electrical outlets or switches). The process is simple, but I’ll show you how to remove wallpaper step by step so you’ll know exactly what to do!
To get set up, have a trash can nearby where you can discard the wallpaper that you remove from the wall. It’s also a good idea to put a drop cloth down on your floors to protect them since wallpaper that’s removed has adhesive on the back that can transfer to your floors if dropped on them. Then…
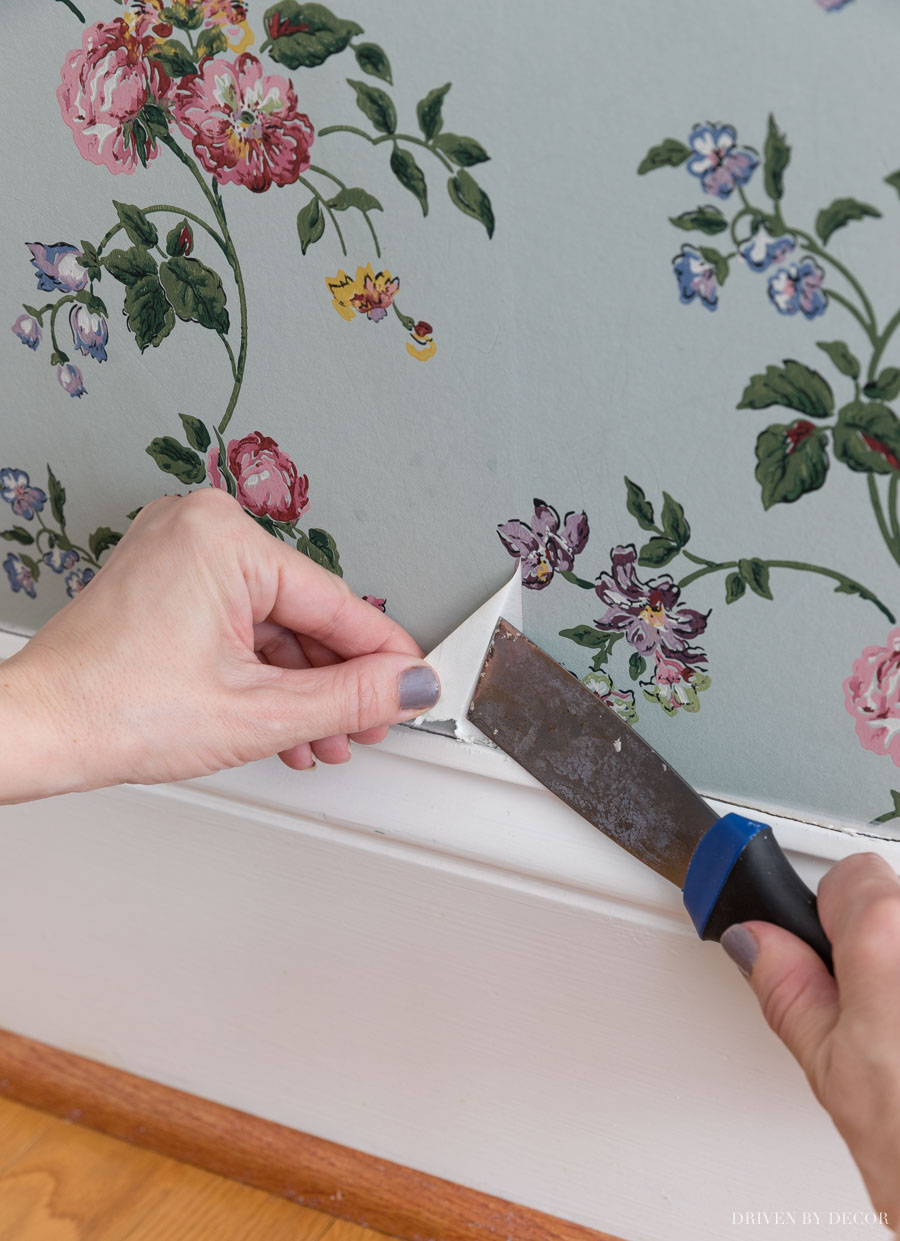
1. Start Steaming at a Bottom Seam
Starting at a bottom seam between two strips of wallpaper, steam that area thoroughly with your steamer. Using a small putty knife, try to get the blade under the steamed wallpaper so you can start pulling the sheet of wallpaper up at the corner. If you can’t get the corner up, steam it some more and try again.
Once I have the first bit of corner pulled up, I continue pulling the sheet with my left hand as it loosens from the wall and use the putty knife in my right hand to get under the paper and help separate it from the wall:
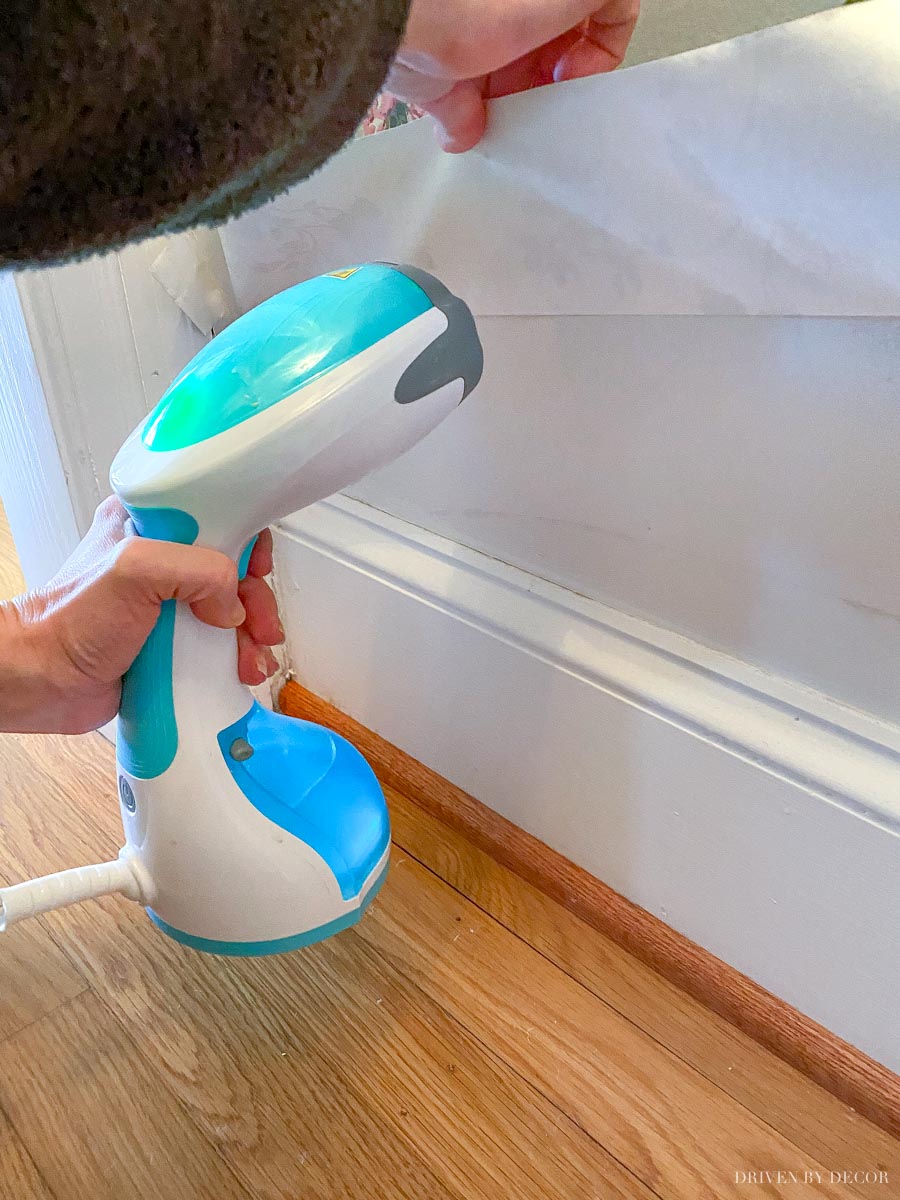
2. Alternate Between Steaming on Top of the Paper & Under It
Once you’re able to pull the corner up, continue steaming that sheet of paper by alternating between steaming on top of the sheet (move the steamer back and forth over the area):

and underneath it (being careful not to steam your hand):
Handheld steamers don’t have a huge water tank so I keep a watering can with a small spout next to me for easy water refills so I can keep going without continually running to the sink.
If you’re really lucky, you might be able to use this technique to get your wallpaper off in large sheets like I did in our laundry room:
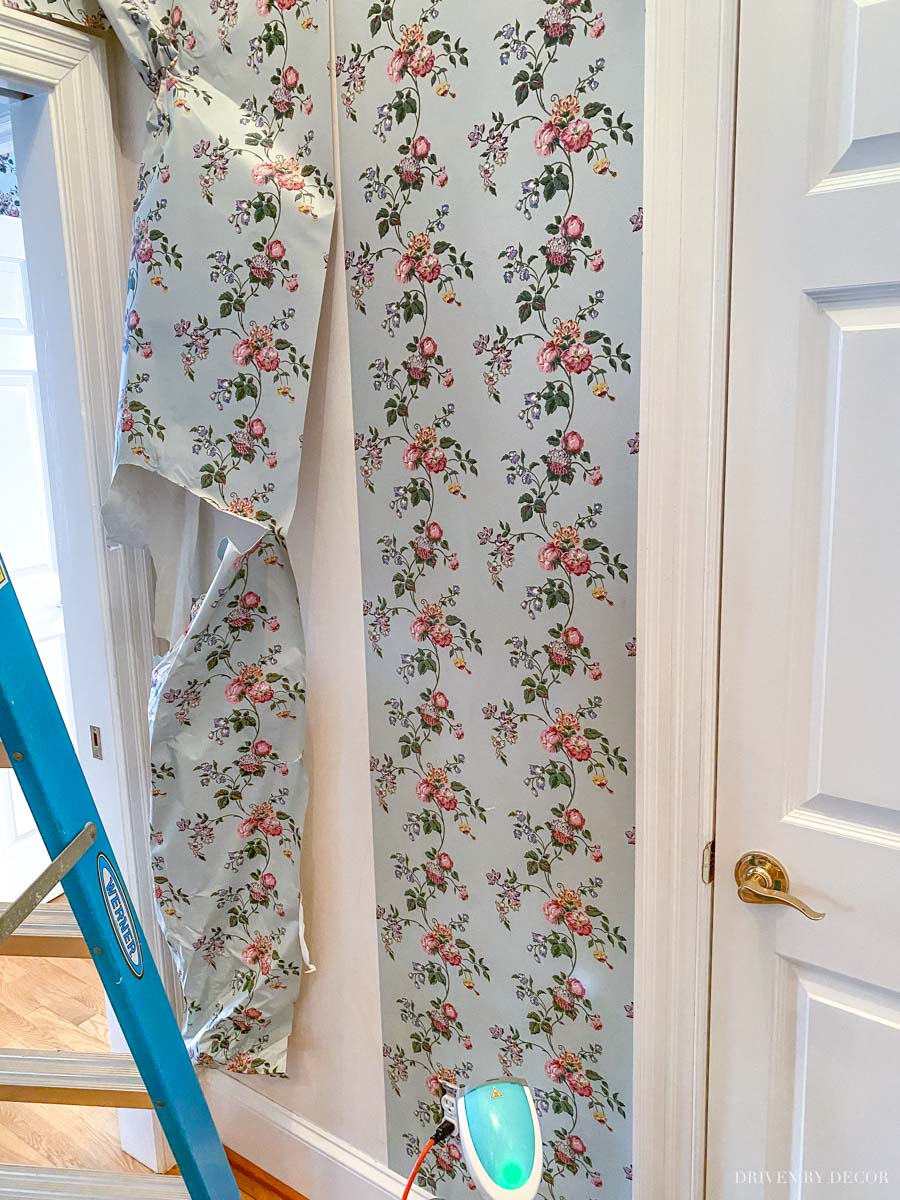
but the reality is that it’s not always that easy! Sometimes it will come off in little pieces no matter what wallpaper removal trick you try. A lot of it has to do with whether the walls were properly prepped before wallpapering or not. If it doesn’t come off quite as easily as you’d like here’s what to do:
3. Use a Putty Knife to Help With More Stubborn Pieces
In some cases you’ll find that you can easily peel off the top layer of wallpaper but the bottom layer of wallpaper backing is still stuck to the wall. This is often the case with vinyl wallpaper that you’ll find in some bathrooms and kitchens – it can be really stubborn!
If this happens, steam off the top layer of wallpaper as described. Then for the paper backing that’s still stuck on the wall, take a damp sponge or rag and soak it well, letting it sit, soaked with water for several minutes while you work on another spot. Then, come back to it and steam the paper backing (starting at the edges) while using a putty knife to lift it off:
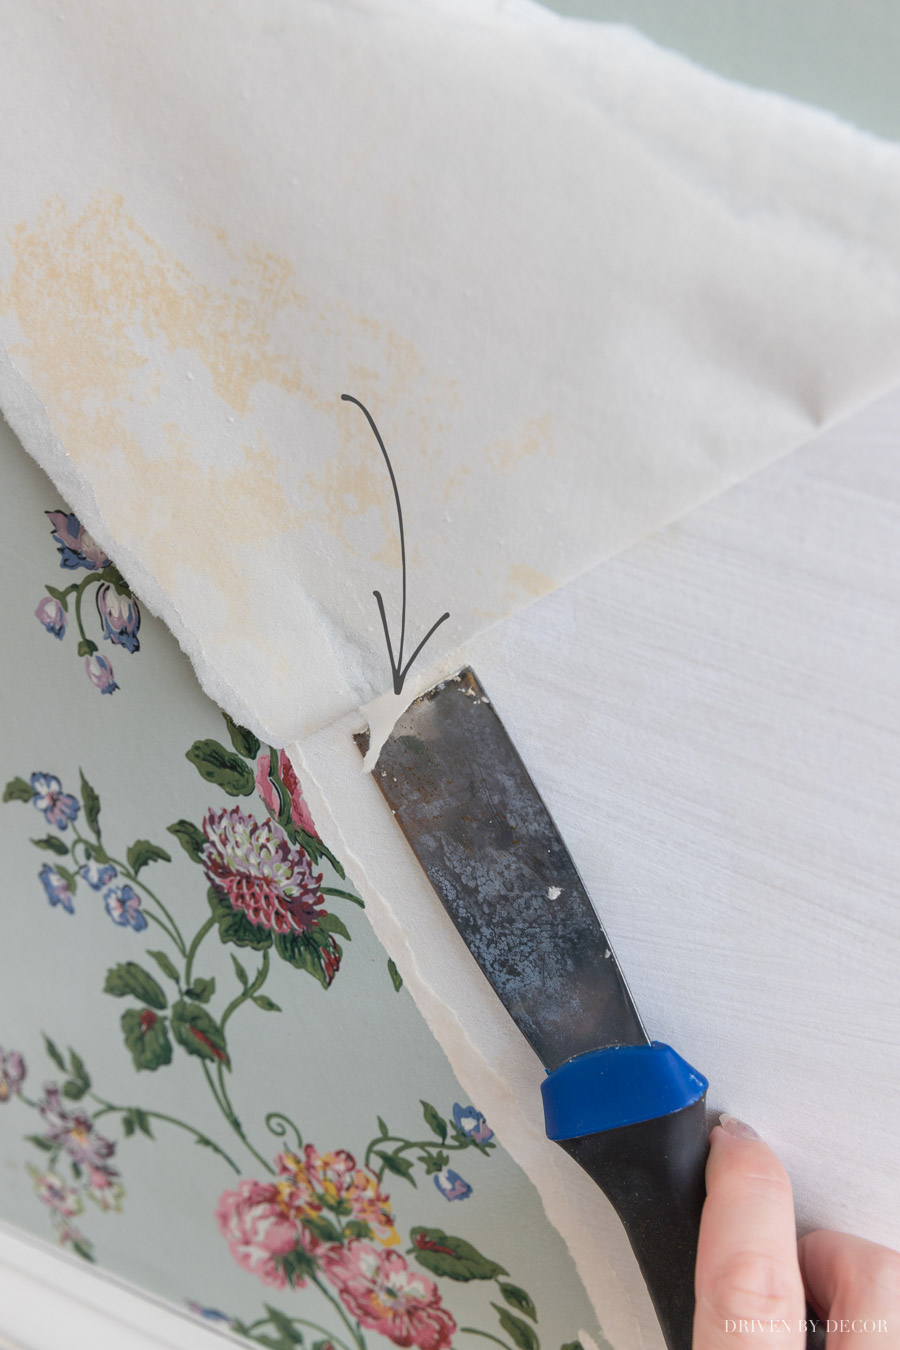
Usually it will lift off quite easily! As an alternative to a putty knife you could also try {this long handled scraper} that gets great reviews.
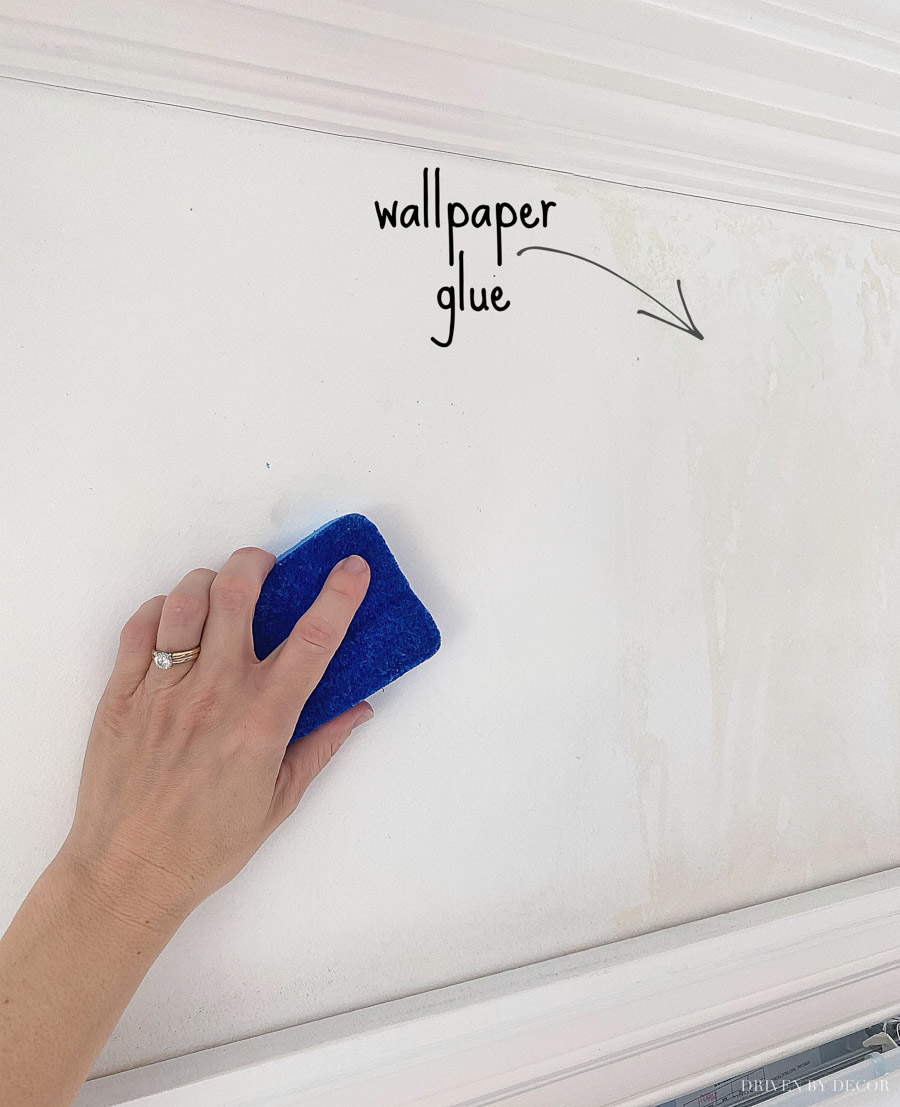
4. Remove the Wallpaper Glue
Now that you know how to remove wallpaper, what about the wallpaper glue residue?! Once all of your wallpaper is removed, you’ll typically still have residual wallpaper adhesive on the wall that you’ll want to get off before painting or wallpaper installation. I simply fill a bucket with warm water and use a dampened sponge to scrub the remaining glue off – you can see the portion where I removed the glue from the wall on the left and the portion I hadn’t yet gotten to on the right:
If there’s a LOT of glue left behind after removing your wallpaper, before I scrub it off with my sponge, I lightly steam one area of the wall at a time and move my putty knife over the wall to scrape off the excess glue:
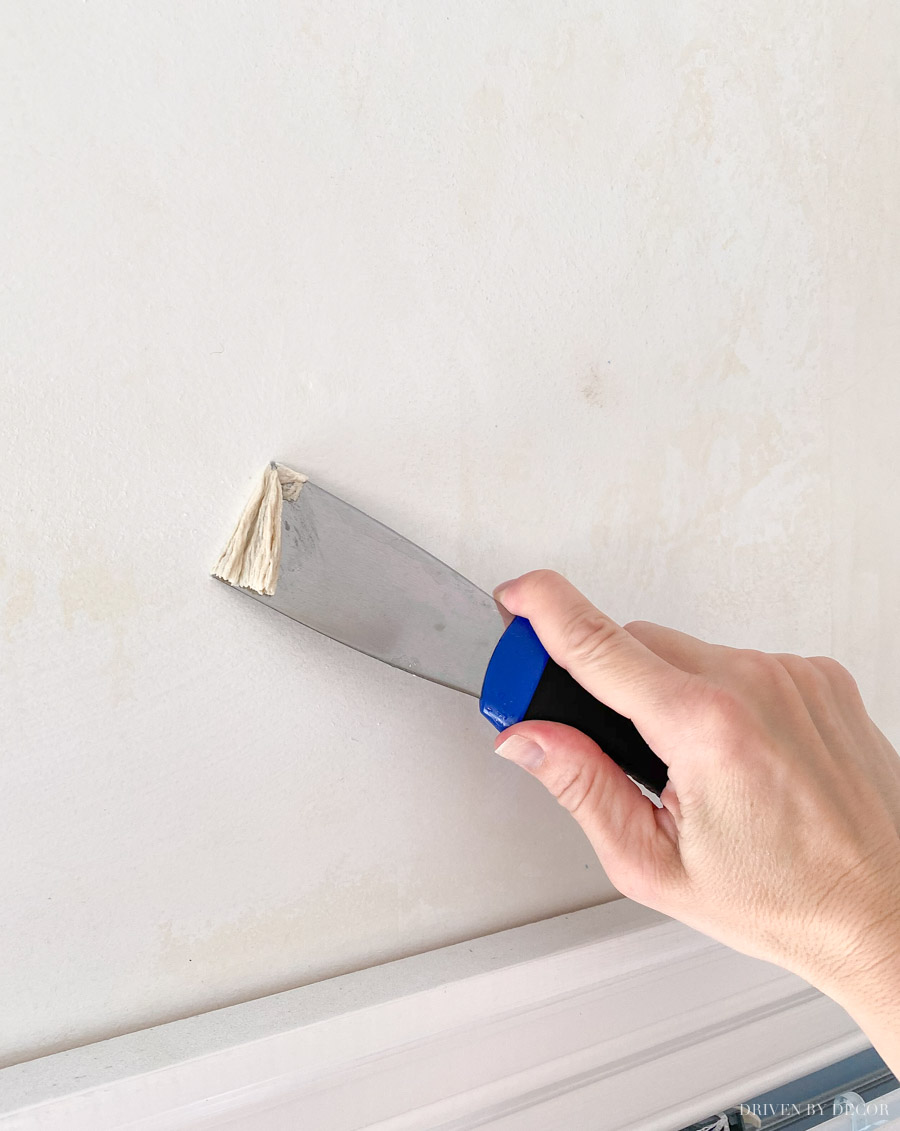
and then follow it up by scrubbing the rest off with my sponge and warm water.
5. Prep Before Painting or Re-Wallpapering
Wallpaper glue is tricky because even when it seems like you’ve gotten it all off, often there’s residual glue there that’s reactivated when you paint the walls (and the glue turns into a glob and messes up your paint job). To prevent this issue, there’s some special prep to do before painting over wallpaper glue.
After stripping the wallpaper and scraping and scrubbing off the residual glue, lightly sand the walls and then brush on a coat of Zinsser ALLPRIME Water-Base Problem Surface Sealer or Gardz Problem Surface Sealer that you can get online {here}. These sealers seal in any residual glue so it won’t be reactivated when painted over. It also seals any cracked or peeling drywall too so that they’re ready to be patched and painted.
After I finishing removing the wallpaper in our laundry room I… added wallpaper right back to it – ha! I’m a glutton for punishment I guess 🙂 Here’s a reminder of what it looked like “before”:
and here’s what it looks like now:
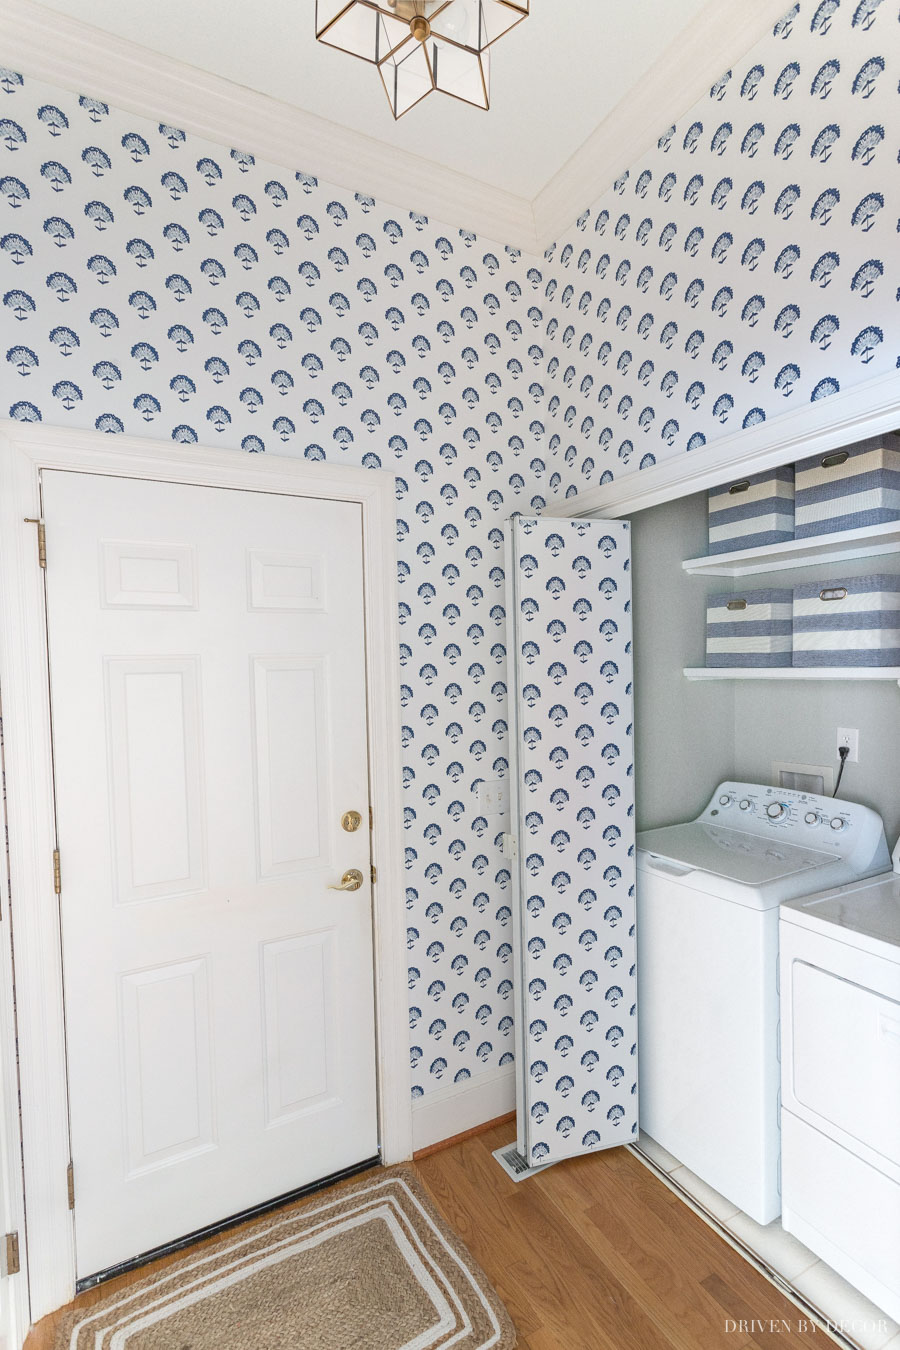
It’s a really hard space to get a photo of since it’s tiny and has no natural light but hopefully you can still see the big difference that the new wallpaper made! I wasn’t a fan of the mirrored doors that the washer and dryer are behind so I actually wallpapered those too after coating them with a good primer!
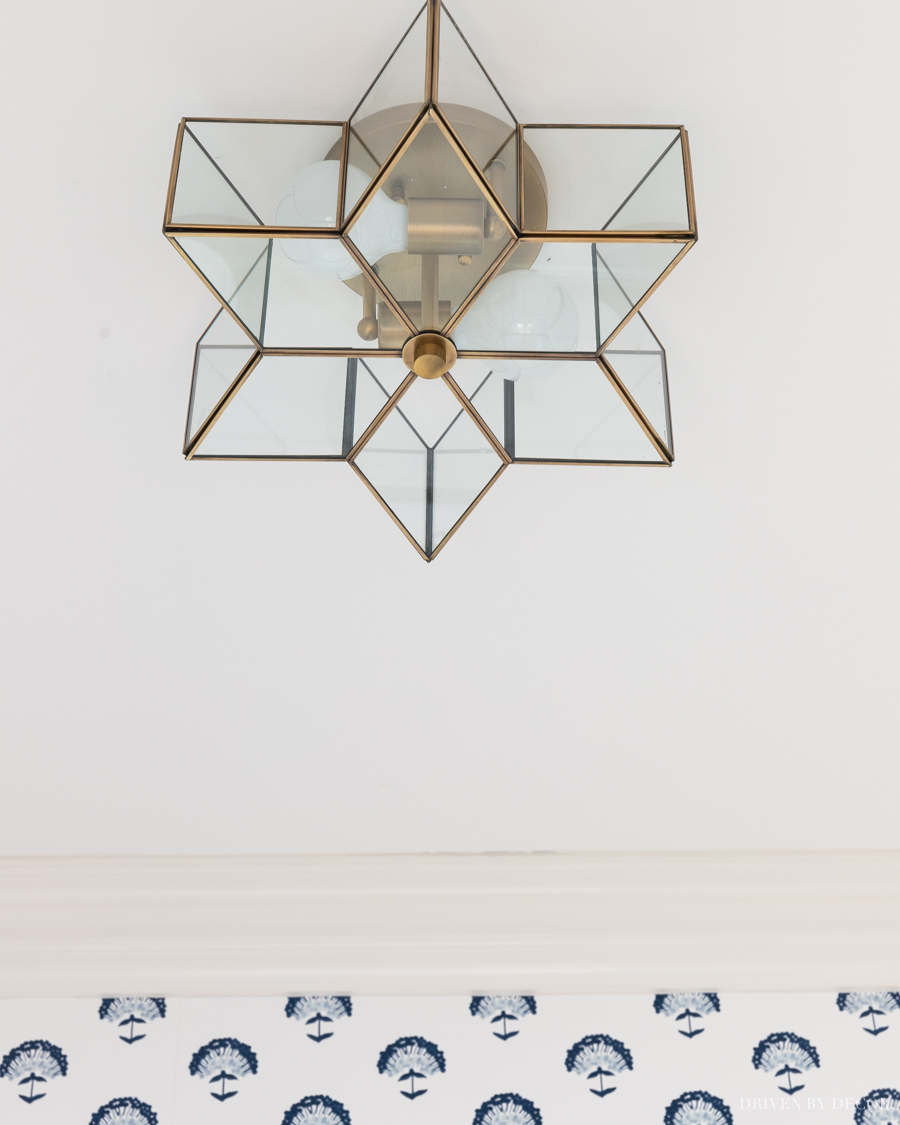
Along with re-wallpapering, I added {this new rug} as a doormat, a set of {these blue & white striped storage bins} above the washer, and swapped out the old, dated light fixture for {this brass star flush mount fixture}:
If you’re re-wallpapering like I did, be sure to check out my post on wallpaper installation for the step by step of hanging your new wallpaper. If you’re intimidated about hanging traditional pasted wallpaper, another option to consider is peel and stick! It’s a great beginner’s way to try out wallpapering since you use a lot of the same techniques to hang it but it’s easier because you’re not rushing against the clock to hang it before the glue on the back of your wallpaper dries. Check out my full blog post on peel and stick wallpaper to get the details on how to hang it!
Other Methods to Try for Removing Wallpaper
While using a handheld steamer is the best way I’ve found to remove wallpaper, there are other ways you can try too if you want to experiment with what works best for you including:
1. A Wallpaper Steamer
A steamer that’s specifically made to steam wallpaper like {this one} has a rectangular shaped attachment that you put on the wall to trap the steam and make it more effective. I’ve tried using one before but found that I did better with a handheld steamer that allowed me to steam under the sheet I was pulling up. It does have the advantage of having a much bigger water tank though so refills aren’t needed nearly as frequently. If you go this route, be sure to get one with a hose that’s long enough to reach the top of your walls.
2. Scoring + Chemical Stripper
Another option for how to remove wallpaper is to “score” your wallpaper using {this tool} that makes small holes in it followed by a wallpaper stripper like {this one} or {this one} that you spray or sponge on. I know some people who use this as their go-to method but for me it was really slow and the scoring tool left a few marks on my wall. Plus I’d rather use plain steam than a chemical stripper. If you use a chemical stripper, be sure to follow the safety instructions using safety goggles and gloves.
3. Hot Water in a Spray Bottle
This is definitely the cheapest route to go if you don’t already own a handheld steamer. Simply put fairly hot water in a spray bottle (or some people use equal parts water and fabric softener or equal parts water and vinegar), spray one area of your wall at a time, let it sit, and then use a scraper to remove the wallpaper. I removed the first half of the wallpaper in our foyer this way so it’s definitely do-able but I experimented with my handheld steamer for the first time on the second half and it moved things along much more quickly for me.
I hope you all found this to be helpful! If you want some wallpaper removing practice, come on over (ha – I wish!). While I’ve tackled our laundry room, small breakfast nook, powder room, girls’ bathroom, and kitchen, I still have our master bathroom to go….


Laurie Orlando says
Looks fantastic!
Karen Bunch says
Kris,
I’ve removed more wallpaper than I care to remember. I confess I had a pretty good method, but the steamer seems more efficient. I love the new blue and white paper and how clever to cover the mirrored doors. I confess when you showed the first before picture I almost thought the laundry room was attached to a bedroom.
You’re really making great progress on the new place. I’m happy to hear it’s keeping you busy. I’m creating new tasks daily around our house, but I confess I’m ready for a re-socialization order. 🙂
Karen
joe says
Great job! I found that the easiest way to remove wall paper was to wet it with a spray bottle and leave it on for about 5 minutes. Thanks for sharing,
Lisa says
Oxiclean is my go to wallpaper remover. It dissolves the glue and the paper scrapes off easily. Also it doesn’t have as strong a smell as some other options.
Kelly says
Watered down fabric softener (Downy) works every time for me
Liz Serpa says
Kris, I have removed a lot of old wallpaper in my life time and one item that I found really useful was an old plastic spatula. Why a spatula, because it won’t gouge the walls like a sharp putty knife might. Just find an old one in your kitchen drawer and go to town. Try it, I think you’ll like it. Also, for puttying I will use an old gift card because of the flexibility to press into gouges and then sweep it clean. Just some thoughts form someone who folks used to call “so domestic” hahahahha,
Vicki Templeton says
A friend told me about using 1/4 cup plain Pine-Sol in a gallon bucket of hot water. Sponge it on until wallpaper is damp. Let it set about 5 minutes, then use a plastic scrapper to remove dampened area. This cuts the glue really well. I had some wallpaper that was really hard and this worked for me.
Sara says
That looks like an epic removal job!! I usually put hot water in a garden pump sprayer, and spray the whole wall. Then start at the top, spray again and start pulling it off. Your hand doesn’t get as tired as it does from a small spray bottle and you can do huge spaces all at once.
Kim says
Wallpaper can be difficult to remove. The big difference is if the drywall was painted prior to installation. Quite often, builders would just put wallpaper over “raw” drywall. Our builder had a reputation for doing that so my husband snuck in on a weekend and primed/painted the rooms that were to be wallpapered. Made a big difference.
Kellie Green says
Ugh! removing wallpaper is the worst! Like you, we have dated paper in the house we purchased. The problem I am having is that they hung the wallpaper directly on the sheetrock. I have attempted to remove it from 1 wall in a bathroom and have put gouges in the sheetrock that will now have to be fixed…do you think the handsteamer/putty knife will work on my walls? I used a tool to score and then a chemical remover on my first attempt.
Now would be the perfect time to continue this project, with all of this time on my hands!
Lilly T says
Great job! I found that the easiest way to remove wall paper was to wet it with a spray bottle and leave it on for about 5 minutes. The big pieces came right off. I did not use hot/warm water and did not score the paper. It was the easiest thing ever! I removed it in 2 rooms. If you don’t want to spray it, you can wet a rag and apply it over the wall paper, wait 5 minutes and pull. I didn’t even have glue stuck on the walls and didn’t have to use the scraper either. Easy peasy! 🙂