I love how wallpaper transforms the look of a space like nothing else can but.. having to hire out for wallpaper installation can make it a pricey option! A few years ago I decided to try hanging wallpaper myself, not knowing if it would be doable or a disaster. After a bit of a learning curve, I realized it was totally doable and I’ve now got quite a few wallpapering projects under my belt.
Today I’m sharing the ten wallpaper installation tips that I think would help you the most if you’re considering learning how to wallpaper a room on your own because yes, you CAN do this! Let’s kick it off with tips on the best wallpaper projects to start with as a beginner… (post includes commissionable links; for more information, see my full disclosure statement {here})
1. Go Simple For Your First Wallpapering Project
I made the mistake of choosing the worst project for learning how to wallpaper. My mistake was trying to hang grasscloth wallpaper on my first go. Little did I know that hanging grasscloth is SO much harder than hanging regular wallpaper for two reasons – (1) glue you get on the front of the paper will stain grasscloth whereas with regular paper it wipes right off and (2) grasscloth paper is thick which makes it difficult to trim and install in room corners. So DON’T make hanging grasscloth your first wallpapering project.
I did eventually pull this poorly selected first project off by with the help of the nicest local wallpaper installer (thanks Chuck!) after realizing I was in over my head. Not only was he totally open to the idea of me doing the job with him to learn how to wallpaper but he was the most amazing teacher. By working together, we added grasscloth wallpaper all around my daughter’s room:
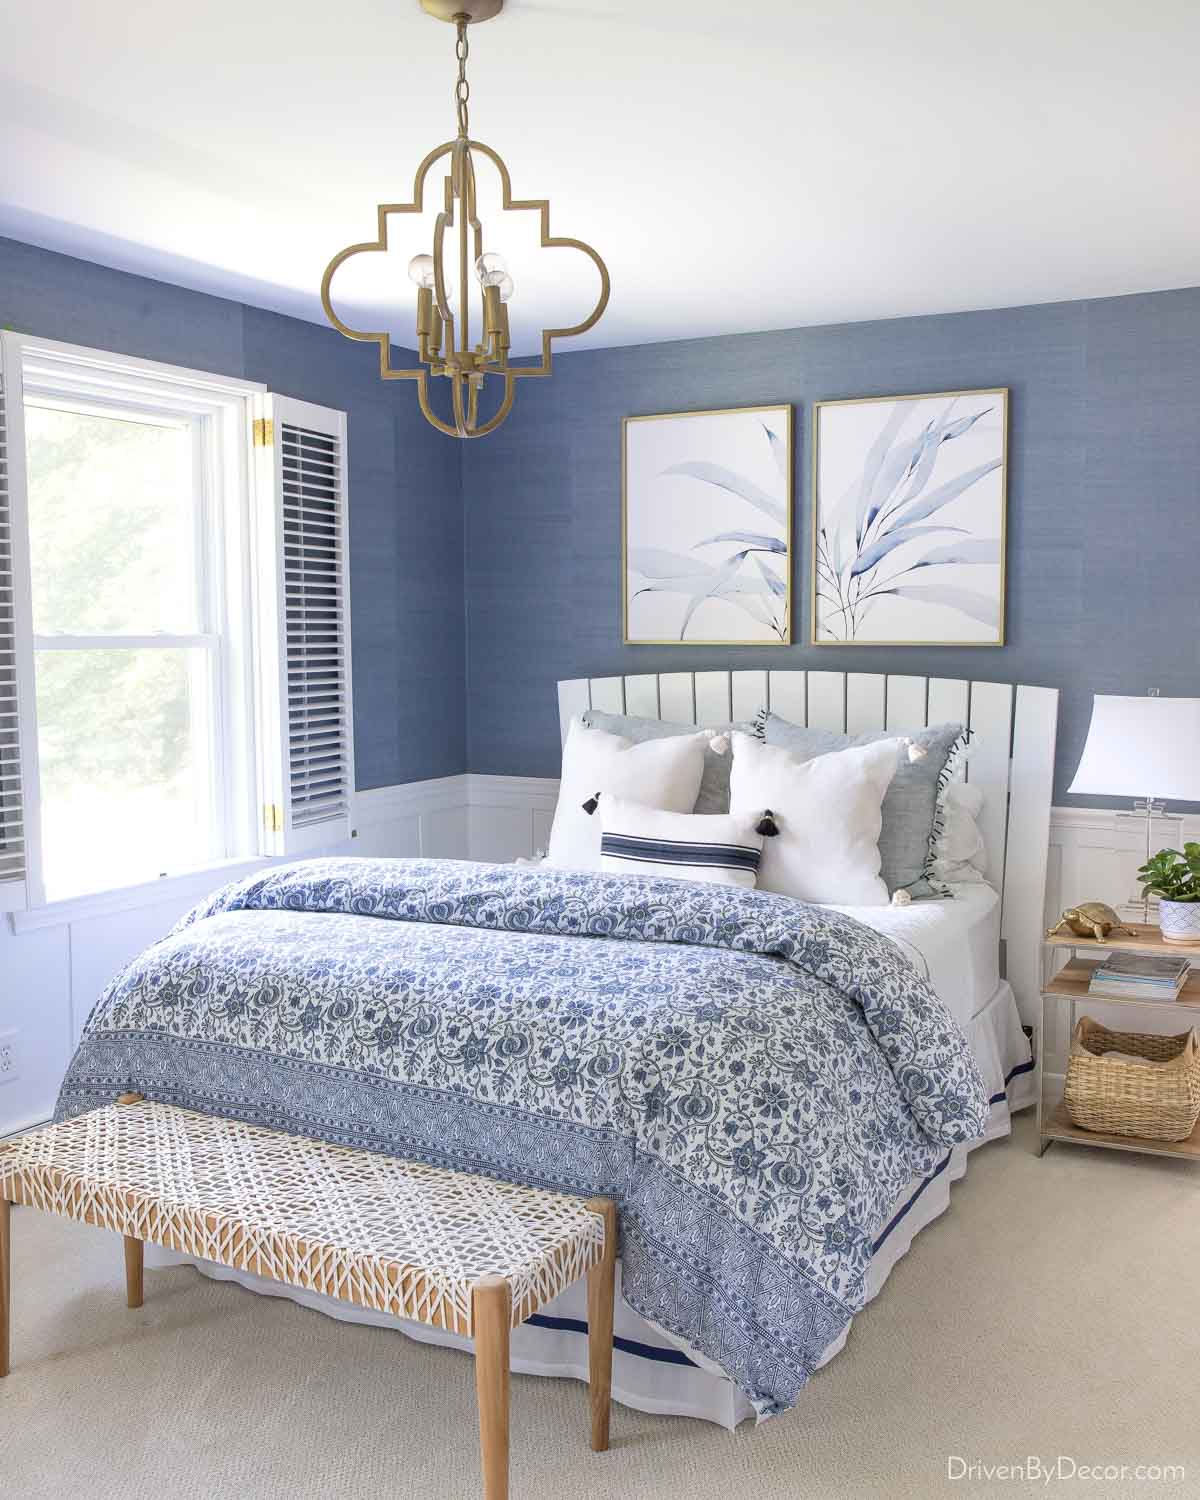
Room Sources: Blue grasscloth wallpaper (similar) | Gold quatrefoil pendant | Framed art (left) | Framed art (right) | Leather weave bench | Acrylic lamp | Bedding no longer available
Having had that experience, I would highly recommend having an experienced friend help you with your first wallpapering job or hire a local wallpaper who is open to working with you to knock your first job out if possible. Or if that’s not an option, start with a simple wallpapering project such wallpapered bookshelves:
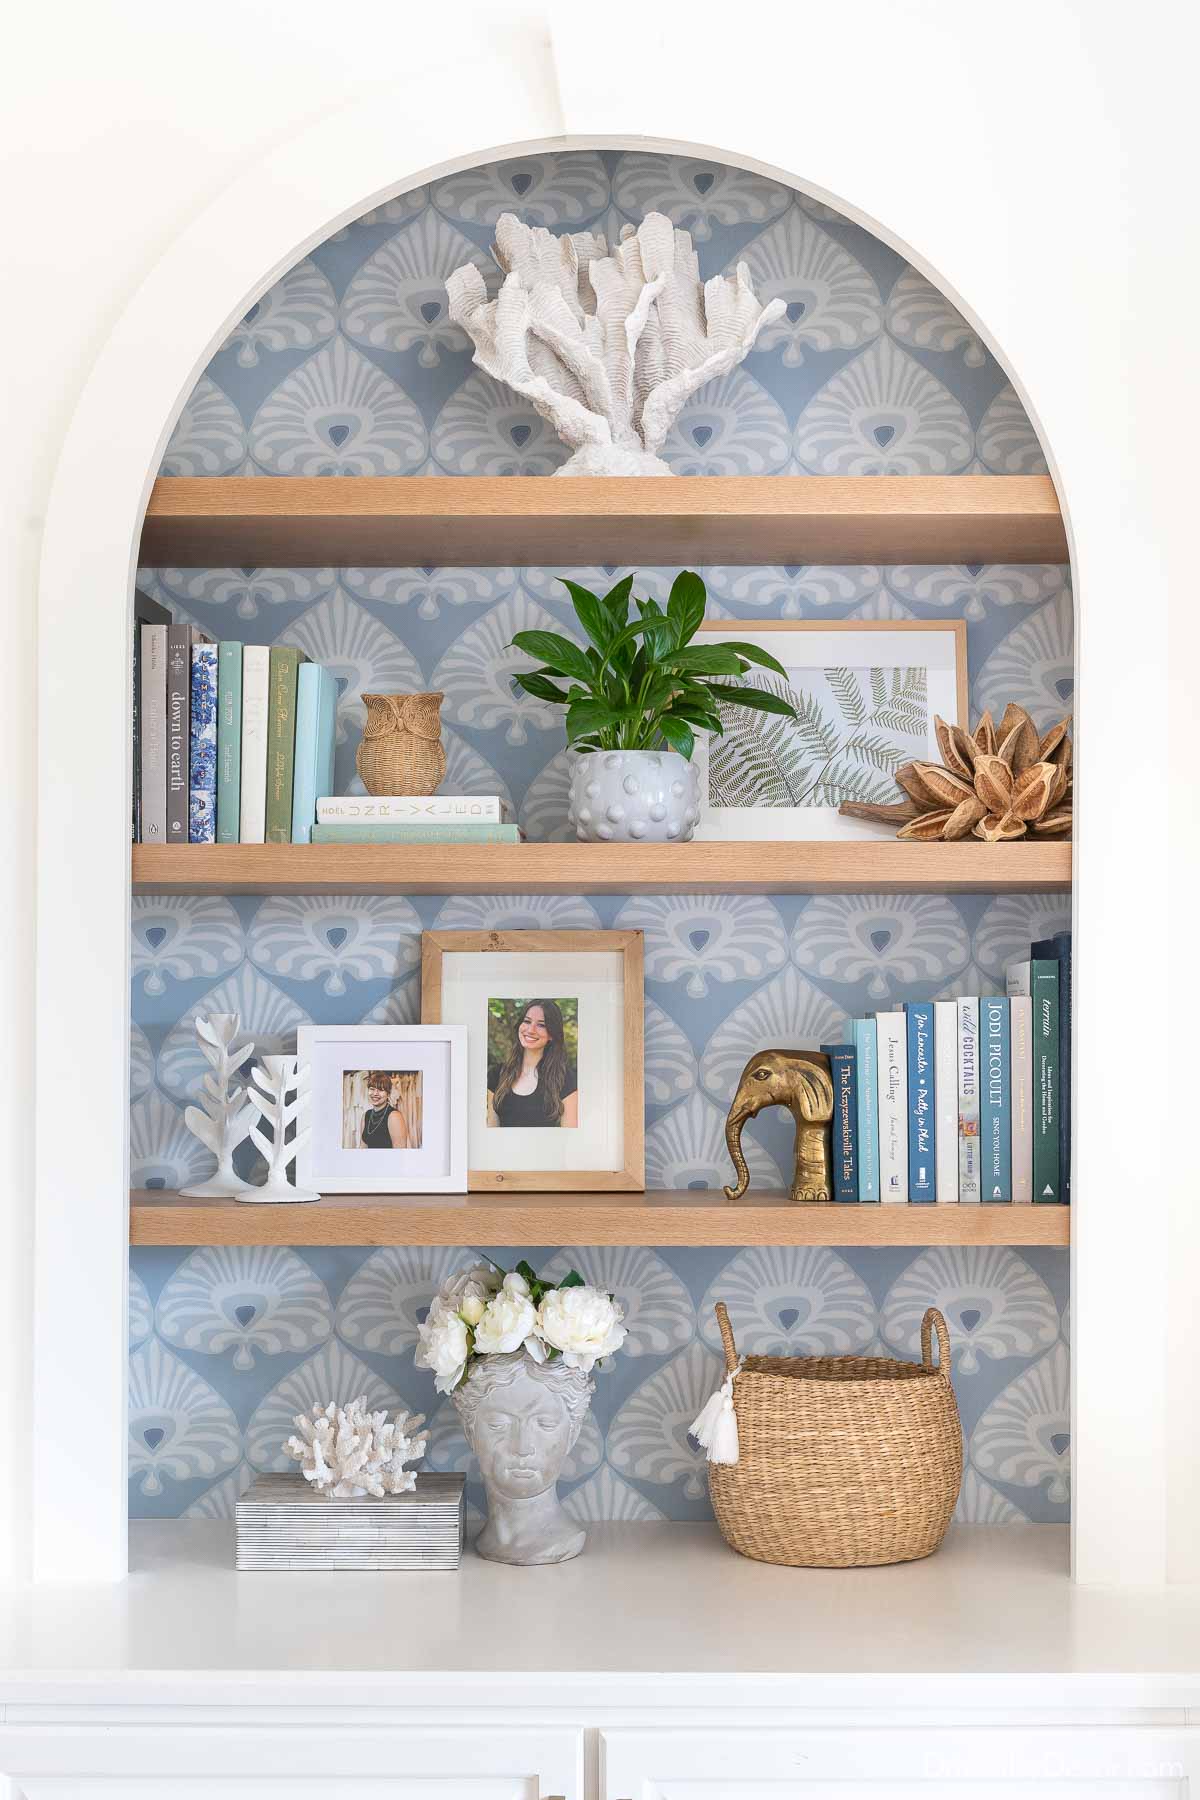
Sources: Sources: Wallpaper | Oak shelves (Nature finish) | Large faux coral (similar) | White bubble planter | Fern art | Star pod | White square frame (8.3″ x 8.3″) | Burlwood frame (11″ x 13″) | Elephant bookend | Decorative black & white box | Coral “topper” (similar) | Bust planter | Round basket
or a single accent wall like this wall in my girls’ room that I added peel and stick wallpaper to:
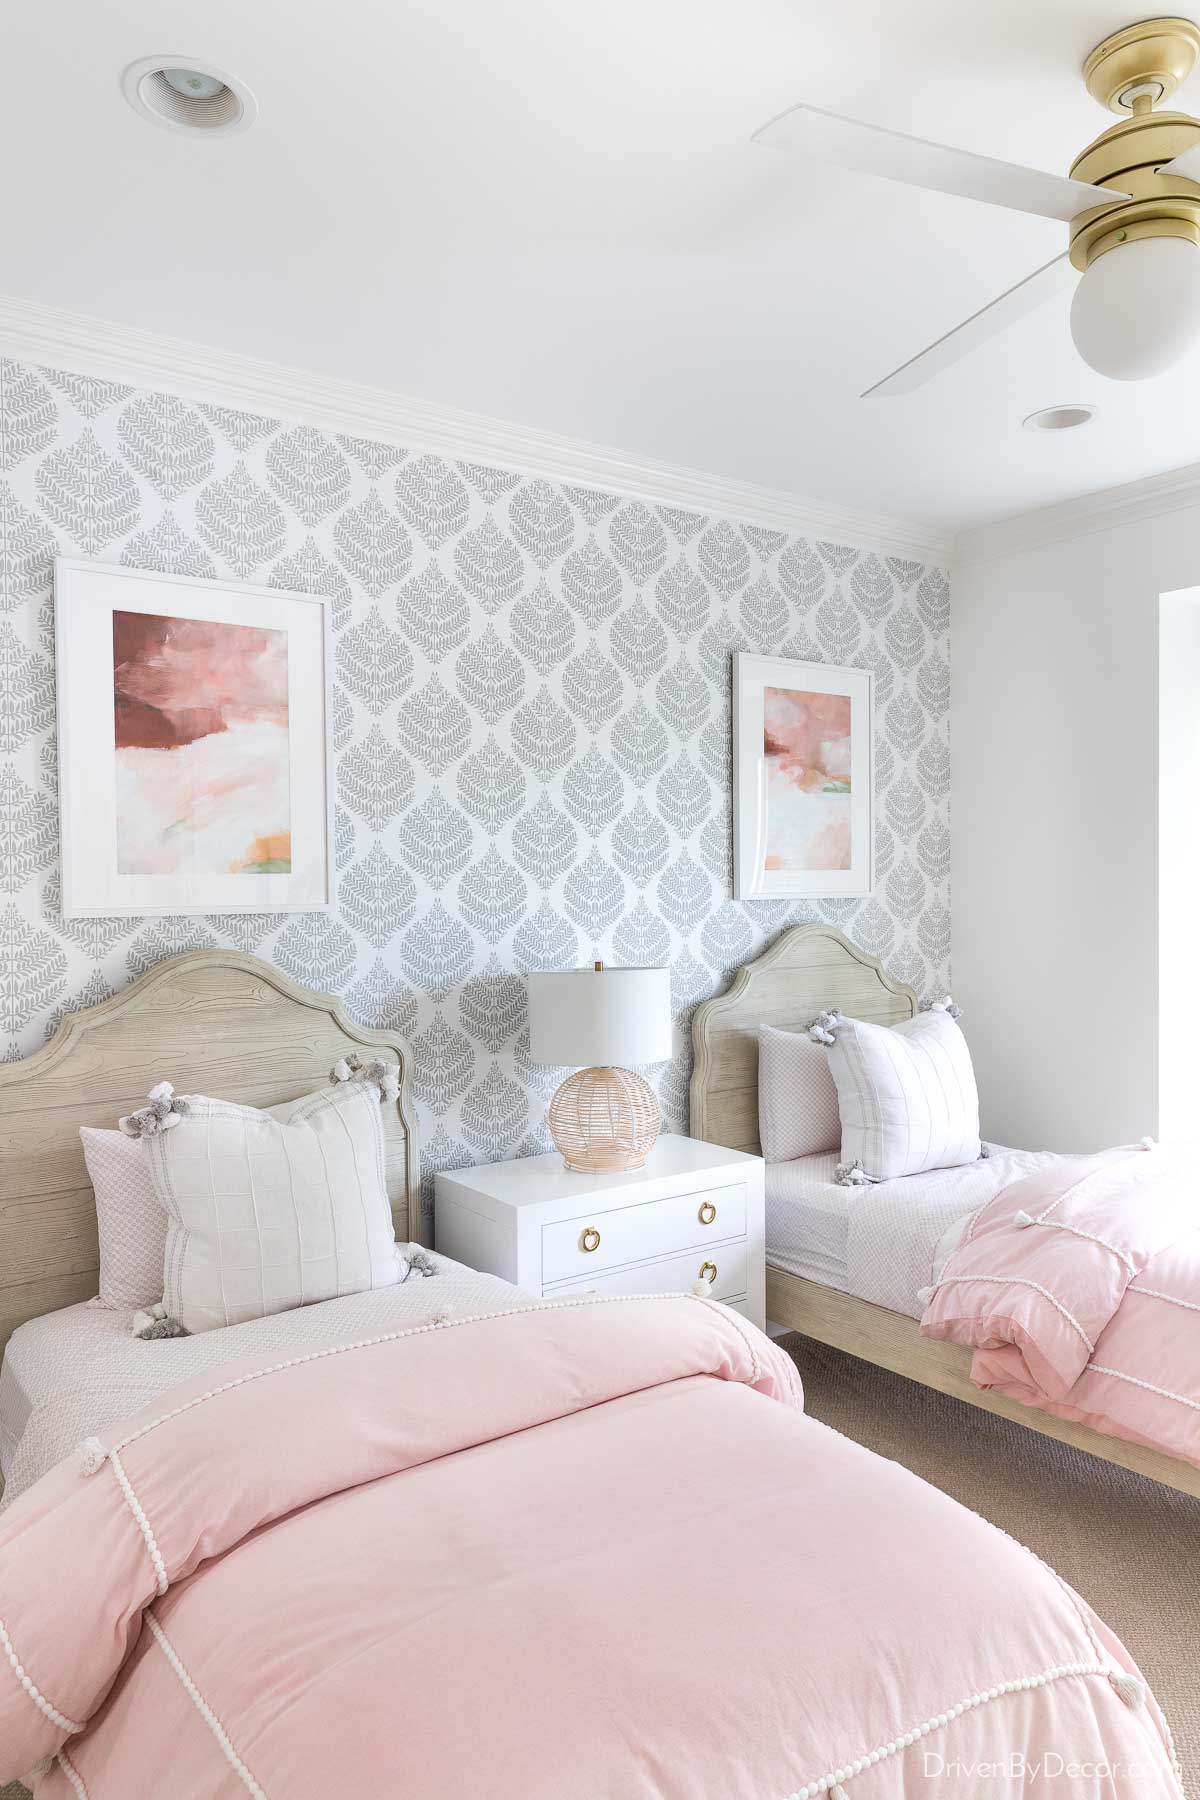
Room Sources: Gray damask peel & stick wallpaper | Globe light ceiling fan | Arched wood beds | Framed art (left) | Framed art (right) | White dresser | Rattan lamp
This post focuses on tips for hanging traditional wallpaper but for peel and stick, check out my post on how to hang peel and stick wallpaper
Also rooms that have wainscotting or some other molding treatment on the bottom ½ to ⅓ of the wall like this one are easier since you’re dealing with shorter wallpaper strips:
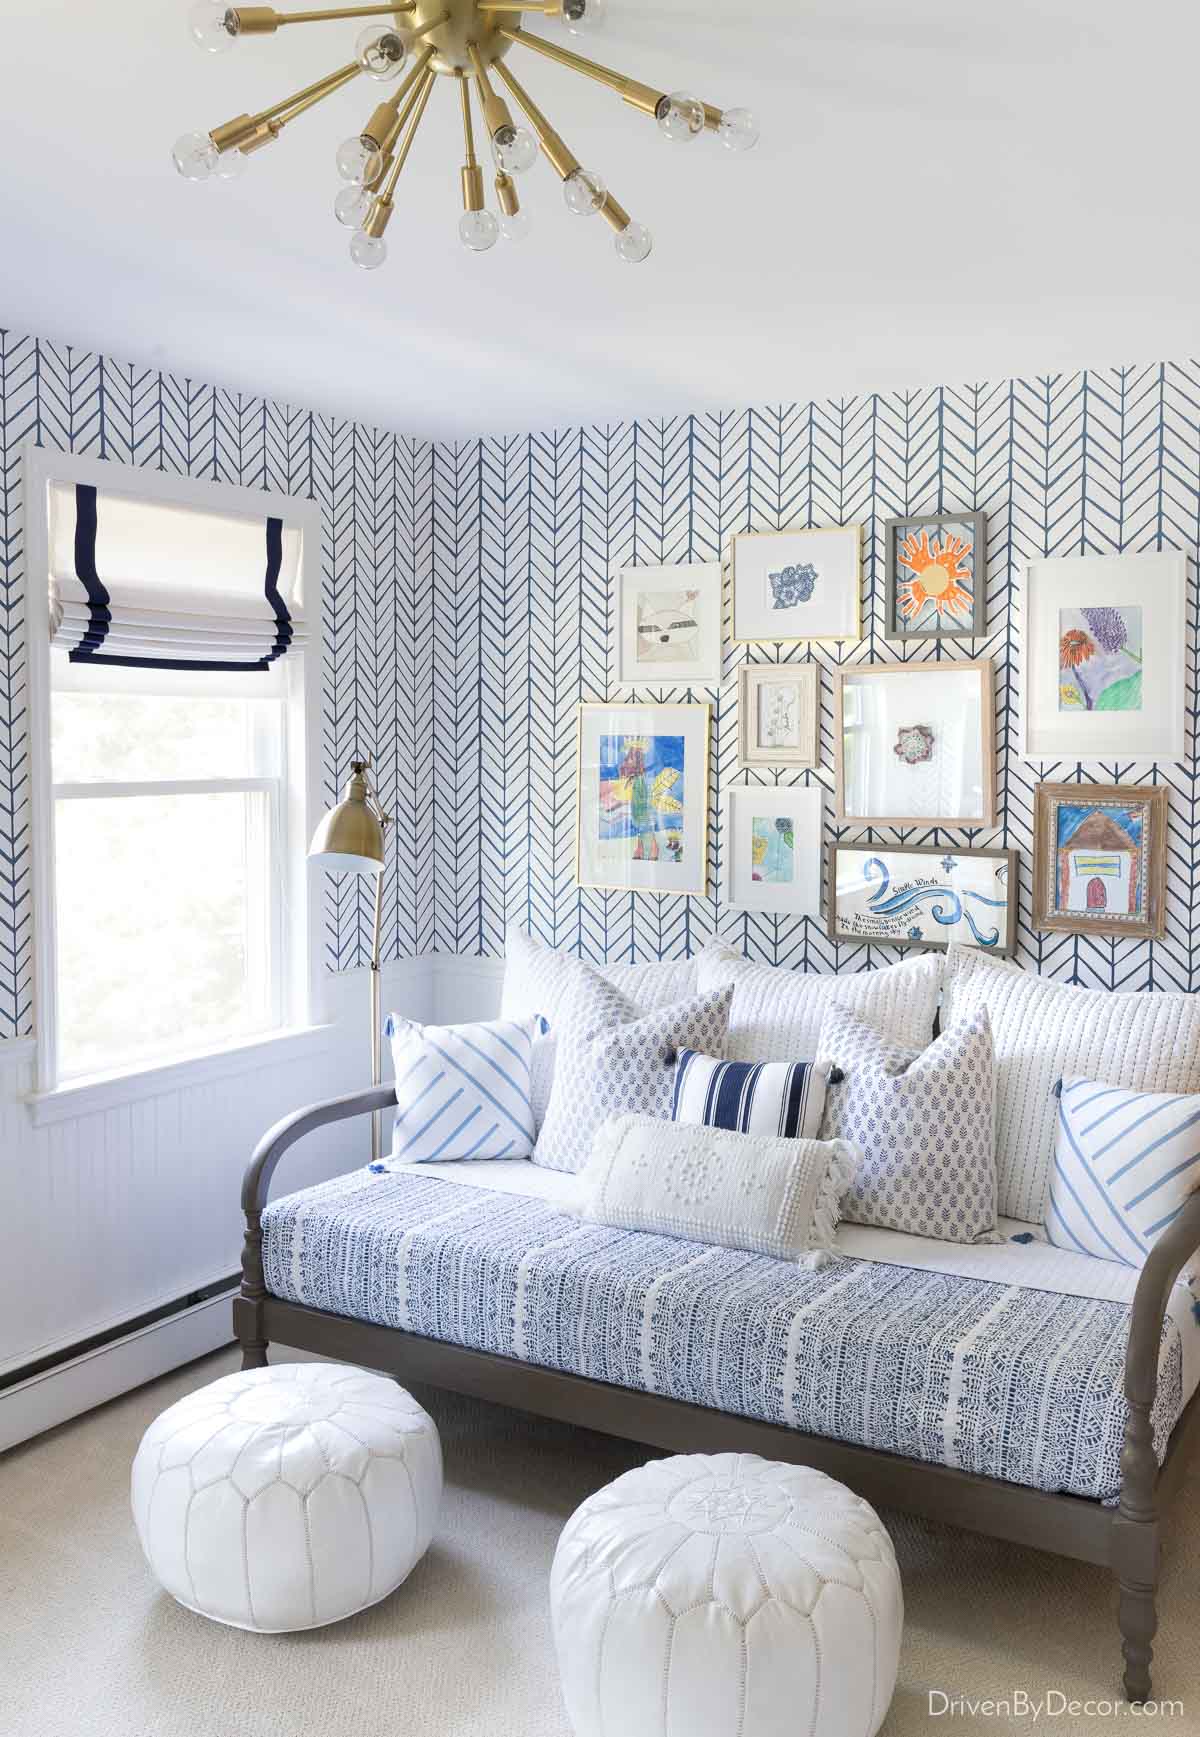
Bonus Room Sources: “Feather” Herringbone wallpaper (color: denim) | Daybed | Blue & white quilt | White quilted Euro shams w/navy stitch (similar) | Blue & white block print pillow covers (similar) | Long textured lumbar pillow | Brass floor lamp (similar) | Brass sputnik flush mount light fixture (similar) | Roman shades with ribbon trim in Light Navy trim | White Moroccan leather poufs
You could also consider adding a wallpaper backsplash to your kitchen if it’s not tiled. It involves small strips of wallpaper that are easy to manage.
Along with picking a simpler than average project for your first go at wallpapering, I highly recommend that you order more wallpaper than you think you’ll need (there are various online wallpaper calculators that will estimate the number of rolls needed). Wallpaper is created in batches and the exact same wallpaper from different batches can vary a bit in color. If you run short on wallpaper and need to order another roll, it might be a different batch and not match exactly. Give yourself some room to mess up a time or two in your first wallpapering job without the stress of possibly running out of wallpaper.
Also, choose high quality wallpaper. I love Serena & Lily wallpaper – it’s great quality and while it’s definitely not cheap, most of their wallpapers are less than high end brands like Schumacher.
2. Apply Tinted Wall Sizer Before Wallpapering
When you’re new to wallpapering, you might not always get the seams between strips of wallpaper perfect. If you’re installing dark wallpaper on light walls (or vice versa), that teeny gap in your seam can be pretty obvious. So I recommend tinting your wallpaper sizing the same color as your wallpaper to make any imperfect seams blend right in. It’s a wallpaper installation tip that can make all the difference!
What is wall sizer? It’s a product that you apply to your walls just like a coat of paint (edging with a paint brush and rolling the rest) prior to wallpapering. It makes positioning your wallpaper easier during installation, promotes adhesion, and makes it easier to remove your wallpaper if you ever want to years later.
I recommend Shieldz Acrylic Wall Sizer that’s clear and can be used as-is or tinted to match the color of your wallpaper. Another option is Shieldz Universal Wallcovering Primer that’s white and can be used as-is or tinted to light and medium colors (you need to use the Acrylic Wall Sizer instead if tinting to a dark color).
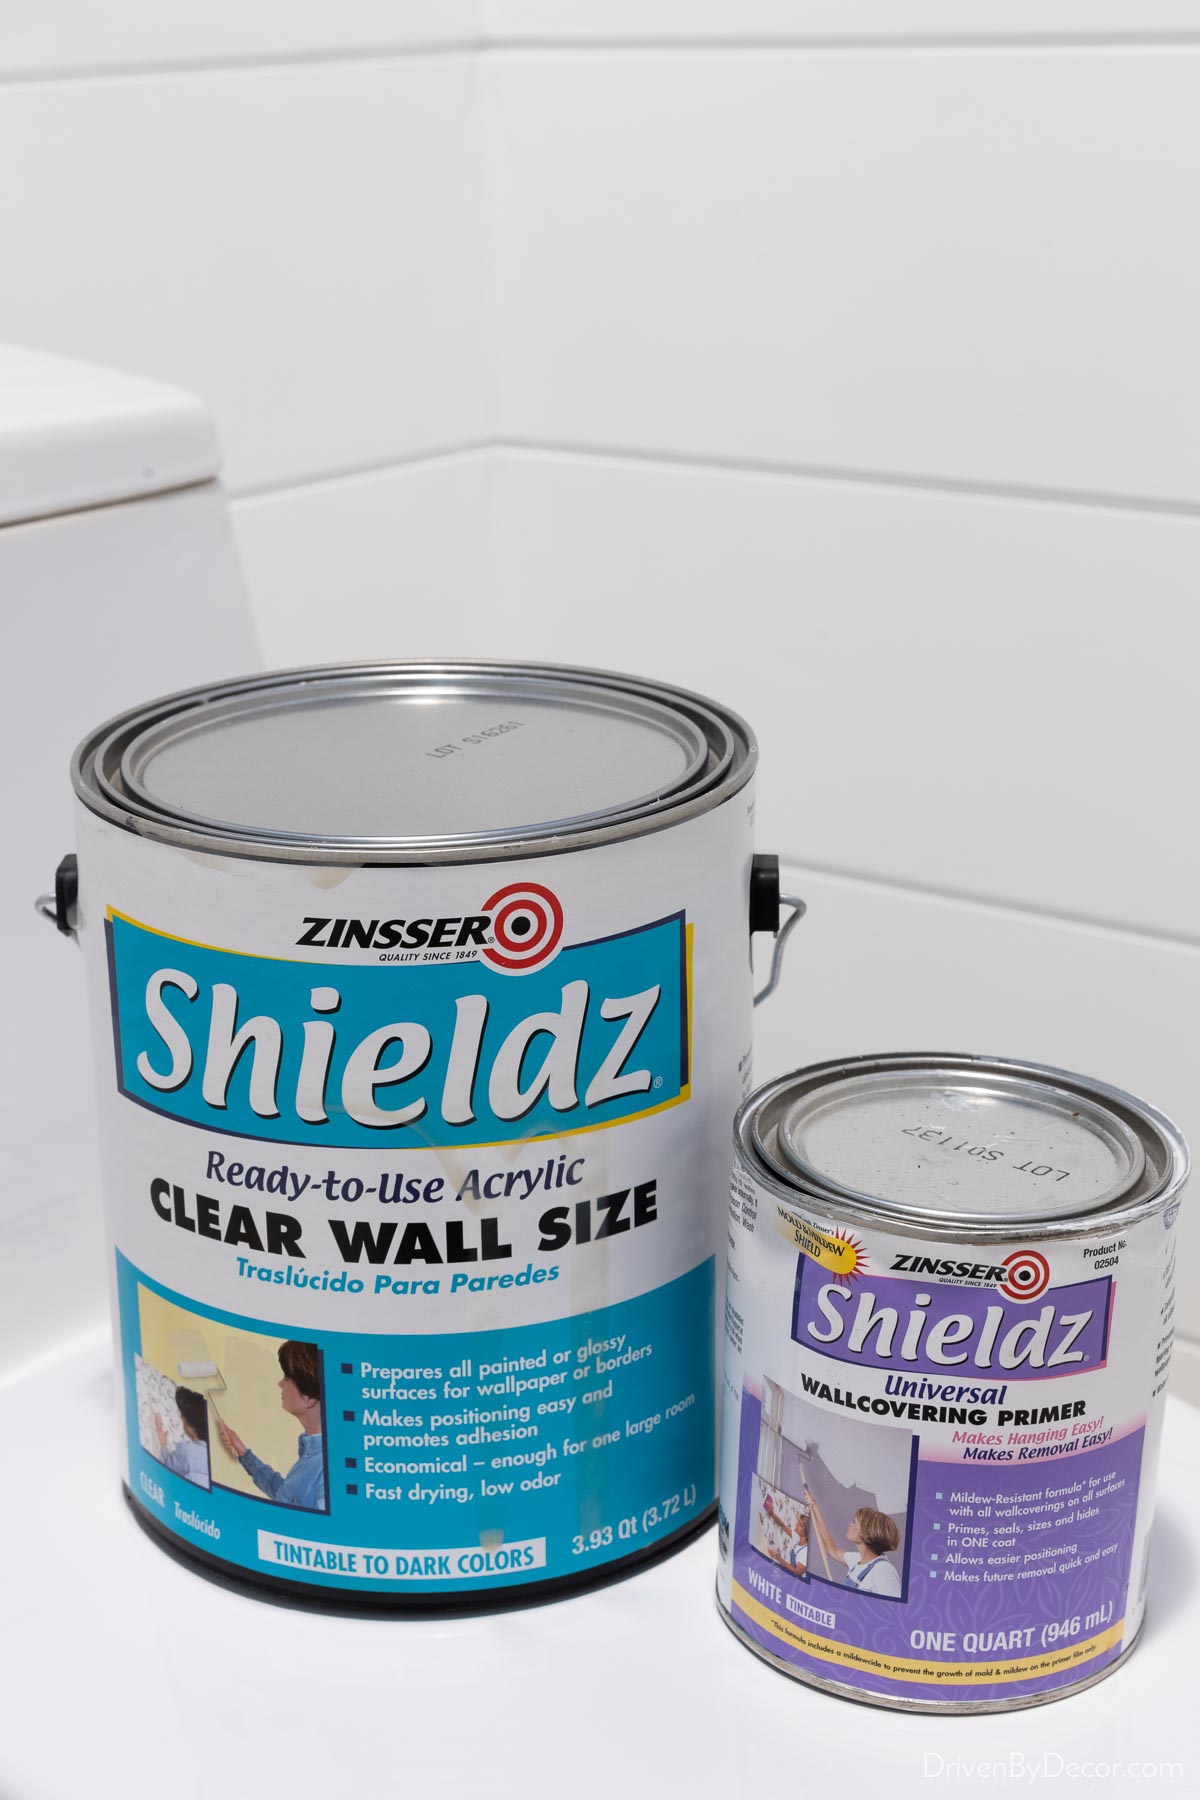
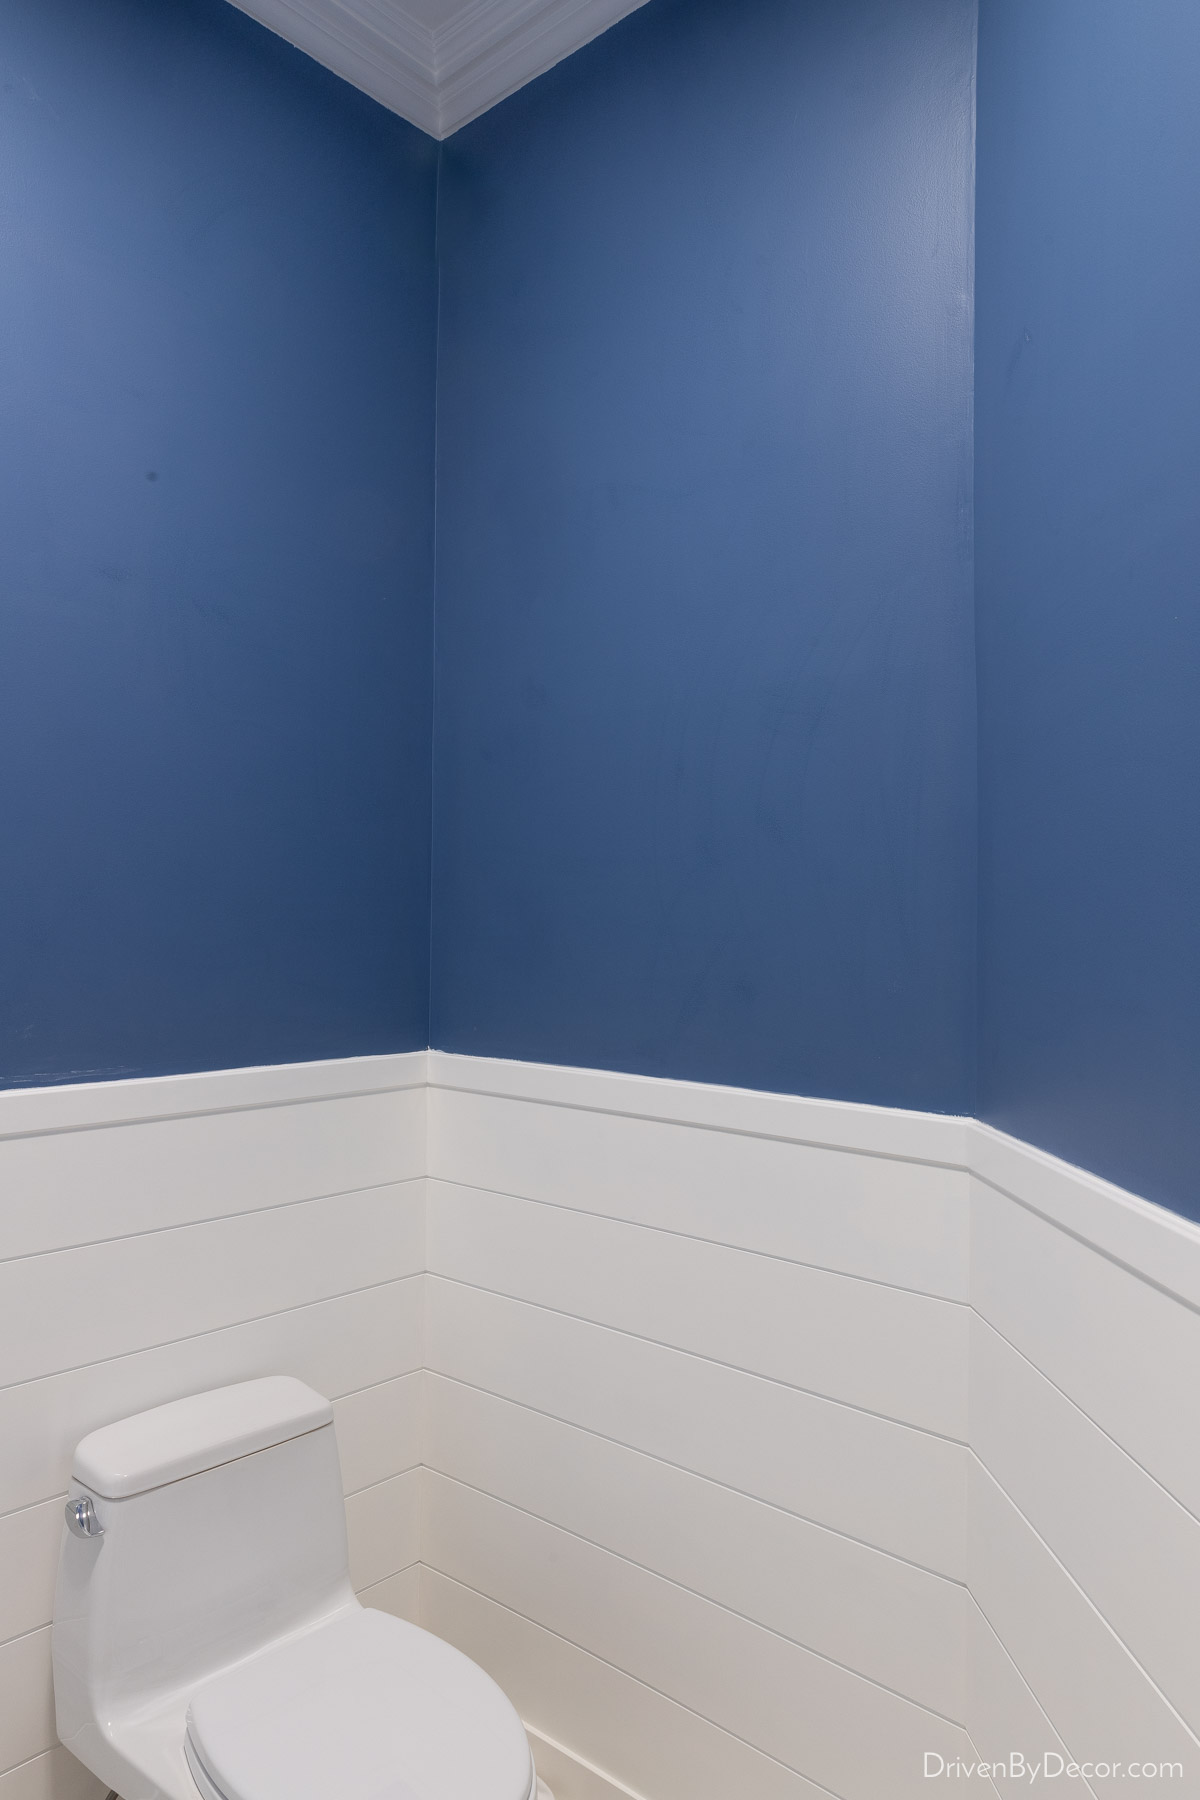
They’re hard to find online but I’ve had luck locally at Ace Hardware where they can also do the tinting. After using Shieldz Acrylic Wall Sizer tinted to match my wallpaper, this is what my bathroom walls looked like before I started wallpapering:
Just like you would when you’re painting a room, be sure to patch any holes, cracks, etc. in the walls before applying the sizer. If there’s existing wallpaper that you have to remove before installing new wallpaper, check out my posts on how to remove wallpaper. And if you’re wondering about whether it’s ok to use wallpaper in a bathroom, check out my post on bathroom wallpaper for a tip on sealing your wallpaper.
3. Gather the Right Tools for Wallpaper Installation
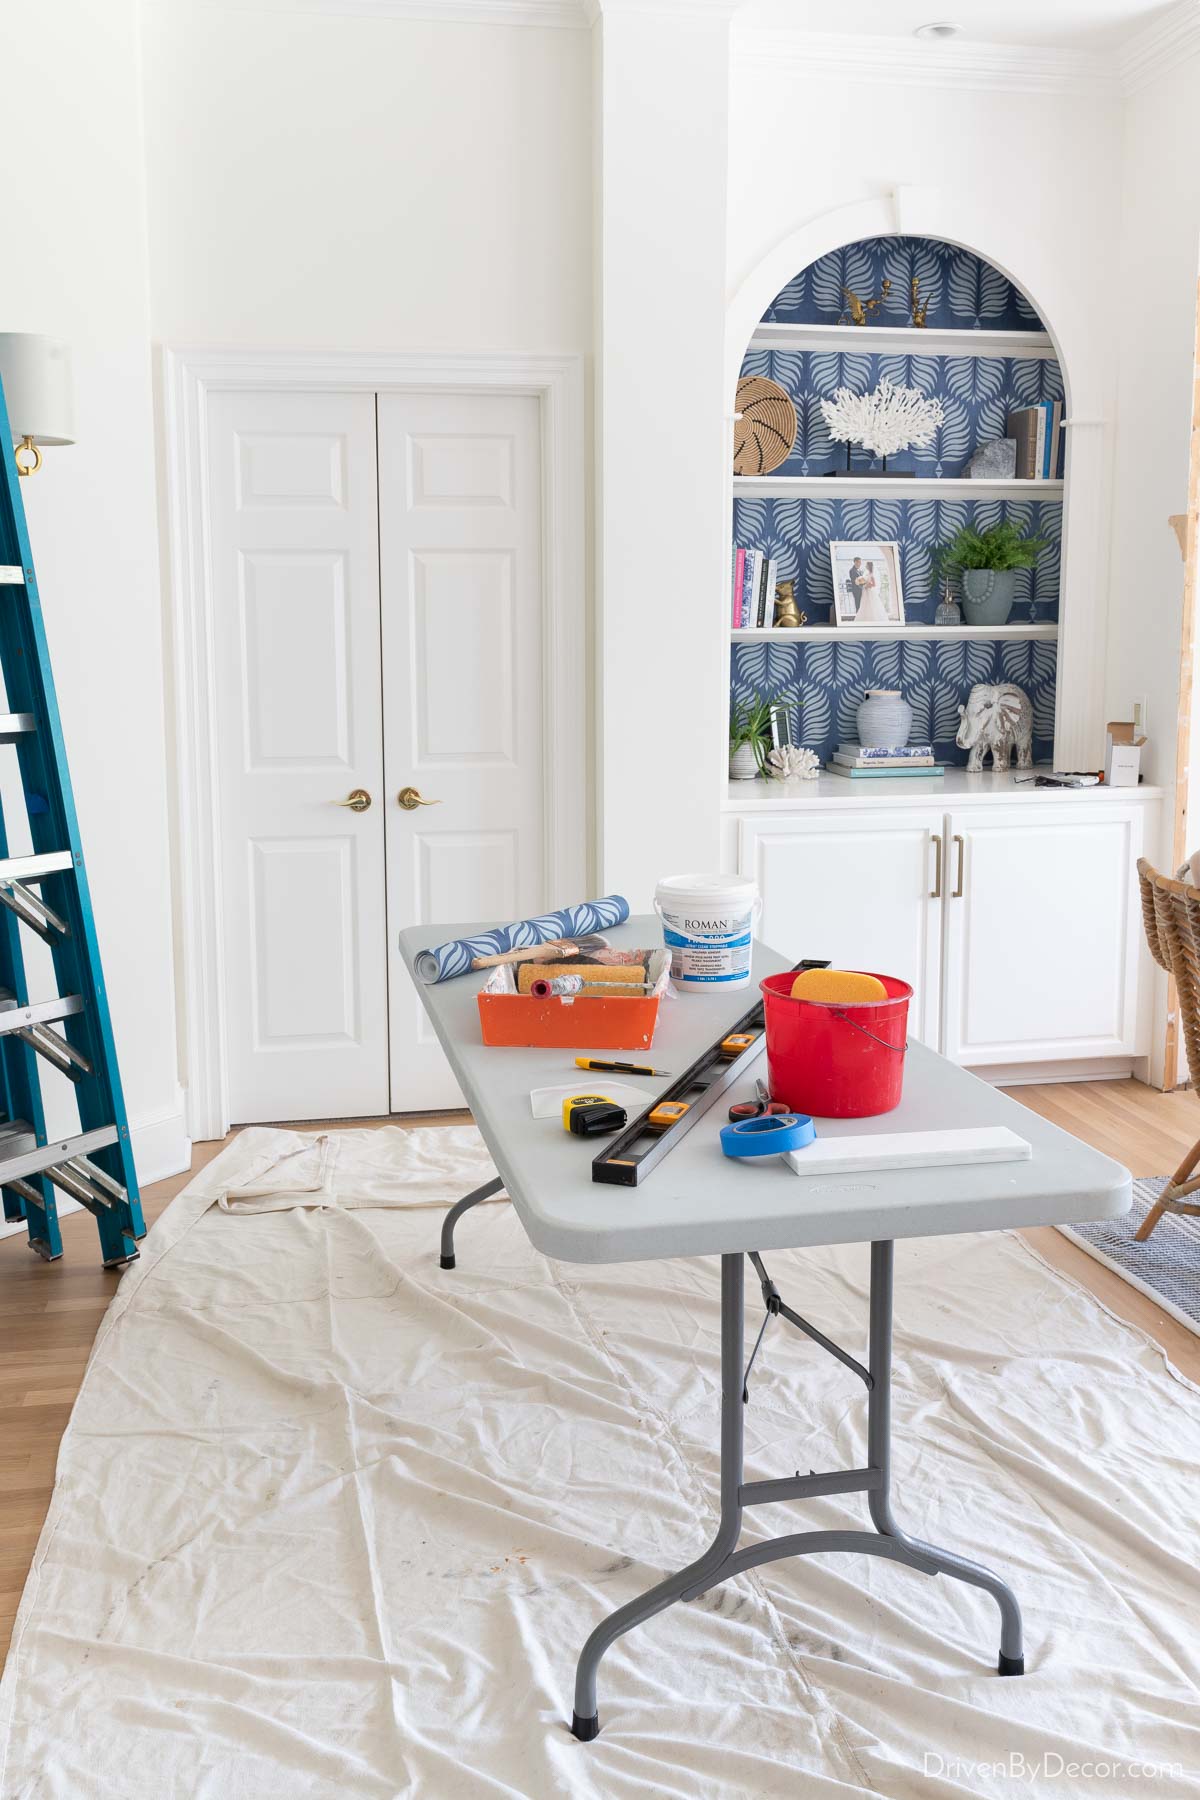
Before starting your wallpaper installation, make sure you have all the tools you need to get the job done right! You’ll need a large, flat surface to cut your wallpaper on and apply adhesive to the back of it. It WILL get cut marks in it so don’t use anything you care about. I use this 6′ long folding table:
You could also use a thick sheet of plywood on top of sawhorses as long as the wood is smooth and won’t damage your wallpaper.
Other supplies you’ll need include:
- 48″ metal level such as {this one}
- {This smoothing tool} x 2
- A 9mm snap off razor such as {this one} + ultra-sharp snap-off blades – I use {these}
- A pair of {these small scissors} + a pair of regular scissors
- ⅜″ nap roller + roller handle, paint tray, & paint brush (any size)
- Large sponge like {this one} + bucket
- Seam roller
- Metal straight edge such as a 6″ putty or taping knife
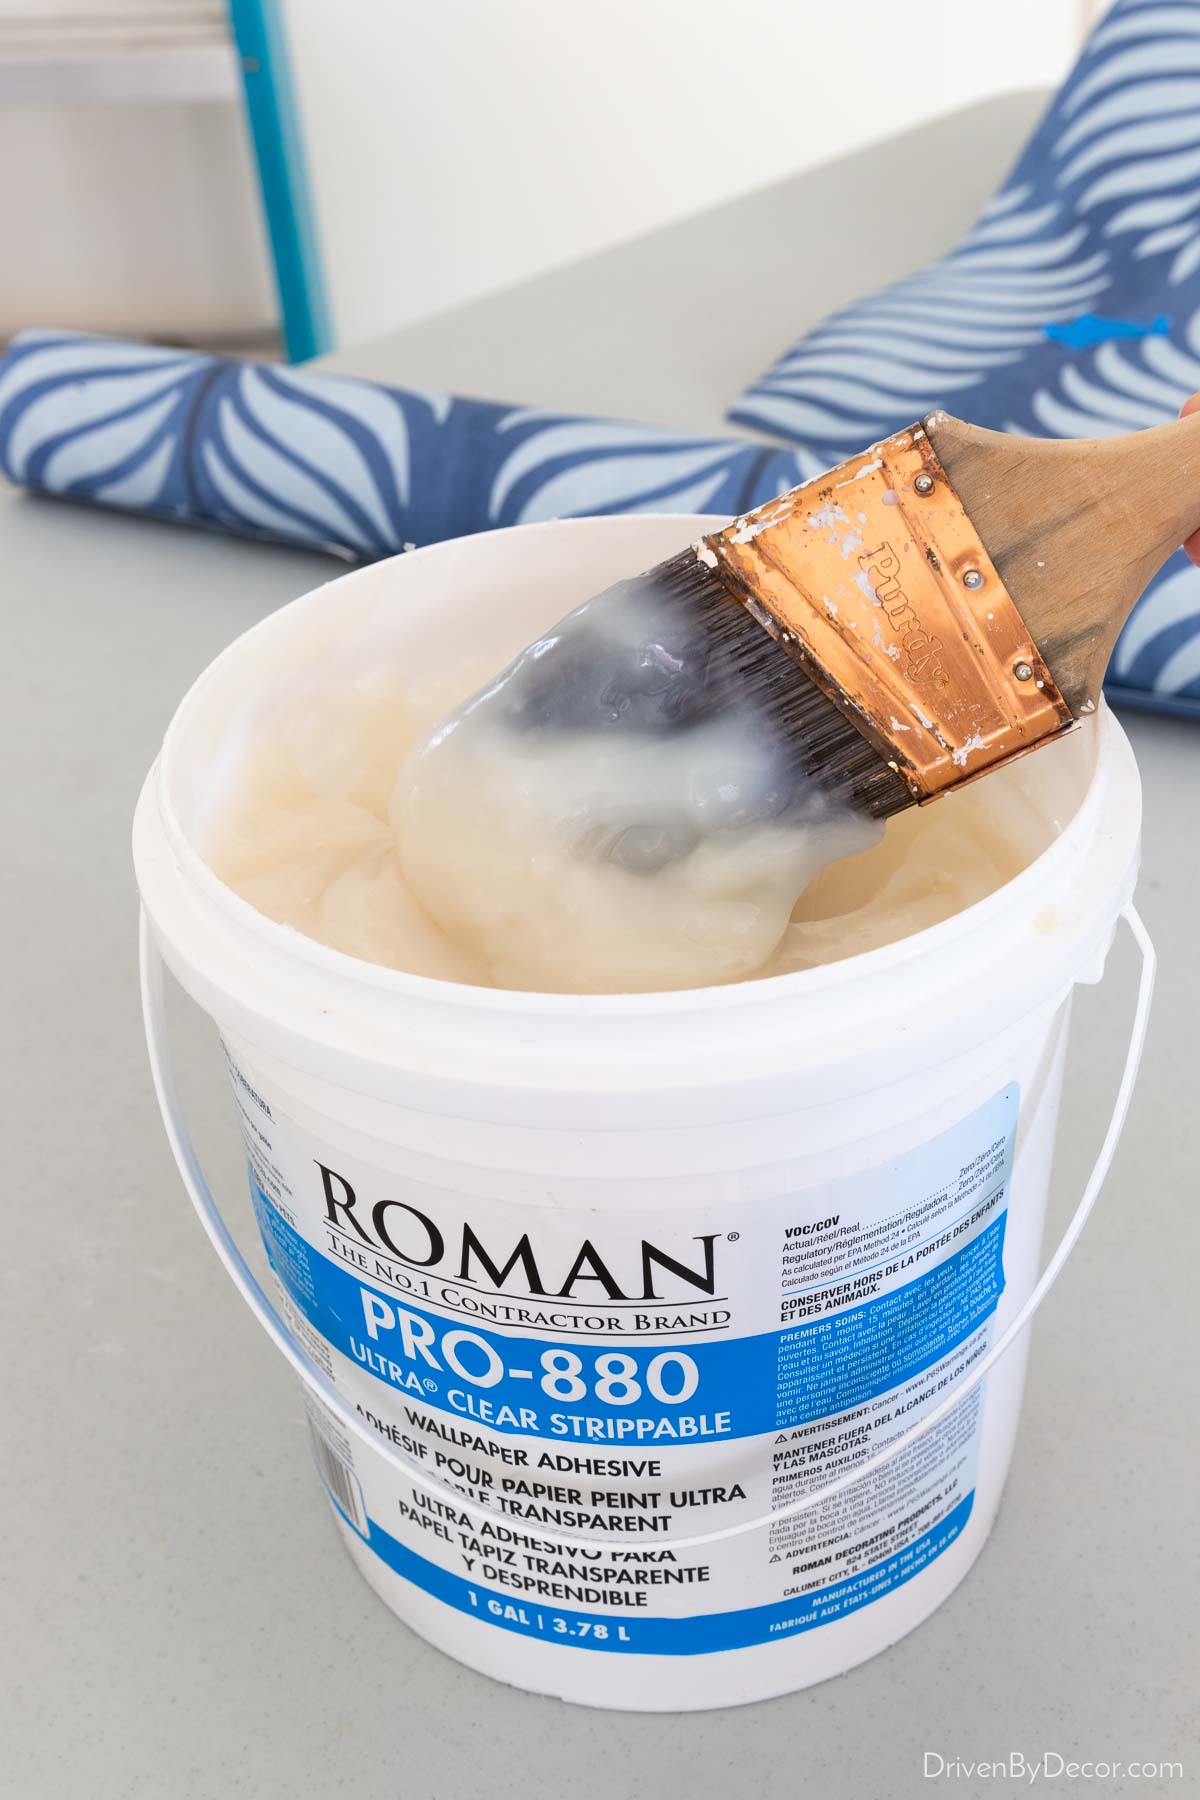
- Wallpaper paste (unless your paper comes pre-pasted) – I’ve tried several and love Roman Pro-880 that you can buy {here}. It has a gel-like consistency that doesn’t dry out as quickly as other wallpaper pastes, giving me more time to reposition and get bubbles out of my wallpaper when hanging it.
A few other things you’ll need that you should already have on hand include a tape measure, pencil, small clean cloth/rag, painter’s tape, drop cloths, & a ladder.
4. Plan Before Pasting
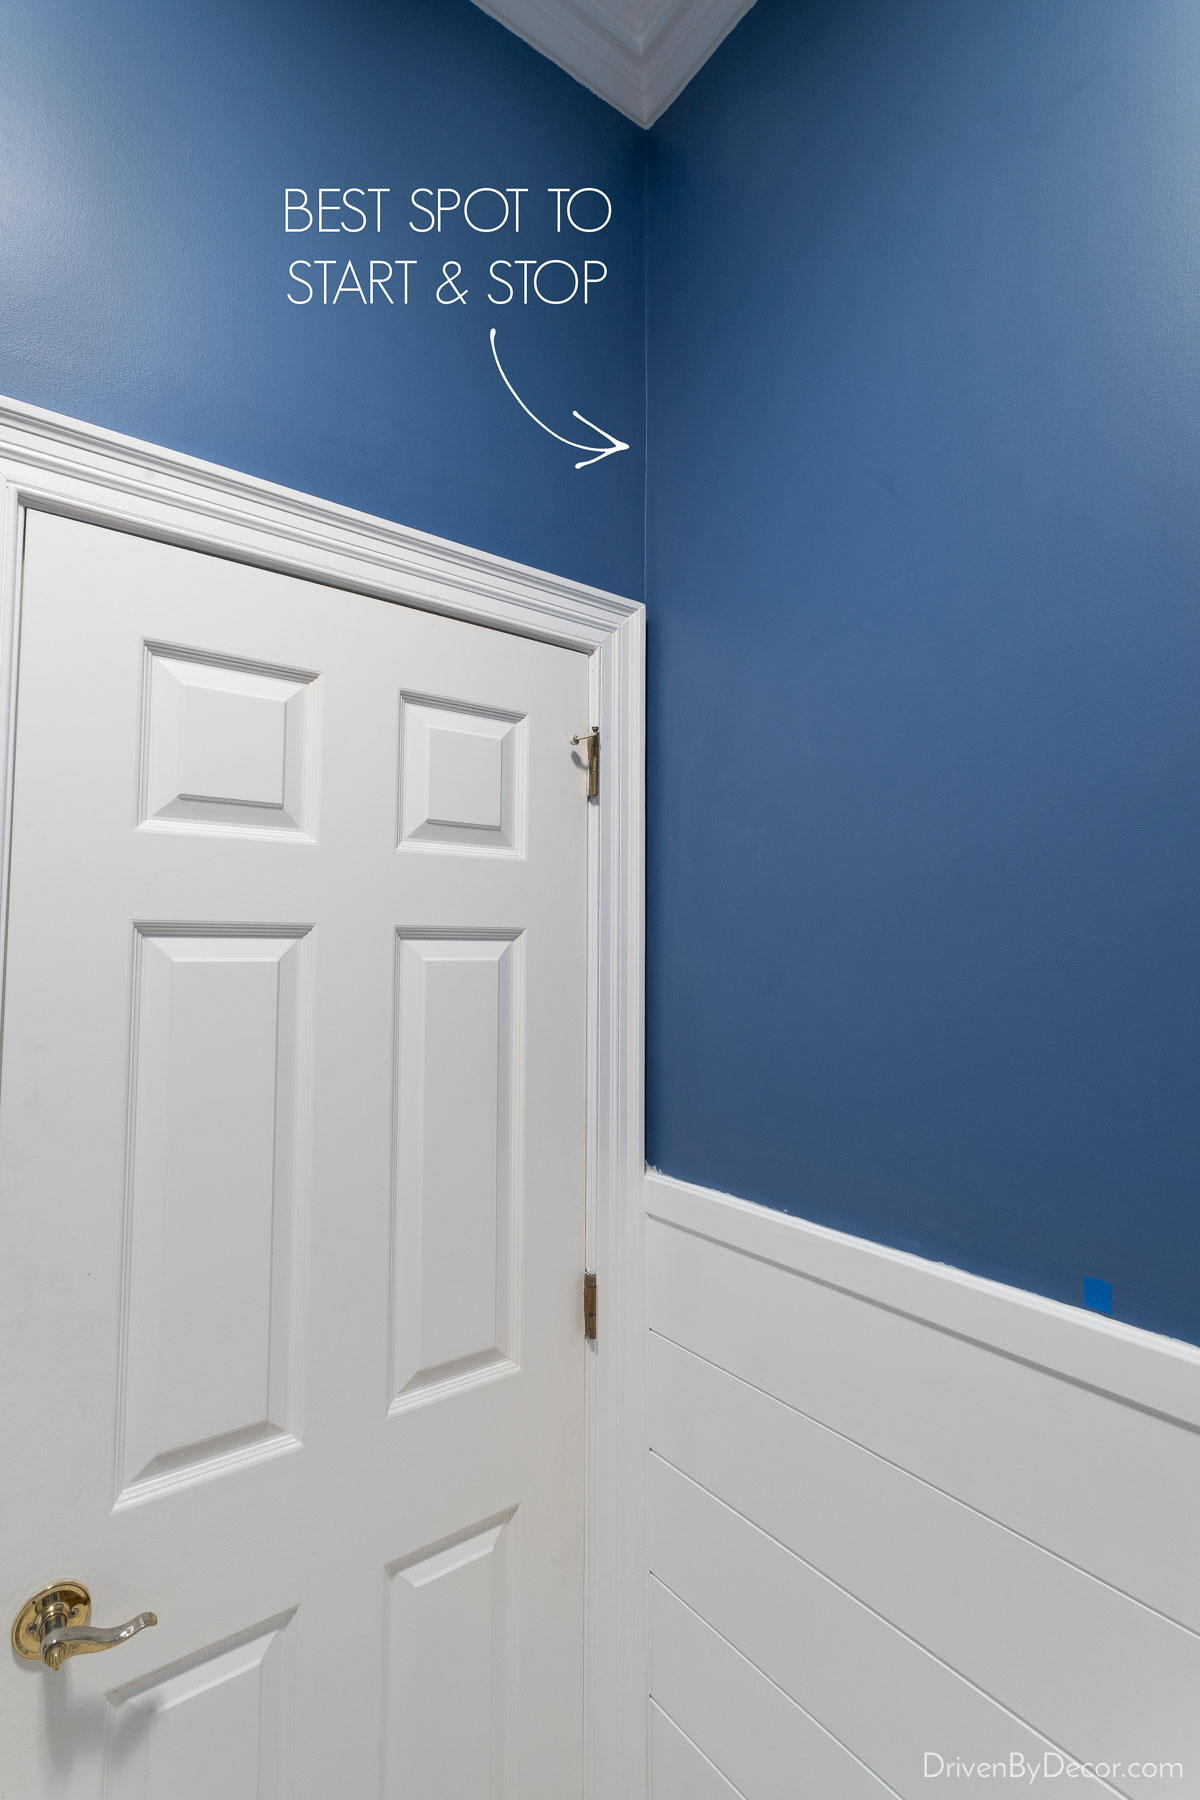
Just like with painting, a lot of the work is in the planning and prep! Before you ever start wallpapering, you need to plan the best spot in your room to start and stop. It’s highly unlikely that your pattern will match up where the first and last strips you hang meet up so you want it to be in the most inconspicuous spot in your room which is most often a corner. Another thing to consider when your wallpaper has a large pattern is whether you want to center the pattern in a certain spot such as above a furniture piece or other focal point in the room.
In our bathroom, I was installing a wallpaper that didn’t need to be centered anywhere in the room so I simply wanted to choose the most inconspicuous spot to start and stop. I decided that this corner above the door into our powder room would be the best starting point:
Once you’ve decided on the best starting point, take painter’s tape and mark where each new strip will start to make sure your plan works for the entire room. You can simply measure the width of your wallpaper roll or cut off a small strip of your wallpaper to use for marking:
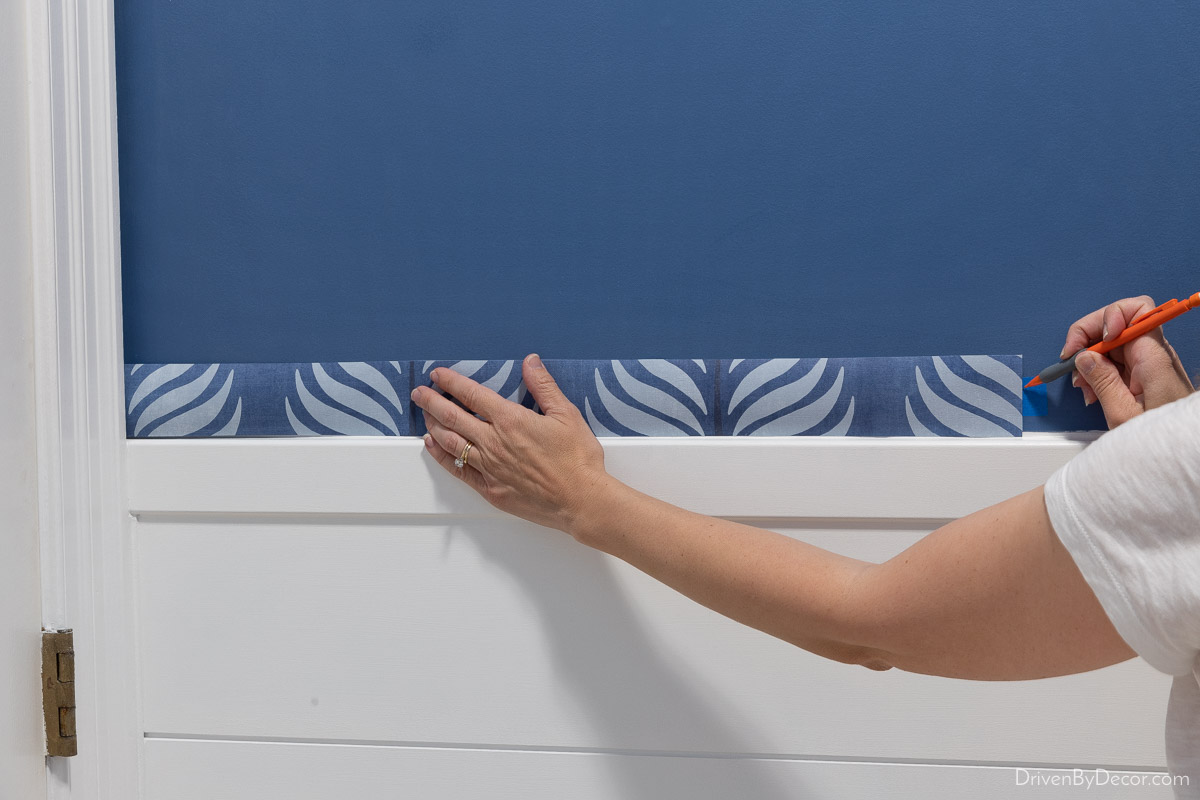
What you don’t want is to have a wallpaper seam within an inch or two of a window, door, or outside corner because dealing with a tiny strip of wallpaper isn’t easy and it’s prone to tearing. You also don’t want any strips to end smack in the center of an inside corner. If it looks like you’re going to run into one of these situations, see how each strip would fall if you take 4″ (or some other measurement) off the width of the first strip you hang. If everything then falls right into place, you’ll just want to cut 4″ (or whatever measurement you decided on) off of the left edge of the first strip of wallpaper you hang. Save that cut-off strip in case you need it at the end.
5. Label the Top of Each New Strip
You’re finally ready to start with your wallpaper installation! Cut your first strip of wallpaper about 4″ longer than the height of the wall you’re covering to allow 2″ of excess paper at the top and 2″ at the bottom:
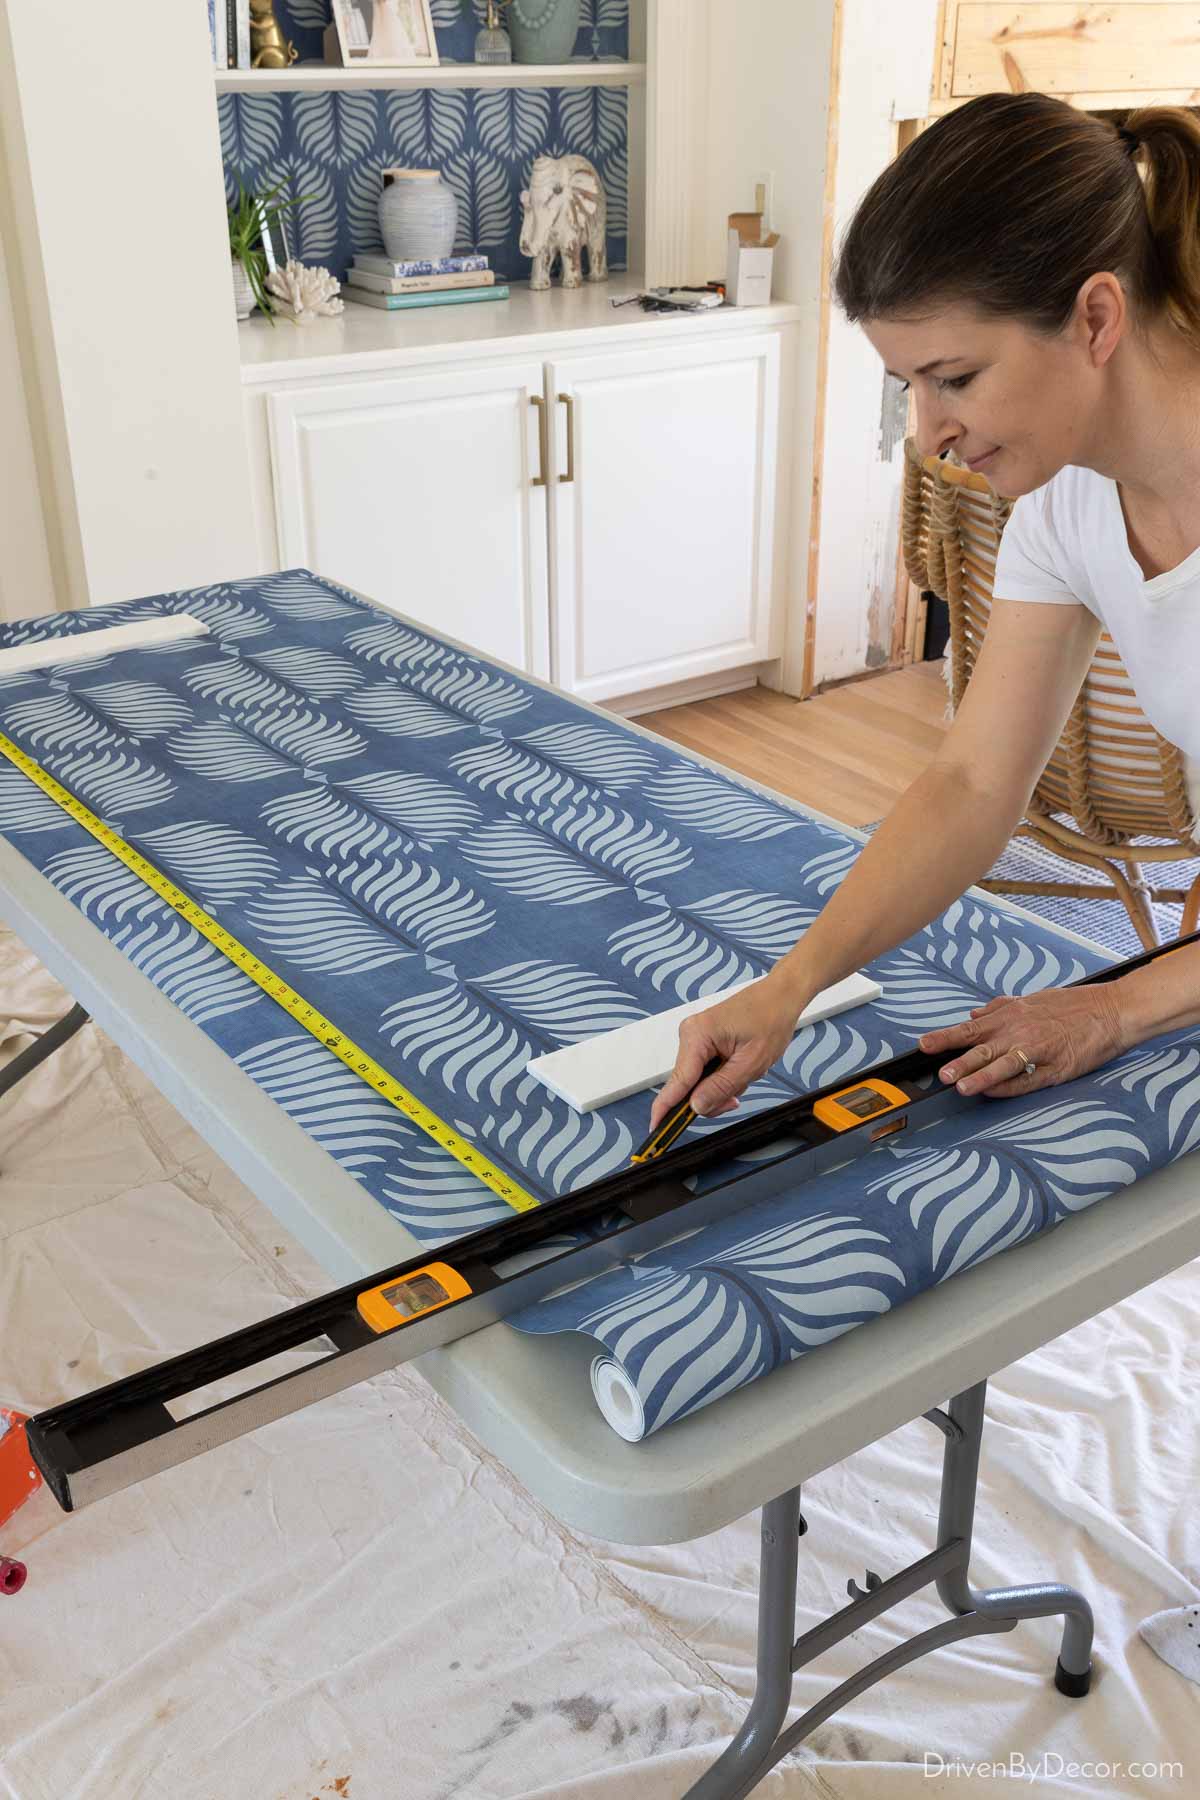
If your paper has a large scale pattern, make sure you’re ok with where the pattern will get cut off at the top and bottom before cutting your strip. Some professionals will cut all of their wallpaper strips before installation. Personally I don’t recommend that for a newbie since an error in where you cut one strip can mean that all the strips you cut after that are wrong too. I’ve been there, done that so now play it safe and cut one at a time.
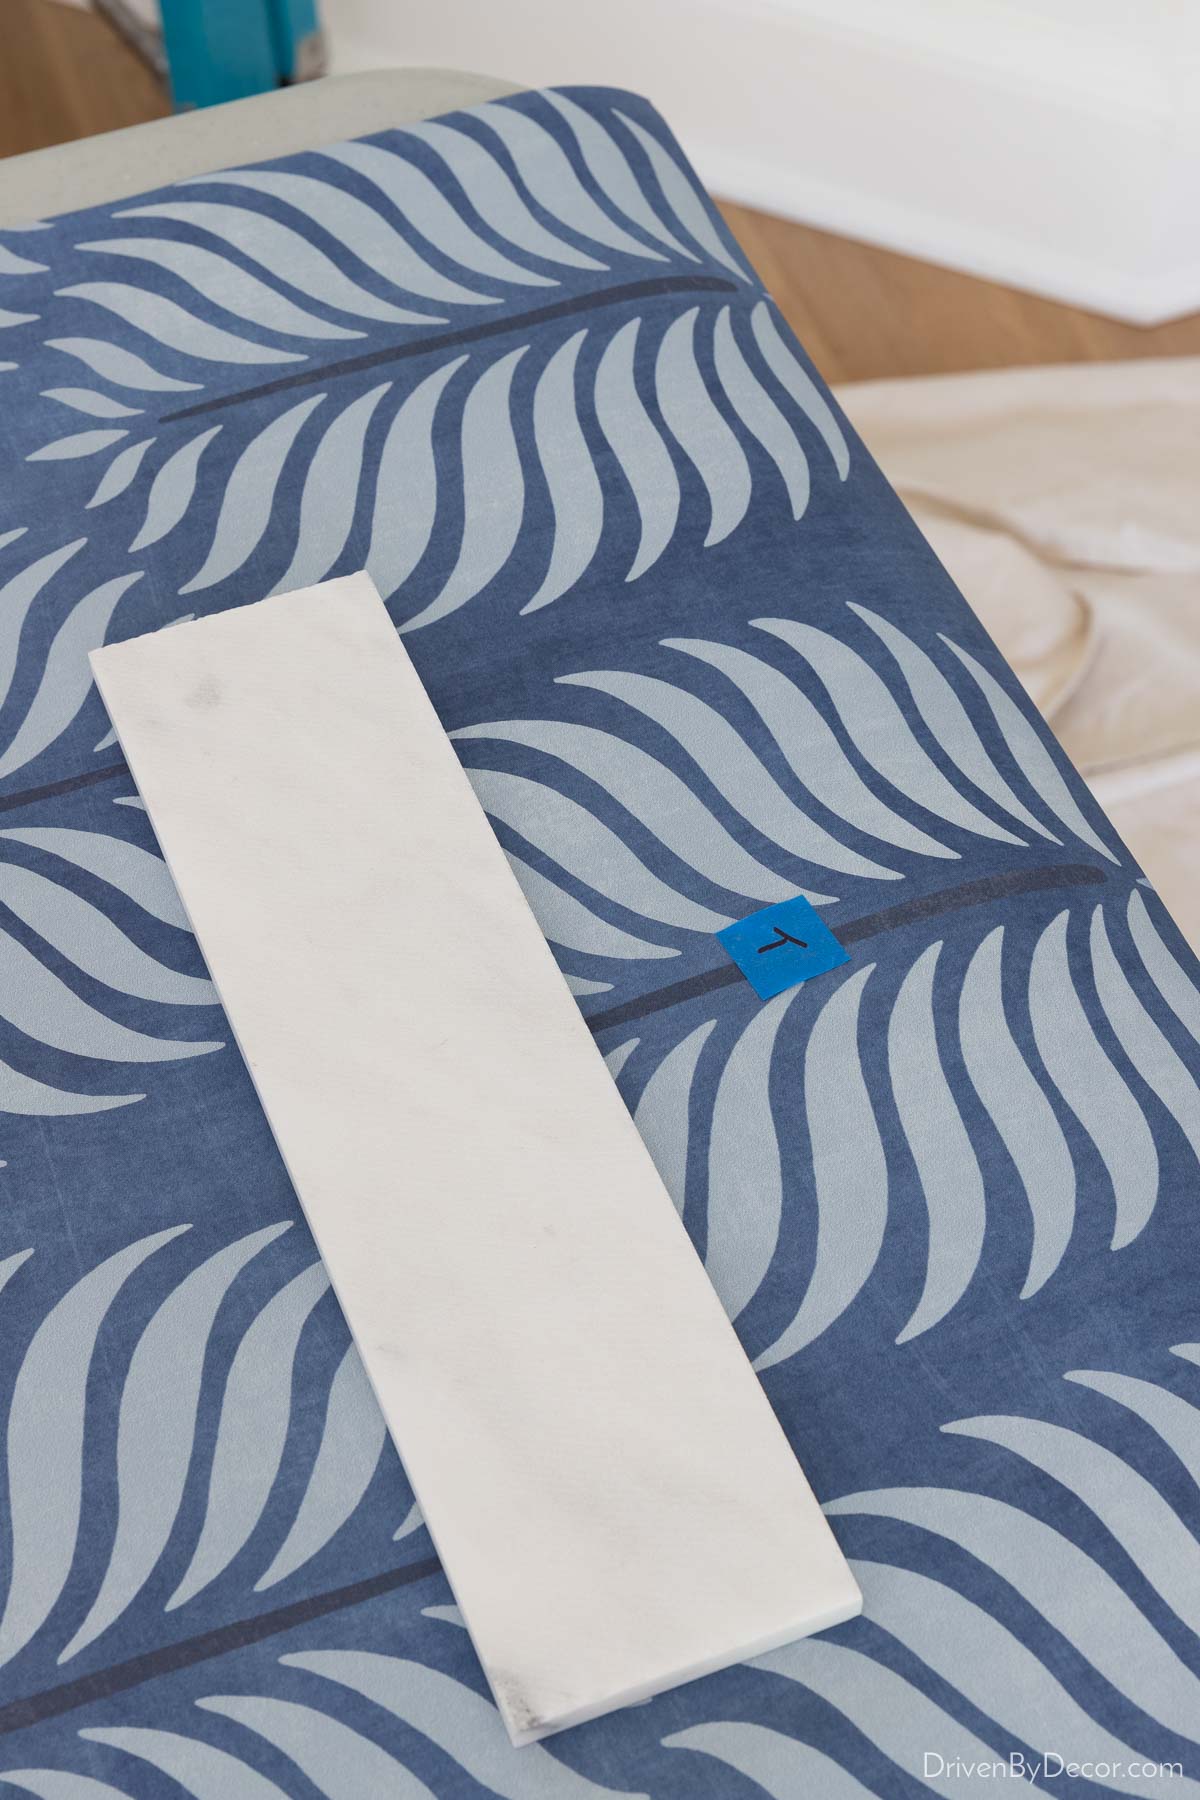
Place a piece of painter’s tape on the top of the wallpaper strip labeling it as the top. While the top and bottom is obvious with some patterns, with others like mine it isn’t and labeling it will save you from confusion when it’s time to hang:
6. Roll, Don’t Brush
Note: Traditional wallpapers require adhesive to hang them on the wall but some are pre-pasted and only require water to activate the paste. These instructions are for traditional wallpaper.
Pour some wallpaper adhesive into a paint tray and using a ⅜″ nap roller, roll it evenly onto the back of the top half your wallpaper strip, starting at the center and working toward the edges. It’s tempting to just use a brush instead of a roller but I’ve made that mistake before and don’t recommend it. The roller does a much better job of getting the paste on evenly so you don’t have any blobs of paste to smooth out behind your paper. The goal is a thin, even coat:
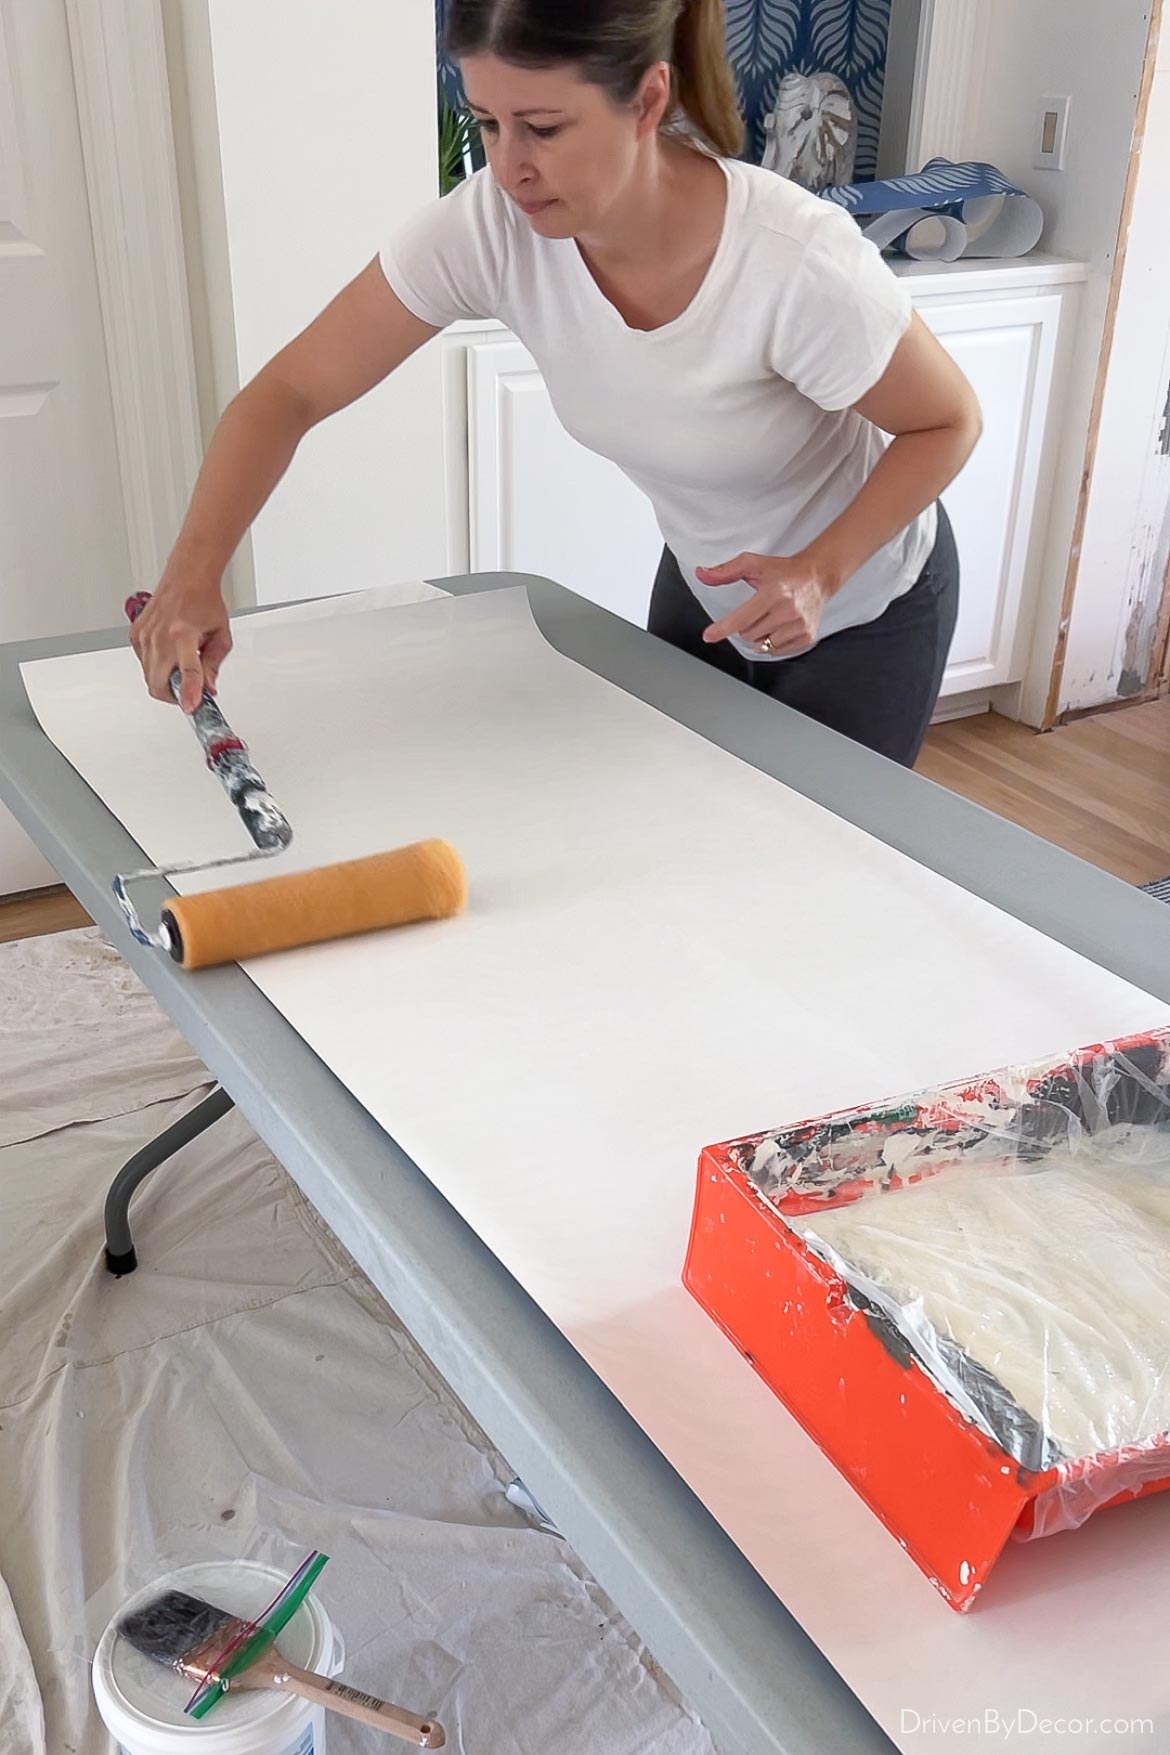
You may need to place a weight (which can be your level or anything else) on both ends to keep the strip from rolling up while pasting until you get to the ends. Roll the paste over the entire back of the top half of your wallpaper strip, being sure to get the edges well. If your table has straight edges, one helpful trick is to line the edge of your wallpaper strip up with the edge of your table so you can roll the paste on well without getting any on your table (my table has rounded edges so it doesn’t work well unfortunately).
Once you’re done pasting the top half, gently fold it in half without creasing your paper at the fold:
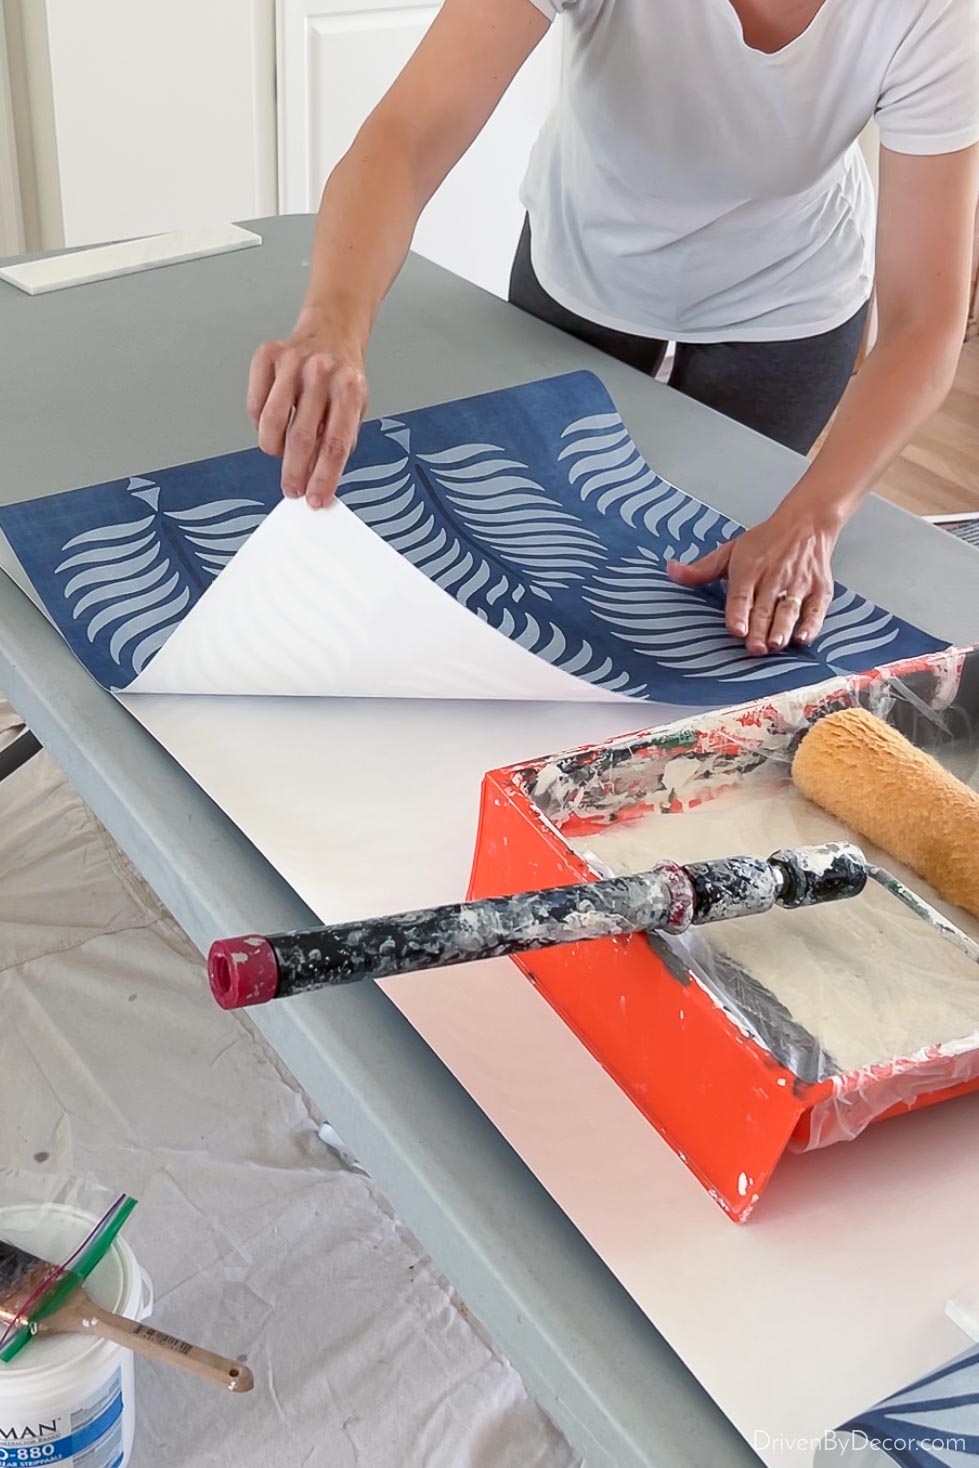
This is called “booking” and it allows the adhesive to soak into the paper and relax it prior to hanging so it doesn’t expand once on the wall and create bubbles & wrinkles. Now use your sponge and warm water to remove any glue you’ve gotten on your table while pasting. Then roll the adhesive on the bottom half of your wallpaper strip. Once done, fold the bottom portion of the strip in half too:
Look at the instructions on your wallpaper to see if it has a recommended booking time. Usually it’s about 3-5 minutes. Take that time to draw a level line on your wall (see below) but don’t let your paper sit too long or the glue will start to dry. If it’s going to sit any longer than the booking time, place it in a plastic bag to keep the glue from drying out.
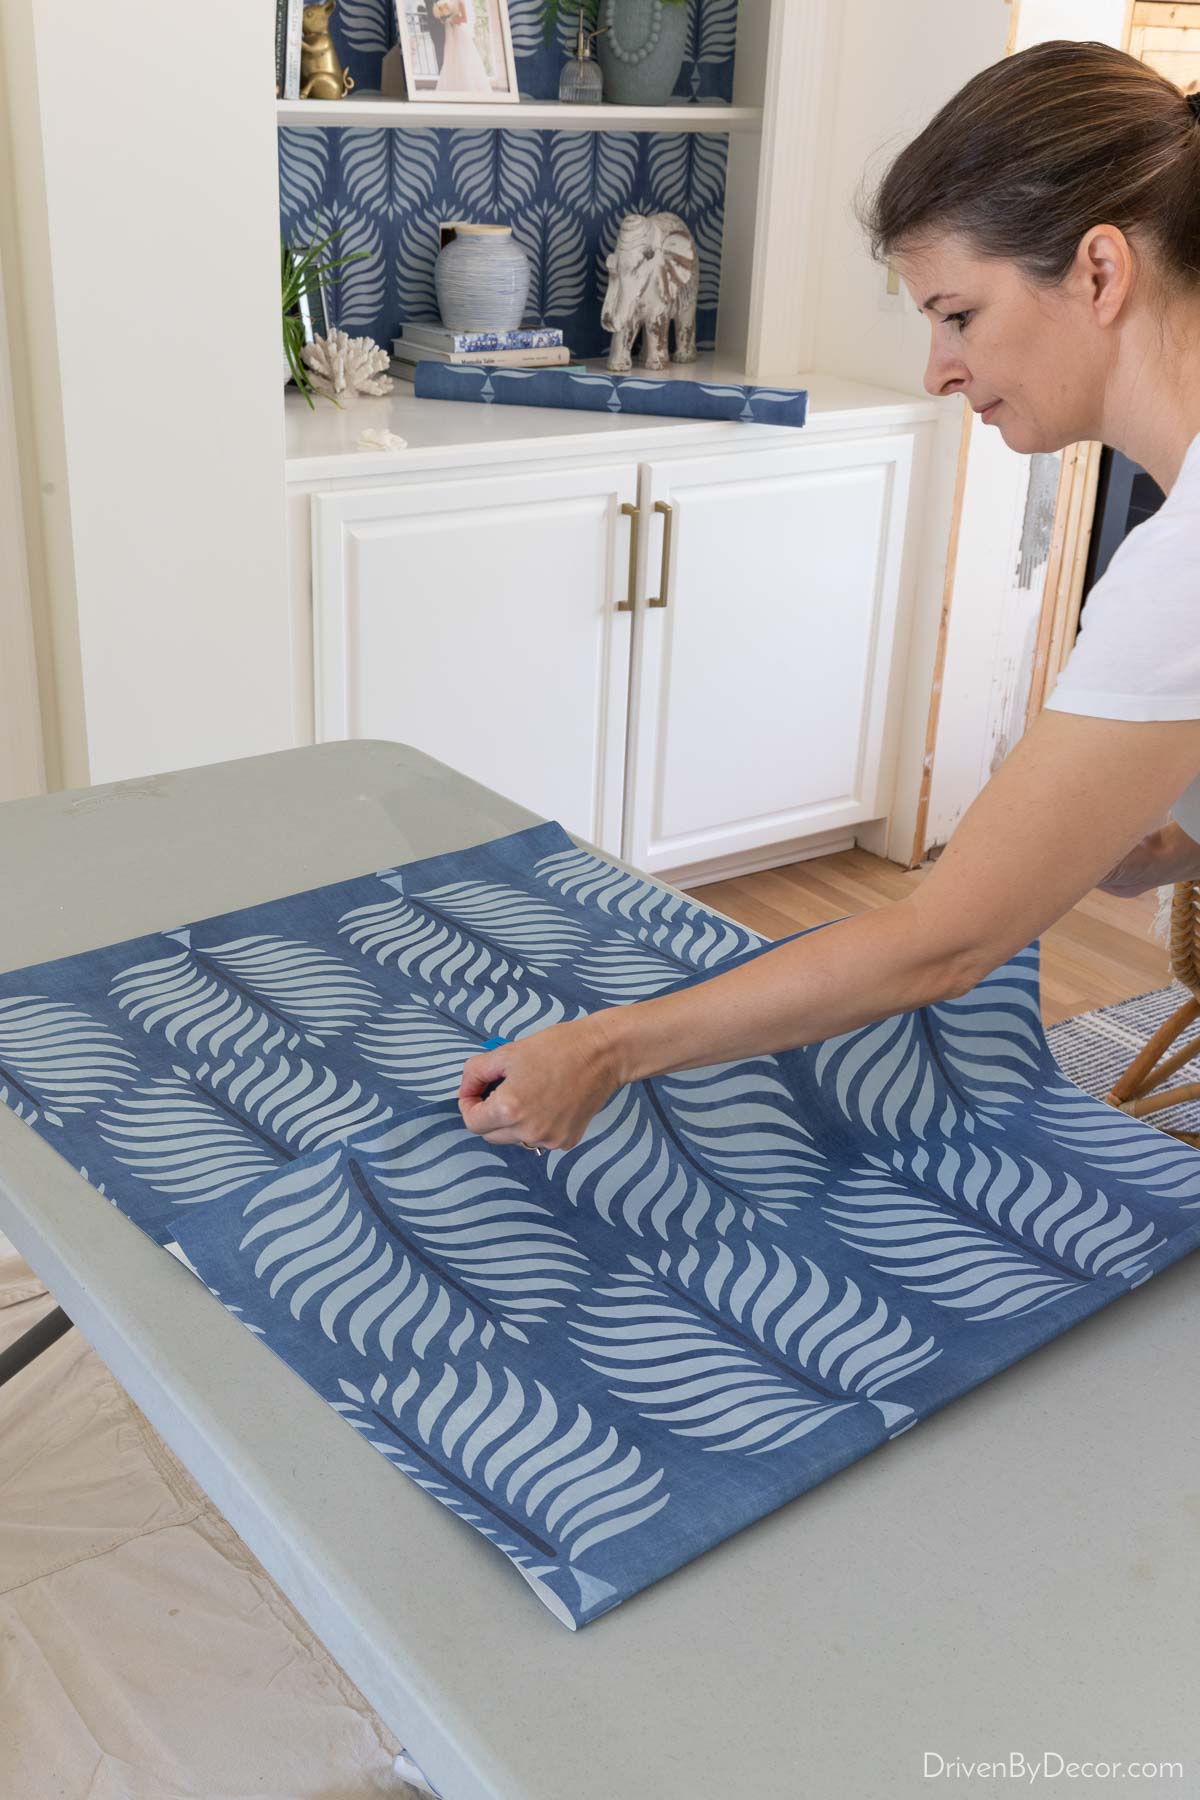
When cutting strips of wallpaper, you’ll end up with several remnant wallpaper pieces. Don’t throw away any of these extra remnant pieces of wallpaper! You might be able to use some of them in other places in your room (like above a doorway where you only need a short strip). Also, check out these wallpaper ideas because several of them involve using just small remnants to do fun things like creating coasters or wallpapering your stair risers.
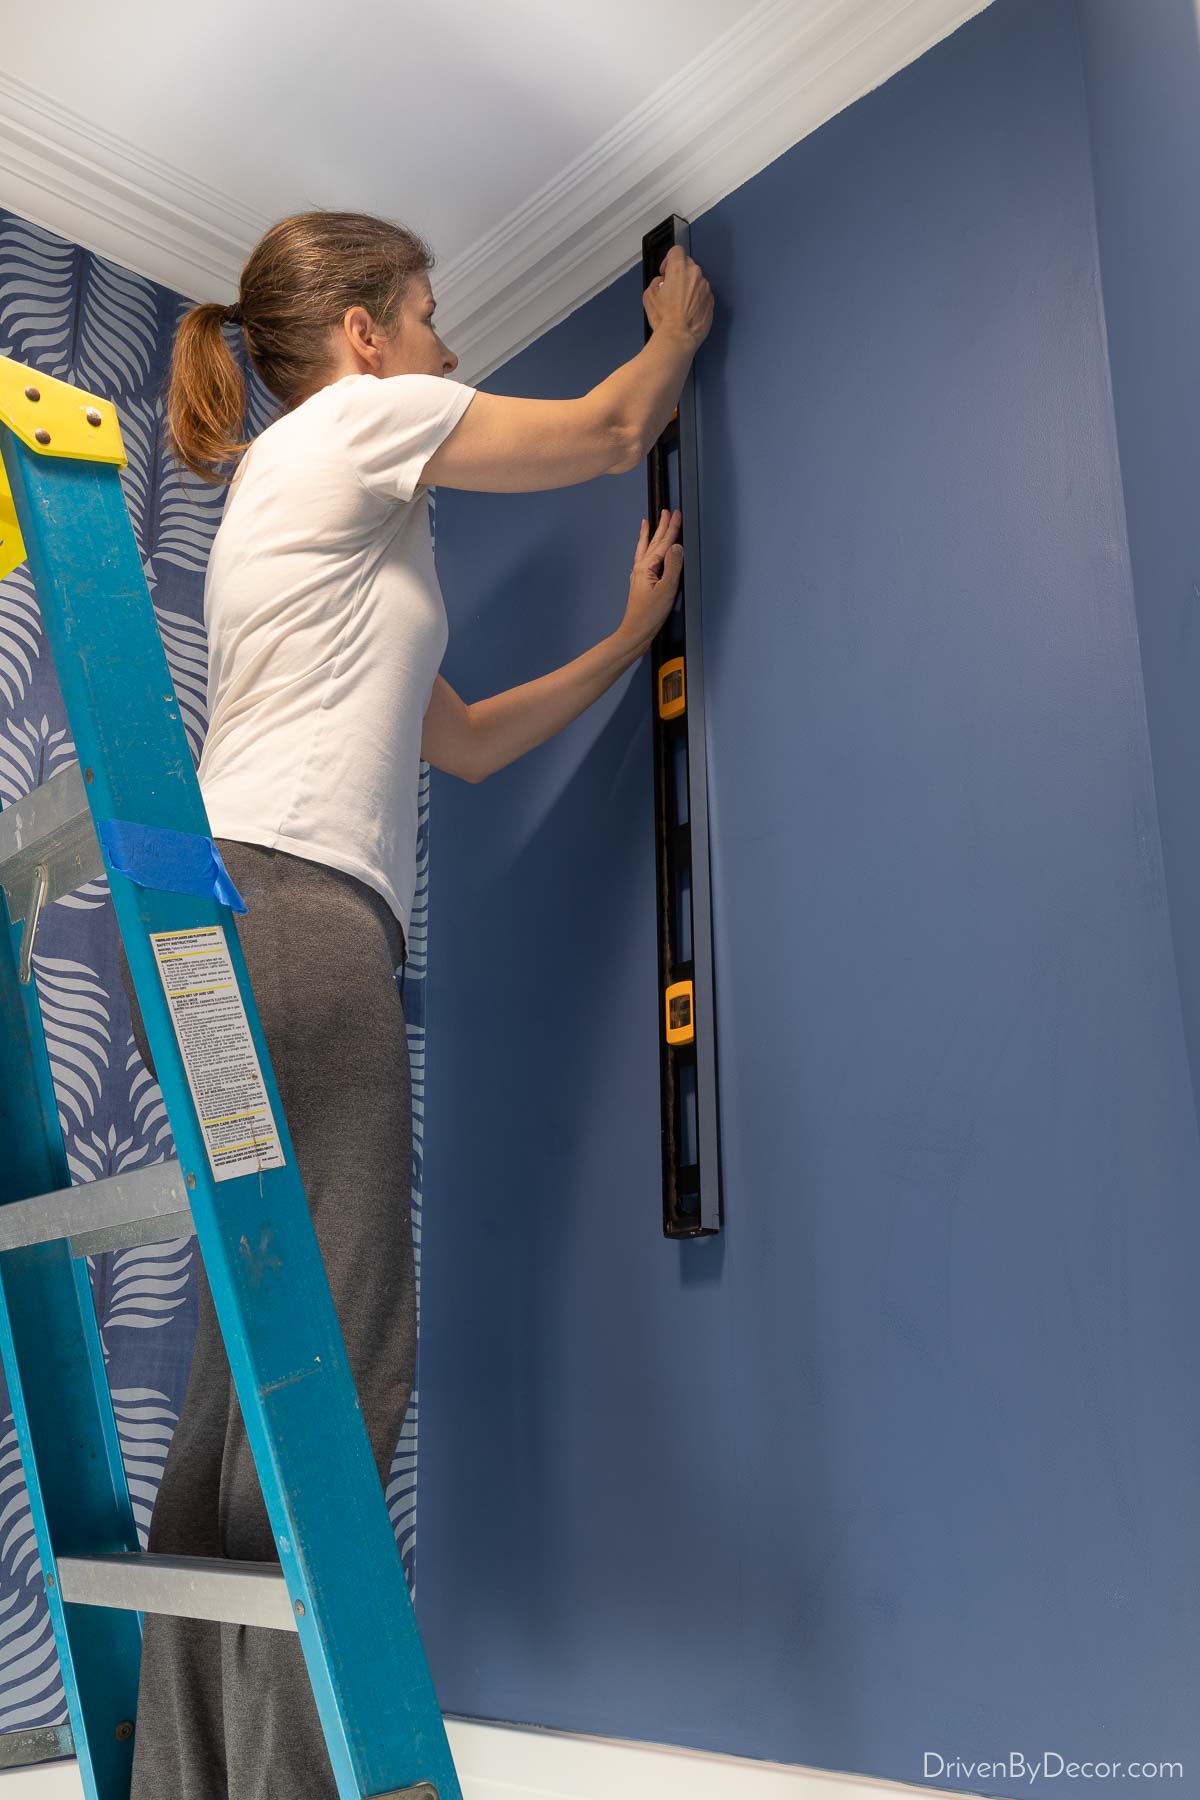
7. Start Straight With Wallpaper Installation!
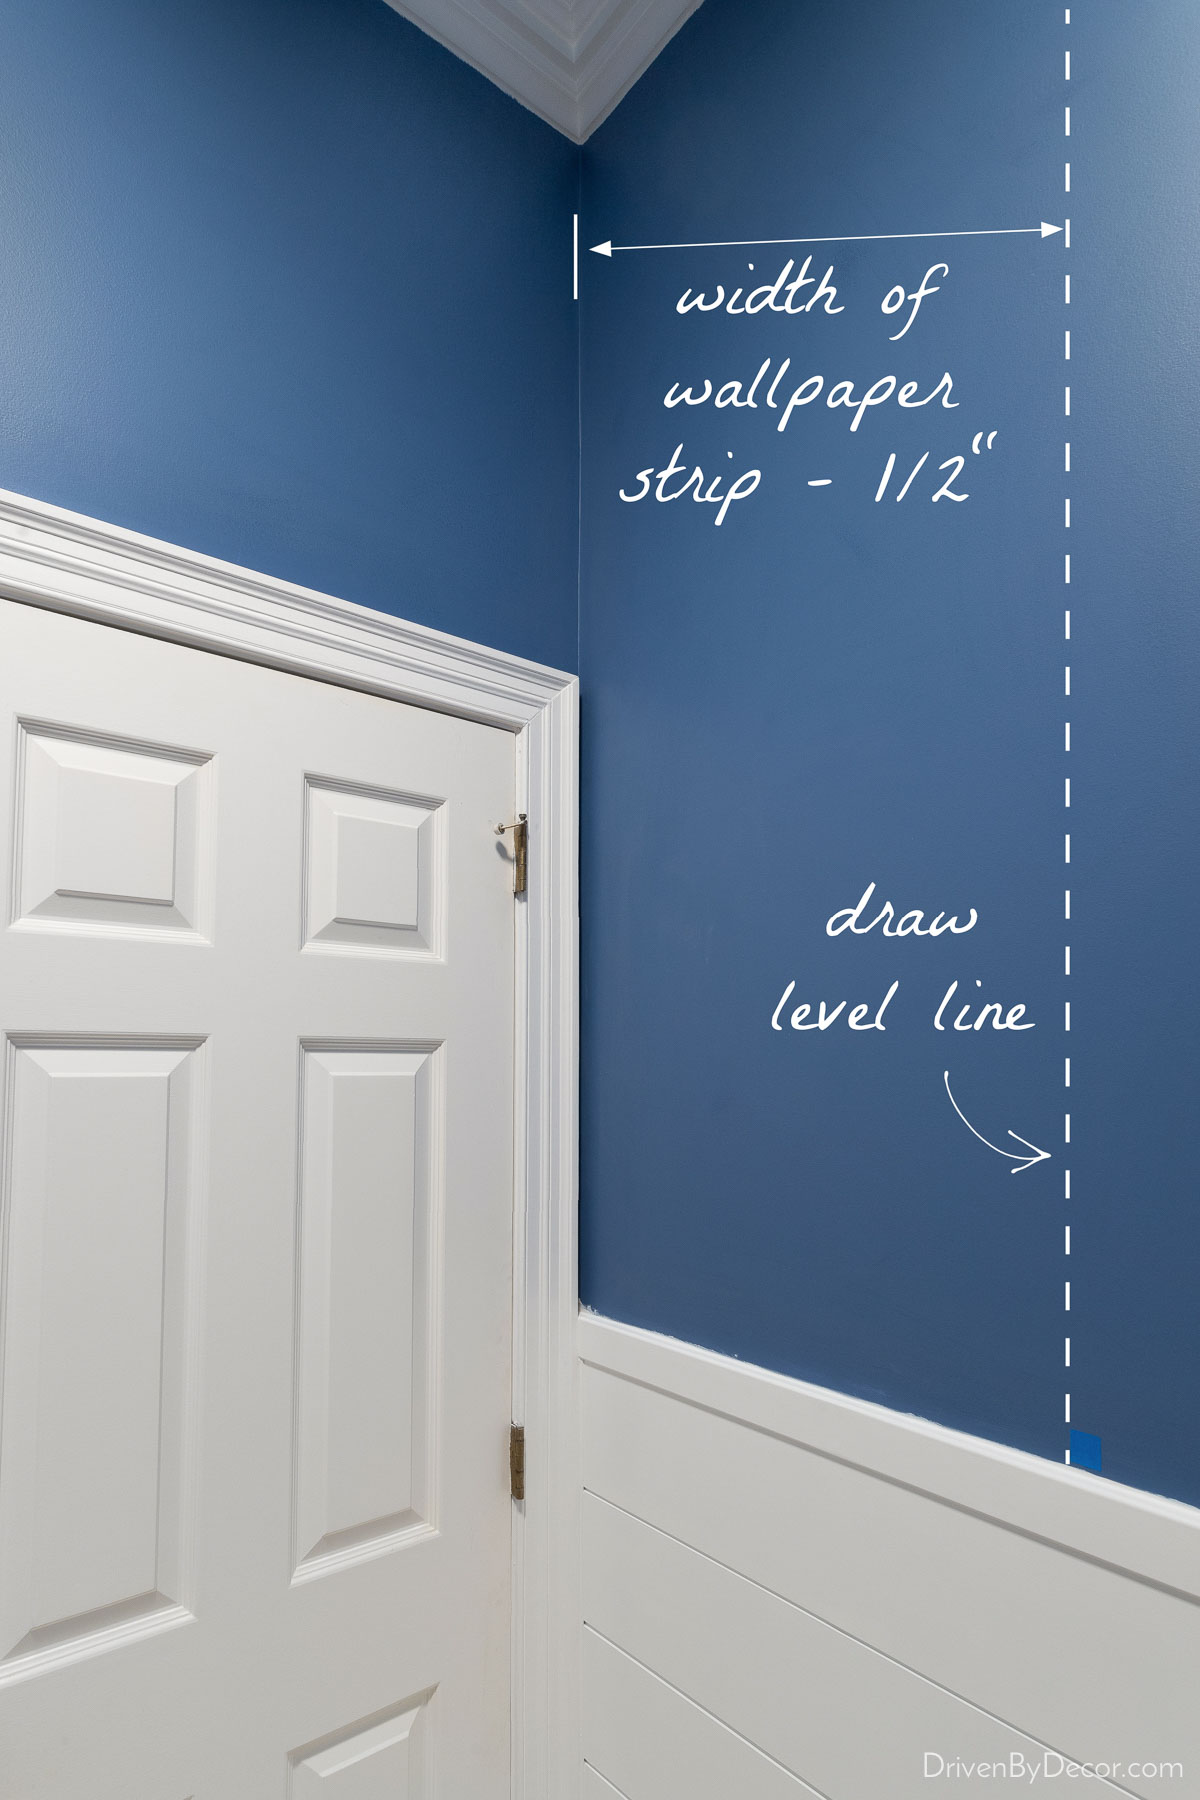
Are you ready to start your wallpaper installation? It’s super important that the first strip of wallpaper you install on any wall is installed straight. Then every strip you hang on the rest of the wall will be straight too. To accomplish that, use your 48″ level to draw a level line where you want the right edge of your first wallpaper strip to fall. In my case, I’m starting in a corner and my wallpaper strip is 27″ wide. I’ll explain more about corners later but you want your paper to go fully into the corner and overlap the next wall by ½″. So I drew a level line 26 ½″ out from the corner:
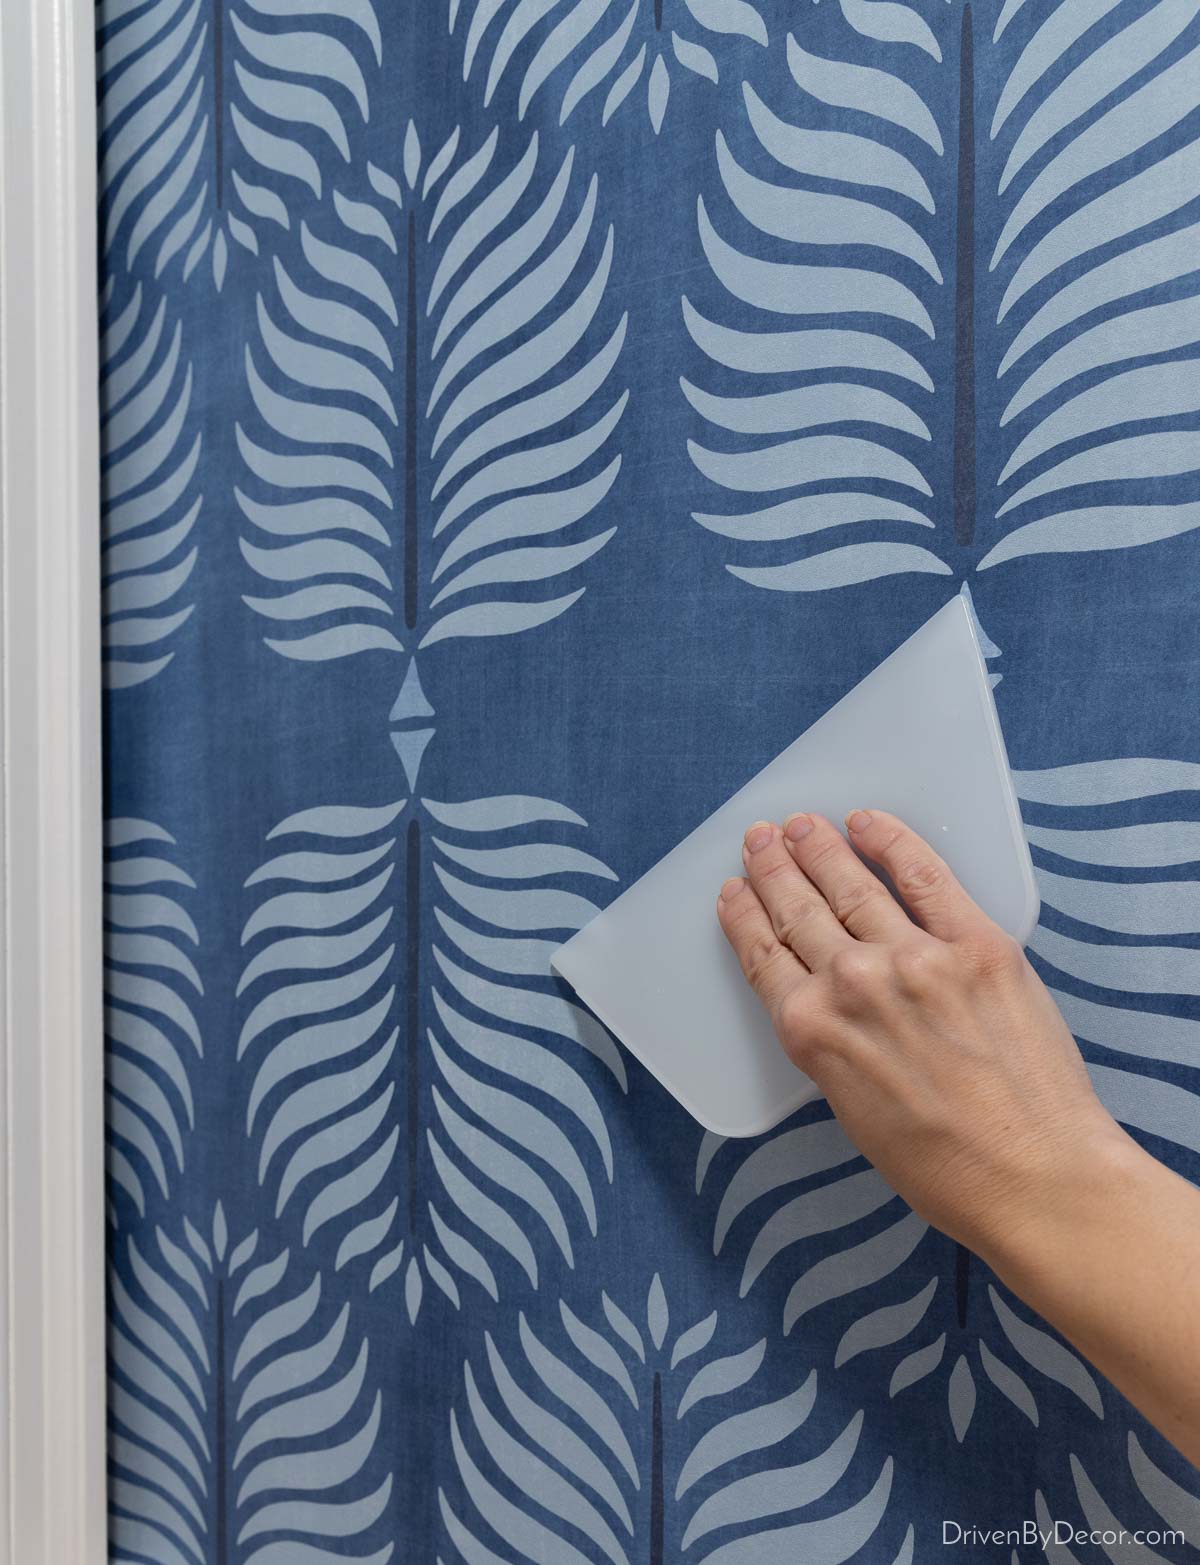
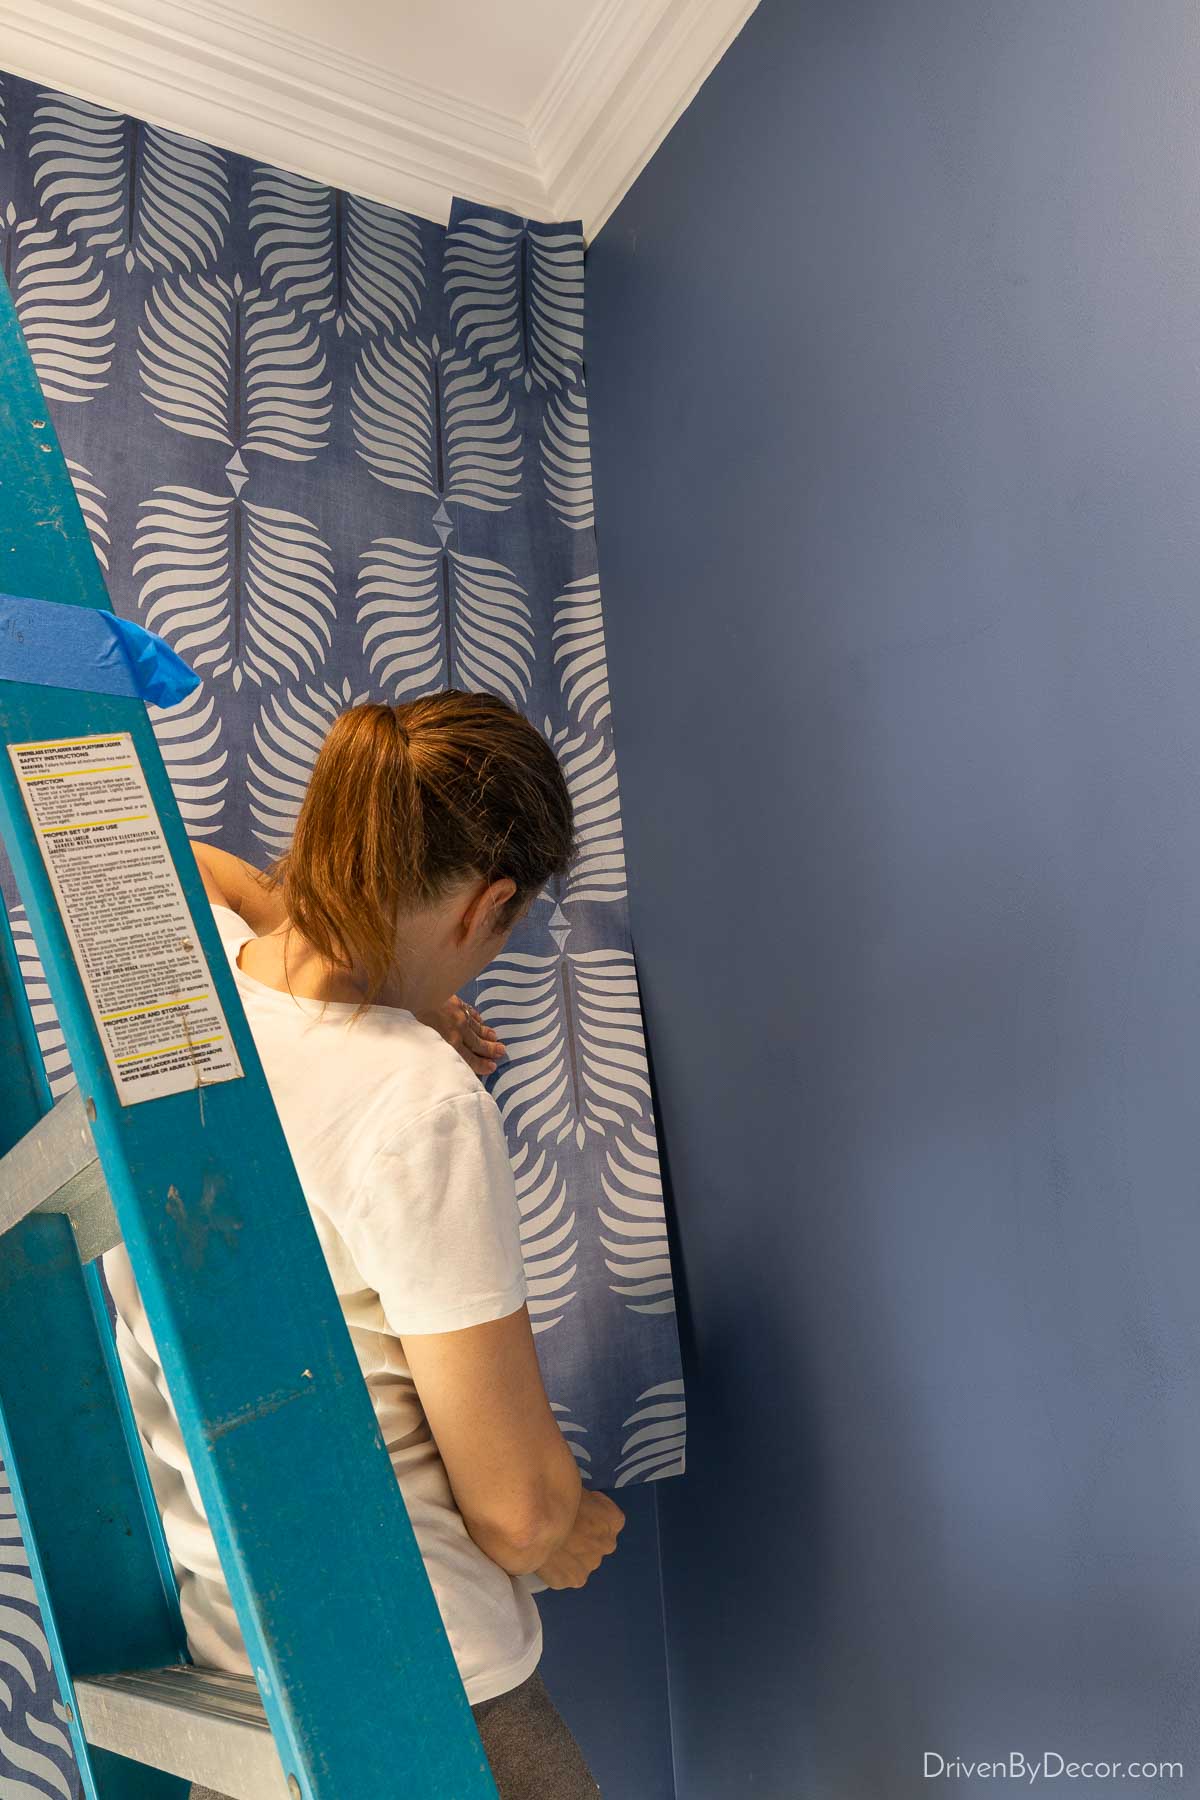
To install your first wallpaper strip, begin by unfolding the top half of your first strip and sliding it into position on the wall, lining up the wallpaper edge with the line that you drew. Remember to leave that 2″ of excess paper at the top. Use your smoother to gently press the paper down and smooth out any bubbles or wrinkles. Once the top half of your strip is installed, unfold the bottom half and do the same. Keep smoothing the entire strip until there are no wrinkles or air bubbles, working from the center to the edges.
8. Keep Your Razor Sharp
Once you’ve thoroughly smoothed down your first strip, you’ll going to cut off the excess paper at the top and bottom. To do this, you’ll need a straight edge and a sharp razor. They key to this is “sharp”! Use a razor with snap-off blades that are high quality, not cheapies. With each cut, snap it off to get a fresh blade.
To make your cut, hold a straight edge up tightly at the spot you wish to trim. Then take your razor and make your cut, using the straight edge as your guide. While it’s recommended that you use a metal straight edge, I’ve found that my smoother works best for me. It glides really easily, helping me make more even cuts:
Try both a metal edge and a smoother and see which works best for you! I have two smoothers – one I use for cutting and one I use for trimming. That way, if I ever cut into one of the smoothers by accident when trimming (it hasn’t happened yet…), I still have a good one for smoothing.
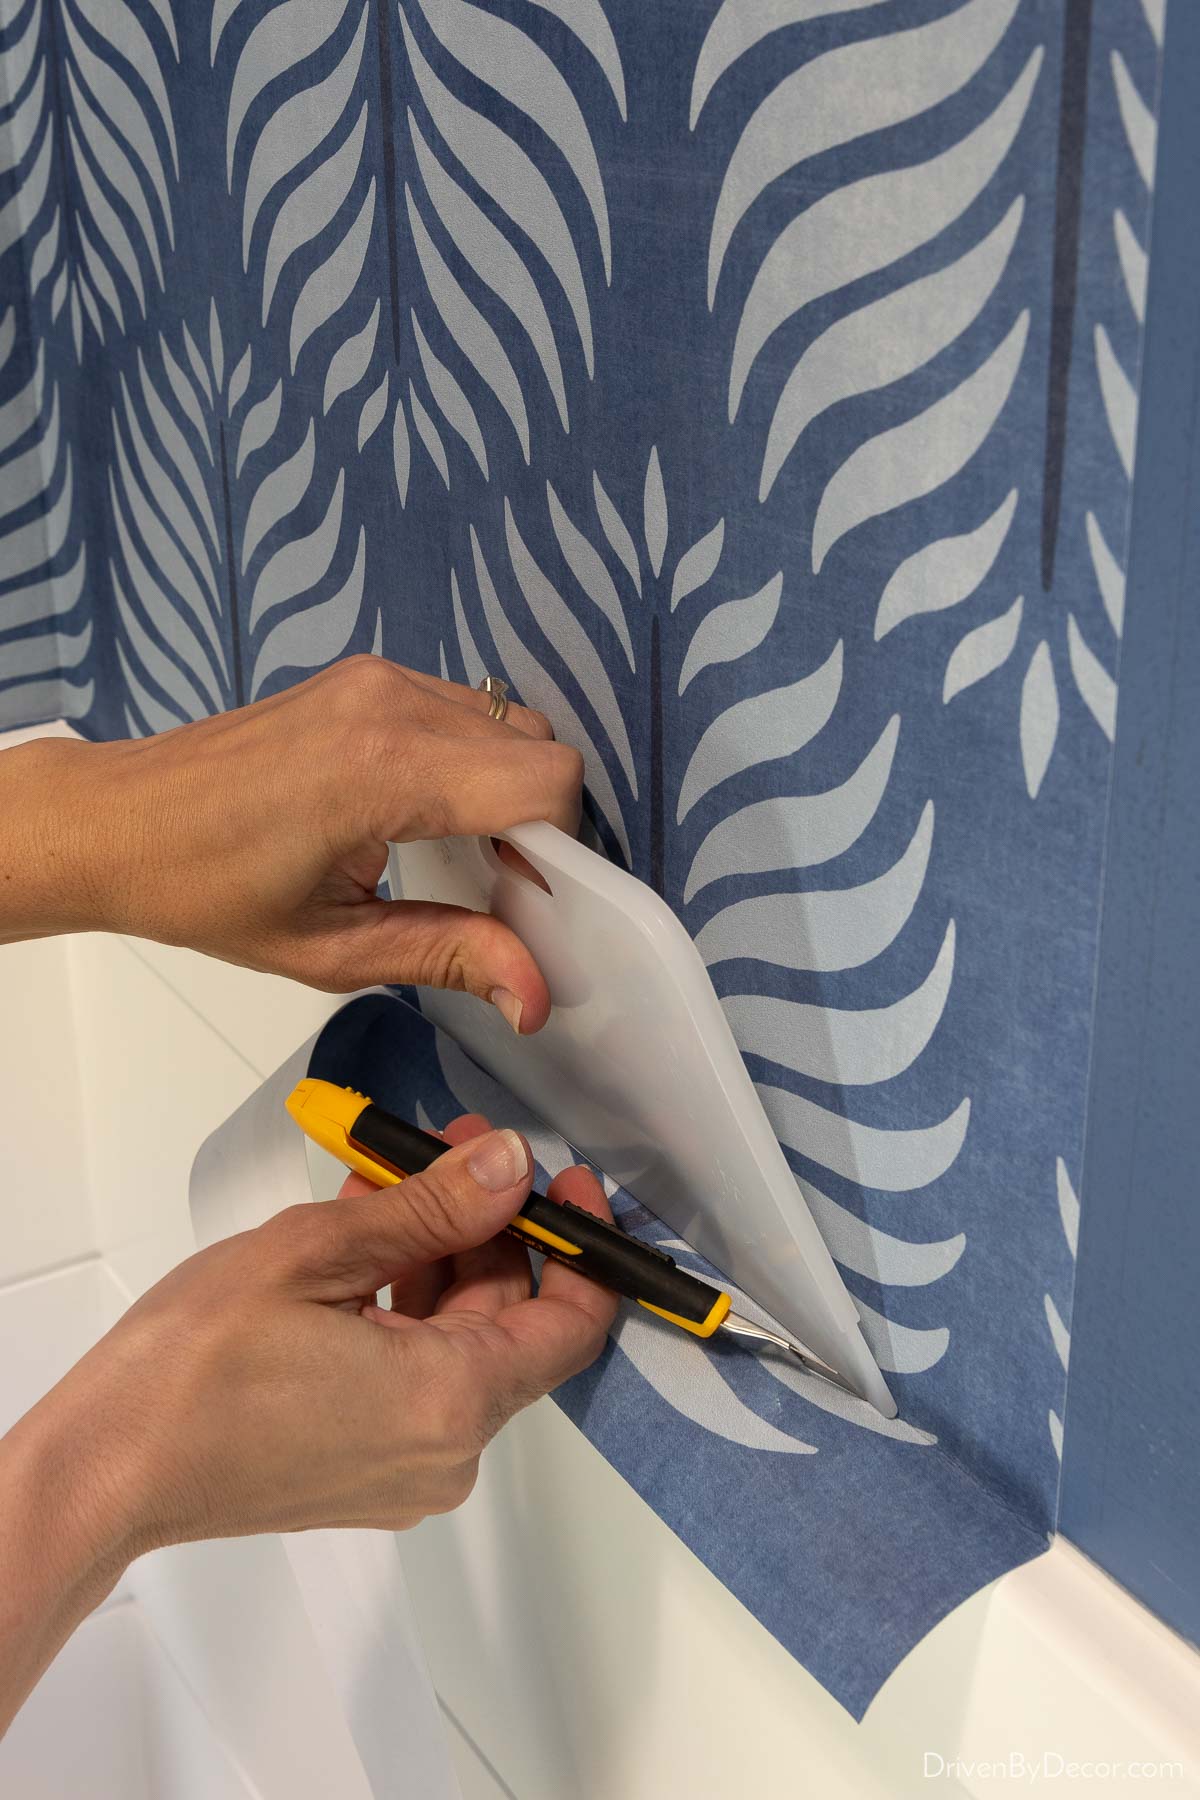
One important tip while trimming the top and bottom of your paper is to never pick up your razor the whole time you’re cutting. Either glide your razor and straight edge along in unison or pick up and reposition your straight edge while keeping your razor in place. It gives you a nice, clean line:
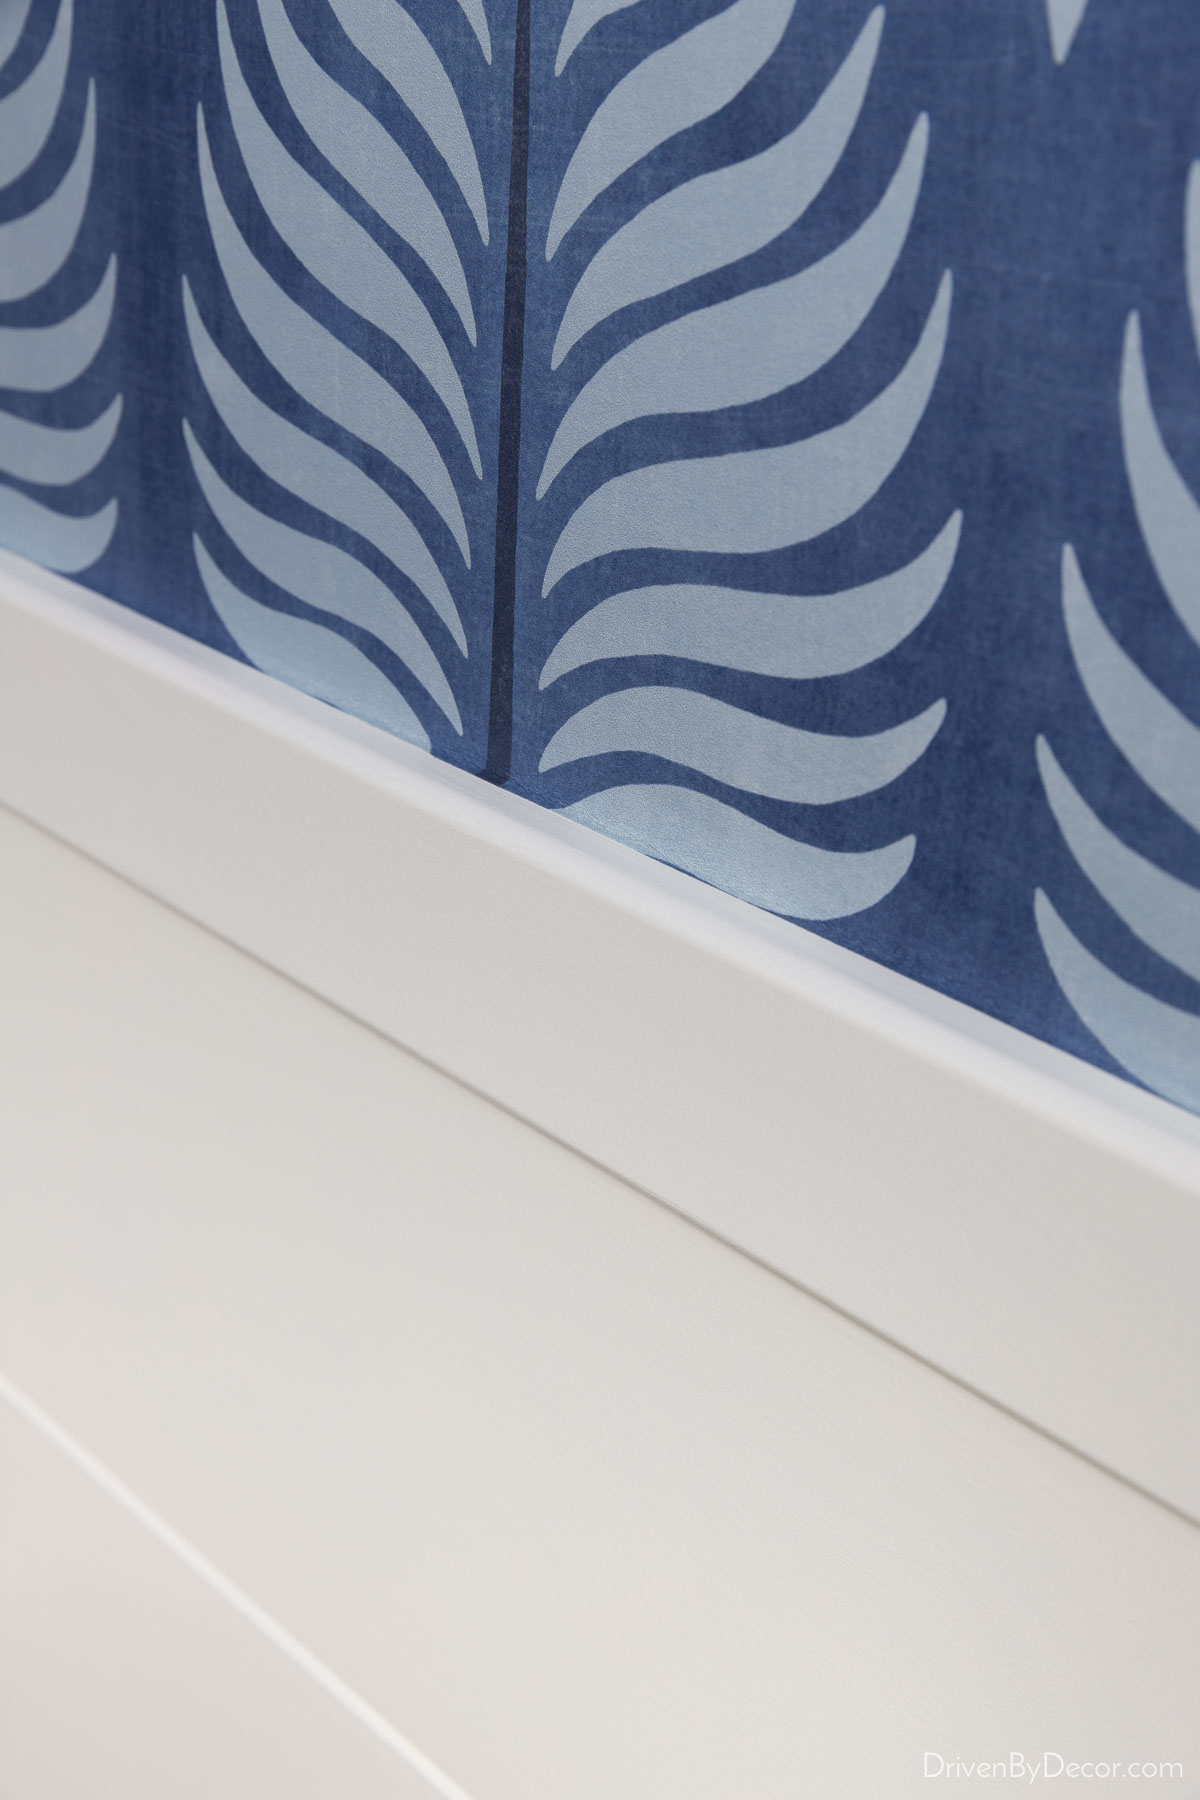
The same way that you cut off the excess paper where it meets the ceiling and baseboard (or bathroom shiplap in my case) is how you’ll cut off excess paper around doors and windows too. If you’re ever pulling the excess paper away after making your razor cut and find you have a spot where you didn’t cut fully through the paper with your razor, a small pair of scissors is super helpful in making a quick snip to keep that clean-lined edge.
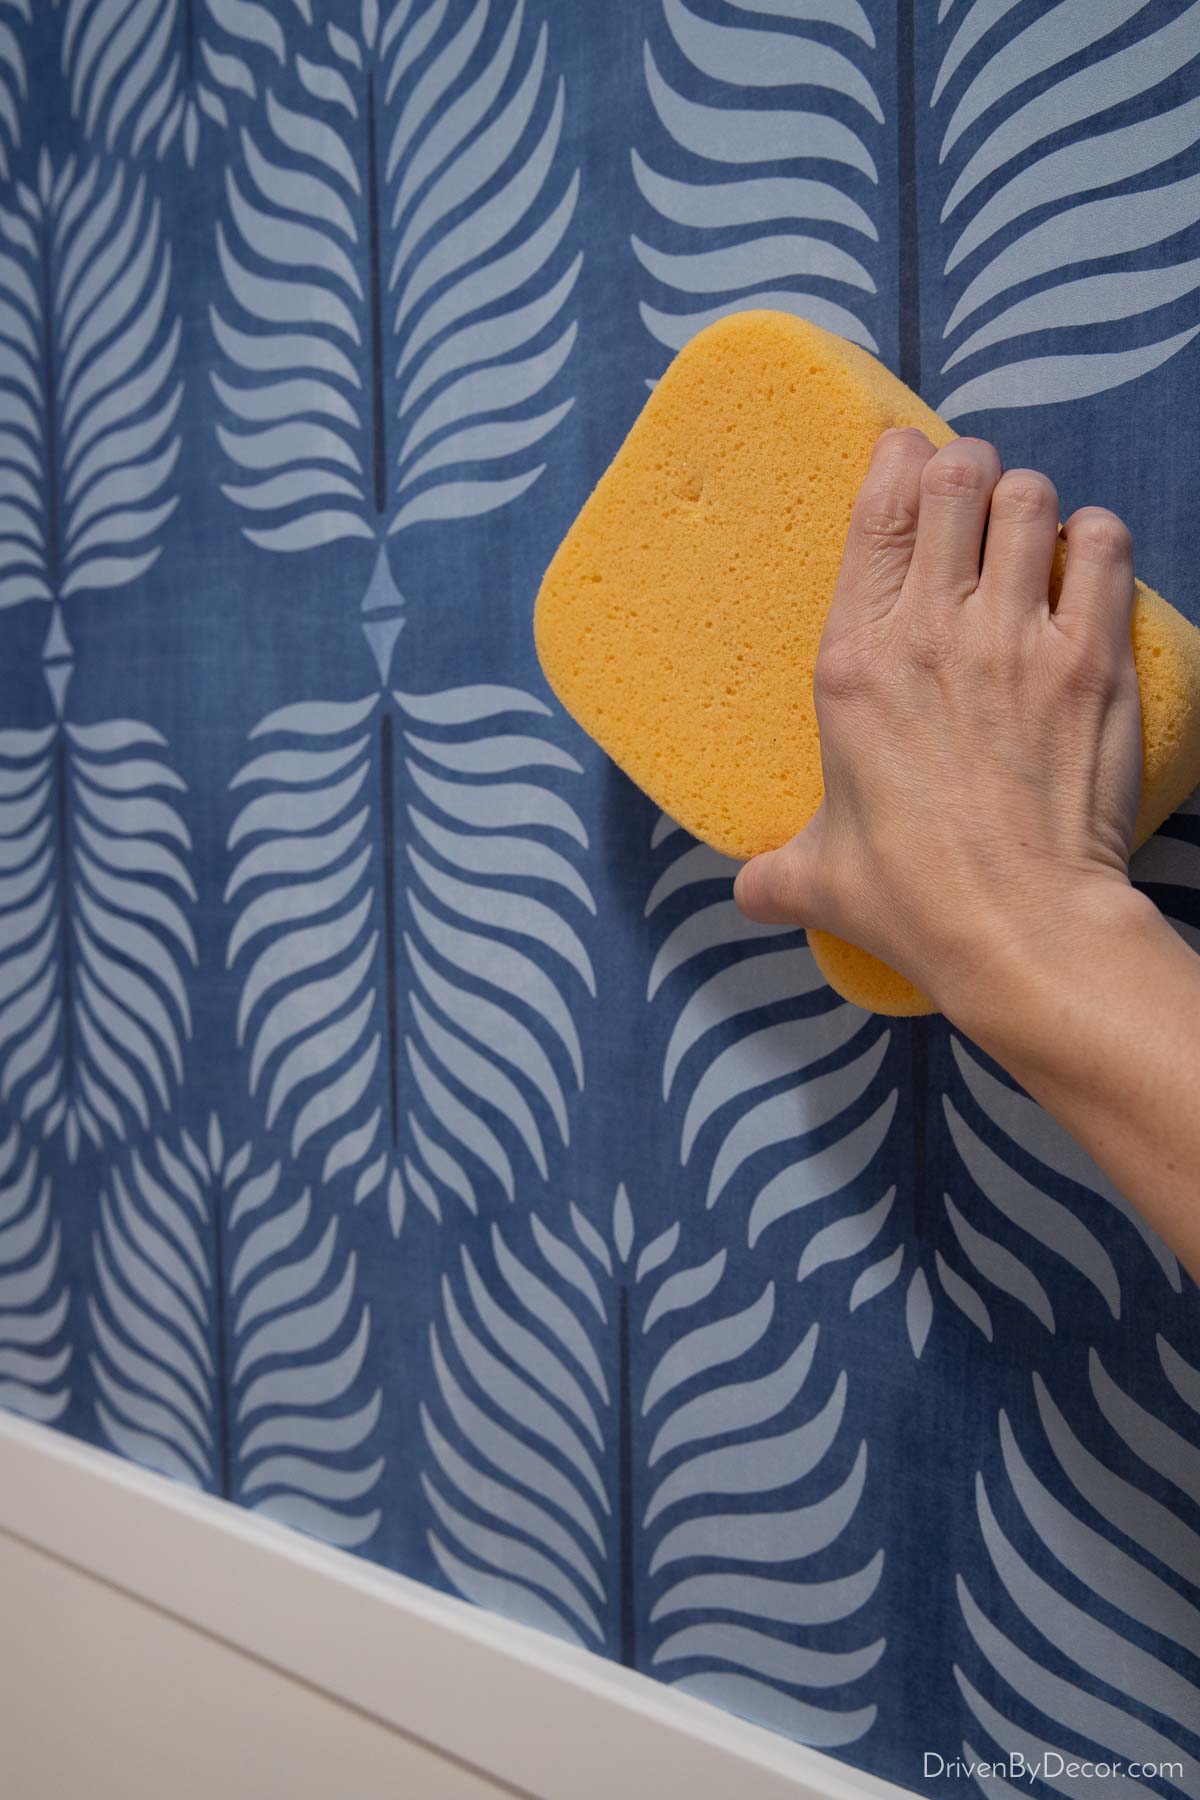
9. Clean Off Glue As You Go
It’s almost inevitable that you’ll get some glue on the front of your wallpaper which (as long as it’s not grasscloth) is no big deal. With most wallpapers, glue will wipe off with a damp cloth or sponge if you get to it before it dries. So every time you hang a new sheet, use your sponge or a cloth dampened in clean water to wipe away any glue from the wallpaper.
Also make sure to wipe off your baseboards/crown molding/ceiling at the top and bottom of the wall that typically get glue on them from the back of the excess wallpaper you cut away.
10. Set the Seam
Now it’s time to hang the next wallpaper strip! Hold the roll of wallpaper up next to the strip you just installed until you see where the pattern matches. Put a piece of painter’s tape on the wallpaper roll where the new strip will hit the ceiling (or crown molding). Go back to your cutting/pasting table and cut the roll of wallpaper at about 2″ above this marked spot. Then unroll it and cut at the appropriate length at the bottom (full strip length should be wall length + 4″).
For your first strip of wallpaper, you’ll just be lining it up with the level line that you marked on your wall. But from your second strip on, you’ll be butting the left edge of your new strip up to the right edge of the already-installed strip, creating a seam. One great wallpaper installation tip that I got from the wallpaperer who taught me is to “set the seam” before laying the entire strip of wallpaper on the wall.
What do I mean by that? When you’re ready to install a new strip of wallpaper, only place the side of the strip that’s closest to the seam you’re creating down on the wall while holding the other side of the wallpaper away from the wall. You can see that here, where I’ve placed the left side of my new strip down on the wall while I match it up to create the seam with my left hand while I’m holding the right side away from the wall with my right hand:
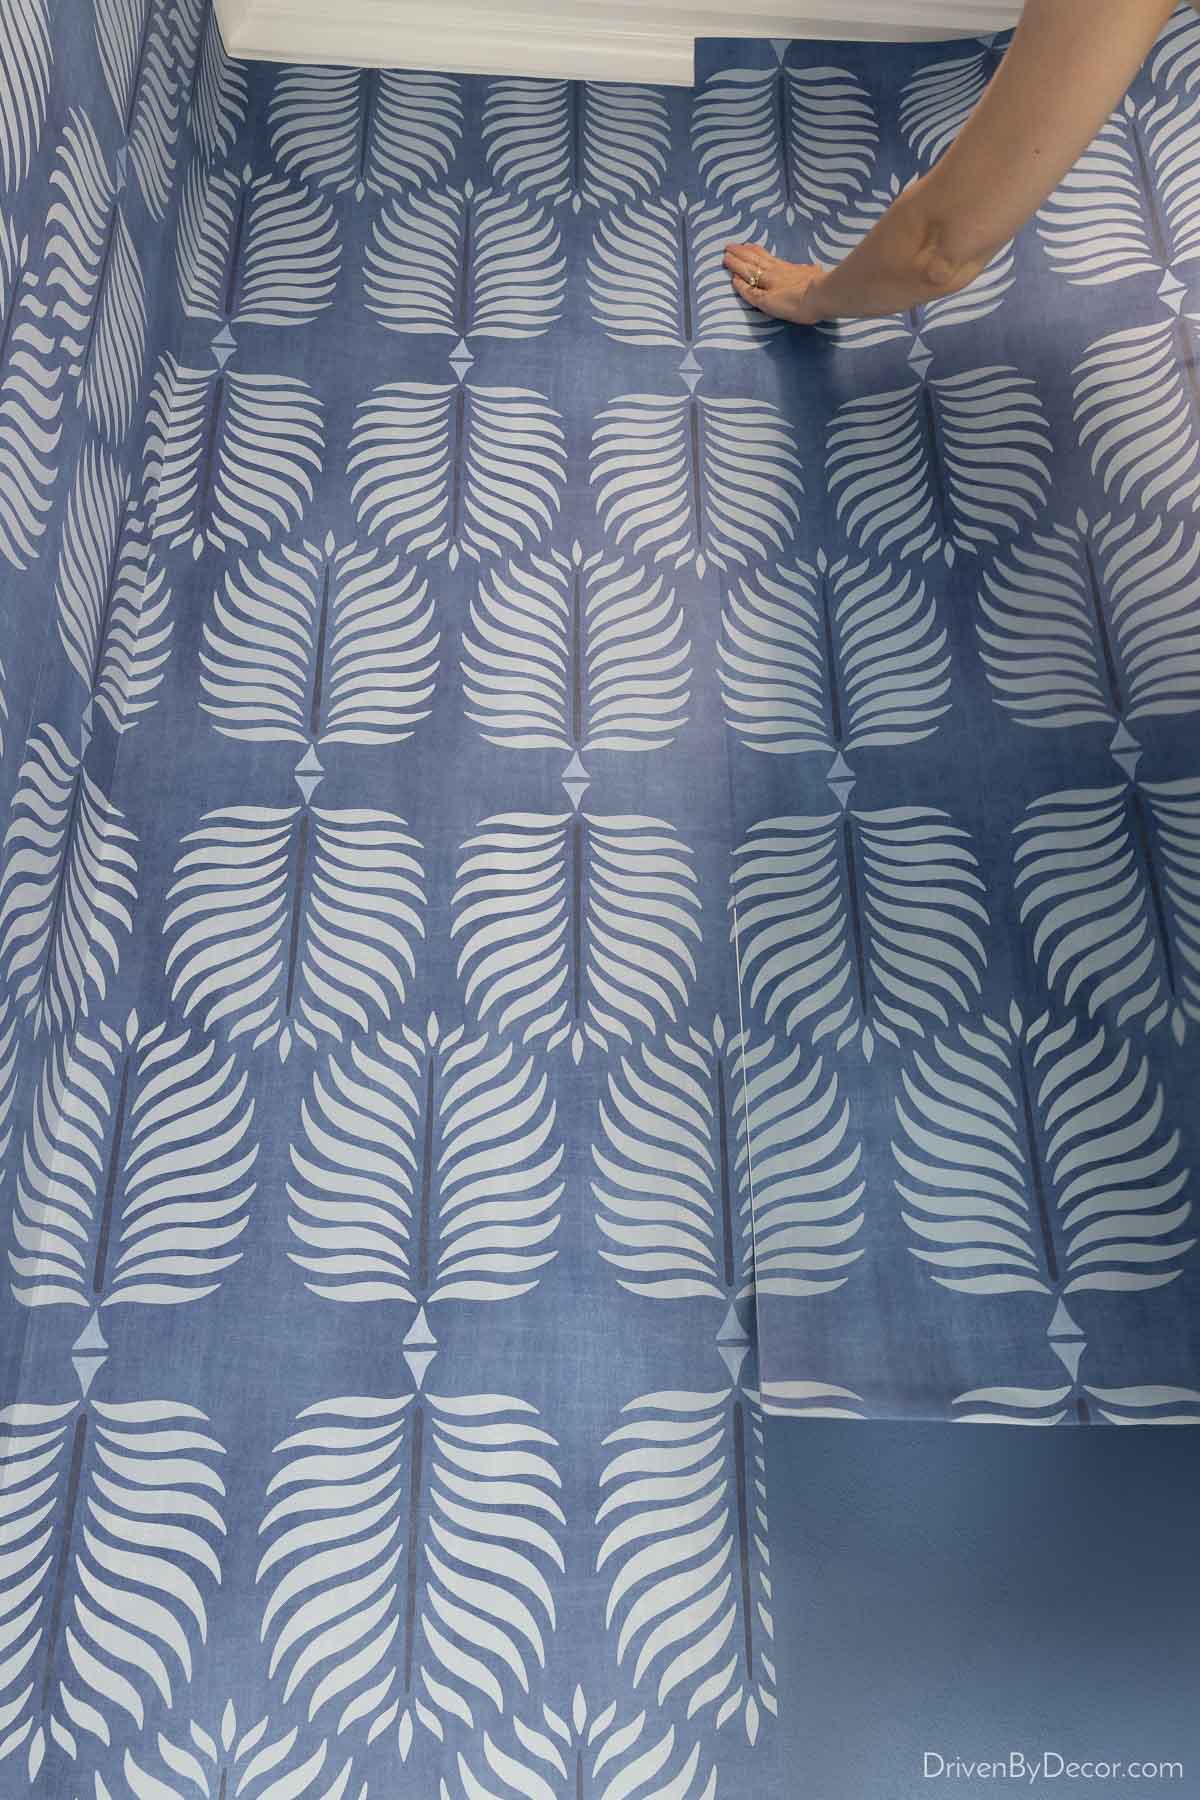
Doing this allows you to move the paper on the wall more easily so you can easily slide it into the perfect position to match up at the seam. Once you’ve matched up the pattern between the two sheets and created a tight seam, use your smoother over top of the seam to smooth the new sheet down and set it in place. Only then do you lay down the other side of the sheet and smooth that down too. Work in sections of a few feet at a time starting from the top, matching the seam, setting it in place with the smoother, and then smoothing out the full width of that section. When you’re done hanging the strip, use a seam roller along the entire length of the seam.
11. Cut Your Corners
Oops – I said 10 tips but want to add just one more! Unless you’re only wallpapering an accent wall or bookcase back, you’ll eventually come to a corner. You should never install a full strip of wallpaper that covers part of one wall, goes into the corner, and then covers part of the next wall. Why? Because corners are rarely even so it’s unlikely that the edge of the strip on the second wall will be straight up and down, setting you up for disaster as you continue down the wall. Also wallpaper tends to pull away from corners if installed like this.
Instead you want to cut your strip of wallpaper into two. The first strip will cover the first wall and the corner and continue about ½″ onto the second wall. To determine the size to cut your strips, measure the distance from the end of the last strip you installed into the corner at the top, the middle, and the bottom:
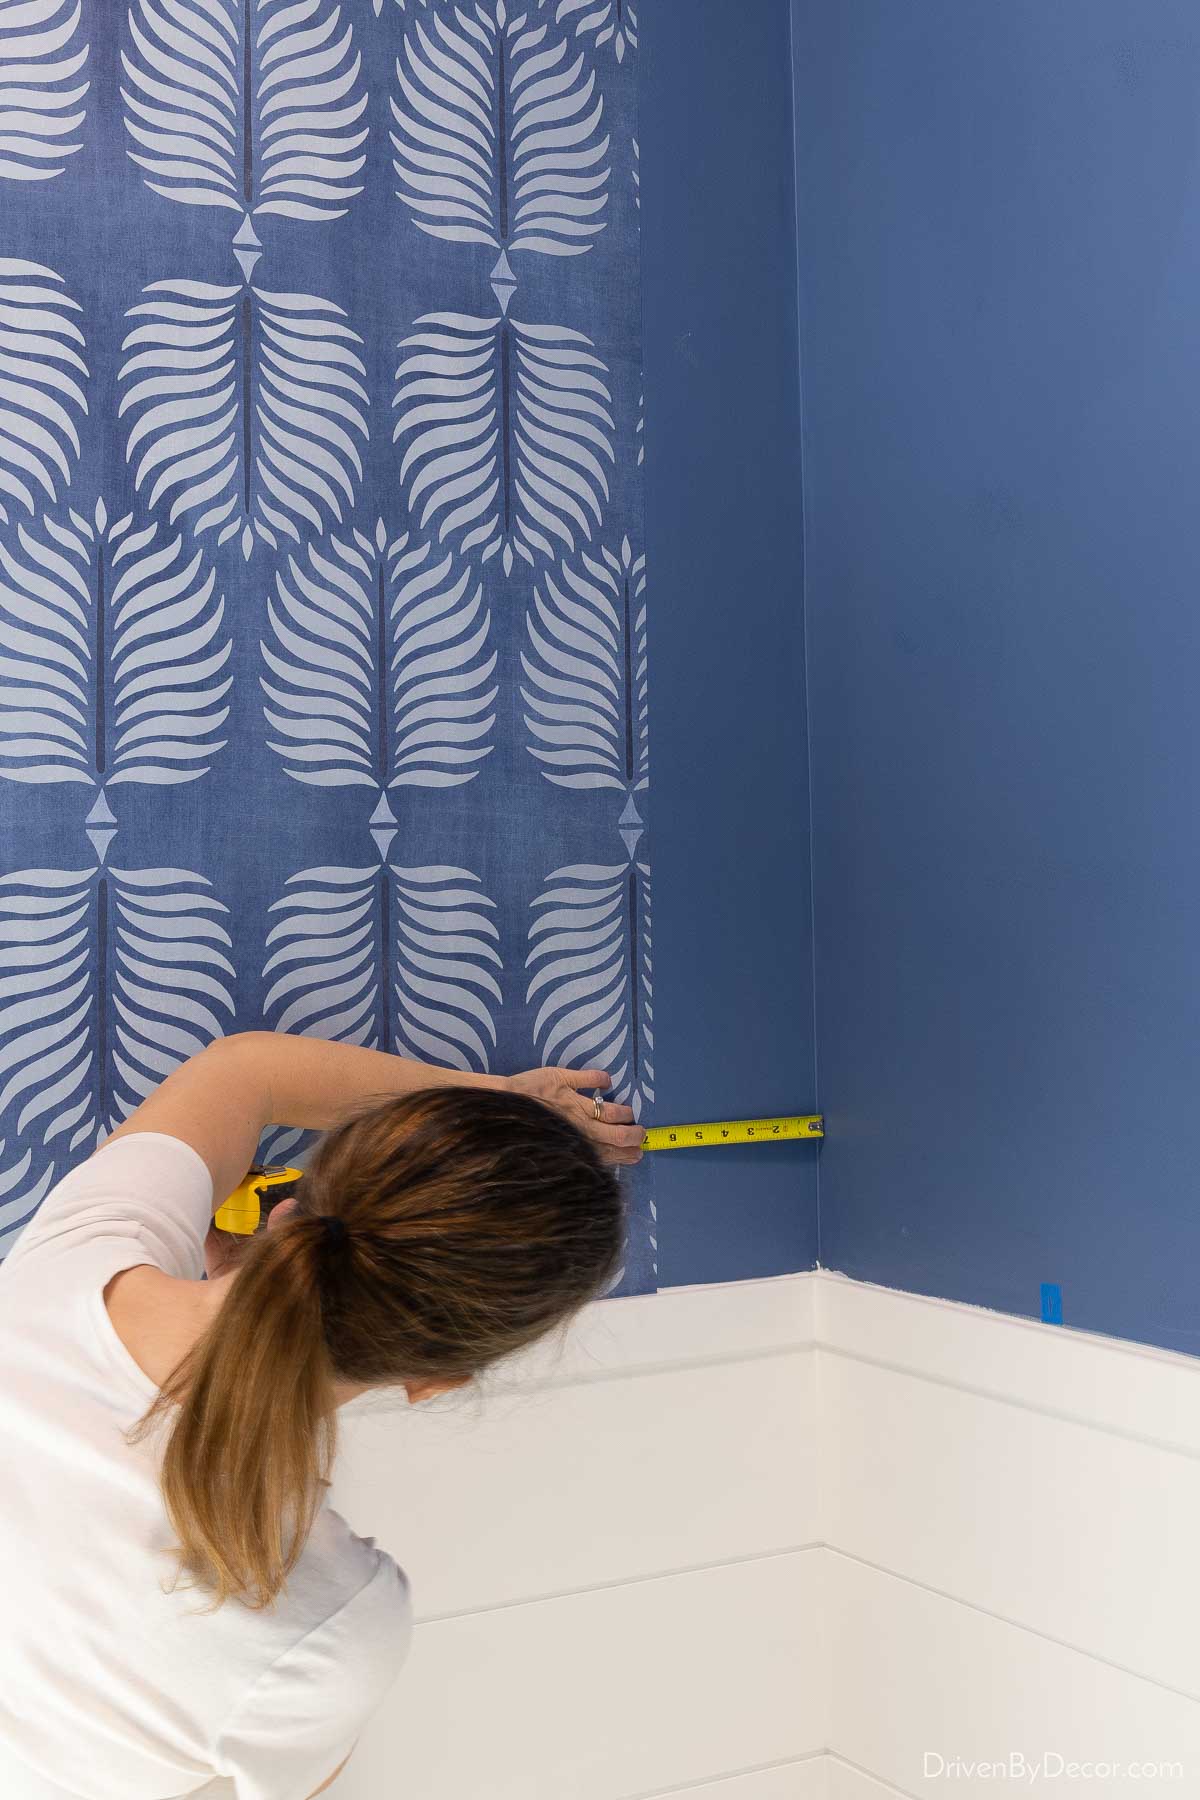
All three measurements should be the same or similar. The distances for me were 6 ⅜″ at the top & middle and 6 ½″ at the bottom. Take the longest measurement of those 3 measurements (6 ½″) and add ½″ to it (7″). Cut your strip of wallpaper off the roll like you normally would and then cut it in two along the entire length of the strip so that the strip on wall A is the width that you need:
Since my roll is 27″ wide, I now have a 7″ wide strip to install on wall A and a 20″ strip to install on wall B. Install your strip on wall A as usual by setting the seam:
and then smoothing the paper down, pressing firmly into the corner. Here’s what it looked like when done:
Now remember how I said it was important to start straight with each new wall? Just like we did at the beginning, we’re going to mark a straight, level line down the wall where the edge of the wallpaper strip going on wall B will fall:
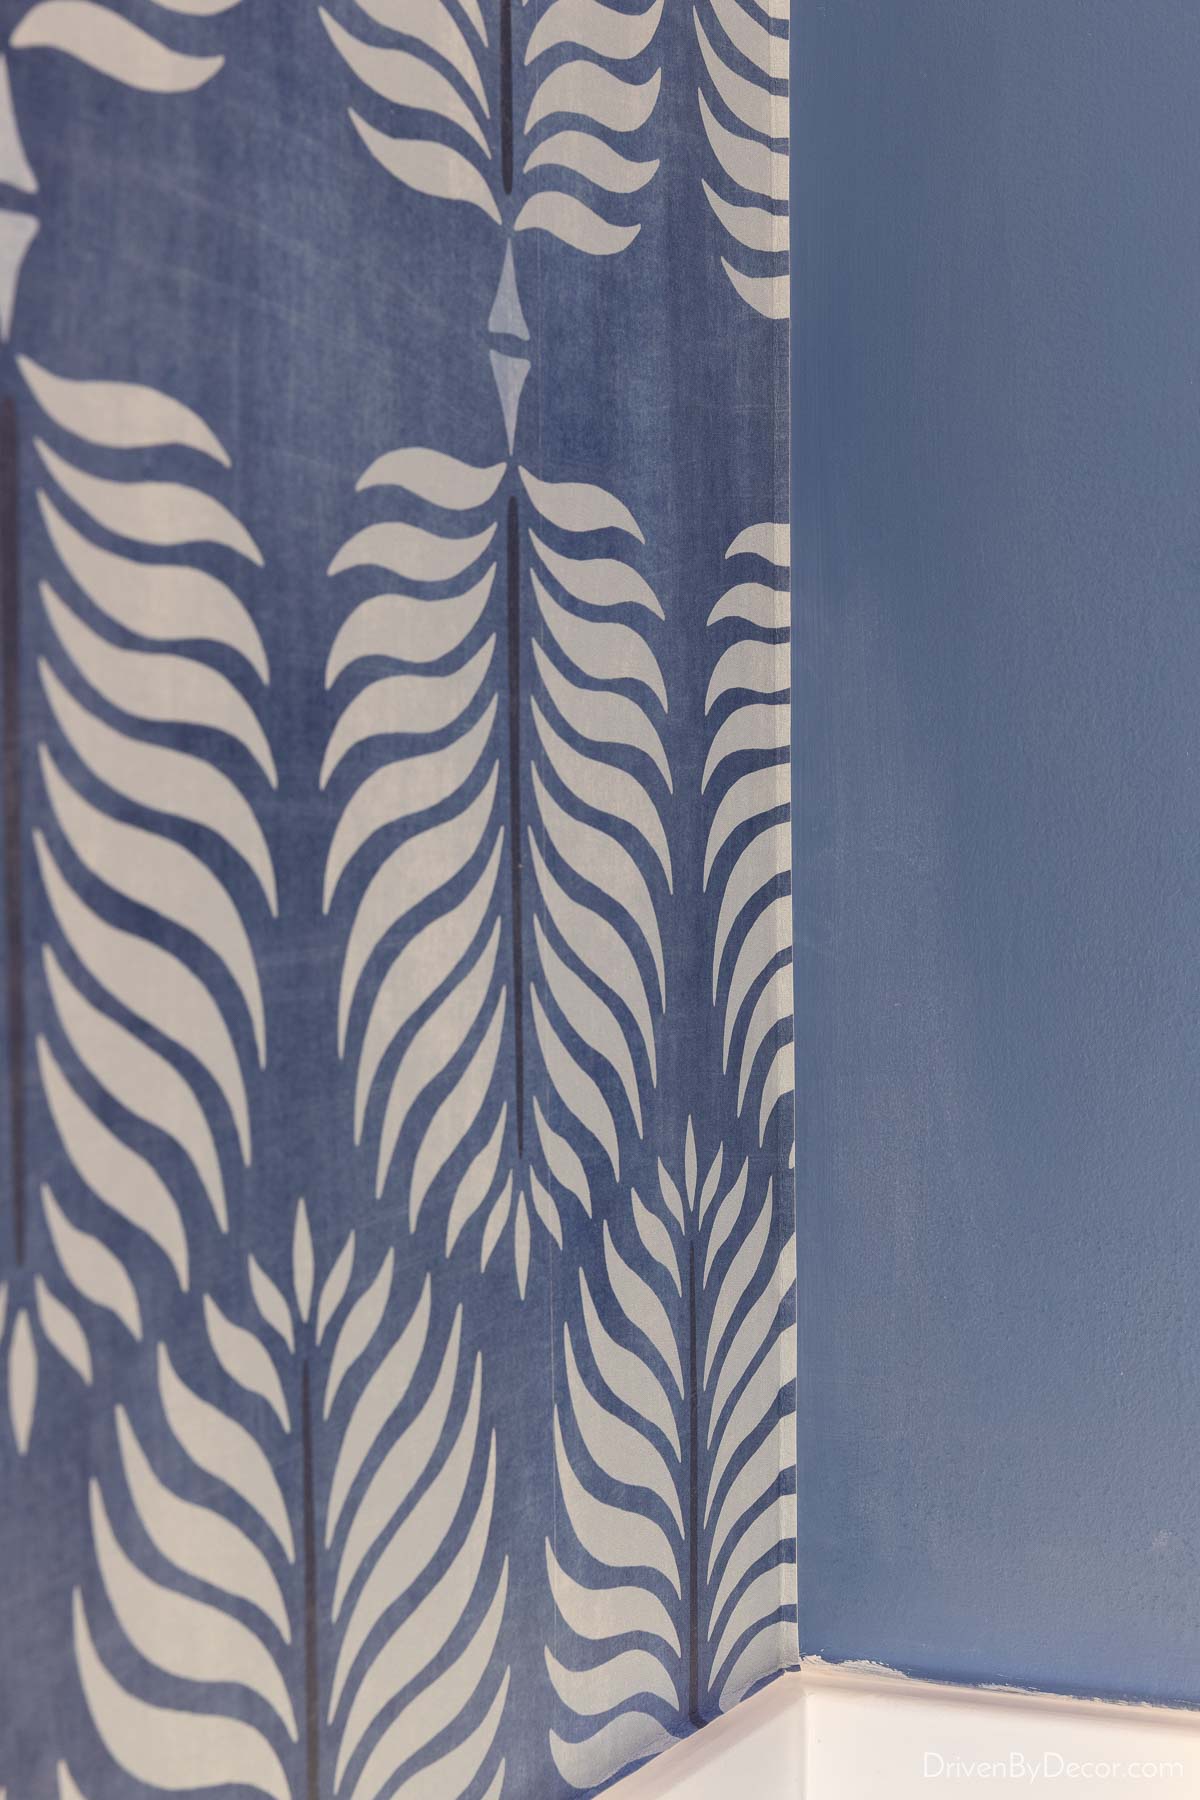
You’ll now use this as your guide to hang the second side of the strip that you cut in two pieces. It will overlap some or all of the first strip depending upon how even or uneven your corner is. Try to match up the pattern as best as you can with the sheet that you installed into the corner but it won’t match up perfectly if your corner is uneven. That’s ok – corners do a pretty good job of hiding small mis-matches in pattern. For example, this corner of our bathroom looks like everything matches up perfectly:
but if you really look closely, you’d see that the pattern doesn’t match up perfectly at all spots.
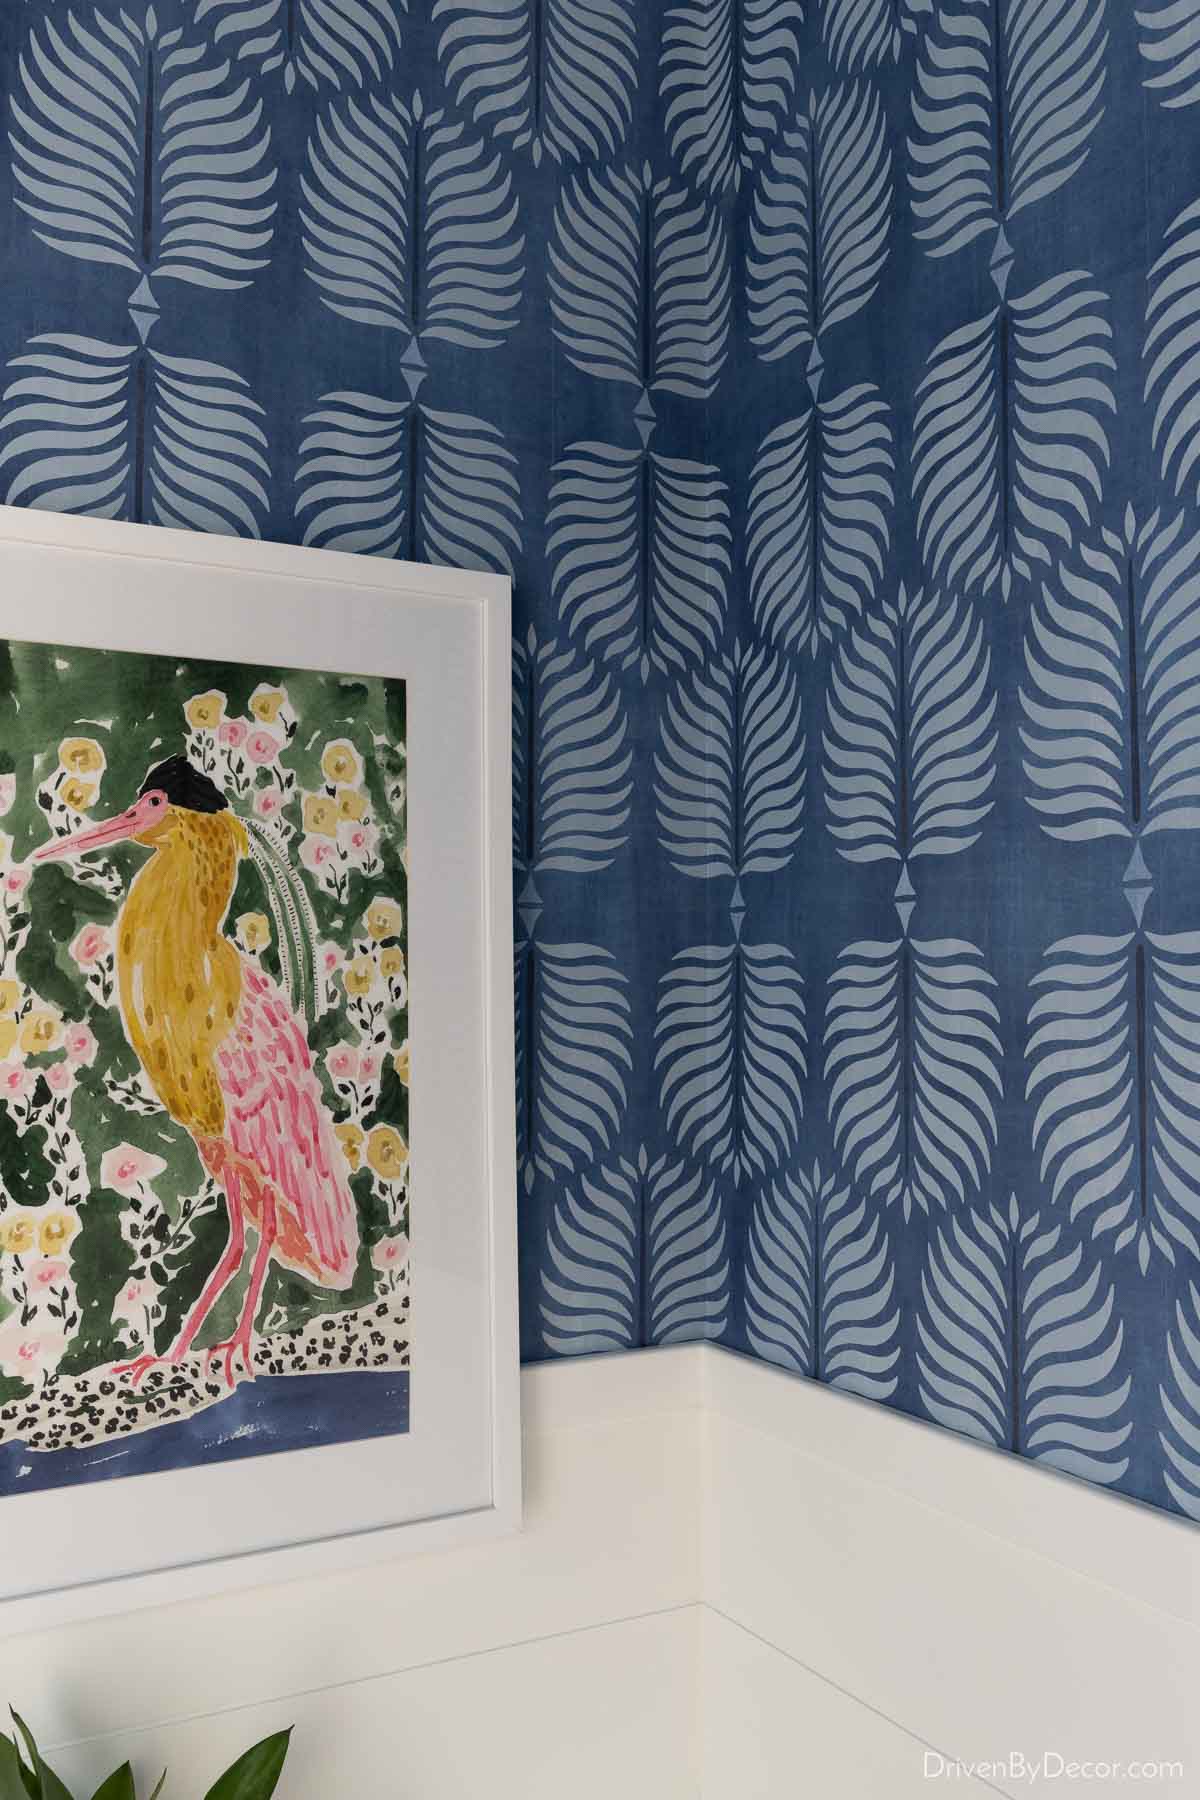
What’s important is that the sheet you just installed on side B is level so you’ve set yourself up for success to continue down the rest of the wall with nice, straight wallpaper sheets. After continuing around the five walls of our bathroom (Yes, five! This room has two 135 degree angled walls.), this is how my powder room wallpapering project turned out:
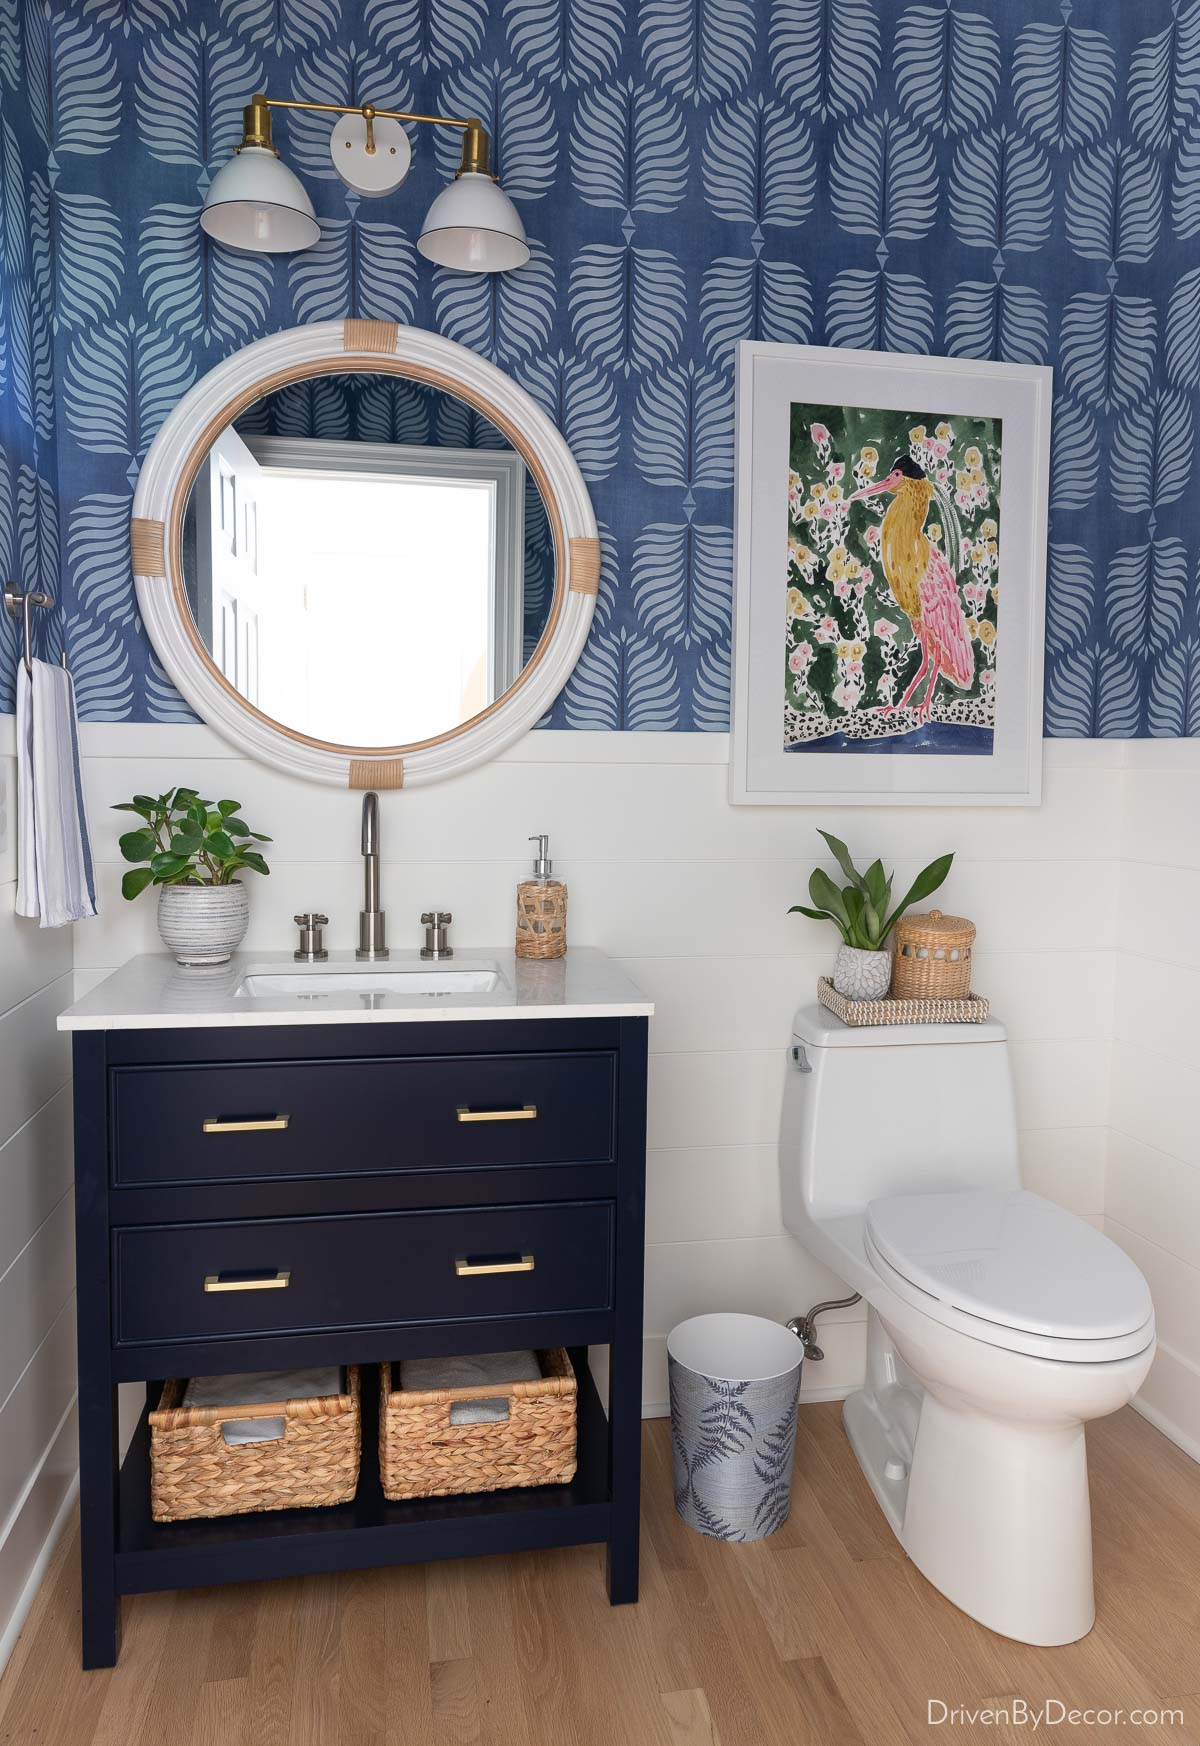
Sources: Wallpaper | Shiplap | 2-Light sconce | Round rattan mirror | Vanity | Faucet (brushed nickel) | Striped planter | Woven soap pump | Towel ring (stainless) | Towel | Vanity baskets (large) | Toilet | Toilet paper holder (brushed brass) | Woven toilet tray (small) | Woven canister | Bird art print (18 x 24) with White wood frame (similar) | Waste basket covered with grasscloth wallpaper remnant
That wraps up my wallpaper installation tips! I hope that you find some of them to be helpful if you decide to try tackling a wallpaper project on your own! Every wallpapering project is a bit unique and I decided to keep this post to the basics since it was already getting super long 🙈. But if you’re going to encounter a wallpapering obstacle like having to wallpaper around a pedestal sink, an arched window frame, etc. then read up on those specific situations before going at it. Just remember tip #1 – keep your first project simple!
XO,


Mary from Life at Bella Terra says
Kris, wonderful, detailed tutorial! I’ve never hung my own wallpaper but you have inspired me to do so. Love it all.
Renae says
Great tips! Wallpapering can be so difficult. Hugs to you.
Kristin says
I’ve wallpapered twice and both times I had issues with the wallpaper strips not lining up exactly with the previous strip. It would line up in one area on the wall, but as I moved down towards the bottom, it no longer matched up no matter what I did. I did mark my line with a level so I’m not sure what I did wrong. (frustrating)!