Wondering how to hang peel and stick wallpaper? I’m sharing the step-by-step details!
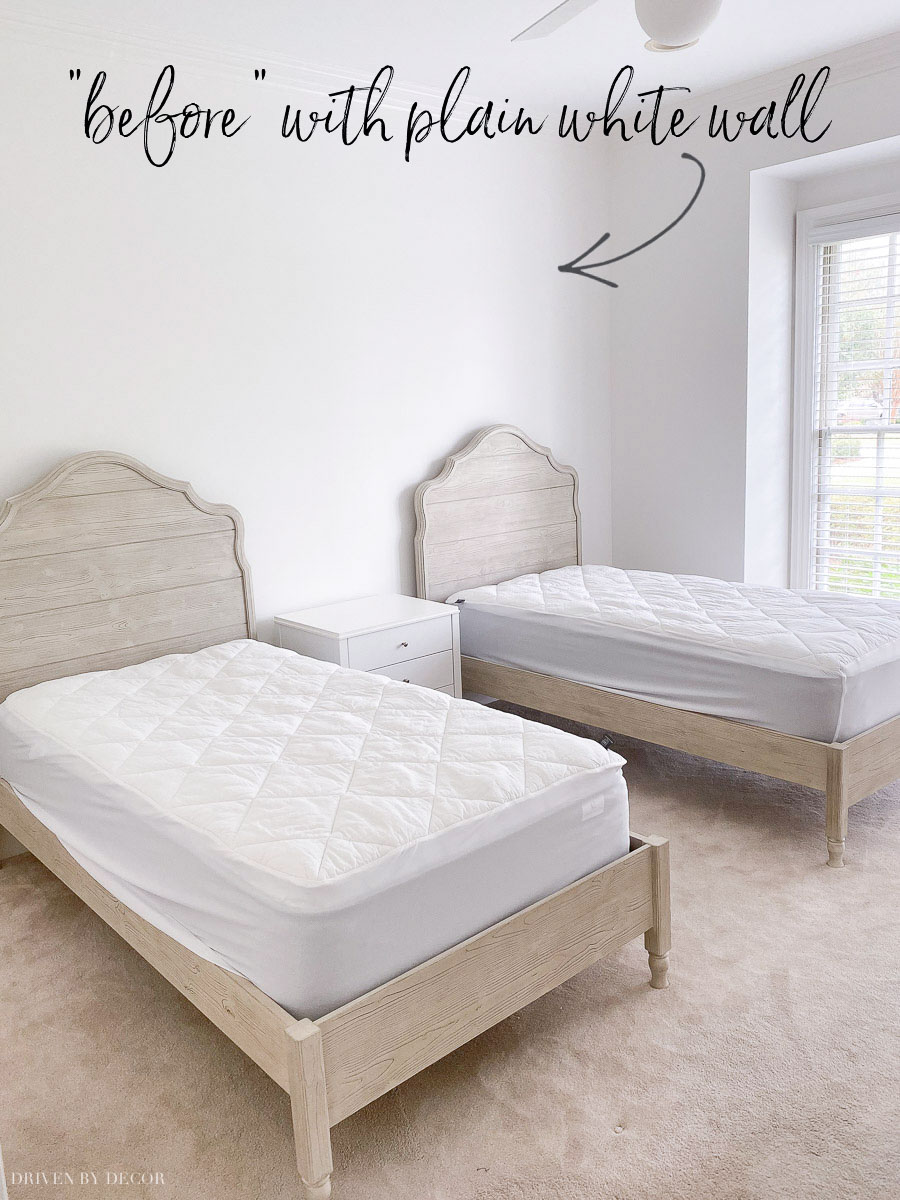
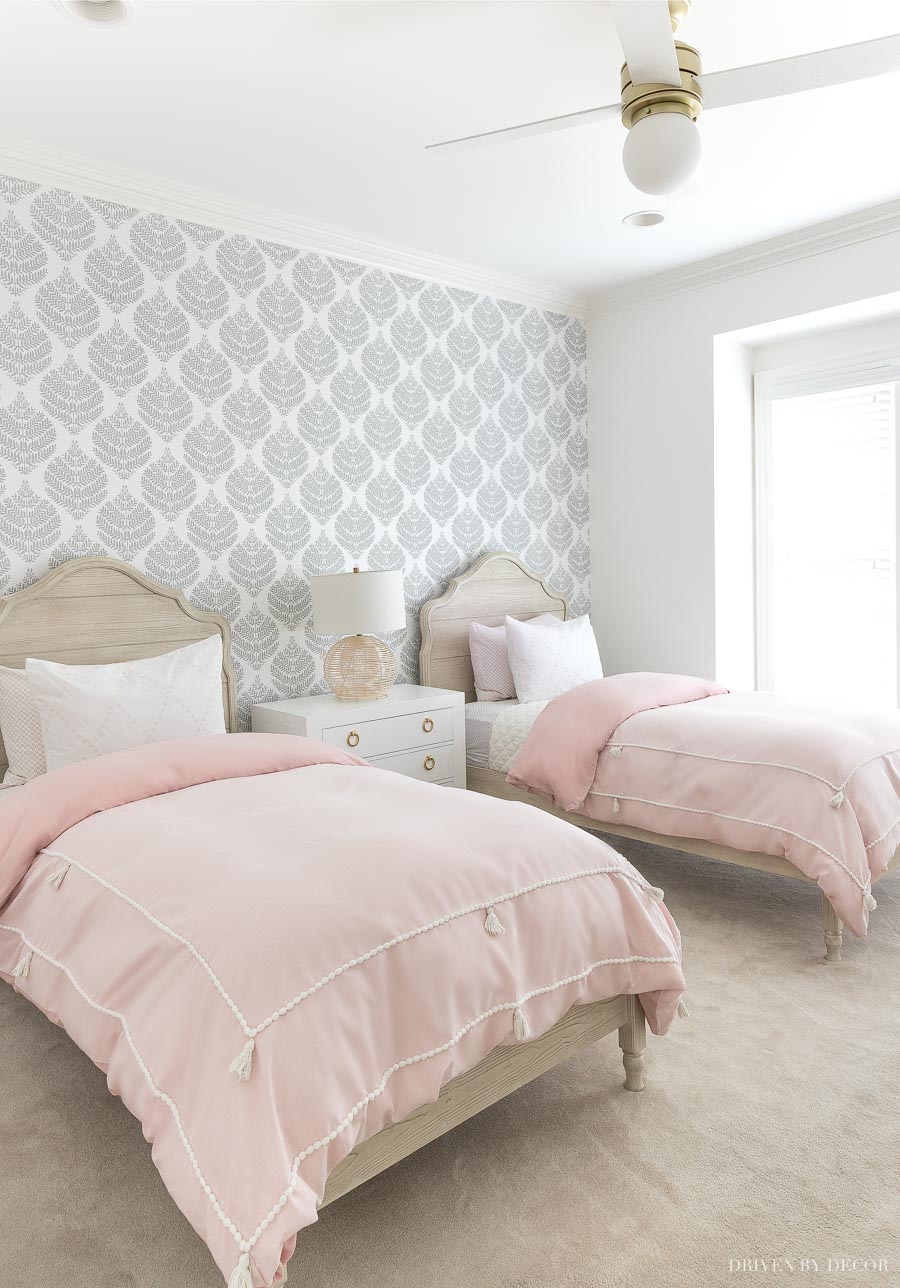
Have you ever tried peel and stick wallpaper (also known as removable wallpaper)? Until recently I’d only hung traditional wallpaper but I’ve always been intrigued by the peel & stick kind and decided to give it a go in my girls’ room. They have white walls and I thought that adding a little color and pattern to their bed wall would be the perfect addition to the space:
When I shared my wallpapering progress on Instagram Stories I got tons of questions about how to hang peel and stick wallpaper so I decided to share the step by step of how I did it. Hopefully it will give you the information and inspiration to try a project of your own! Let’s jump on in… (post includes affiliate links; full disclosure statement available {here})
1. Find Your Peel & Stick Wallpaper
For my wallpapering project, I bought {this gray damask peel & stick wallpaper} that I thought would add a lot to the room without being overpowering or difficult to work around:
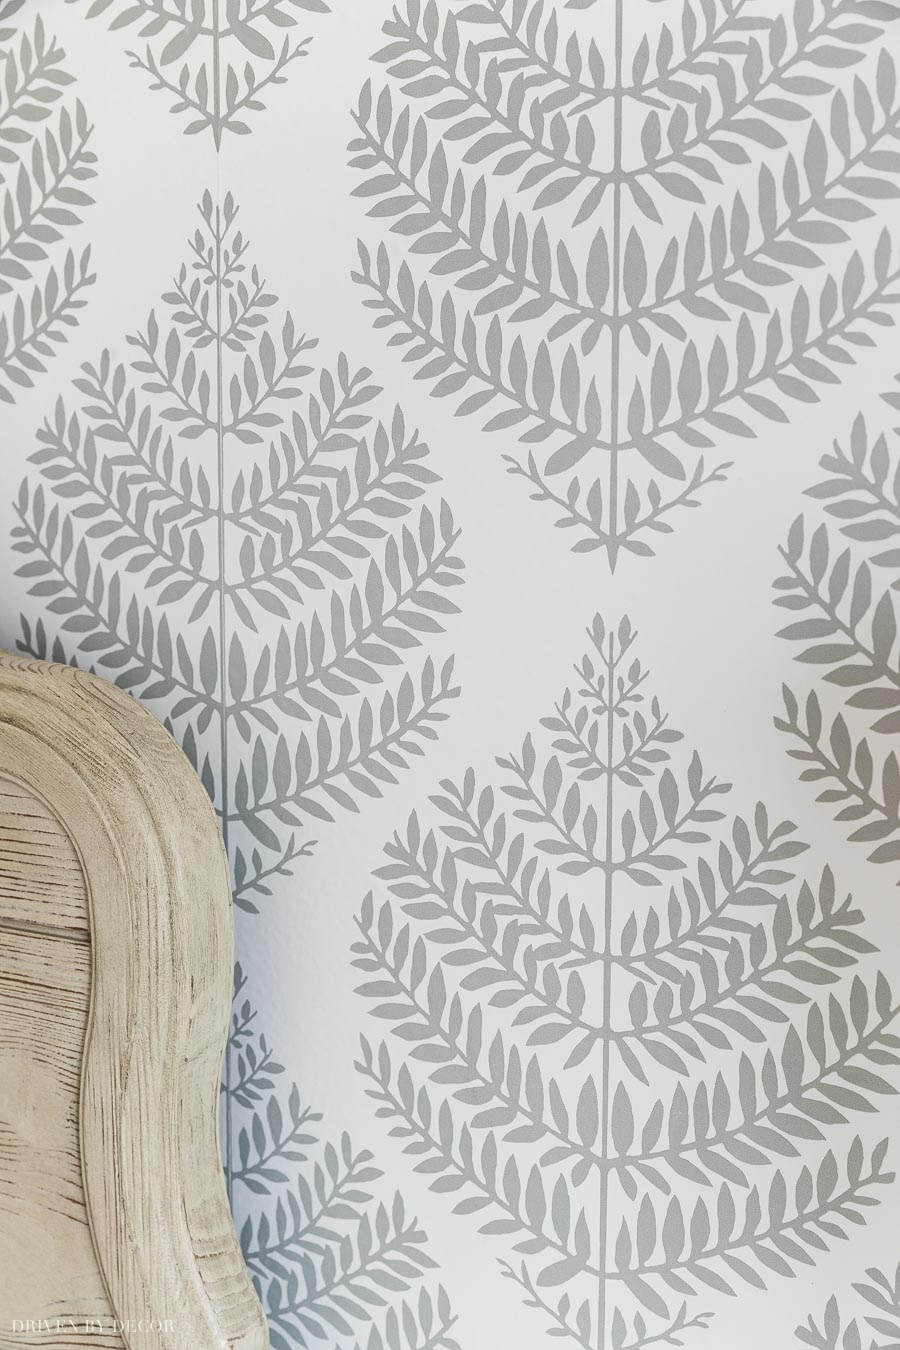
It also comes in black, blue, green, & taupe. The rolls are 20.5″ wide and 198″ long (they cover about 28 square feet).
There are LOTS of other great options to choose from too. Here are a few:
On Amazon, I love {this black & white herringbone}, {this striped hexagon}, and {this pretty floral}
On Etsy, there are several great options at {this Etsy shop}, {this Etsy shop}, and also {this Etsy shop}
Wayfair has some pretty options {here}
Anthropologie has some really stunning options {here}
Rifle Paper Co. has several gorgeous peel and stick wallpaper options {here}
Tip: An alternative to peel and stick wallpaper that’s even easier to apply is removable vinyl wall decals. See my post on vinyl wall decals for more details!
2. Figure Out How Much Wallpaper You Need
There are various online wallpaper calculators you can use to figure out how much wallpaper you need but the most basic way is to calculate the square footage of the wall space you are papering and divide it by the square feet of one roll (this info is included in the wallpaper listing).
If you are using a patterned wallpaper, you will need additional rolls because there will be some wasted wallpaper since the pattern on neighboring strips needs to match up. You’ll need at least 10% more paper for a small pattern repeat and 20% more for a large pattern repeat. Then on top of this, order at least 1-2 extra rolls to allow for errors and underestimations (especially if returns of extra rolls are free).
I was able to get my girls’ whole wall done with four rolls but got kind of lucky that my measurements worked out that way because if my ceilings were just a few inches higher I would have needed more.
Be aware that peel & stick wallpaper rolls are typically shorter than most traditional wallpaper rolls so online wallpaper calculators that don’t take roll length into account will underestimate the number of rolls needed.
3. Gather Your Wallpaper Hanging Tools
The tools to hang peel and stick wallpaper are basically the same as traditional wallpaper except you obviously don’t need the glue. My recommended tool list includes:
- Long level such as {this one} or a laser level such as {this one}
- Tape measure
- {This smoothing tool}
- 9mm snap off razor such as {this one} or {this one}
- Sharp snap-off blades – I use {these} ultra sharp ones
- Pencil Other tools you could use (but I didn’t) include a seam roller such as {this one} and a metal straight edge.
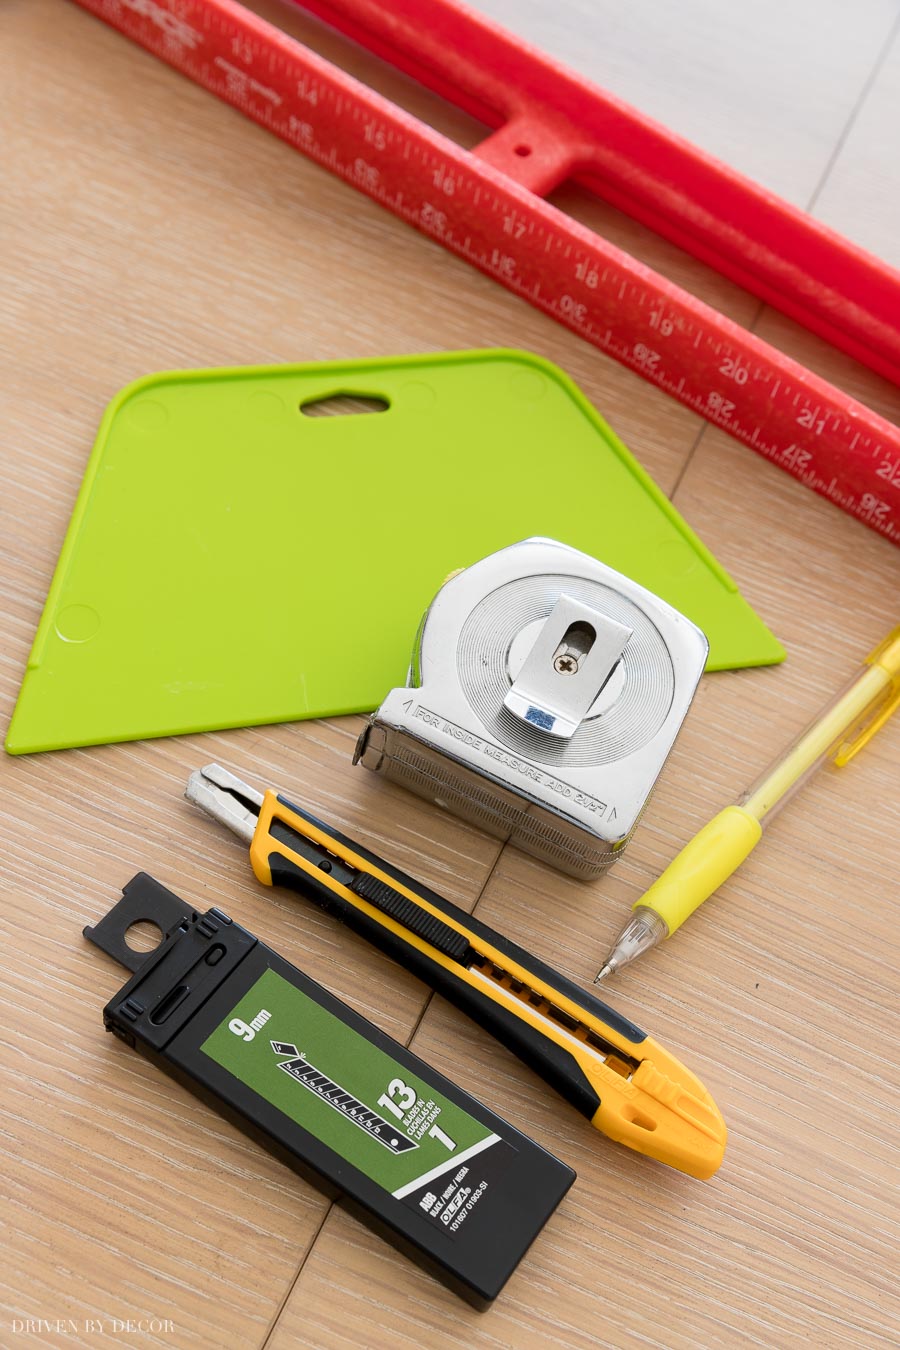
Another tool you could use (but I don’t) is a metal straight edge for trimming the ends of the wallpaper (more on that later!)
4. Prep Your Walls
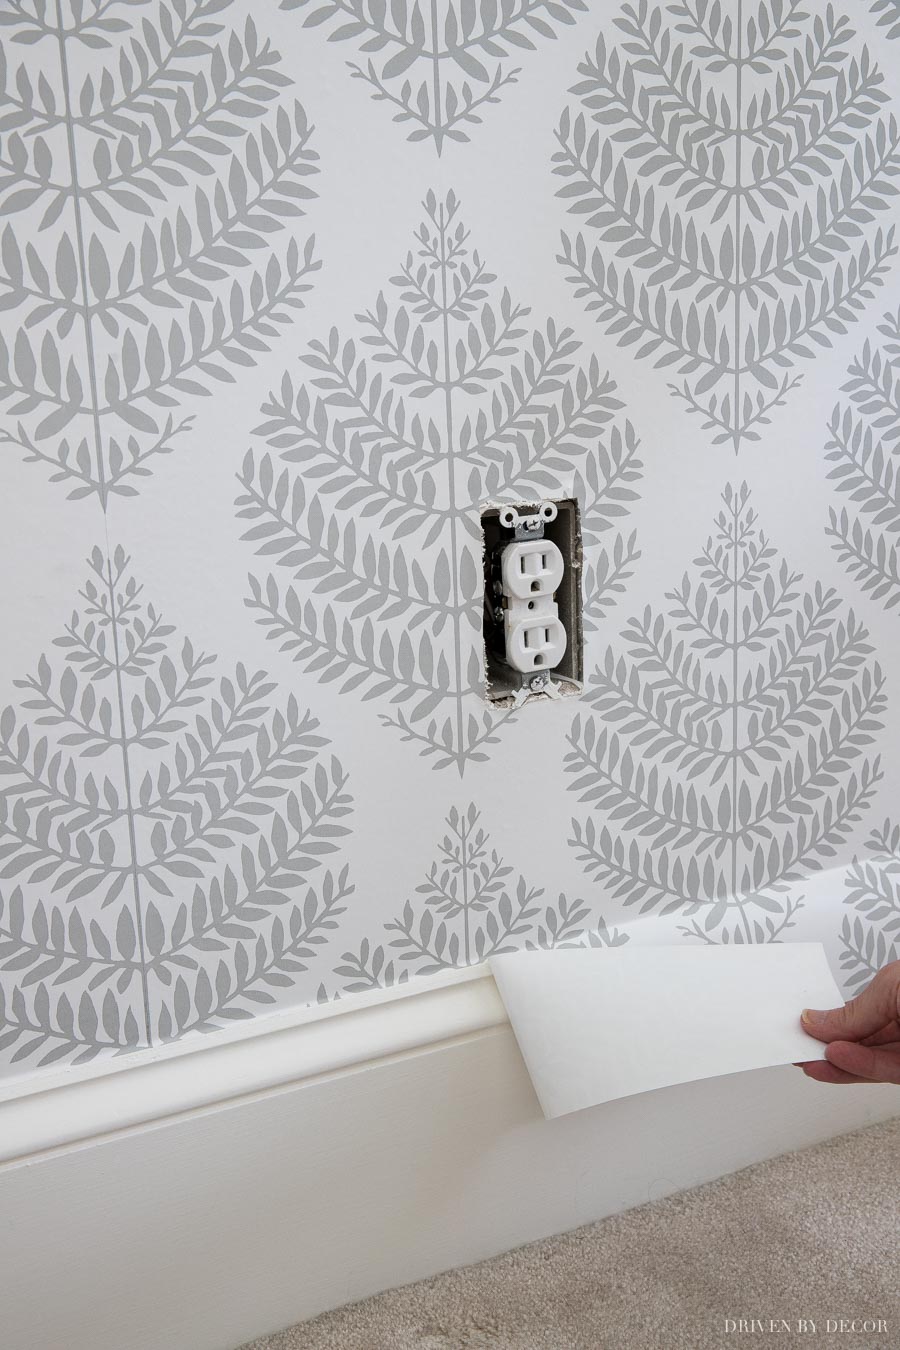
Peel and stick wallpaper will adhere best to clean walls so it’s a good idea to give your walls and the top of your baseboards a quick wipe down with a microfiber cloth to remove any dust. You’ll also need to remove outlet and switch covers and move furniture out of the way.
5. Plan The Layout of Your Wallpaper
Next, you’ll want to plan the layout of your wallpaper. For accent walls, measure the length of your wall and divide it by the width of your wallpaper to determine how many strips of wallpaper it will take.
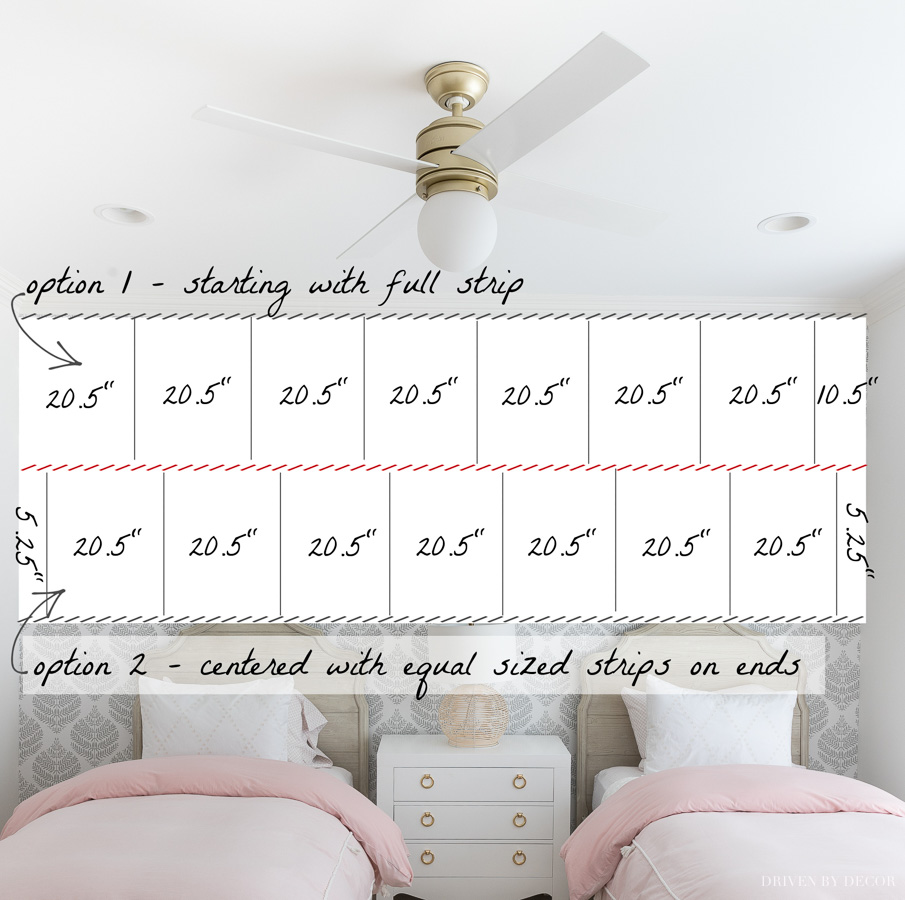
You have two options for how to lay your wallpaper out if you’re doing an accent wall – Option (1) is to start at the left side with a full strip and work your way across to the right side where your last strip will be cut to size. The wall I was papering is about 154″ wide and my wallpaper was 20.5″ wide so this would mean that I would hang seven full 20.5″ strips and then a 10.5″ wide strip at the end
Option (2) is to center your pattern, using full strips in the middle and two equally cut strips on the left and right ends. For me, this would have meant hanging one 5.25″ strip, seven full 20.5″ strips, and then another 5.25″ strip at the end. I decided to go the easier route (Option 1) since I didn’t feel like it was important for the pattern of the particular wallpaper I was working with to be centered. If my last strip was going to be something measly like 1-2″, I would have gone with option #2 because it’s difficult to work with a really small strip.
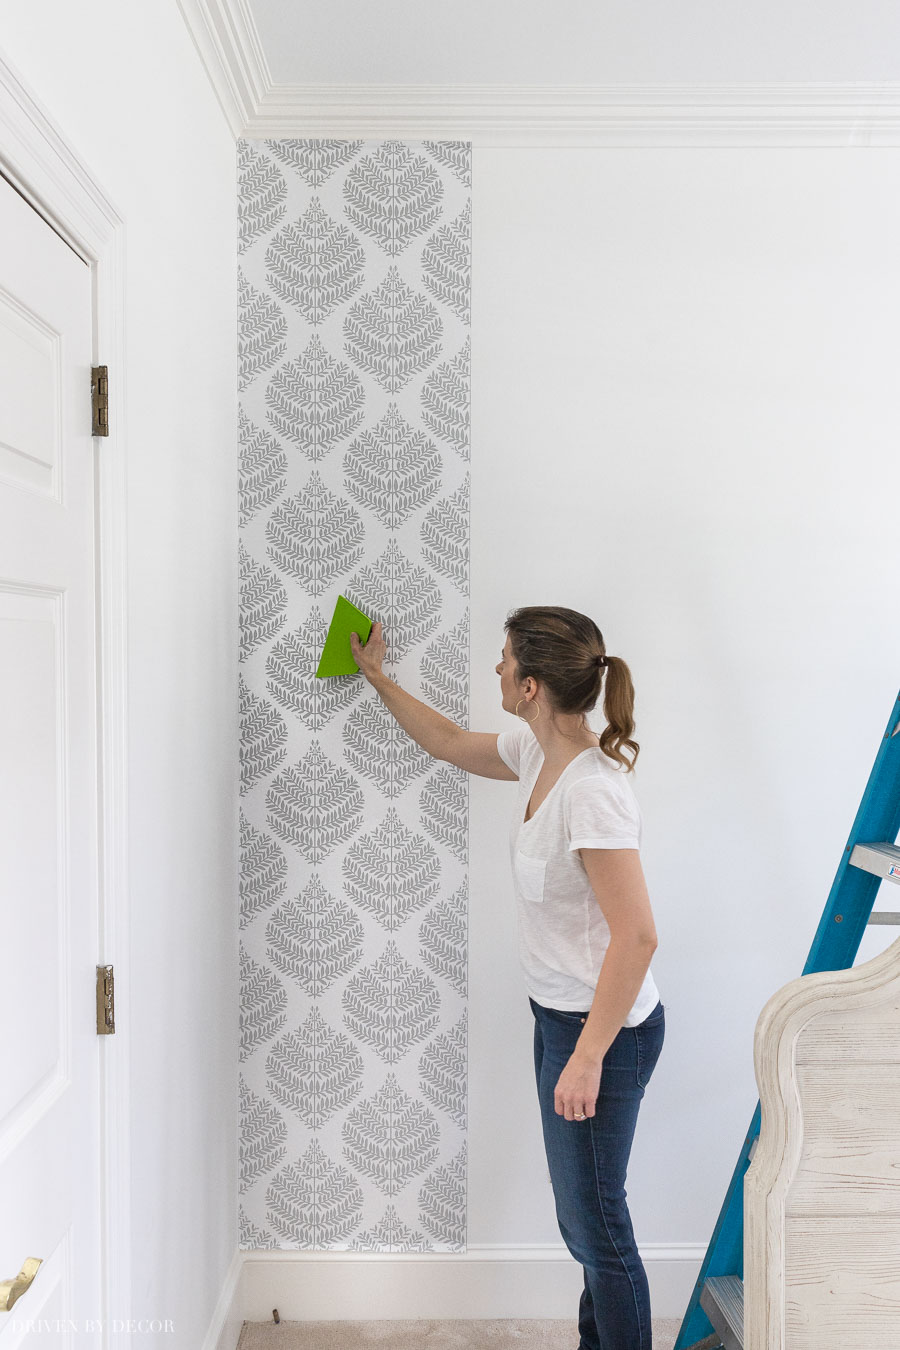
6. Hang Your First Strip Straight
Once you’ve figured out the width of your first strip, draw a level vertical line down the entire wall that you’ll use as your guide for placing your first strip. Having that first strip be level is VERY important because any “un-levelness” in the first strip gets magnified and more visible as you continue down a wall.
Since I was using a full size strip, my line was 20.5″ (the size of my roll) from where the wall starts on the left. You can also use a laser level if you don’t want marks on your wall that you’ll see once your wallpaper is removed.
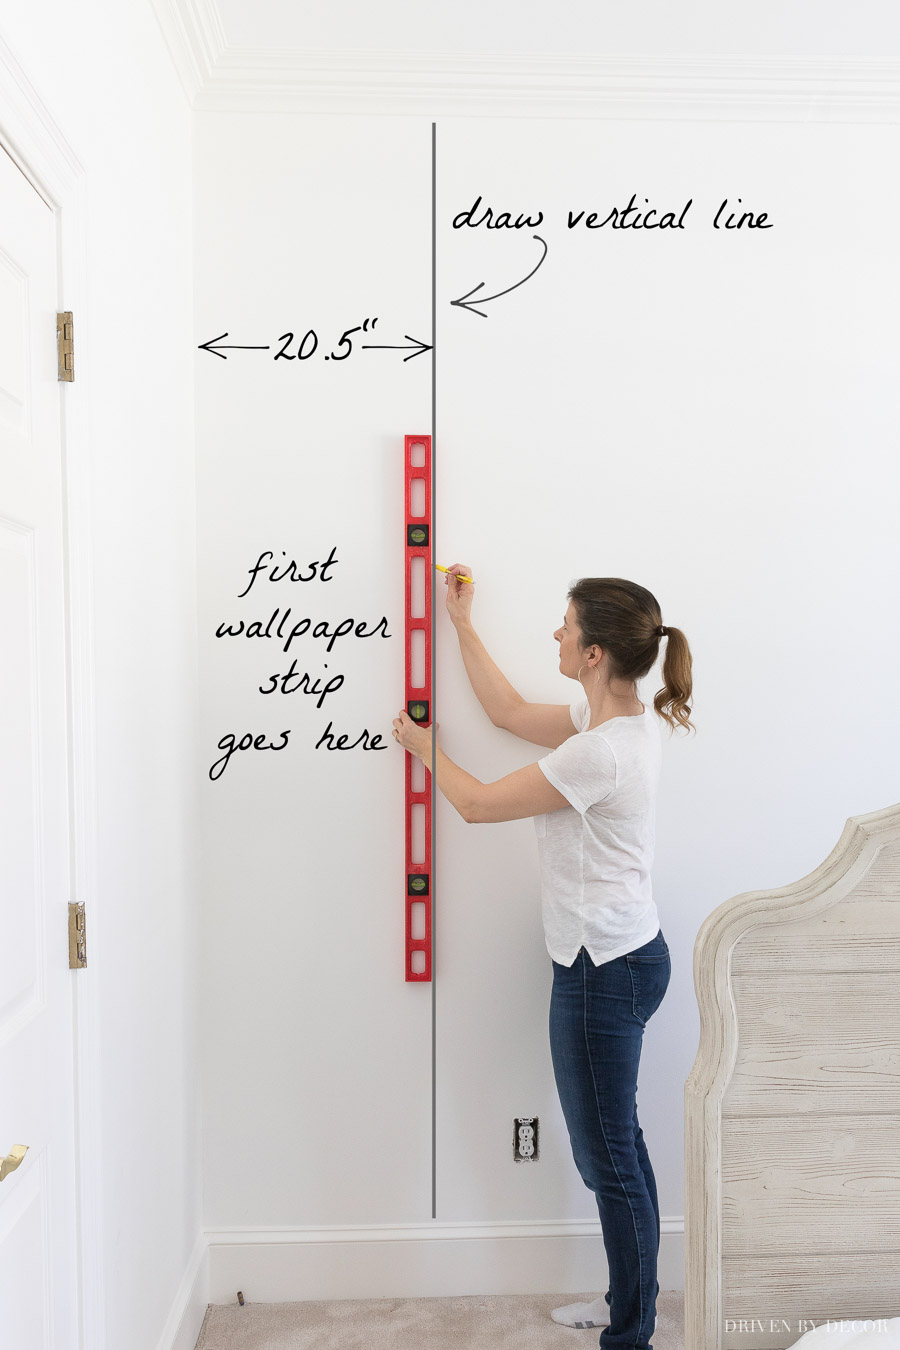
Then you’ll simply place the edge of your first wallpaper strip precisely along this line. You only need to do this for the first strip of wallpaper on the wall (and for each new wall you’re papering if you’re going around the entire room).
7. Match Up the Seams with Your Second Strip
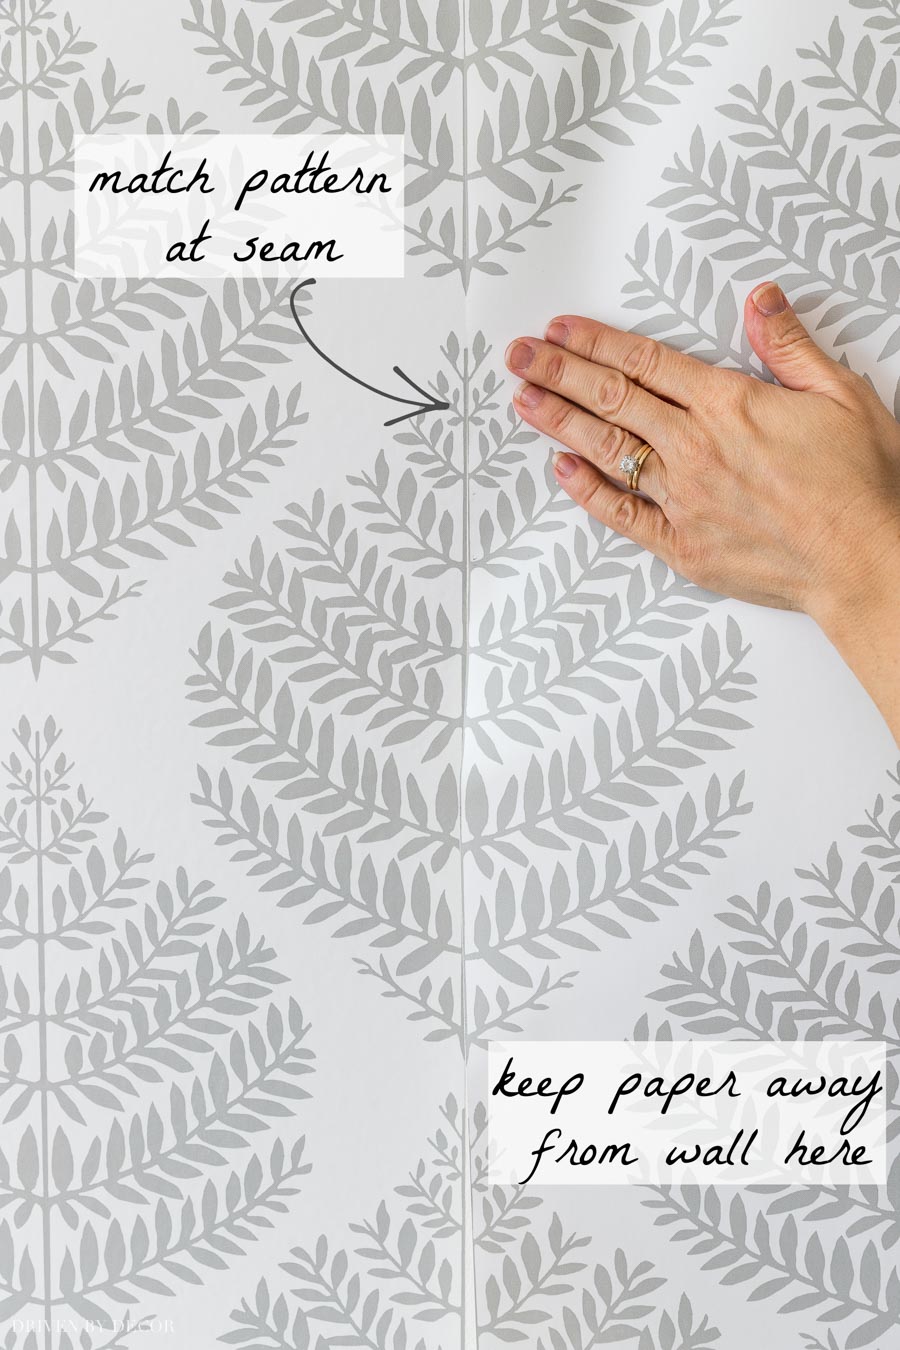
The key to lining up two strips of peel and stick wallpaper to create a nearly invisible seam is to spend your time getting a close pattern match at the top of each strip.
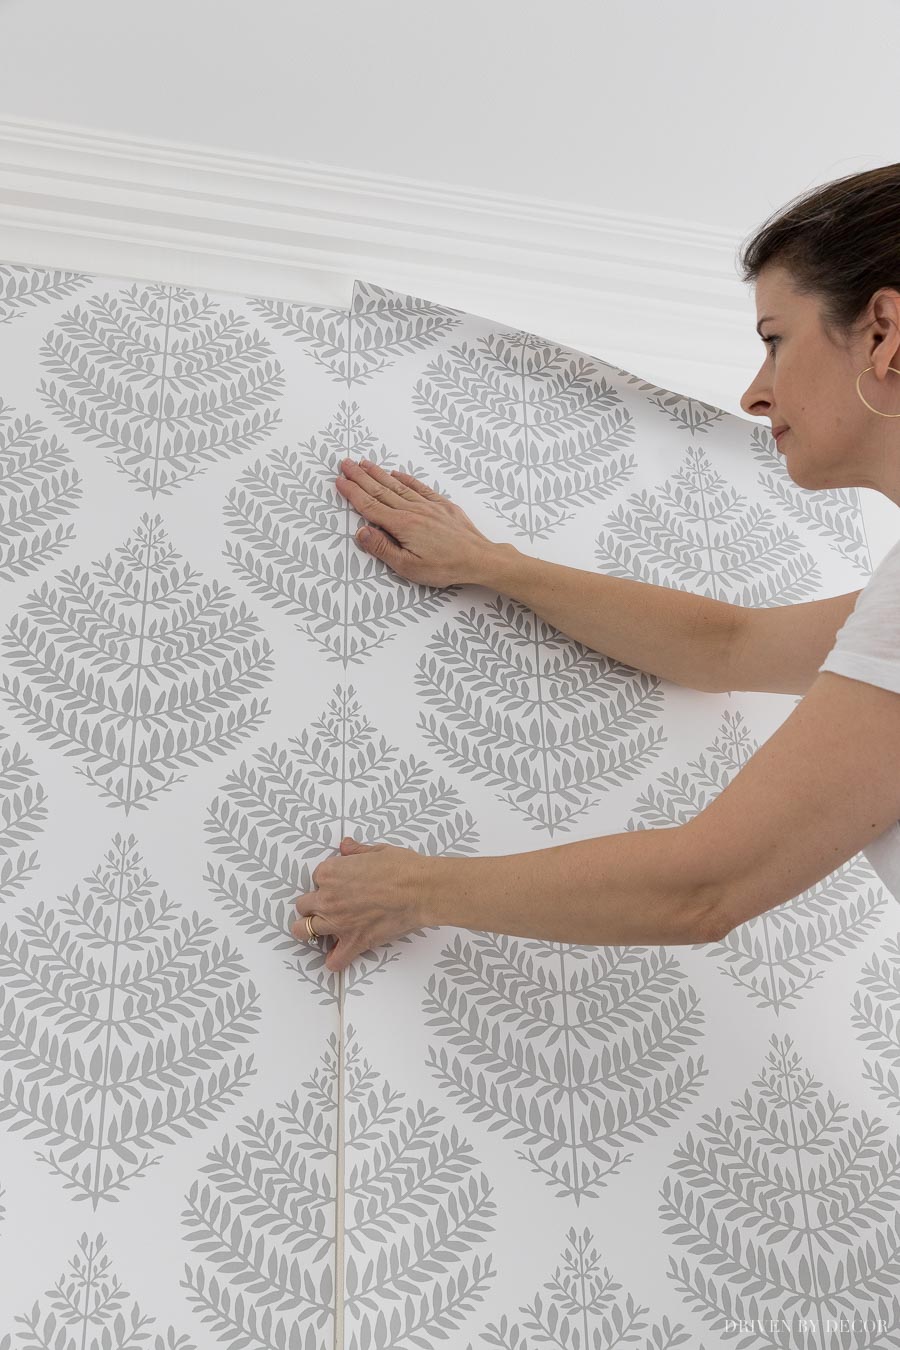
Instead of removing a ton of the backing at a time to reveal the sticky paper, with each new strip you hang, start by pulling the backing away only a few inches along the entire top edge. Then pull a little more away from the top corner near the seam, exposing more of the sticky paper only along the side of the strip where you’re matching up the seam.
Keep the other side of the wallpaper strip (the one away from the seam) and the wallpaper below where you’re doing the seam matching away from the wall so that the only thing you’re sticking down is that small area right at the seam. The two strips should be tightly next to each other at the seam but not overlapping.
Once you’ve got it matched up, it’s easy – simply continue removing the backing from the wallpaper a bit at a time and use your smoothing tool as you go to smooth the wallpaper onto the wall and prevent bubbles and wrinkles. Be careful NOT to have the wallpaper fold over and stick to itself – if this happens it’s very hard to pull it back apart without damaging the paper.
8. Cut Off the Extra Paper
When cutting off extra paper at the top or bottom, you’ll want it to be in a nice straight line. The key to doing this is to (1) always keep a sharp blade on your razor. I recommend using snap-off razor blades so you can snap off a piece before each new cut so you have a fresh blade. Also use high quality, ultra sharp blades like {these} instead of the cheap ones they come with. It’s also important that (2) you use a straight edge as your guide – this can be a long putty knife like {this} or I simply use my wallpaper smoother.
As you move your blade along the entire strip that you want to cut off, never lift your blade up! Cut along the length of your straight edge, then move your straight edge several inches down while keeping your blade in place, then cut along the length of the newly positioned straight edge, and continue until you’ve cut the entire strip:
If you never lift up on your razor, it should come off in one nice straight strip:
Want to save this post?
Also use this same technique to cut off the extra width on the last strip you hang on an accent wall, moving your straight edge and razor down the wall from the top corner to the bottom.
Wallpapering just that one wall made SUCH a difference:
So now that you know the step-by-step of how to hang wallpaper, let’s get to some of your most commonly asked questions…
Is Peel & Stick Easier to Hang Than Traditional Wallpaper?
Overall I’d say yes, if you’ve never hung wallpaper before you’ll have an easier time as a beginner with the installation of peel and stick wallpaper. One of the biggest reasons why is that you can take your time with peel and stick (with traditional wallpaper, you have to work somewhat quickly to get it up before the glue starts drying).
Also, applying the glue on traditional wallpaper takes extra time so hanging peel & stick wallpaper is faster. I hung it by myself but if you’re new to wallpaper hanging it would help to have a second person.
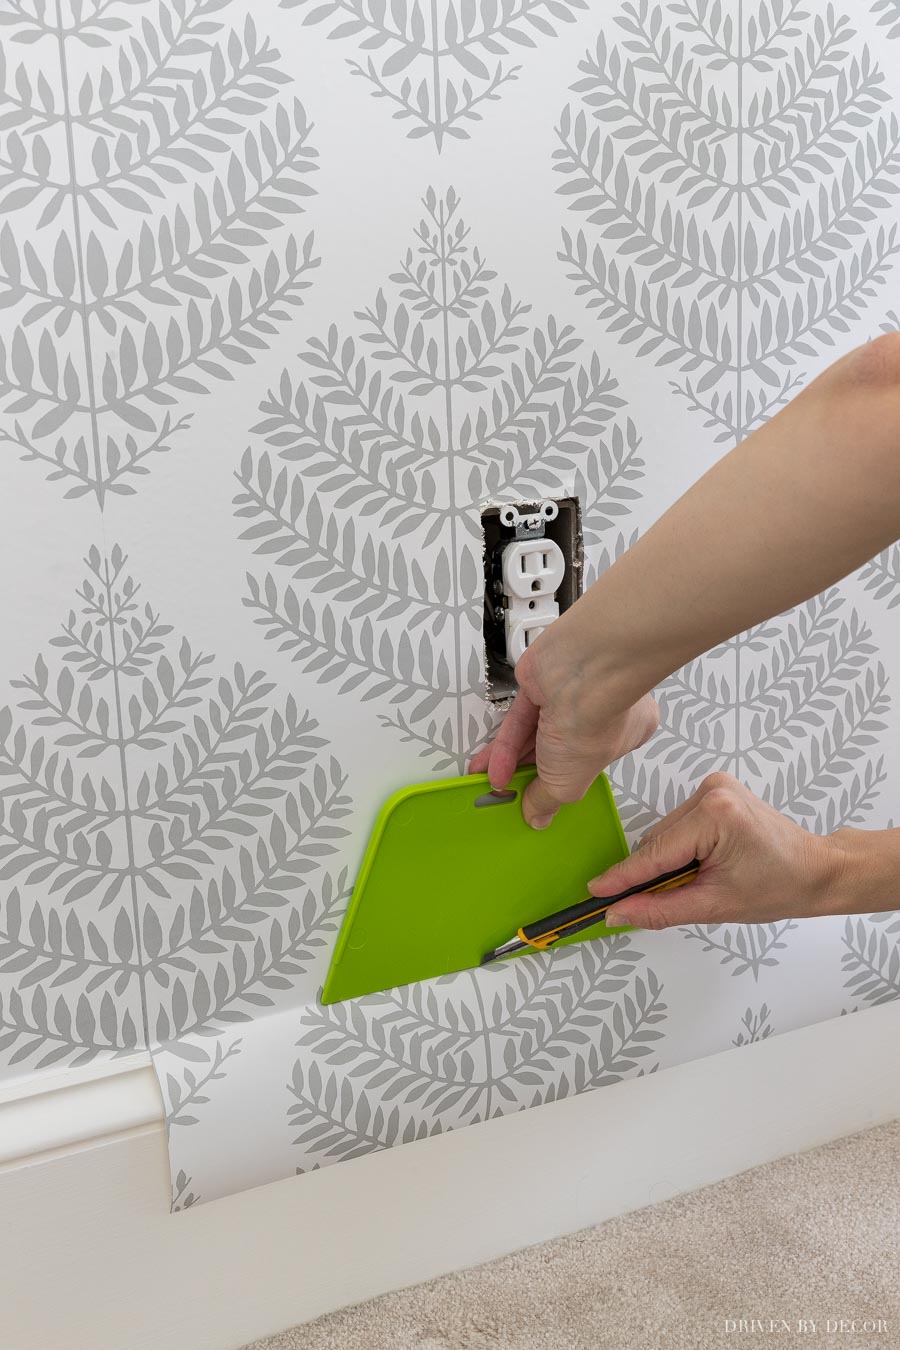
I also thought that cutting around the outlets was easier with the peel and stick because once you get to an outlet, you can simply leave the paper backing on that section and lay it on top of the outlet, use a pencil to trace the outline of outlet on top of the paper, and then cut it out with scissors or your razor (with traditional wallpaper, you’d get glue in your outlets doing this and possibly a good shock too!).
The one part that I thought was a little harder with peel & stick was matching the seams. With traditional wallpaper, the glue allows you to slide the wallpaper on the wall and make adjustments without having to lift the wallpaper up. With peel & stick wallpaper, wherever you stick it, it will stay so you have to be really precise when you line it up. The good news is that you CAN lift the peel & stick wallpaper up and reposition it to try again – I did that several times and it seemed to still stick fine.
Can I Hang Peel & Stick Wallpaper on Textured Walls?
You can but I wouldn’t necessarily recommend it because (1) I’m not confident that it would stick long-term when your walls aren’t flat and (2) peel & stick wallpaper is similar to Con-Tact paper where any little thing that’s under it will show, whether it’s a piece of debris or the texture on your wall. If you wallpaper a textured wall, you’ll see every lump and bump through the paper.
I also don’t think you could match the seams well with textured walls. So unfortunately, if you have textured walls I’d recommend sanding them down before hanging wallpaper. Starting with a smooth surface will get you the result you’re looking for!
Would You Recommend Peel & Stick Wallpaper for a Beginner?
If you’ve never tried hanging any type of wallpaper, I think a small project with peel and stick wallpaper is the perfect way to start! For example, consider wallpapering the back of a bookcase like I recently did in our family room (I used traditional pasted wallpaper but you could definitely do it with peel & stick!):
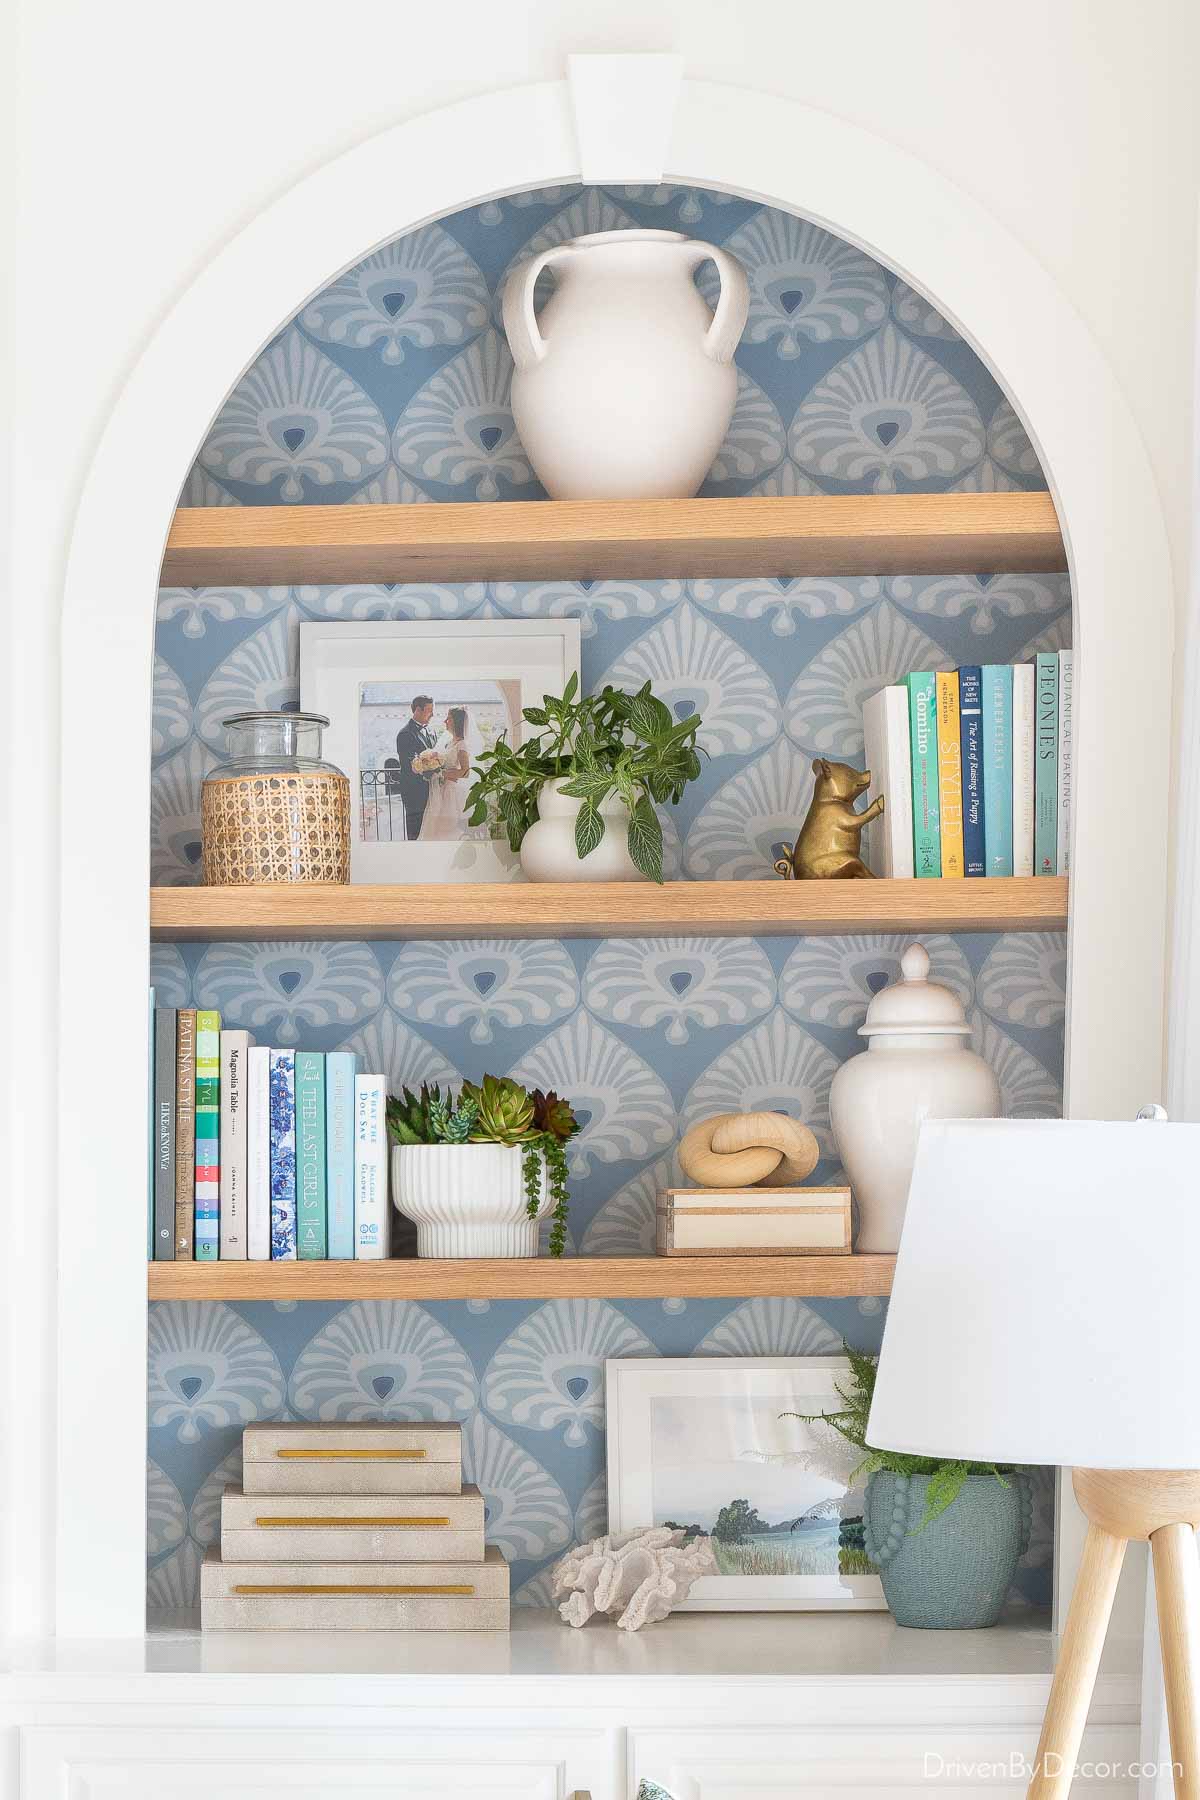
Sources: Tripod floor lamp | Bookcase wallpaper | Oak shelves | Large handled vase (medium size) | Cane wrapped vase | Brass pig bookend | Fluted white bowl | Faux succulents | Wood knot | White ginger jar (similar) | Stacked boxes | Small coral (similar) | Landscape art | Blue planter – no longer available
Another fun option is to add peel & stick wallpaper to your stair risers – see my post on stair riser ideas for details! You can find several other small project ideas for using peel & stick wallpaper in my post on wallpaper ideas.
Want to check out a similarly “sticky” project? See my post on updating our kitchen by using marble contact paper for countertops.
Does Peel & Stick Wallpaper Ruin the Walls When You Remove It?
I’ve read a lot of reviews on peel & stick wallpaper and people who have removed it almost universally say that it came off without damage to the wall or leaving behind any residue.
It’s been two years now since I hung our peel and stick wallpaper and none of it has begun peeling away from the wall – it’s in great shape! The only thing I noticed is that in several spots, the seams between strips of wallpaper have started to separate a bit. It’s not something I would have noticed without looking super closely, in part because my white wall color is similar to the white in the paper. However, any separation of the seams could be more noticeable if the wall color was a very different color from the colors in your wallpaper.
Does Peel & Stick Wallpaper Come Off the Wall Over Time
How well it adheres is likely going to differ a bit from brand to brand, the condition of the walls it was hung on, whether the paper is exposed to high humidity, etc. Most people who have hung peel and stick wallpaper have had no problem with it coming off on its own but there definitely are some reviews from people who had issues with it. I’m sure its durability will differ from brand to brand. The paper I used is holding strong two years out!
Where Did You Get…?
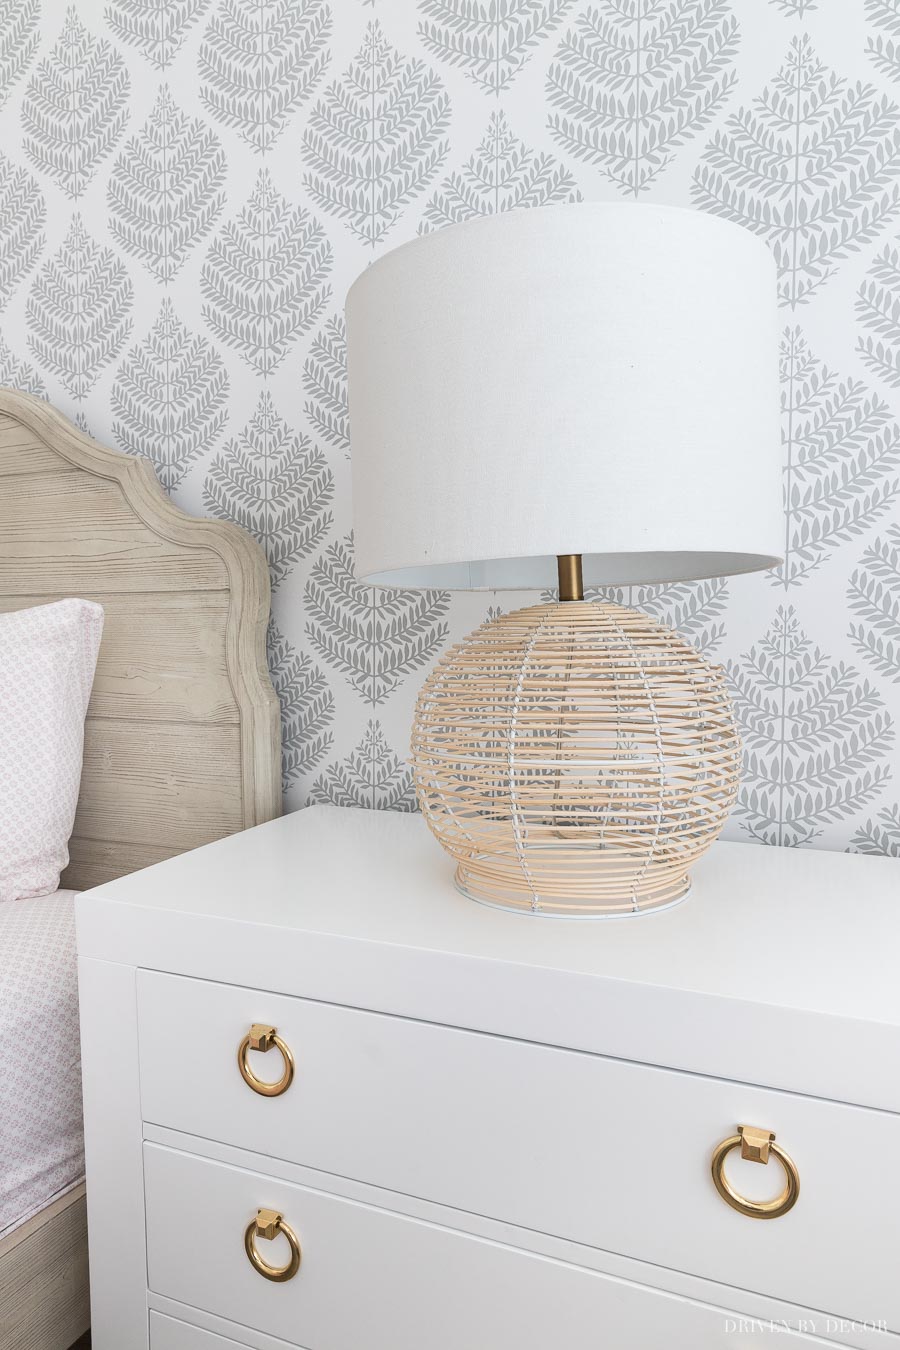
Along with our new wallpaper, there are a few other additions to my girls’ room that I’m happy to share sources for. We already had {these cute twin beds} (they’re no longer available in the Driftwood finish that I have but are still available in French White) but I upgraded the small nightstand that was previously between them to a larger white chest found {here}:
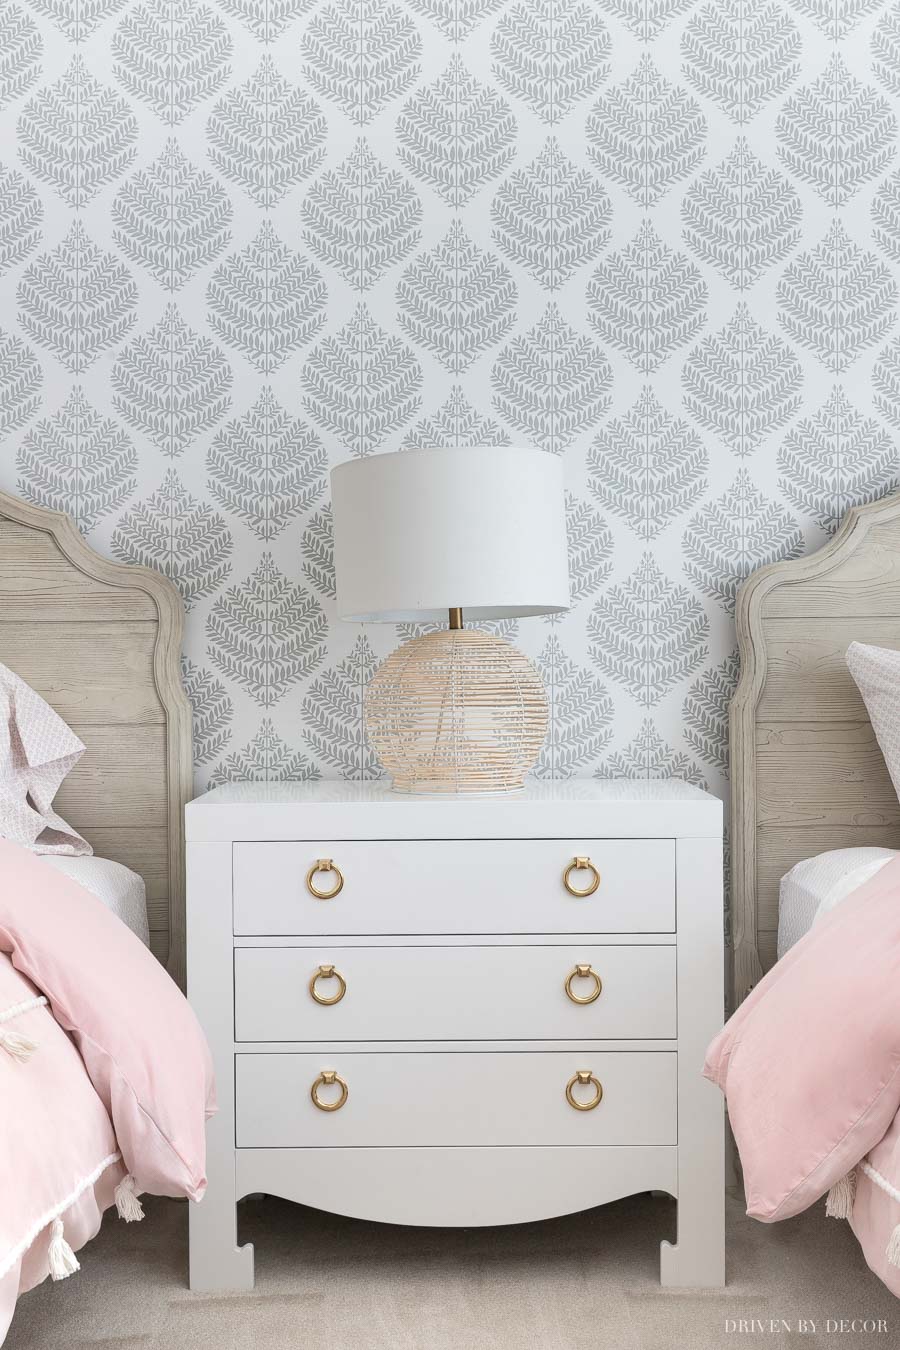
I’m smitten by the design of the chest’s legs! On top of the chest I added {this cute rattan lamp} that’s really well priced:
For bedding, I took the plunge and bought two of {these all-time favorite white quilts}. I have the same quilt in various colors in all of our other bedrooms and they wash and wear amazingly well even after having had some of them for close to ten years now. I also added a pair of {these tassel duvet covers}:
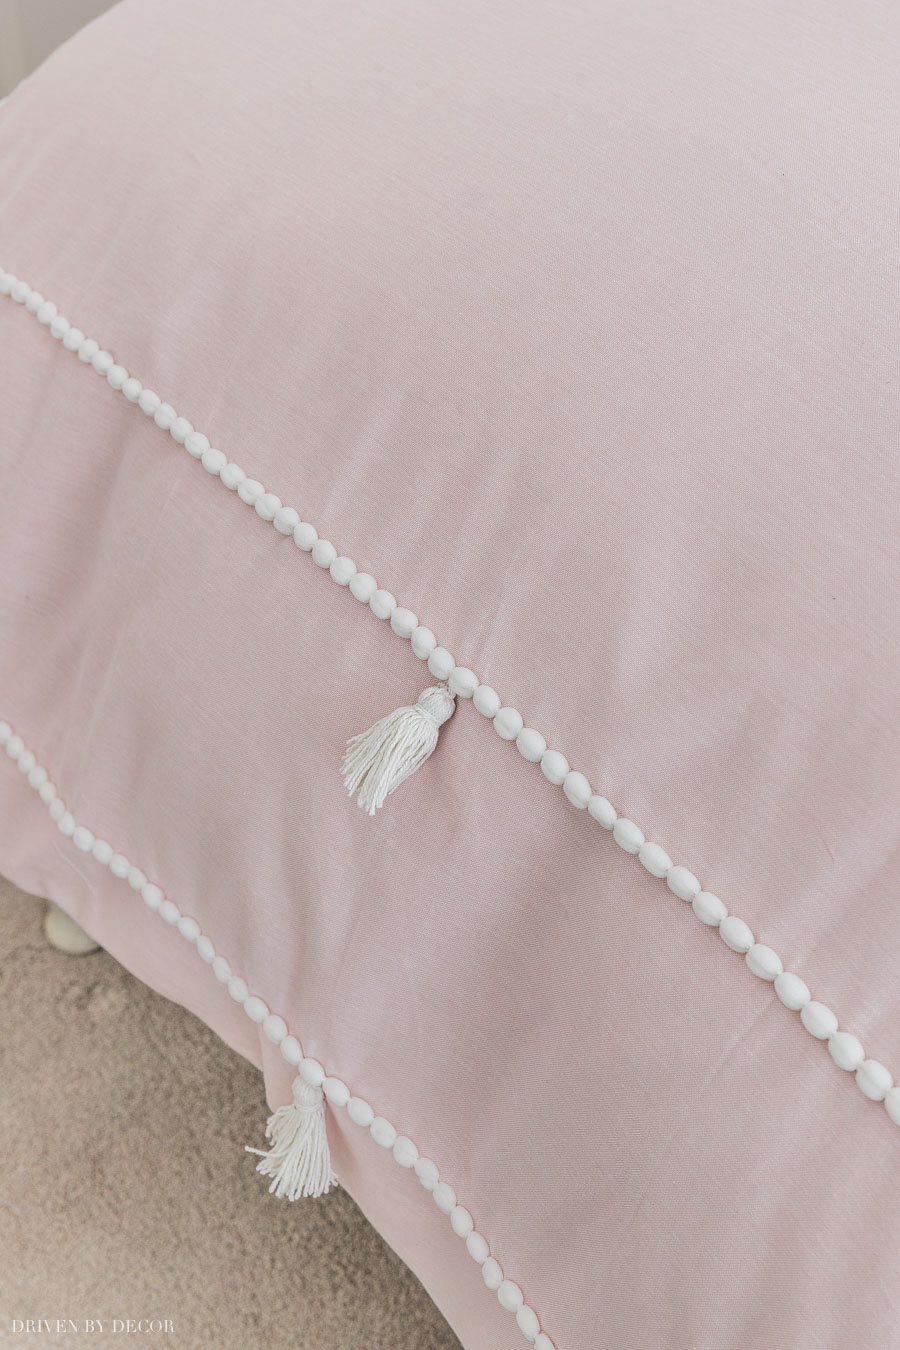
If you like the look of the duvet cover but don’t want the edging or tassels, check out {this similar duvet cover} in soft rose.
And one last thing I got a lot of questions about is our ceiling fan – I replaced the old ugly one months ago with {this globe ceiling fan} and love it!

See my post on the best ceiling fans for bedrooms for more great ceiling fan options.
Have any other questions or experiences with peel and stick wallpaper to share? Send them my way!
XO,


Denise says
Hi Kris!
Another great job as always! Can you tell me if the wallpaper has any odor, and if so, is it very strong. Also, is there a reason you took the outlet cover off instead of papering around it?
Thanks so much,
Denise
Wayne Adreon says
I know how silly this may sound, but….I bought a bunch of PEEL AND STICK WALLPAPER , Is it workable to actually use wallpaper PASTE on the peel and stick?? Meaning do not take the paper off the back of the p[eel and stick wallpaper , will it work?
Brenda Herring says
Could you use it on painted walls and would it stick?
Nancy says
Do you think I would have to remove existing border or paper over it.
Don’t judge… haha
Stephanie Moore says
Long time follower about to wallpaper! Question: I do have textured walls, what is your recommendation on sanding them down? I am doing a similar wall with 2 windows in my master, thank you!
Annick says
So refreshing to read a blog that is well-written, has a POV and a personality, and lacks that irritating, saccharin tone toward readers; implying everyone able to read, can also afford everything they happen to see/appreciate (the more cost-effective choices are helpful!).
I truly enjoy your taste, your diy skills (we too hv them—my husband is a master builder w/ many national/international awards, so we too tackle much ourselves), but also recognize when a trade professional is required! Your decision to reside in two locales is extremely interesting as well as exciting, and one I hadn’t given real thought to until now; it could be the winning ticket for us!
I’m not a big blog follower, but I’m going to follow you. Your overall esthetic is very similar to ours (except perhaps our art collection—always growing, and mid-century heavy, is the design ‘leader’ in nearly every room). But our collection has never kept us from incorporating rennos we’ve truly enjoyed, and are similar to your style.
True compliments on creating a clean, but inviting, informative, unstuffy, but not too folksy, blog. I really find you and your ideas stylish, liveable, and dare I write cool, without dating myself too terribly?!? Great work 👌🏽🌻🐝🪴ƛƝƝƖƇƘ
p.s. I too am about to shop carpet, and haven’t for YEARS (!), so looking very much forward to you experience!