If you’re painting over wallpaper glue, doing this first will get you the perfect result you’re looking for!
I LOVE wallpaper and the beauty it adds to a room. What I don’t love is removing a previous owner’s dated wallpaper. Having moved multiple times, it’s something I’ve done a LOT of. And what I’ve found is that no matter how you remove wallpaper, some residual wallpaper glue is left behind on the walls. If you start painting over wallpaper glue that’s not fully removed, you’ll find that the paint reactivates the glue remnants and you’ll have a bumpy mess on your walls.
So what do you do? I’m going to share my step by step guide for success, from removing your wallpaper to putting on that final coat of paint! Let’s get to it… (post includes affiliate links – full disclosure statement available {here})
Removing Wallpaper
My favorite way to remove wallpaper is with a steamer – you can use a wallpaper steamer like {this highly rated one} or you can just use a handheld portable clothes steamer which is my favorite tool. I have {this handheld steamer} and like it because I can alternate easily between steaming on top of the paper and under it to get it off best:
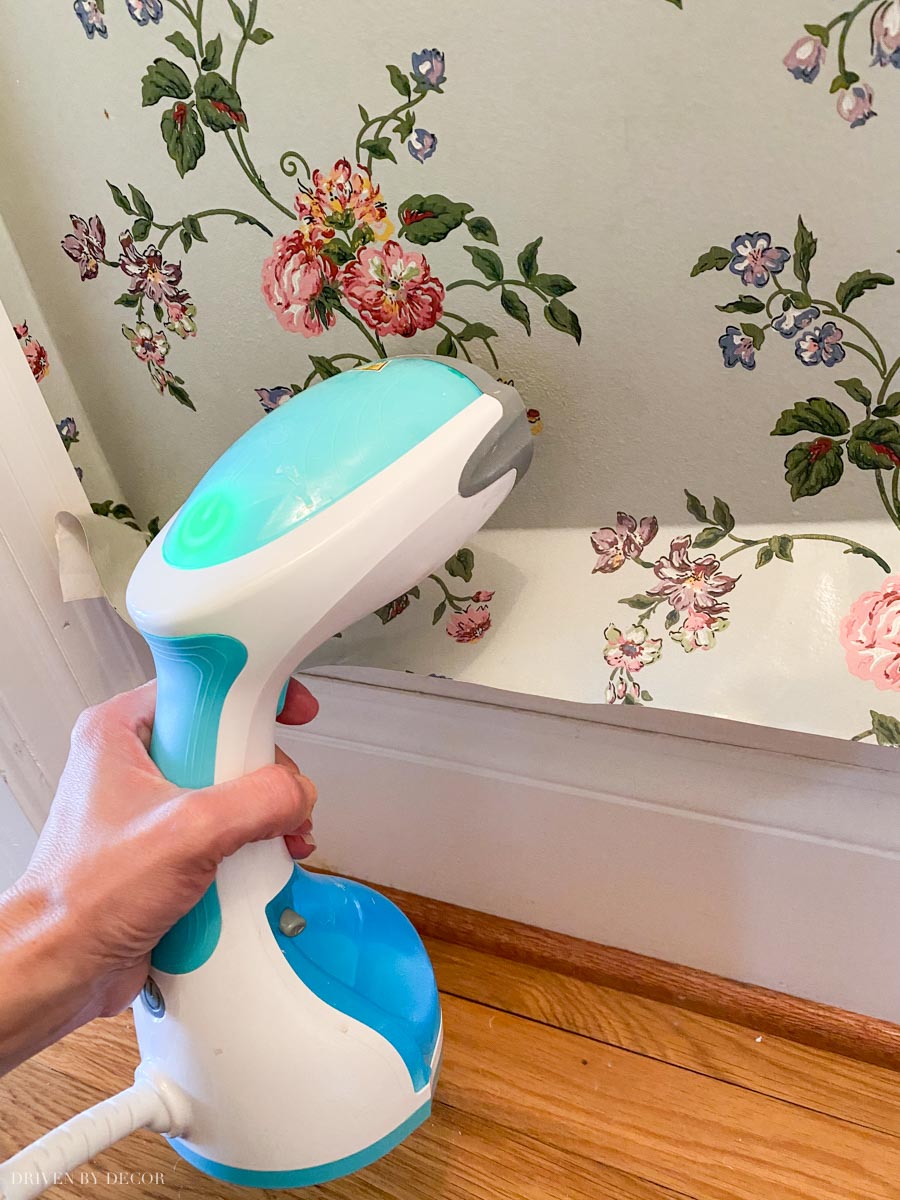
See my post on how to remove wallpaper for more details on using the steamer method of wallpaper removal plus other options for removing it. Once your old wallpaper is down, an important next step is to scrub your walls to remove as much glue as possible. Using a simple sponge and warm water will do the trick! If there is a lot of glue on the walls, skim a putty knife across the surface of your wall once you’ve dampened it to remove excess glue prior to scrubbing.
Sealing Your Walls
After you’ve scrubbed your walls, it might look like you’ve gotten all of the glue, but trust me, there’s some residual glue there. And if you start painting over wallpaper glue, it will reactivate the glue and leave you with little globs on your wall. What’s worked really well for me in dealing with the nightmarish residual wallpaper glue problem is this:
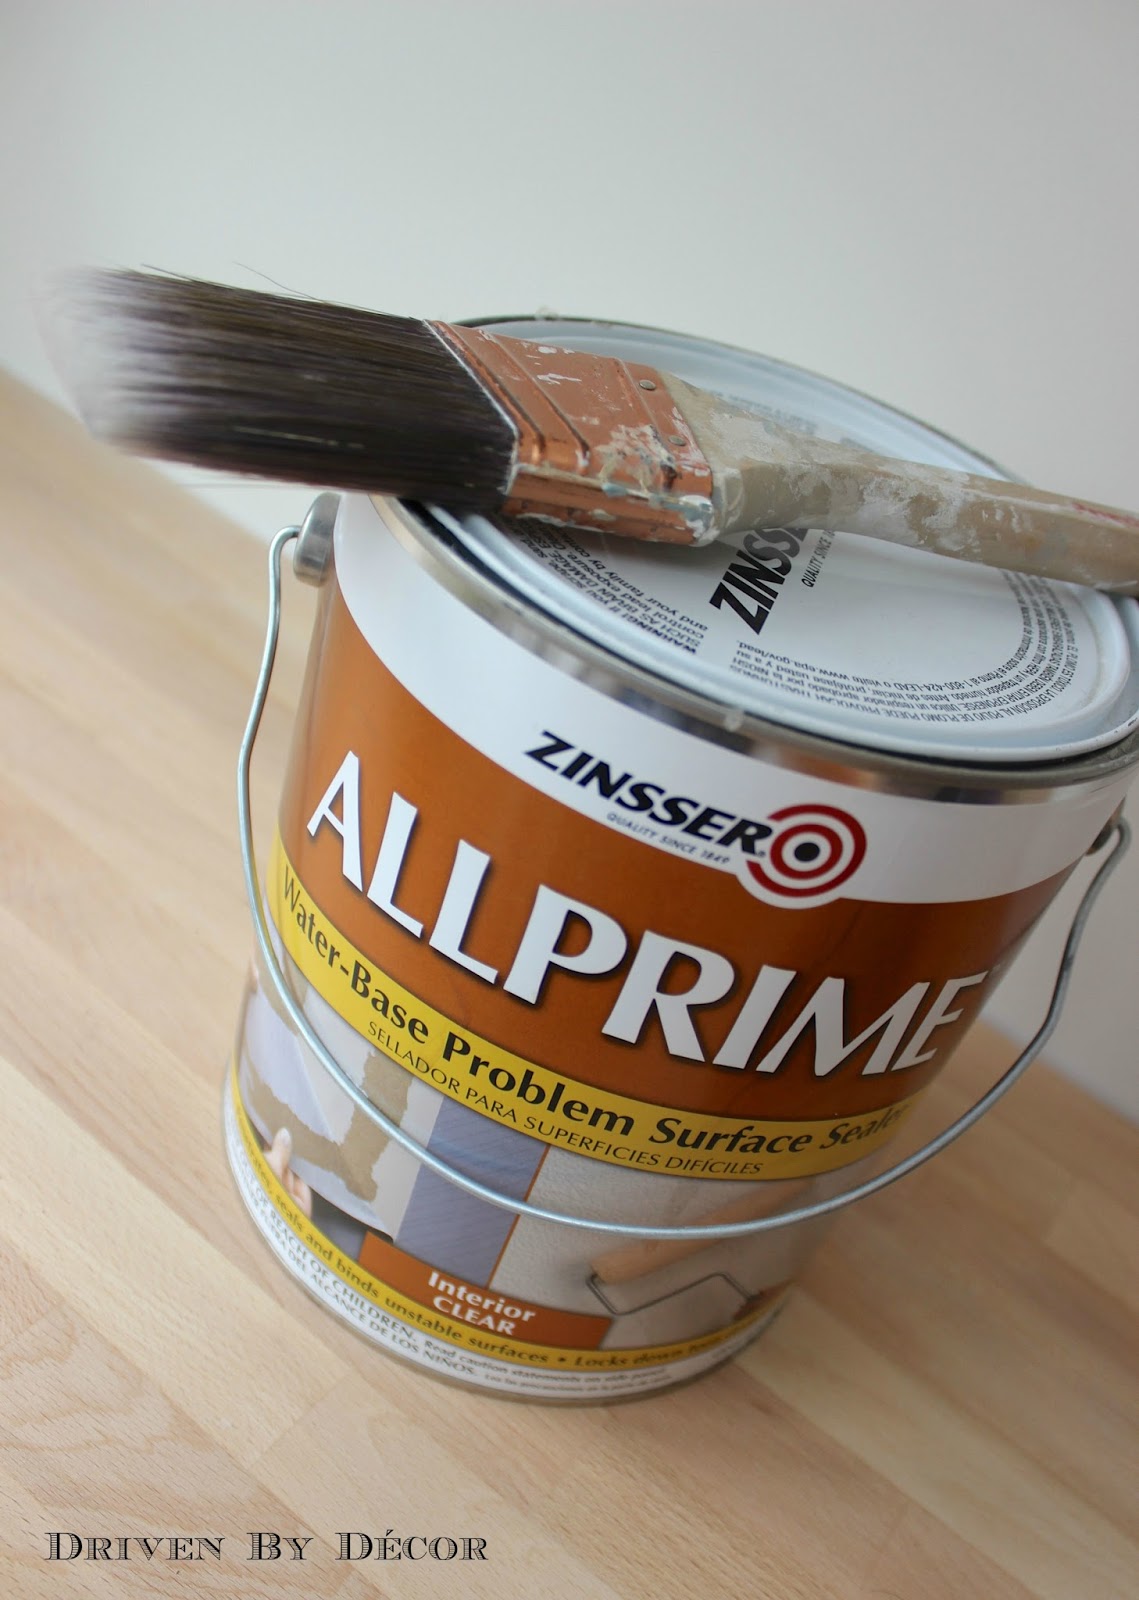
After scrubbing off the residual glue, I lightly sand the walls and then brush on a coat of Zinsser ALLPRIME Water-Base Problem Surface Sealer. (Note: Zinsser ALLPRIME is sold at Benjamin Moore dealers. It is the same product as Gardz Problem Surface Sealer which you can buy online {here}). These problem surface sealers do a few things. First of all, they seal in any residual glue so when you paint over it, you have a nice, smooth coat.
The other important thing that a problem surface sealer does is to seal peeling and cracked drywall. If your wallpaper was stubborn to remove, you may have a few spots cracked or torn spots like this where the bare drywall is exposed:
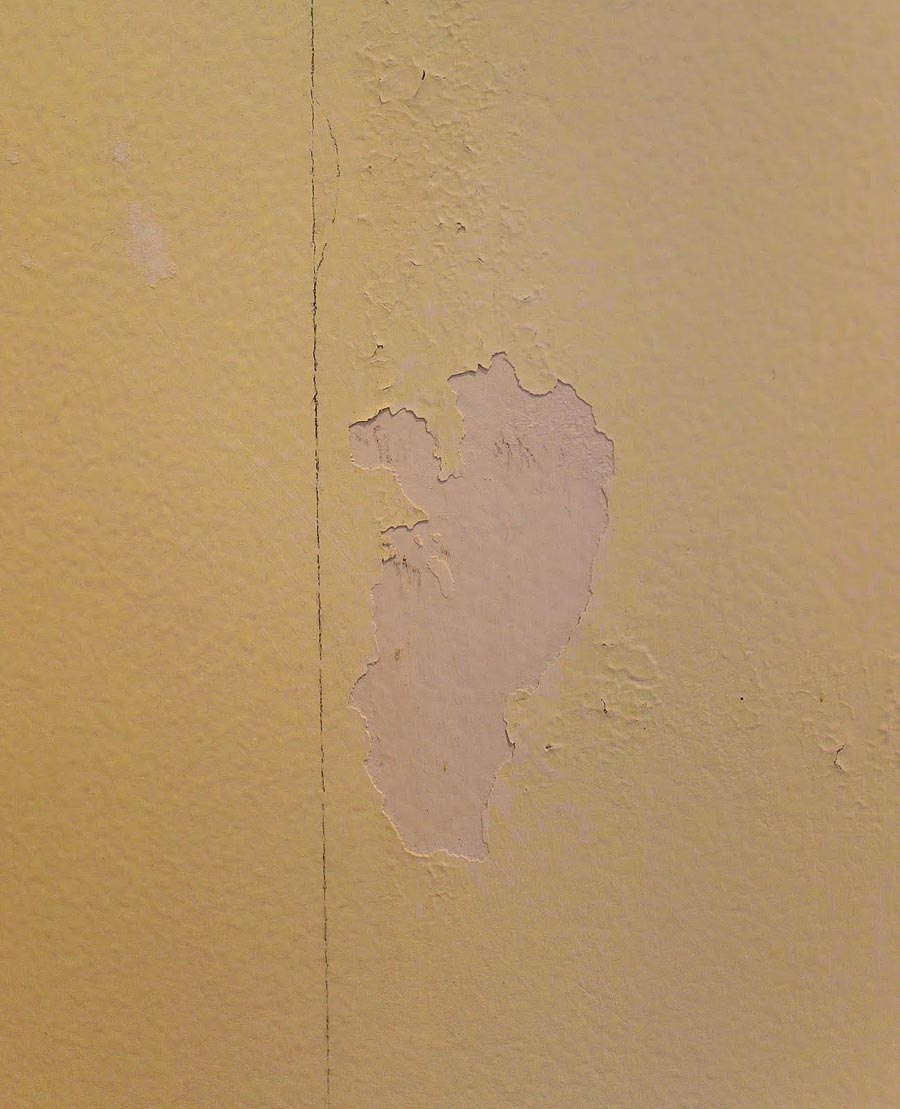
Once they’re covered with a problem surface sealer, these spots will be ready to patch and paint and will soon be unnoticeable.
Another way to seal the wallpaper glue is to use an oil-based primer. I much prefer one of the two problem surface sealers because (1) I don’t like working with any oil based products. You can’t clean your brushes, rollers, and other supplies with water and oil-based paint has a strong odor (usually with high VOCs). The other reason I prefer not to use an oil-based primer is that it takes a long time to dry. The problem surface sealers I recommend are fast drying, drying to the touch in just an hour.
Painting or Wallpapering Your Walls
They key to a beautiful paint job is all in the prep work. If you’ve used a sealer and patched any cracks or divots, you’ve set yourself up for success! See my post on how to paint a room for a list of the tools you’ll need to get your paint job done plus a step by step tutorial. What if you’re taking wallpaper down and then putting new wallpaper up? See my post on wallpaper installation for ten helpful tips for hanging your own wallpaper.
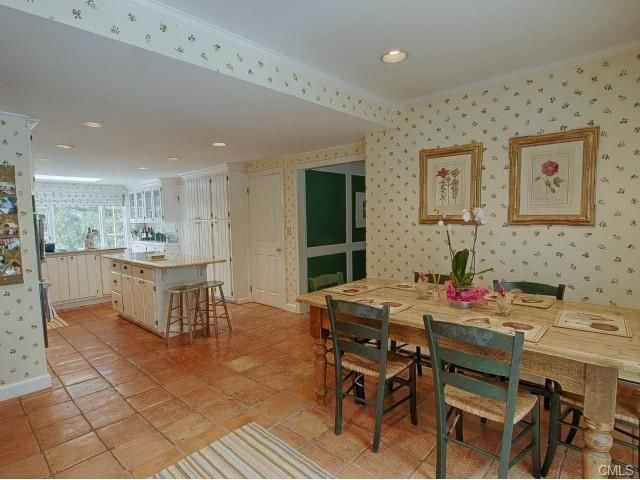
While it’s a lot of work, it’s definitely worth it in the end! In our previous home we took down wallpaper in room after room, including this dated floral wallpaper that was in the kitchen:
This is that same space after we remodeled our kitchen (and I took all of the wallpaper down and repainted with Benjamin Moore Cloud White):

For lots more details, pics, and sources check out my post on our kitchen remodel “before” and “after”. And you can tour the rest of our Connecticut home {here}. Good luck with your project!


Jen Hammons says
I love those floors! Where did you get them if you don’t mind me asking?
Joe says
You are recommending a water based primer over wallpaper adhesive walls? I thought that would defeat the purpose of trying to protect the surface when painting. It’s been awhile so maybe the technology in primers and paints have improved to allow for this. working on a remodel and wish I had removed the plaster from the walls and started over with drywall.
Susan says
Hi there—I have the same spots on my walls as you’ve shown in the photo above, and I’m getting ready to tackle them. After scraping, scrubbing with warm water, sanding, and a coat of Gardz, you say it’s “ready to patch”—does each of these spots have to be patched, or will the Gardz fill the spot and level the surface? What product am I using to patch? This is my first experience with taking down very old wallpaper, and you’ve given me hope that it might turn out okay if I get all the steps right. Thanks!
Kris Jarrett says
Hi Susan,
The Gardz won’t fill in any patches of messed up drywall unfortunately. You’ll want to fill those with spackling paste and sand them smooth. Hope that helps!
Snuffy says
It looks like your walls had a skim coat applied before the wallpaper glue went on. My walls were not primed, skim coated, or had any sizing applied before the glue/wallpaper – UGH! I did the breakfast area, and it took nearly a week to get all of the backing off, messing up the drywall in several places in the process.
Now I am working on the entry way. I was able to take down the outer layer of paper, but the glue backing is left. I am planning on using Zinsser oil based Cover Stain Primer to completely coat it. Then texturing, and then using an oil based paint. I will let you know how it goes!
Kris Jarrett says
I’ve had to remove wallpaper that was put on bare drywall too and it’s horrible – unfortunately no matter what you use to try and get it off, your drywall will still get messed up in spots. Sounds like you have a great plan to take care of it though – good luck!
Barb says
If there’s still some wallpaper paste residue after I’ve scrubbed and scrubbed will the Gardz work to seal that in before I texturize and paint? Thank you very much
Sharon says
How do you like that steamer for clothes? I’m looking for one and would prefer a small one but want one that works good as well.
Care says
Thanks for a great tip I am in the middle of a mess need answers to glue stuck on walls and pealing part of my Sheetrock
Thank you
Kit says
Learning the Hardway. I removed vinyl wall paper and backing with warm water. Came off easily. The wall paper had been on the wall for 20+ years. Ugh. I wiped the walls with Dishwashing liquid and warm water. There was still residual glue, but I thought the Primer would fix any issues related to it. However, I used a water based Kilz Premium primer. No bubbles or areas that I can see coming up. I’m planning on putting a venetian plaster over this wall in a bathroom with a glaze and sealer. I’m concerned that I didn’t use an oil based primer and there will be peeling. What do I do now. I stopped at one coat of the primer and am now trying to find a solution before the problem starts bubbling up..thoughts? What do I do from here?
Kris Jarrett says
If you’ve already used the primer and your walls still look great, I wouldn’t be worried about the reappearance of the residual glue since that would be evident by the time the primer dried. But unfortunately I have no experience with venetian plaster so I can’t recommend the best primer in your situation.
Laura says
Thank you for this! I’m working on a WHOLE HOUSE wallpaper removal project – gag – and needed this. I have tried and tried to get this glue off but it still has a sticky touch and it’s driving me crazy! I’ve been scraping and scrubbing and there’s still a fine layer of sticky!!!! There are no raised spots of glue… just once it’s wet it gets tacky. Is it ok to prime over that texture or do I keep trying to get this off?
Kris Jarrett says
You do want to get your walls to where there are no raised or textured spots before using the sealer but if it’s just that you get raised spots with water, you don’t need to keep worrying about that. As long as the walls are smooth, you can go ahead with the sealer and not worry about trying again and again to clean the walls with water.
Susan says
What is the best primer for walls that were wallpapered in the bathroom? Should they be primed differently? I will use the Benjamin Moore Aura matte paint to prevent mildew, but does it prevent permanent streaking? My sister painted her bathroom with an eggshell color, but it still left streaking stains. Will the Aura brand prevent streaking as well as mildew?
Kris Jarrett says
You can use the ALL PRIME product I mentioned in this post for priming! I’ve personally had great luck with using Aura in bathrooms (no problems at all!)
Diana says
HI, I’m removing vinyl wallpaper in my bathroom. The vinyl paper removes easily, however, there is a paper left behind on the wall. Do I need to remove this paper along with the paste that is still on the wall? Or, can I just use the ALPRIME to cover it?
If I remove the paper with a water solution I dig in the wall. I’m just looking for a quick fix. I’m having someone to skim coat the walls. My concern I don’t want the paper and paste to show up the following year on the walls if I use the ALLPRIME.
Thank you,
Kris Jarrett says
Diana, I’m not 100% sure and don’t want to give you the wrong advice. My guess is that if you’re skim coating, you’d be fine using the ALLPRIME to seal everything and then skim coat over it but I’d double check with the person doing the skim coating for you!
Jessie Roberts says
Use hot water and Downey fabric softener then try a silicone pan cleaner like the ones from pampered chef to clean stone wear. But my kitchen wasn’t prepped correctly so I am on the hunt for Allprime for that!