Wall stencils are inexpensive, easy to use, and give any room an instant style facelift. Learn how to stencil a wall for a stunning look!
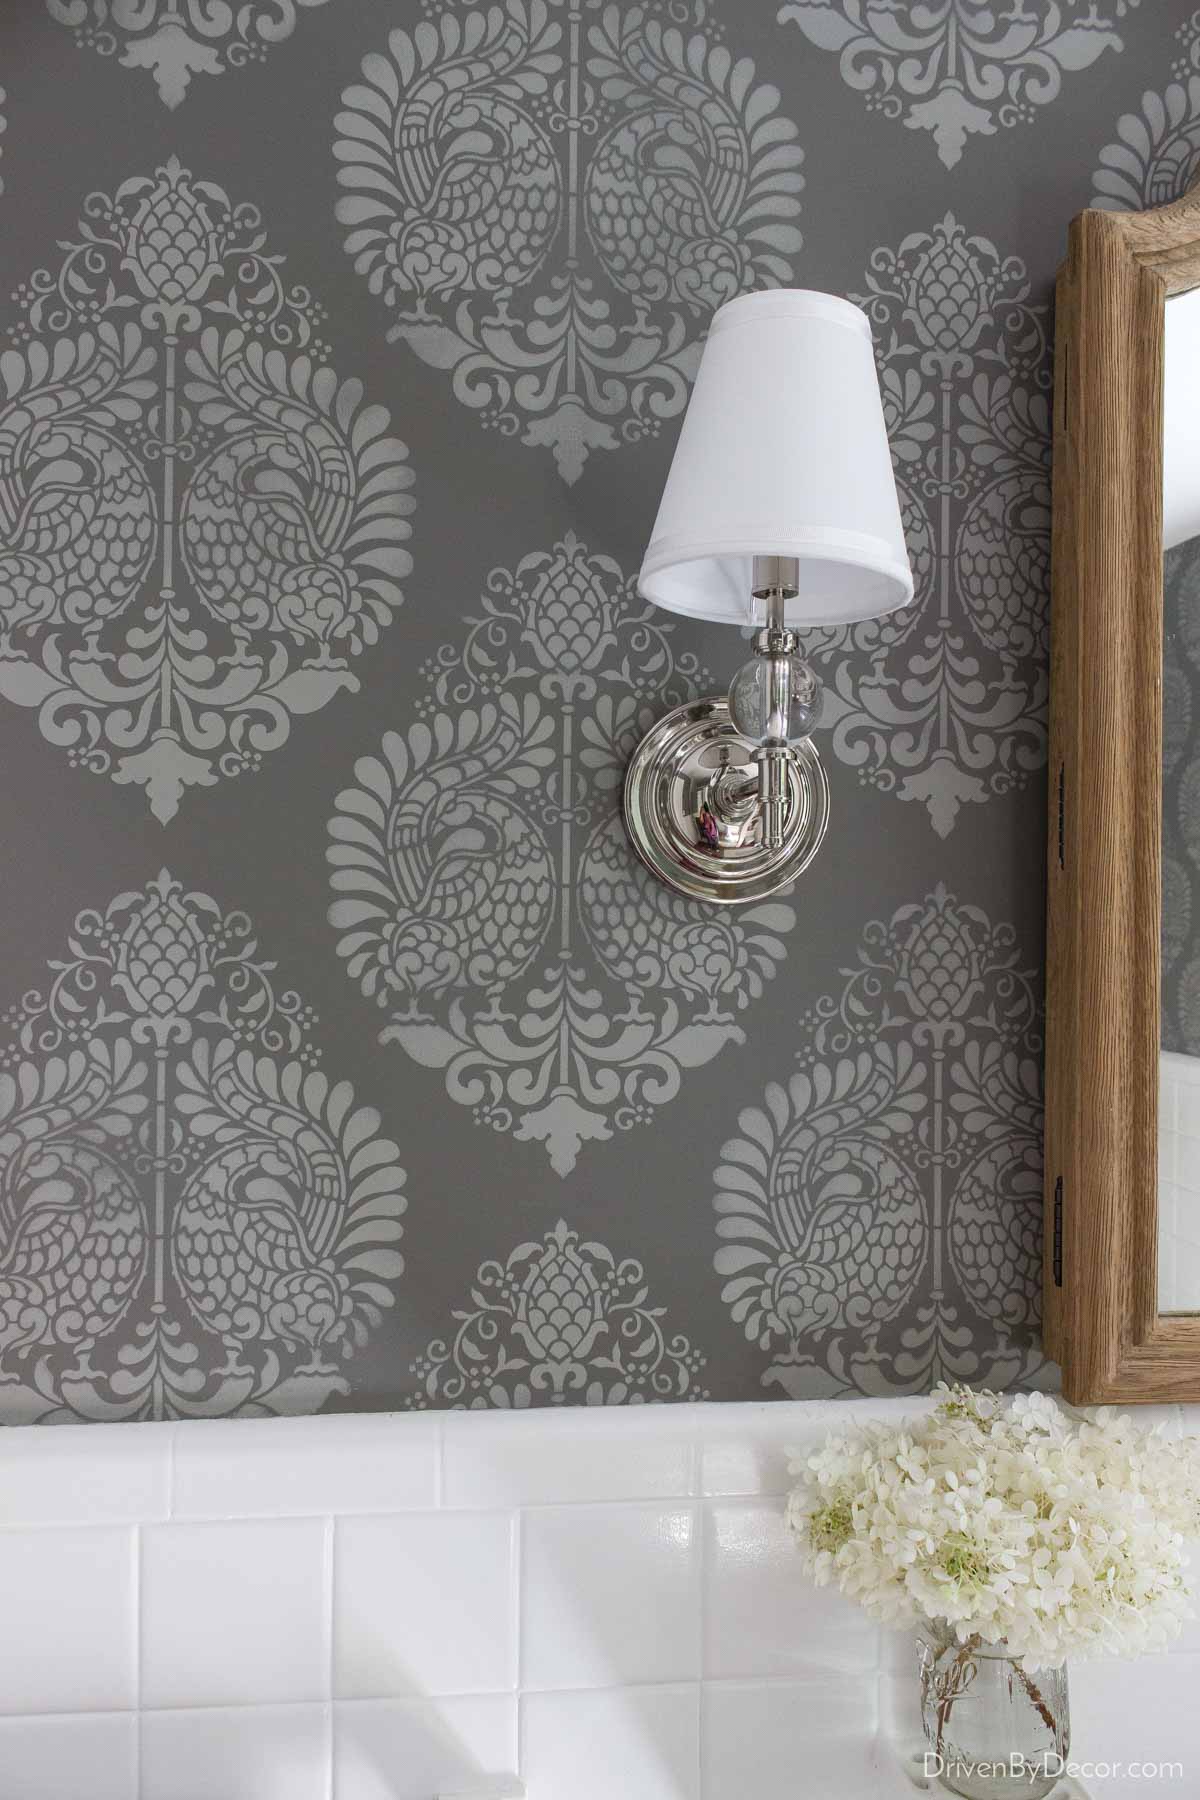
When a lot of people think about wall stencils, visions of dated floral borders stenciled around your grandma’s kitchen come to mind. But there are SO many gorgeous stencil patterns out there now that can give you a high-end look! It’s been several years since I stenciled the walls in our powder room for our budget bathroom remodel and I still love how it turned out. It’s definitely one of my favorite DIY home projects!
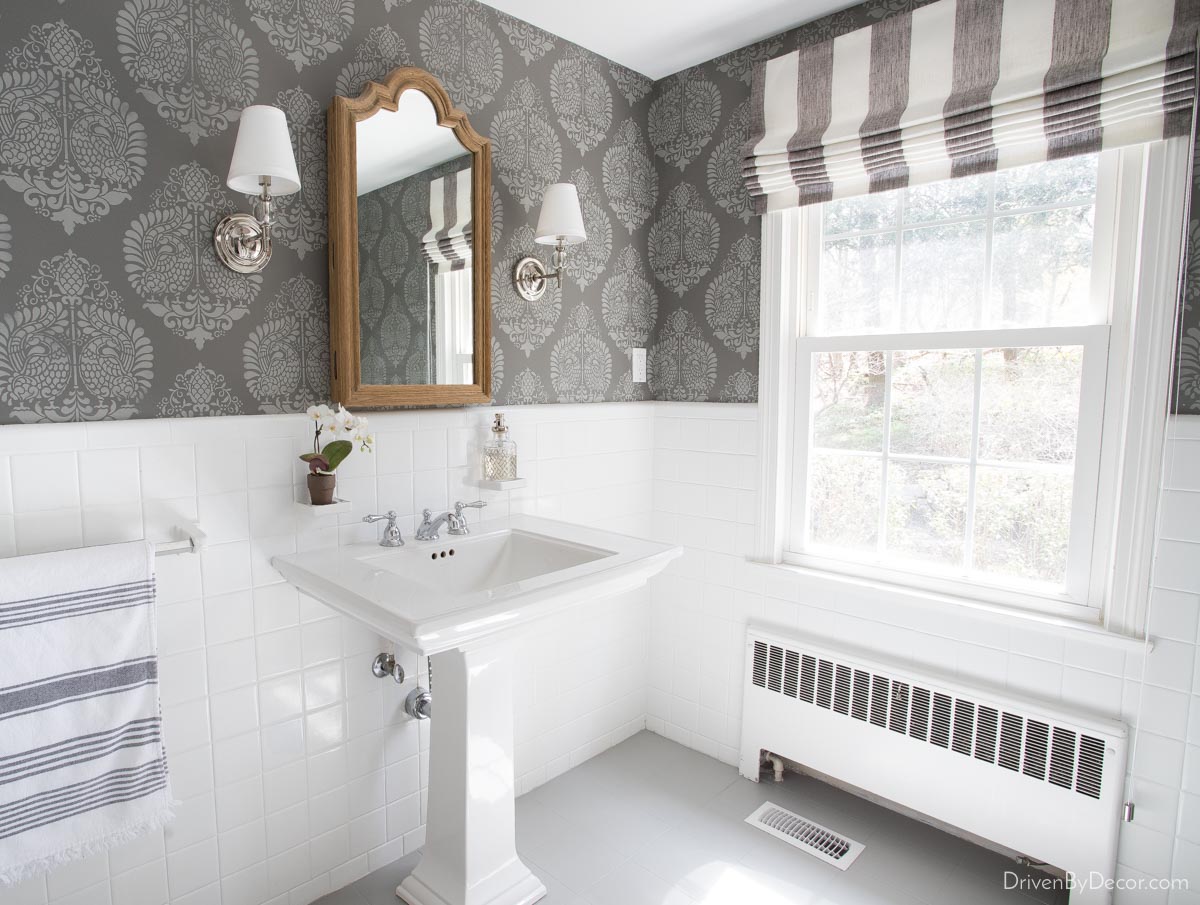
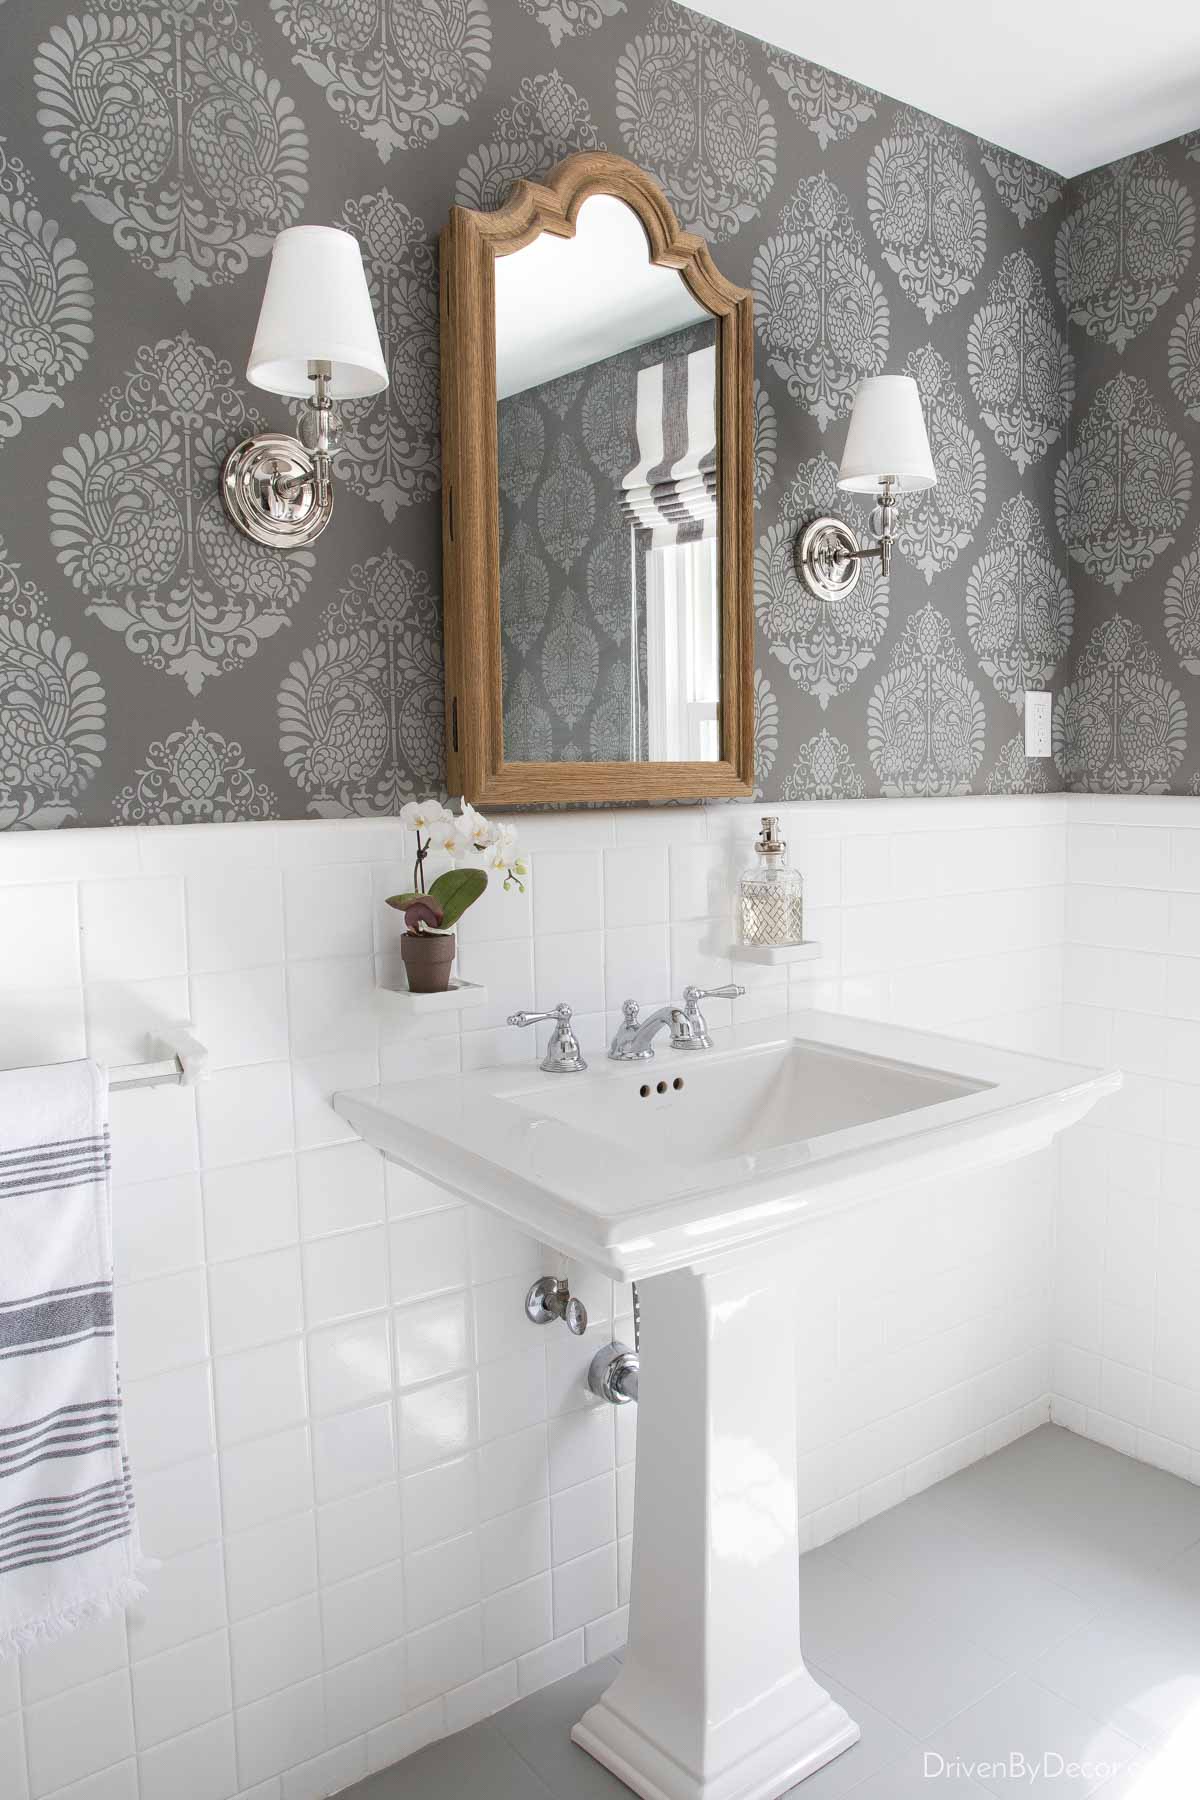
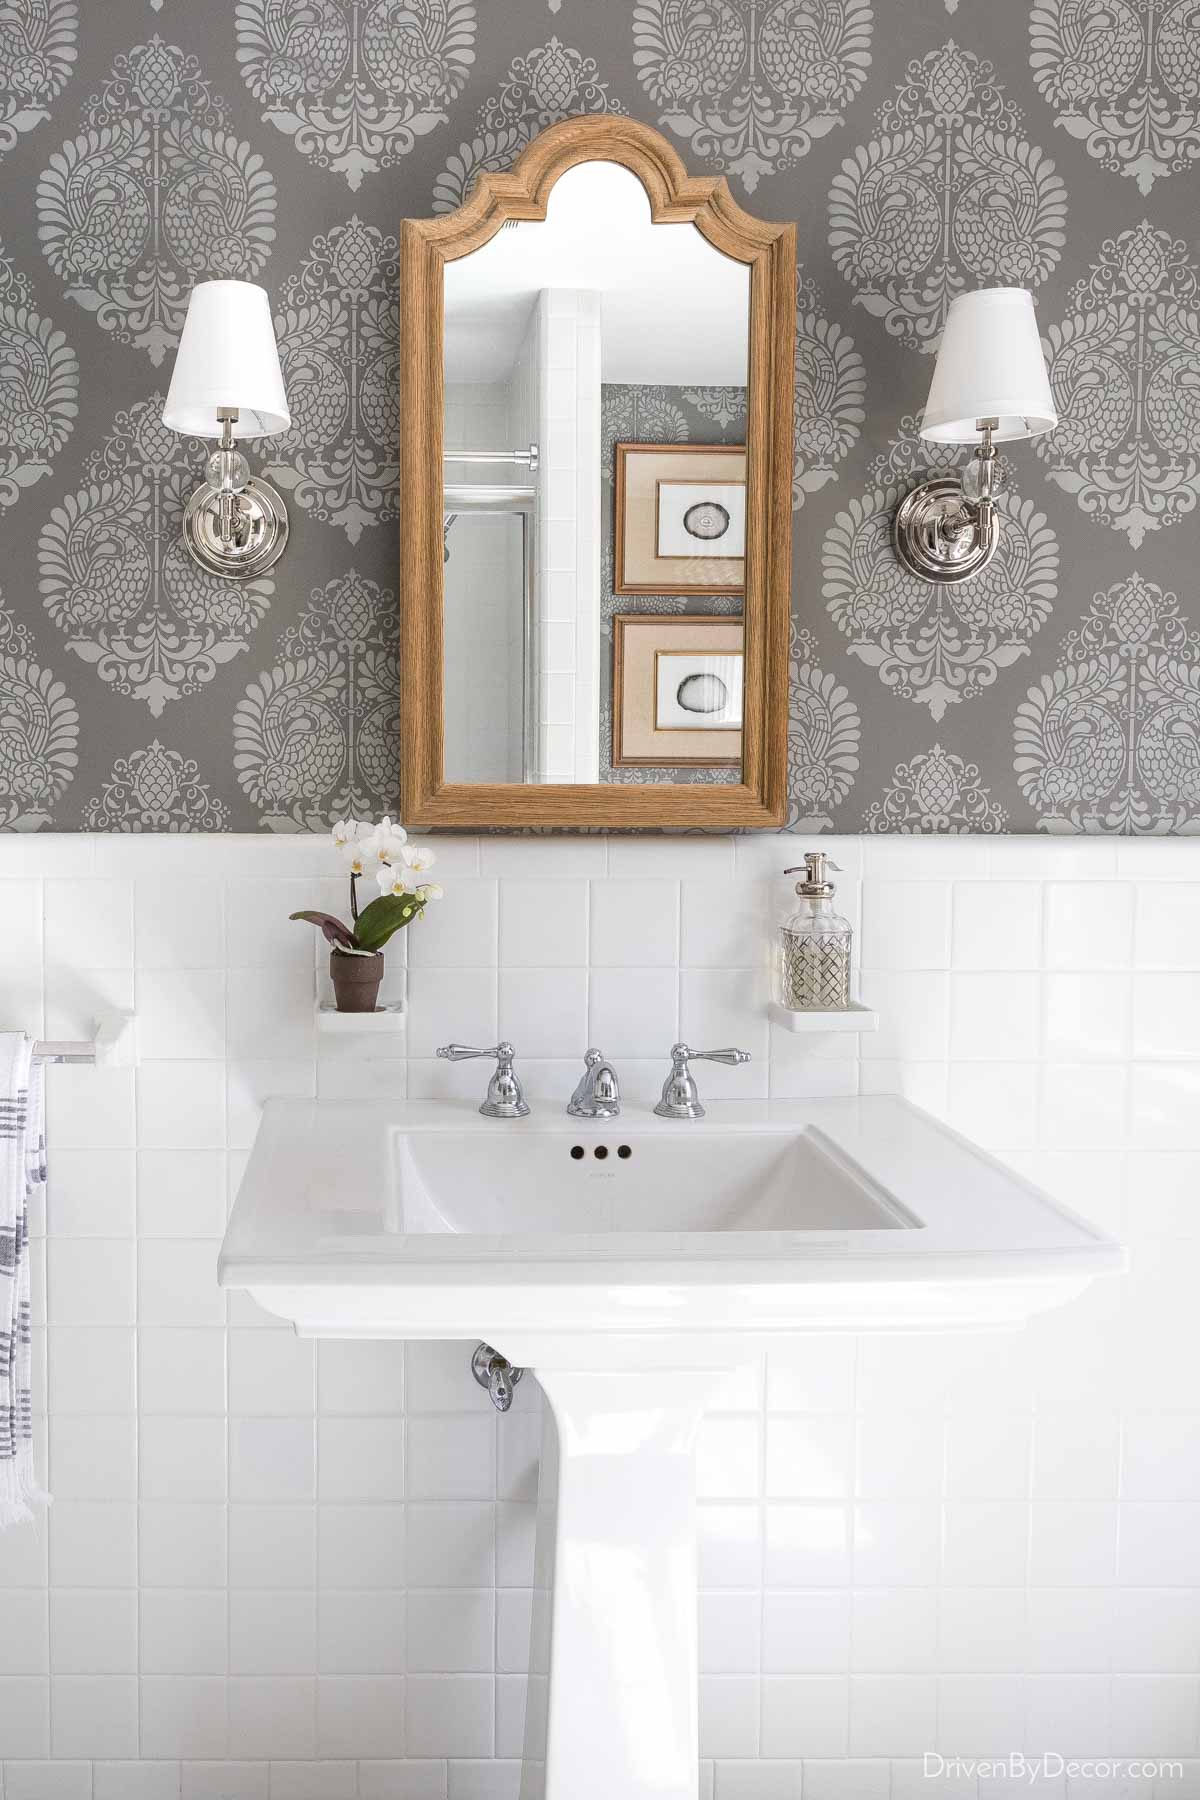
Powder Room Sources: Damask Wall Stencil (11.25″ x 15.5″) | Arched wood medicine cabinet mirror – no longer available | Pedestal Sink | Sconces (Polished Nickel) | Gray & white striped towel
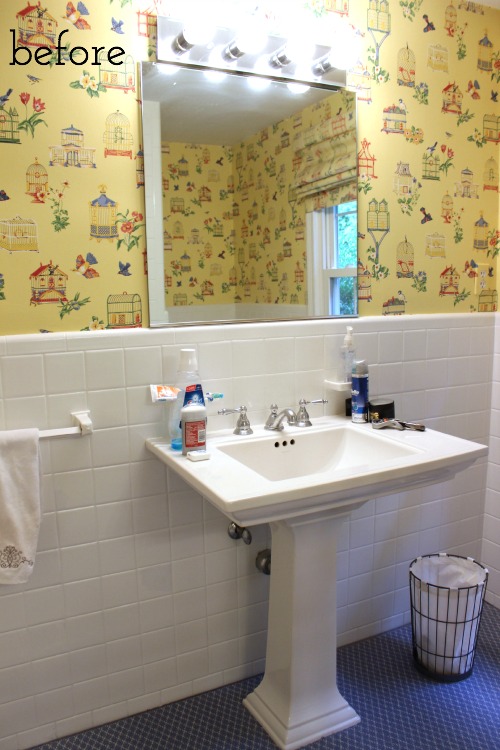
To fully appreciate it, you have to compare what this bathroom looked before the wall stenciling and painting of our tile floors:
vs. how it looks now:
So how do you use wall stencils to transform a room? I’ll share the step by step of stenciling walls and answer all of the great stenciling questions you sent my way! Let’s get to it… (post includes affiliate links – full disclosure statement available {here}).
1. Choose a Stencil
Wondering where to buy wall stencils? There are a lot of fabulous sources! Three of my favorite shops to find them are:
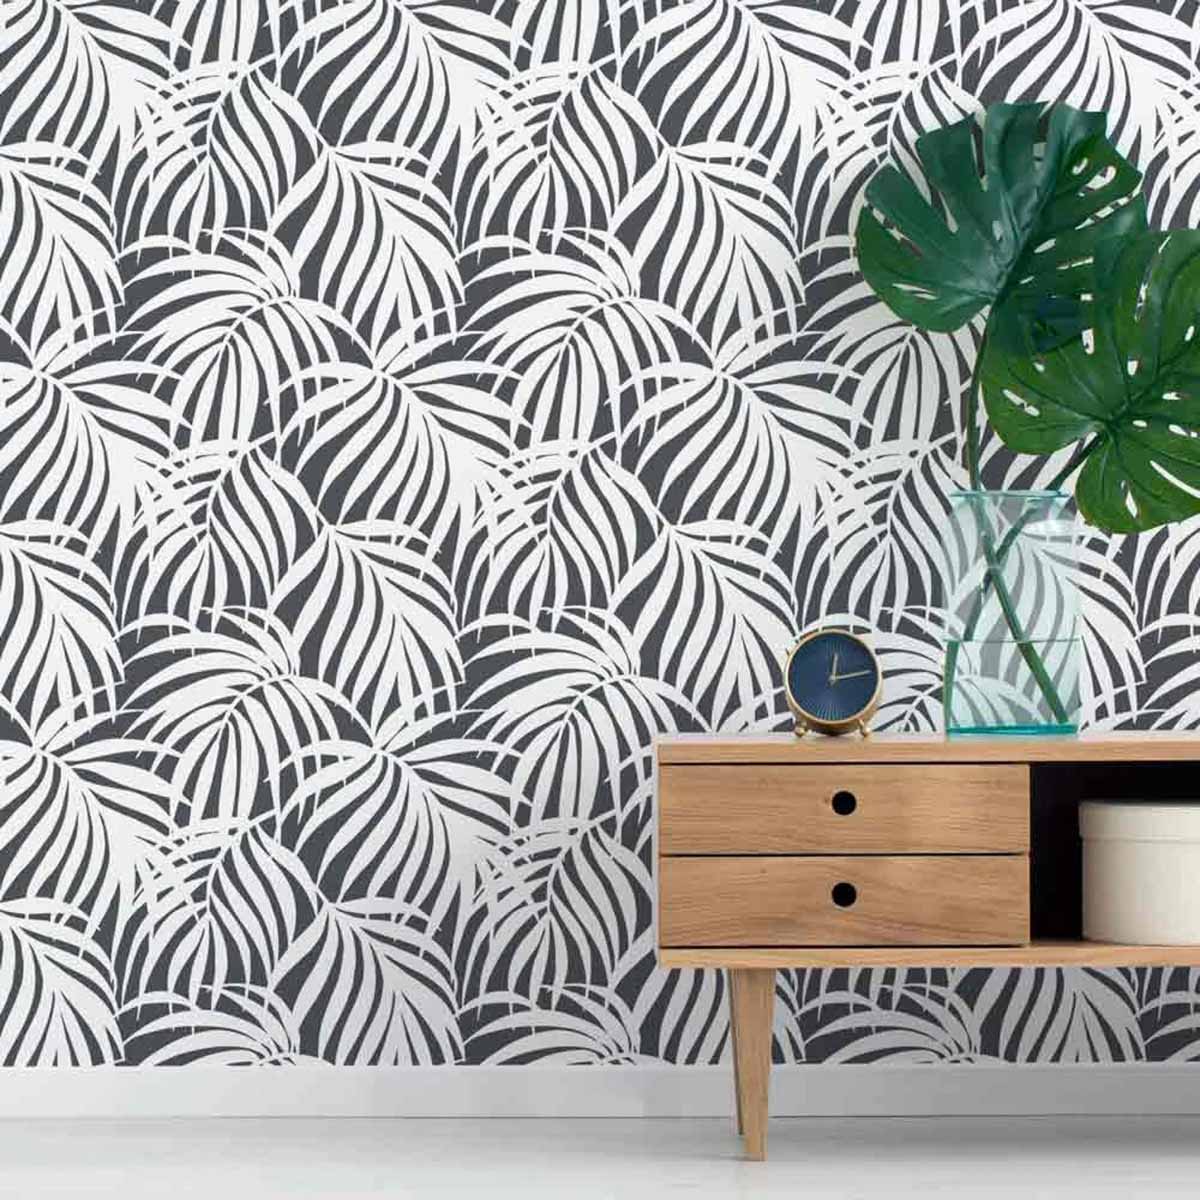
- Cutting Edge Stencils {here} – they’re the #1 stencil shop on Etsy and have everything from mandala stencils to farmhouse stencils, damask stencils, nautical stencils & many more wall stencil patterns. I especially love {this breezy palms stencil}:
- Stencil Revolution {here} that has over 1500 stencil designs. One of my favorites is {this fern pattern wall stencil}.
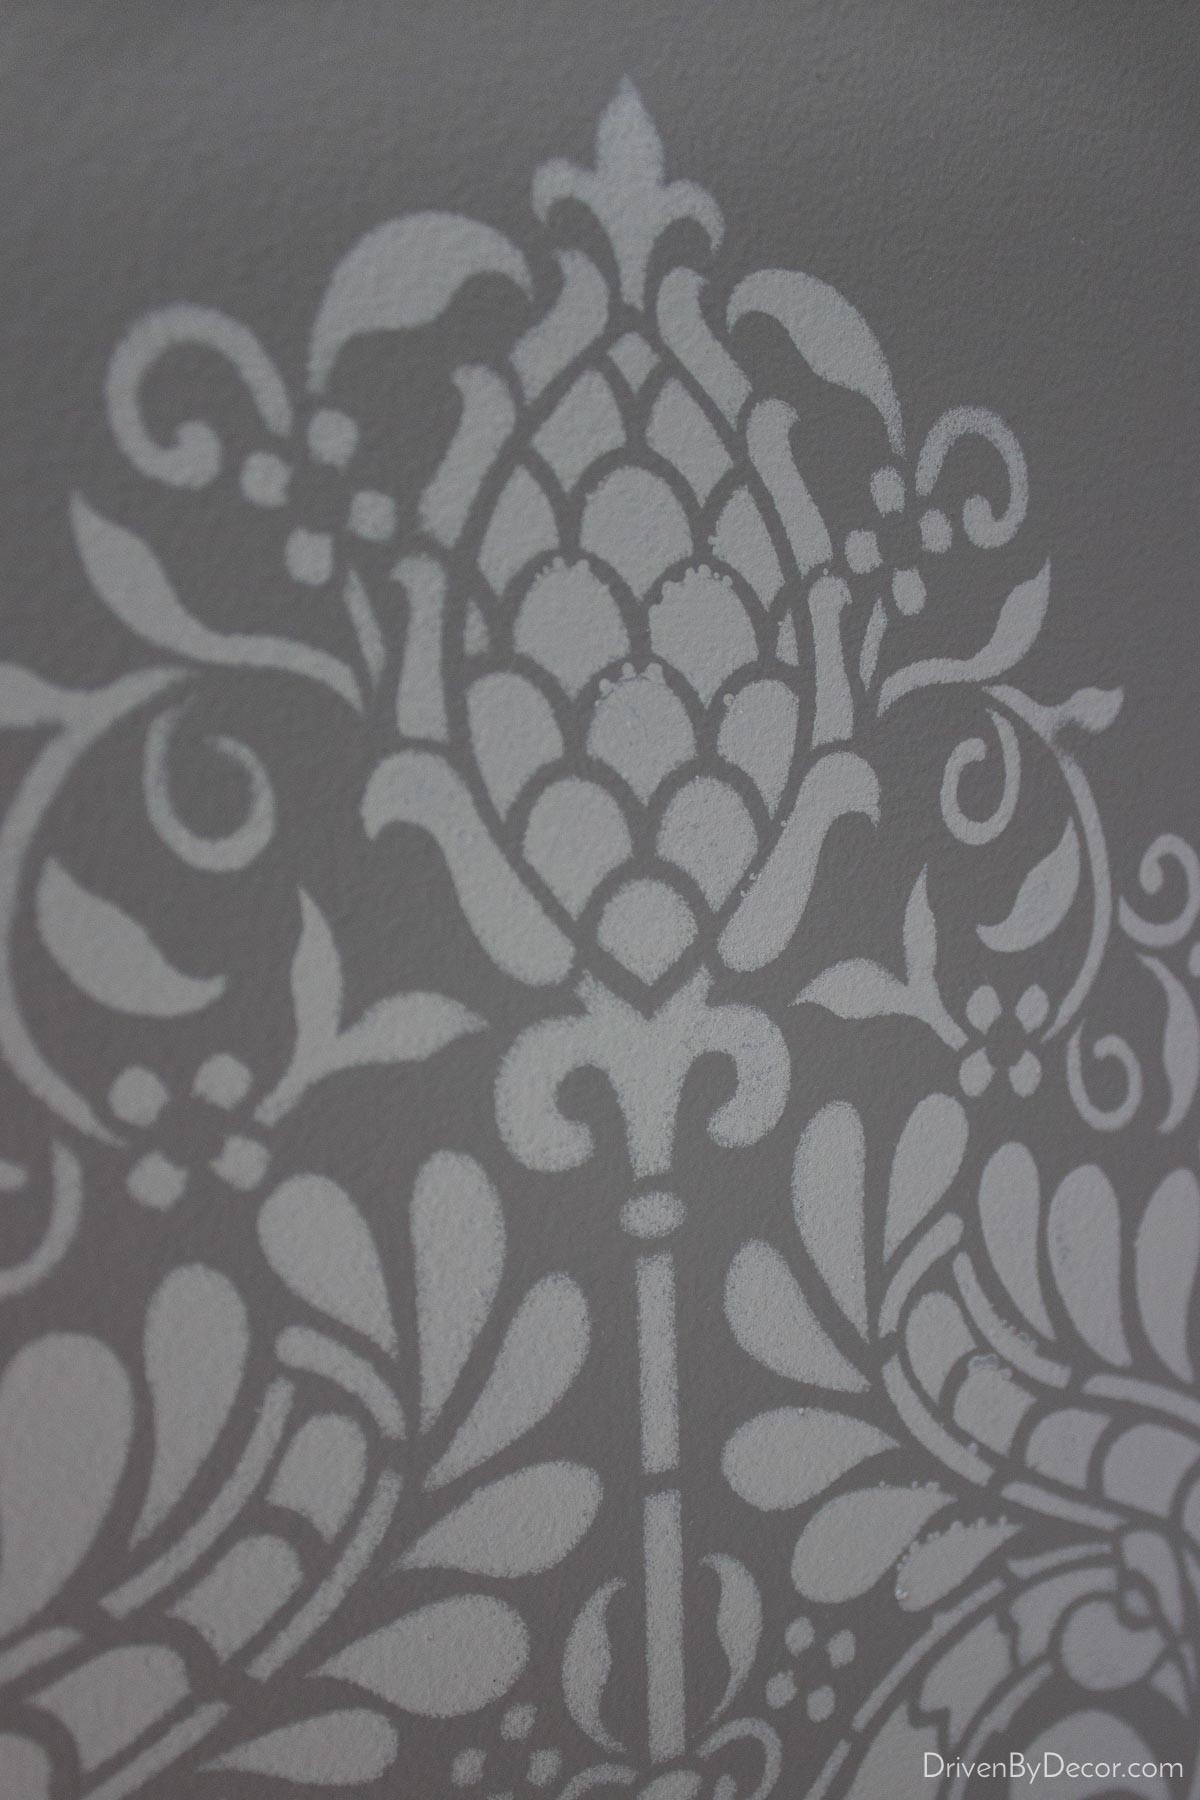
- Royal Design Studio {here} that has several show-stopping stencils including {this Annapakshi Indian Damask Stencil} (11.25″w x 15.5″h size) that I used in our bathroom. While it’s listed as a furniture stencil, it’s the same type of stencil as their wall stencils so works beautifully on walls too.
2. Gather Your Supplies
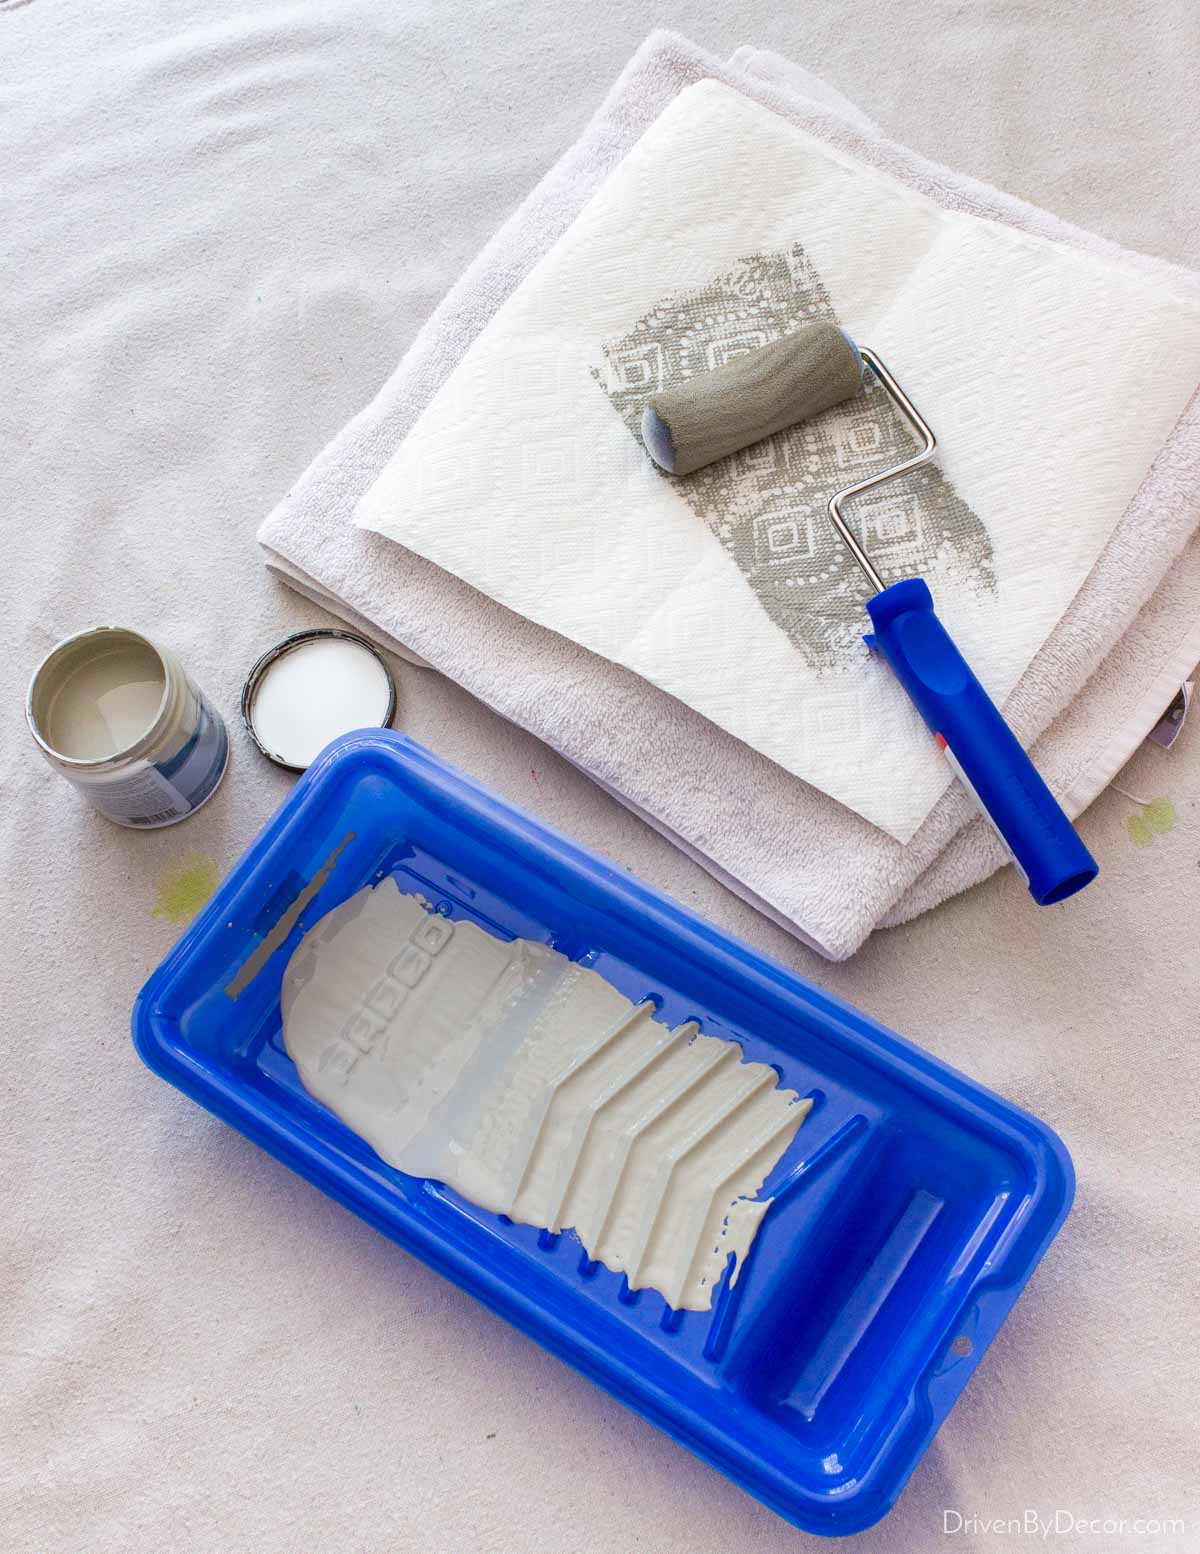
In addition to your wall stencil, you’ll need a few additional supplies including:

- 4″ foam roller with handle + 4″ paint roller tray
- 1″ angled Purdy paint brush for stenciling the corners and edges. You could use stenciling brushes like {these brushes} instead but I had better luck with the traditional angled paint brush. You might want to experiment with both to see what works best for you.
- Latex paint remover – this is a must-have for cleaning off your stencil (it makes it SO much easier). You can also use it to help clean your brush and roller.
- Painter’s tape
- Latex paint – choose one paint color to paint the wall you’re stenciling and a second color to use with the stencil
- Foam board, paper towels, & a small level
3. Practice Using a Wall Stencil
If you’ve never stenciled before I strongly recommend you practice on a foam board. Paint the foam board with the background wall color you plan to use and then experiment with your wall stencils. It will help you fine tune your stenciling technique and also test out different possible paint color combinations. My first stenciling attempts were far from pretty (see that bottom corner? yikes!):

but after several practice rounds I got the hang of it and was ready to put my practice to use on our bathroom walls.
My biggest tip is to use VERY little paint! What worked best for me was to offload as much paint as possible in the roller tray and to then roll it a few times over a folded stack of paper towels so there was only a small amount of paint left on the roller.
Then use light pressure with your roller over your entire stencil – you’ll need to go back and forth over it quite a few times to get a good, even distribution of paint.
4. Figure Out the Best Spot on Your Wall to Start
Once you have your technique down, you’re ready to try it out on your walls. My tip here is to give some thought to where you want to start (you may want to center your pattern on the wall) rather than just jumping into it without thinking. If possible, you may want to start on the wall where mistakes will be the least noticeable because even though you’ve practiced, your technique will improve as you get further into the project.
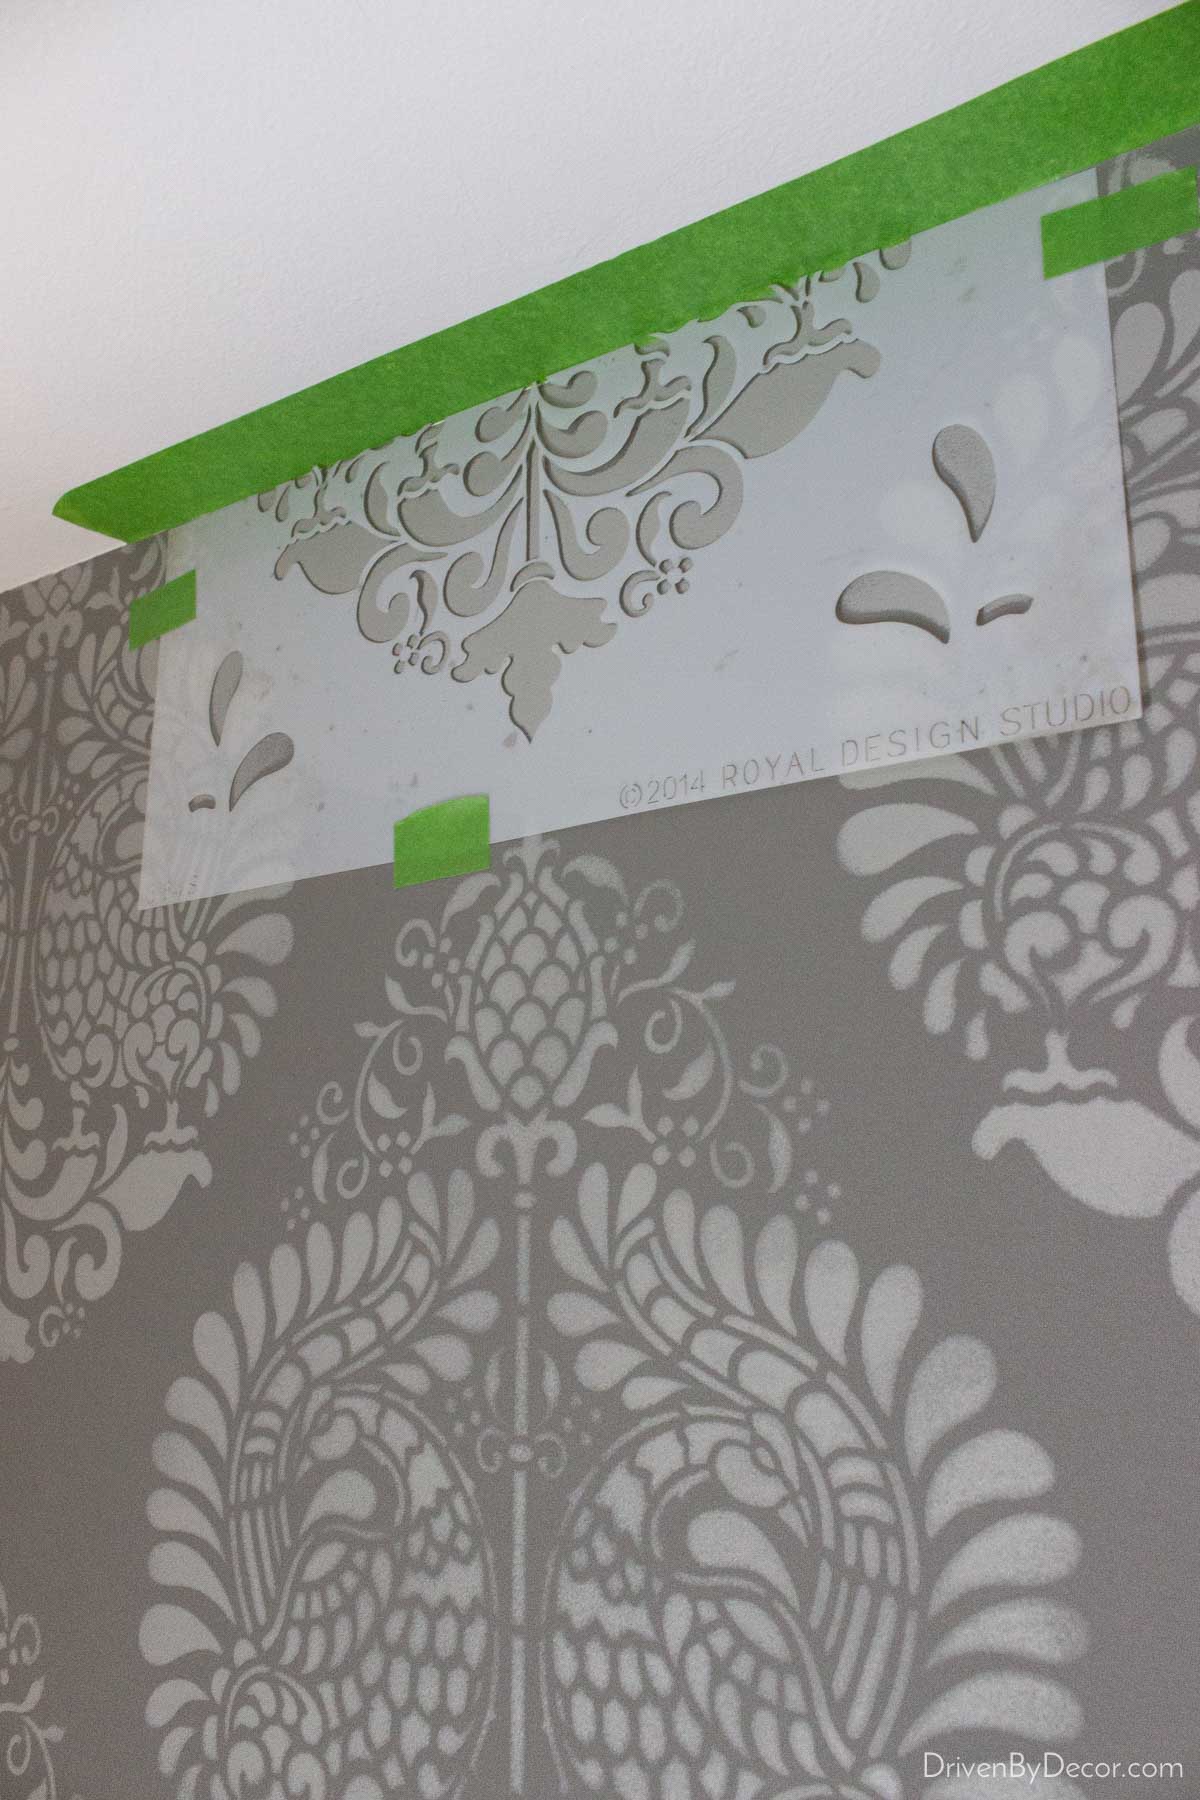
5. Level, Tape, & Roll Over Your Stencil
Once you’ve decided where to place your stencil, use painter’s tape to tape all four corners down and hold a level up to the side of the wall stencil to ensure that it’s straight. I didn’t use the level every time I placed the stencil but I did use it from time to time throughout the project to make sure I was staying on track.
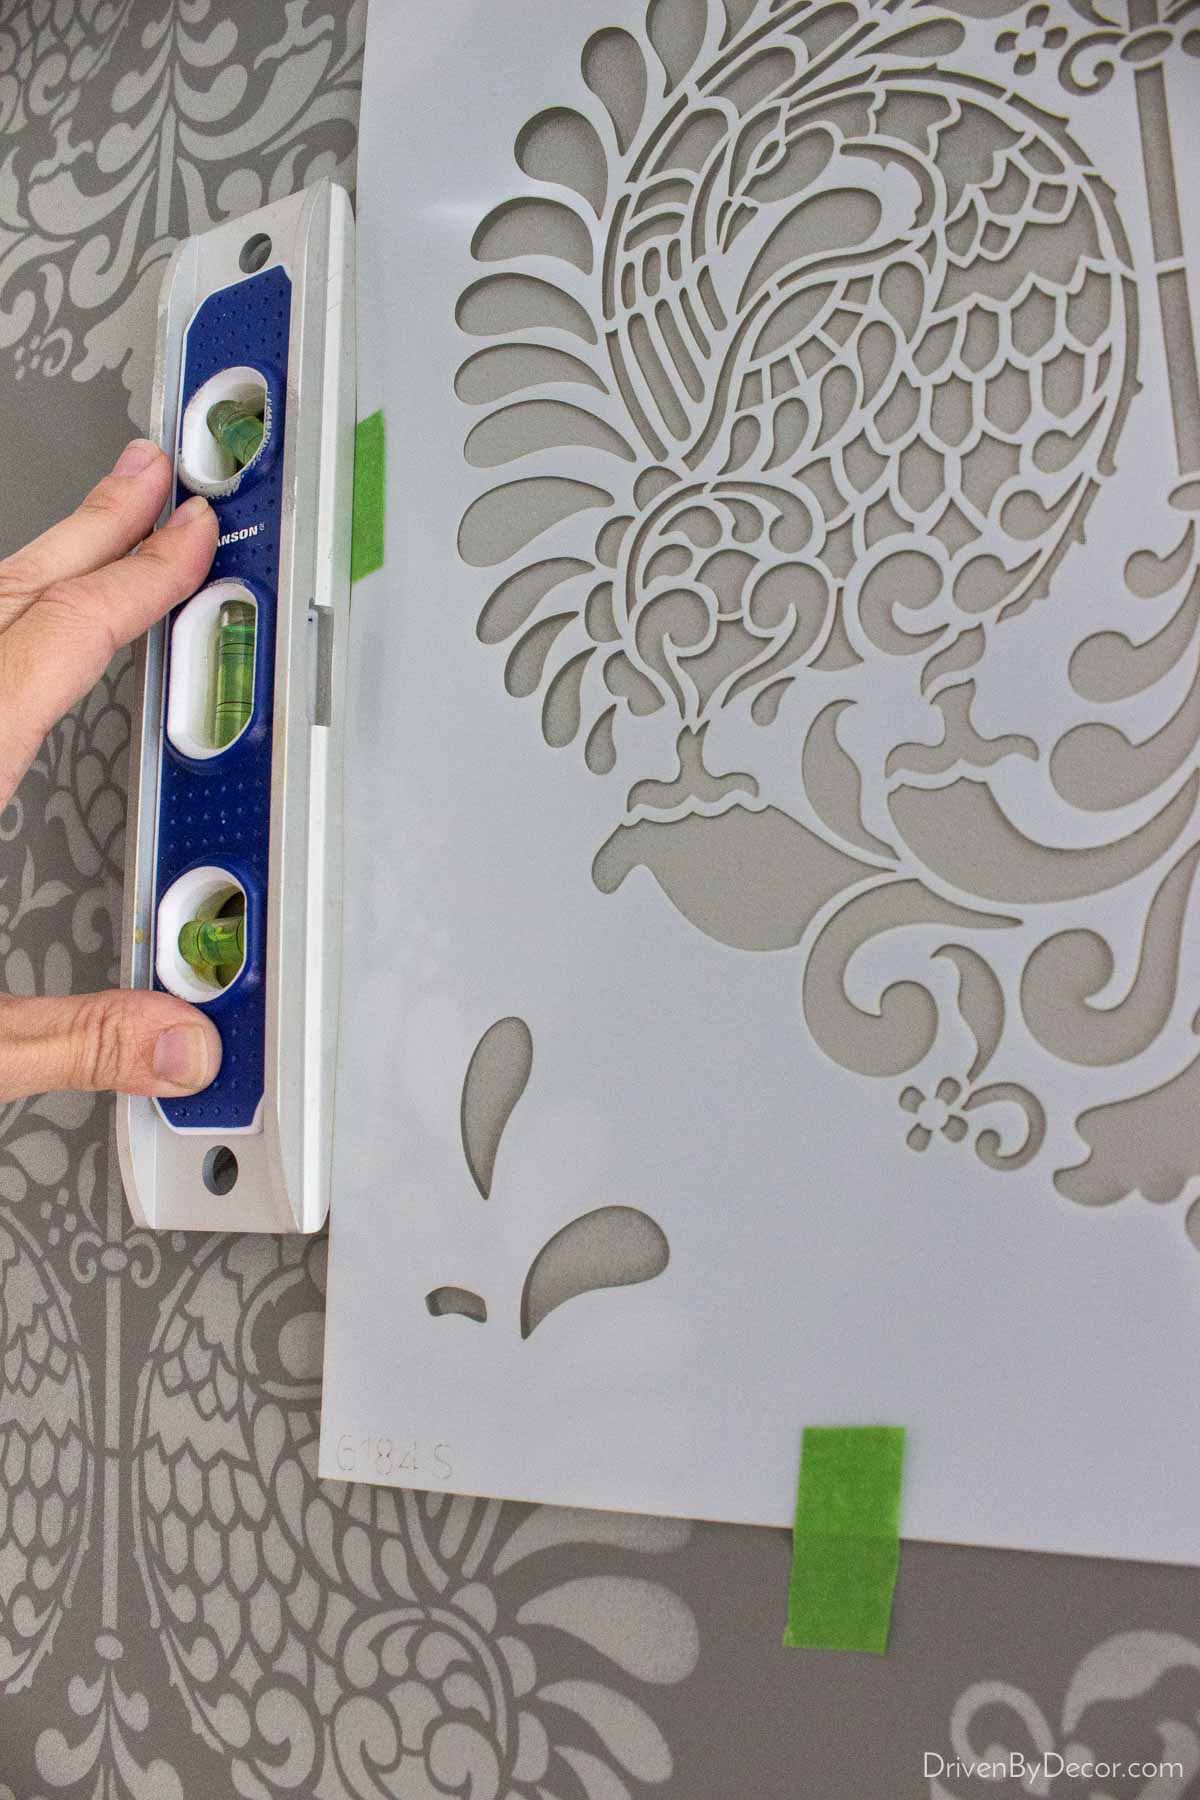
As far as placement of the stencil, the stencil that I used had a built-in guide – there were cut-outs in the corners that lined up with areas that I had previously stenciled, ensuring that I was distributing my stencil evenly. It was so helpful and definitely a feature I would look for when choosing wall stencils!
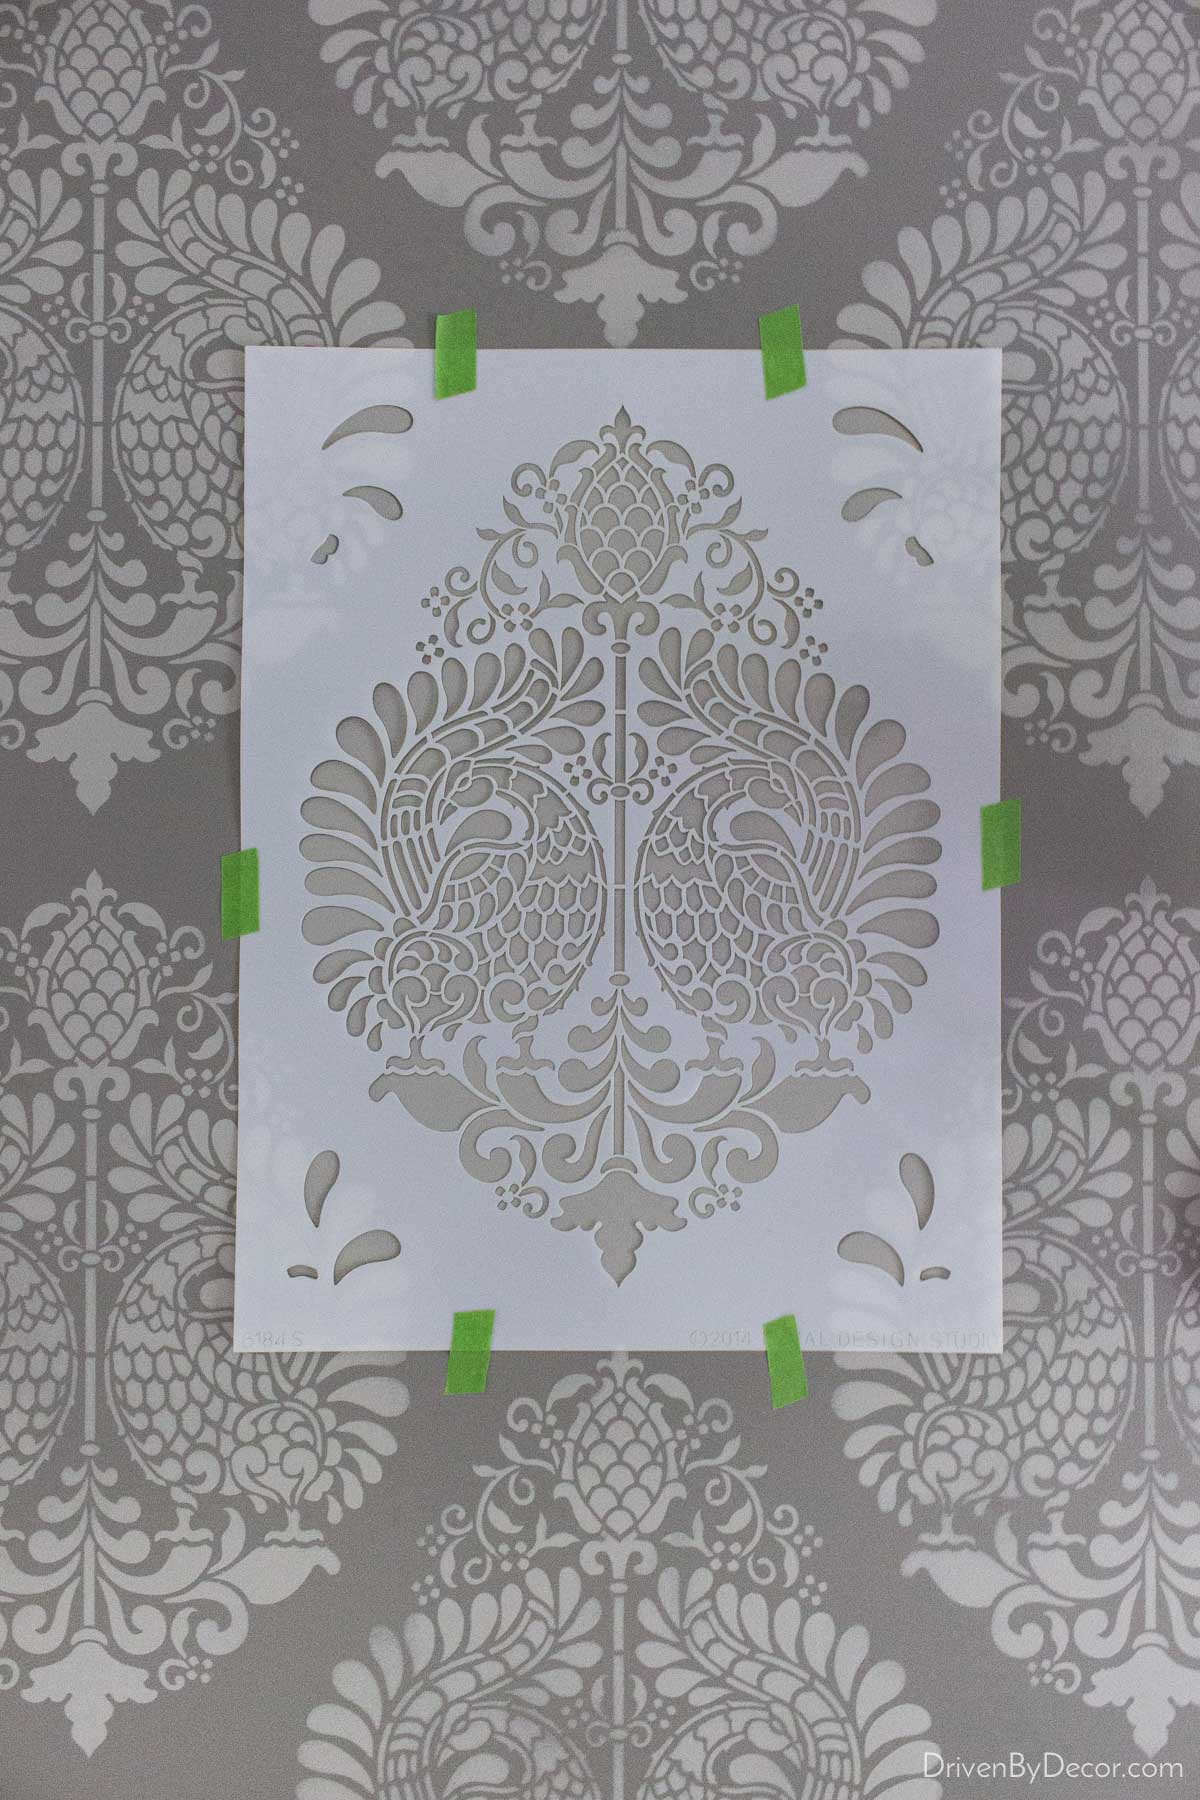
Now you’ll roll over the stencil with your foam roller just like you did when you practiced. Remember, use only a little paint, light pressure, and multiple rolls back and forth.
Want to save this post?
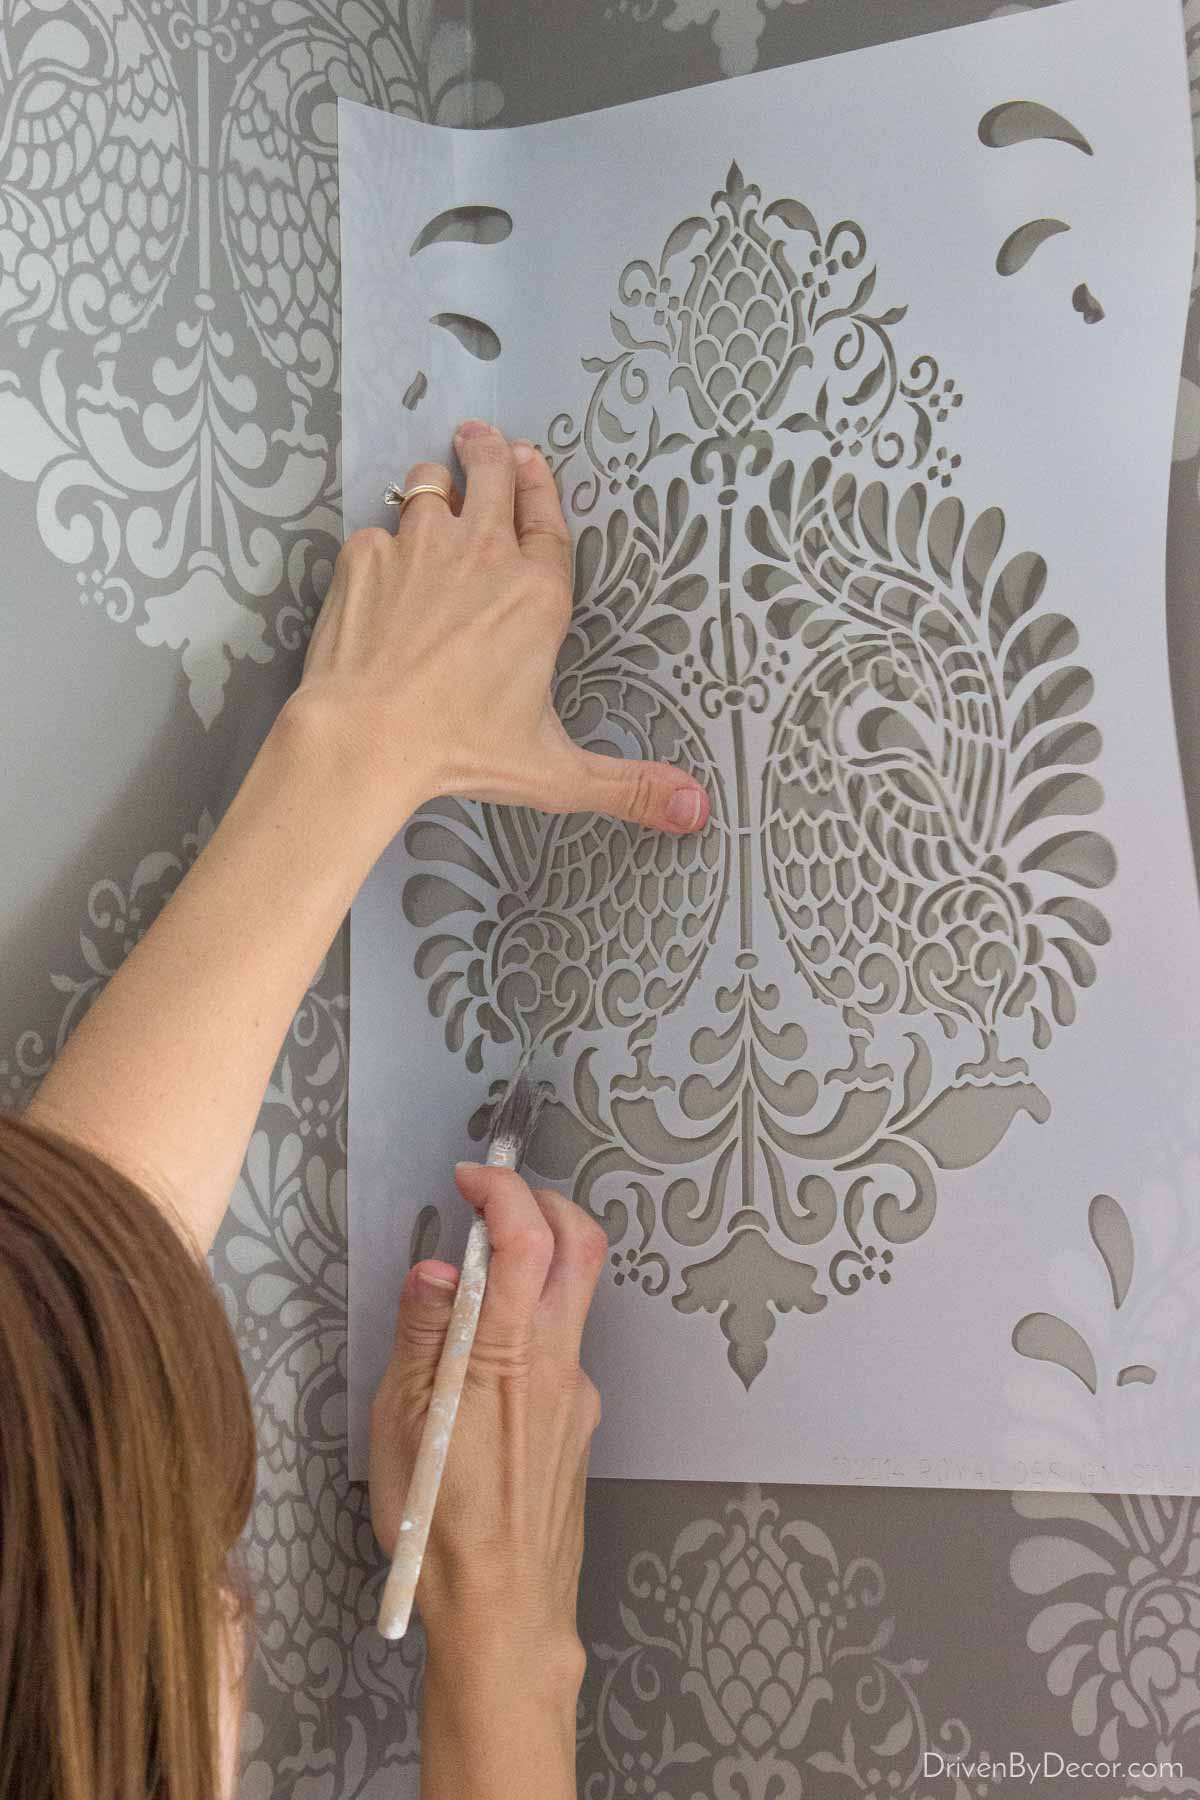
What about the corners? They’re tricky suckers! The key is to stencil just one side of the corner at a time. Jam the stencil as tightly into the corner and against the wall as you can (don’t worry about keeping the whole stencil flat – just worry about the area you’re stenciling) and use a brush with very little paint in a straight up and down dabbing motion.
Once I stenciled one side of the corner, I would usually move on to stenciling another area of the wall to give that corner a few minutes to dry and then come back to do the other side of the corner using the same technique. It really helps to have two people doing corners (one person holding the stencil into the corner with both hands and the other person stenciling) but it’s doable with one person too (I did all but one corner by myself).
I did something a little different where my stencil hit the ceiling and the tile on my wall. I actually waited to do these areas until I was done doing all of my other stenciling and then I cut my stencil (I used a yardstick to draw a straight line on it and then just cut it with scissors). I put a line of painters tape at the ceiling, taped the stencil down as usual and used a combination of my stenciling roller and brush. Sooo much easier than trying to work with a full stencil!
Just be aware that even if you stencil evenly, often the walls aren’t completely even so some of the areas near the ceiling that you have left to stencil might be bigger than others – start with the biggest areas first and work your way down to the smallest. This way, you can continue cutting your wall stencil smaller and smaller to fit the space.
If you don’t want to cut your stencil, you can just bend it like you did in the corners.
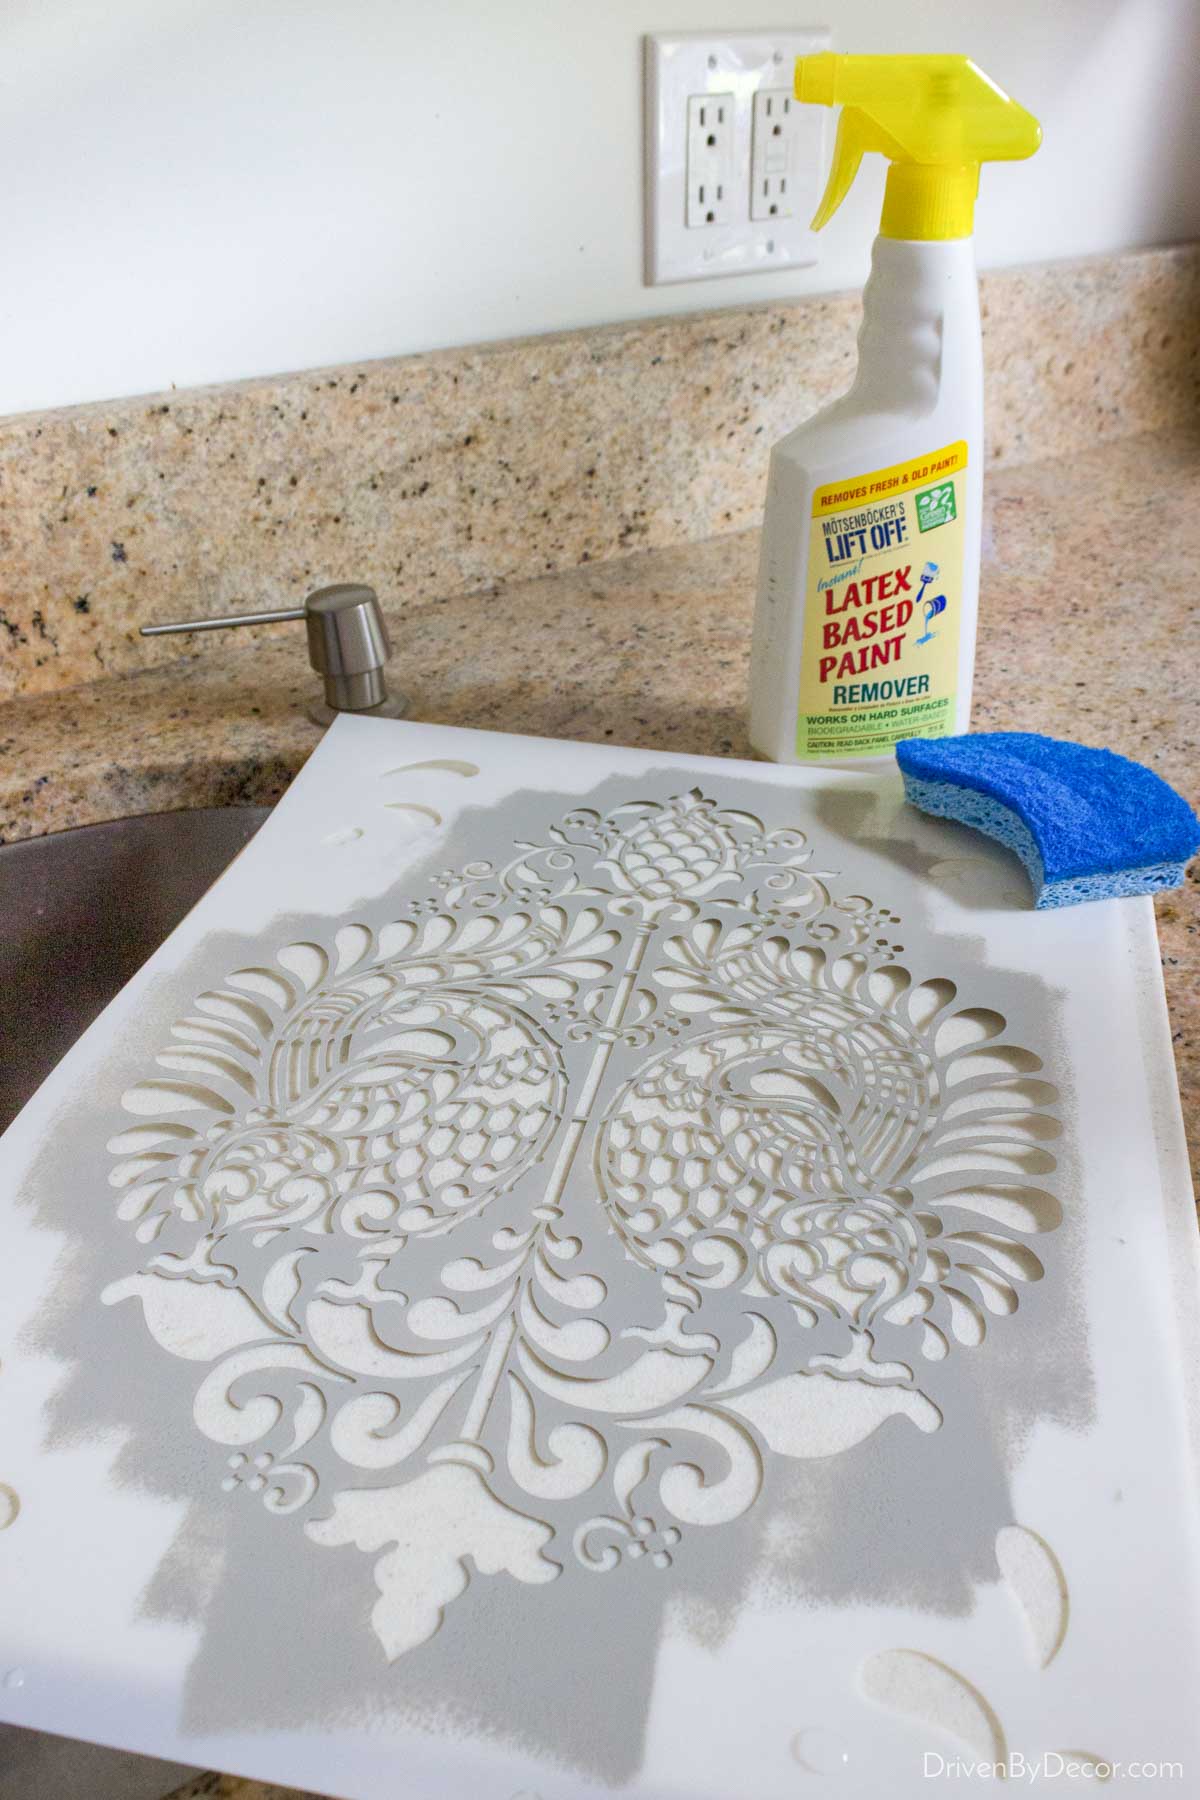
I have one other tip to share from something that I figured out when I was well into my stenciling project. I was finding that my stenciling was becoming more uneven and that this was due to build-up of paint on my stencil. To combat this, every time I rolled or brushed over my stencil, I laid the stencil on an old cutting board and used a damp paper towel to wipe off as much paint as I could before continuing with my stenciling. Even doing this, eventually enough paint would build up that I’d have to clean my stencil fully to get nice clean lines and an even distribution of paint.
Initially I tried cleaning my wall stencil with soap and water but the paint is HARD to get off and it took forever! I finally tried using {this spray latex paint remover} and it worked beautifully! I simply put the stencil on my old cutting board, sprayed it, let it sit for a few minutes, and then washed the paint off.
My last tip is not to worry about making it perfect! Every single person who has seen our bathroom (and doesn’t read my blog :)) thinks that it’s wallpaper because when the whole space is done, you don’t notice all of those little imperfections:
But trust me, they’re there! My corners are far from perfect:
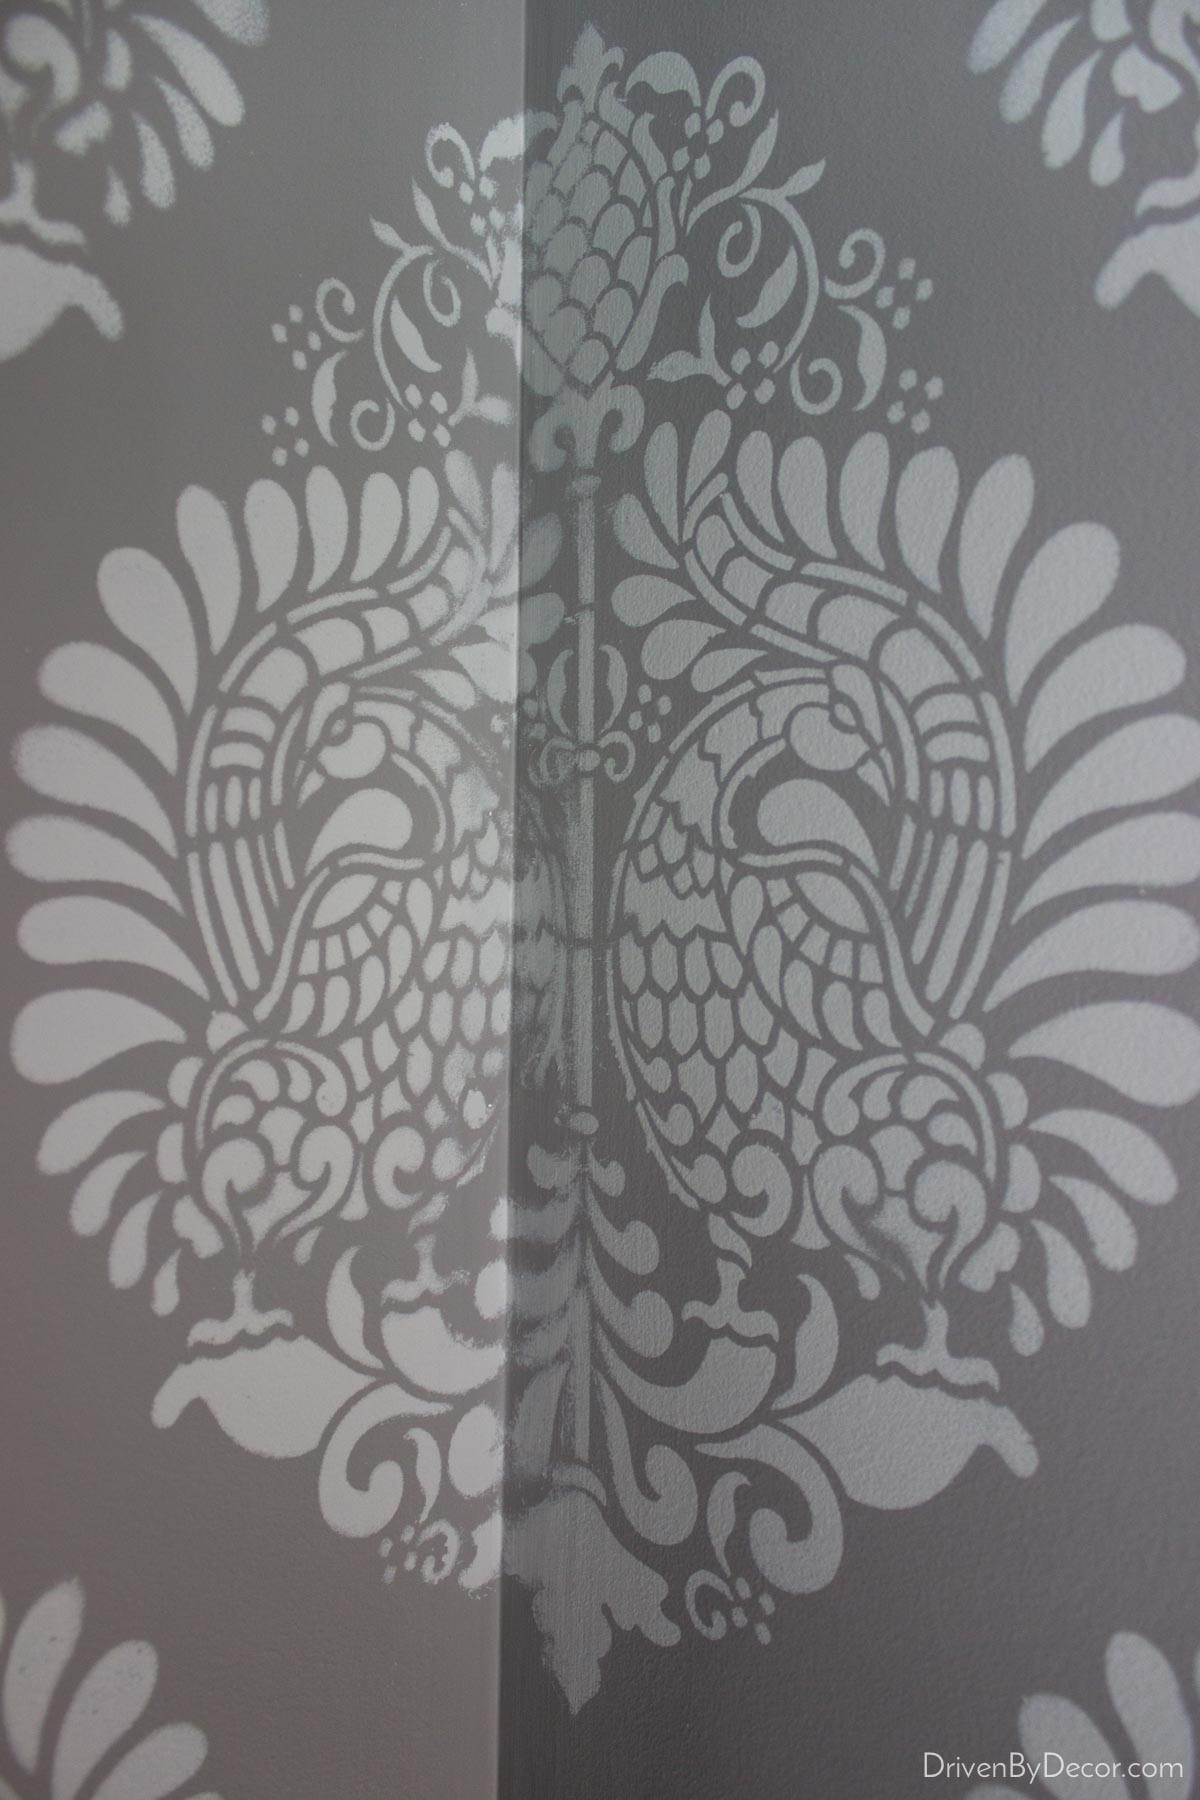
and there are several spots where my paint bled through the stencil (by the way, if you catch these as they’re happening, you can use a damp toothpick to swipe them away!).
As I was stenciling, I was thinking I would go back and touch up all of these spots at the end but truly you just don’t notice them when you’re looking at the room as a whole so I’ve let them be!
And now on to the questions that you guys had for me…
Is Stenciling Hard?
I wouldn’t say it’s hard but as with every DIY, there is a bit of a learning curve to it which is why practice is key. Stenciling IS time consuming – it takes a lot longer to stencil a wall than it does to wallpaper or paint it. For your first stenciling project, I would recommend that you start small with an accent wall, back of a bookcase, or small bathroom instead of jumping into stenciling an entire room.
Do You Need Special Paint for Wall Stenciling?
Nope! You can use the same paint as you use for painting walls with wall stencils. That’s one advantage that wall stenciling has over wallpapering – you can choose the exact shades you want for your space so it coordinates beautifully with your decor! Since you don’t need much paint for stenciling, a quart of paint should be plenty, meaning that you can stencil for a fraction of the cost of wallpapering.
What are Other Options for Decorating Walls?
One option is to use peel and stick wallpaper – you get a similar look to regular wallpaper but it’s easier to install and more suitable for beginners. Check out my post on installing peel and stick wallpaper for more details. Another option (and the quickest and easiest of them all) is to use wall decals. These are basically like stickers and they’re easy to both put on and take off. See my post on the vinyl wall decals in our laundry room for all the details.
I hope you found this helpful!


valerie says
love, love, love.
i have stenciled before, usually borders, never with large stencil like this, going to try/copy your room, lol.
looks time-consuming,(and fun at the same time) but i’m sure you would say it was worth it!
Linda says
Thank you for all your tips I’ll use them the next time I stencils
Rae says
I know this is an old thread but what the heck, maybe the op will see this and smile
I havent stenciled in years but after stumbling on this post I have ideas for 2 problem areas in my mobile home.. i recently picked up a dog print stencil for a small step I recently repainted but hadnt carried the idea farther. Thanks!
Patricia Laurrell says
Just purchased a small beach cottage. You inspire me!! So glad I came upon your posts.
Kelly Bradley says
Did you paint over the wallpaper? I have never been able to remove paper successfully. I’d love any tips you could share! Beautiful job; so inspiring!
Kris Jarrett says
No I removed the wallpaper – this post has some tips that might help: https://www.drivenbydecor.com/how-remove-wallpaper/
Rae says
I painted over flocked 1970s wallpaper that was stuck like cement to cheap paneling. It was a small dining room. I painted the whole front of house a light creamy yellow then put several coats of stain blocker over the black floral print wallpaper + chipped wallboard. I painted several coats of yellow paint with super heavy mixes of paint texturizer – I used mostly the large grain but I used the sand finish as well(my walls had a lot of damage).
The walls look fine. They wont be entries in a magazine contest but they blend in with the rest of the house and with a light color, its not noticable.
I did run into an issue towards the end, I had to leave extra drying time. The heavy wer paint on top of heavy sodden wallpaper was starting to pull loose in spots. Extra dry time solved that issue
Robbie says
Great info. I just ordered my first stencil and can’t wait to start.
Maureen says
Beautiful! Thank you so much for sharing this! I am intrigued by stenciling, there are some gorgeous stencils out there but a little intimidated by it all. You’ve made me realize that it doesn’t have to be “picture perfect” and will still look beautiful! Your bathroom is gorgeous by the way. I am going to give it a shot and will definitely use your tips.
Dawn says
Hi. Your bathroom turned out so beautifully. Could you please share your two paint colors you used on your stenciled walls? I’m interested in stenciling my kitchen floor and those are the colors I would love. Thank you
Cherol says
I just love it. Where did you get the stencil?
Kris Jarrett says
There’s a direct link to the stencil I used in the third paragraph of the blog post 🙂
Cindy says
Absolutely beautiful! THANK YOU for those great tips! I’m starting a stencil project and they will be very helpful!
Pat says
Hello, your basic tips are helpful.
I’m in my upper 70’s so I can relate to kitchen and bathroom stenciling.
I’m embarking on stenciling 2 interior cement walls.
You say to begin by centering your stencil. That was different for me.
It was 40 years since my last attempt and the design was a border only.
I’m trying to conceal flaws in cement and chunks out if one edge where wall juts out.
Any helpful tips before I bite off more then I can chew. Hahaha.
Thanx you much.