Our budget bathroom remodel is done! Over the past six weeks I’ve been remodeling our hall bathroom as part of the One Room Challenge – it’s been full of unexpected hurdles and setbacks at every turn. Well I finally made it to my finish line and I’m so excited to show you how our budget bathroom remodel turned out! (post includes affiliate links – full disclosure statement available {here})
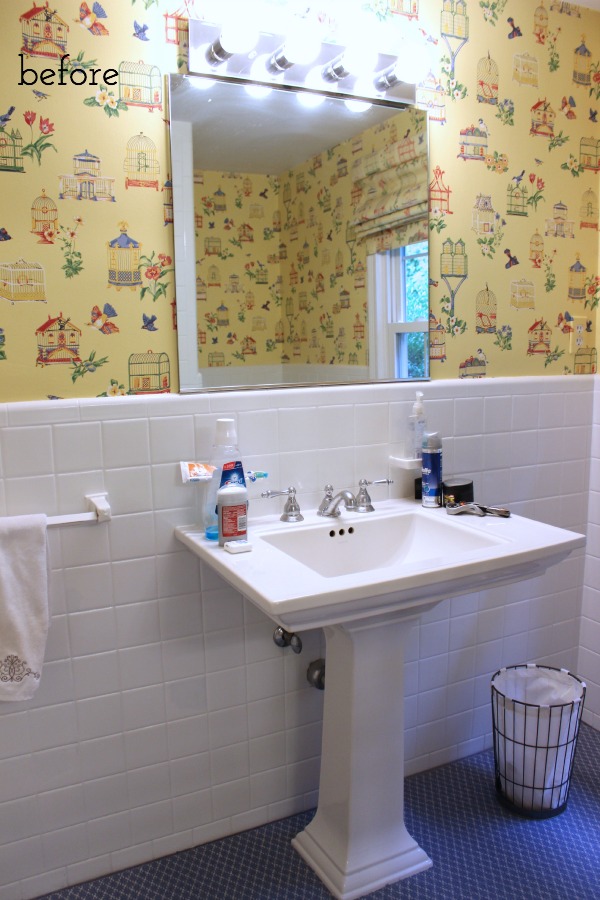
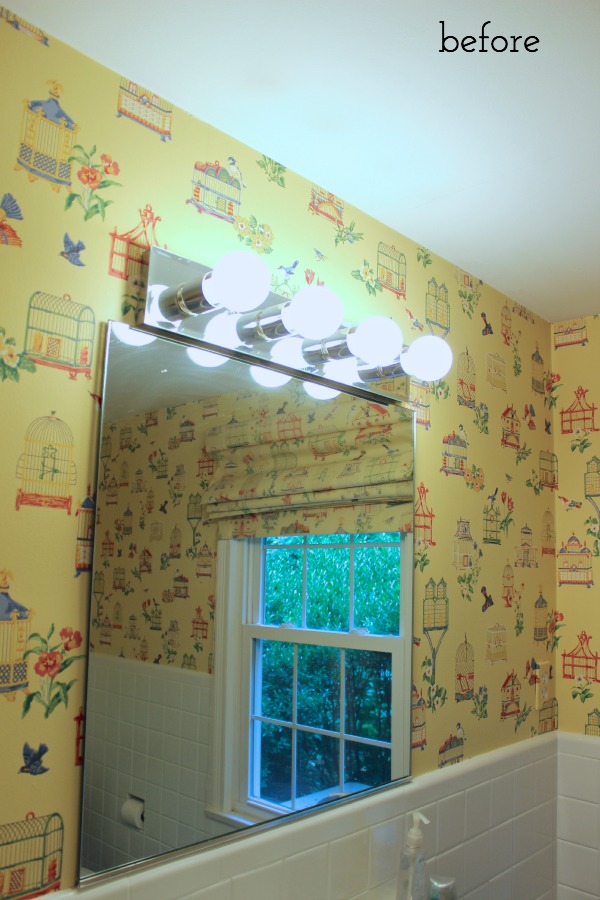
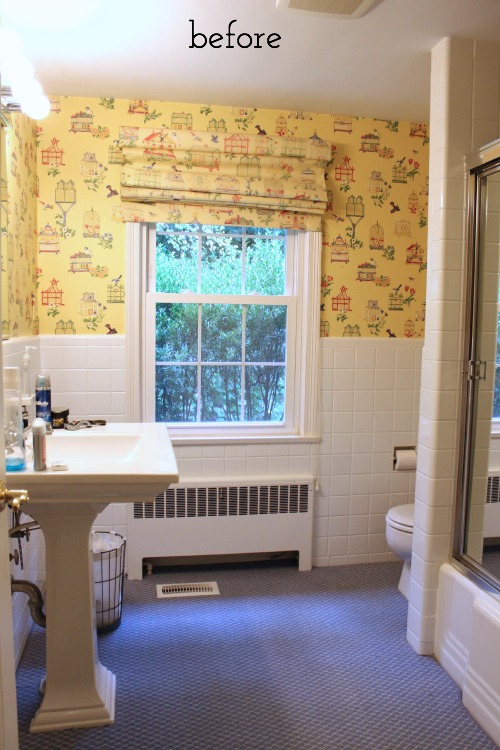
First, let’s throw it back to the “before”. Do you all remember what it looked like when I started? We had dated wallpaper, weird vanity bulbs, a plain Jane mirror, and carpet (gross!)…
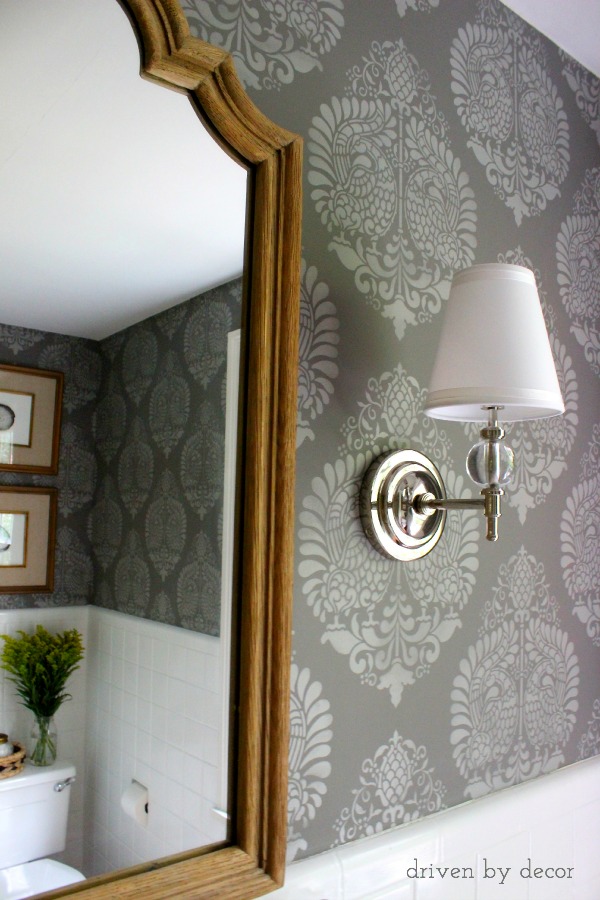
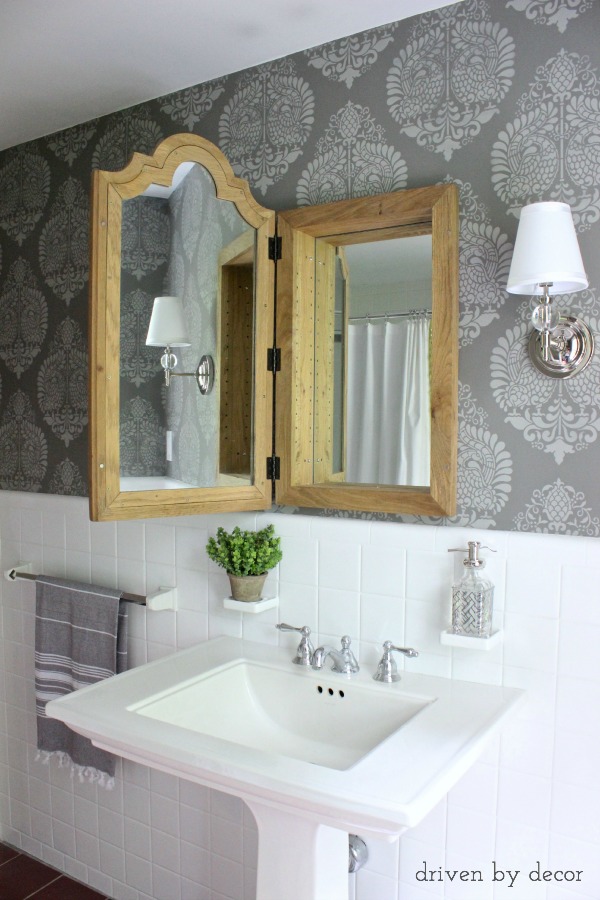
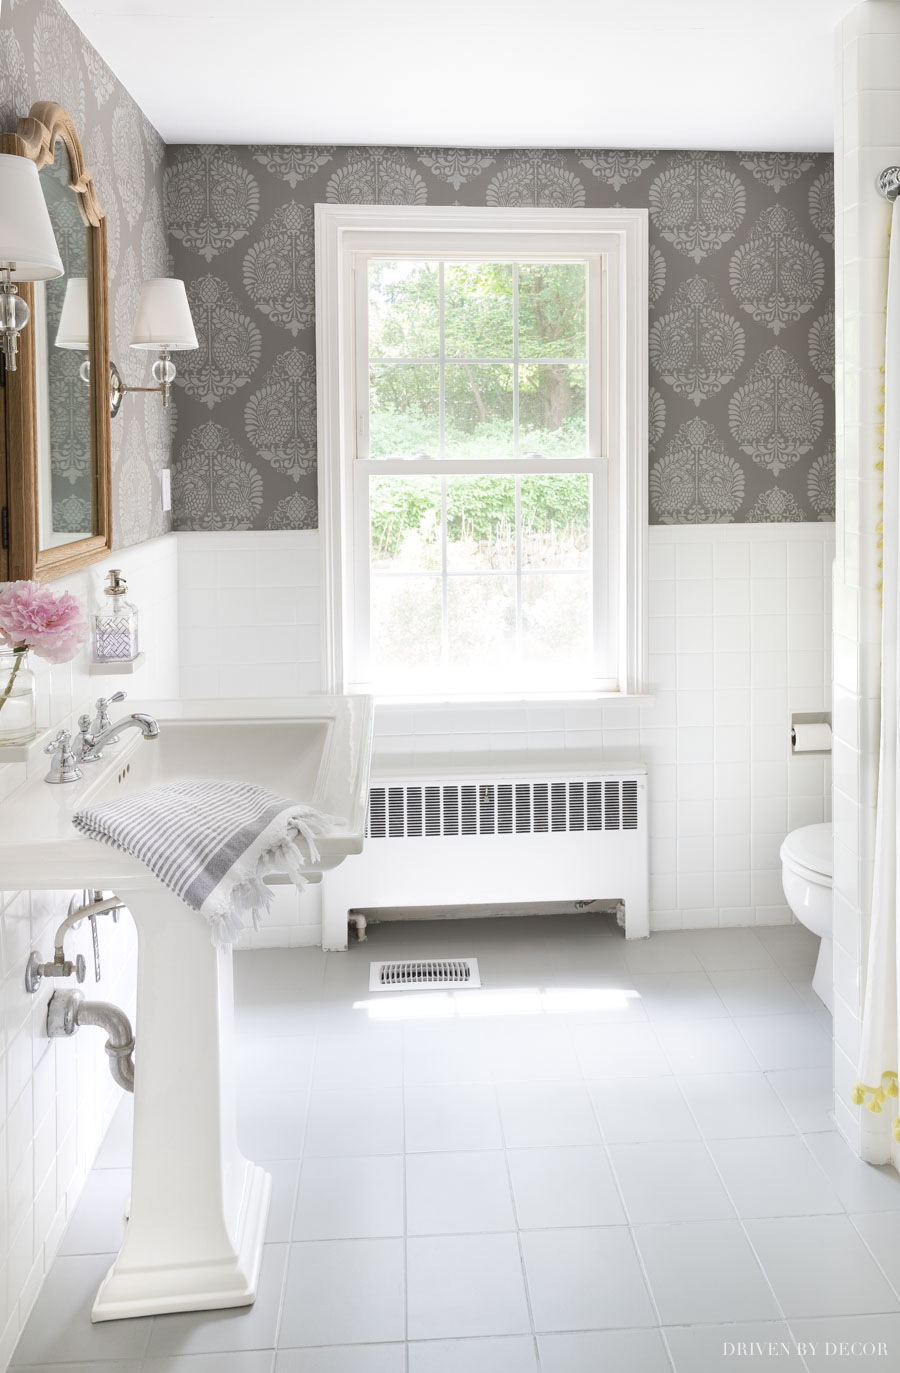
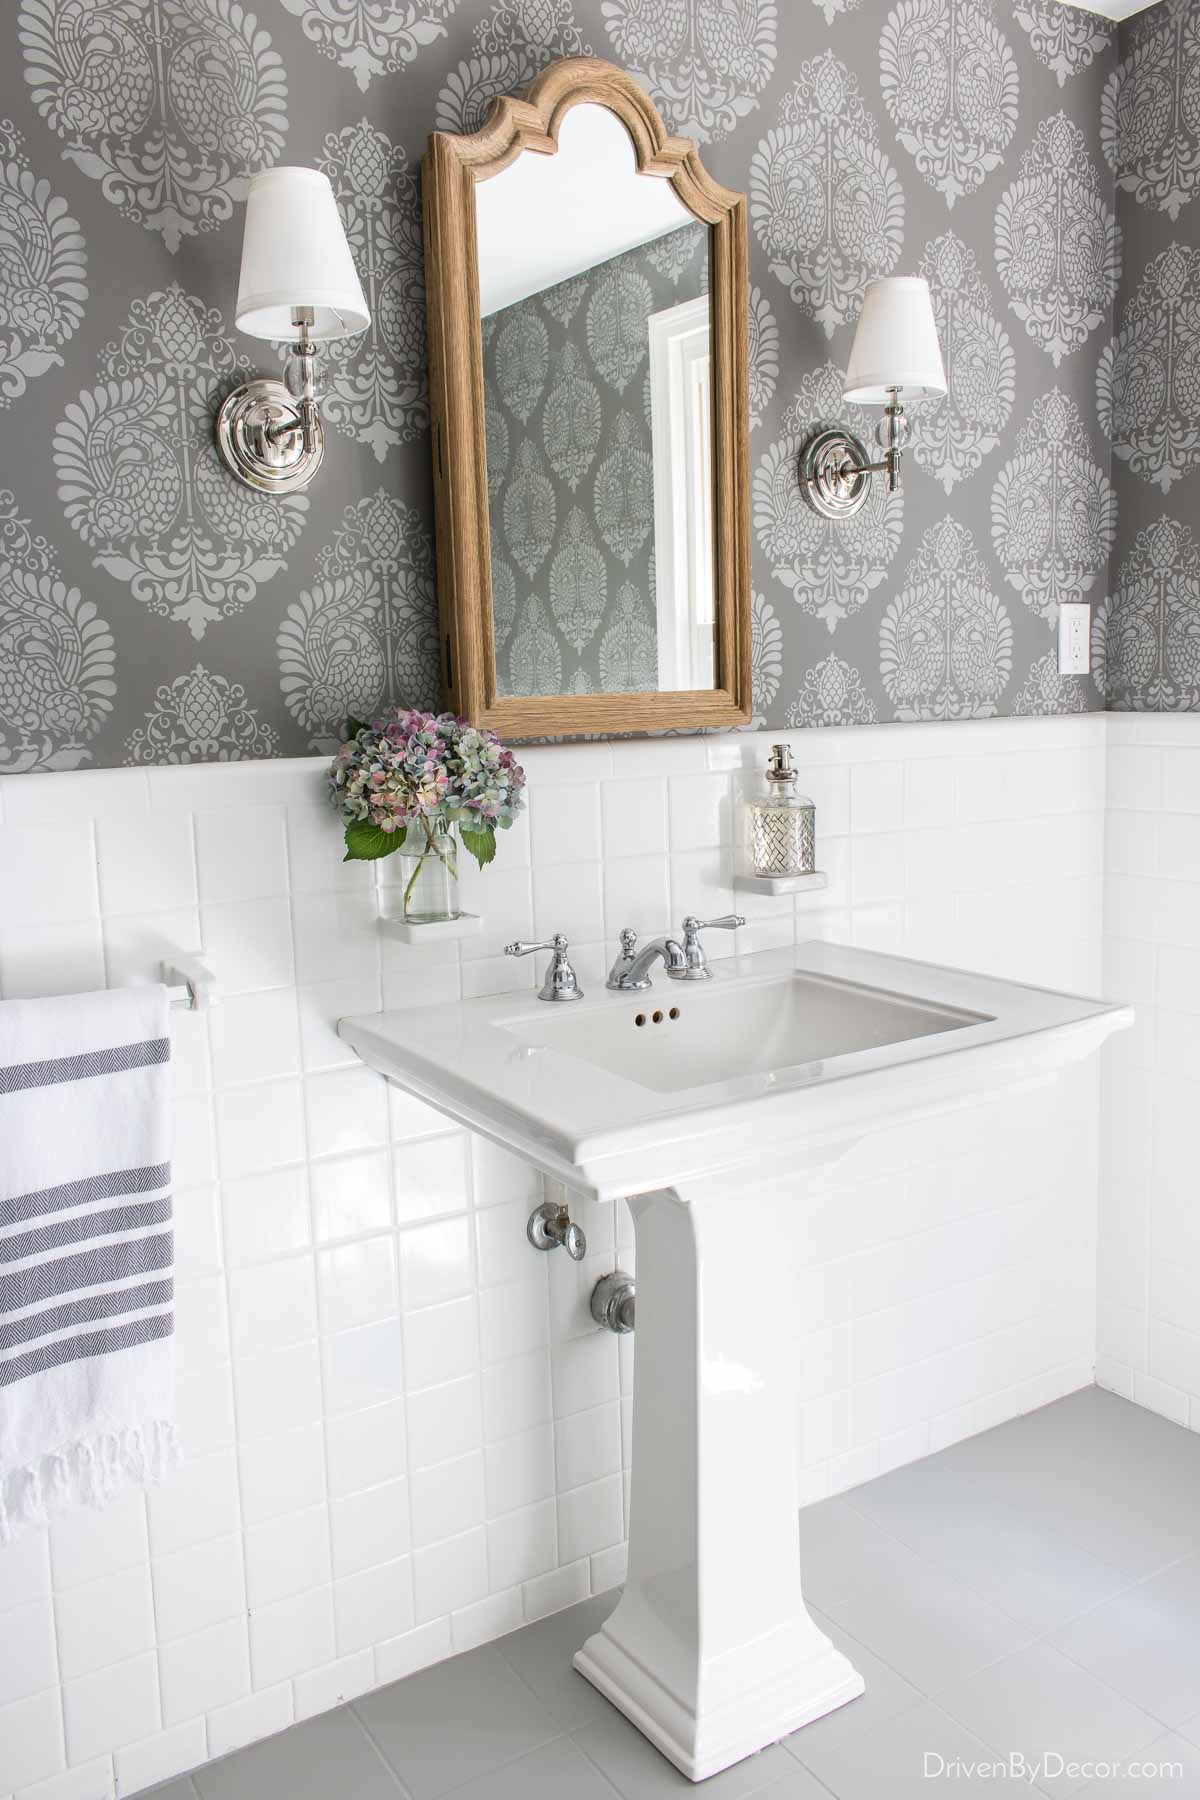
Say hello to newly painted and stenciled walls, wood medicine cabinet, and glamorous sconces!
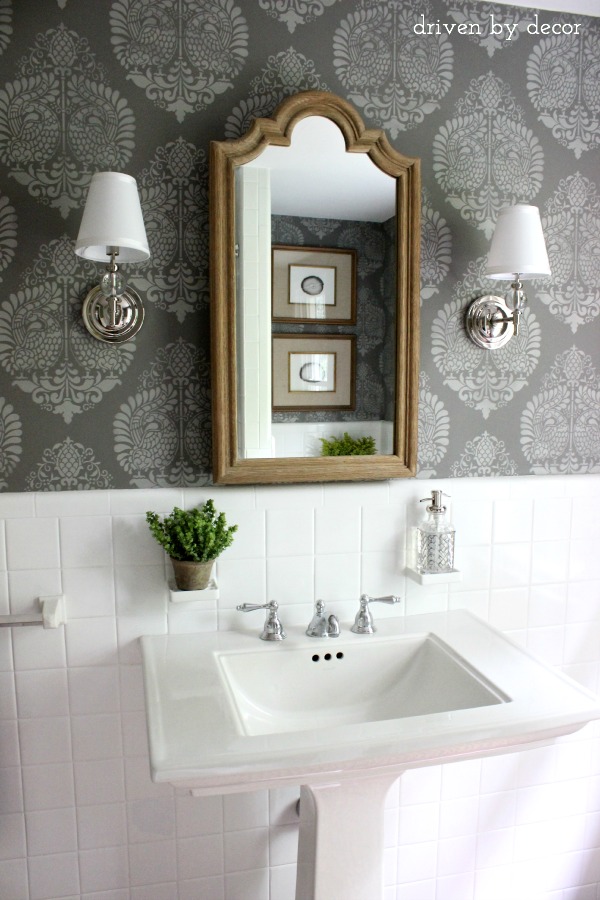
Sources: Medicine Cabinet – no longer available but {this arched wood mirror} is similar | Pedestal sink | Sconces
Here are some take-away tips from our budget transformation:
Stencil the Bathroom Walls
Stenciling the bathroom walls is what made the biggest difference! I had NEVER stenciled before doing this room and definitely learned a lot through trial and error but am so happy with how it turned out:
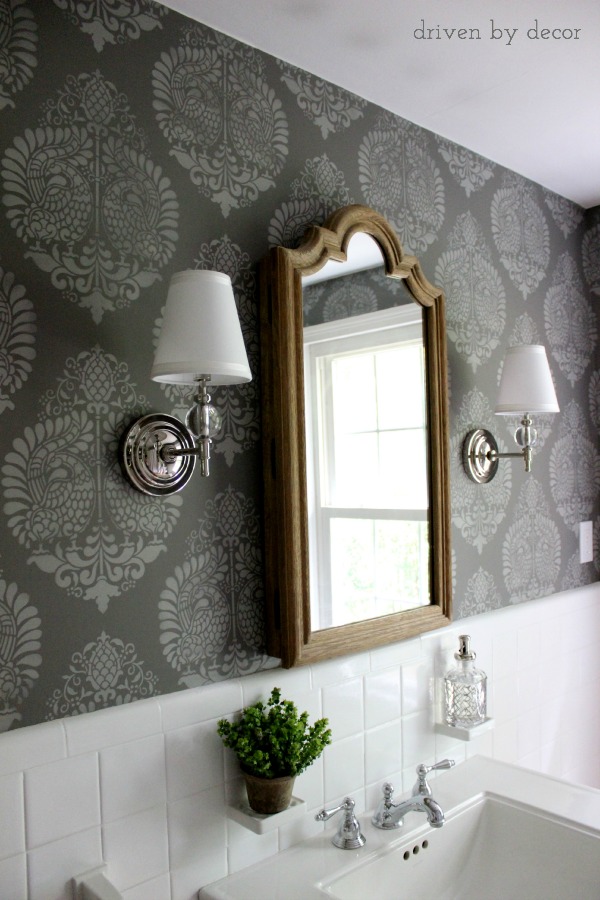
While it was time intensive, once I got the hang of it, it was fairly easy. And also budget friendly – while it looks like wallpaper, it cost a fraction of the price. I painted the walls Benjamin Moore Chelsea Gray and then used {this furniture stencil} with Benjamin Moore Platinum Gray for the stenciling. For more details on the step by step of stenciling plus lots of tips, see my post on wall stencils.
Work With What You’ve Got
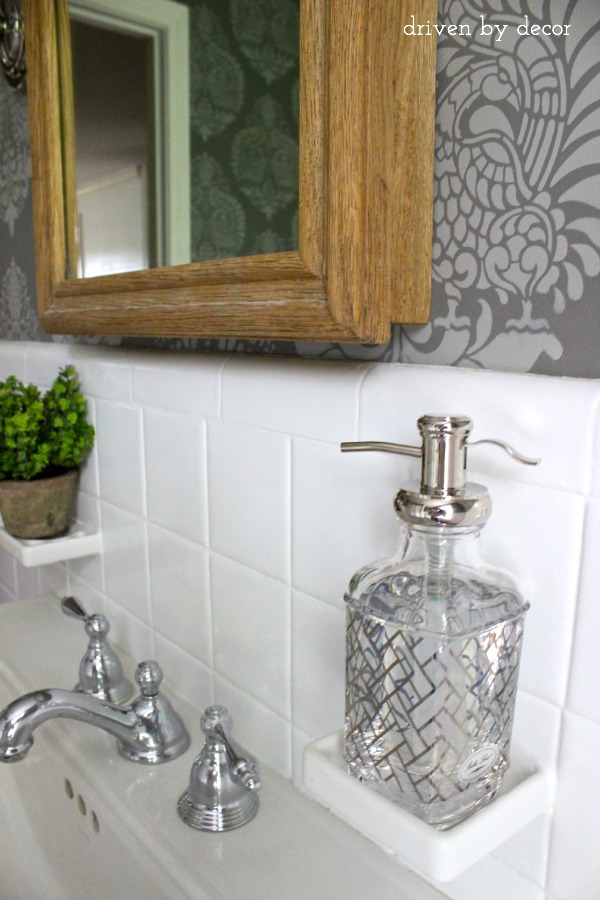
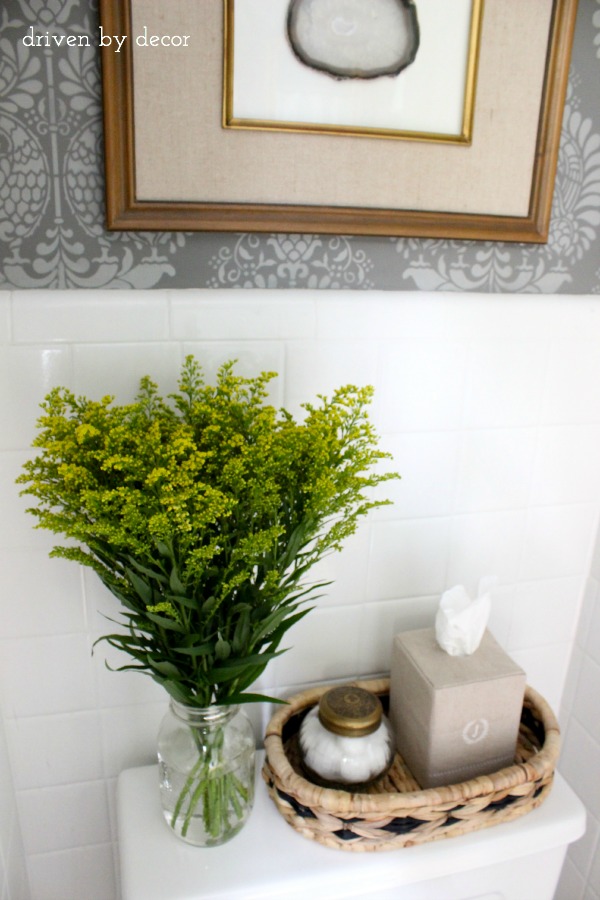
Being able to do a bathroom remodel with a limitless budget would be amazing but… it’s rarely feasible. Sometimes you’ve got to think outside of the box and work with what you’ve got. Two of the awkward things to work around in our bathroom were the built-in soap and cup/toothbrush holders. I originally had some semi-elaborate plans to fix them up but then realized that my grand plan was adding up $$$ so I made the best of it. The cup/toothbrush holder turned into the perfect plant stand:
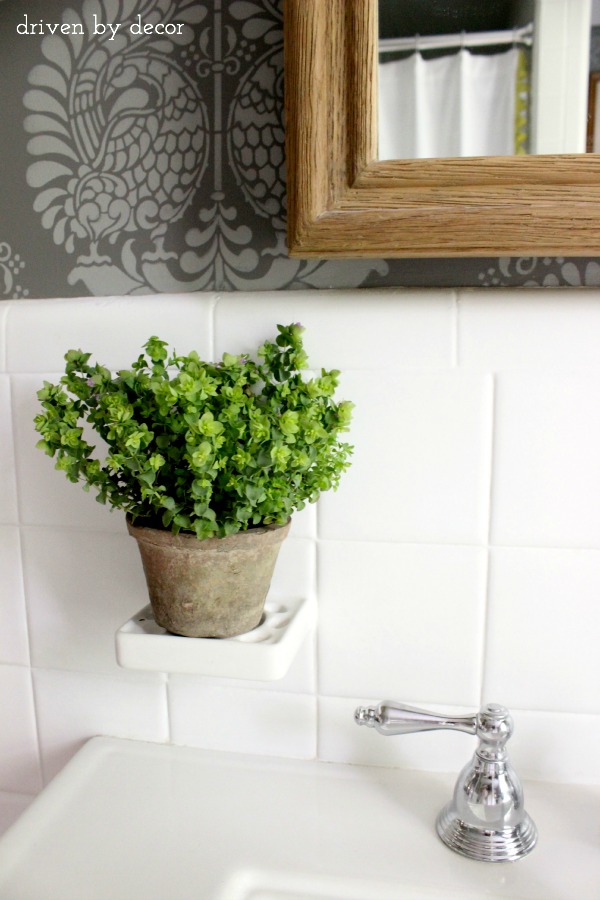
and the soap dish fits my new HomeGoods soap dispenser like a glove!
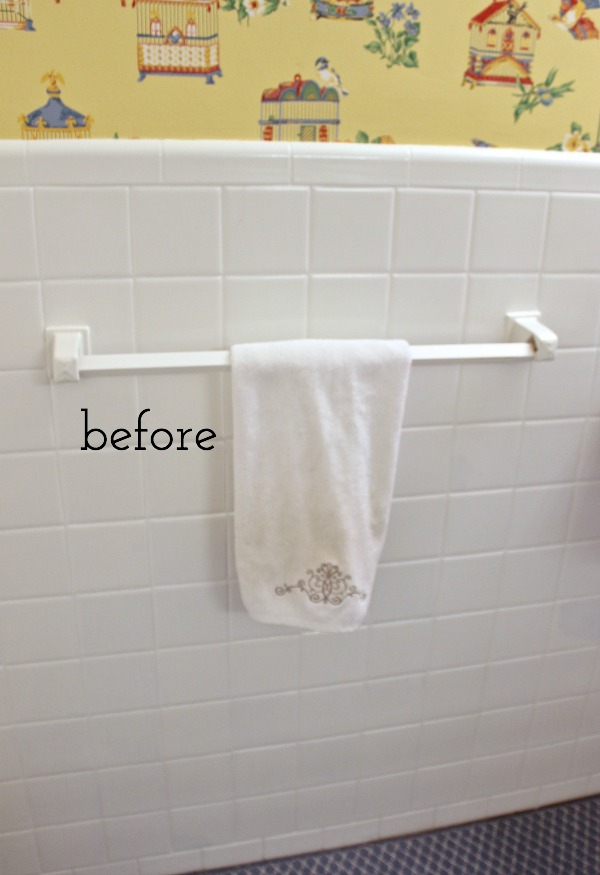
We also had a junky plastic towel bar that I would have loved to replace but removing the towel bar ends would have damaged the tile beneath it:
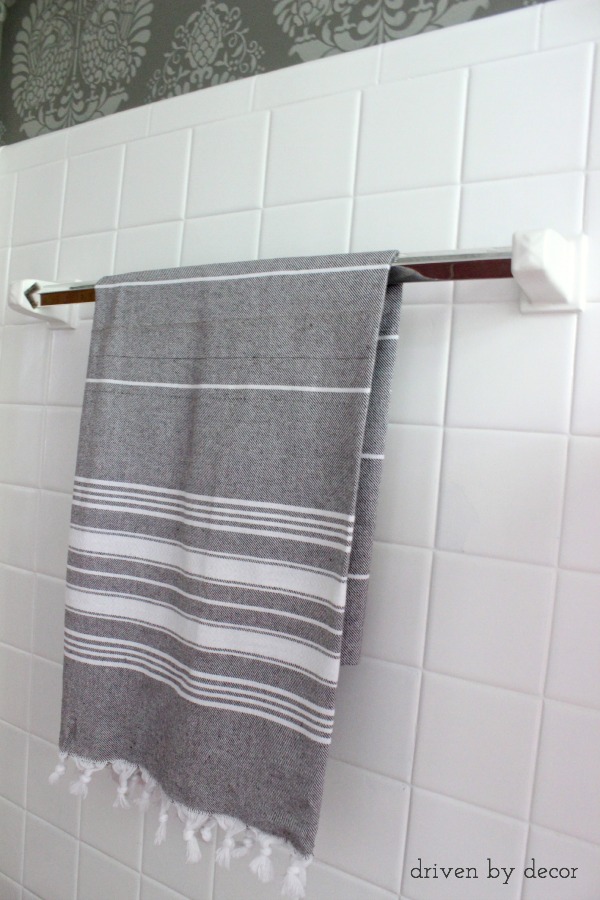
So instead I left the towel bar ends as-is and replaced the bar with a new chrome one. If you’ve got those annoying fixed ceramic ends on your towel bar too, I explain how to replace a towel bar with fixed ends {here}. Then I prettied it up with a gray and white striped Turkish towel:
Add Storage With a Medicine Cabinet Mirror
This bathroom is the one that my husband uses to shower and get ready in so some storage for all of his bathroom junk was priority #1. Originally we were planning to find a narrow furniture piece to put in the corner of the bathroom to add some storage. But since we also needed to switch out the plain builder’s grade mirror…
we decided to kill two birds with one stone and add a mirrored medicine cabinet instead of a plain mirror (one of my favorite bathroom mirror ideas!). The medicine cabinet has plenty of room to store all of his crapola that previously cluttered up the top of the sink (pic is from before we added the shelves to it):
No more heart palpitations when an unexpected guest to our home asks to use the bathroom!
Want to save this post?
DIY Your Own Art
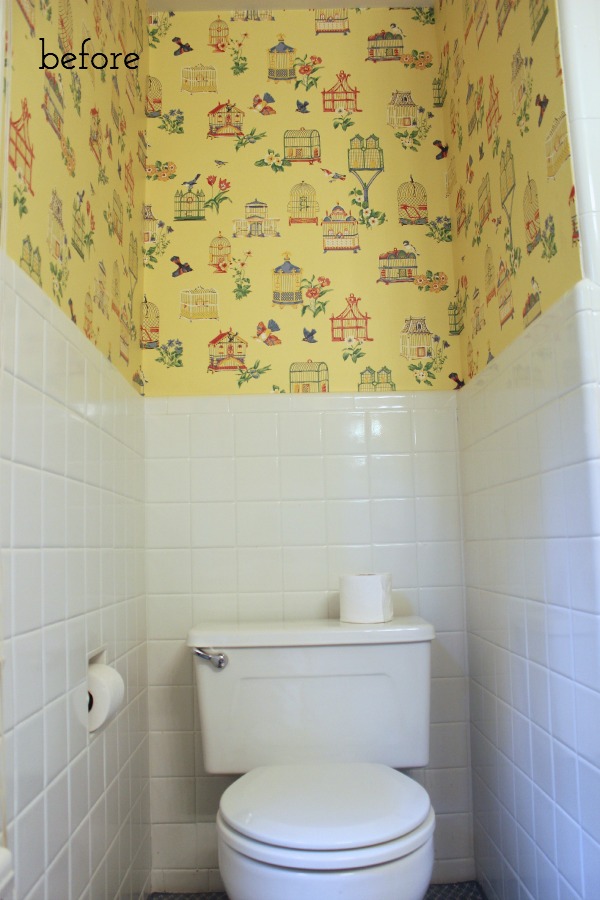
The wall space above the toilet got a little makeover too:
I bought two Target frames and then simply added an agate slice to eat one to create my own art:
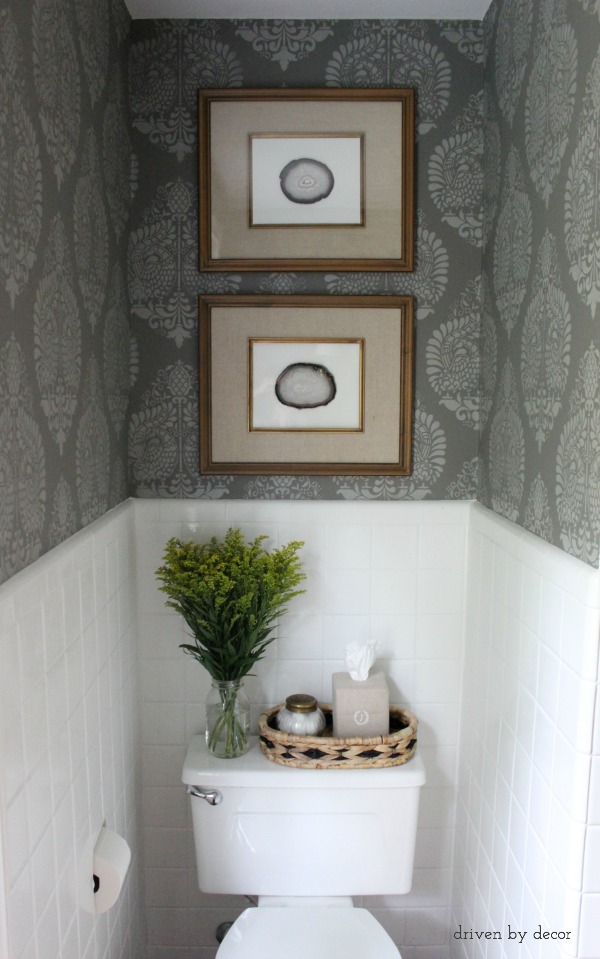
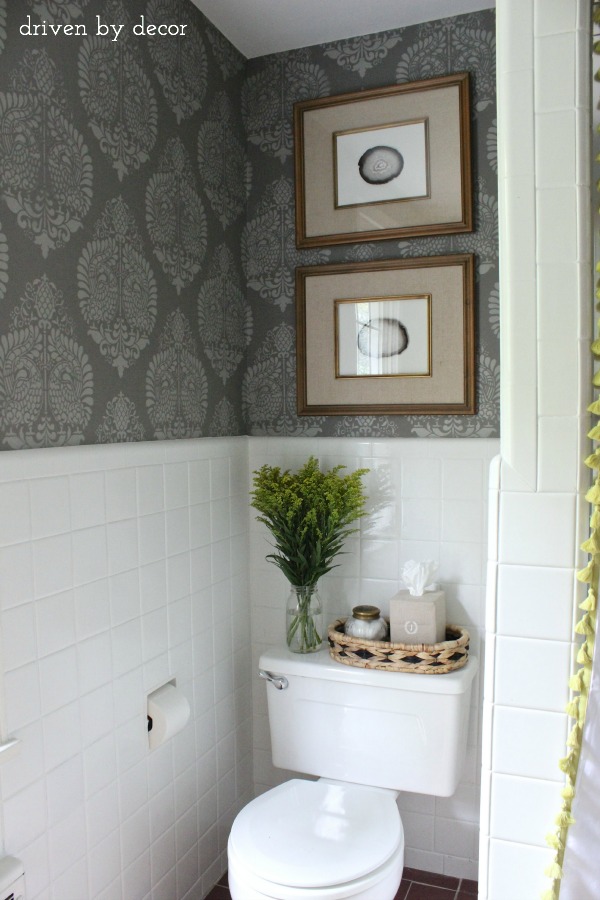
The top of the toilet tank even got a little bit of love:
Freshen Up The Look of Your Shower With a New Curtain
And remember when I was debating between three different shower curtains? Did you guess that this was the one that I would end up with?
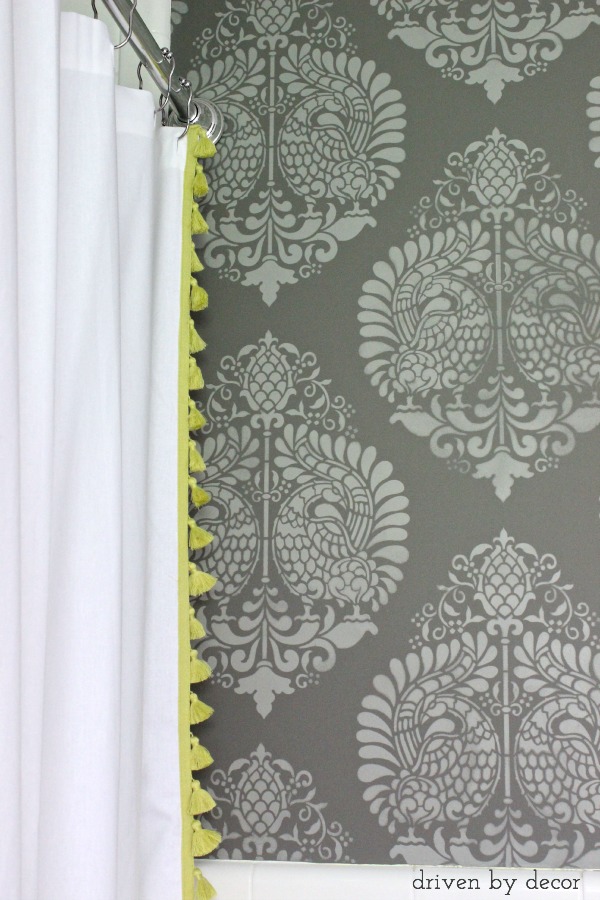
Adding a shower curtain in front of my ugly mirrored shower doors not only made the space so much prettier but it was more budget friendly than removing the mirrored doors too!
Paint Your Tile Floors
And what about our carpeted bathroom floors? Underneath the carpet I found tile but… it was REALLY ugly red tile:

Replacing it would have cost big bucks so a few weeks after my One Room Challenge reveal, I painted it! It made a HUGE difference:
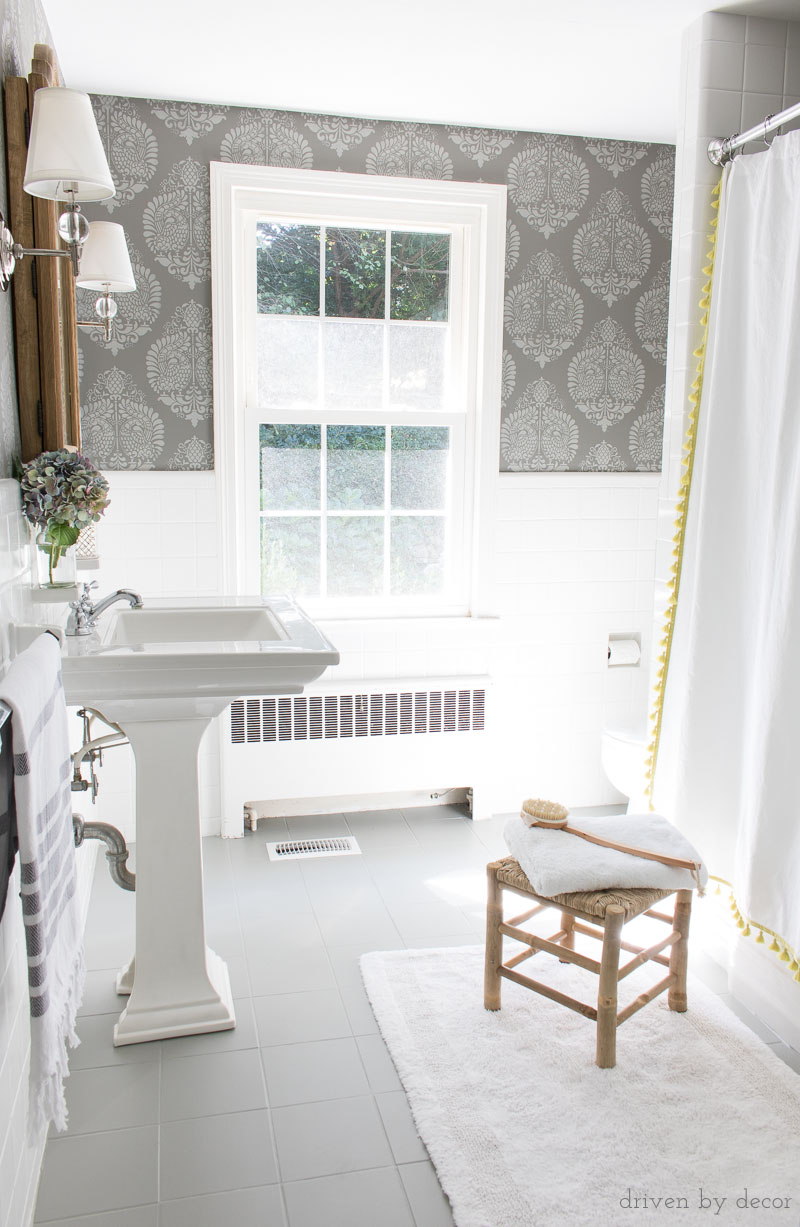
Get all the details of how I painted our bathroom’s ceramic tile floors {here}. And as an update, yes the painted tile held up REALLY well for years after!
Here’s one last look at the complete “before” and “after”:
Have any questions about our new space? I’ve included a full source list for everything in our bathroom below. While this was a very budget friendly bathroom remodel, a few years later we went all out on a complete master bathroom remodel. I share ten of my best master bathroom remodel ideas if you want to check it out!


Wall Colors & Stencil: Annapakshi Indian Damask Wall Stencil – I used the 11.25″ x 15.5″ furniture stencil (c/o Royal Design Studio) | Basecoat paint: Benjamin Moore Aura Bath & Spa (Matte) in Chelsea Gray | Stencil paint: Platinum Gray (Benjamin Moore color but mixed in Behr Premium Plus Ultra in Satin)
Medicine Cabinet: No longer available but if you’re looking for a mirror in a similar design, check out {this arched wood mirror} | Pedestal Sink: Kohler Memoirs sink found {here} | Sconces: Crystal ball sconces
Shower Curtain: Tassel Shower Curtain in Citrine | {this shower curtain} is similar and comes in more color options | Soap dispenser, woven basket on toilet, agate slices: HomeGoods | Gold & glass jar in basket: No longer available | Plant: Ornamental Oregano in Linen Wrapped Pot (Terrain) | Frames: Target Threshold (no longer available) but {these linen mat frames} are a pretty alternative | Tissue Box Cover: Linen Hemstich Tissue Box Cover


Juliana Ribera says
Hi Kris,
I’m loving your decor and ideas. Where did you get the towel bar? I have a bathroom simular to yours. Same painted tiles (it used to be egg yellow, argh!).
Thank you!
Juliana
Cheryl says
This makeover is stunning!
Your choice of products turned a once juvenile decor themed bathroom into a room with a sophisticated, classy vibe!
I love it!
Donna says
8 totally love your makeover..I m in the middle of the same thing..I love that medicine cabinet and mirror..8 checked the price on Wayfair..it’s 399.00..woo..
Constance Buckler says
Gorgeous! I absolutely love it!
Luna Sky says
Looks wonderful. I have looked at several pages in the series but might have missed it: did you paint over the wall paper in the bathroom before stenciling? Or did you remove what looks to be wall paper in the “before” pictures? Not sure what to do with the ugly vinyl 1980s wall paper in my horror of a bathroom. But I DO now know what to do with the tile floors! Thank you for that post!
kelly says
Yes, she removed it. I had the same question. See Week One at the top of this blog post.
rose says
hello,
where are the wall mount toothbrush holder and soap dish from?
thank you!
rose
Kelly says
Pretty! So did you Kilz/primer over the old wall paper and then paint it gray? Or did you remove the wallpaper first?
kely says
nevermind! i found the answer.
Amy says
Love your bathroom. I’m curious how the linen shades on the sconces have held up over time in the bathroom. I have a small master bath and want to use the same RH sconces but am a bit nervous that the linen shades won’t hold up with the shower steam. Would love your thoughts. Thanks!
Kris Jarrett says
Hi Amy,
There haven’t been any issues with the shades and steam but strangely they’ve gotten discolored over time from the lightbulb (almost like mild scorching) even though I’m using the appropriate watt bulbs. It didn’t happen right away but it’s getting gradually worse and to the point that I’m going to try to find replacements soon.
Elain says
I thought it was white tile. No matter … it still looks great!
Elaine says
What an amazing and elegant transformation! I admire that you worked around existing items, such as soap dish, towel rack, tile, etc. already present in the room! Anyone can hire a contractor to rip out everything and start fresh (all it takes is money)! What you did was much more creative, imaginative, and showed your talent for design and decor. I love the lime green accent on the shower curtain (perfection!!) and I also love the clean white tile presently in the room and do hope you decide down the road to keep it as I think it adds much to the style of the bathroom!
Kris Jarrett says
Thank you so much Elaine – such a sweet comment! At some point I might replace the wall tile only because it’s pink tile that was glazed white years ago and it’s starting to chip with the old pink showing through. Oh the joys of an older home! 🙂
Alice says
what a gorgeous room! I love the lime green trim on the shower curtains, the little things really make the room.
Kris Jarrett says
Thanks so much Alice!
Nataliya says
Hi, Chris! That’s fabulous! I know it’s an old post, but may be you can answer my question. We have slightly textured walls. Do you think I can get away with that or a smooth wall is a must for this kind of stencil? What technique did you use to apply paint over the stencil – roller or something else?
Thank you so much!
Kris Jarrett says
I think it would be pretty difficult to stencil textured walls since the stencil needs to be laying totally flat for you to get nice, crisp lines. I used a roller for my stenciling – I have a post with all of the how-to details of my stenciling here: https://www.drivenbydecor.com/2015/08/stenciling-how-to-tips-tricks-pics.html
Jim says
I am glad you saved that classic white sink. It really gives other colors in the room a chance to contrast so it fits in with any decor change. Even the gray pattern contrasts with the white sink. Just imagine if you have picked a sink with a distinct color – how limiting it would be to any design choice in the future.
Robbie says
Speaking of sinks….I absolutely love it! We are remodeling and I’d love to have a pedestal sink because I think it’s much less fussy than a cabinet. What I like about yours is the wide sides so that guests have room to place their items when getting ready. I know the sink was there before your gorgeous remodel, but would you happen to know the brand and style?
Kris Jarrett says
Yes, it’s a Kohler sink! I added a link to the exact one to the Source List at the bottom of the post!
Mary Stewart says
Love the room! Can you please tell me if you used the medium or large size stencil for the wall? I want to use the stencil on one feature wall in my small, small, small dining room.
Kris Jarrett says
Hi Mary – I actually used the small wall stencil but it looks like Royal Designs reorganized their website and now has the small size listed separately as a furniture stencil. I changed the link at the end of this post so it will now go directly to the one I used. Good luck with your dining room!
Deb Johns says
What a beautiful transformation!! This looks fresh, but still so classic. I’m trying to update our house to sell (wish I had done improvements sooner, so we could enjoy them). I’m planning on using this stencil for a tiny powder room, but when I clicked your link, the only choices available were the medium and large. I’m wondering if the small is sold out. Can you confirm that you used the small size? The medium is 15 inches at the widest point, and I’m thinking that might be a bit too large. Thanks!
Kris Jarrett says
Hi Deb! I feel your pain on wishing you had done things before it was time to sell – I’ve done the same thing myself in the past. As far as the stencil, it is the small size that I used. I think they rearranged their site and the small size is now listed under their furniture stencils. Good luck with the work on your house!
Bonnie says
What a beautiful transformation! I’m wondering if you ever painted the tile floors? I’m wanting to do the same to mine and would love to see how you did yours. Thanks for such an inspiring blog!
Kris Jarrett says
I can’t believe that it’s almost a year later and STILL I haven’t painted the floor! That’s our hall bathroom that guests use when visiting our house and it seems like we always have something coming up that makes me not want to pull that bathroom out of commission for a week or two. I still plan to do it – hopefully soon!
Heidi says
HI Kris, It looks like you’ve replaced the actual towel bar and not the end brackets. Is this true? I just finished a flip house that had the same towel bar. The brackets are somehow attached to withstand a nuclear blast and the bar is wooden (go figure). Because I was anxious cutting the wooden bar and not being able to find a replacement, I compromised and spray painted it a brushed silver. I am assuming your bar is spring loaded to fit properly. Is this correct? If so, can you tell me where you found it? Many Thanks!
Kris Jarrett says
Hi Heidi – yes, I have those same lovely, impossible-to-remove end brackets so I just replaced the bar. I actually did a post on it that shows you exactly how I did it – here’s the link: https://www.drivenbydecor.com/2014/11/replace-towel-bar-mounted-ceramic-tile.html
Hope that helps!
Kris