Can you paint tile floors? Yes! I’m sharing how to paint a tile floor so it looks good and lasts! We painted the ceramic tile floors in our bathroom and this simple, inexpensive DIY transformed our space!
Have you ever had a project that ended up being so much easier than you expected that you wished you hadn’t procrastinated so long to do it? Painting the ceramic tile floors in our first floor bathroom was one of those projects!
I decided I was going to figure out how to paint our tile floor way back in 2014 when I was making over my space for the One Room Challenge. But.. the stenciling of the bathroom walls took so long that I ran out of time to do it before my big reveal. Somehow THREE full years went by before I finally knocked this little DIY project. It ended up being so cheap and easy to do and I LOVE the result! Welcome to my its-five-hundred-times-better-than-those-ugly-reddish-floors-were bathroom!
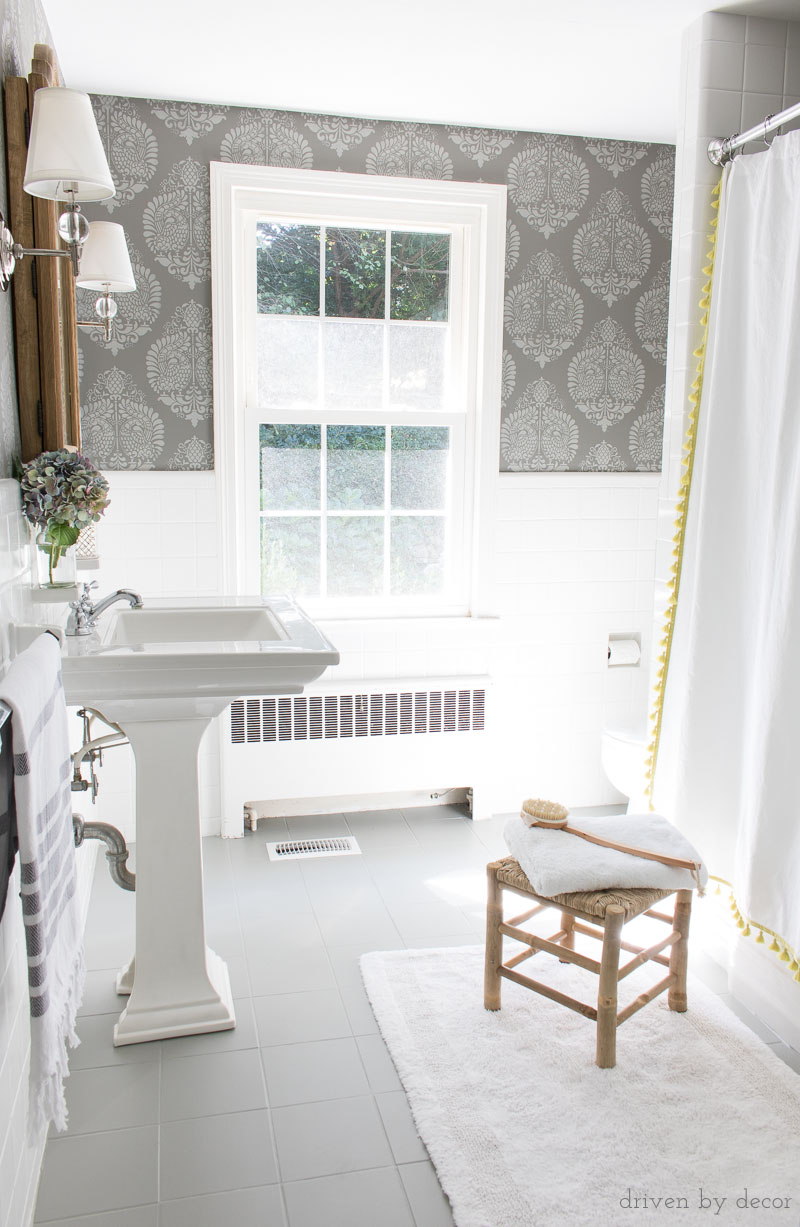
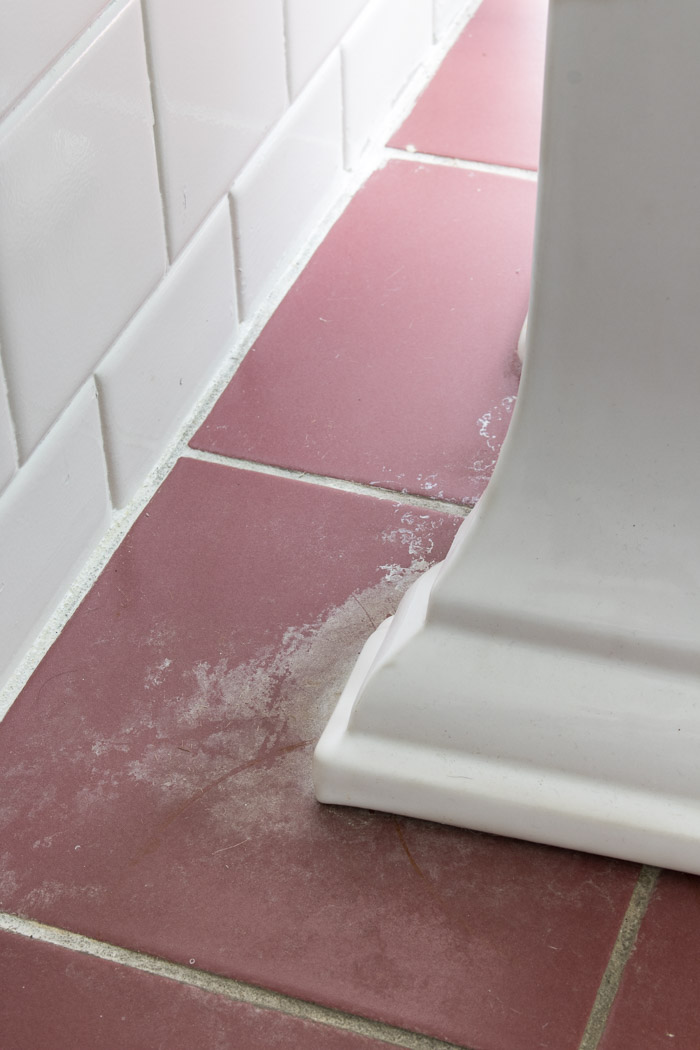
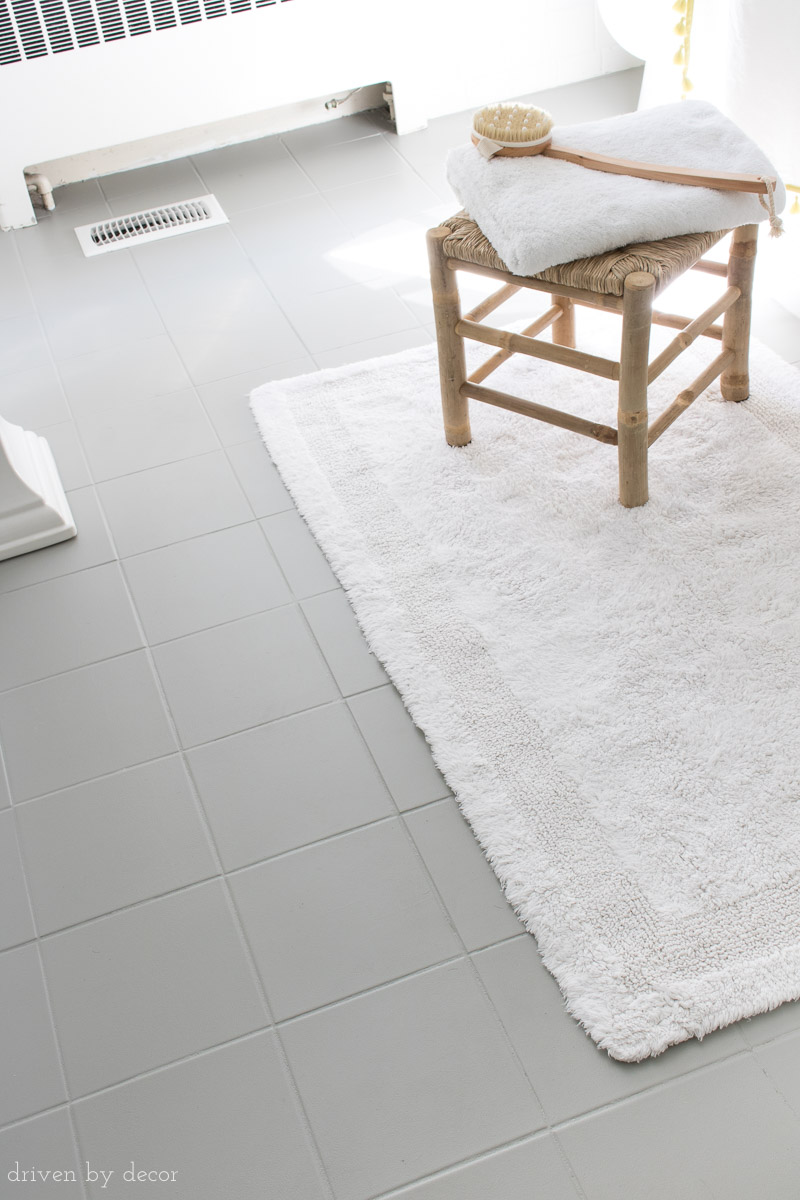
Such a HUGE improvement over the reddish tile we started with, right?!

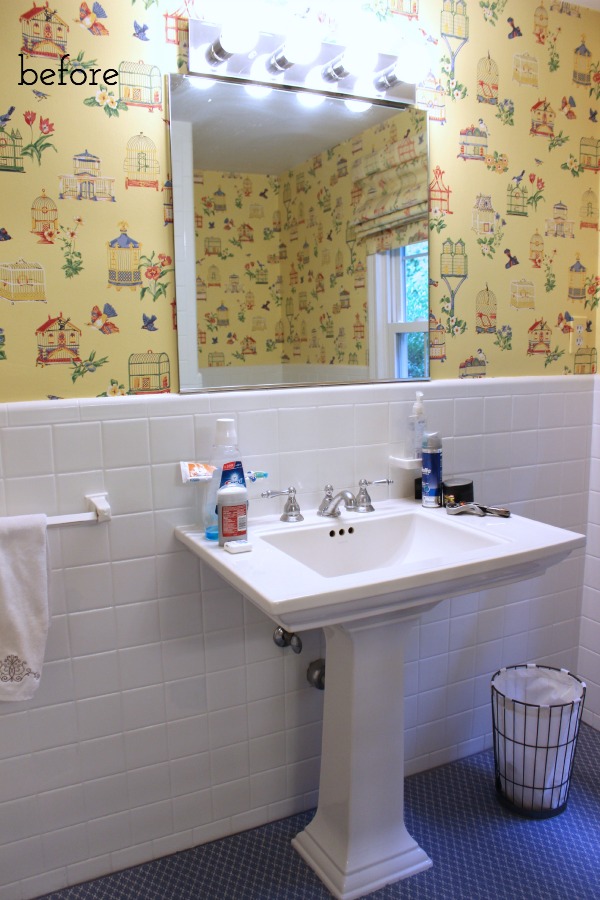
And believe it or not, the ugly color wasn’t even the worst thing about the old tile floors. Behind both the sink and the toilet, the tile had gross, ugly stains that I couldn’t get off no matter how hard I tried. It was completely gagworthy and something the previous owners hid under a custom cut rug they had in this bathroom when we bought the house:
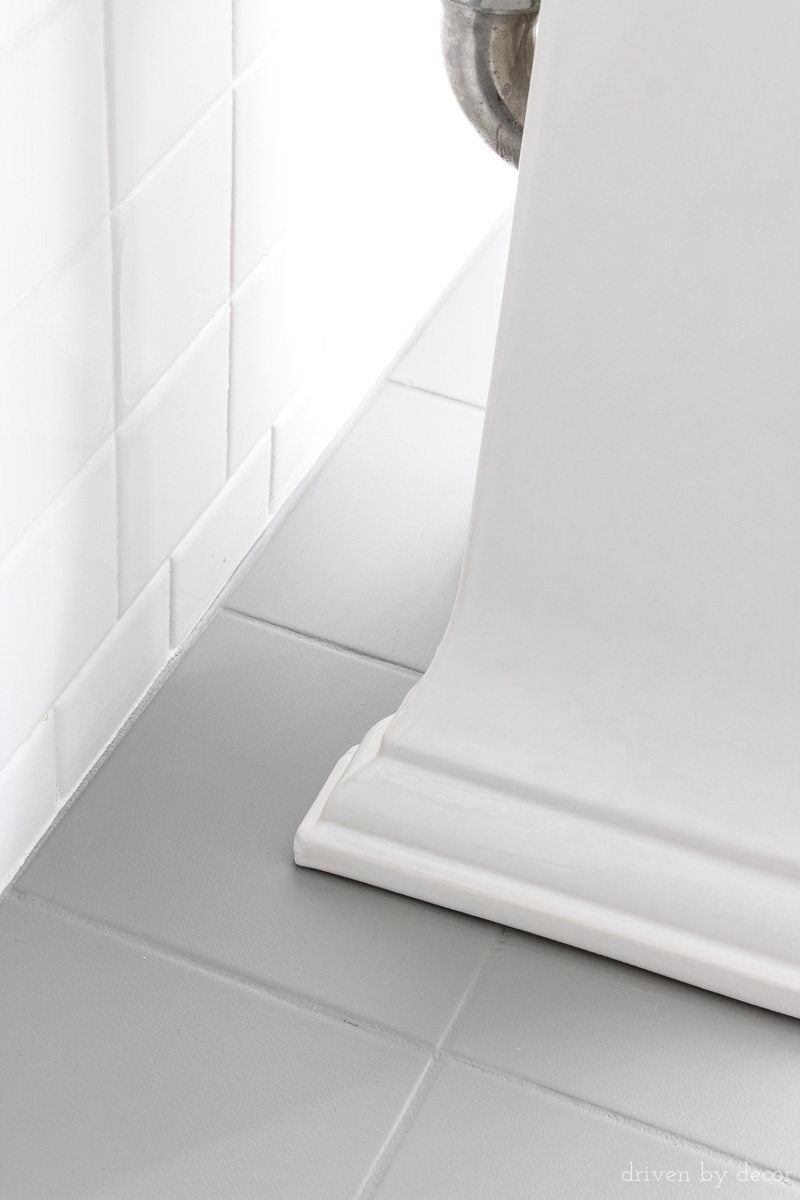
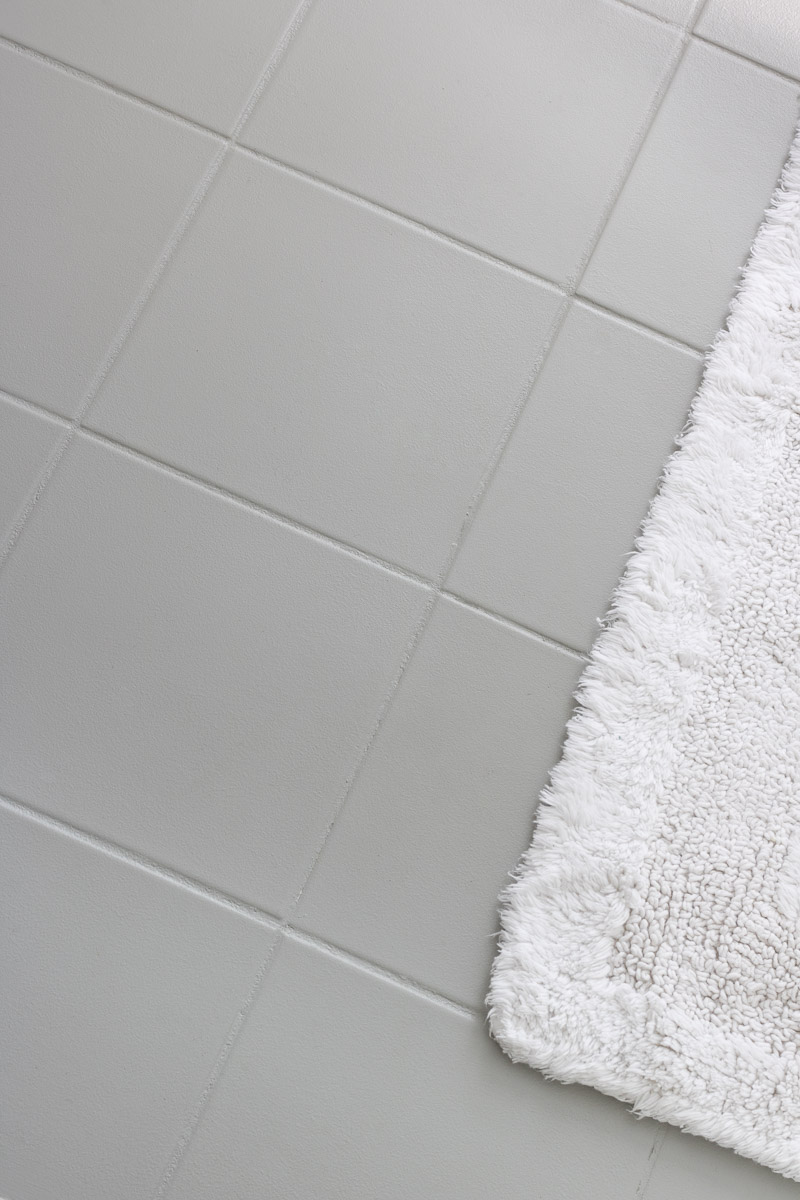
Now you’d never know that my poor tile had such an ugly past!
It’s been six years now since we painted our tile floors and I would do it all over again! Today, I’m sharing everything you need to know about how to paint a tile floor so it lasts! 🙌🏻 (post includes commissionable links; for more information, see my full disclosure statement {here})
Step 1: Gather Your Supplies
These are the supplies you’ll need to successfully knock this project out:
- Sandpaper (I used 80, 120, and 220 grit) and/or an electric sander (I used {this sander} and {this sandpaper} that fits it.
- Stripper and cleaner (I used {this one})
- Grout or caulk to repair cracked/missing grout (if needed)
- Bonding primer (I swear by {this STIX primer})
- 4″ mini rollers such as {these} that have ¼″ nap
- Mini roller frame
- Paint brush
- Benjamin Moore Floor & Patio Paint
- Polyurethane topcoat (optional)
Step 2: Sand Your Tile Floors
The first step is to lightly sand your tile floors. The purpose is not to remove the glaze on the tile, it’s just to scuff it up which helps the primer adhere. And it also removed the disgusting crap on the surface of my tile that I couldn’t get off no matter what I tried.
It’s important to note that ceramic tile can contain lead so consider testing for it or consulting with a professional if you’re unsure about your tile. Always use protective eyewear and an appropriate mask or respirator to prevent you from breathing in the sanding dust. And contain the dust so it doesn’t go into other areas of the house.
I used {this electric sander} which makes the job so much quicker and easier than doing it by hand. If you do a lot of projects around the house and don’t already have one of these electric sanders, I’d highly recommend it. It’s lightweight, fits in the palm of your hand, and has an angled head to get into corners easily:
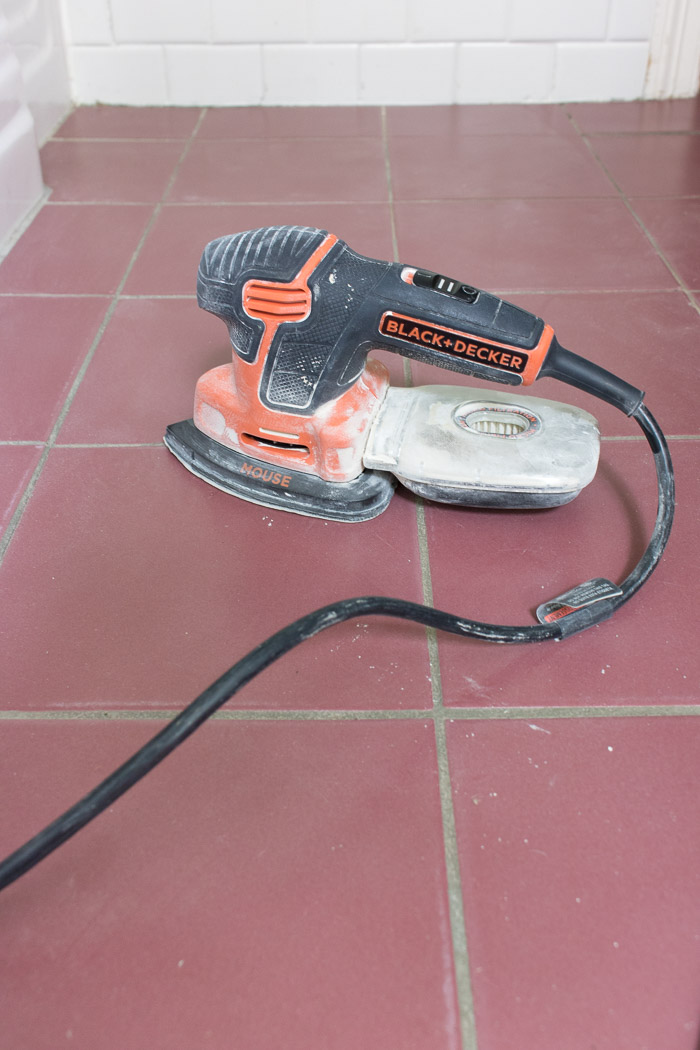
I sanded the tiles that had a build-up of crud on them with 80 grit sandpaper, did a light sanding of the whole floor with 120 grit, and then finished off with a quick once-over with a fine 220 grit sandpaper. A variety pack of sandpapers that fit the mouse sander such as {this one} is perfect.
Step 3: Clean Your Floors (Super Well!)
After finishing sanding, I vacuumed up all of the dust and debris and then went to town on cleaning my floors. Any heavy-duty stripper & cleaner should do the job – you can get the one that I used online {here}.
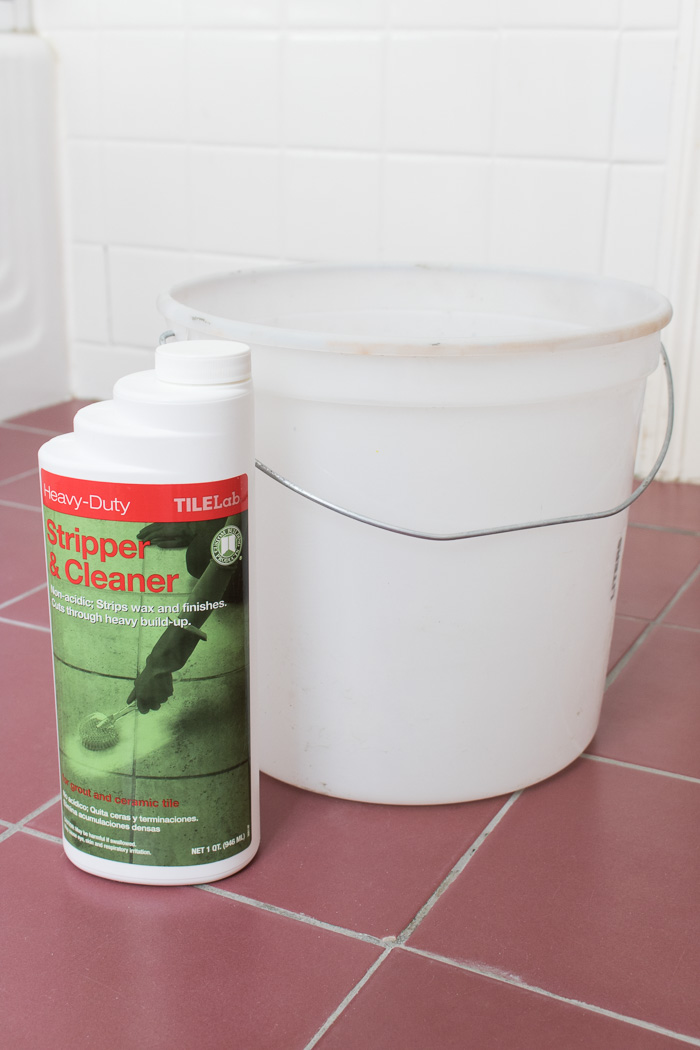
I mixed the cleaner with water (per the instructions), mopped it onto the floor, let it sit for about 15 minutes, and then scrubbed the entire floor with a nylon scrub brush. Then I cleaned it off with bucket of warm water and did it a second time. The cleaner the floor, the better your paint will adhere!
Step 4: Repair any Missing Grout or Cracked Tiles
The grout on our floor was a mess and there are several areas where chunks of it were missing. Regrouting is a pretty huge job since you need to spend a lot of time digging out the old grout first so I went the easy route and simply used paintable caulk to fill in and smooth over any bare spots in my grout. The caulk adhered well and now that it’s painted, you would never know that I had done it.
Now would be the time to replace or repair any cracked tiles too. I had one tile closer to our bathtub with a crack in it but knew it would be covered by our bathroom rug so I simply caulked the cracked portion and sanded down the rough edge a bit instead of replacing it.
Step 5: Apply a Good Primer
Using a really good primer is the key to success for painting ceramic tile! I used INSL-X STIX (available {here}) which is my go-to primer for painting surfaces that paint might normally have a hard time adhering too.
I used a paint brush and small roller simultaneously (I use a ¼ inch mini roller like {these}), painting the edges and grout lines with my brush and then rolling on the primer for the rest. Just make sure to start at the far end of the room and work towards the door so you don’t paint yourself into a corner. Once it was dry, I recoated using the same technique.
Step 6: Paint Your Tile!
I painted our floor tile in the same way as I primed it, using a paint brush on the edges and on the grout and rolling the rest as I went (as with the primer, I used a 4 inch mini roller like {this}):
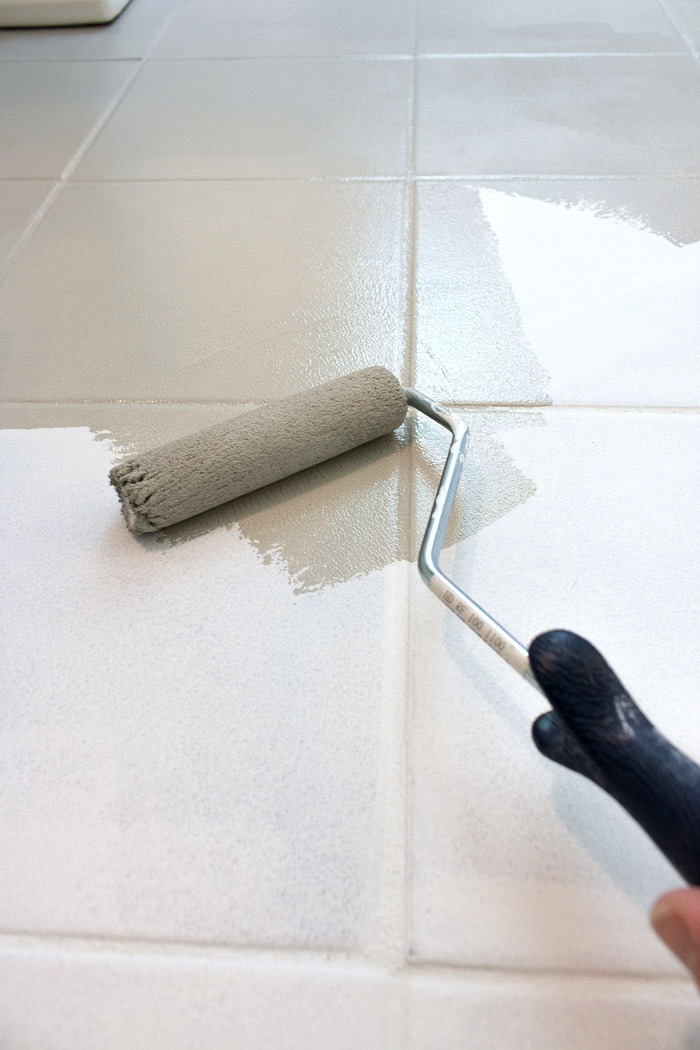
The type of paint that I used was Benjamin Moore’s Floor & Patio Paint since it’s meant to stand up to lots of use and abuse. It comes in High Sheen and Low Sheen options. I chose Low Sheen just for personal preference.
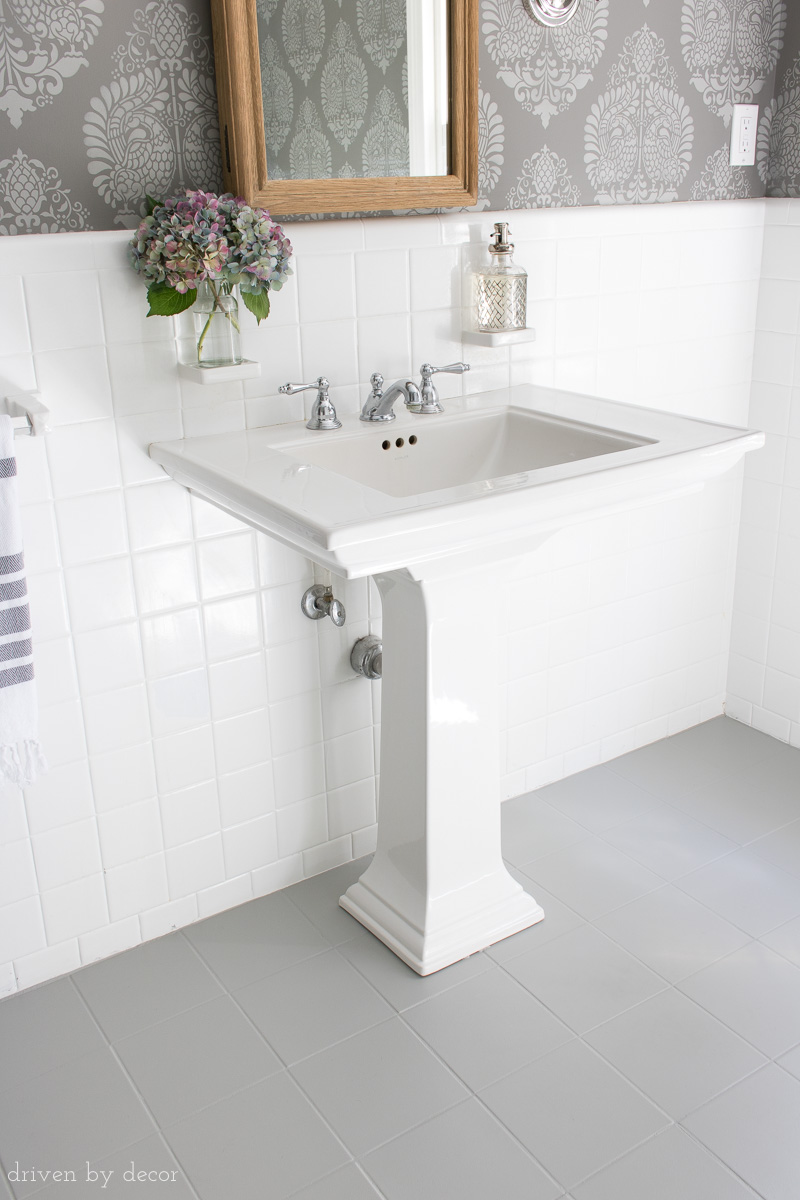
I applied three coats of paint, letting it dry according to the paint instructions in between coats. The color I chose is Benjamin Moore Platinum Gray, which is the same gray color as the lighter portions of my stenciled walls.
Step 7: Seal Your Tile?
The last step, if you choose to do it, is to seal your tile. I was definitely torn on whether or not to seal mine. With porch paint you technically don’t need to seal it since the paint is made to withstand a lot of wear. The pro of adding a polyurethane topcoat is that it will make your painted tile more durable. The negative is that with a polyurethane topcoat, if you get a gash in your floor that needs to be repaired, it’s a little trickier to fix in a way that it blends in perfectly if you’ve topcoated with polyurethane.
I decided NOT to use a polyurethane topcoat and years later I’m happy with that choice. At one point a deep scratch appeared on one of our tiles that I’m guessing was made by stone getting stuck in someone’s shoe tread while construction was being done on our house. I was able to sand and repaint just that one tile and it blended in perfectly.
I also recoated our painted tile floors a few years after they were first done to freshen them up, and since I had no polyurethane topcoat I didn’t have to do any prepwork to remove it before repainting.
Step 8: Let Your Floor Dry & Then Put It To Use!
After your last coat of paint or polyurethane, give your floor at least a couple of days to fully dry before walking on it. The more humid it is, the longer it will take. It’s best to be gentle with it (no heeled shoes, etc.) for the first week or two until everything is fully cured.
Overall, I’m incredibly happy with how our painted tile floor looks and how it’s worn! Especially for a project that cost me under $100!
It’s fun to look back and see how far this bathroom has come. This is what it looked like when we moved in and the tile was covered by carpet (which I promptly took out because I decided that even the ugliest tile is better than a rug that goes around the toilet – yuck!):
and here it is today:
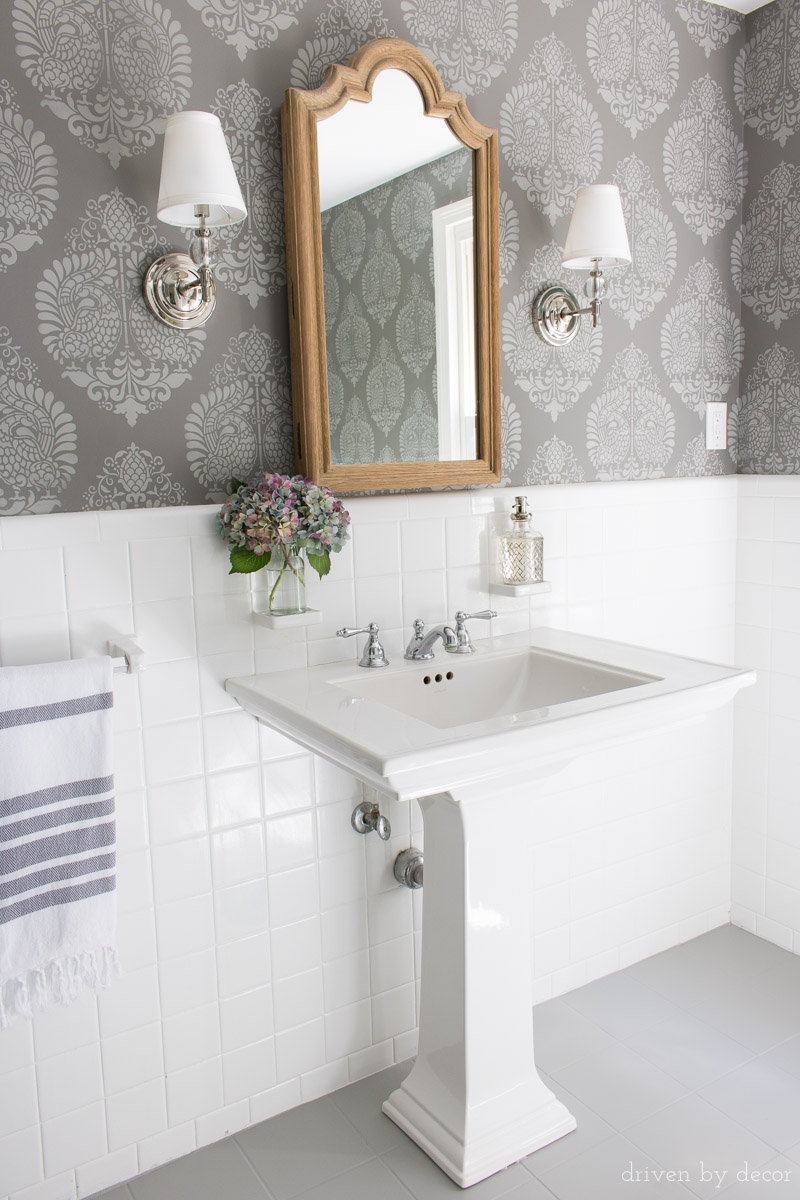
Powder Room Sources: Damask Wall Stencil (11.25″ x 15.5″) | Arched wood medicine cabinet mirror – no longer available | Pedestal Sink | Sconces (Polished Nickel) | Gray & white striped towel
The best part is that it’s a room we didn’t spend a ton of money on. Other than the money spent on the wood medicine cabinet and sconces, the rest of the changes were accomplished with inexpensive DIY projects. To learn more about our bathroom makeover check out my posts on:
Wall Stencils (yes, those walls are stenciled, not wallpapered!)
How to Replace a Towel Bar with Fixed Ceramic Ends
Also check out my post on our painted bathroom vanity which was another easy painting project that made a huge difference!
UPDATE!! If you’re wondering how our painted tile floors have held up, check out my post how how our painted tile lasted with an update of how they had done years later!
Thanks for stopping by!


Carol says
You’ve definitely inspired me!!!!!
Wish me luck:)
Thank you.
Keeli says
Is it still holding up after almost 3 years?
Kemah says
Just simply beautiful! I googled painting ceramic tile floors and found your site. So glad that I did.
I’m contemplating doing my kitchen floors. We live on a ranch, sandy soil, dogs and a high traffic area. Eventually, we will replace the floors with hardwood, but until then, I just can’t stand these 12×12 brownish tiles. Ugh! Lol our entire house is a 1993 ranch house, great bones, but dated!
Looking forward to seeing more of your DIY projects. Thank you!
Amy G says
Kris, so excited to try this — I think I am going to go the stencil route possibly. I initially planned to do vinyl peel and stick tiles, but they were really expensive. There had to be a better option for a basement bathroom — here it is!
Marie says
That’s a fabulous job you did. I’m just concerned that it has actually lasted? Did it as I’m thinking of doing the same thing in our downstairs toilet…..
Alex says
I have the same question, how is it holding up?
Kris Jarrett says
This follow-up post has all the details! https://www.drivenbydecor.com/does-painted-tile-last/
Anonymous says
You did a fabulous job and it looks amazing. I was thinking of doing this to my bathroom floor, but after finding out about the dry time I dont think it would work for me since it’s the only bathroom. Unless there’s a way around it.
KAREN says
Hi Kris,
I just “found” you and have already loved your posts/projects. I can really appreciate your knowledge (I’m an Interior Designer) it is so nice that you share it with us all. A big thank you to you!
Hanna says
Stunning. Love it.
Hanna says
Beautiful. How long did it take to do / paint the bathroom floor? Planning to do mine.
Jessica says
Sorry if I read over this – did you remove your toilet and sink or just paint around?
Thanks!
Kris Jarrett says
No I just painted around them!
Vessela says
Amazing! I am inspired to paint ours.
What kind of roller did you use to achieve smooth finish? Did you use new rollers between coats?
Did you use satin finish?
Thank you.
Kris Jarrett says
I used a 1/4″ nap small roller for a super smooth finish. I didn’t use a new roller between coats – just covered the roller with plastic and stored it in the refrigerator between coats. I used the Low Sheen version of the paint I mentioned.
Ignacia says
I´ve done it three times and non of them have worked. Mabye is because my bathrooms are used to shower about 4 times every day and the paint is not exactrly for that? Any idea?
Kris Jarrett says
Did you paint the tile in the shower itself or the tile on the floor? I don’t know if painting tile that’s actually in the shower and being exposed to that much moisture and humidity would work.
Carmel says
Be aware of a phenomenon that can happen with latex paint. I followed all of your directions, then put the first coat of Benjamin Moore Floor and Patio paint. After 5 days, the first coat is still tacky. This is called blocking. Just hoping it doesn’t take weeks or months to resolve. Still needs the second coat.
Stephanie Lynn McCain says
Now this makes more sense. Beautiful.
Angela says
The new “look” on you bathroom is absolutely gorgeous! I need to do this in the second bathroom. Beige walls, beige tiles yuck ? looked ok in the beginning three yrs ago. But after seeing what you did, I need to do ours and sooner rather that later. Thanks for sharing ??
Angela N.
Bill says
Question, what grit sand paper did you use? and if you want a high gloss paint, what paint do you buy?
Kris Jarrett says
I sanded the tiles I had with the crud on them with 80 grit, did the whole floor with 120 grit, and then finished off with a quick once-over with a fine 240 grit. And the same Floor & Patio paint that I used has a high gloss option!