Can you paint tile floors? Yes! I’m sharing how to paint a tile floor so it looks good and lasts! We painted the ceramic tile floors in our bathroom and this simple, inexpensive DIY transformed our space!
Have you ever had a project that ended up being so much easier than you expected that you wished you hadn’t procrastinated so long to do it? Painting the ceramic tile floors in our first floor bathroom was one of those projects!
I decided I was going to figure out how to paint our tile floor way back in 2014 when I was making over my space for the One Room Challenge. But.. the stenciling of the bathroom walls took so long that I ran out of time to do it before my big reveal. Somehow THREE full years went by before I finally knocked this little DIY project. It ended up being so cheap and easy to do and I LOVE the result! Welcome to my its-five-hundred-times-better-than-those-ugly-reddish-floors-were bathroom!
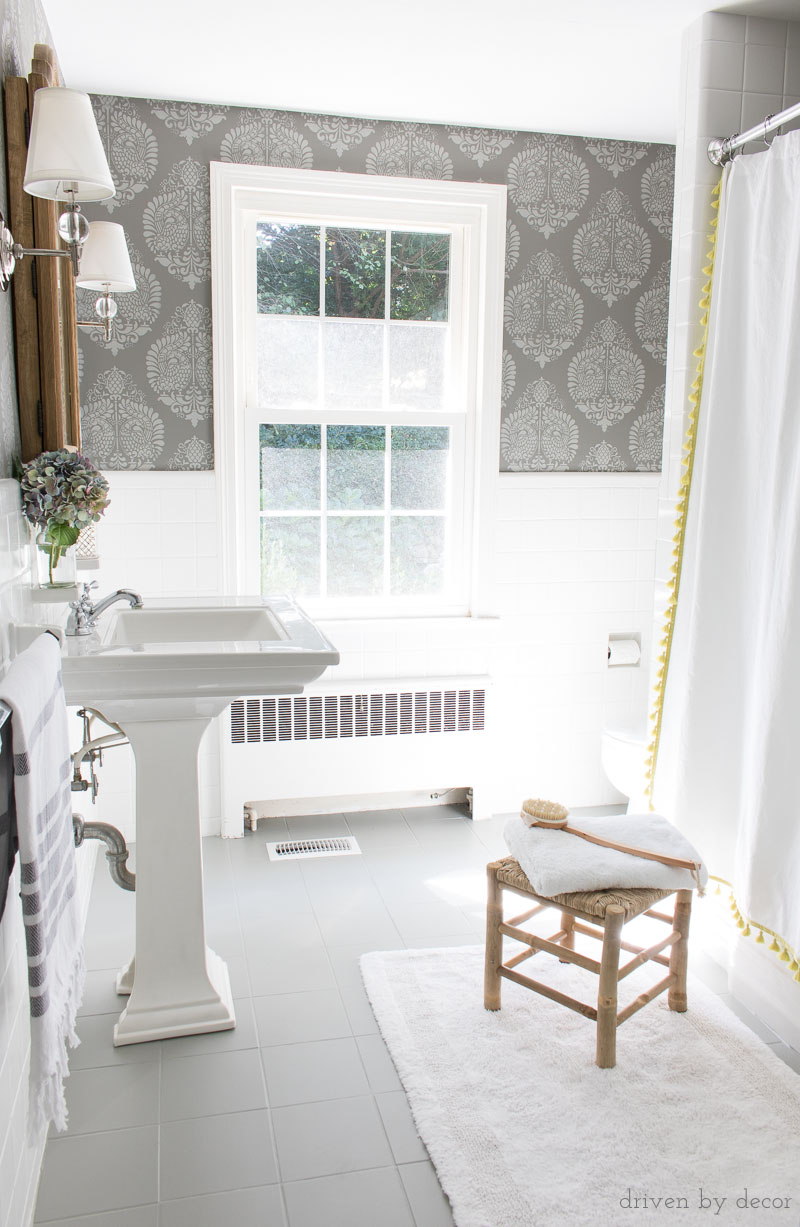
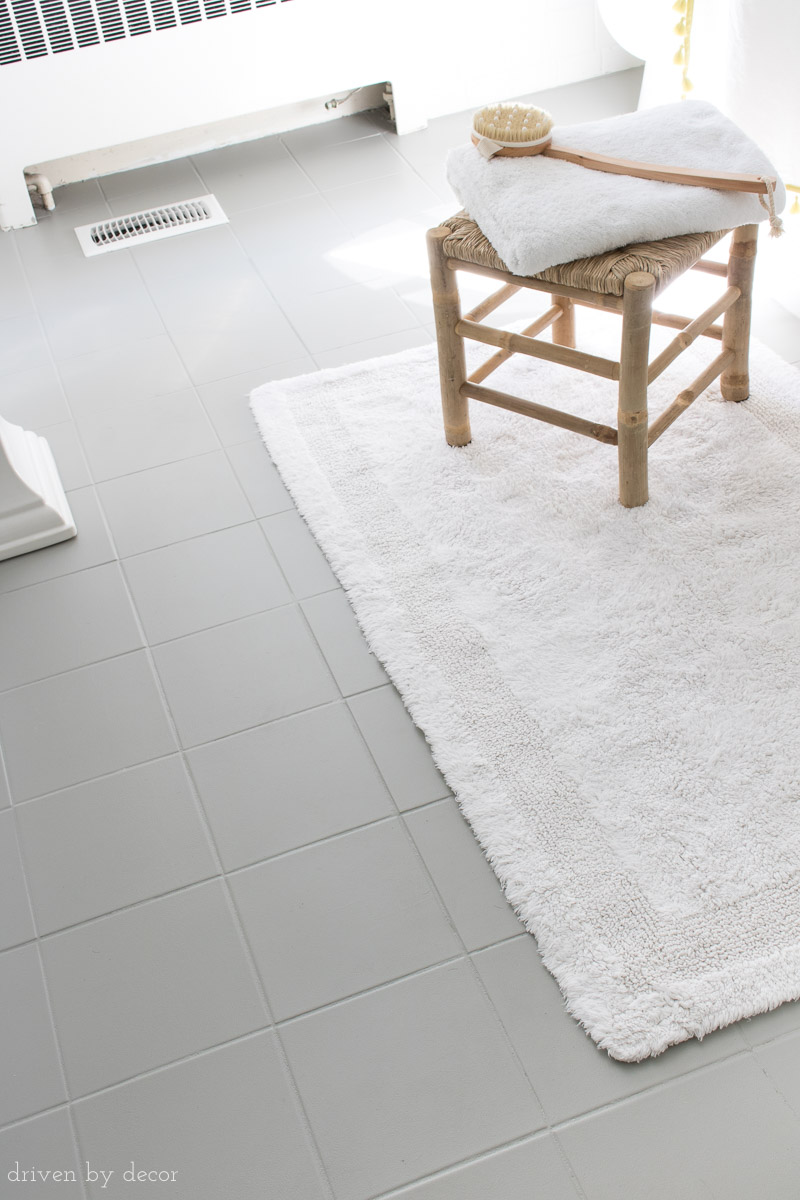
Such a HUGE improvement over the reddish tile we started with, right?!

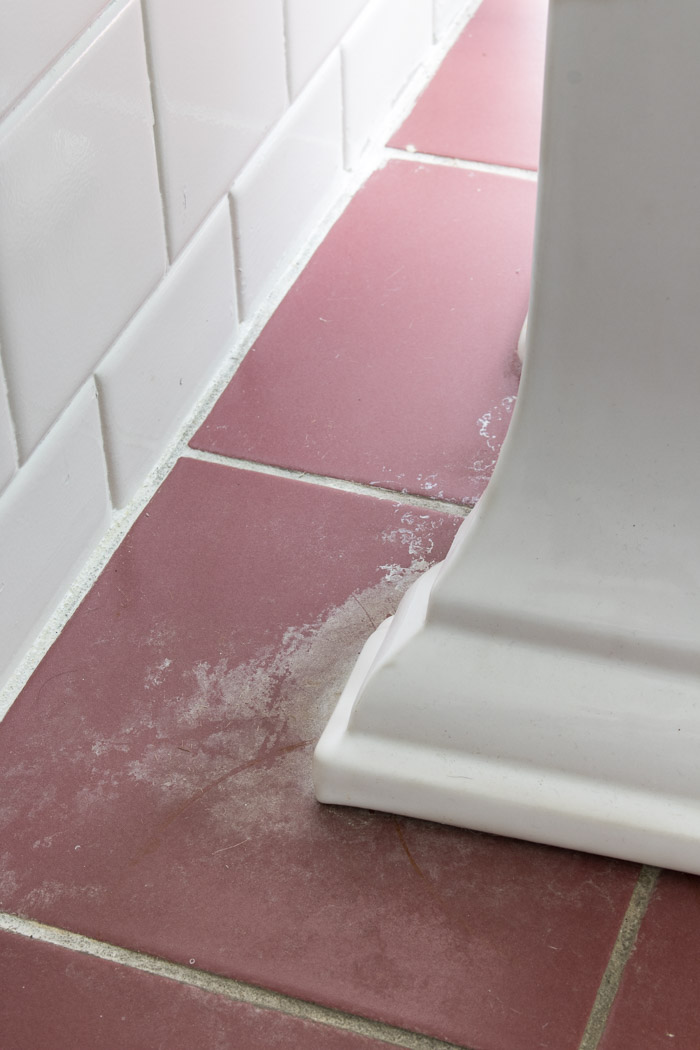
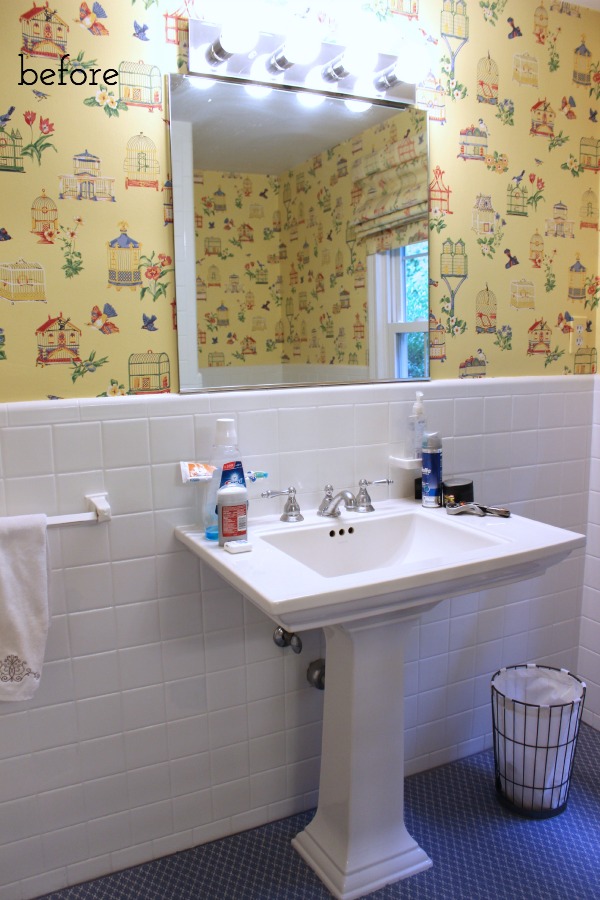
And believe it or not, the ugly color wasn’t even the worst thing about the old tile floors. Behind both the sink and the toilet, the tile had gross, ugly stains that I couldn’t get off no matter how hard I tried. It was completely gagworthy and something the previous owners hid under a custom cut rug they had in this bathroom when we bought the house:
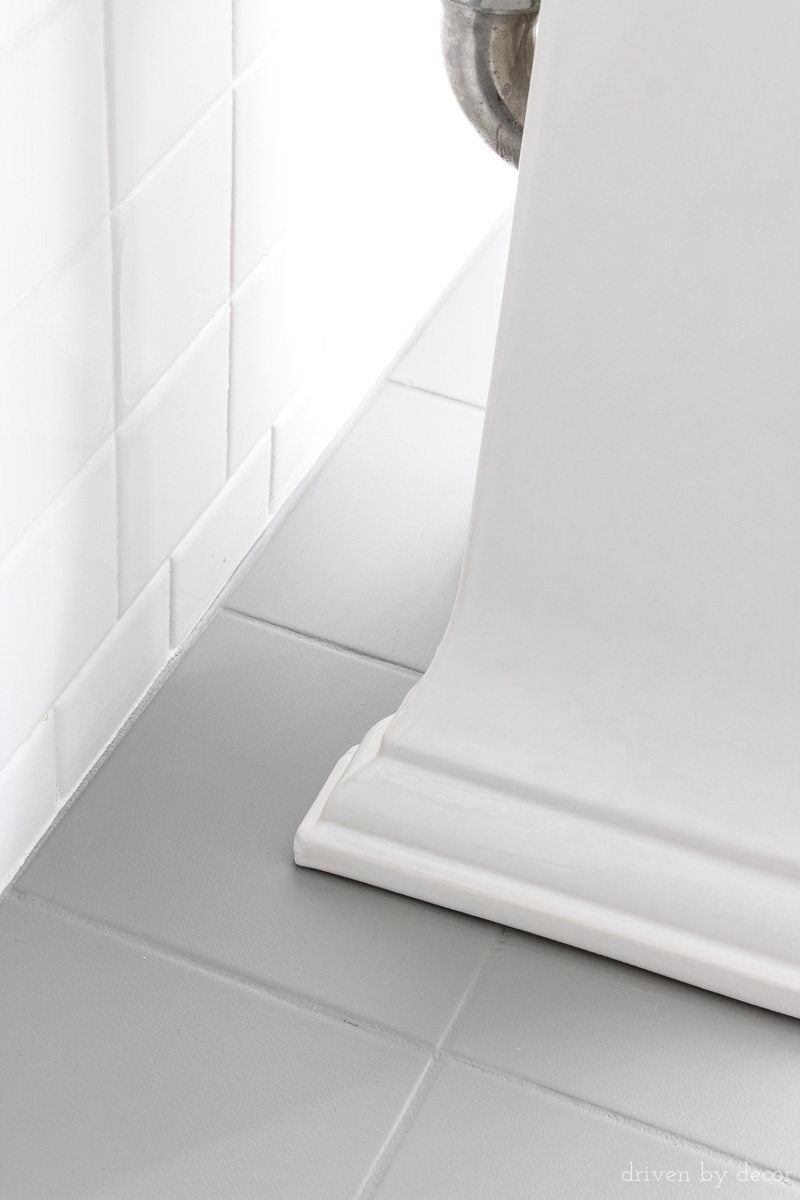
Now you’d never know that my poor tile had such an ugly past!
It’s been six years now since we painted our tile floors and I would do it all over again! Today, I’m sharing everything you need to know about how to paint a tile floor so it lasts! 🙌🏻 (post includes commissionable links; for more information, see my full disclosure statement {here})
Step 1: Gather Your Supplies
These are the supplies you’ll need to successfully knock this project out:
- Sandpaper (I used 80, 120, and 220 grit) and/or an electric sander (I used {this sander} and {this sandpaper} that fits it.
- Stripper and cleaner (I used {this one})
- Grout or caulk to repair cracked/missing grout (if needed)
- Bonding primer (I swear by {this STIX primer})
- 4″ mini rollers such as {these} that have ¼″ nap
- Mini roller frame
- Paint brush
- Benjamin Moore Floor & Patio Paint
- Polyurethane topcoat (optional)
Step 2: Sand Your Tile Floors
The first step is to lightly sand your tile floors. The purpose is not to remove the glaze on the tile, it’s just to scuff it up which helps the primer adhere. And it also removed the disgusting crap on the surface of my tile that I couldn’t get off no matter what I tried.
It’s important to note that ceramic tile can contain lead so consider testing for it or consulting with a professional if you’re unsure about your tile. Always use protective eyewear and an appropriate mask or respirator to prevent you from breathing in the sanding dust. And contain the dust so it doesn’t go into other areas of the house.
I used {this electric sander} which makes the job so much quicker and easier than doing it by hand. If you do a lot of projects around the house and don’t already have one of these electric sanders, I’d highly recommend it. It’s lightweight, fits in the palm of your hand, and has an angled head to get into corners easily:
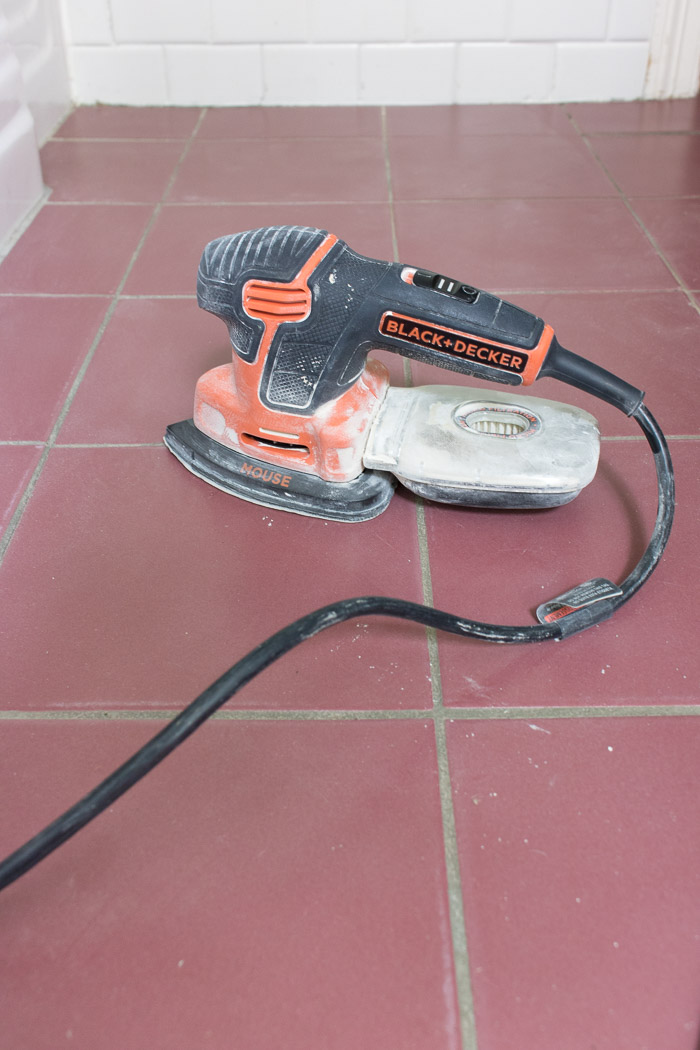
I sanded the tiles that had a build-up of crud on them with 80 grit sandpaper, did a light sanding of the whole floor with 120 grit, and then finished off with a quick once-over with a fine 220 grit sandpaper. A variety pack of sandpapers that fit the mouse sander such as {this one} is perfect.
Step 3: Clean Your Floors (Super Well!)
After finishing sanding, I vacuumed up all of the dust and debris and then went to town on cleaning my floors. Any heavy-duty stripper & cleaner should do the job – you can get the one that I used online {here}.
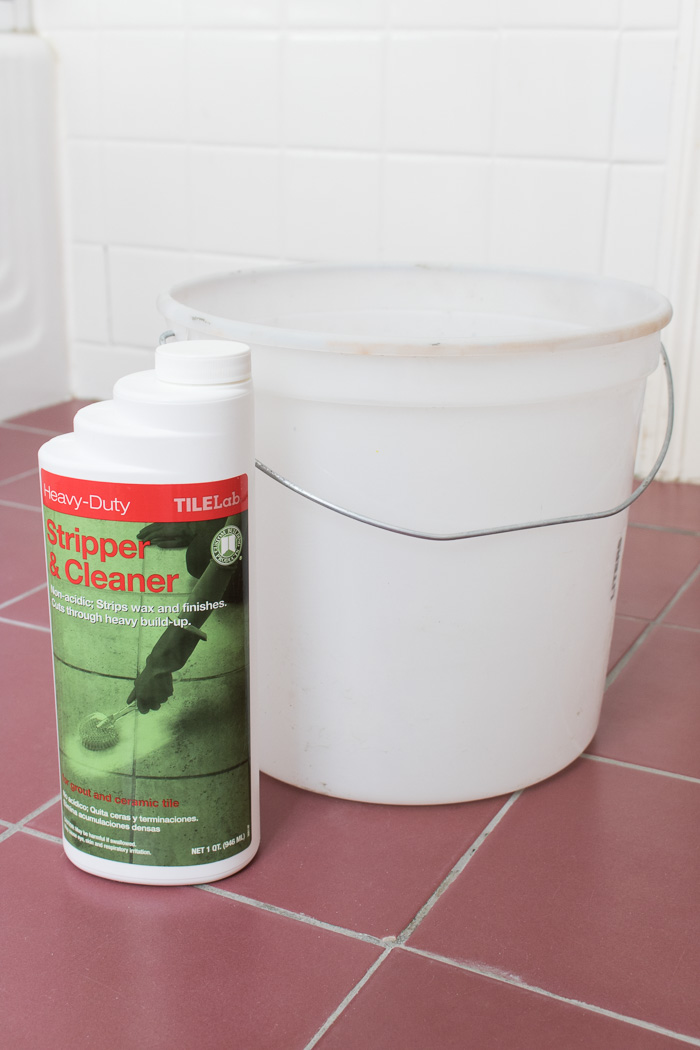
I mixed the cleaner with water (per the instructions), mopped it onto the floor, let it sit for about 15 minutes, and then scrubbed the entire floor with a nylon scrub brush. Then I cleaned it off with bucket of warm water and did it a second time. The cleaner the floor, the better your paint will adhere!
Step 4: Repair any Missing Grout or Cracked Tiles
The grout on our floor was a mess and there are several areas where chunks of it were missing. Regrouting is a pretty huge job since you need to spend a lot of time digging out the old grout first so I went the easy route and simply used paintable caulk to fill in and smooth over any bare spots in my grout. The caulk adhered well and now that it’s painted, you would never know that I had done it.
Now would be the time to replace or repair any cracked tiles too. I had one tile closer to our bathtub with a crack in it but knew it would be covered by our bathroom rug so I simply caulked the cracked portion and sanded down the rough edge a bit instead of replacing it.
Step 5: Apply a Good Primer
Using a really good primer is the key to success for painting ceramic tile! I used INSL-X STIX (available {here}) which is my go-to primer for painting surfaces that paint might normally have a hard time adhering too.
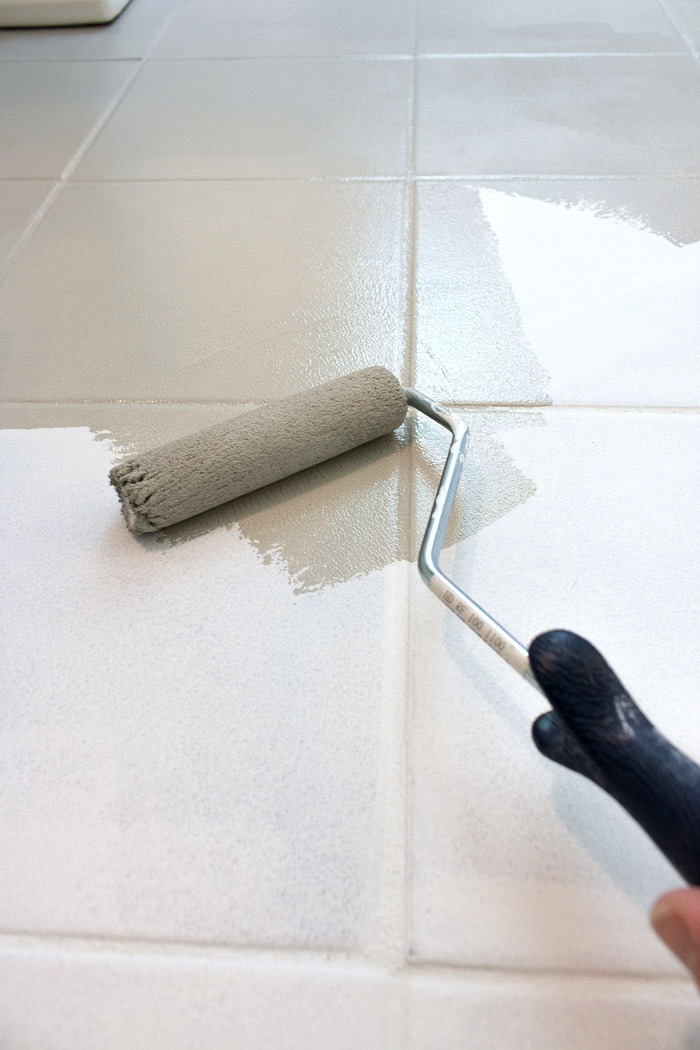
I used a paint brush and small roller simultaneously (I use a ¼ inch mini roller like {these}), painting the edges and grout lines with my brush and then rolling on the primer for the rest. Just make sure to start at the far end of the room and work towards the door so you don’t paint yourself into a corner. Once it was dry, I recoated using the same technique.
Step 6: Paint Your Tile!
I painted our floor tile in the same way as I primed it, using a paint brush on the edges and on the grout and rolling the rest as I went (as with the primer, I used a 4 inch mini roller like {this}):
The type of paint that I used was Benjamin Moore’s Floor & Patio Paint since it’s meant to stand up to lots of use and abuse. It comes in High Sheen and Low Sheen options. I chose Low Sheen just for personal preference.
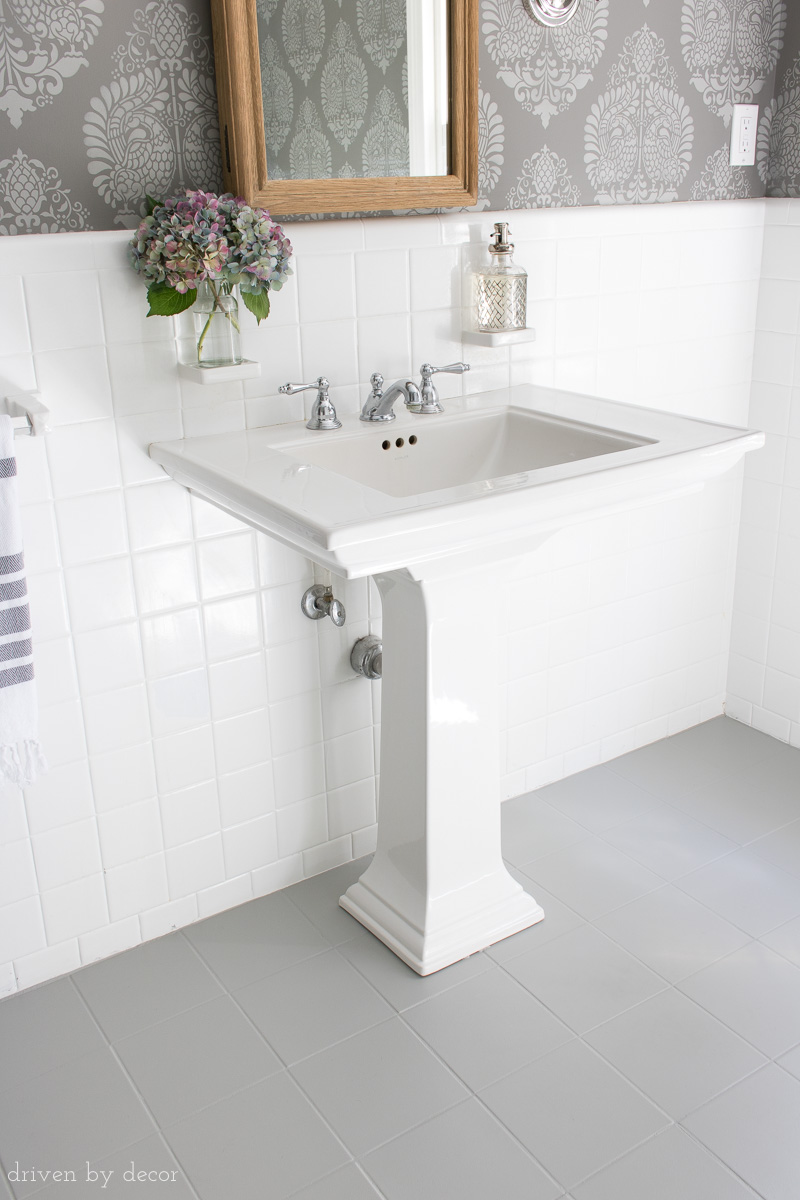
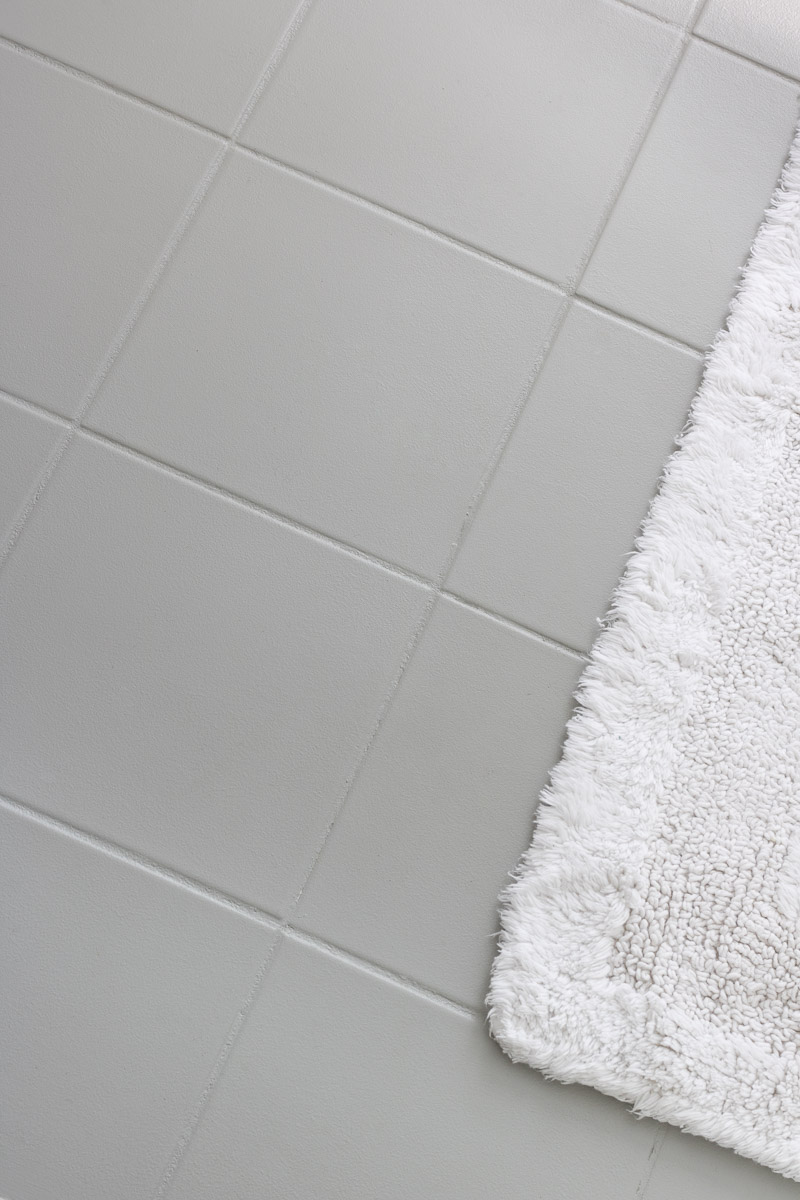
I applied three coats of paint, letting it dry according to the paint instructions in between coats. The color I chose is Benjamin Moore Platinum Gray, which is the same gray color as the lighter portions of my stenciled walls.
Step 7: Seal Your Tile?
The last step, if you choose to do it, is to seal your tile. I was definitely torn on whether or not to seal mine. With porch paint you technically don’t need to seal it since the paint is made to withstand a lot of wear. The pro of adding a polyurethane topcoat is that it will make your painted tile more durable. The negative is that with a polyurethane topcoat, if you get a gash in your floor that needs to be repaired, it’s a little trickier to fix in a way that it blends in perfectly if you’ve topcoated with polyurethane.
I decided NOT to use a polyurethane topcoat and years later I’m happy with that choice. At one point a deep scratch appeared on one of our tiles that I’m guessing was made by stone getting stuck in someone’s shoe tread while construction was being done on our house. I was able to sand and repaint just that one tile and it blended in perfectly.
I also recoated our painted tile floors a few years after they were first done to freshen them up, and since I had no polyurethane topcoat I didn’t have to do any prepwork to remove it before repainting.
Step 8: Let Your Floor Dry & Then Put It To Use!
After your last coat of paint or polyurethane, give your floor at least a couple of days to fully dry before walking on it. The more humid it is, the longer it will take. It’s best to be gentle with it (no heeled shoes, etc.) for the first week or two until everything is fully cured.
Overall, I’m incredibly happy with how our painted tile floor looks and how it’s worn! Especially for a project that cost me under $100!
It’s fun to look back and see how far this bathroom has come. This is what it looked like when we moved in and the tile was covered by carpet (which I promptly took out because I decided that even the ugliest tile is better than a rug that goes around the toilet – yuck!):
and here it is today:
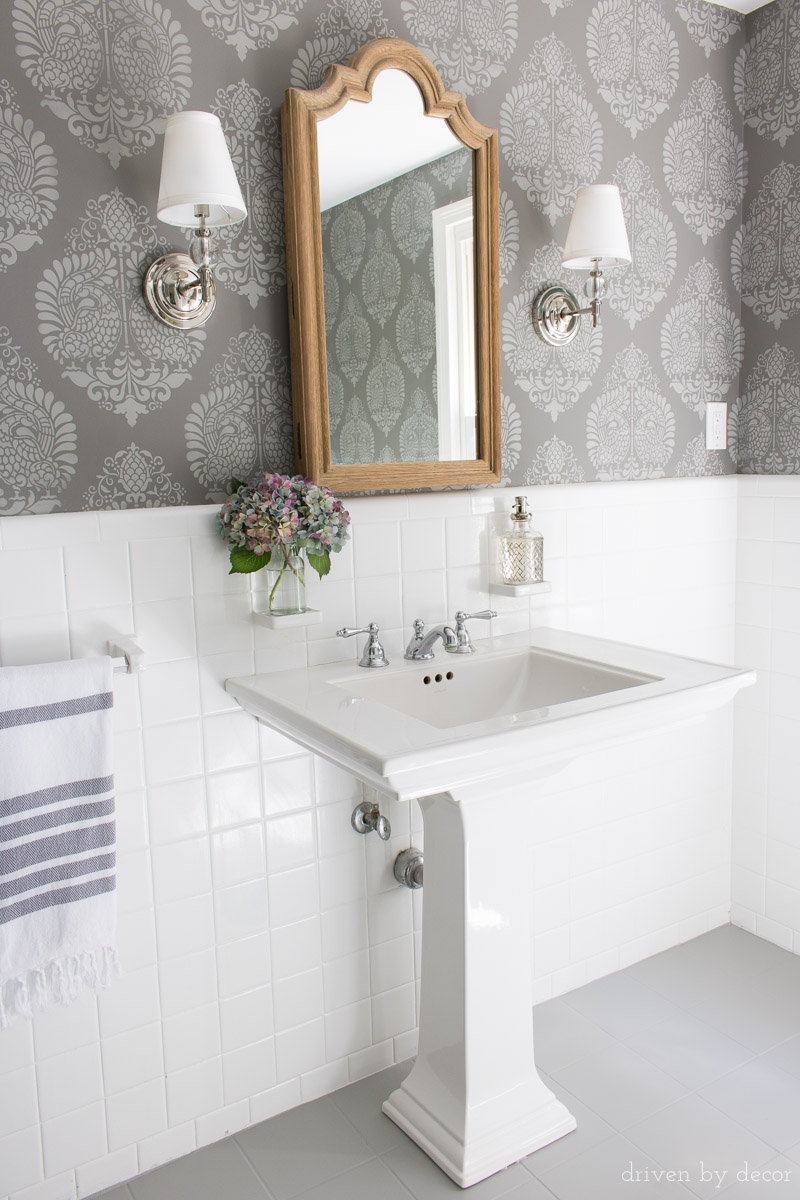
Powder Room Sources: Damask Wall Stencil (11.25″ x 15.5″) | Arched wood medicine cabinet mirror – no longer available | Pedestal Sink | Sconces (Polished Nickel) | Gray & white striped towel
The best part is that it’s a room we didn’t spend a ton of money on. Other than the money spent on the wood medicine cabinet and sconces, the rest of the changes were accomplished with inexpensive DIY projects. To learn more about our bathroom makeover check out my posts on:
Wall Stencils (yes, those walls are stenciled, not wallpapered!)
How to Replace a Towel Bar with Fixed Ceramic Ends
Also check out my post on our painted bathroom vanity which was another easy painting project that made a huge difference!
UPDATE!! If you’re wondering how our painted tile floors have held up, check out my post how how our painted tile lasted with an update of how they had done years later!
Thanks for stopping by!


Lisa Kraus says
Did you paint same color in grout spaces? It looks great! I want to do this to my kitchen floor. Thank you so much! Not sure if I need to do any to the grout
Kris Jarrett says
Yes, I painted the entire floor including the grout.
Eliza says
Hi Kris,
Beautiful bathroom! Thank you very much for sharing all the necessary information to ‘Get it Done’. I’m so glad I found your post and look forward to receiving your posts, in the meantime….I’ll get on the tile floor, LOL.
Debbie says
Looks amazing! I really want to paint the ugly beige tile in my only bathroom. Since I only have one bathroom, how long would I need to wait before showering? Is this even an option? Thanks for your help!
Kris Jarrett says
It really depends upon how humid it is when you paint and how much air circulation your room gets. I would give it a minimum of a few days even under ideal conditions.
Becky says
Absolutely stunning makeover. You have inspired me to paint my downstairs bathroom tile floor. I eventually want to put vinyl wood down over it– my whole first floor is tiled, like one big airport landing strip. BLECH. So if the painting doesn’t turn out as pretty as yours, I won’t freak out too much – knowing it will get covered next year anyway. Thank you for inspiring me!
Kris Jarrett says
That’s exactly what gave me the courage to do mine – I was planning on changing out my bathroom floor in a few years so knew if it was a fail, it wasn’t the end of the world. I’ve been so pleasantly surprised by how well it’s held up!
Susan Mohr says
I am having my tub and surround reglazed in a couple of weeks and have been contemplating replacing the bathroom tile, too, but having a hard time finding a contractor that isn’t booked up, plus cringe at the inconvenience of the mess of removing the old tile, and the toilet being out of commission for days! Ran across this blog and now I know how to make the old tile look like new! We do have radiant heat in the floor, but I actually think that will be a plus if I wait until Fall to paint the tile, as it should enhance drying time. Also thinking of doing a stencil design on these 8X8 tiles. I’m thinking a little pattern can hide any imperfections from wear and tear. My husband will be away in Sept for a 2 week hunting trip, the perfect time for this project. And, yes, the heat may be on by then, as we live in Wisconsin! : ) Thanks so much for a great “how-to” blog!!
Kris Jarrett says
So glad you found it helpful Susan! And I think a pattern would look beautiful!
Alice Pax says
I was looking for a post on how to paint a bathroom floor.
I just love your blog. Your bathroom is beautiful and the directions were so simple!
THANK YOU!!!
Tamara Harrison says
Thank You! I really enjoyed how you wrote this. Honestly, I usually just browse over these type of articles. But I actually read yours and that means I will be using your guide for my entry tile, bathroom tile, and kitchen tile. The kitchen tile I may have to touch up more often. But… it will be easier than chipping and tearing up all that tile. Thank You Again.
Rebecca Shalmoni says
Any chance you can link the paint you used? I’m trying to find it online, but am having trouble finding the exact one!
It would be much appreciated 🙂
Kris Jarrett says
I don’t think it’s available for purchase online because it has to be tinted to the color you want but any local Benjamin Moore dealer should carry it!
Layah says
How is the paint holding up years later? You have done a great job the bathroom is beautiful.
Kris Jarrett says
It’s held up great – details are in this post: https://www.drivenbydecor.com/does-painted-tile-last/
Tracy says
The whole room looks quite beautiful. I have been thinking of doing the same with my bathroom floor tiles. I shelled out to retile walls but doing the floor is just too much upheaval and cost. Everyone looks in horror and shakes their head when I talk of painting my floor tiles but I think if you really put the effort into the preparation then it’s got to be worth a try. I am keeping your article on hand to refer to.
And maybe you need to ban outside shoes in the house but that’s quite a common culture in my neck of the woods – three seasons – snow and slush, mud season, dry dust and grit season, back to snow.
Kris Jarrett says
Yes, prep is definitely key! And I would love to totally ban shoes in my house – I try as much as I can but my husband is proving to be difficult to train 🙂
Jean says
It looks great! I’ve been thinking about having this done using Garage floor paint. Now I’m wondering if it would be a durable as the porch and floor paint us used? I loved the new wallpaper too! Great job.
Kris Jarrett says
I’m not sure – I’ve never used paint specifically for garage floors!
Debi Croy says
I’m guessing from the pictures & description that you did not remove the toilet and sink for the project. Did you caulk around them when done? Also, what matte roller did you use?
Thanks
Kris Jarrett says
Hi Debi – no I didn’t remove either of those. I didn’t caulk around them but in hindsight I probably should have recaulked my toilet before painting the floor. Might do that when I recoat! I used a 1/4″ nap small roller for a super smooth finish!
Michelle says
Hello… I’m so inspired! I have a 1950’s black chipped tiled floor, walls and shower/tub that I’m going to do this to. It will be an enormous job with all the surfaces, but holy moly…. cheap! I want white on white on white….. clean as I have looked at this stained dirty chipped black tile for too long. I can’t wait! I’ll take a before and after!
Cheers!
Michelle
Kris Jarrett says
Good luck! My only hesitation would be the tile in your shower and tub – I’m not sure painted tile will stand up to how wet and humid it is in the actual shower or not.
Becky says
She didn’t paint inside the tub or shower, did she? I thought just the floor?
Becky says
Whoops, ignore my comment! I misunderstood who I was responding to!
Melissa says
Looks great! I am not happy with my kitchen tile (texture traps dirt). I wonder if something like this would be an inexpensive solution. Thanks for sharing.
Kris Jarrett says
Thanks Melissa – glad you found the post to be helpful!
Tara Stoddard says
We’re the wall tiles already white, or did you paint them as well?
Kris Jarrett says
Our bathroom walls were originally pink tile and the owners before us had them professionally reglazed in white.
Kate says
Thank you so much for this tutorial! I’m going to do a checker pattern in my bathroom and I’m so excited! Your bathroom looks amazing! I love seeing DIY mini makeovers that just need some elbow grease. So inspiring!
Kris Jarrett says
Glad you found it helpful Kate! Hope your project goes well!