If you’re painting over wallpaper glue, doing this first will get you the perfect result you’re looking for!
I LOVE wallpaper and the beauty it adds to a room. What I don’t love is removing a previous owner’s dated wallpaper. Having moved multiple times, it’s something I’ve done a LOT of. And what I’ve found is that no matter how you remove wallpaper, some residual wallpaper glue is left behind on the walls. If you start painting over wallpaper glue that’s not fully removed, you’ll find that the paint reactivates the glue remnants and you’ll have a bumpy mess on your walls.
So what do you do? I’m going to share my step by step guide for success, from removing your wallpaper to putting on that final coat of paint! Let’s get to it… (post includes affiliate links – full disclosure statement available {here})
Removing Wallpaper
My favorite way to remove wallpaper is with a steamer – you can use a wallpaper steamer like {this highly rated one} or you can just use a handheld portable clothes steamer which is my favorite tool. I have {this handheld steamer} and like it because I can alternate easily between steaming on top of the paper and under it to get it off best:
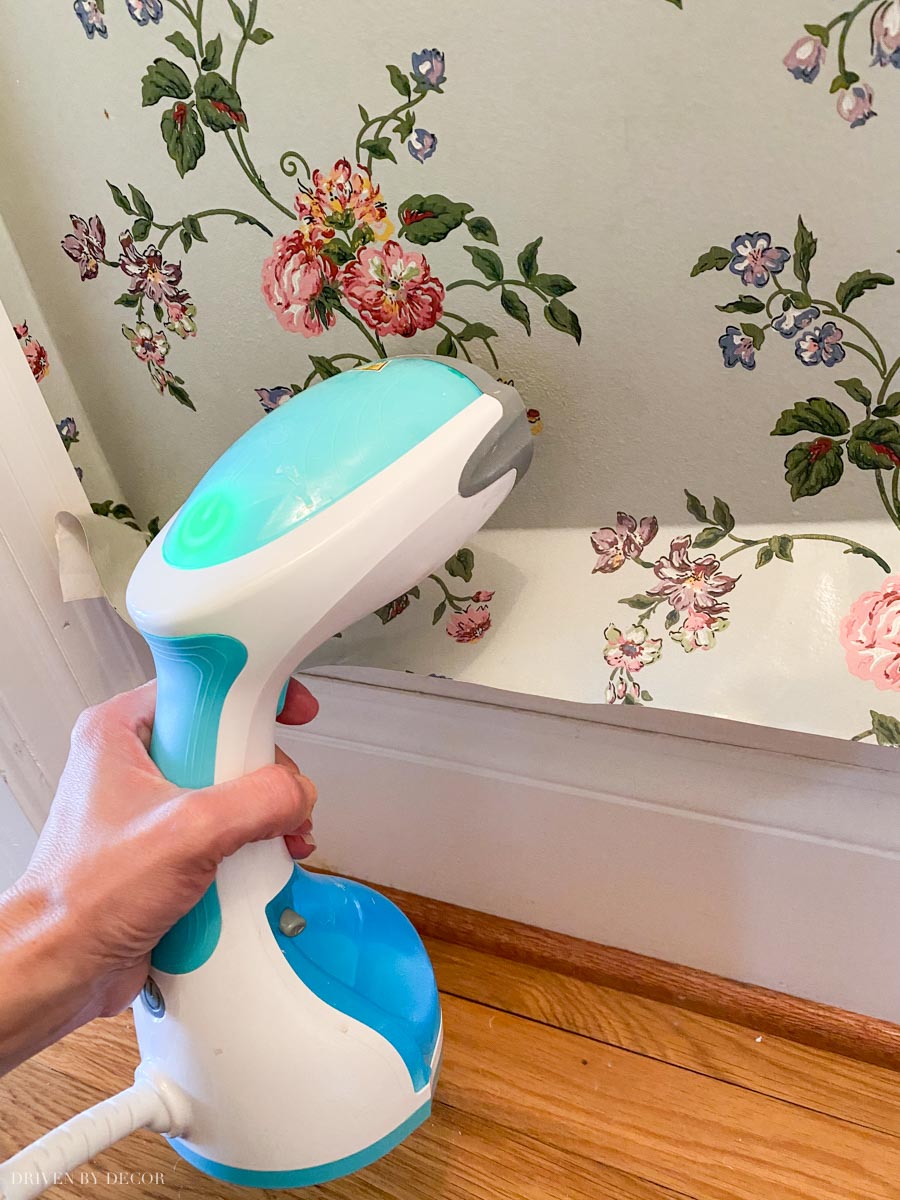
See my post on how to remove wallpaper for more details on using the steamer method of wallpaper removal plus other options for removing it. Once your old wallpaper is down, an important next step is to scrub your walls to remove as much glue as possible. Using a simple sponge and warm water will do the trick! If there is a lot of glue on the walls, skim a putty knife across the surface of your wall once you’ve dampened it to remove excess glue prior to scrubbing.
Sealing Your Walls
After you’ve scrubbed your walls, it might look like you’ve gotten all of the glue, but trust me, there’s some residual glue there. And if you start painting over wallpaper glue, it will reactivate the glue and leave you with little globs on your wall. What’s worked really well for me in dealing with the nightmarish residual wallpaper glue problem is this:
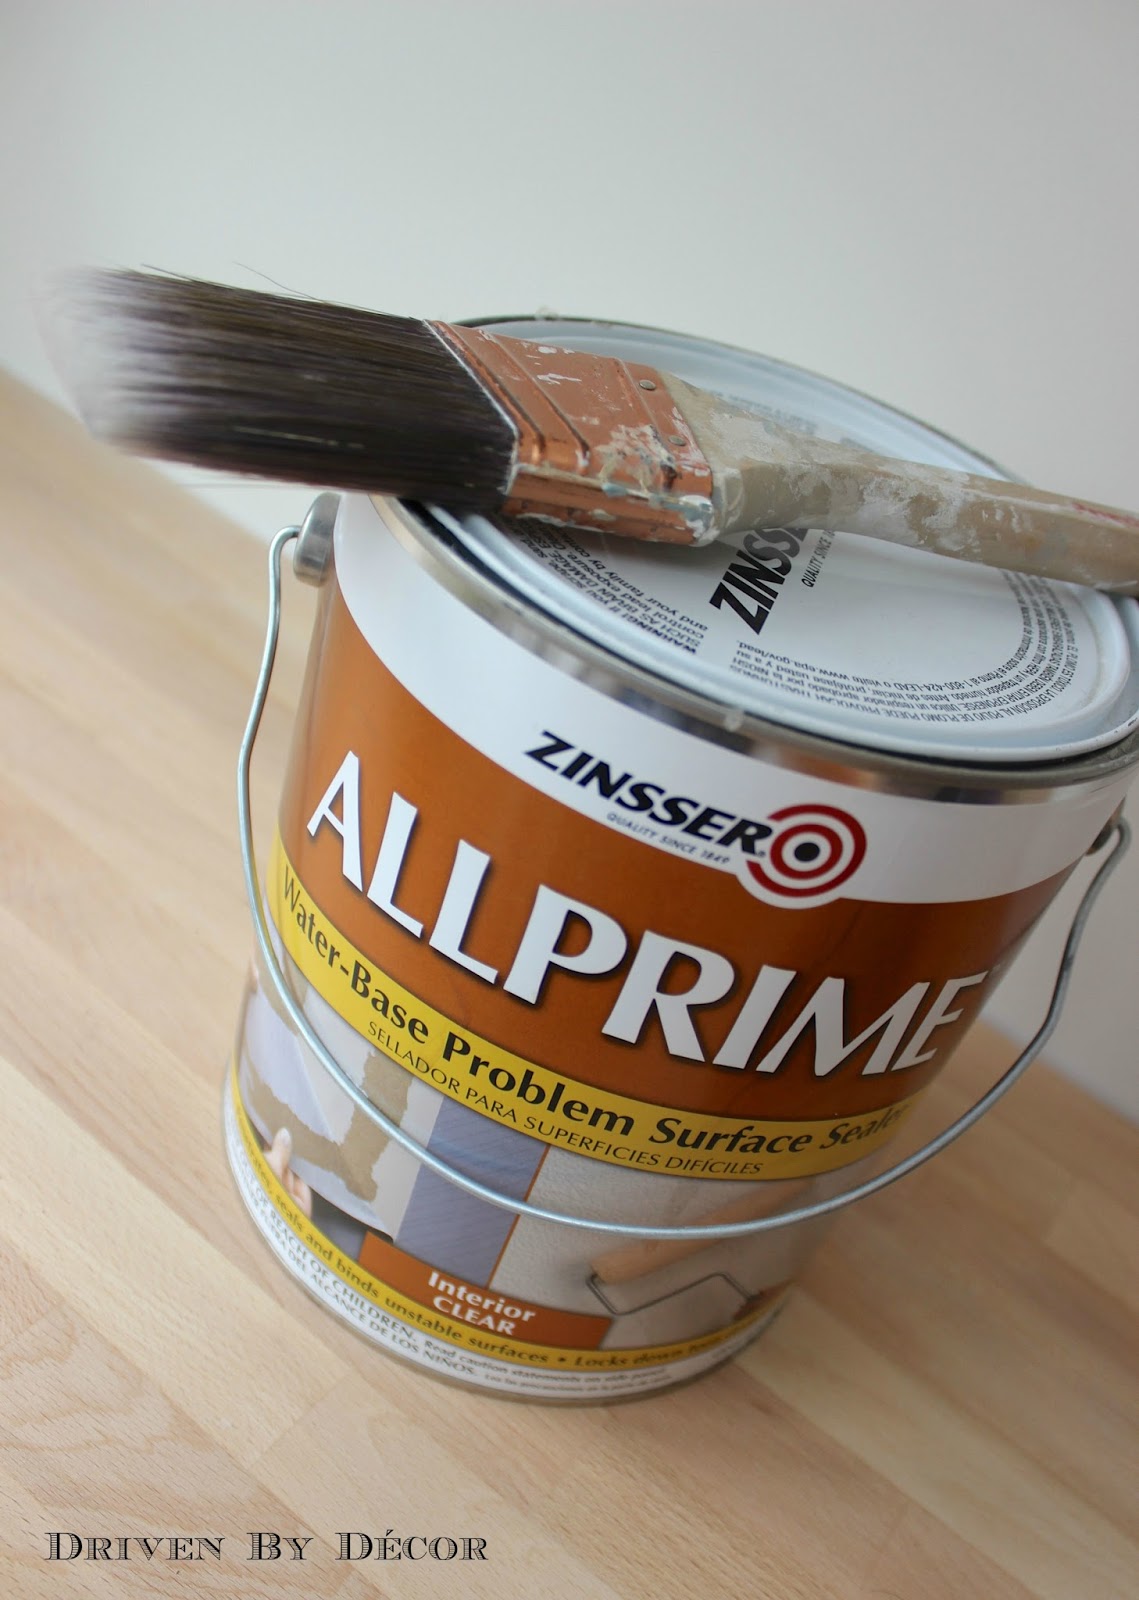
After scrubbing off the residual glue, I lightly sand the walls and then brush on a coat of Zinsser ALLPRIME Water-Base Problem Surface Sealer. (Note: Zinsser ALLPRIME is sold at Benjamin Moore dealers. It is the same product as Gardz Problem Surface Sealer which you can buy online {here}). These problem surface sealers do a few things. First of all, they seal in any residual glue so when you paint over it, you have a nice, smooth coat.
The other important thing that a problem surface sealer does is to seal peeling and cracked drywall. If your wallpaper was stubborn to remove, you may have a few spots cracked or torn spots like this where the bare drywall is exposed:
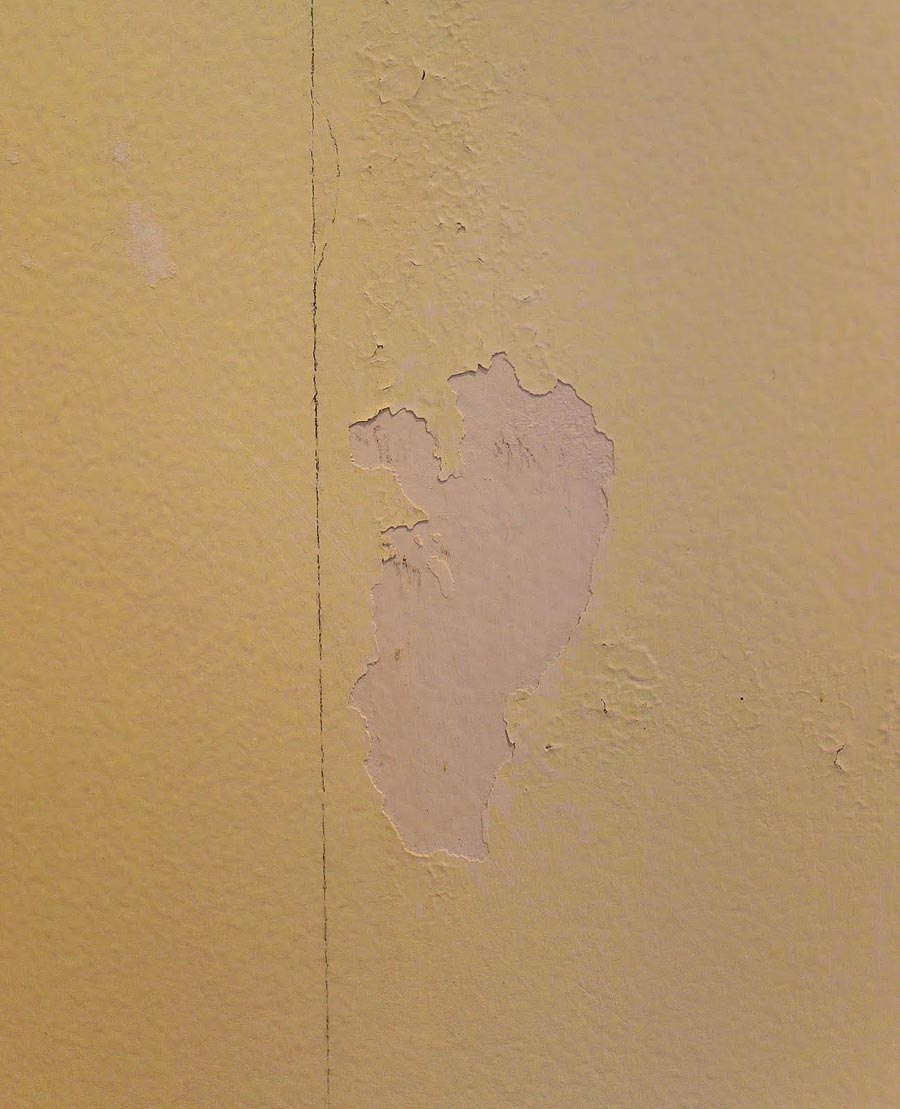
Once they’re covered with a problem surface sealer, these spots will be ready to patch and paint and will soon be unnoticeable.
Another way to seal the wallpaper glue is to use an oil-based primer. I much prefer one of the two problem surface sealers because (1) I don’t like working with any oil based products. You can’t clean your brushes, rollers, and other supplies with water and oil-based paint has a strong odor (usually with high VOCs). The other reason I prefer not to use an oil-based primer is that it takes a long time to dry. The problem surface sealers I recommend are fast drying, drying to the touch in just an hour.
Painting or Wallpapering Your Walls
They key to a beautiful paint job is all in the prep work. If you’ve used a sealer and patched any cracks or divots, you’ve set yourself up for success! See my post on how to paint a room for a list of the tools you’ll need to get your paint job done plus a step by step tutorial. What if you’re taking wallpaper down and then putting new wallpaper up? See my post on wallpaper installation for ten helpful tips for hanging your own wallpaper.
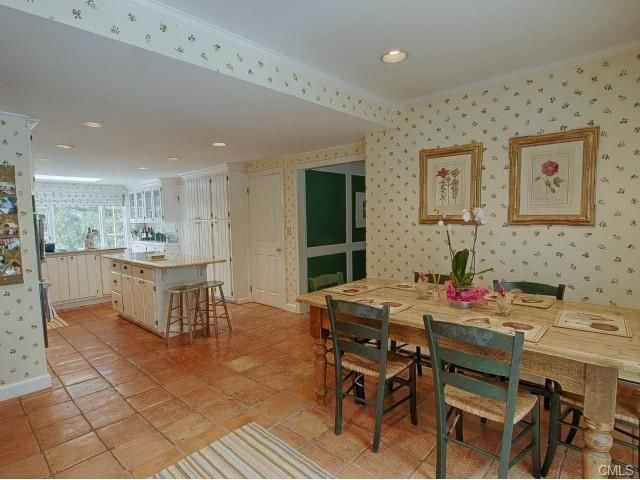
While it’s a lot of work, it’s definitely worth it in the end! In our previous home we took down wallpaper in room after room, including this dated floral wallpaper that was in the kitchen:
This is that same space after we remodeled our kitchen (and I took all of the wallpaper down and repainted with Benjamin Moore Cloud White):

For lots more details, pics, and sources check out my post on our kitchen remodel “before” and “after”. And you can tour the rest of our Connecticut home {here}. Good luck with your project!


Annie says
We moved into our house 2 years ago and much to our surprise we found out that the folks before us had sprayed wall texture over every inch of wallpaper in this house! What an unholy unstable mess. it is. It peels away from the walls when painting and makes the wallpaper below virtually un-strippable. Apparently people just cover up the wallpaper the easiest way possible in our market so they can sell their house quickly. It has been a nightmare to work with. Blech. I am heading out to buy Allprime right now!
Kris Jarrett says
Oh my gosh – what a nightmare! I hope the Allprime works as well for you as it did for me!
linda says
Well I hate to tell you but Benjamin Moore don’t carry this product. I have went everywhere to get this andi can’t find it. I called several Moore dealers and the all said the same thing. Good luck finding and if anyone around Flint Michigan knows where to find please post ????
Kris Jarrett says
Hi Linda – sorry you’re having a hard time finding it. When I wrote this post a year and a half ago, BM was carrying it. Did you see in the post where I noted that it’s the same product as Gardz Problem Surface Sealer by Rustoleum? Maybe you’ll have better luck finding that – I’d go onto Rustoleum’s site and use the search by store feature. Good luck!
Linda says
Thanks for this article. I just removed my wallpaper out of my bathroom and lucky me, my house isn’t that old and they had prepped correctly so it came down easy. Also, I only needed hot water to remove the bottom layer. The most surprising aspect of this was the horrible chemical smell of the primer…we had to evacuate the house! I have no ventilation in my powder room and it just about overwhelmed me!!
Again, great to know how to do this stuff and my next bathroom has windows and I’m not afraid of the wallpaper!!!
Kris Jarrett says
Glad you found this to be helpful Linda – good luck with your next wallpaper removal job!!
Loi Thai, Tone on Tone says
Congrats to the lucky winners! I’m just sorry I missed the giveaway.
PS – Your kitchen looks really big and airy. And full of light!!
Ashley @ The Honest Room says
I can understand why you looked over the wallpaper too. The bones of this house look amazing! The windows in the kitchen alone are worth buying this baby for. Looking forward to your next post to see how it all turned out!
Anonymous says
Where did you purchase this Zinsser product?
Kris @ Driven by Décor says
Thanks for the question – I just updated the post to give some more information about it. The Zinsser product is sold at Benjamin Moore dealers. It is the same product as Gardz Problem Surface Sealer, which can be found at Home Depot and on Amazon.
Loi Thai, Tone on Tone says
Thanks for sourcing the product, Kris! I will jot it down as I’m sure I’ll need it one day. Look forward to seeing the progress in the kitchen!
xo
Loi
Elizabeth @ The Little Black Door says
That always bugs me about house hunters, as well as the obligatory “this will be my closet honey, where will you put your clothes? hahahha” comment. Drives me bonkers! Good lucky with the wallpaper removal, you can do it!!
Jenny says
Sometimes ignorance is bliss, right? That *is* a lot of wallpaper! I have removed my fair share, and it. sucks. Plain and simple. I totally know what you mean about the reactivated glue, because I’ve experienced it firsthand – no fun! I did find a tool that helped with that too – it’s a big sponge, where the opposite side is kind of like a scrubber that you would use to scrub pots and pans. Definitely helps. I will make a note of the primer you recommended when I finally get the nerve (and strength) to tackle my master bathroom. Then my house will almost be wallpaper-free!
Can’t wait to see what your pretty kitchen looks like when the wallpaper is gone!
Anonymous says
OMG… Removing wallpaper is a horrid. Someone finally recommended the Zinsser Primer.
I too would watch House Hunters and think “what brats” when people would’t buy because of the wallpaper… yes, they probably ARE brats, but turns out they weren’t totally off base! Yikes. It will take serious therapy for me to strip another room of wallpaper!
janie
Kris @ Driven by Décor says
You totally had me laughing out loud Janie. Yes, I too will need to seek therapy before I tackle the next wallpapered room!
stephanie at Stephanie Kraus Designs says
way to preserver with the wallpaper. Hang in there!! Can’t wait to see when its all “done”
pam {simple details} says
I don’t remember ever seeing your kitchen before, I LOVE those huge windows!! I’ve been there, too and it will be worth every bit of agony and torture you’re going through!! 🙂
Simply LKJ says
It can be a nightmare to remove, especially if the walls were not primed properly prior to it being installed. Can’t wait to see the “new” kitchen.
Lisa @ Shine Your Light says
I have removed more wallpaper than I care to remember so I feel your pain. I have also tried every product and trick in the book. Our first house had wallpaper from the 40s in every room that was pasted on, and when we took it down, the horsehair plaster underneath came down too…..it was such a nightmare! Your kitchen is so nice and spacious by the way!
jvw home says
i once removed JUST a wallpaper border in a room….after that lil job, i swore i’d never try to remove wallpaper on my own again….so, i can’t imagine the stress you had with a whole room, yikes! can’t wait to see the reveal….
Melissa says
I admit to hiring a great guy (a retired schoolteacher who has always painted and papered on the side) to remove the wallpaper in my house. He has great luck with fabric softener for removing wallpaper, and the bonus is how great it makes the house smell!
Kris @ Driven by Décor says
Thanks for the tip Melissa – that’s one thing I haven’t tried but I’ve got plenty of more wallpaper to test it on!
Anonymous says
Worked for me. Soft on the hands too.
Linda {Calling it Home} says
UGH, I feel your pain. This brings back really bad memories for me. I hope I don’t find this problem in my next home, but it would not keep me from buying a home. Glad it is almost over for you. Congrats to the winners.