During the eight years we lived in our Connecticut home, there was never a period of more than a few weeks that we didn’t have some kind of home remodeling project going on! Today I’ve put together 15 of my favorite home remodeling ideas – the ones that made the biggest difference in our home and that I’d do all over again in a heartbeat! (post includes commissionable links; for more information, see my full disclosure statement {here})
1. Upgrade Wimpy Molding
A lot of the rooms in our home had molding that was pretty wimpy, including our dining room. The baseboards were fine but the crown molding and chair rail were skinny and sad:
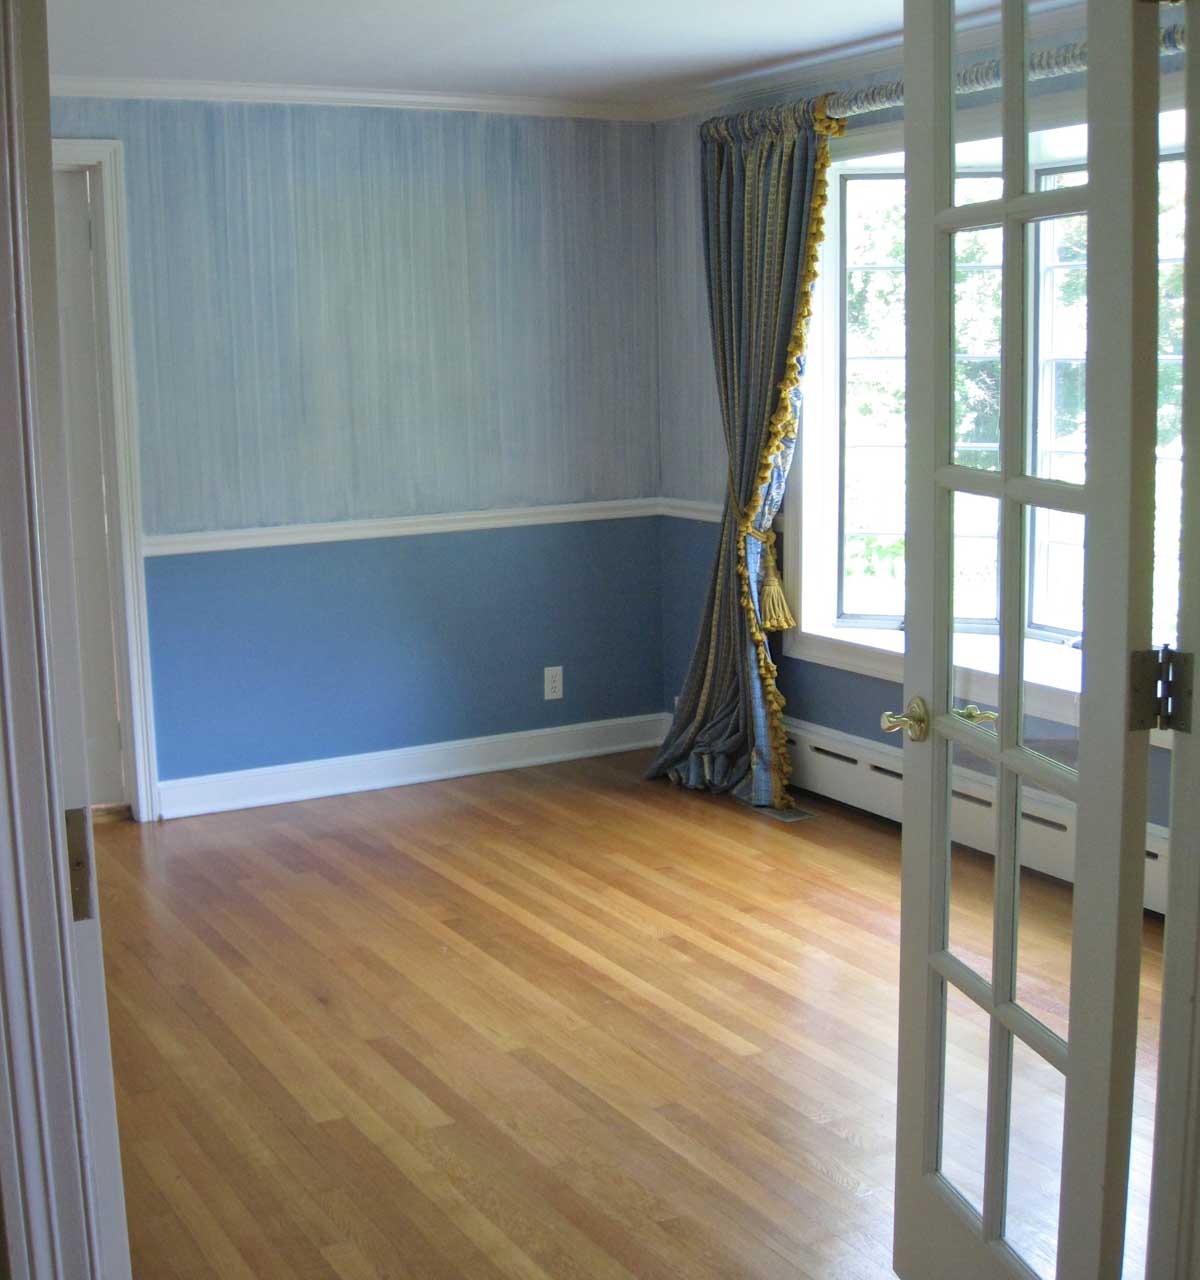
Along with painting and adding new drapes and a light fixture, we replaced the crown molding with something much more substantial – it made such a difference!
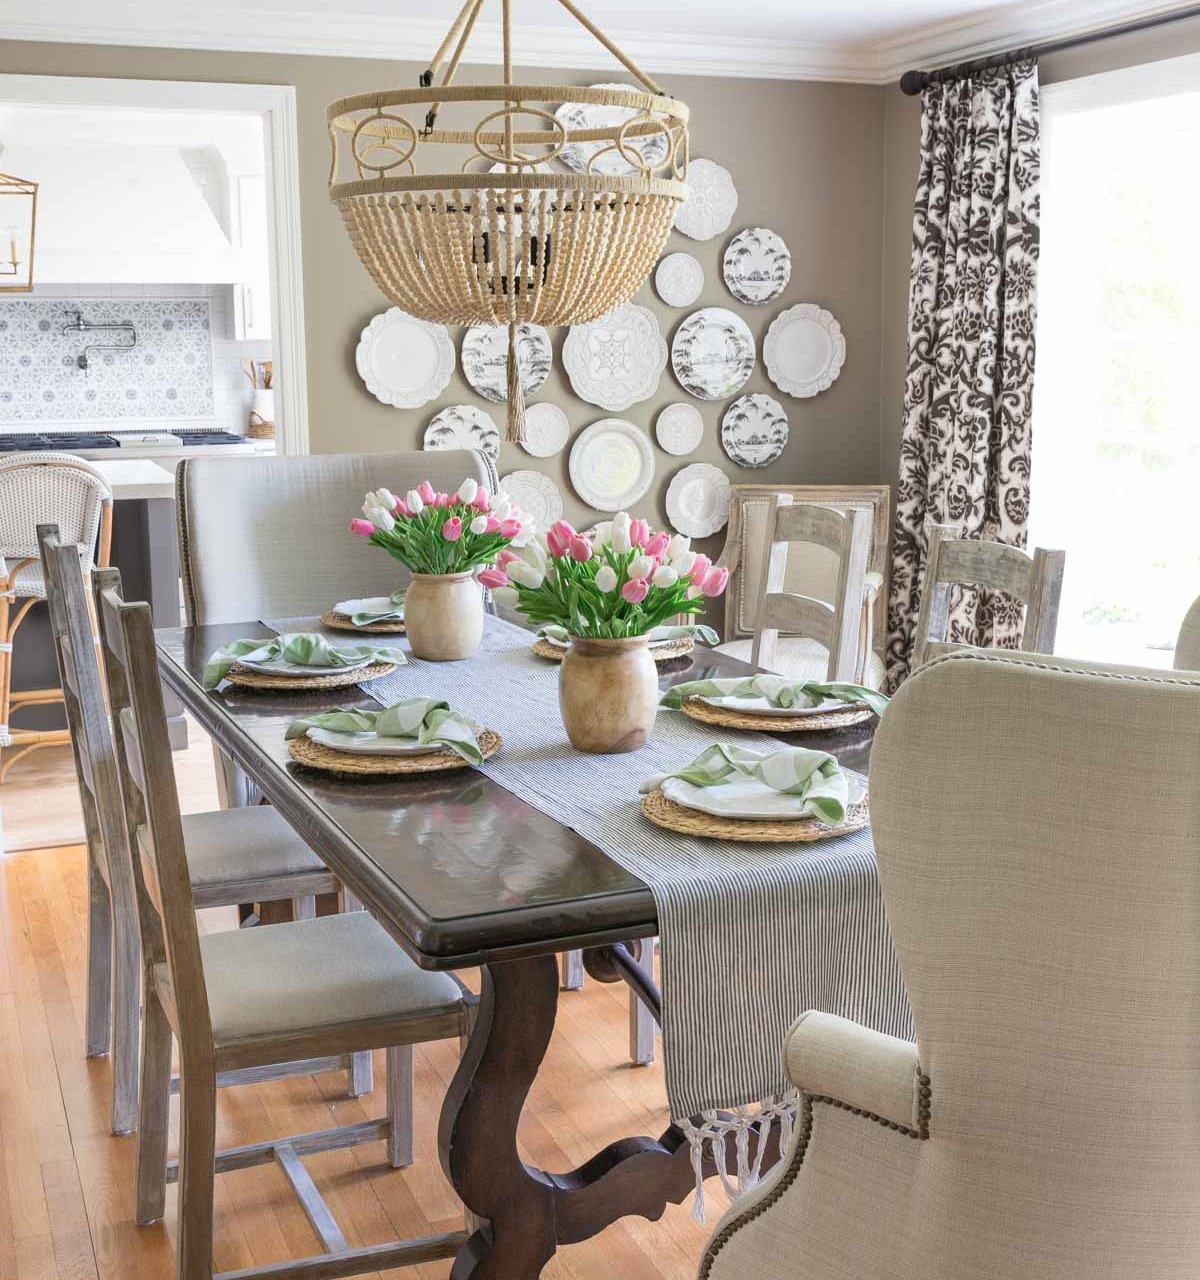
Dining Room Sources: Wood bead chandelier | Rattan chargers (13.5″) | Green & white plaid napkins | DIY Macrame fringe table runner | Wood vases (similar) | Faux pink tulips | Faux white tulips | White wall plates | Patterned wall plates | Drapes, table, & chairs no longer available
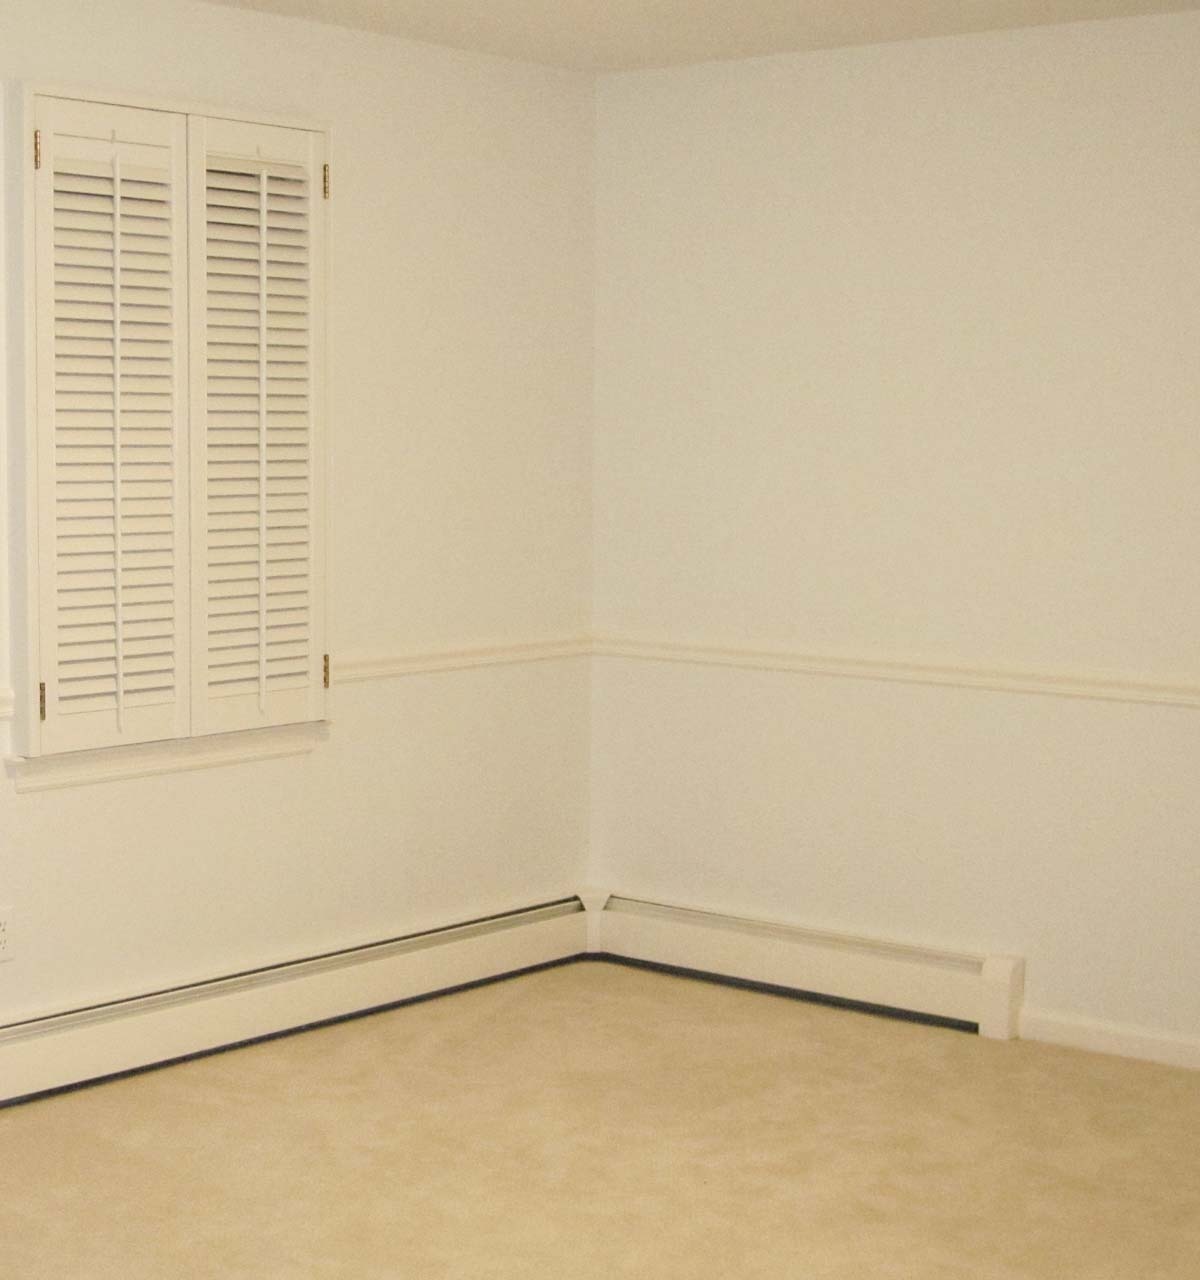
You might also notice that we also removed the chair rail around the entire room. I’m not a fan of wimpy chair rails so prefer to either remove them or add molding below. In the dining room I wanted to create a large plate wall (see details on how to hang plates on the wall for details) so removing the chair rail altogether was the way to go. But in my oldest daughter’s room I added molding below it. This is what her room looked like originally:
And this is what the space looked like once I added board & batten molding below the chair rail, painted it white, and wallpapered the area above it with grasscloth wallpaper:
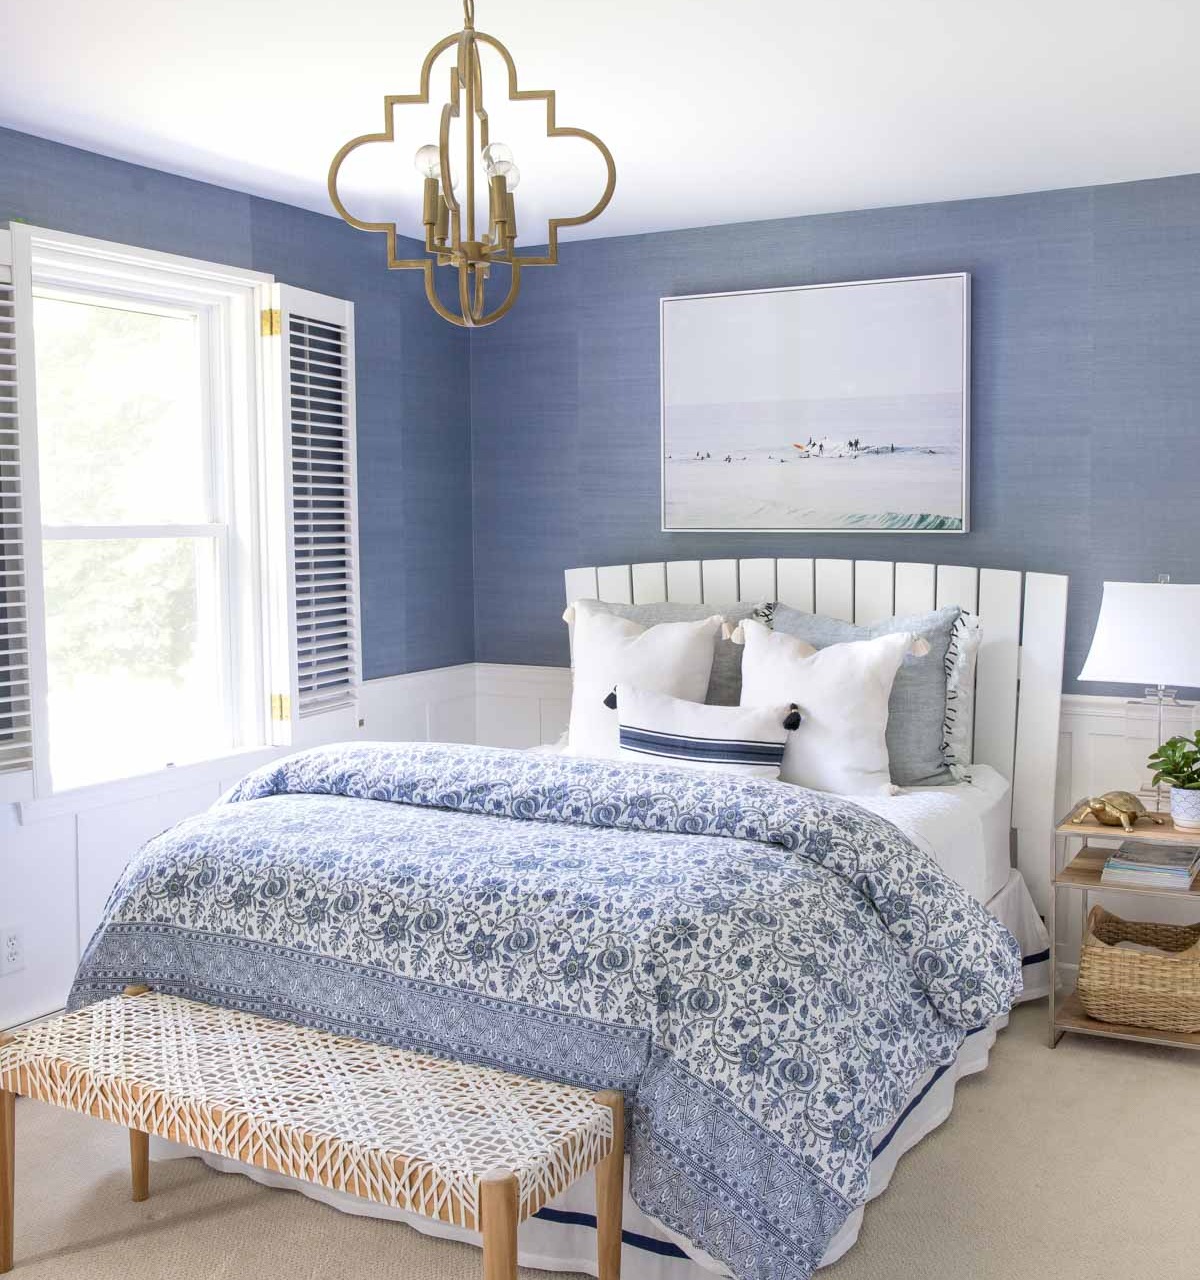
Room Sources: Blue grasscloth wallpaper (similar) | Gold quatrefoil pendant | Canvas surf scene art | Leather weave bench | Acrylic lamp | Bedding no longer available
The board and batten was a pretty simple DIY! I bought strips of thin wood that I cut to create box outlines and nailed them to the wall with a nail gun. It honestly didn’t take a ton of skill to do and gave the space a much higher end look. Whether it’s adding new molding like board and batten or even just swapping out your 3″ baseboards for ones that are more substantial in size, upgrading your molding is a must-do that makes a huge difference.
2. Create a Wow Factor with Wallpaper
I added wallpaper in several rooms of our Connecticut home and every single time it made a bigger impact than I expected it to. The one that surprised me the most was our entryway. It was one of the last projects we did before moving and if I could do it all over again I would make it one of the first!
When we first moved in, we removed the dated & stained entryway wallpaper, painted the walls white, and placed the chest from our old living room in the space. It was fine but pretty blah and lifeless…
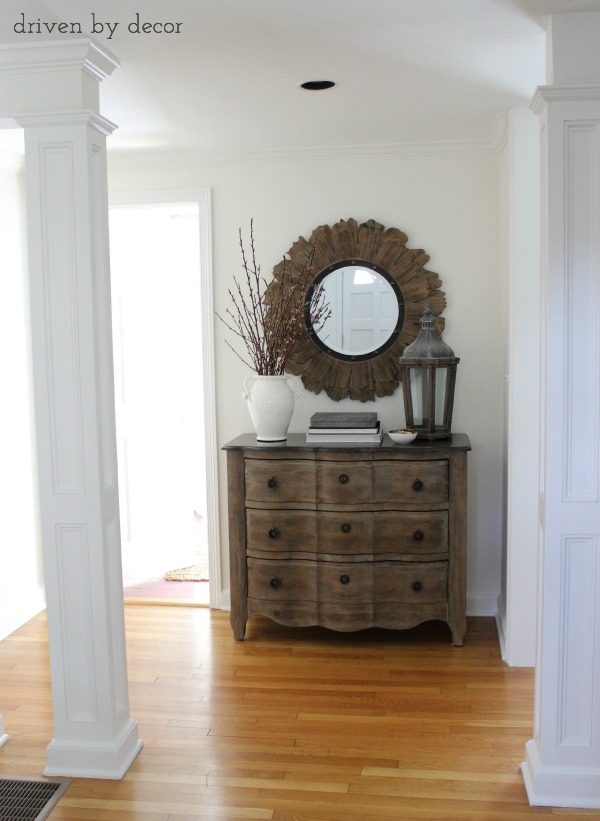
When dressing up our entryway finally made its way to the top of my to-do list, wallpapering with {this wallpaper} and redecorating with new furniture and accessories was a game changer:
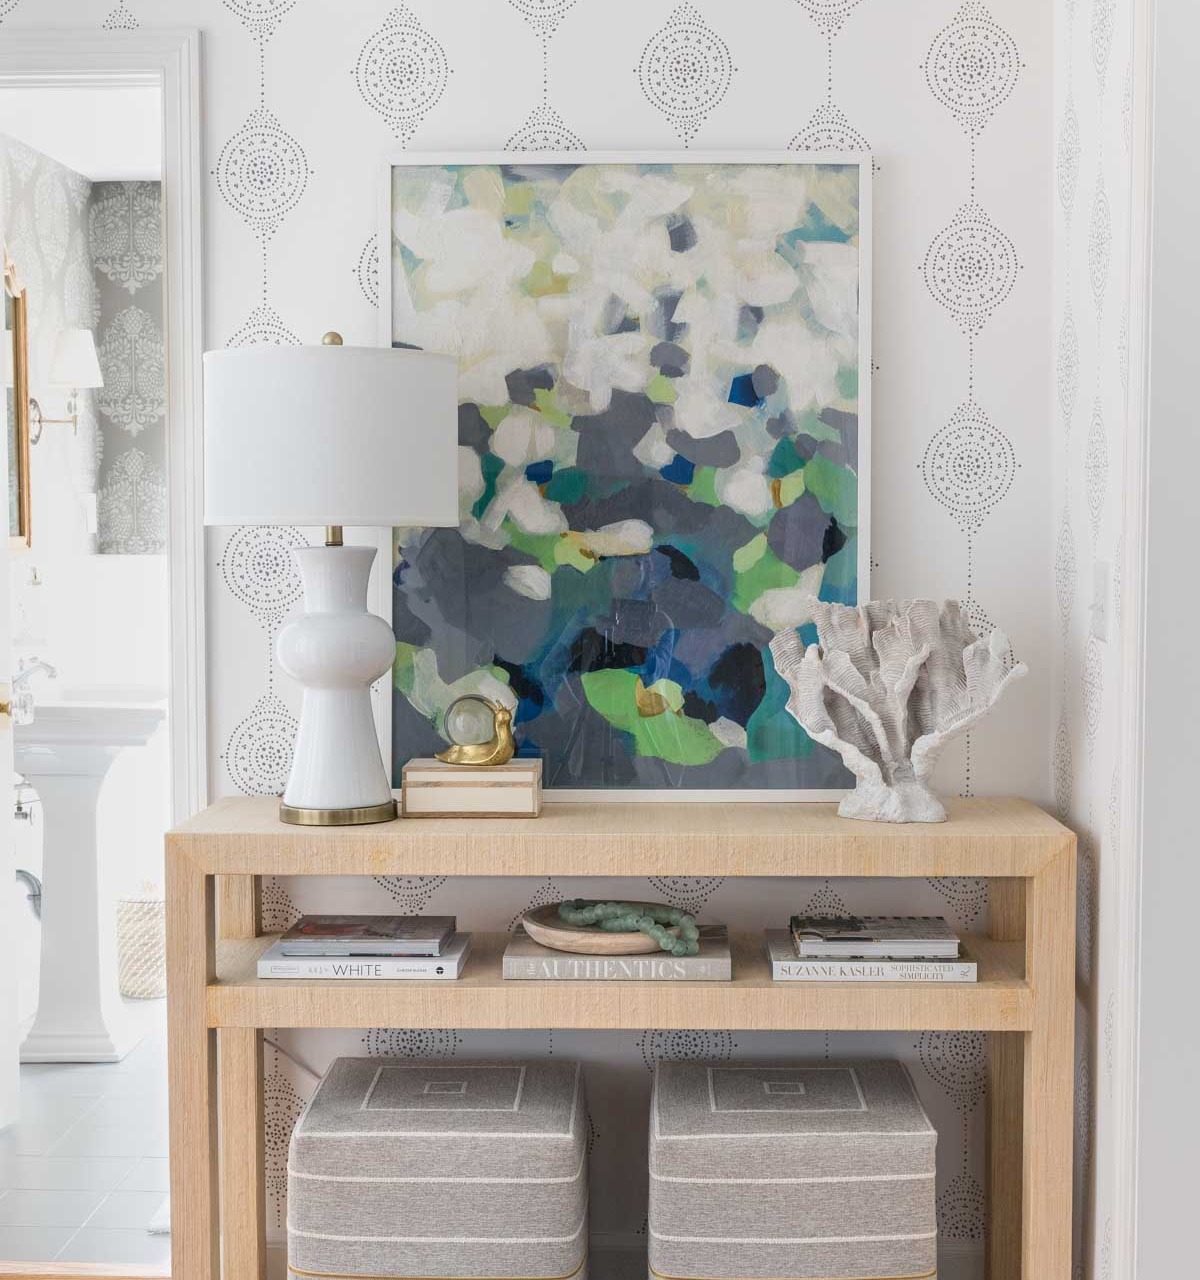
Entryway Sources: Wallpaper | Linen console (also see {this similar console}) | White table lamp | 30″ x 40″ Framed art print | Decorative snail | Wave coral (similar) | Shallow wood bowl | Glass beads | Cube ottomans
It was a good lesson in how much the design of your entryway affects the overall feel of your home! Other changes we made to our entryway included spray painting the black recessed light housings with {this high heat spray paint}, swapping out the dated flush mount light fixture, adding {this entryway rug}, and hanging {this large round basket} on the wall:
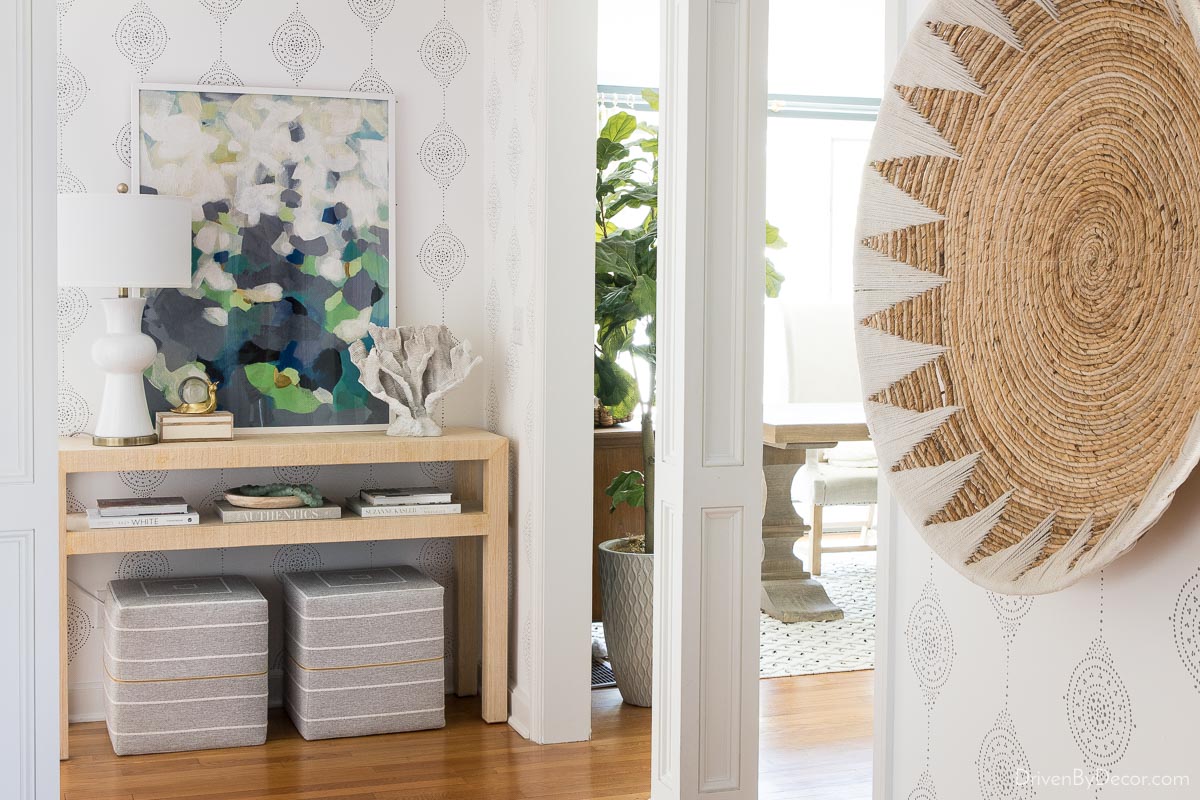
You can see more details of our entryway in my post on entryway decor ideas and see more of my favorite wallpapers in my post on Serena & Lily wallpaper favorites. And if you have to remove old wallpaper before putting new wallpaper up, check out my post on how to remove wallpaper. If you’re intimidated by hanging regular glued wallpaper, you could start off by trying peel-and-stick wallpaper – check out my tips on how to hang peel and stick wallpaper.
3. Revive Dated Cabinets With Paint
My girls’ bathroom was in need of a refresh with dark cabinets that were dated and showing quite a bit of wear and tear. I didn’t want to spend a lot of money in this space and it had nice floor tile and granite countertops so I decided to work with what I had:
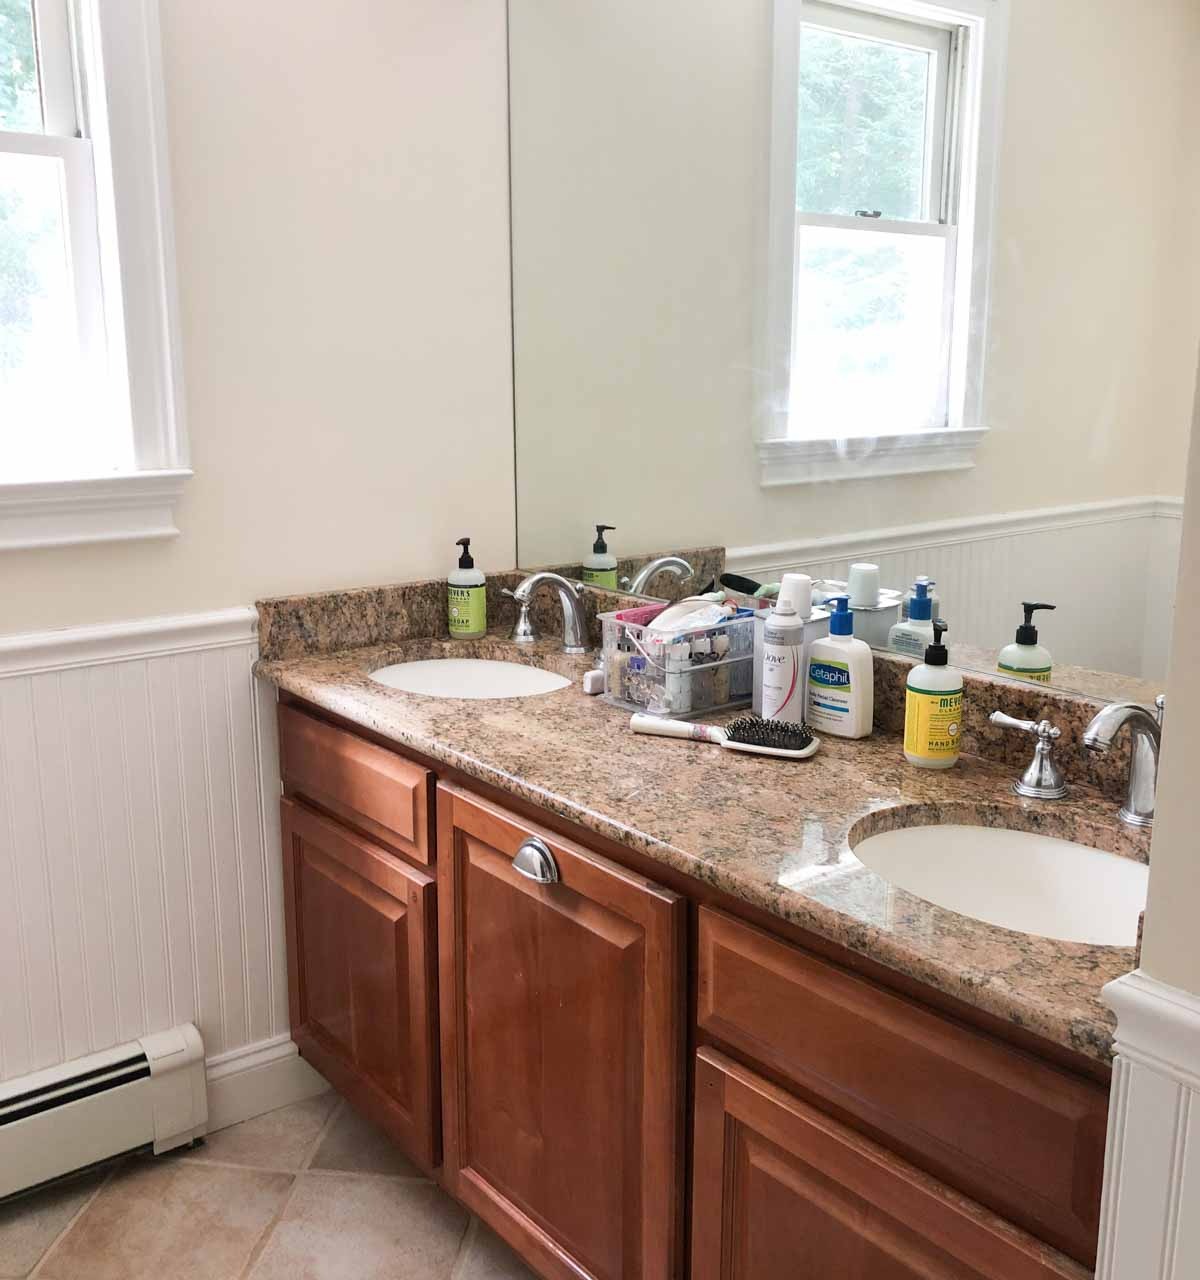
Instead of replacing the cabinets, I fixed the scratches and gouges, painted them white, and added new cabinet hardware. To dress up the rest of the room, I painted the walls and swapped out the glass shades on the light above the mirror for more modern ones. It was just the refresh that this space needed:
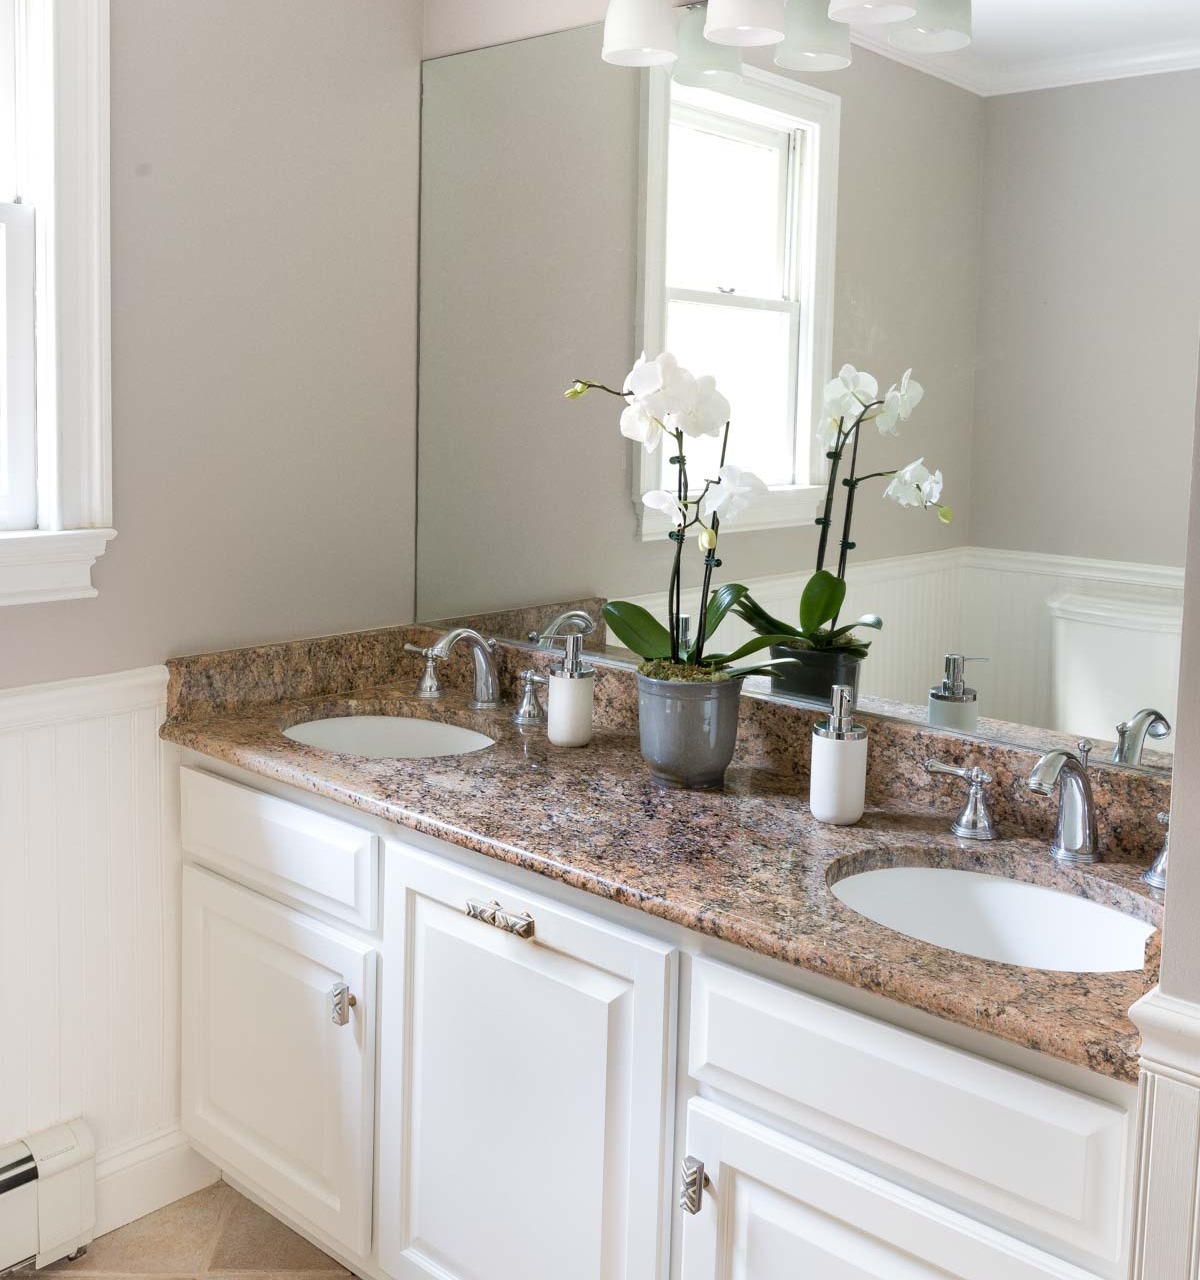
I share my simple step by step tutorial in my post on our painted bathroom vanity if you’d like to try painting your bathroom cabinets too.
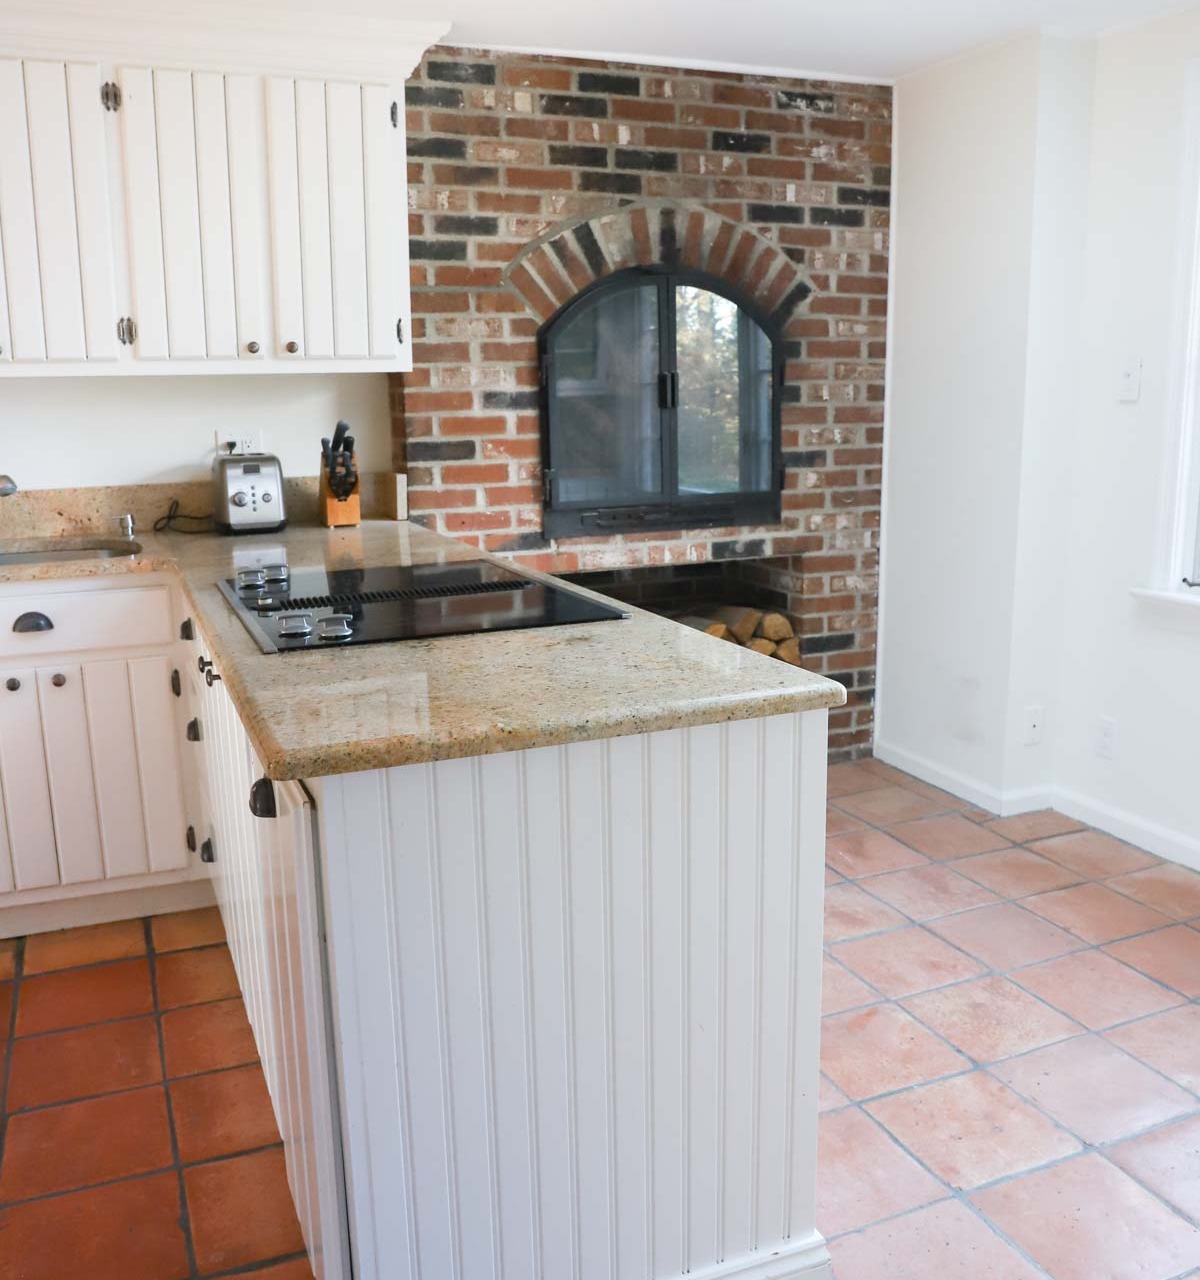
4. Ditch What Doesn’t Work For You (Guilt Free!)
When we were planning our major kitchen remodel, we tried designing it around the brick fireplace in the corner of our kitchen. The fireplace was an original feature of our home and and even though we didn’t use it a lot, we liked the unique nature of it and felt guilty about possibly getting rid of it:
After realizing that we’d have to sacrifice quite a bit in our kitchen design to keep it (there was no way to wrap the cabinets around the front wall of the kitchen with the fireplace there), we made the difficult decision to tear it out. And wow, did I feel guilty about it! But the guilt didn’t last long because once the kitchen remodel moved along and I was able to see our plans come to life, I knew we had made the right decision:
Kitchen Sources: Lantern pendants over island (gilded iron) | Rattan counter stools (fog) | Flooring
We exchanged a fireplace that we used only a few times a year:
for a much more functional and beautiful kitchen that we enjoyed daily:
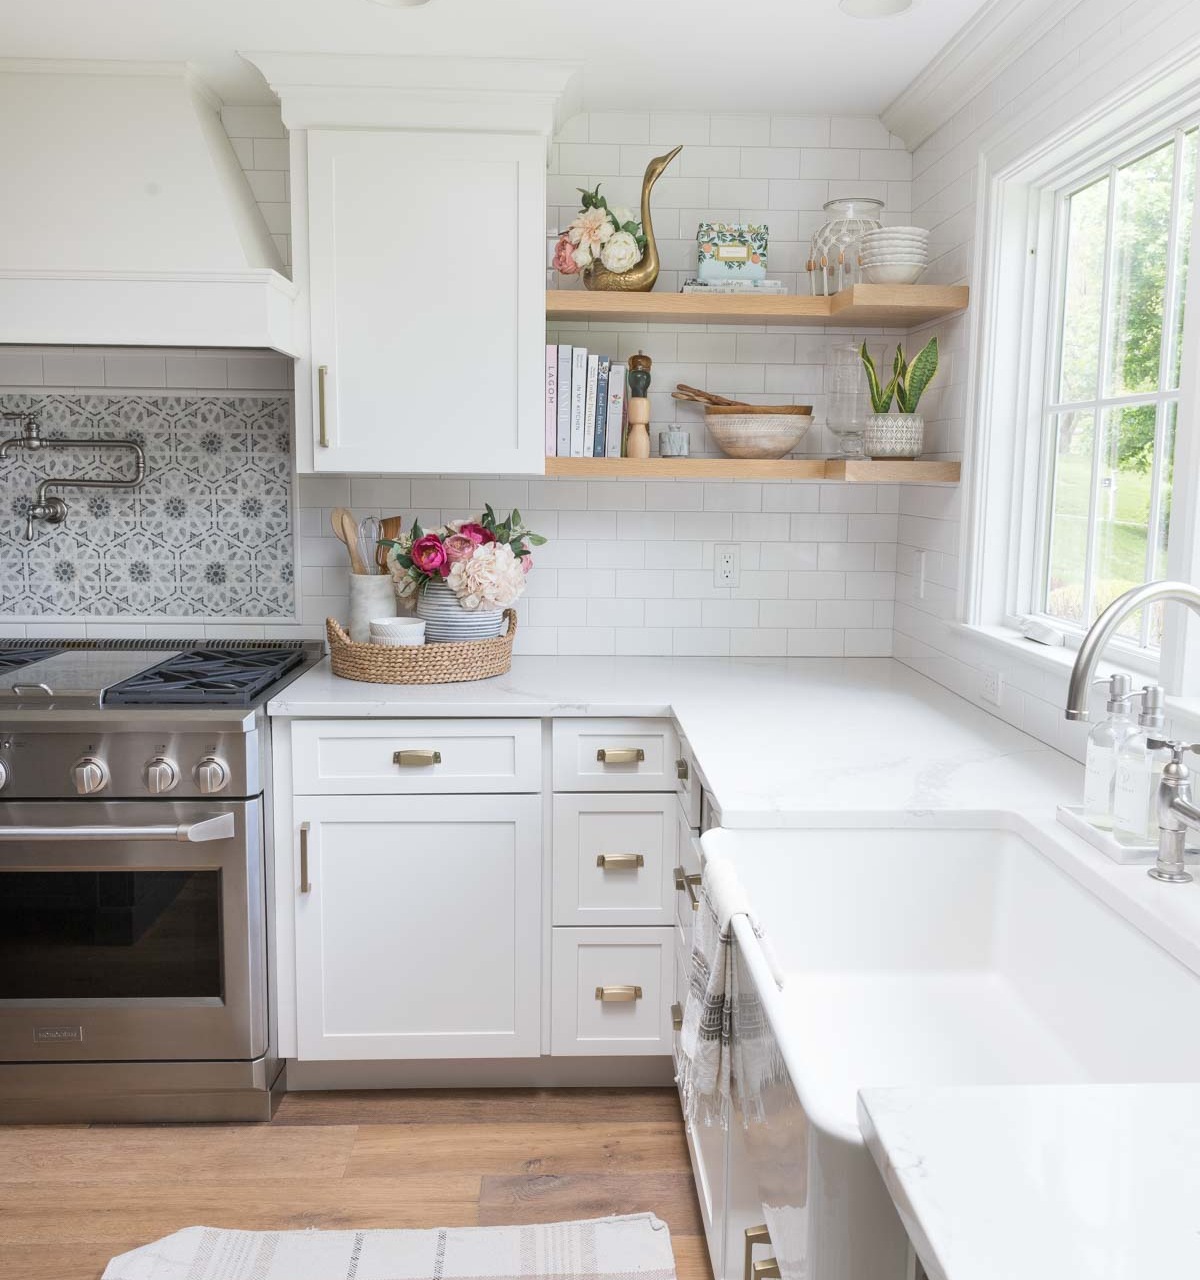
Kitchen Sources: Backsplash mosaic tile | Pot Filler (vibrant stainless) | Cabinet cup pulls | Cabinet pulls (golden champagne) | Round braided tray | Marble & wood utensil holder | Floating corner shelves | Brass swan planter | Floral recipe tin | Sink | Glass pump bottles | Tray for pump bottles | Black & white hand towel
It was a great lesson to do what works for YOU and your family when remodeling your home rather than making decisions based on guilt and/or what other people are telling you to do. For more pics and details about our kitchen, check out our kitchen remodel before & after and also my cabinet cabinet storage ideas.
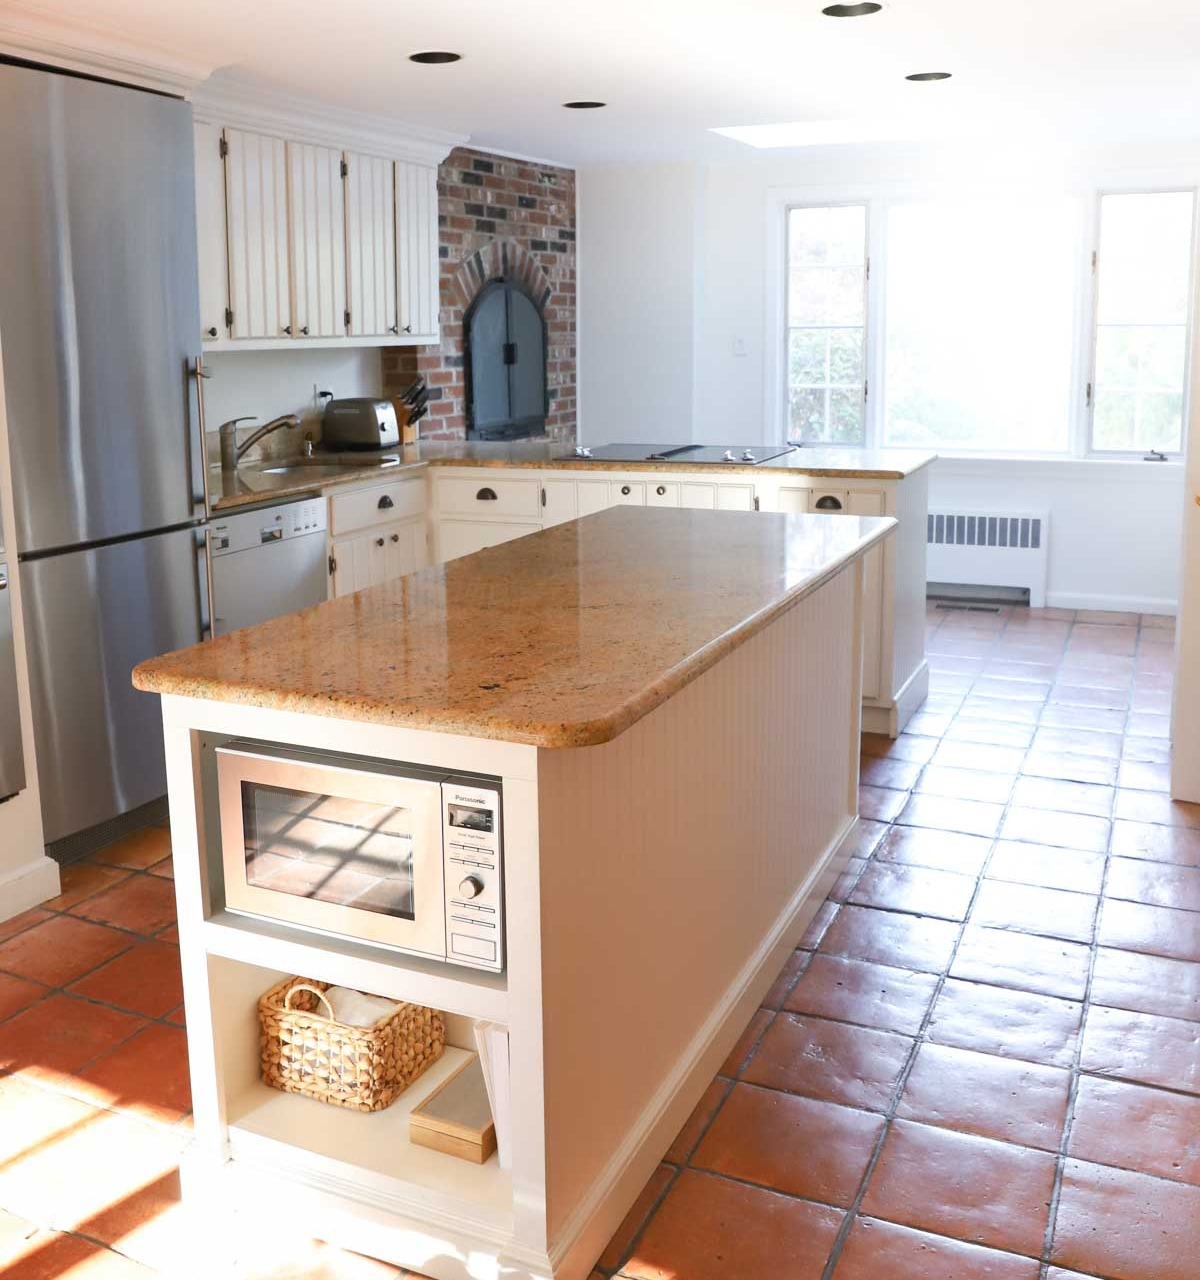
5. Create Built-In Pieces to Maximize Space
When you’re renovating a tight space, consider creating a built-in piece that makes the most of it! Our kitchen eat-in space was small and had baseboard heating along the longest wall so even a small table positioned as close to the wall as possible overlapped our sliders more than I liked:
To solve the problem, I designed a built-in banquette that could be placed flush against the wall so we could accommodate a larger table while taking up a lot less space:

Kitchen Eat-in Sources: Dining table | Capiz pendant (22.5″) | Geometric gray rug | Large blush abstract framed art | Blue floral framed art | Pink floral framed art | Slipcovered dining chairs (similar) | Table runner no longer available
Another plus of creating our own built-in piece is that I was able to choose the fabric and went with {this indoor/outdoor Sunbrella fabric} that was SO easy to clean any spills off of! For more details, see my post on our DIY banquette seating.
6. Install a Countertop Over Your Washer & Dryer
The transformation of our laundry room is one of my favorites because we were able to add so much function to the existing space! One of my favorite parts of our remodel was a simple one – adding a butcher block countertop above the washer and dryer:
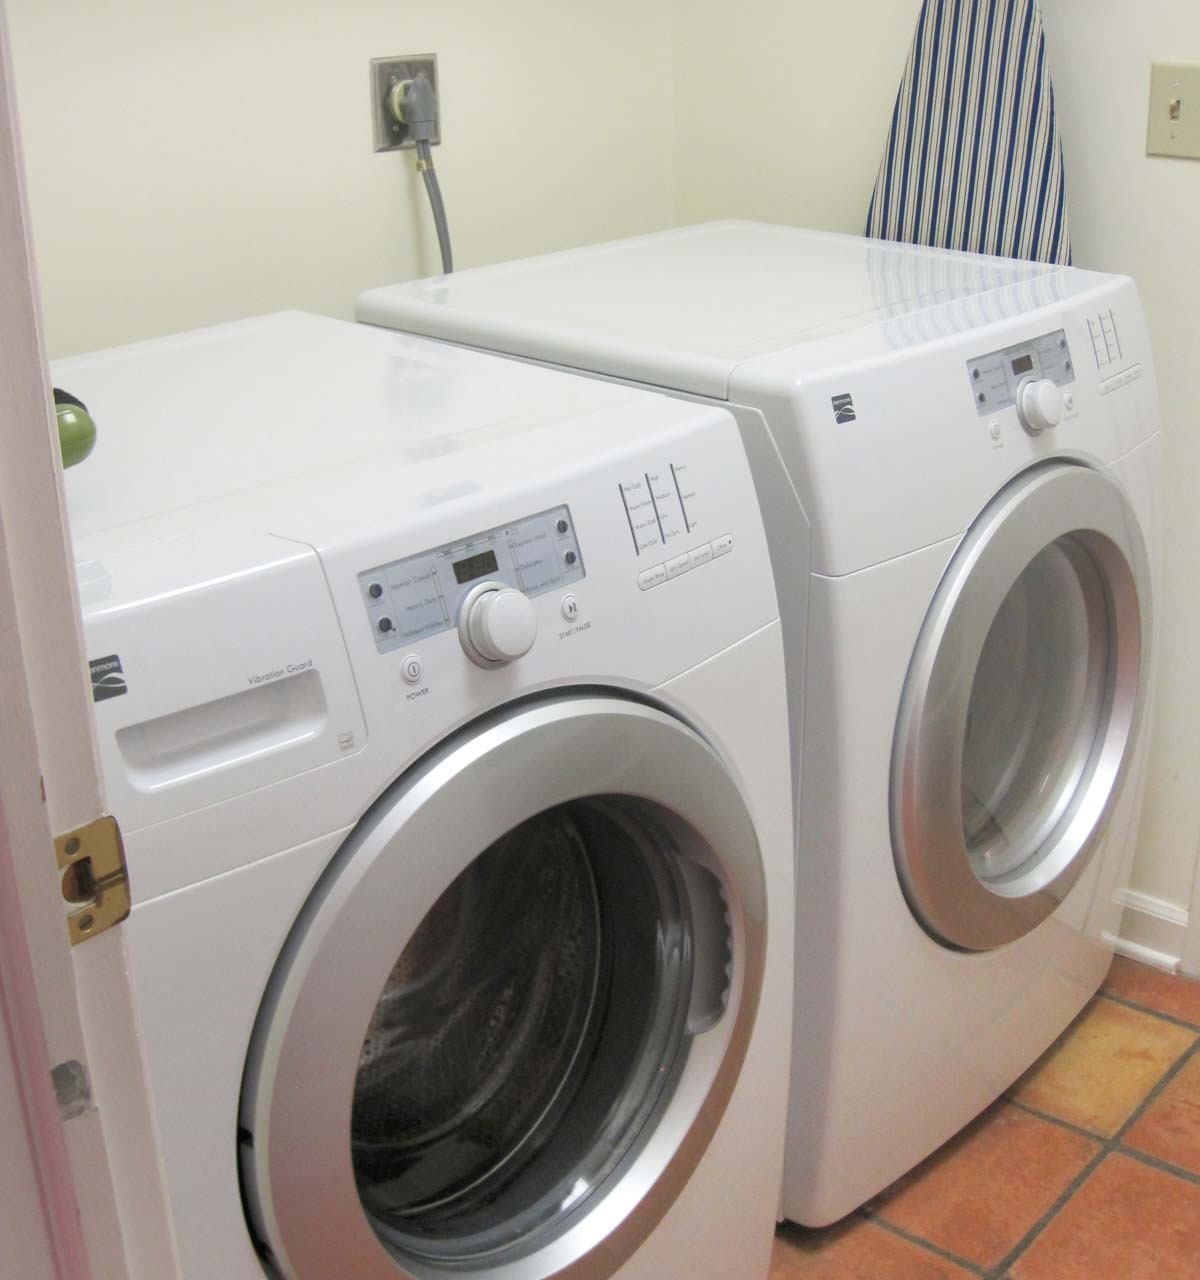
Having all of that extra surface space was awesome for storing laundry baskets and folding laundry that came out of the dryer:
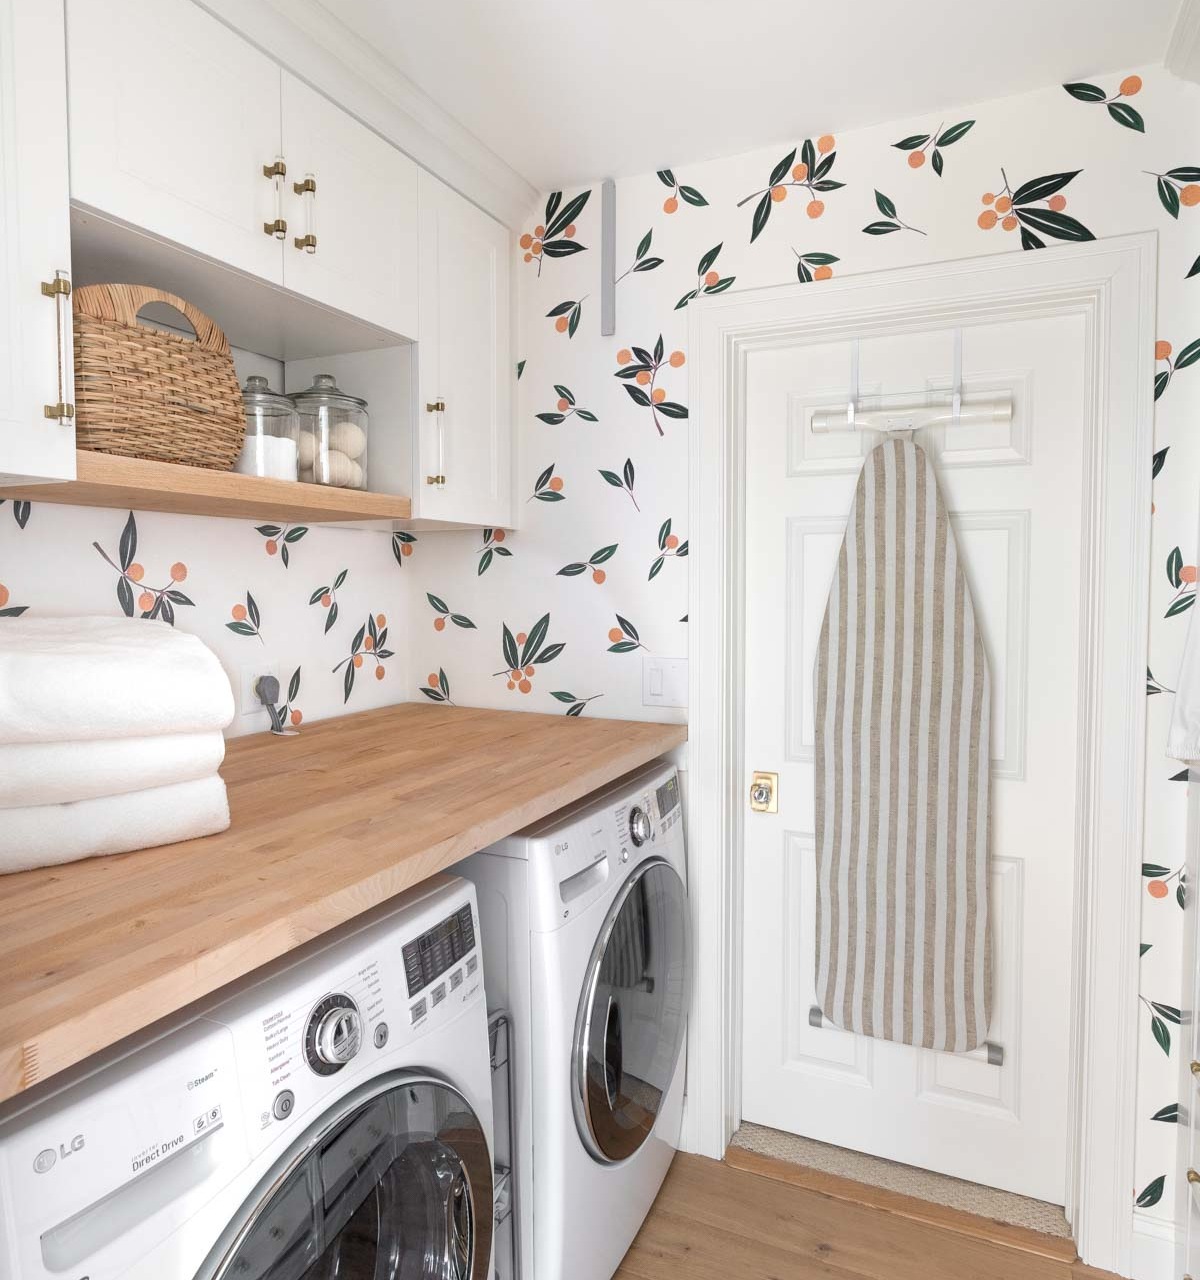
Laundry Room Sources: Tangerine wall decals | Butcher block counter (similar) | Ceiling light | Brass & Acrylic Cabinet pulls (Golden Champagne finish) | Glass Storage Jar | IKEA Laundry room cabinets
I bought our butcher block at IKEA and don’t think they have any solid wood options anymore but you can find similar butcher block {here}. You can see more details including info on the cabinets we installed above our washer & dryer in my post on our IKEA laundry room cabinets.
7. Create a Mudroom Using IKEA Wardrobes
If your closet is short on storage space, IKEA has some pretty amazing options for creating a closet where there is none. Directly across from our washer and dryer in the laundry room was a nook with shallow shelving where the previous owners stored a combination of kitchen bakeware and shoes:
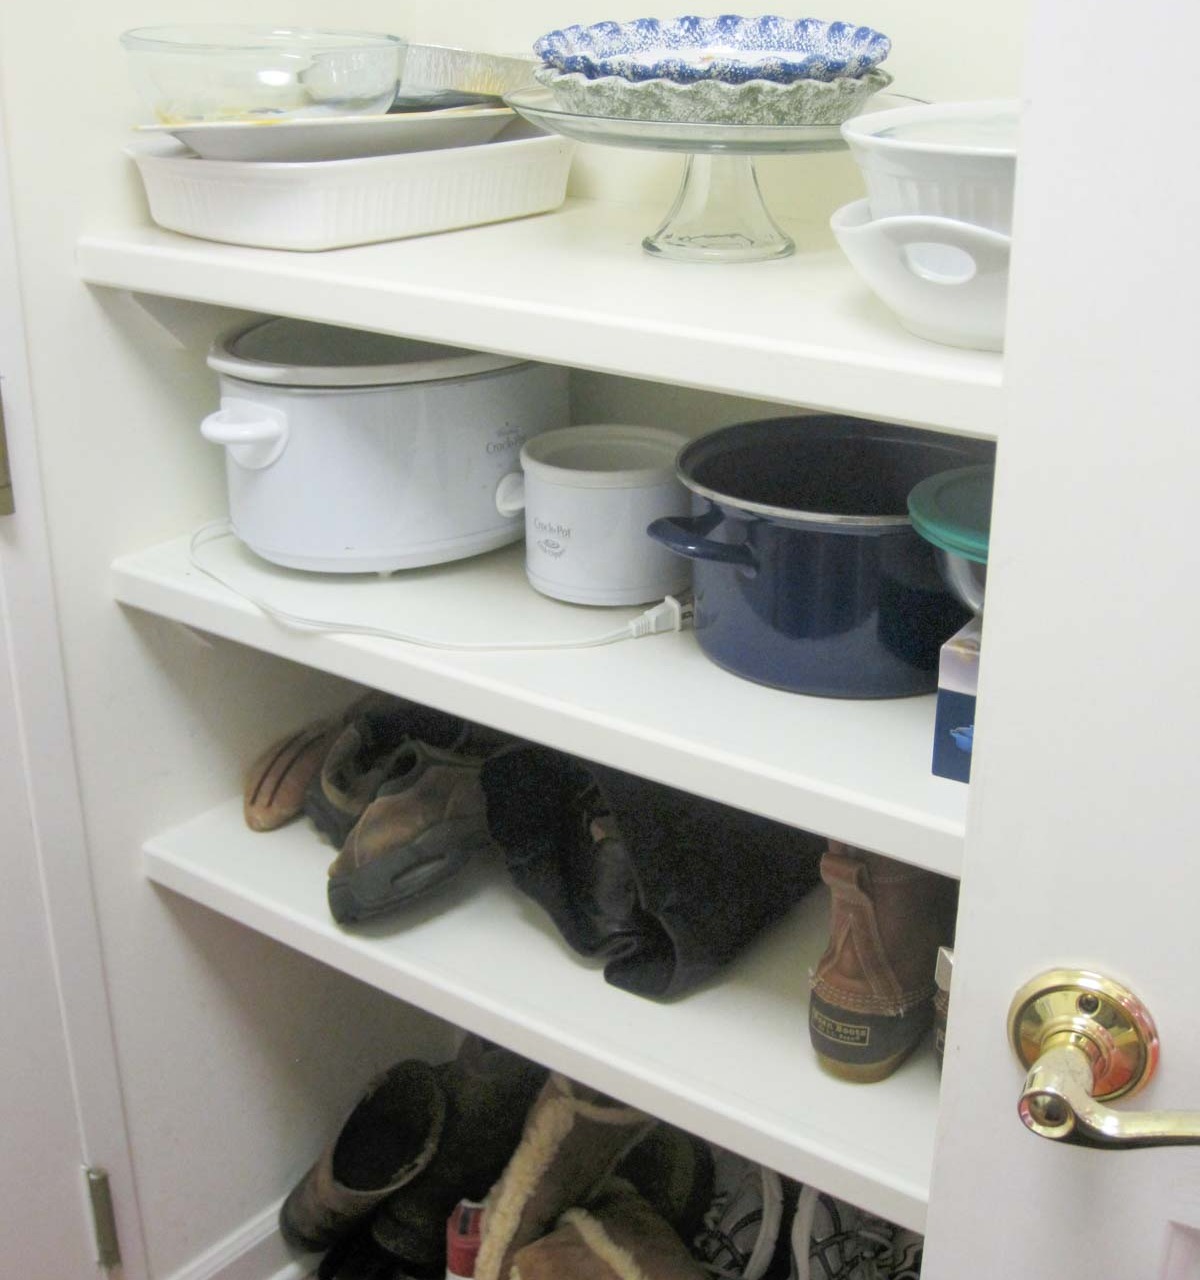
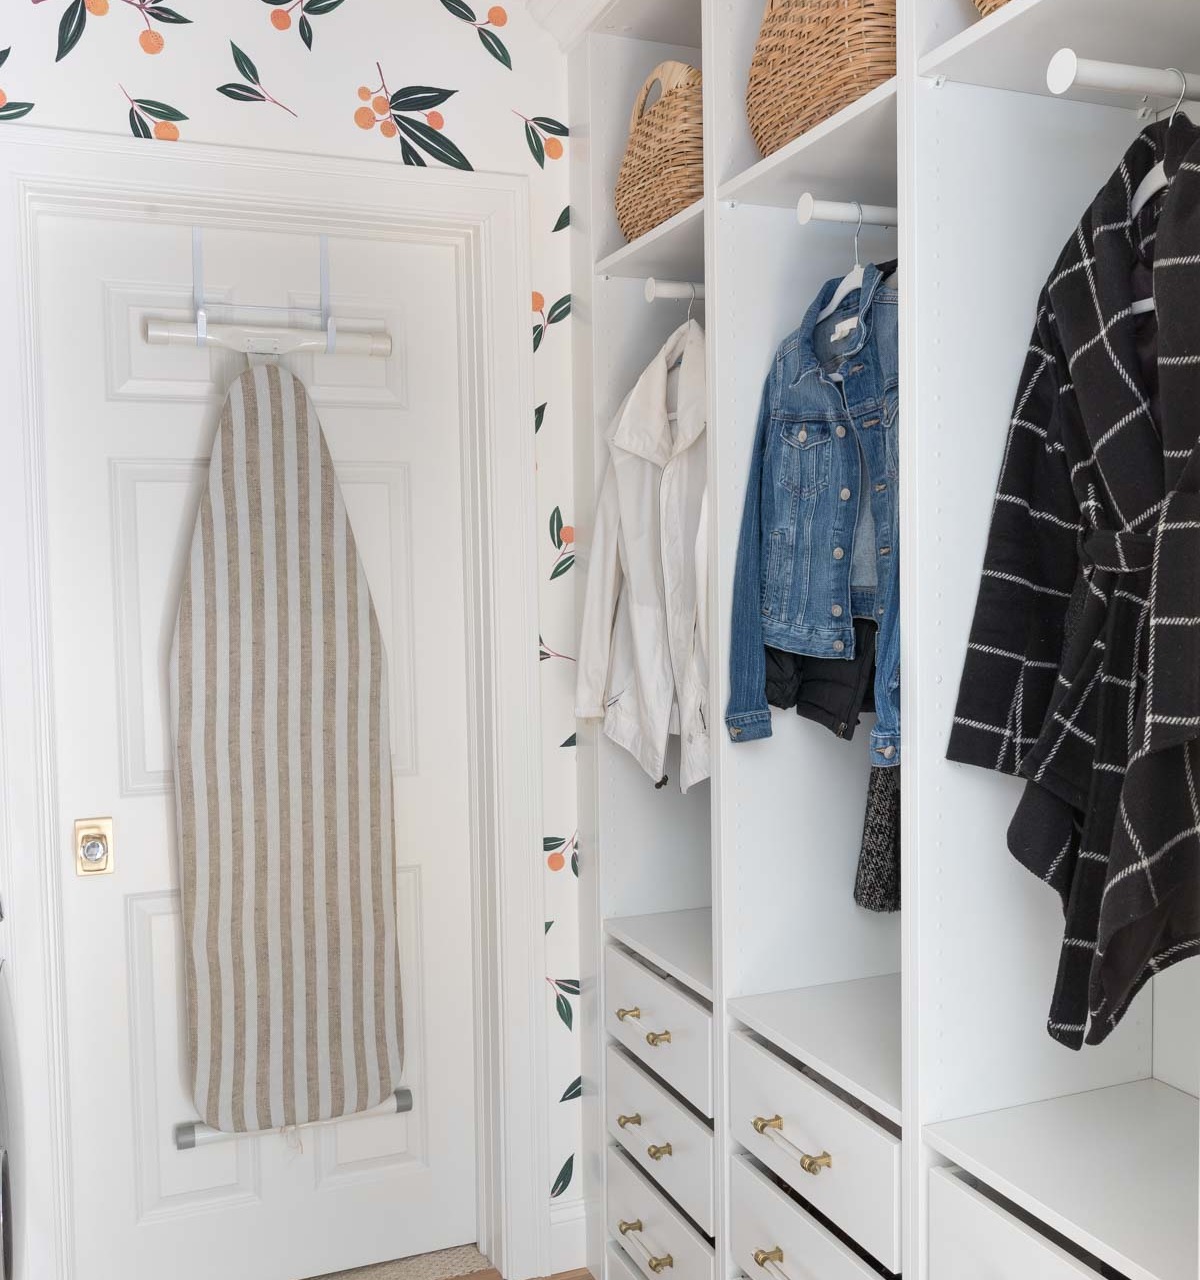
Our house had no hall closet or anywhere to hang and store coats so I decided to use the nook to create a mudroom. It was only about 16″ deep which you might think would be too shallow for coats but Ikea has some genius solutions for small spaces! Using their PAX system to take advantage of every inch of that nook, we ended up creating quite a bit of storage for coats, shoes (in the drawers below the coats), and winter accessories like scarves and gloves (in the baskets above the coats):
Laundry Room Sources: Coat & shoe storage – IKEA | Brass & Acrylic Cabinet pulls (Golden Champagne finish)
I detail the IKEA pieces that we used to create our coat & shoe storage space in my post on our IKEA PAX mudroom. IKEA also has lots of solutions for creating freestanding closets with doors (no nook required 😉) that you can check out {here}.
8. Replace Your Pedestal Sink with a Vanity
Pedestal sinks are fine in hall baths (although I’d personally rather have a vanity there too) but in any other bathroom, kick them to the curb! Our house had pedestal sinks in our hall bathroom, master bathroom, and guest room when we moved in. Trying to juggle putting makeup on, brushing your teeth, or doing just about anything with just a tiny rim around the sink to place things on is no fun. The pedestal sink in our guest bathroom was the first to go:

I replaced it with a 24″ freestanding vanity similar to {this one} which provided a TON more countertop space plus drawers to store toiletries in too:
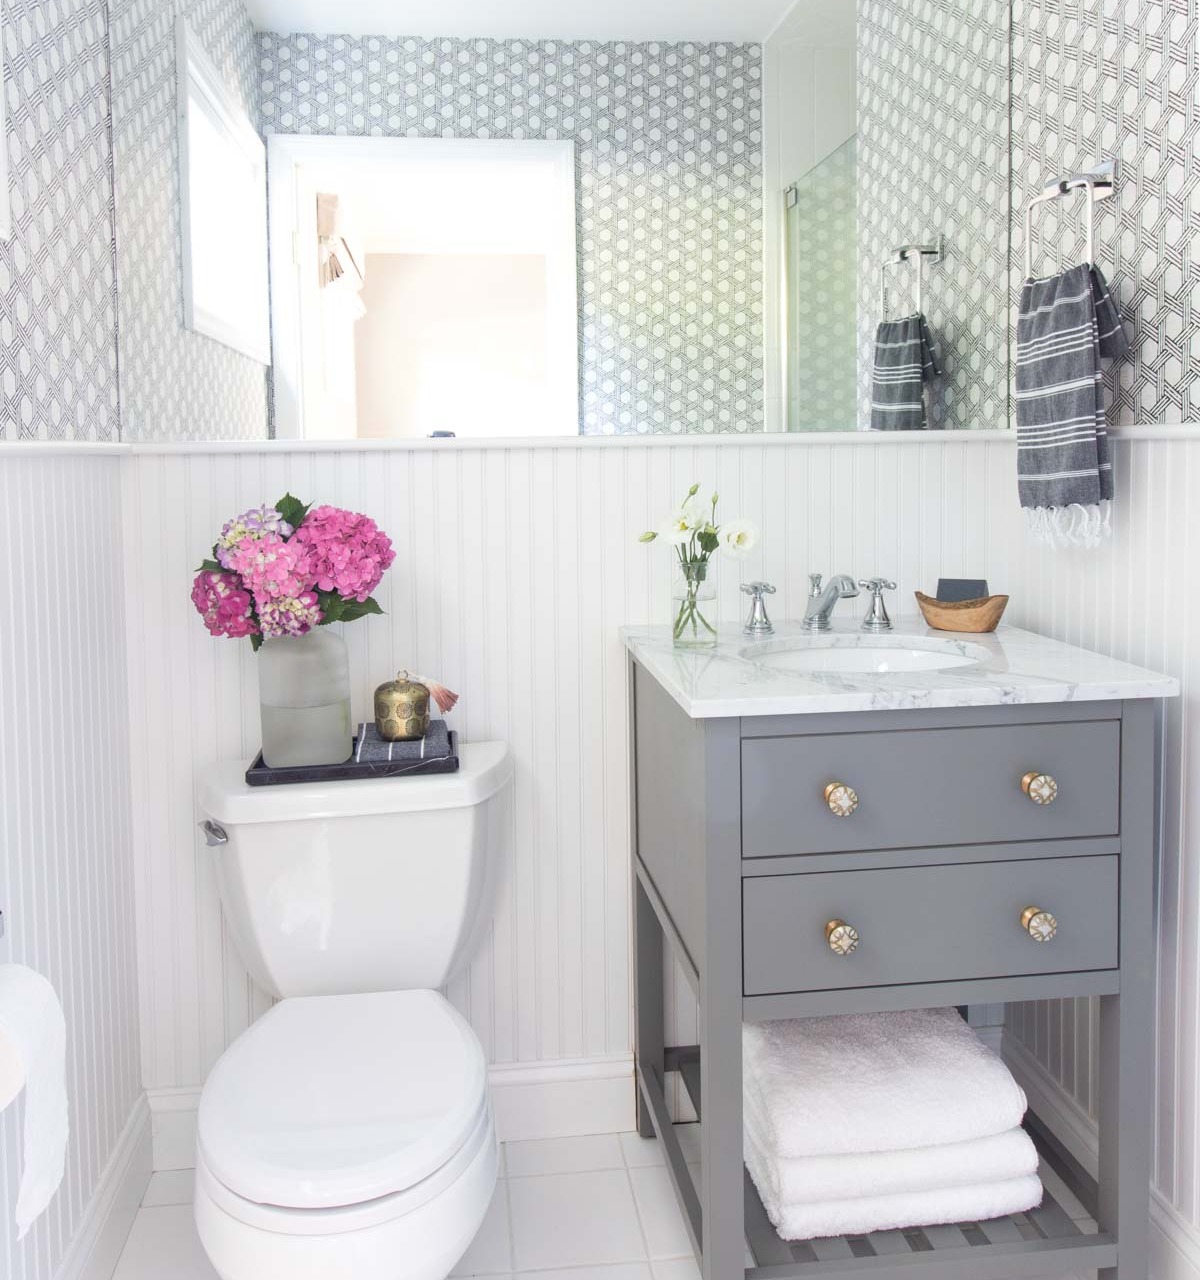
Guest Bathroom Sources: Vanity faucet | Faucet handles | Chrome towel ring | White towels under vanity | 24″ vanity (similar) | Brass and pearl vanity knobs | Wallpaper – no longer available | Brass flush mount light
It was so much more functional for our guests and it looked a lot nicer too! For more “before” and “after” pics of this space, check out my post on guest bathroom ideas.
9. Dress Up Textured Walls With Shiplap
When we moved into our house, the master bedroom walls were a highly textured light blue faux finished plaster with a lot of big cracks. If you’re ever had to skim coat & sand entire rooms to smooth out textured, cracked walls (especially if they’re plaster) you know that it’s basically the worst job ever.
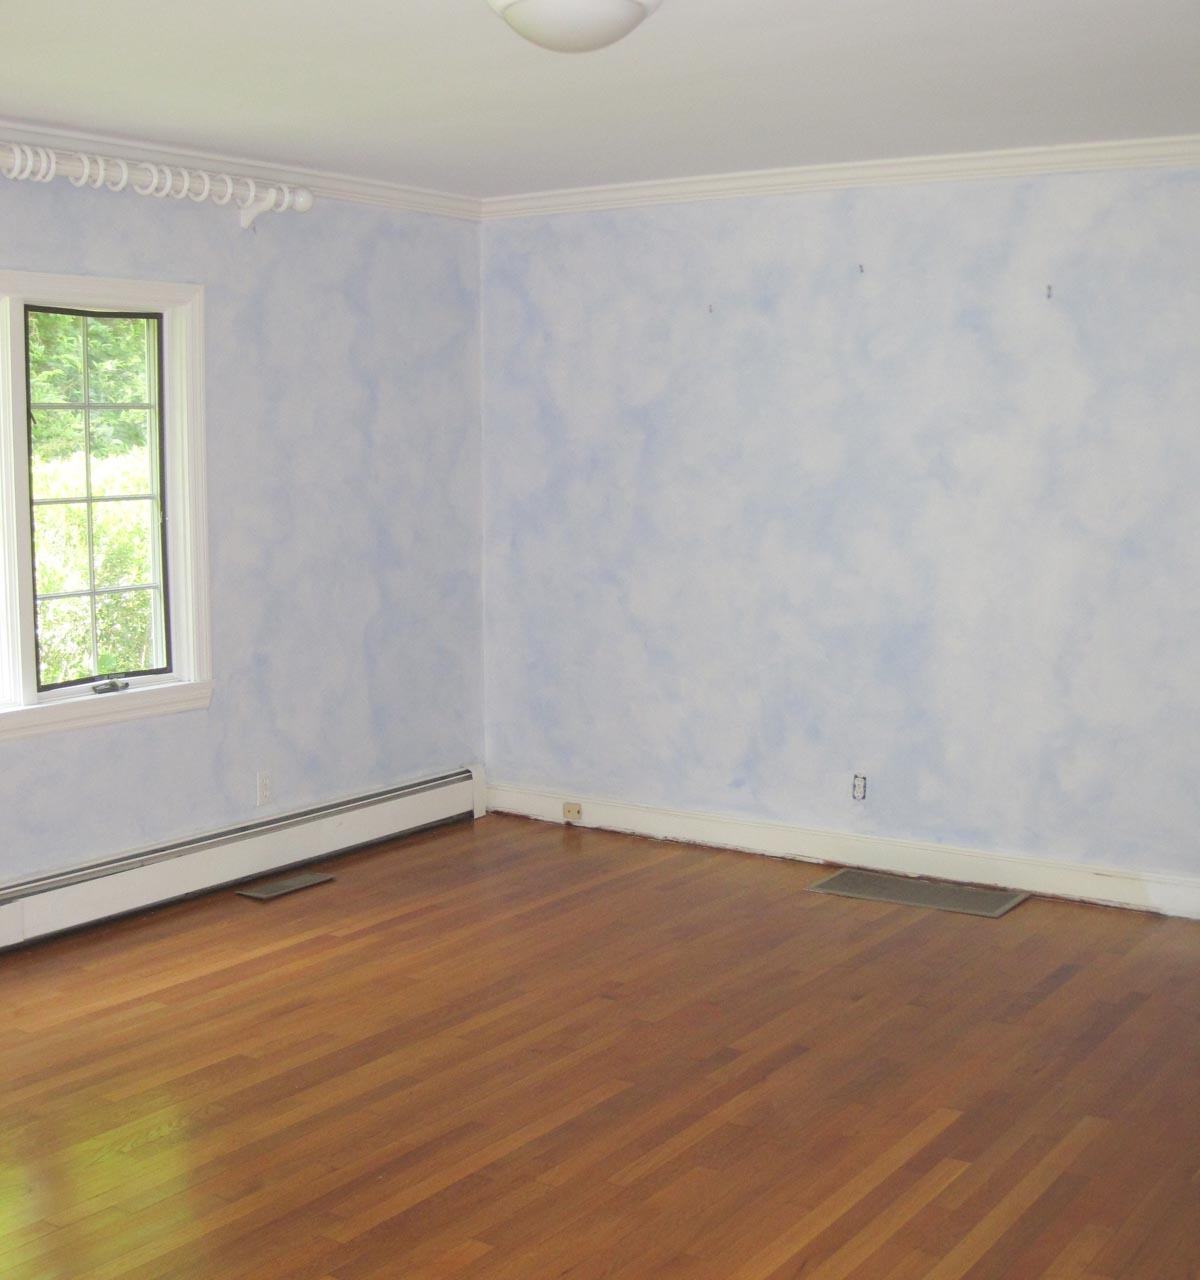
So instead of messing with that I decided to add shiplap! It was a win win because it covered those in-terrible-shape walls while also upping the style factor of our room:

Master Bedroom Sources: Upholstered bed (similar) | Gray nightstands | Camp stools (similar)| White table lamps (similar) | Scalloped flushmount light | Gray & white duvet – no longer available | Gray & white dragon/floral pillows | Quilt (Flagstone color) | Drapes | Diamond jute rug
Adding true wood shiplap to a room would involve removing & reinstalling all of the molding (crown molding, baseboards, and doorway molding), so I cheated and added faux shiplap using thin wood strips that butted right up to the existing molding. Check out my post for all the details on installing our faux DIY shiplap walls. Shiplapping over our textured, cracked walls killed two birds with one stone, but you definitely don’t need to have textured walls to consider doing it – I love the look!
10. Say Goodbye To Your Bifold Doors
Along with my dislike of pedestal sinks, I’ll add bifold closet doors to my pet peeve list. It drives me nuts how much room they take up when folded back, making a chunk of the closet difficult to access. Plus they tend to be creaky and sometimes difficult to open and close. In our master bedroom, our original closet was one continuous space that was over eight feet long BUT it had two bifold doors and a portion of wall in the middle that was making a good chunk of our closet hard to get to. Plus you couldn’t have the bifold doors on the left AND the door to our bedroom open at the same time:
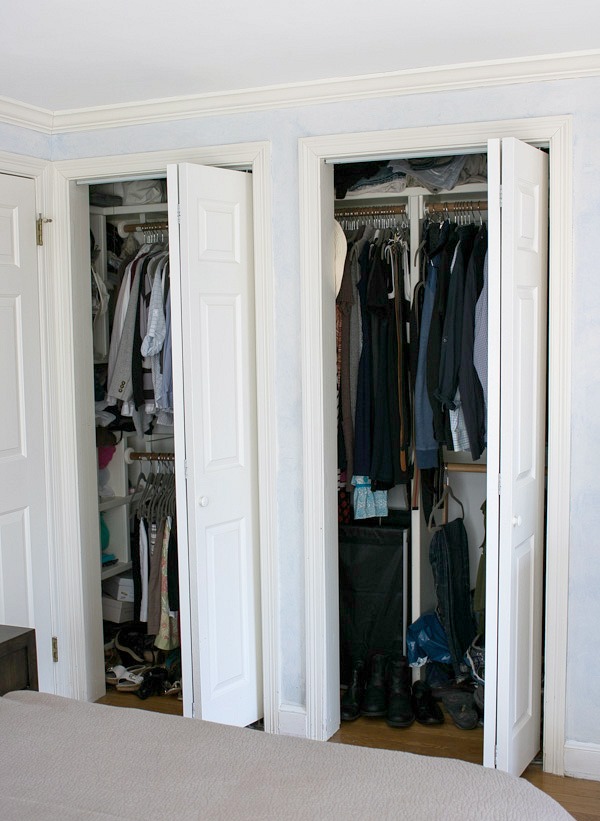
Our contractor was able to confirm that the chunk of wall in the middle wasn’t load bearing so we removed the bifold doors and he removed that wall and reframed the opening to create one long space. In lieu of doors, I added a long, thin rod and lightweight curtains and dressed up the inside of the closet with acrylic rods and {this wallpaper}:
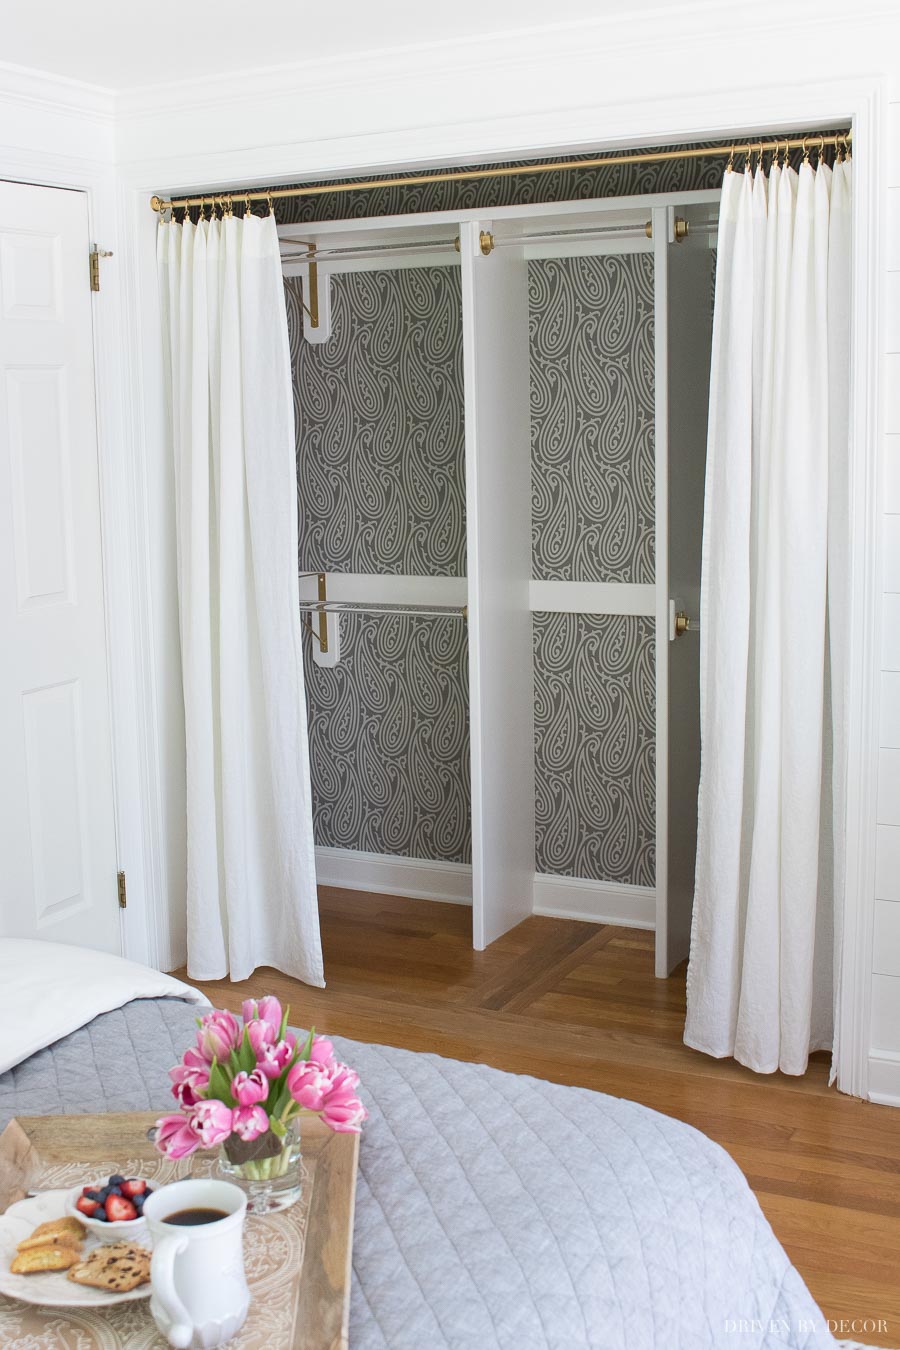
I know that closet curtains aren’t for everyone (and honestly I was initially hesitant to add them since I wasn’t sure how I’d like them) but I ended up loving both the look and the functionality of our new closet. You can get sources and read more details about using curtains instead of closet doors and get other ideas for transforming the look of your closets in my post on closet door ideas.
11. Create Stylish Storage Space With Floating Shelves
Our master bathroom is the one room in our home that I was able to design from scratch since it was a new addition to our house. However, we had a max width and length to work with for the new space so it was a little bit of a jigsaw puzzle trying to figure out what would work best where. The space between our shower and the far wall of our bathroom was a tricky one to figure out a use for until I had the idea to add floating shelves – they ended up being exactly what we needed:
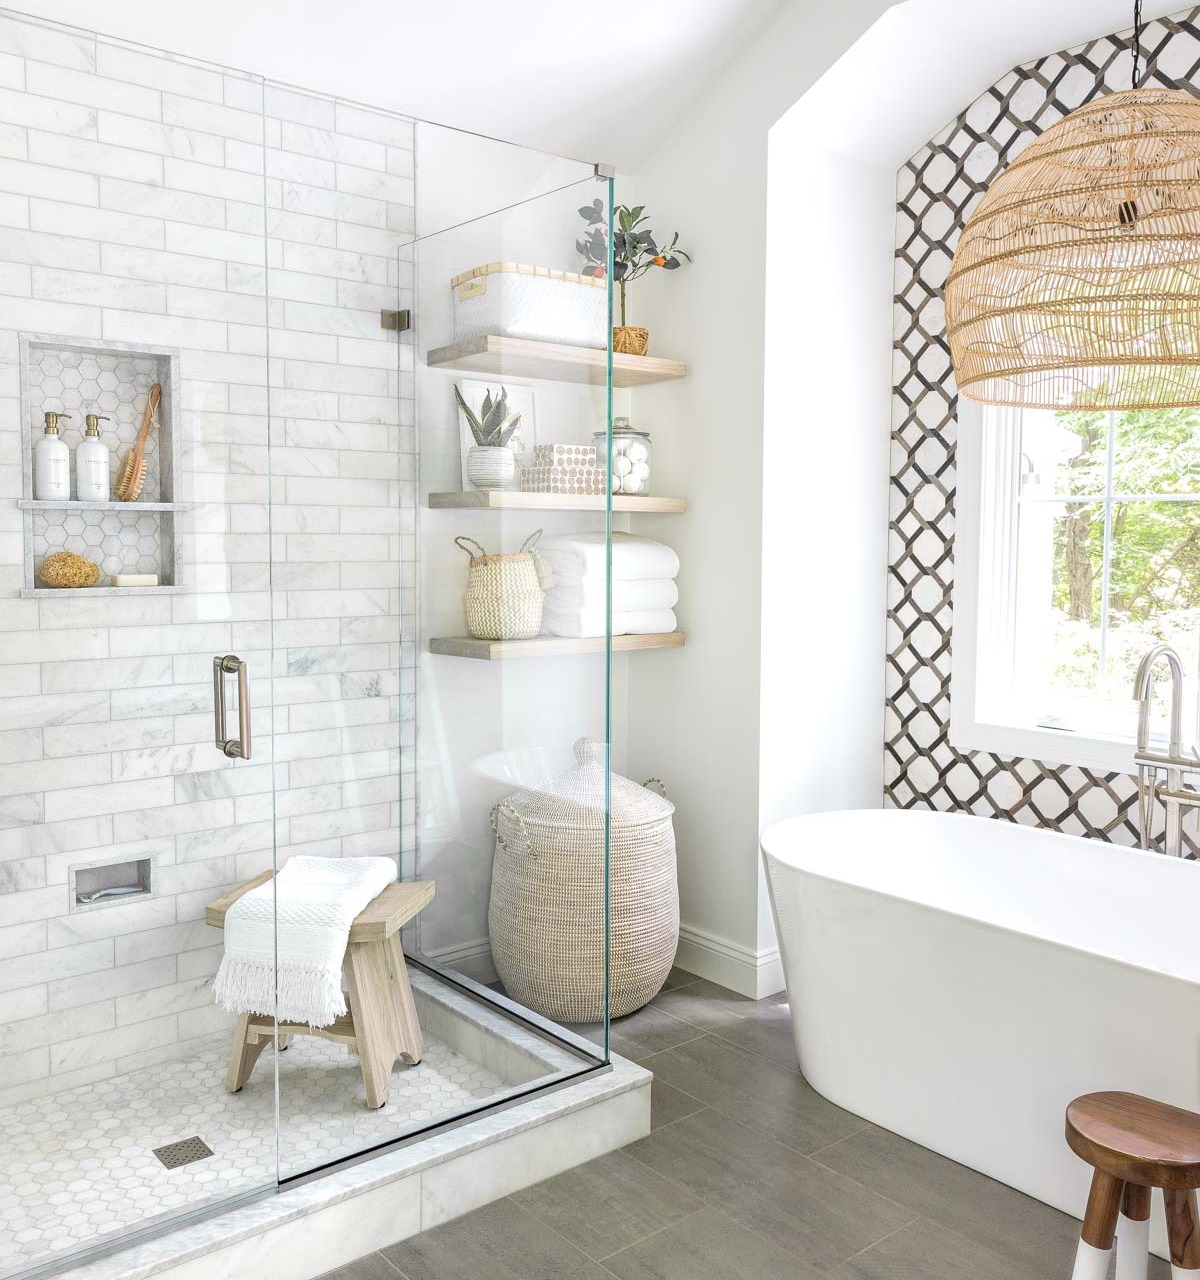
Master Bathroom Sources – Shower: Pump bottles (16 oz white/gold) | Shower stool | Tub: Freestanding bathtub | Dipped leg stool
At first glance it might seem that our shelves aren’t doing anything other than showcasing pretty things, but we kept our extra rolls of TP in the top basket, washcloths in the lower basket, bath bombs in the glass jar, hair accessories in the stacked boxes, and a stack of clean towels too:
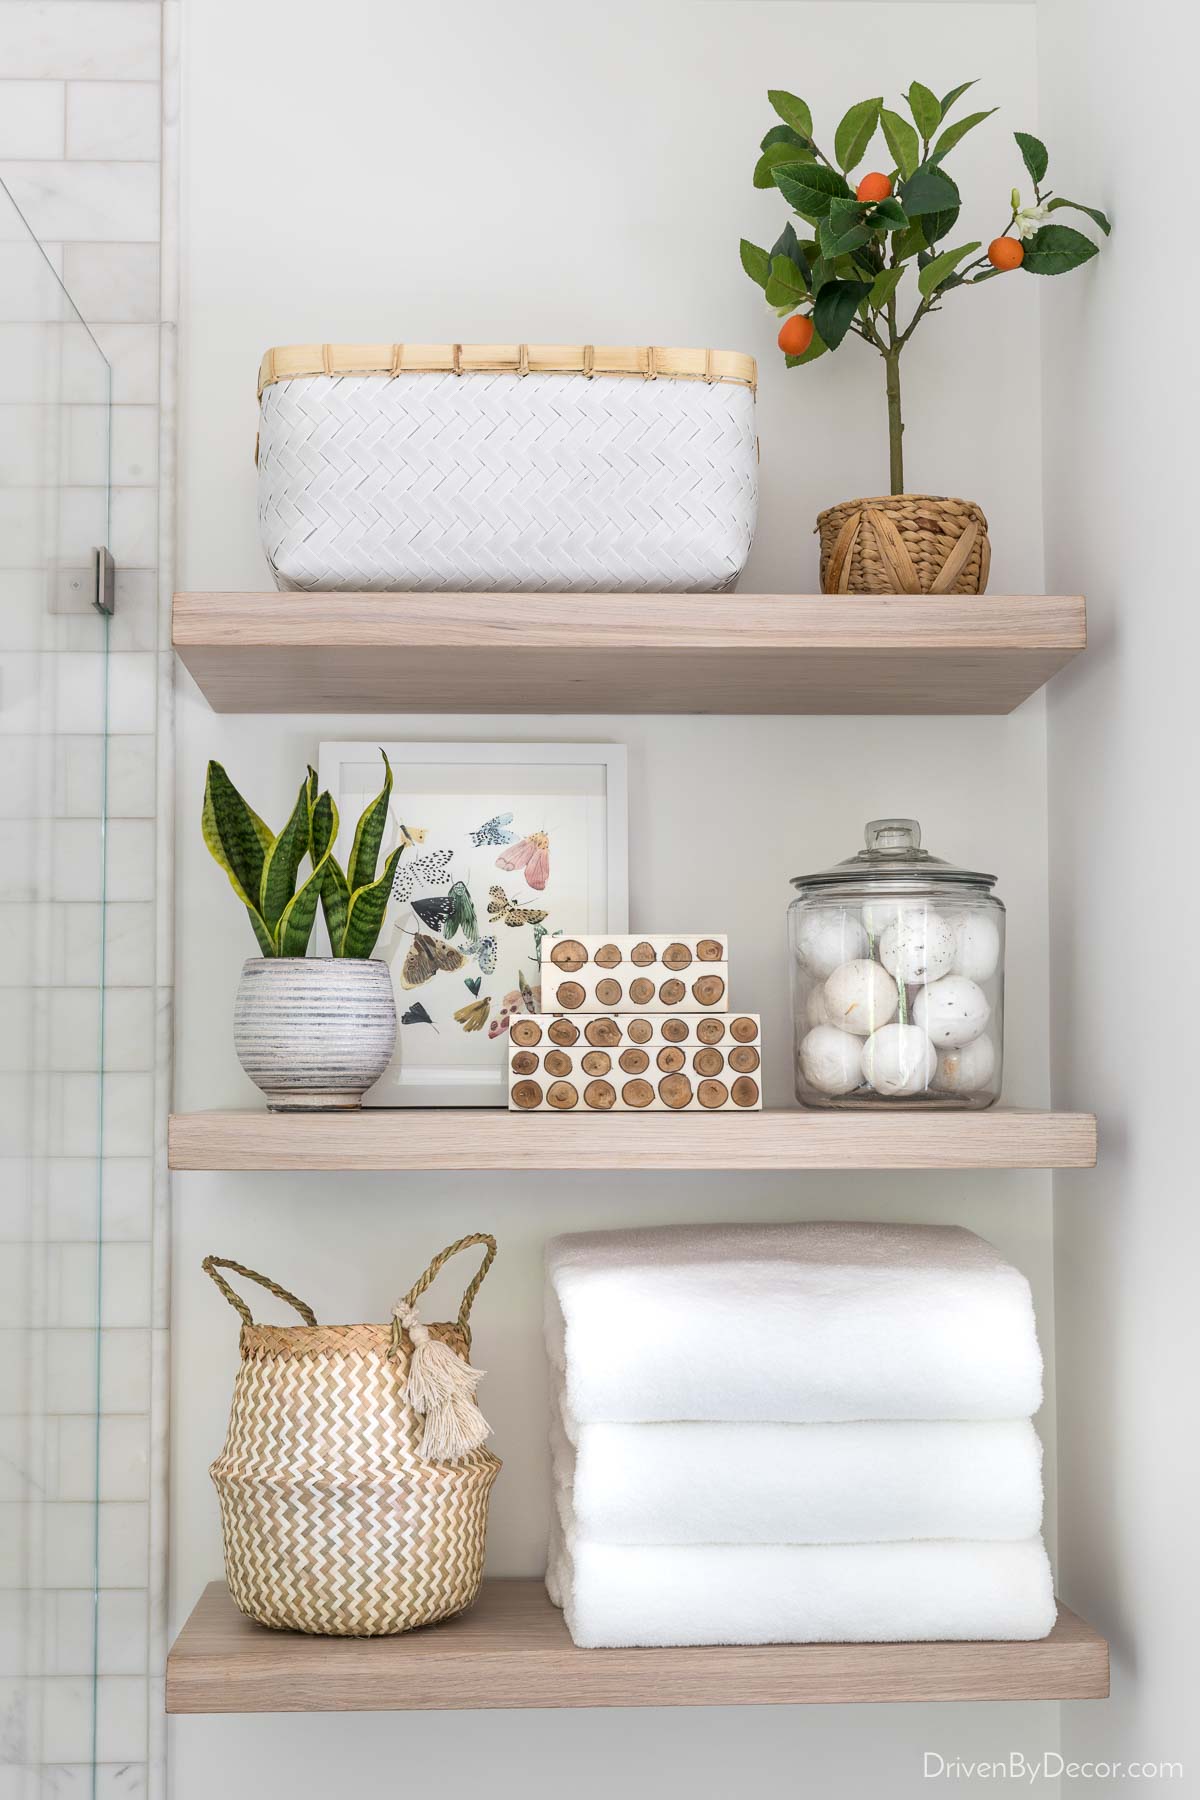
Shelf Sources: Floating shelves | White woven basket (medium) | Colorful moth art print | Glass canister (1 gallon size) | Bath bombs | Belly basket (similar) | Favorite bath towels | Large lidded basket for hamper (under shelves) | Other accessories no longer available
I shared an entire post with details on the shelves we chose, how they’re hung, and the spacing on our wall in my post on our bathroom floating shelves. And if you haven’t seen the details of our bathroom before, check out our bathroom remodel before & after and my post on 10 master bathroom remodel ideas.
12. Refresh Your Fireplace By Retiling
The biggest room in our Connecticut home was our living room and this fireplace was the focal point of the space:
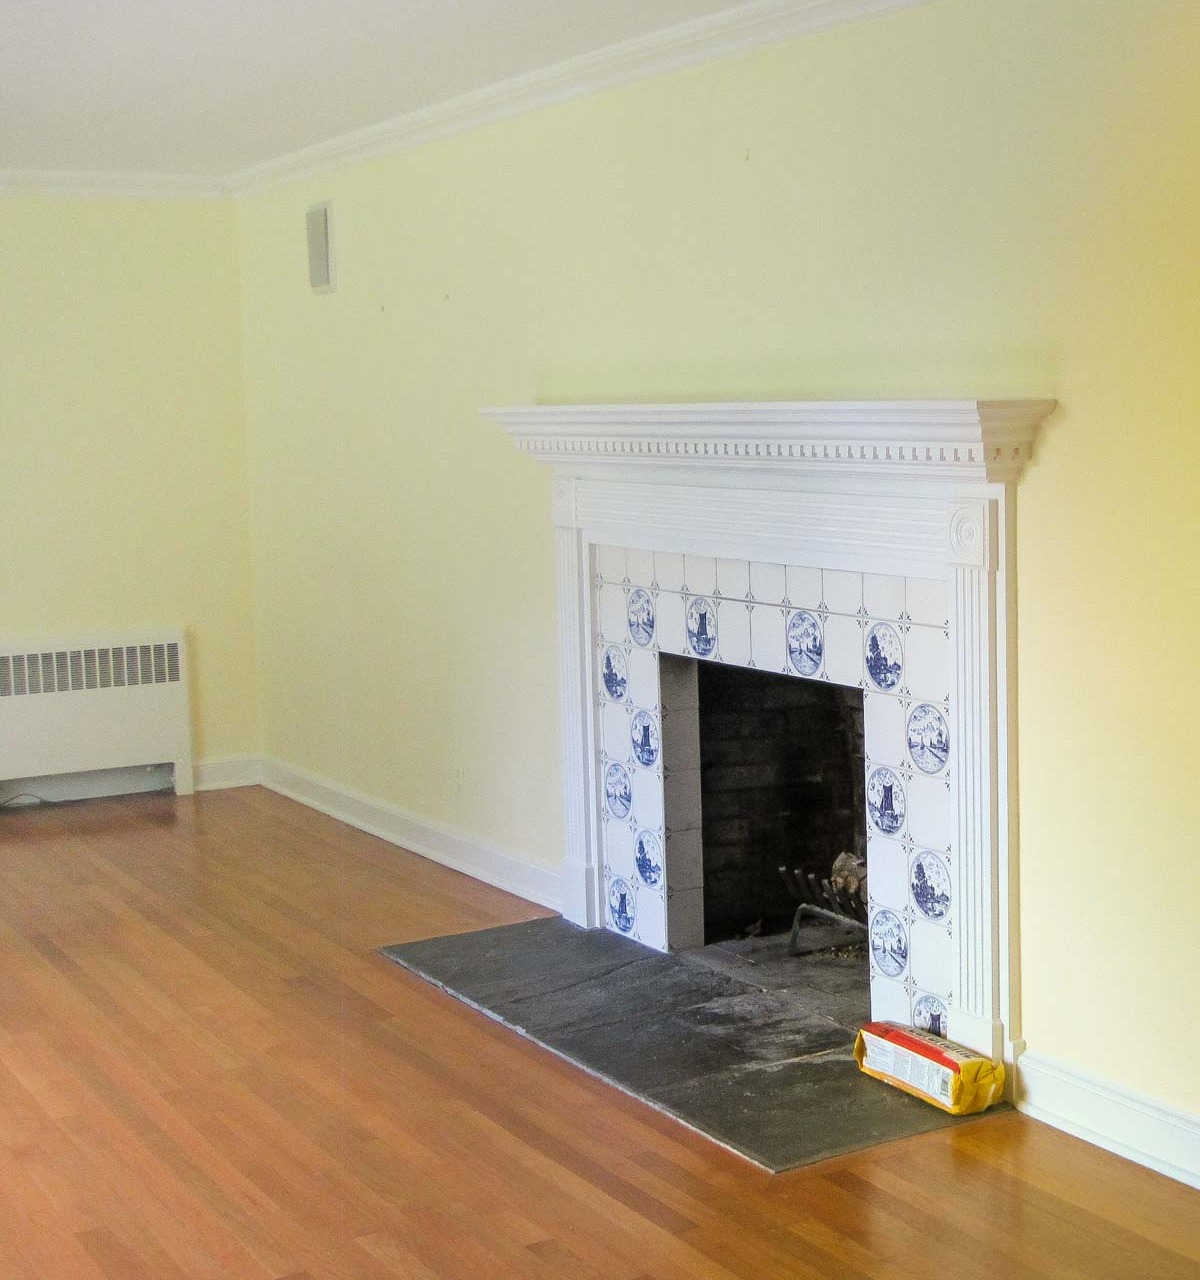
The tile simply wasn’t my style so along with painting the walls, I decided to have the fireplace retiled and also changed up the wood fireplace surround to something less ornate and with more dimension. The room hardly looks the same!:
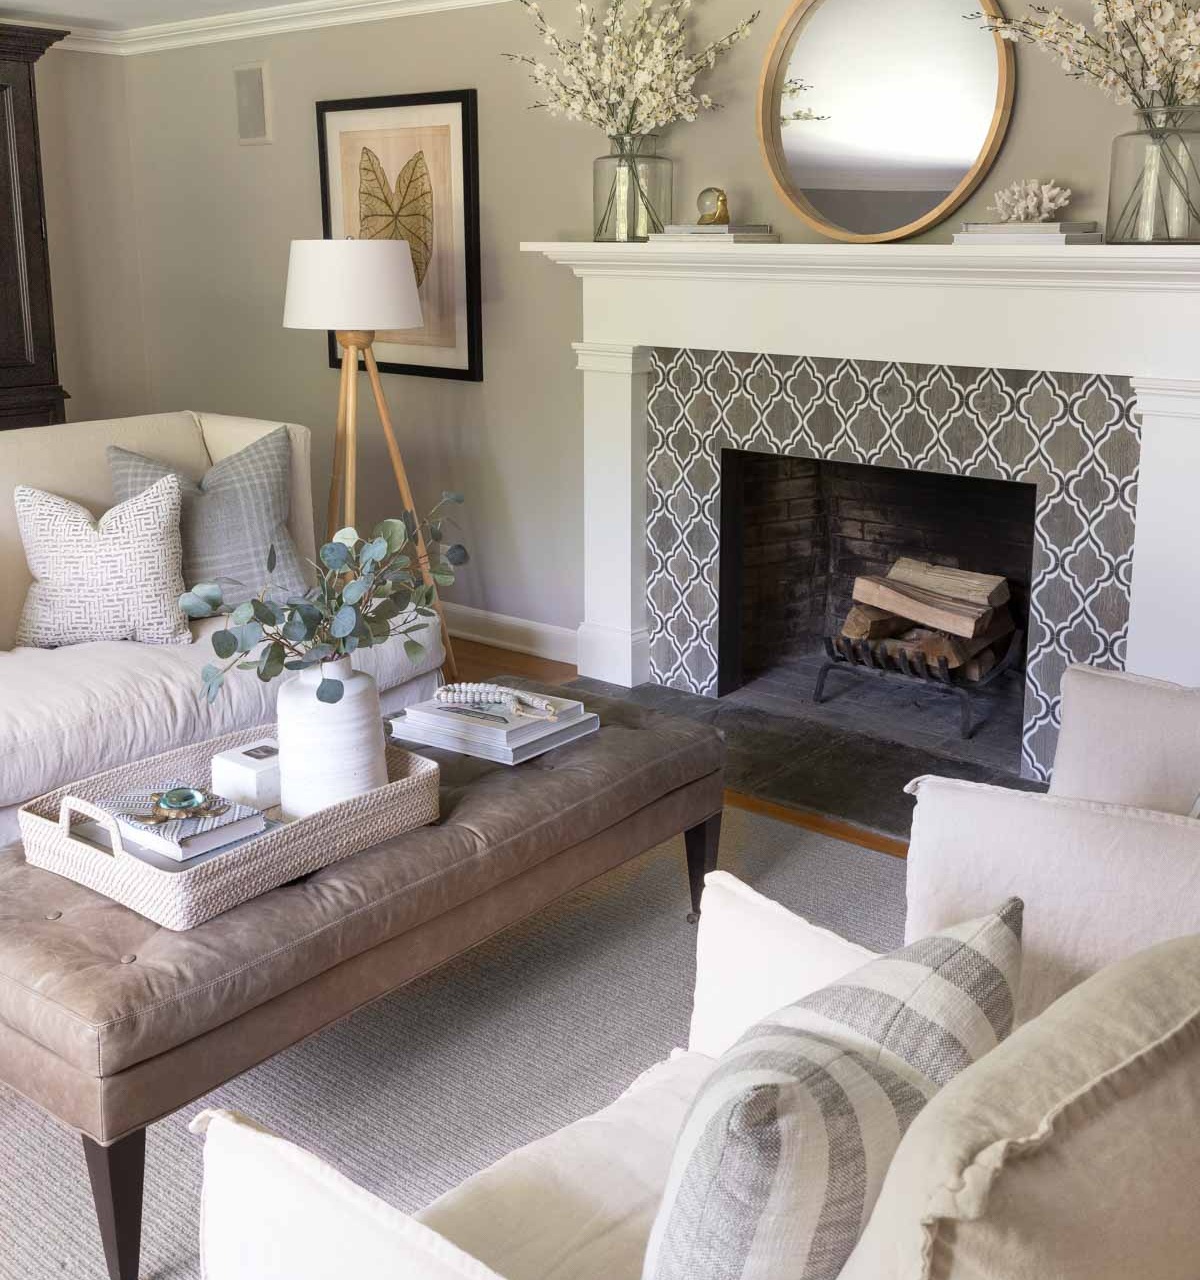
Living Room Sources: Loveseat & ottoman (custom order from Lee Industries) | Linen swivel chairs | Wood floor lamp | Round mirror over fireplace | Faux flowers in mantel vases
Since such a small amount of tile is needed, a fireplace is a great place to use a higher end tile that would be too expensive for larger tiling jobs! When possible, keep your fireplace hearth as-is like we did to keep the cost down. See more pics of our fireplace and living room in my post on Sherwin Williams Anew Gray (the paint color on our living room walls).
13. Add Statement Lighting
When we bought our house, the only overhead lighting in our family room was this utilitarian track lighting mounted on beams that spanned the room:
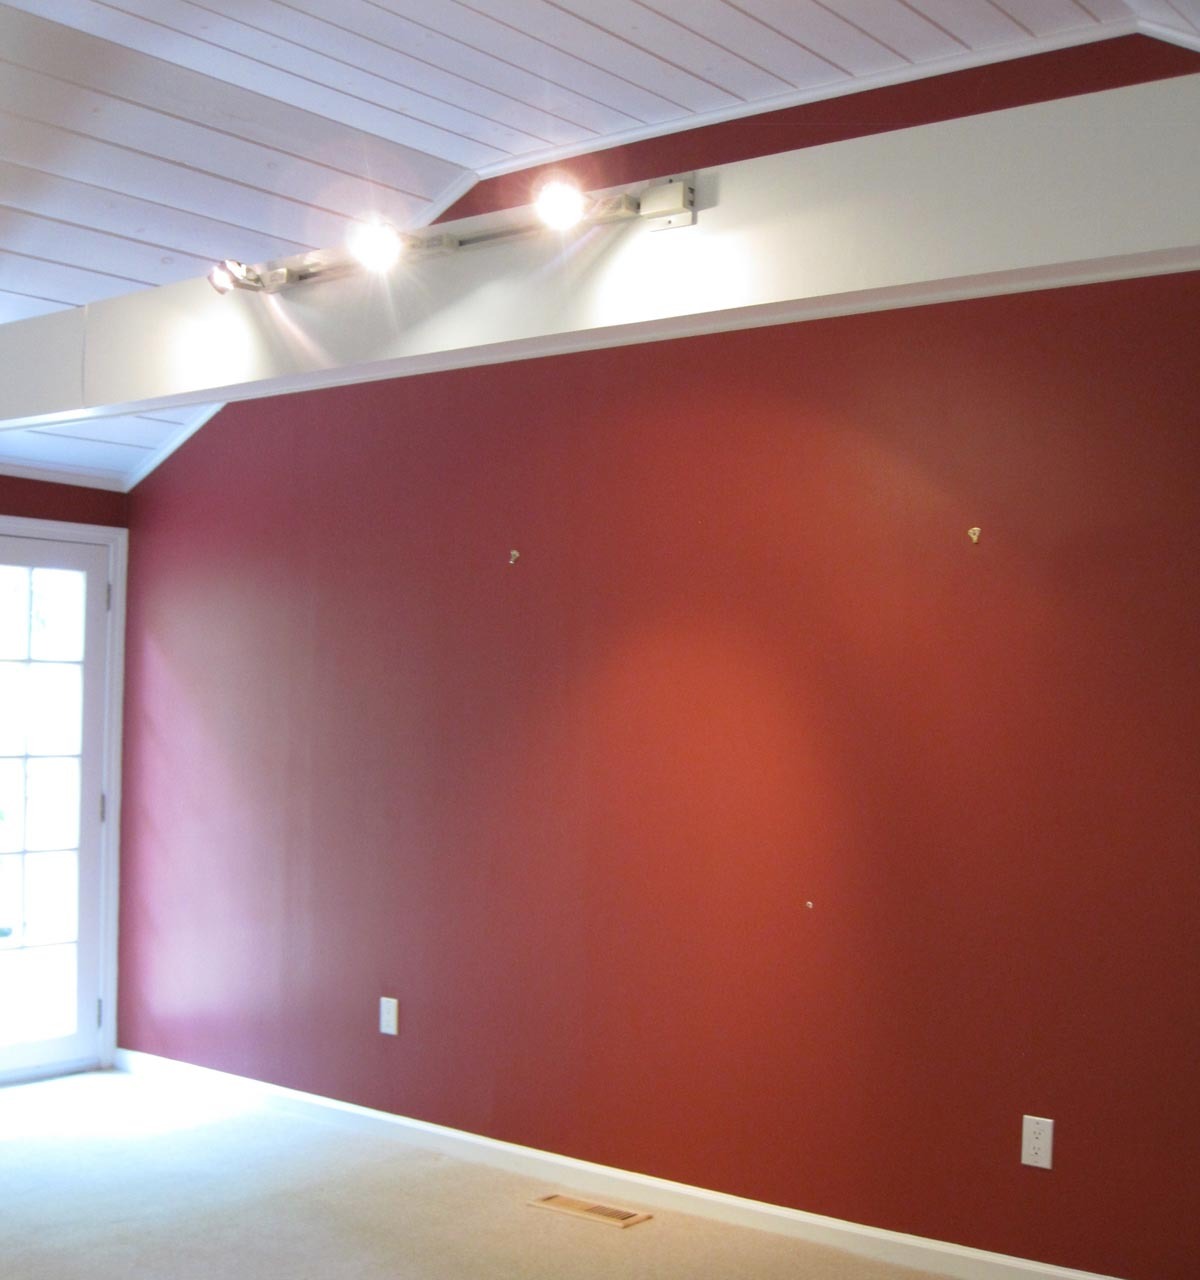
The beams made the ceilings feel much lower than they were and they were a bit of a falling apart mess too. We removed both the beams and the lighting, painted the entire space white, and had an electrician run new wiring so we could install {this statement-making two-tier chandelier}:
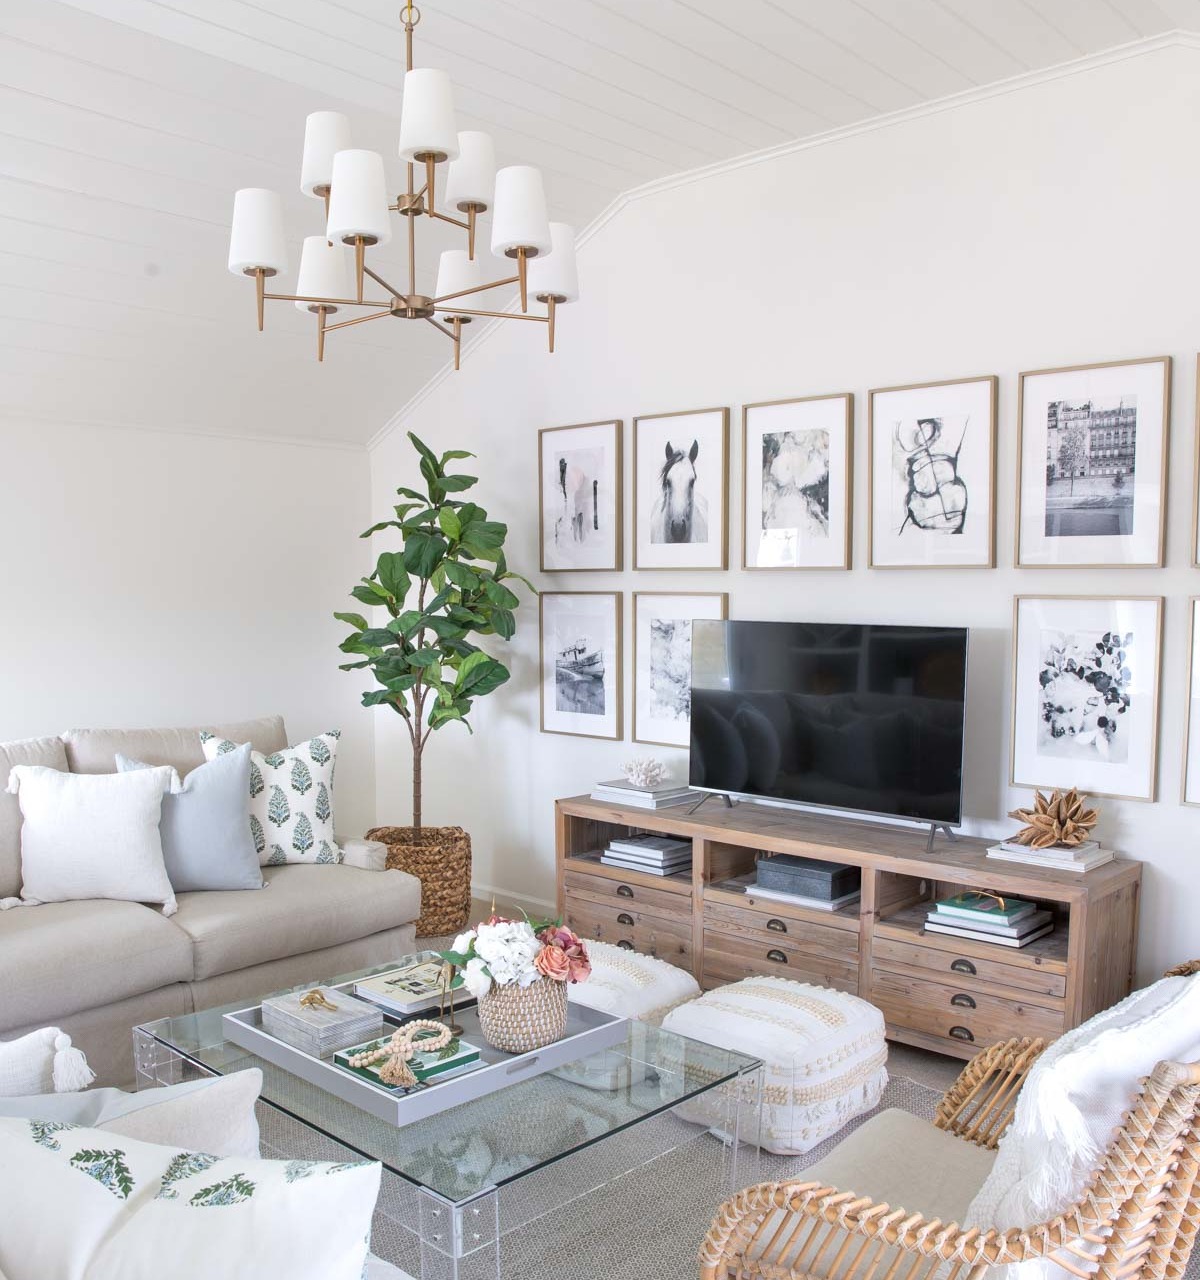
Sources: TV console (similar) | Faux fiddle leaf fig tree | Rug | Art prints (details in {this post} | Acrylic coffee table (similar) | Coffee table tray (28″ square) | Textured neutral poufs | Rattan chair
The change in lighting made all the difference! Another space where I went with statement lighting was over the tub in our master bathroom where I went with {this oversized rattan pendant} that truly made the space special.
14. Paint Your Tile Floors
Not all home remodeling projects need to break the bank! Our hall bathroom (which also had a tub/shower in it) had custom cut blue carpet atop ugly red tile:
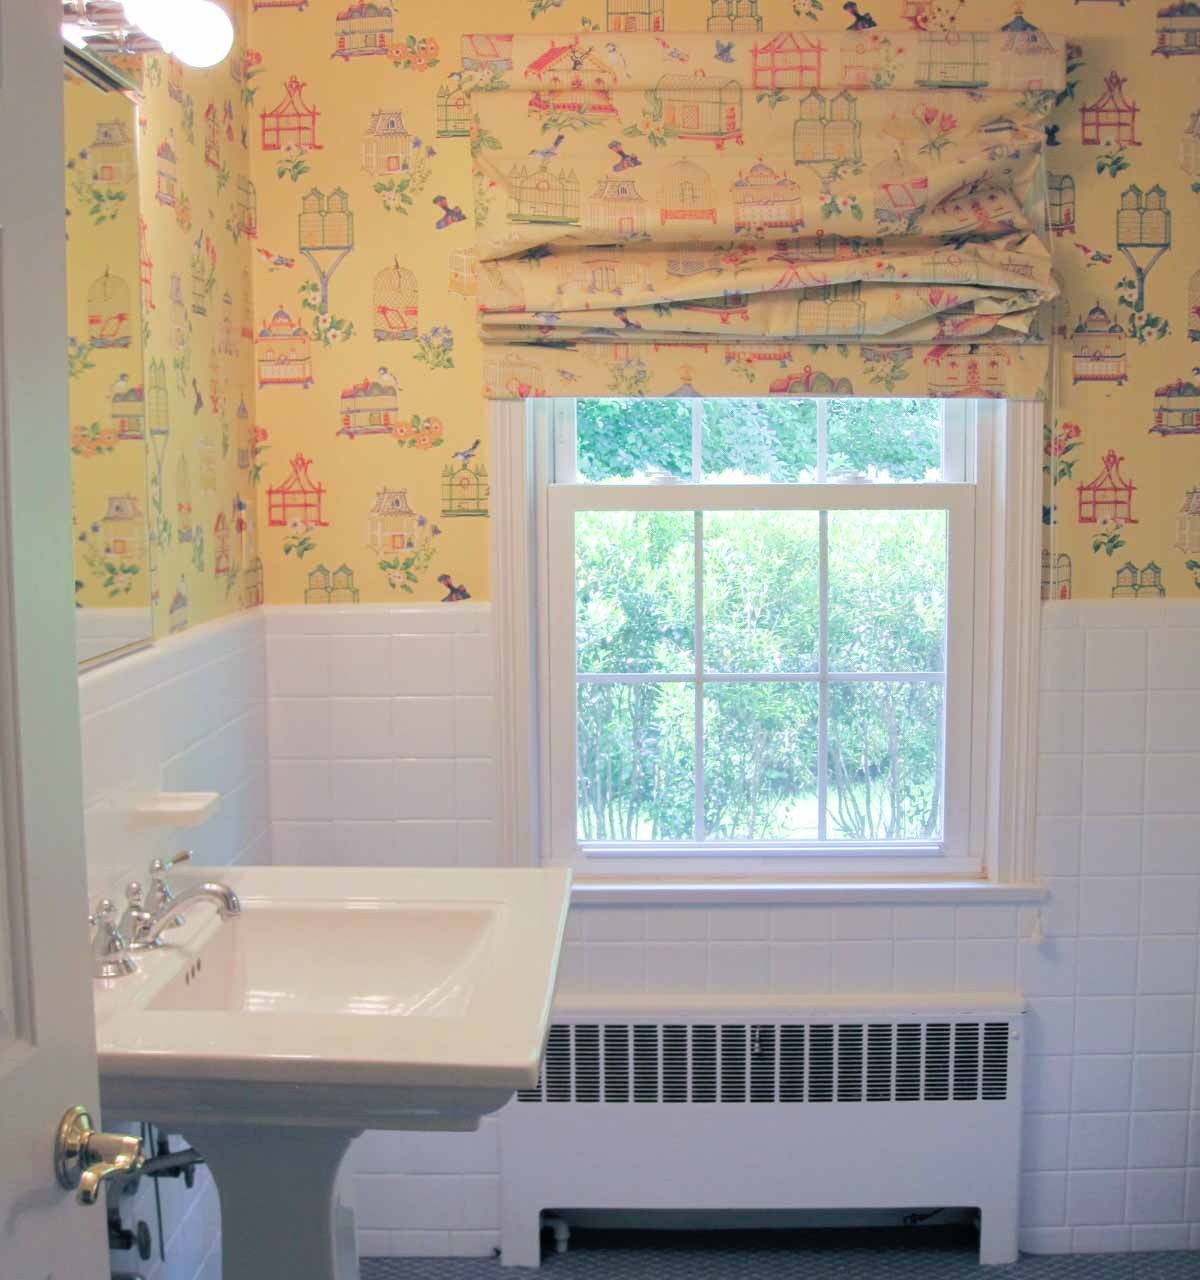
I couldn’t handle the idea of carpet in a bathroom but the red tile floors underneath were pretty horrific so I decided to try painting the tile as a temporary measure. Little did I know that it would look so good and hold up so well that my “temporary” tile painting turned into a long-term solution:
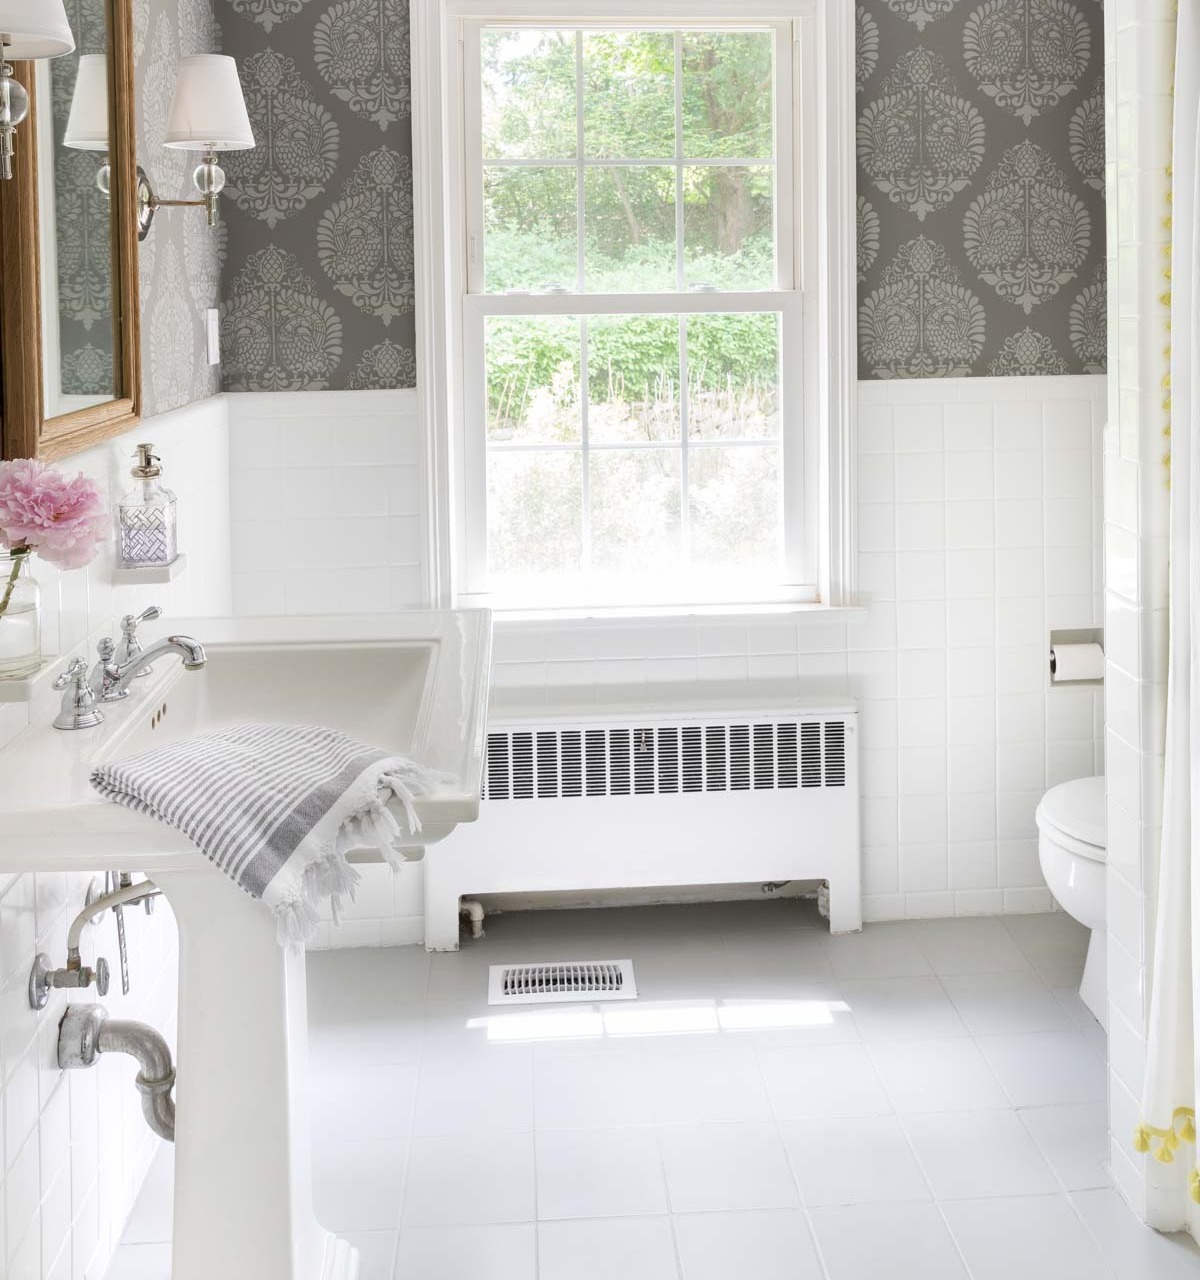
Powder Room Sources: Annapakshi Indian Damask Wall Stencil (11.25″ x 15.5″) | Wood mirror (similar) | Pedestal Sink | Sconces (Polished Nickel) | Gray striped towel
You can see the complete step by step in my post on how to paint a tile floor and get all the details of how I transformed our bathroom walls on the cheap in my post on how to stencil a wall.
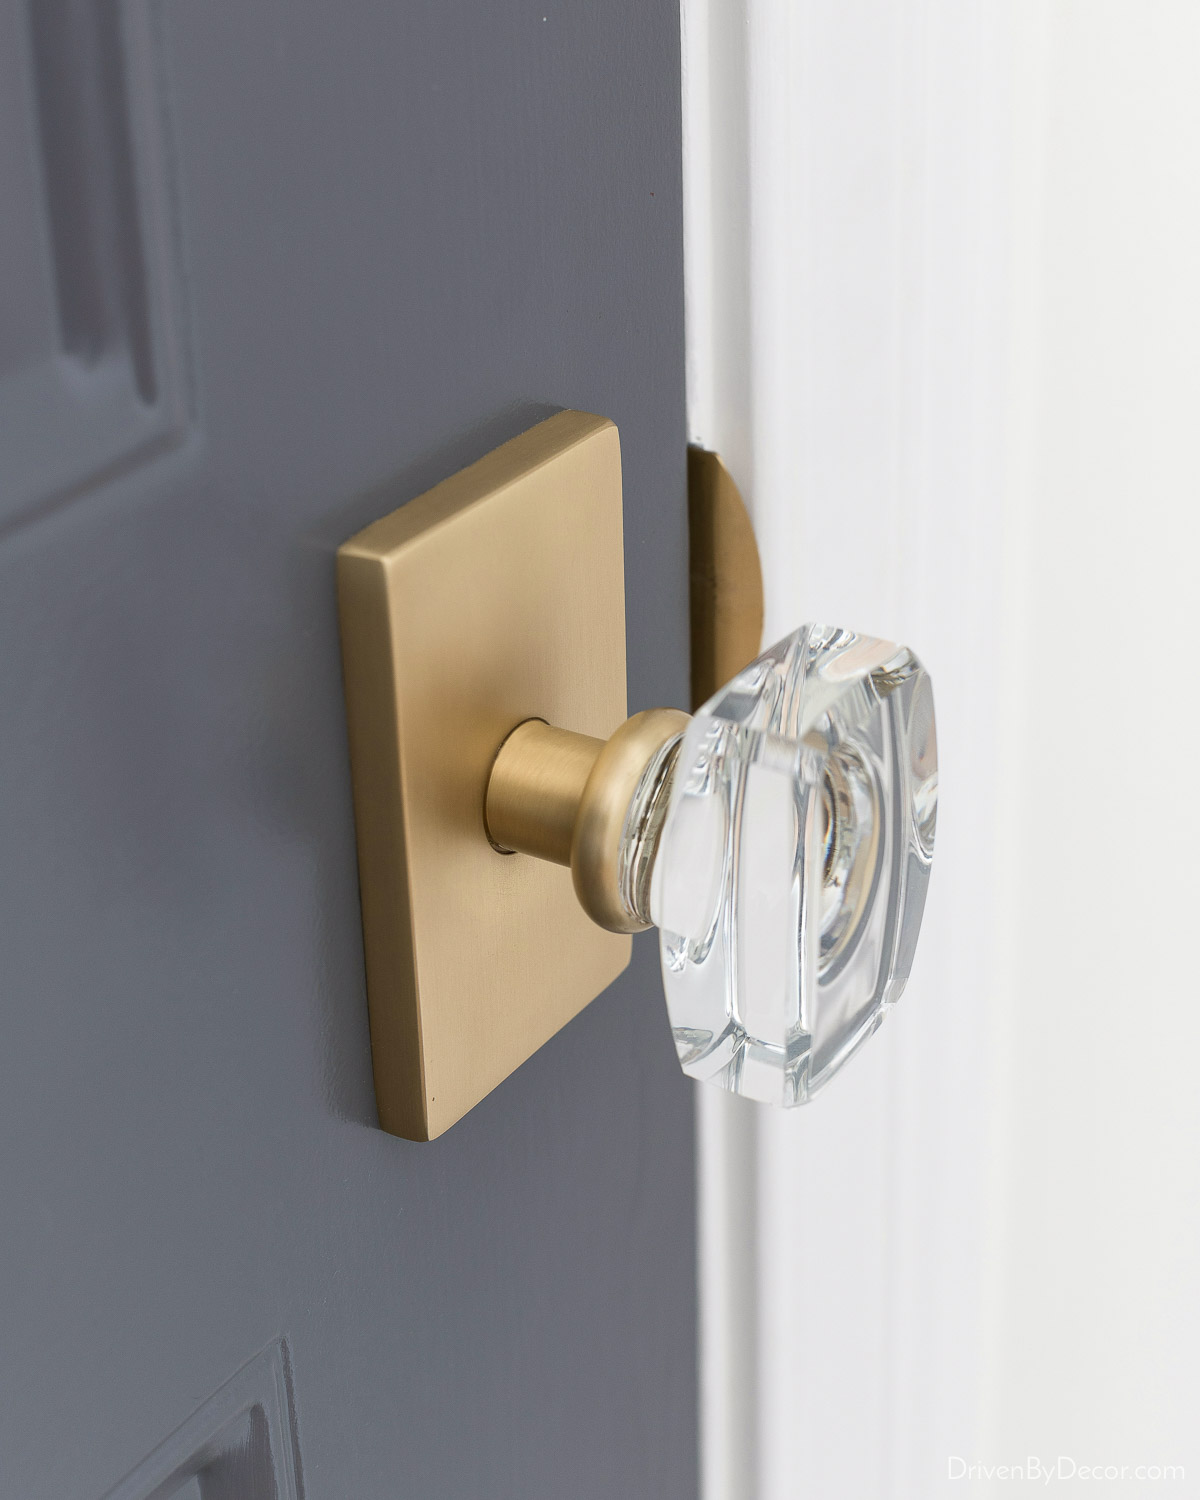
15. Don’t Ignore Your Doors
Worn, builder basic door hardware instantly dates your home. Changing out your interior door hardware and hinges and giving your doors a fresh coat of paint makes more of an impact than you might think! With each room renovation we did in our home, we gave the door a fresh coat of paint and swapped out the hardware to {these gorgeous crystal & satin brass knobs}:
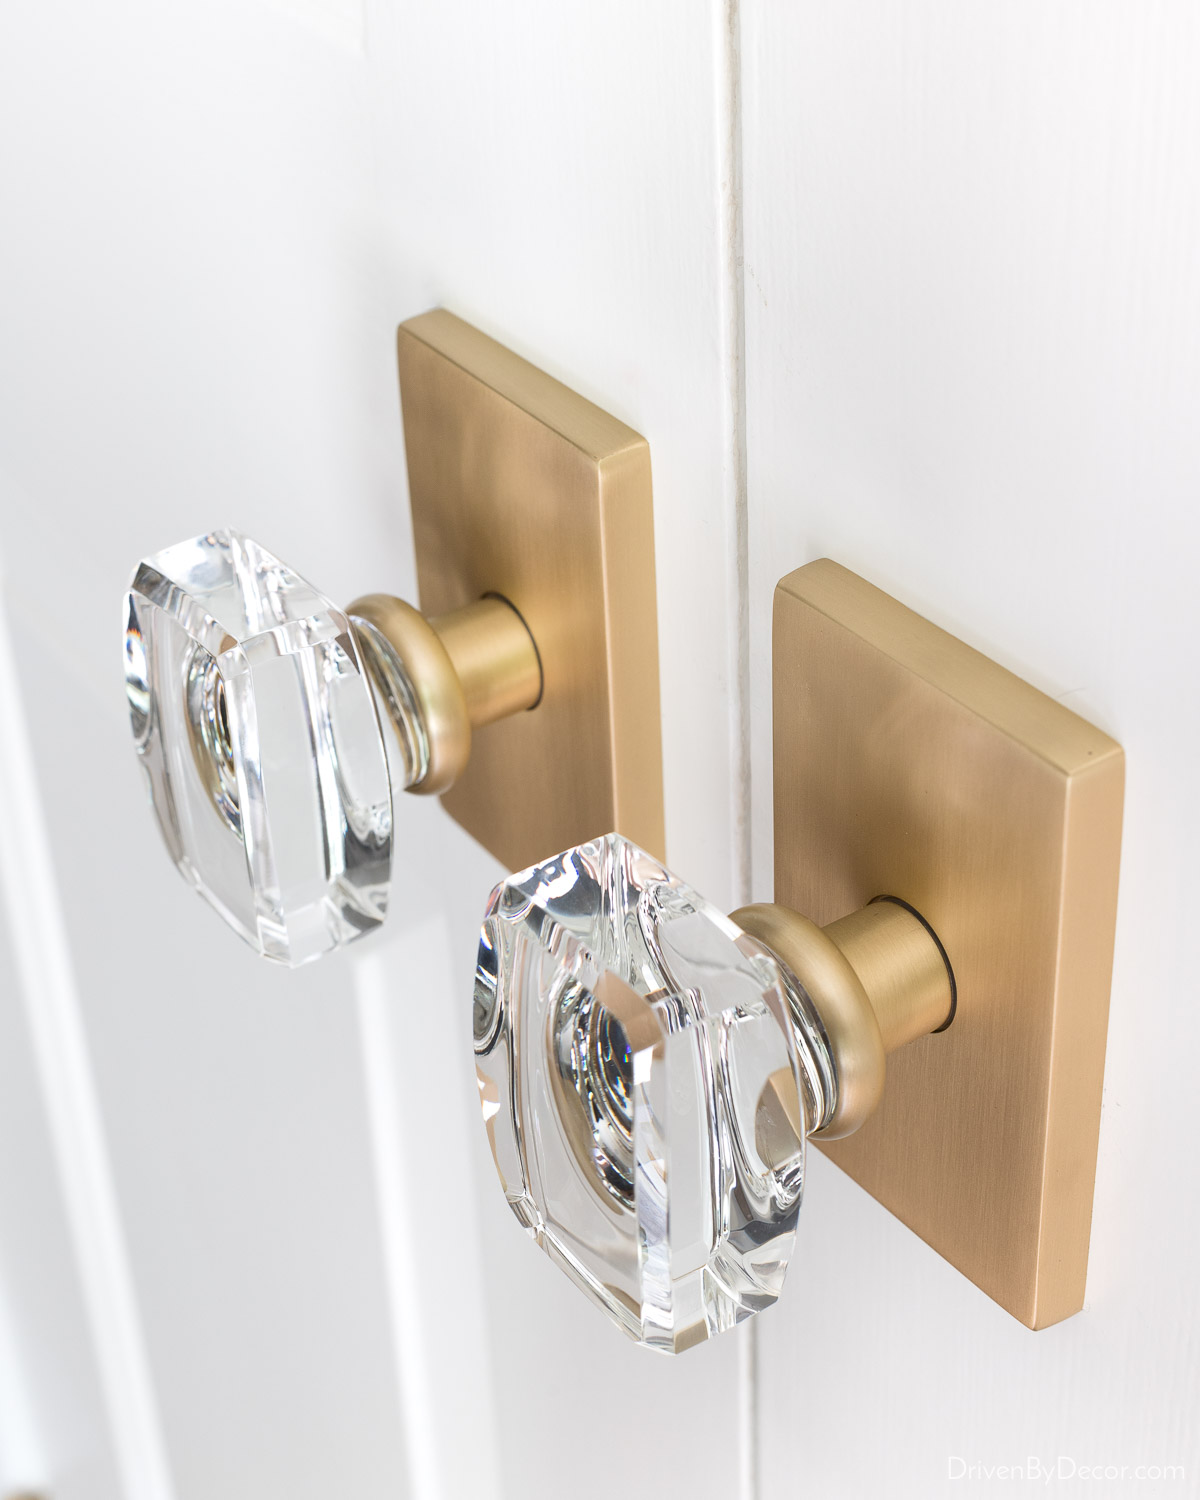
Over time we changed out every door knob plus the hinges on our first floor while leaving the original style on our second floor to save some money (the original ones also had a brass finish so they coordinated fairly well). I also changed the paint color on the inside of our two entry doors (our front door + door leading to garage) to Benjamin Moore Charcoal Slate and loved the combination of this color with our new knobs:
If you’ve never painted a door before, you’ll find that it’s pretty easy! Check out my post on how to paint a door – it has all the details you need to get the job done right and includes my favorite paint colors for doors including both white and color options.
And with that, this post is a wrap! Every week I share a new batch of favorite finds so be sure to hop over to my Shop page {here} to check out the latest!
Want to save this post?


Laura says
Kris – your home is beautiful! Could you tell me where to find the duvet in the blue bedroom at the beginning of your post? Thanks for your help!
Shannon Culvahouse says
Kris, Thanks for all the great ideas. We have an enclosed back patio that still has stucco on one wall. I’d love to ship lap it. Can I cover the stucco with your cheap ship lap? Would I need to put up some vertical slats to nail it to? I’d love to start planning this project but I can’t figure out how to proceed.
Janet says
I was pulling up old carpet in a bedroom yesterday and when I was working on the closet – fighting bifold door hardware – a set of doors fell on me! Once that happened, it was all the motivation I needed to “finish the job” and rip out the other 3 sets with plans to implement #10- closet curtains, which I’ve loved since you first shared them! This post was timely and I’ll be following your lead! <3
Gail says
Kris…it is remarkable how much work you have done in your CT. home in not a lot of time! You continue to inspire and challenge us to look at our spaces with fresh eyes while giving us confidence to tackle things ourselves. I am in awe of some of the projects you have done sans contractor!! Thank you for your practical and original ideas. Keep sharing your creative advice…we look forward to every new project you do! Best to you and family in your new digs!!
Karen B. says
Kris,
This is definitely timely. My husband recently passed away after a lengthy battle with cancer. I’ll be moving to a suitably smaller place and there is plenty to do to bring it up to date.
I’ll keep this post for reference. You are always so spot-on in your projects.
Karen
Susan says
Kris,
I love getting your blogs. So inspirational! May I ask where you purchased the art in your foyer? When I clicked on the link, it took me to Serena & Lily, so is that where you found it?
Thanks,
Susan F
Fabienne Madsen says
I love all your refresh ideas! So beautiful! Fabienne
Sherri Swanson says
Kris –
In item #2 above, your entryway makeover, you have a link to the 30 x 40 framed artwork. I love the colors! The link opens to the S & L console table. I would love to know where you purchased the artwork.
Thank -you!
Paula Moreshead says
You provide a wealth of information and ideas on your blog which are much appreciated…thanks!